【雕爷学编程】MicroPython动手做(17)——掌控板之触摸引脚2
知识点:什么是掌控板?
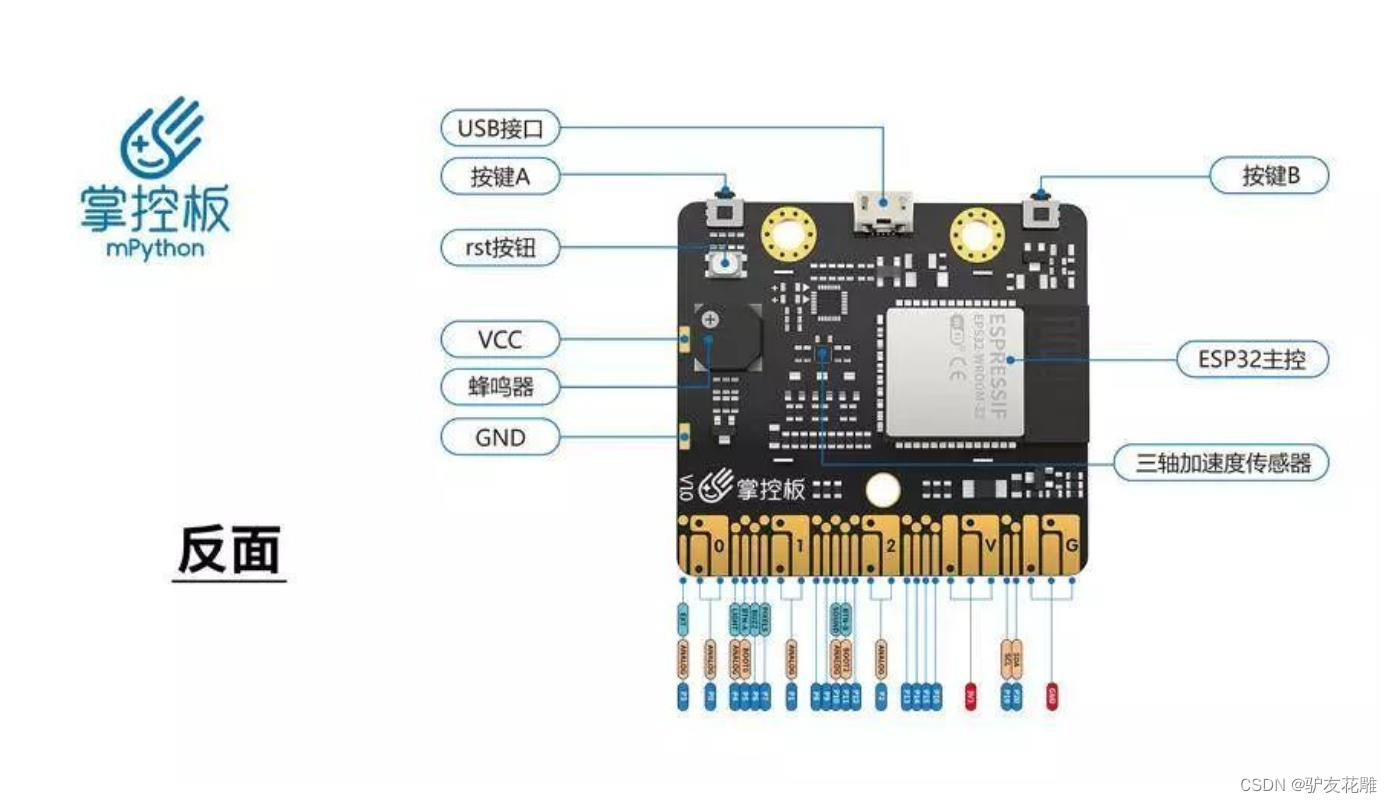
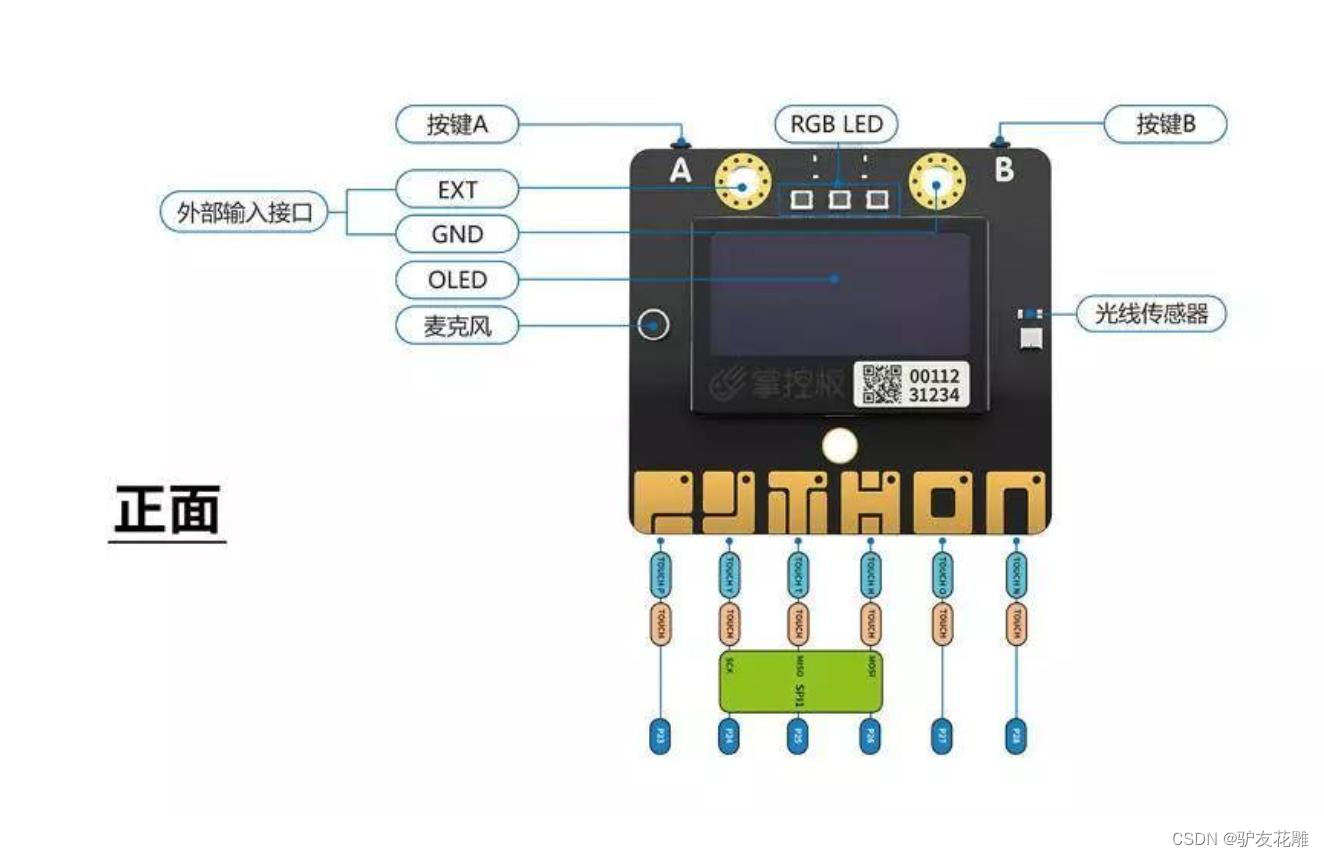
掌控板是一块普及STEAM创客教育、人工智能教育、机器人编程教育的开源智能硬件。它集成ESP-32高性能双核芯片,支持WiFi和蓝牙双模通信,可作为物联网节点,实现物联网应用。同时掌控板上集成了OLED显示屏、RGB灯、加速度计、麦克风、光线传感器、蜂鸣器、按键开关、触摸开关、金手指外部拓展接口,支持图形化及MicroPython代码编程,可实现智能机器人、创客智造作品等智能控制类应用。

掌控板硬件特性:
ESP-32主控
处理器:Tensilica LX6双核处理器(一核处理高速连接;一核独立应用开发)
主频:高达240MHz的时钟频率
SRAM:520KB
Flash:8MB
Wi-Fi标准:FCC/CE/TELEC/KCC
Wi-Fi协议:802.11 b/g/n/d/e/i/k/r (802.11n,速度高达150 Mbps),A-MPDU和A-MSDU聚合,支持0.4us防护间隔
频率范围:2.4~2.5 GHz
蓝牙协议:符合蓝牙v4.2 BR/EDR和BLE标准
蓝牙音频:CVSD和SBC音频低功耗:10uA
供电方式:Micro USB供电
工作电压:3.3V
最大工作电流:200mA
最大负载电流:1000mA
掌控板载
三轴加速度计MSA300,测量范围:±2/4/8/16G
地磁传感器MMC5983MA,测量范围:±8 Gauss;精度0.4mGz,电子罗盘误差±0.5°
光线传感器
麦克风
3 颗全彩ws2812灯珠
1.3英寸OLED显示屏,支持16*16字符显示,分辨率128x64
无源蜂鸣器
支持2个物理按键(A/B)、6个触摸按键
支持1路鳄鱼夹接口,可方便接入各种阻性传感器
拓展接口
20通道数字I/O, (其中支持12路PWM,6路触摸输入)
5通道12bit模拟输入ADC,P0~P4
1路的外部输入鳄鱼夹接口:EXT/GND
支持I2C、UART、SPI通讯协议


7、6个触摸按键控制RGB灯并显示按键名
#MicroPython动手做(17)——掌控板之触摸引脚
#6个触摸按键控制RGB灯并显示按键名from mpython import *from machine import Timerimport time_status_p = _status_y = _status_t = _status_h = _status_o = _status_n = 0
def on_touchpad_P_pressed():pass
def on_touchpad_P_unpressed():pass
def on_touchpad_Y_pressed():pass
def on_touchpad_Y_unpressed():pass
def on_touchpad_T_pressed():pass
def on_touchpad_T_unpressed():pass
def on_touchpad_H_pressed():pass
def on_touchpad_H_unpressed():pass
def on_touchpad_O_pressed():pass
def on_touchpad_O_unpressed():pass
def on_touchpad_N_pressed():pass
def on_touchpad_N_unpressed():passtim12 = Timer(12)def timer12_tick(_):global _status_p, _status_y, _status_t, _status_h, _status_o, _status_ntry:touchPad_P.read();passexcept:returnif touchPad_P.read() < 400:if 1 != _status_p:_status_p = 1;on_touchpad_P_pressed()elif 0 != _status_p:_status_p = 0;on_touchpad_P_unpressed()if touchPad_Y.read() < 400:if 1 != _status_y:_status_y = 1;on_touchpad_Y_pressed()elif 0 != _status_y:_status_y = 0;on_touchpad_Y_unpressed()if touchPad_T.read() < 400:if 1 != _status_t:_status_t = 1;on_touchpad_T_pressed()elif 0 != _status_t:_status_t = 0;on_touchpad_T_unpressed()if touchPad_H.read() < 400:if 1 != _status_h:_status_h = 1;on_touchpad_H_pressed()elif 0 != _status_h:_status_h = 0;on_touchpad_H_unpressed()if touchPad_O.read() < 400:if 1 != _status_o:_status_o = 1;on_touchpad_O_pressed()elif 0 != _status_o:_status_o = 0;on_touchpad_O_unpressed()if touchPad_N.read() < 400:if 1 != _status_n:_status_n = 1;on_touchpad_N_pressed()elif 0 != _status_n:_status_n = 0;on_touchpad_N_unpressed()tim12.init(period=100, mode=Timer.PERIODIC, callback=timer12_tick)def on_touchpad_P_pressed():global ioled.fill(0)oled.DispChar('P', 60, 22, 1)oled.show()rgb[0] = (int(255), int(0), int(0))rgb.write()time.sleep_ms(1)time.sleep(1)rgb.fill( (0, 0, 0) )rgb.write()time.sleep_ms(1)def on_touchpad_H_pressed():global ioled.fill(0)oled.DispChar('H', 60, 22, 1)oled.show()rgb[0] = (int(255), int(102), int(0))rgb.write()time.sleep_ms(1)time.sleep(1)rgb.fill( (0, 0, 0) )rgb.write()time.sleep_ms(1)def on_touchpad_Y_pressed():global ioled.fill(0)oled.DispChar('Y', 60, 22, 1)oled.show()rgb[1] = (int(0), int(153), int(0))rgb.write()time.sleep_ms(1)time.sleep(1)rgb.fill( (0, 0, 0) )rgb.write()time.sleep_ms(1)def on_touchpad_O_pressed():global ioled.fill(0)oled.DispChar('O', 60, 22, 1)oled.show()rgb[0] = (int(255), int(102), int(0))rgb.write()time.sleep_ms(1)rgb[1] = (int(255), int(102), int(0))rgb.write()time.sleep_ms(1)time.sleep(1)rgb.fill( (0, 0, 0) )rgb.write()time.sleep_ms(1)def on_touchpad_T_pressed():global ioled.fill(0)oled.DispChar('T', 60, 22, 1)oled.show()rgb[2] = (int(51), int(51), int(255))rgb.write()time.sleep_ms(1)time.sleep(1)rgb.fill( (0, 0, 0) )rgb.write()time.sleep_ms(1)def on_touchpad_N_pressed():global ioled.fill(0)oled.DispChar('N', 60, 22, 1)oled.show()rgb.fill((int(255), int(102), int(0)))rgb.write()time.sleep_ms(1)time.sleep(1)rgb.fill( (0, 0, 0) )rgb.write()time.sleep_ms(1)
mPython 图形编程

8、简易触摸按键电子琴(6键)

#MicroPython动手做(17)——掌控板之触摸引脚
#简易触摸按键电子琴(6键)from mpython import *import music
while True:music.stop()if touchPad_P.read() < 400:music.pitch(262, 500)else:if touchPad_Y.read() < 400:music.pitch(294, 500)else:if touchPad_T.read() < 400:music.pitch(330, 500)else:if touchPad_H.read() < 400:music.pitch(349, 500)else:if touchPad_O.read() < 400:music.pitch(392, 500)else:if touchPad_N.read() < 400:music.pitch(440, 500)
mPython 图形编程

视频:掌控板模拟简易触摸按键电子琴(6键)
https://v.youku.com/v_show/id_XNDY0ODEwMjcxMg==.html?spm=a2hbt.13141534.app.55!25!2555!255!25!25!255A
9、触摸按键点播六首曲子
#MicroPython动手做(17)——掌控板之触摸引脚
# 触摸按键点播六首曲子from mpython import *
import time
import music
from machine import Timerdef on_button_a_down(_):time.sleep_ms(10)if button_a.value() == 1: returnmusic.stop()_status_p = _status_y = _status_t = _status_h = _status_o = _status_n = 0
def on_touchpad_P_pressed():pass
def on_touchpad_P_unpressed():pass
def on_touchpad_Y_pressed():pass
def on_touchpad_Y_unpressed():pass
def on_touchpad_T_pressed():pass
def on_touchpad_T_unpressed():pass
def on_touchpad_H_pressed():pass
def on_touchpad_H_unpressed():pass
def on_touchpad_O_pressed():pass
def on_touchpad_O_unpressed():pass
def on_touchpad_N_pressed():pass
def on_touchpad_N_unpressed():passtim12 = Timer(12)def timer12_tick(_):global _status_p, _status_y, _status_t, _status_h, _status_o, _status_ntry:touchPad_P.read();passexcept:returnif touchPad_P.read() < 400:if 1 != _status_p:_status_p = 1;on_touchpad_P_pressed()elif 0 != _status_p:_status_p = 0;on_touchpad_P_unpressed()if touchPad_Y.read() < 400:if 1 != _status_y:_status_y = 1;on_touchpad_Y_pressed()elif 0 != _status_y:_status_y = 0;on_touchpad_Y_unpressed()if touchPad_T.read() < 400:if 1 != _status_t:_status_t = 1;on_touchpad_T_pressed()elif 0 != _status_t:_status_t = 0;on_touchpad_T_unpressed()if touchPad_H.read() < 400:if 1 != _status_h:_status_h = 1;on_touchpad_H_pressed()elif 0 != _status_h:_status_h = 0;on_touchpad_H_unpressed()if touchPad_O.read() < 400:if 1 != _status_o:_status_o = 1;on_touchpad_O_pressed()elif 0 != _status_o:_status_o = 0;on_touchpad_O_unpressed()if touchPad_N.read() < 400:if 1 != _status_n:_status_n = 1;on_touchpad_N_pressed()elif 0 != _status_n:_status_n = 0;on_touchpad_N_unpressed()tim12.init(period=100, mode=Timer.PERIODIC, callback=timer12_tick)def on_touchpad_P_pressed():music.play(music.DONG_FANG_HONG, wait=False, loop=False)def on_touchpad_Y_pressed():music.play(music.BIRTHDAY, wait=False, loop=False)def on_touchpad_T_pressed():music.play(music.MO_LI_HUA, wait=False, loop=False)def on_touchpad_H_pressed():music.play(music.ODE, wait=False, loop=False)def on_touchpad_O_pressed():music.play(music.PRELUDE, wait=False, loop=False)def on_touchpad_N_pressed():music.play(music.CAI_YUN_ZHUI_YUE, wait=False, loop=False)button_a.irq(trigger=Pin.IRQ_FALLING, handler=on_button_a_down)while True:oled.fill(0)oled.DispChar("A键:停止", 35, 0, 1)oled.DispChar("P:东方红  Y:生日快乐", 6, 20, 1)oled.DispChar("T:茉莉花  H:欢乐颂", 11, 35, 1)oled.DispChar("O:婚宴 N:彩云追月", 13, 50, 1)oled.show()
mPython X 图形编程

视频:触摸按键点播六首曲子
https://v.youku.com/v_show/id_XNDY1Mzc0MTc0OA==.html?spm=a2h0c.8166622.PhoneSokuUgc_1.dtitle

10、六个触摸键控制的RGB颜色灯
#MicroPython动手做(17)——掌控板之触摸引脚
#六个触摸键控制的RGB颜色灯from mpython import *
import network
import time
import music
from yeelight import *
from machine import Timermy_wifi = wifi()my_wifi.connectWiFi("zh", "zy1567")_status_p = _status_y = _status_t = _status_h = _status_o = _status_n = 0
def on_touchpad_P_pressed():pass
def on_touchpad_P_unpressed():pass
def on_touchpad_Y_pressed():pass
def on_touchpad_Y_unpressed():pass
def on_touchpad_T_pressed():pass
def on_touchpad_T_unpressed():pass
def on_touchpad_H_pressed():pass
def on_touchpad_H_unpressed():pass
def on_touchpad_O_pressed():pass
def on_touchpad_O_unpressed():pass
def on_touchpad_N_pressed():pass
def on_touchpad_N_unpressed():passtim12 = Timer(12)def timer12_tick(_):global _status_p, _status_y, _status_t, _status_h, _status_o, _status_ntry:touchPad_P.read();passexcept:returnif touchPad_P.read() < 400:if 1 != _status_p:_status_p = 1;on_touchpad_P_pressed()elif 0 != _status_p:_status_p = 0;on_touchpad_P_unpressed()if touchPad_Y.read() < 400:if 1 != _status_y:_status_y = 1;on_touchpad_Y_pressed()elif 0 != _status_y:_status_y = 0;on_touchpad_Y_unpressed()if touchPad_T.read() < 400:if 1 != _status_t:_status_t = 1;on_touchpad_T_pressed()elif 0 != _status_t:_status_t = 0;on_touchpad_T_unpressed()if touchPad_H.read() < 400:if 1 != _status_h:_status_h = 1;on_touchpad_H_pressed()elif 0 != _status_h:_status_h = 0;on_touchpad_H_unpressed()if touchPad_O.read() < 400:if 1 != _status_o:_status_o = 1;on_touchpad_O_pressed()elif 0 != _status_o:_status_o = 0;on_touchpad_O_unpressed()if touchPad_N.read() < 400:if 1 != _status_n:_status_n = 1;on_touchpad_N_pressed()elif 0 != _status_n:_status_n = 0;on_touchpad_N_unpressed()tim12.init(period=100, mode=Timer.PERIODIC, callback=timer12_tick)def on_touchpad_P_pressed():global itime.sleep_ms(500)bulb.set_rgb(153, 0, 0)oled.DispChar("P键  红色", 38, 32, 1)oled.show()rgb.fill((int(153), int(0), int(0)))rgb.write()time.sleep_ms(1)def on_touchpad_Y_pressed():global itime.sleep_ms(500)bulb.set_rgb(0, 153, 0)oled.DispChar("Y键  绿色", 38, 32, 1)oled.show()rgb.fill((int(0), int(153), int(0)))rgb.write()time.sleep_ms(1)def on_touchpad_T_pressed():global itime.sleep_ms(500)bulb.set_rgb(51, 51, 255)oled.DispChar("T键  蓝色", 38, 32, 1)oled.show()rgb.fill((int(51), int(51), int(255)))rgb.write()time.sleep_ms(1)def on_touchpad_H_pressed():global itime.sleep_ms(500)bulb.set_rgb(255, 102, 0)oled.DispChar("H键  橙色", 38, 32, 1)oled.show()rgb.fill((int(153), int(51), int(0)))rgb.write()time.sleep_ms(1)def on_touchpad_O_pressed():global itime.sleep_ms(500)bulb.set_rgb(204, 51, 204)oled.DispChar("O键  紫色", 38, 32, 1)oled.show()rgb.fill((int(102), int(51), int(102)))rgb.write()time.sleep_ms(1)def on_touchpad_N_pressed():global itime.sleep_ms(500)bulb.set_rgb(255, 204, 51)oled.DispChar("N键  黄色", 38, 32, 1)oled.show()rgb.fill((int(153), int(102), int(51)))rgb.write()time.sleep_ms(1)rgb[1] = (int(51), int(51), int(51))
rgb.write()
time.sleep_ms(1)
music.play('G5:1')
bulb = Bulb(discover_bulbs()[0]["ip"])
time.sleep_ms(500)
bulb.turn_on()
oled.fill(0)
oled.DispChar("触摸键控制RGB灯", 18, 16, 1)
oled.show()
mPython X 实验图形编程

#MicroPython动手做(17)——掌控板之触摸引脚
#六个触摸键控制的RGB颜色灯(实验视频)
https://v.youku.com/v_show/id_XNDcwMTY3MzkxNg==.html?spm=a2h0c.8166622.PhoneSokuUgc_1.dtitle

11、触摸不同按键,点亮不同色RGB灯
from mpython import *while True:if(touchPad_P.read() < 100):rgb[0] = (255,0,0) # 开灯,设置红色rgb[1] = (255,0,0) # 设定为红色rgb[2] = (255,0,0) # 设置为红色rgb.write()elif(touchPad_Y.read() < 100):rgb[0] = (0,255,0) #关灯rgb[1] = (0,255,0)rgb[2] = (0,255,0)rgb.write()elif(touchPad_T.read() < 100):rgb[0] = (0,0,255) #关灯rgb[1] = (0,0,255)rgb[2] = (0,0,255)rgb.write()elif(touchPad_H.read() < 100):rgb[0] = (255,255,0) #关灯rgb[1] = (255,255,0)rgb[2] = (255,255,0)rgb.write()elif(touchPad_O.read() < 100):rgb[0] = (255,0,255) #关灯rgb[1] = (255,0,255)rgb[2] = (255,0,255)rgb.write()elif(touchPad_N.read() < 100):rgb[0] = (0,255,255) #关灯rgb[1] = (0,255,255)rgb[2] = (0,255,255)rgb.write()
相关文章:
【雕爷学编程】MicroPython动手做(17)——掌控板之触摸引脚2
知识点:什么是掌控板? 掌控板是一块普及STEAM创客教育、人工智能教育、机器人编程教育的开源智能硬件。它集成ESP-32高性能双核芯片,支持WiFi和蓝牙双模通信,可作为物联网节点,实现物联网应用。同时掌控板上集成了OLED…...

pytorch 中 view 和reshape的区别
在 PyTorch(一个流行的深度学习框架)中, reshape 和 view 都是用于改变张量(tensor)形状的方法,但它们在实现方式和使用上有一些区别。下面是它们之间的主要区别: 实现方式: reshap…...
认识数组指针
文章目录 数组指针的定义数组指针的应用 数组指针的定义 类比 整形数组——存放整形的数组 指针数组——存放指针的数组 整形指针——存放整形地址的指针 数组指针——存放数组地址的指针 深度理解 在之前我们知道:数组名表示首元素地址,但是有…...
SSM面试题-Spring容器的启动流程
解答: 1. BeanDefinitionReader读取配置文件(xml yml properties),创建BeanDefinition(存储bean的定义信息) 2. 配置文件读取成功后,将相应的配置转换成 BeanDefinition 的对象实例保存在DefaultListableBeanFactory#beanDefinitionMap 中 3. 根据配置的 BeanFacto…...
)
Vue 3:玩一下web前端技术(八)
前言 本章内容为VUE基础与相关技术讨论。 上一篇文章地址: Vue 3:玩一下web前端技术(七)_Lion King的博客-CSDN博客 下一篇文章地址: (暂无) 一、基础 官方文档:创建一个 Vue…...

AI绘画Stable Diffusion原理之Autoencoder-Latent
前言 传送门: stable diffusion:Git|论文 stable-diffusion-webui:Git Google Colab Notebook:Git kaggle Notebook:Git 今年AIGC实在是太火了,让人大呼许多职业即将消失,比如既能帮…...

C++核心知识点总结
学习一门新的程序设计语言得到最好方法就是练习编写程序! C基础 变量和基本类型 基本内置类型 定义解释 算术类型 整型:包括字符和布尔类型,bool、char、wchar_t、char16_t、char32_t、short、int、long、long long、 浮点型:…...
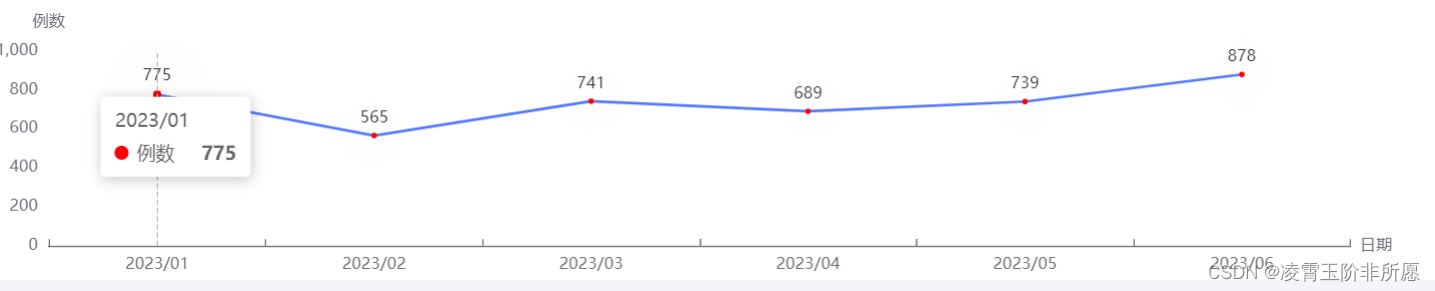
echart折线图,调节折线点和y轴的间距(亲测可用)
options代码: options {tooltip: {trigger: axis, //坐标轴触发,主要在柱状图,折线图等会使用类目轴的图表中使用。},xAxis: {type: category,//类目轴,适用于离散的类目数据,为该类型时必须通过 data 设置类目数据。…...
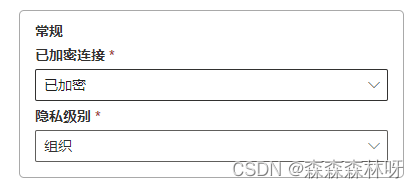
Power BI-云端报表定时刷新--ODBC、MySQL、Oracle等其他本地数据源的刷新(二)
ODBC数据源 一些小众的数据源无法直接连接,需要通过微软系统自带的应用“ODBC数据源”连接。 1.首次使用应安装对应数据库的ODBC驱动程序,Mysql的ODBC驱动需要手动安装 2.在web服务中进行数据源的配置 Mysql数据源 1.Powerbi与Gateway第一次连SQL…...

redis 淘汰策略和持久化
文章目录 一、淘汰策略1.1 背景1.2 淘汰策略 二、持久化2.1 AOF日志2.1.1 AOF配置2.1.2 AOF策略2.1.3 AOF缺点2.1.4 AOF Rewrite2.1.5 AOF Rewrite配置2.1.6 AOF Rewrite缺点2.1.7 fork进程时的写时复制2.1.8 大key对持久化的影响 2.2 RDB快照2.2.1 RDB配置2.2.2 RDB缺点 2.3 混…...
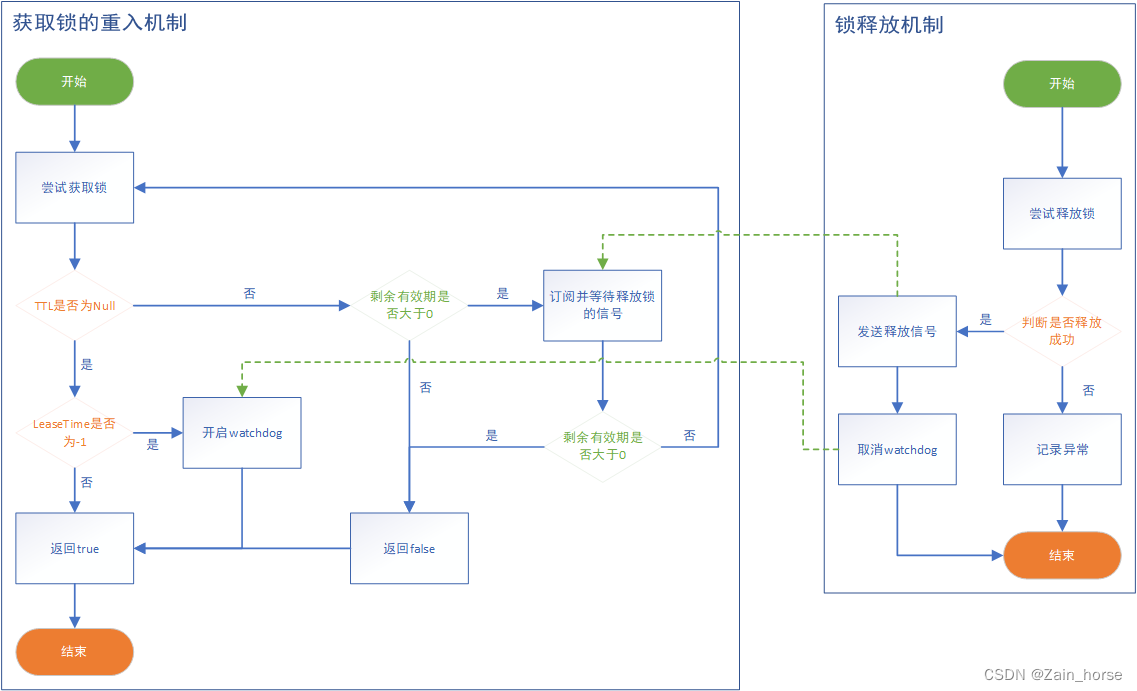
Redis学习路线(6)—— Redis的分布式锁
一、分布式锁的模型 (一)悲观锁: 认为线程安全问题一定会发生,因此在操作数据之前先获取锁,确保线程串行执行。例如Synchronized、Lock都属于悲观锁。 优点: 简单粗暴缺点: 性能略低 &#x…...
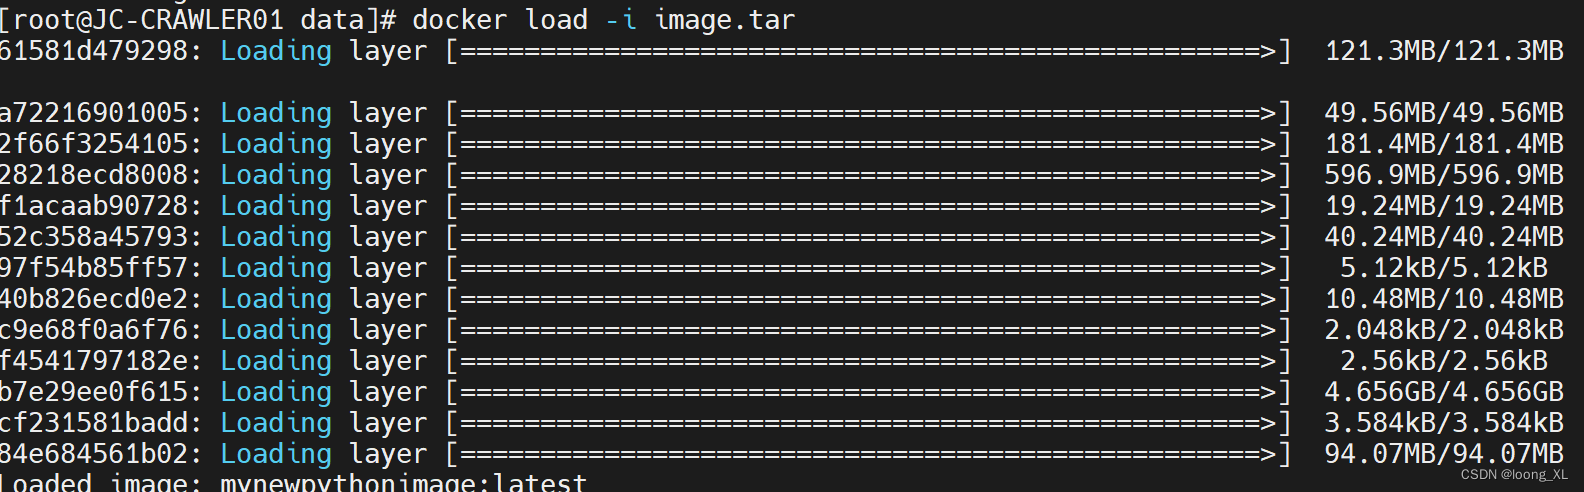
一、创建自己的docker python容器环境;支持新增python包并更新容器;离线打包、加载image
1、创建自己的docker python容器环境 参考:https://blog.csdn.net/weixin_42357472/article/details/118991485 首先写Dockfile,注意不要有txt等后缀 Dockfile # 使用 Python 3.9 镜像作为基础 FROM python:3.9# 设置工作目录 WORKDIR /app# 复制当前…...
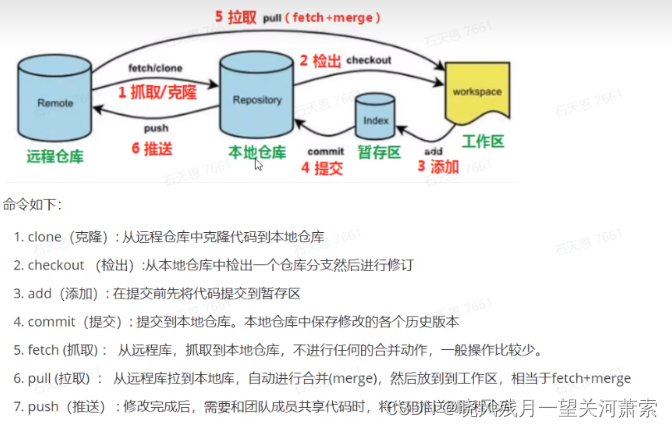
【Git】git企业开发命令整理,以及注意点
1.git企业开发过程 业务的分支大概有以下几个: master:代码随时可能上线 develop:代码最新 feature/xxx:实际业务开发分支 release/xxx:预发布分支 fix:修复bug分支 过程大概是这样的: 首…...

使用Django自带的后台管理系统进行数据库管理的实例
Django自带的后台管理系统主要用来对数据库进行操作和管理。它是Django框架的一个强大功能,可以让你快速创建一个管理界面,用于管理你的应用程序的数据模型。 使用Django后台管理系统,你可以轻松地进行以下操作: 数据库管理&…...
1254 - 1266 题)
leetcode解题思路分析(一百四十五)1254 - 1266 题
统计封闭岛屿的数目 二维矩阵 grid 由 0 (土地)和 1 (水)组成。岛是由最大的4个方向连通的 0 组成的群,封闭岛是一个 完全 由1包围(左、上、右、下)的岛。请返回 封闭岛屿 的数目。 BFS或者DFS…...

使用 GORM 连接数据库并实现增删改查操作
步骤 1:安装 GORM 首先,我们需要安装 GORM 包。在终端中运行以下命令: shell go get -u gorm.io/gorm 步骤 2:导入所需的包 在 Go 代码的开头导入以下包: import ("gorm.io/driver/mysql" // 如果你使用…...

kafka集群搭建(Linux环境)
zookeeper搭建,可以搭建集群,也可以单机(本地学习,没必要搭建zookeeper集群,单机完全够用了,主要学习的是kafka) 1. 首先官网下载zookeeper:Apache ZooKeeper 2. 下载好之后上传到…...
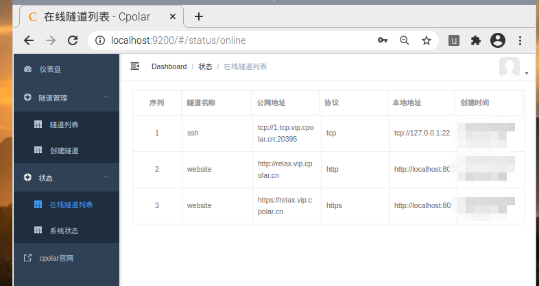
树莓派本地快速搭建web服务器,并发布公网访问
文章目录 树莓派本地快速搭建web服务器,并发布公网访问 树莓派本地快速搭建web服务器,并发布公网访问 随着科技的发展,电子工业也在不断进步,我们身边的电子设备也在朝着小型化和多功能化演进,以往体积庞大的电脑也在…...

集合中的数据结构
栈 先进后出入口跟出口在同一侧 队列 先进先出入口跟出口在不同的一层 数组 查询快、增删慢查询快是因为数组的地址是连续的,我们通过数组的首地址就可以找到数组,之后通过数组的下标就可以访问数组的每一个元素。增删慢是因为数组的长度是固定的&…...
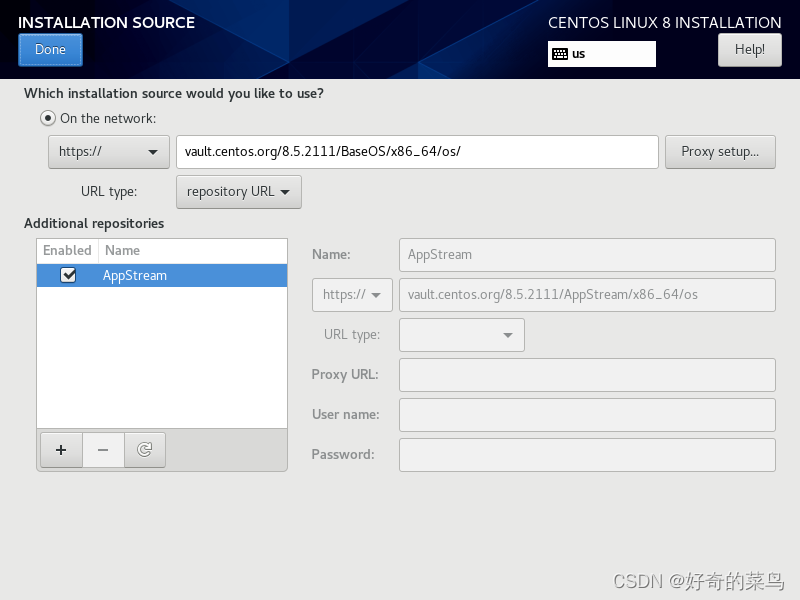
CentOS 8 错误: Error setting up base repository
配置ip、掩码、网关、DNS VMware网关可通过如下查看 打开网络连接 配置镜像的地址 vault.centos.org/8.5.2111/BaseOS/x86_64/os/...

vscode如何添加ollama本地模型-实现token自由
vscode一直支持的都是云端闭源的模型,例如 GPT Claude等等,当这些闭源模型的免费额度用完之后,则需要付费继续使用。本文介绍的是vscode接入ollama的本地模型,从而实现token自由。 ollama 首先需要到ollama的官网下载ollama应用…...

Unpaywall扩展:一键解锁学术论文的终极免费方案
Unpaywall扩展:一键解锁学术论文的终极免费方案 【免费下载链接】unpaywall-extension Firefox/Chrome extension that gives you a link to a free PDF when you view scholarly articles 项目地址: https://gitcode.com/gh_mirrors/un/unpaywall-extension …...

Dan Koe: 如果你有多重兴趣,请不要浪费接下来的2-3年
本文整理自 Dan Koe 原文。Dan Koe 是 YouTube、X 等平台拥有数百万粉丝的个人成长领域创作者,以"一人公司"理念、深度内容创作和高效 AI 工作流著称。你是否曾因为无法只专注一件事而感到自责? 你学设计,又想学编程;读…...
【科研必备】Elsevier Tracker:5分钟搞定学术投稿监控的终极解决方案
【科研必备】Elsevier Tracker:5分钟搞定学术投稿监控的终极解决方案 【免费下载链接】Elsevier-Tracker 项目地址: https://gitcode.com/gh_mirrors/el/Elsevier-Tracker 你是否也曾为了追踪Elsevier期刊的审稿状态而反复刷新页面?每天登录系统…...

火影迷的AI绘画神器:忍者绘卷Z-Image Turbo零基础入门实战
火影迷的AI绘画神器:忍者绘卷Z-Image Turbo零基础入门实战 1. 前言:当火影忍者遇上AI绘画 作为一名火影迷,你是否曾经幻想过自己也能创造出独特的忍者世界角色?现在,借助"忍者绘卷Z-Image Turbo"这款专为火…...

MusePublic圣光艺苑惊艳效果:大气照明+表达性纹理细节放大展示
MusePublic圣光艺苑惊艳效果:大气照明表达性纹理细节放大展示 1. 引言:当古典艺术遇见AI算力 想象一下,你走进一间19世纪的画室。空气中弥漫着亚麻籽油和矿物颜料的味道,阳光透过高窗洒在亚麻画布上,墙上挂着鎏金画框…...

别再手动画封装了!用嘉立创EDA免费库5分钟搞定Altium Designer缺失的器件
5分钟极速救援:用嘉立创EDA破解Altium Designer封装缺失难题 深夜11点,李工盯着屏幕上闪烁的光标和半成品的PCB布局图,额头渗出细密的汗珠。项目交付截止前48小时,团队突然发现Altium Designer官方库中缺少关键芯片TPS5430DDAR的封…...

Qwen3.5-9B-AWQ-4bit参数调优实战:温度=0.7时中文回答质量与响应速度平衡点
Qwen3.5-9B-AWQ-4bit参数调优实战:温度0.7时中文回答质量与响应速度平衡点 1. 模型概述与参数调优背景 Qwen3.5-9B-AWQ-4bit是一个支持图像理解的多模态模型,能够结合上传图片与文字提示词输出中文分析结果。在实际应用中,我们发现温度参数…...

IDEA 好用的ai插件 Windsurf
文章目录 前言一、Windsurf 插件功能二、IDEA安装三、登录Windsurf四、Windsurf简单使用介绍 前言 在 IntelliJ IDEA 中,Windsurf 是一款专注于 AI 代码辅助的插件,能够提升开发效率。以下是关于该插件的关键信息和使用方法: 提示࿱…...

webMAN-MOD终极指南:如何在PS3上安装这款强大的全能插件
webMAN-MOD终极指南:如何在PS3上安装这款强大的全能插件 【免费下载链接】webMAN-MOD Extended services for PS3 console (web server, ftp server, netiso, ntfs, ps3mapi, etc.) 项目地址: https://gitcode.com/gh_mirrors/we/webMAN-MOD 你是否还在为PS3…...