nginx简介与安装配置,目录结构和配置文件介绍
一.nginx简介
1.简介
2.特性
二.nginx安装
1.rpm包方式
(1)下载扩展源
(2)安装扩展rpm包,nginx -V查看配置参数,后面源码安装时要用到
2.源码方式
(1)建议提前下好所需要的部分包
(2)下载tar.gz包
(3)建议将包解压到/usr/local/src下,执行configure文件
(4)安装好上面需要的包,继续执行第一步
(5)一直到这步,configure文件就执行好了
(6)make,make install编译安装
三.nginx部分目录结构
1.conf目录
2.html目录
四.nginx配置文件说明
一.nginx简介
1.简介
nginx是一个轻量级的网页服务器、方向代理服务器和电子邮件代理服务器,具有配置灵活、静态资源高并发、系统资源占用少、拥有缓存服务等优点。
2.特性
(1)对于静态资源,高速,高并发访问和缓存,支持htto相应速率限制
(2)支持使用反向代理加速,缓存数据
(3)可实现负载均衡和节点健康检查
(4)支持FastCGI,SCGI,Memcached Servers等服务的急速和缓存
(5)支持基于域名、端口、IP的虚拟主机站点代理,可以进行访问控制
(6)支持Keep-alive和pipelined连接
(7)在代码上线时可以平滑重启,不影响基本功能
(8)可以对日志进行格式自定义、临时缓冲、快速轮训和rsyslog处理
(9)支持信号控制nginx进程
(10)支持url重写和正则表达式匹配
(11)支持PUT、DELETE、MKCOL、COPY、MOVE等特殊http请求方法
(12)支持邮件服务代理
二.nginx安装
前提要卸载或关闭apache的httpd
[root@localhost ~]# systemctl stop httpd
[root@localhost ~]# systemctl status httpd
● httpd.service - The Apache HTTP ServerLoaded: loaded (/usr/lib/systemd/system/httpd.service; disabled; vendor preset: disabled)Active: inactive (dead)Docs: man:httpd(8)man:apachectl(8)
1.rpm包方式
(1)下载扩展源
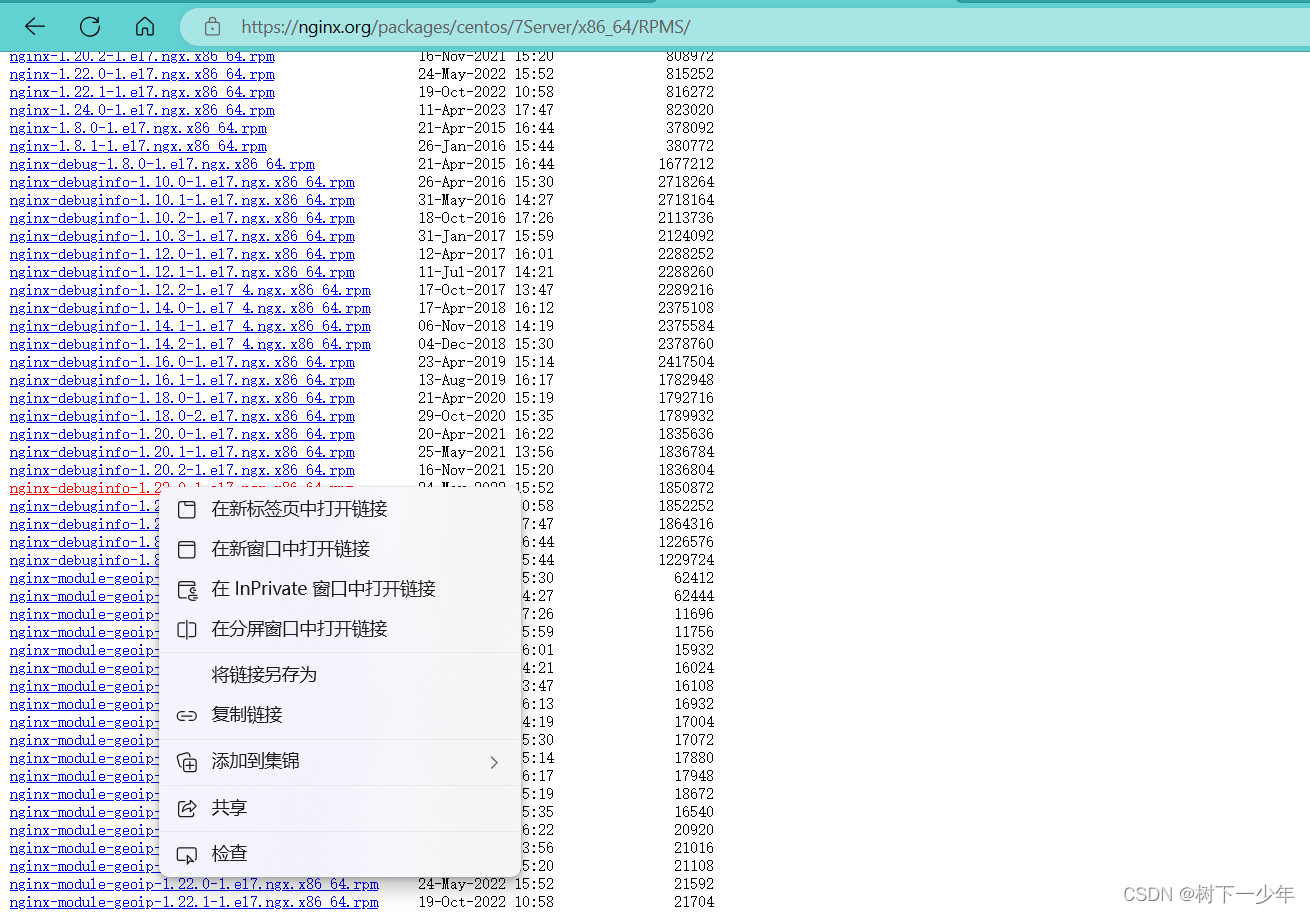
(2)安装扩展rpm包,nginx -V查看配置参数,后面源码安装时要用到
[root@localhost ~]# yum install https://nginx.org/packages/centos/7Server/x86_64/RPMS/nginx-debuginfo-1.22.0-1.el7.ngx.x86_64.rpm
[root@localhost ~]# yum install nginx-1.22.0-1.el7.ngx.x86_64.rpm -y
[root@localhost ~]# nginx -v
nginx version: nginx/1.22.0
[root@localhost ~]# nginx -V
nginx version: nginx/1.22.0
built by gcc 4.8.5 20150623 (Red Hat 4.8.5-44) (GCC)
built with OpenSSL 1.0.2k-fips  26 Jan 2017
TLS SNI support enabled
configure arguments: --prefix=/etc/nginx --sbin-path=/usr/sbin/nginx --modules-path=/usr/lib64/nginx/modules --conf-path=/etc/nginx/nginx.conf --error-log-path=/var/log/nginx/error.log --http-log-path=/var/log/nginx/access.log --pid-path=/var/run/nginx.pid --lock-path=/var/run/nginx.lock --http-client-body-temp-path=/var/cache/nginx/client_temp --http-proxy-temp-path=/var/cache/nginx/proxy_temp --http-fastcgi-temp-path=/var/cache/nginx/fastcgi_temp --http-uwsgi-temp-path=/var/cache/nginx/uwsgi_temp --http-scgi-temp-path=/var/cache/nginx/scgi_temp --user=nginx --group=nginx --with-compat --with-file-aio --with-threads --with-http_addition_module --with-http_auth_request_module --with-http_dav_module --with-http_flv_module --with-http_gunzip_module --with-http_gzip_static_module --with-http_mp4_module --with-http_random_index_module --with-http_realip_module --with-http_secure_link_module --with-http_slice_module --with-http_ssl_module --with-http_stub_status_module --with-http_sub_module --with-http_v2_module --with-mail --with-mail_ssl_module --with-stream --with-stream_realip_module --with-stream_ssl_module --with-stream_ssl_preread_module --with-cc-opt='-O2 -g -pipe -Wall -Wp,-D_FORTIFY_SOURCE=2 -fexceptions -fstack-protector-strong --param=ssp-buffer-size=4 -grecord-gcc-switches -m64 -mtune=generic -fPIC' --with-ld-opt='-Wl,-z,relro -Wl,-z,now -pie'
安装完成
2.源码方式
(1)建议提前下好所需要的部分包
[root@localhost nginx-1.22.0]# yum -y install make zlib zlib-devel gcc-c++ libtool openssl openssl-devel(2)下载tar.gz包

(3)建议将包解压到/usr/local/src下,执行configure文件
[root@localhost nginx-1.22.0]# pwd
/usr/local/src/nginx-1.22.0[root@localhost nginx-1.22.0]# ./configure --prefix=/etc/nginx --sbin-path=/usr/sbin/nginx --modules-path=/usr/lib64/nginx/modules --conf-path=/etc/nginx/nginx.conf --error-log-path=/var/log/nginx/error.log --http-log-path=/var/log/nginx/access.log --pid-path=/var/run/nginx.pid --lock-path=/var/run/nginx.lock --http-client-body-temp-path=/var/cache/nginx/client_temp --http-proxy-temp-path=/var/cache/nginx/proxy_temp --http-fastcgi-temp-path=/var/cache/nginx/fastcgi_temp --http-uwsgi-temp-path=/var/cache/nginx/uwsgi_temp --http-scgi-temp-path=/var/cache/nginx/scgi_temp --user=nginx --group=nginx --with-compat --with-file-aio --with-threads --with-http_addition_module --with-http_auth_request_module --with-http_dav_module --with-http_flv_module --with-http_gunzip_module --with-http_gzip_static_module --with-http_mp4_module --with-http_random_index_module --with-http_realip_module --with-http_secure_link_module --with-http_slice_module --with-http_ssl_module --with-http_stub_status_module --with-http_sub_module --with-http_v2_module --with-mail --with-mail_ssl_module --with-stream --with-stream_realip_module --with-stream_ssl_module --with-stream_ssl_preread_module --with-cc-opt='-O2 -g -pipe -Wall -Wp,-D_FORTIFY_SOURCE=2 -fexceptions -fstack-protector-strong --param=ssp-buffer-size=4 -grecord-gcc-switches -m64 -mtune=generic -fPIC' --with-ld-opt='-Wl,-z,relro -Wl,-z,now -pie'
#弹出来缺什么就安装它的开发包(devel)
(4)安装好上面需要的包,继续执行第一步
[root@localhost nginx-1.22.0]# yum install -y pcre-devel
[root@localhost nginx-1.22.0]# ./configure --prefix=/etc/nginx --sbin-path=/usr/sbin/nginx --modules-path=/usr/lib64/nginx/modules --conf-path=/etc/nginx/nginx.conf --error-log-path=/var/log/nginx/error.log --http-log-path=/var/log/nginx/access.log --pid-path=/var/run/nginx.pid --lock-path=/var/run/nginx.lock --http-client-body-temp-path=/var/cache/nginx/client_temp --http-proxy-temp-path=/var/cache/nginx/proxy_temp --http-fastcgi-temp-path=/var/cache/nginx/fastcgi_temp --http-uwsgi-temp-path=/var/cache/nginx/uwsgi_temp --http-scgi-temp-path=/var/cache/nginx/scgi_temp --user=nginx --group=nginx --with-compat --with-file-aio --with-threads --with-http_addition_module --with-http_auth_request_module --with-http_dav_module --with-http_flv_module --with-http_gunzip_module --with-http_gzip_static_module --with-http_mp4_module --with-http_random_index_module --with-http_realip_module --with-http_secure_link_module --with-http_slice_module --with-http_ssl_module --with-http_stub_status_module --with-http_sub_module --with-http_v2_module --with-mail --with-mail_ssl_module --with-stream --with-stream_realip_module --with-stream_ssl_module --with-stream_ssl_preread_module --with-cc-opt='-O2 -g -pipe -Wall -Wp,-D_FORTIFY_SOURCE=2 -fexceptions -fstack-protector-strong --param=ssp-buffer-size=4 -grecord-gcc-switches -m64 -mtune=generic -fPIC' --with-ld-opt='-Wl,-z,relro -Wl,-z,now -pie'
[root@localhost nginx-1.22.0]# yum install -y openssl-devel
[root@localhost nginx-1.22.0]# ./configure --prefix=/etc/nginx --sbin-path=/usr/sbin/nginx --modules-path=/usr/lib64/nginx/modules --conf-path=/etc/nginx/nginx.conf --error-log-path=/var/log/nginx/error.log --http-log-path=/var/log/nginx/access.log --pid-path=/var/run/nginx.pid --lock-path=/var/run/nginx.lock --http-client-body-temp-path=/var/cache/nginx/client_temp --http-proxy-temp-path=/var/cache/nginx/proxy_temp --http-fastcgi-temp-path=/var/cache/nginx/fastcgi_temp --http-uwsgi-temp-path=/var/cache/nginx/uwsgi_temp --http-scgi-temp-path=/var/cache/nginx/scgi_temp --user=nginx --group=nginx --with-compat --with-file-aio --with-threads --with-http_addition_module --with-http_auth_request_module --with-http_dav_module --with-http_flv_module --with-http_gunzip_module --with-http_gzip_static_module --with-http_mp4_module --with-http_random_index_module --with-http_realip_module --with-http_secure_link_module --with-http_slice_module --with-http_ssl_module --with-http_stub_status_module --with-http_sub_module --with-http_v2_module --with-mail --with-mail_ssl_module --with-stream --with-stream_realip_module --with-stream_ssl_module --with-stream_ssl_preread_module --with-cc-opt='-O2 -g -pipe -Wall -Wp,-D_FORTIFY_SOURCE=2 -fexceptions -fstack-protector-strong --param=ssp-buffer-size=4 -grecord-gcc-switches -m64 -mtune=generic -fPIC' --with-ld-opt='-Wl,-z,relro -Wl,-z,now -pie'
(5)一直到这步,configure文件就执行好了
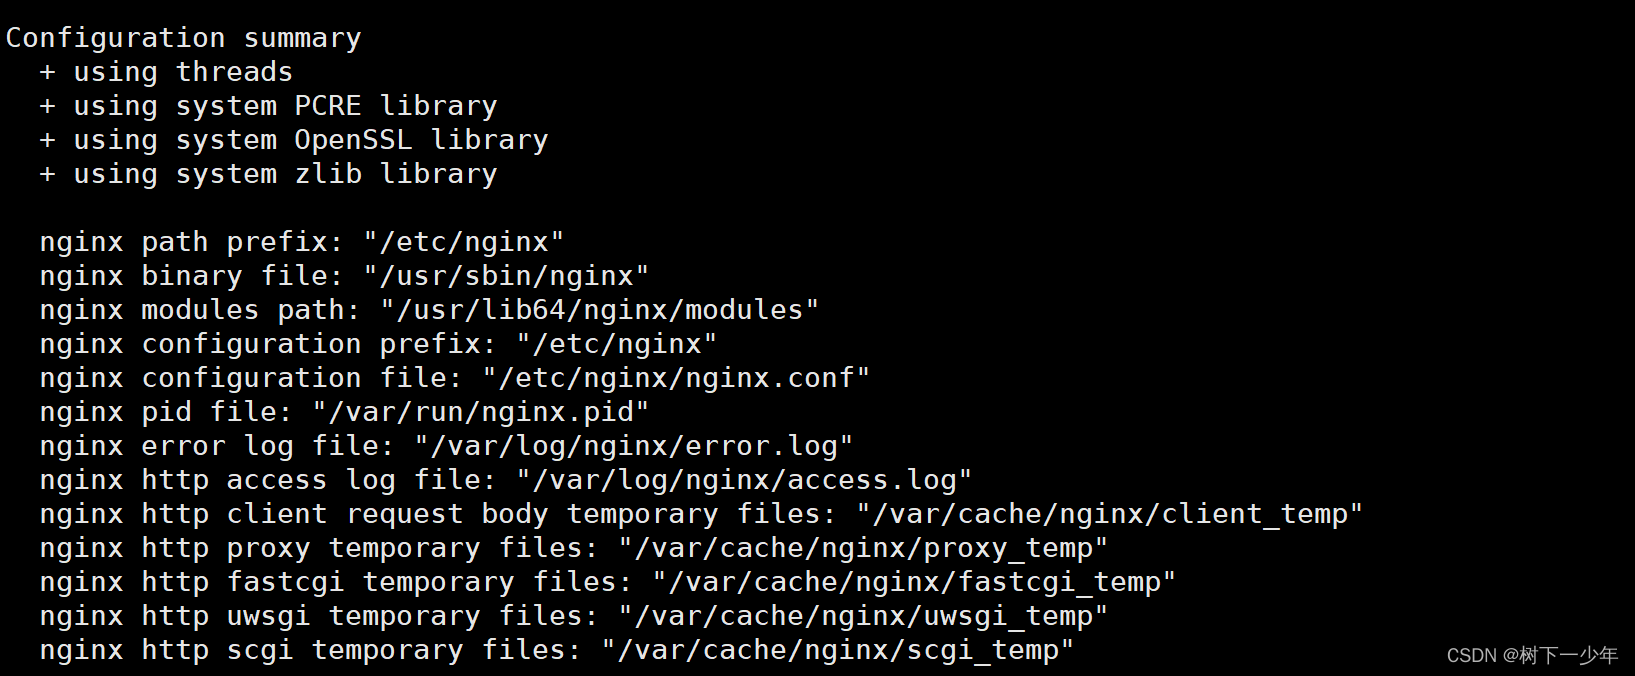
(6)make,make install编译安装
[root@localhost nginx-1.22.0]# make
[root@localhost nginx-1.22.0]# make install
[root@localhost nginx-1.22.0]# nginx -V
nginx version: nginx/1.22.0
built by gcc 4.8.5 20150623 (Red Hat 4.8.5-44) (GCC)
built with OpenSSL 1.0.2k-fips  26 Jan 2017
TLS SNI support enabled
configure arguments: --prefix=/etc/nginx --sbin-path=/usr/sbin/nginx --modules-path=/usr/lib64/nginx/modules --conf-path=/etc/nginx/nginx.conf --error-log-path=/var/log/nginx/error.log --http-log-path=/var/log/nginx/access.log --pid-path=/var/run/nginx.pid --lock-path=/var/run/nginx.lock --http-client-body-temp-path=/var/cache/nginx/client_temp --http-proxy-temp-path=/var/cache/nginx/proxy_temp --http-fastcgi-temp-path=/var/cache/nginx/fastcgi_temp --http-uwsgi-temp-path=/var/cache/nginx/uwsgi_temp --http-scgi-temp-path=/var/cache/nginx/scgi_temp --user=nginx --group=nginx --with-compat --with-file-aio --with-threads --with-http_addition_module --with-http_auth_request_module --with-http_dav_module --with-http_flv_module --with-http_gunzip_module --with-http_gzip_static_module --with-http_mp4_module --with-http_random_index_module --with-http_realip_module --with-http_secure_link_module --with-http_slice_module --with-http_ssl_module --with-http_stub_status_module --with-http_sub_module --with-http_v2_module --with-mail --with-mail_ssl_module --with-stream --with-stream_realip_module --with-stream_ssl_module --with-stream_ssl_preread_module --with-cc-opt='-O2 -g -pipe -Wall -Wp,-D_FORTIFY_SOURCE=2 -fexceptions -fstack-protector-strong --param=ssp-buffer-size=4 -grecord-gcc-switches -m64 -mtune=generic -fPIC' --with-ld-opt='-Wl,-z,relro -Wl,-z,now -pie'
安装完成
三.nginx部分目录结构
1.conf目录
[root@localhost nginx-1.22.0]# ll
total 804
drwxr-xr-x 6 1001 1001    326 Aug  9 19:25 auto
-rw-r--r-- 1 1001 1001 317070 May 24  2022 CHANGES
-rw-r--r-- 1 1001 1001 484445 May 24  2022 CHANGES.ru
drwxr-xr-x 2 1001 1001    168 Aug  9 20:30 conf
-rwxr-xr-x 1 1001 1001   2590 May 24  2022 configure
drwxr-xr-x 4 1001 1001     72 Aug  9 19:25 contrib
drwxr-xr-x 2 1001 1001     40 Aug  9 19:25 html   # Nginx 的默认站点目录
-rw-r--r-- 1 1001 1001   1397 May 24  2022 LICENSE
-rw-r--r-- 1 root root    387 Aug  9 19:49 Makefile
drwxr-xr-x 2 1001 1001     21 Aug  9 19:25 man
drwxr-xr-x 3 root root    174 Aug  9 20:26 objs
-rw-r--r-- 1 1001 1001     49 May 24  2022 README
drwxr-xr-x 9 1001 1001     91 Aug  9 19:25 src[root@localhost nginx-1.22.0]# pwd
/usr/local/src/nginx-1.22.0[root@localhost nginx-1.22.0]# tree conf
conf
├── fastcgi.conf   # fastcgi 相关参数的配置文件
├── fastcgi_params   # fastcgi 的参数文件
├── koi-utf
├── koi-win
├── mime.types   # 媒体类型
├── nginx.conf    # Nginx默认的主配置文件
├── scgi_params
├── uwsgi_params
└── win-utf0 directories, 9 files
2.html目录
[root@localhost nginx-1.22.0]# tree html
html
├── 50x.html   # 错误页面替代显示文件,出现错误时调用这个页面
└── index.html   # 默认的首页文件, 在实际环境中,一般用index.html、 index.php或index.jsp来做
四.nginx配置文件说明
[root@localhost ~]# vim /etc/nginx/nginx.conf #rpm包在这个文件,源码安装的配置文件是/usr/local/src/nginx-1.22.0/conf/nginx.conf
user  nginx;     #用户
worker_processes  auto;    #主模块命令,指定bnginx要开启的进程数,一般指定一个,如果cpu多多和,则和cpu数量一致即可error_log  /var/log/nginx/error.log notice;   #主模块命令,全局错误日志,debug(最详细),info,notice,warn,error,crit(最简略)
pid        /var/run/nginx.pid;  #主模块命令,指定进程id的存储文件位置#events指定设定nginx的工作模式和连接上限
events { #use 模式      (事件模块指令,放在events中指定nginx的工作模式,select-标准工作模式,poll-标准工作模式,kqueue-BDS系统高效工作模式,epoll-Linux平台首选高效工作模式,rtsig,/dev/poll)worker_connections  1024;   #事件模块指令,定义每个进程的最大连接数,默认1024,max_client客户端连接数=worker_processes*worker_connections,max_clients=worker_processes*worker_connections/4,当然这些设置也受文件系统打开数量限制,执行名“ulimit -n 65535”后生效
}#http服务配置
http {include       /etc/nginx/mime.types;    #include主模块命令,include配置文件default_type  application/octet-stream;  #http核心模块指令,octet-stream默认二进制流log_format  main  '$remote_addr - $remote_user [$time_local] "$request" ''$status $body_bytes_sent "$http_referer" ''"$http_user_agent" "$http_x_forwarded_for"';access_log  /var/log/nginx/access.log  main;sendfile        on;   #高效传输模式#tcp_nopush     on;keepalive_timeout  65;   #超时时间server {                    #server 区块listen 80;          #端口server_name localhost;      #域名location / {               #location区块,可以写多个root html;           #站点目录,路径不定,按我的源码安装方式那就在/usr/local/src/nginx-1.22.0/htmlindex index.html index.htm;     #首页文件} error_page 500 502 503 504 /50x.html;        #错误信息配置location = /50x.html {         #html文件位置root html;          #路径}}#gzip  on;  #是否开启压缩
include /etc/nginx/conf.d/*.conf;
}
相关文章:
nginx简介与安装配置,目录结构和配置文件介绍
一.nginx简介 1.简介 2.特性 二.nginx安装 1.rpm包方式 (1)下载扩展源 (2)安装扩展rpm包,nginx -V查看配置参数,后面源码安装时要用到 2.源码方式 (1)建议提前下好所需要的部…...
CTF流量题解http4.pcapng
流量分析 导出http 打开报错 验证文件头,发现是zip。 图常片见里文可件能的包16含进:压制缩头包部,word,pdf JPG FF D8 FF E0/FF D8 FF E1 PNG 89 50 4E 47 GIF 47 49 46 38 ZIP 50 4B 03 04 RAR 52 61 72 21 MP3 49 44 33 0 改后缀 使用工具爆破。 git clone git…...

旷视科技AIoT软硬一体化走向深处,生态和大模型成为“两翼”?
齐奏AI交响曲的当下,赛道玩家各自精彩。其中,被称作AI四小龙的商汤科技、云从科技、依图科技、旷视科技已成长为业内标杆,并积极追赶新浪潮。无论是涌向二级市场还是布局最新风口大模型,AI四小龙谁都不甘其后。 以深耕AIoT软硬一…...

STM32 F103C8T6学习笔记2:GPIO的认识—GPIO的基本输入输出—点亮一个LED
今日继续学习使用 STM32 F103C8T6开发板 点亮一个LED灯,文章提供源码,测试工程,实验效果图,希望我的归纳总结会对大家有帮助~ 目录 GPIO的认识与分类 : 引脚安排整理: 定时器的引脚例举: …...

数组相关练习
数组练习 将数组转化成字符串数组拷贝求数组元素的平均值查找数组中指定元素(顺序查找)二分查找冒泡排序数组逆序 将数组转化成字符串 import java.util.Arrays;public class Text1 {public static void main(String[] args) {int[] arr {5, 6, 4, 2};System.out.println(Arr…...
Leetcode-每日一题【剑指 Offer 11. 旋转数组的最小数字】
题目 把一个数组最开始的若干个元素搬到数组的末尾,我们称之为数组的旋转。 给你一个可能存在 重复 元素值的数组 numbers ,它原来是一个升序排列的数组,并按上述情形进行了一次旋转。请返回旋转数组的最小元素。例如,数组 [3,4…...
git教程(第一次使用)
一、gitee和github区别 二、git使用 下载地址 windows:https://gitforwindows.org/ mac:http://sourceforge.net/projects/git-osx-installer/ 1.git初次运行前的配置 (1)配置用户信息 git config --global user.name "…...

Autoware.ai1.14.0自动驾驶-Demo运行
Autoware.ai1.14.0自动驾驶-Demo运行 数据准备 下载数据: wget https://autoware-ai.s3.us-east-2.amazonaws.com/sample_moriyama_data.tar.gz wget https://autoware-ai.s3.us-east-2.amazonaws.com/sample_moriyama_150324.tar.gz一定要注意解压文件是在.auto…...

AttributeConverter
AttributeConverter 是 JPA 中的一个接口,,用于实体属性和 数据库字段,,之间的转换,,,类似mybatis中的typeHandler AttributeConverter使用 定义一个类实现AttributeConverter接口,…...
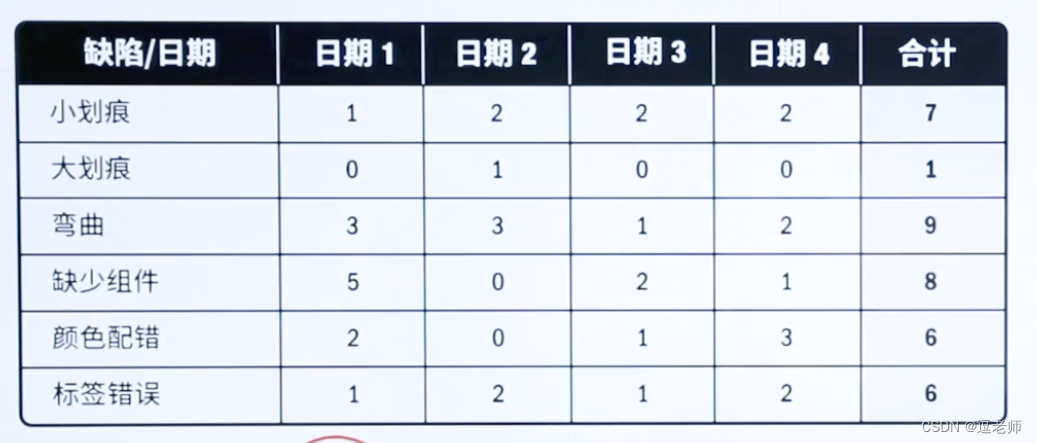
【逗老师的PMP学习笔记】8、项目质量管理
目录 一、规划质量管理1、质量管理的发展历史2、戴明环,PDCA理论3、【关键输入】事业环境因素4、【关键输入】成本效益分析5、【关键工具】质量成本6、【关键输出】质量管理计划7、插一嘴,项目的三个标准8、【关键工具】质量测量指标 二、管理质量1、【关…...

Zookeeper集群
目录 一、Zookeeper 概述 1)Zookeeper 定义 2)Zookeeper 工作机制 3)Zookeeper 特点 4)Zookeeper 数据结构 5)Zookeeper 应用场景 6)Zookeeper 选举机制 ●第一次启动选举机制 ●非第一次启动选举机…...

后端进阶之路——Spring Security构建强大的身份验证和授权系统(四)
前言 「作者主页」:雪碧有白泡泡 「个人网站」:雪碧的个人网站 「推荐专栏」: ★java一站式服务 ★ ★前端炫酷代码分享 ★ ★ uniapp-从构建到提升★ ★ 从0到英雄,vue成神之路★ ★ 解决算法,一个专栏就够了★ ★ 架…...
)
【香瓜说职场】第10月(2018.01.29)
自从17年4月份开始辞职创业,已经10个月了。聊聊近况。 一、博客被冻结 冻结原因是我把博客的积分放在淘宝店铺售卖,卖一周就被查了。 我的每个积分售卖0.5元,是全网最低,每个资源下载一般需要2、3个积分。售…...

LeetCode解法汇总1749. 任意子数组和的绝对值的最大值
目录链接: 力扣编程题-解法汇总_分享记录-CSDN博客 GitHub同步刷题项目: https://github.com/September26/java-algorithms 原题链接:力扣 描述: 给你一个整数数组 nums 。一个子数组 [numsl, numsl1, ..., numsr-1, numsr] 的…...
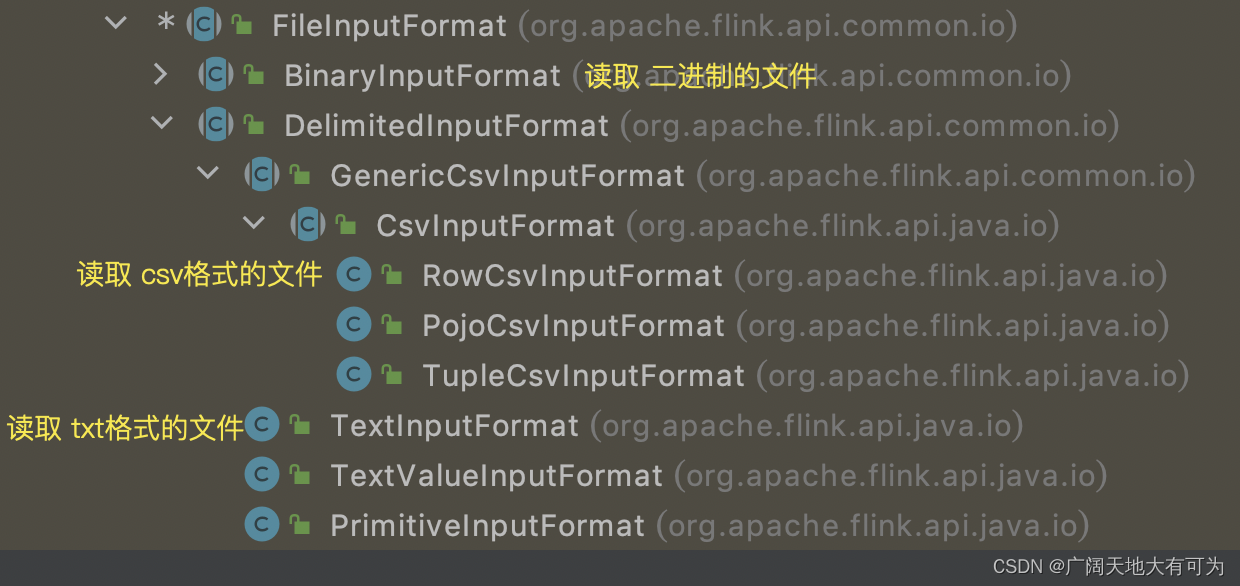
4.2、Flink任务怎样读取文件中的数据
目录 1、前言 2、readTextFile(已过时,不推荐使用) 3、readFile(已过时,不推荐使用) 4、fromSource(FileSource) 推荐使用 1、前言 思考: 读取文件时可以设置哪些规则呢? 1. 文件的格式(tx…...

Effective Java笔记(28)列表优于数组
数组与泛型相比,有两个重要的不同点 。 首先,数组是协变的( covariant ) 。 这个词听起来有点吓人,其实只是表示如果 Sub 为 Super 的子类型,那么数组类型 Sub[ ]就是Super[ ]的子类型。 相反,泛…...

做BI领域的ChatGPT,思迈特升级一站式ABI平台
8月8日,以「指标驱动 智能决策」为主题,2023 Smartbi V11系列新品发布会在广州丽思卡尔顿酒店开幕。 后疫情时代,BI发展趋势的观察与应对 在发布会上,思迈特CEO吴华夫在开场致辞中表示,当前大环境背景下…...
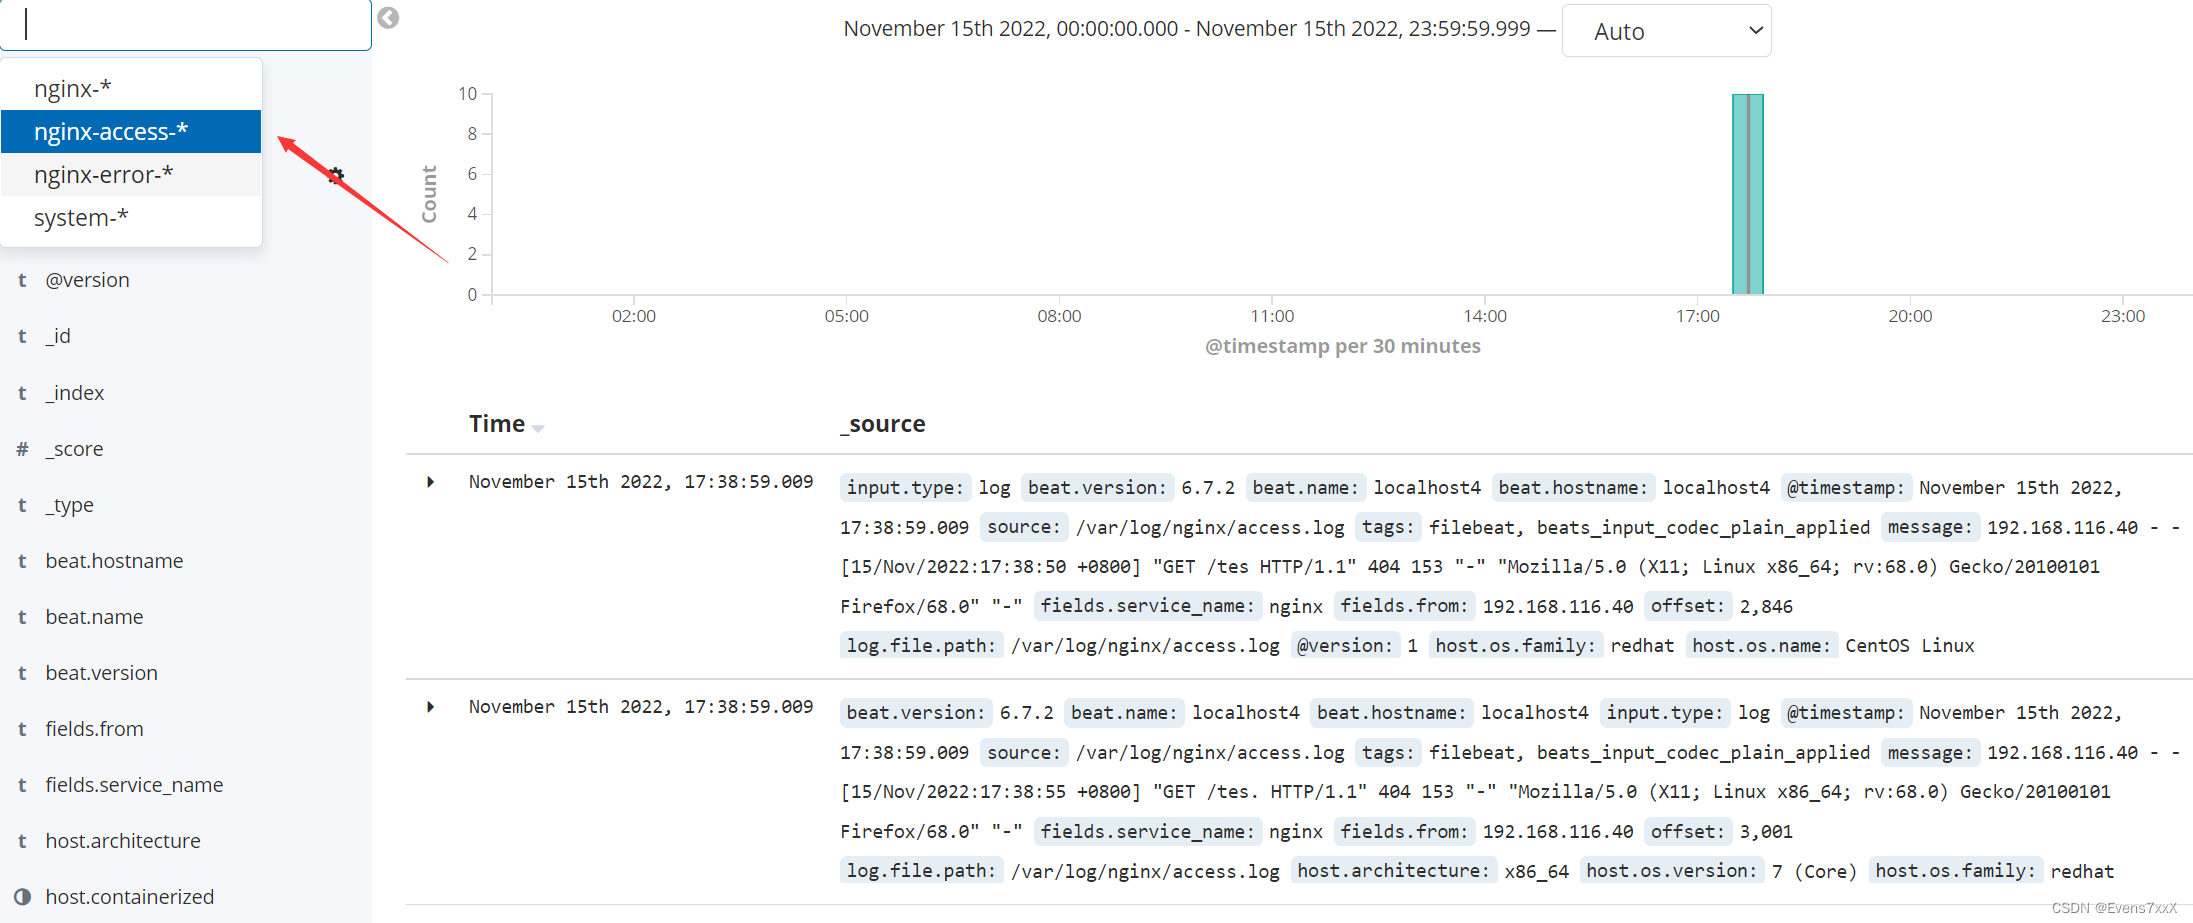
ELFK——ELK结合filebeat日志分析系统(2)
目录 一、filebeat 二、ELFK 1.原理简介 2.在ELK基础上部署filebeat 一、filebeat Filebeat,轻量级的开源日志文件数据搜集器。通常在需要采集数据的客户端安装 Filebeat,并指定目录与日志格式,Filebeat 就能快速收集数据,并…...

webSocket 协议是什么
webSocket 协议是什么,能简述一下吗? websocket 协议 HTML5 带来的新协议,相对于 http,它是一个持久连接的协议,它利用 http 协议完成握手,然后通过 TCP 连接通道发送消息,使用 websocket 协议可…...

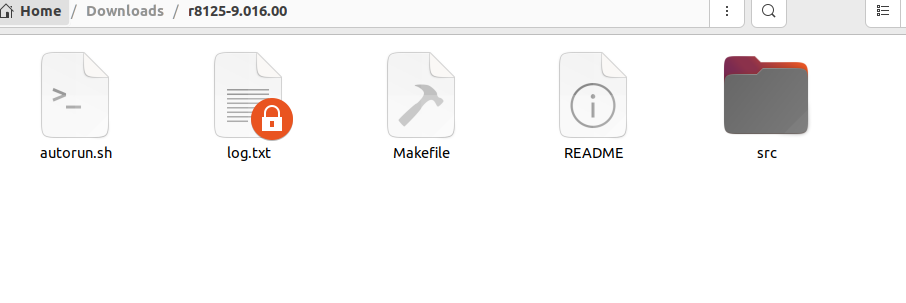
CentOS 7迁移Anolis OS 8
背景:生产环境客户要求操作系统国产化 操作系统:Centos7.9 内核:5.4.108 服务器可以联网,进行在线迁移: # 下载迁移工具软件源 wget https://mirrors.openanolis.cn/anolis/migration/anolis-migration.repo -O /etc/y…...
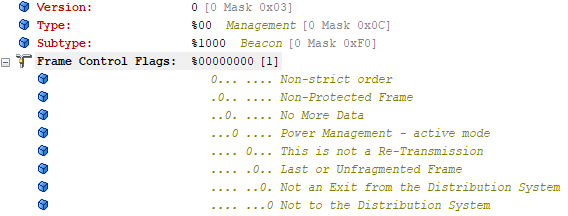
【WiFi帧结构】
文章目录 帧结构MAC头部管理帧 帧结构 Wi-Fi的帧分为三部分组成:MAC头部frame bodyFCS,其中MAC是固定格式的,frame body是可变长度。 MAC头部有frame control,duration,address1,address2,addre…...

浅谈不同二分算法的查找情况
二分算法原理比较简单,但是实际的算法模板却有很多,这一切都源于二分查找问题中的复杂情况和二分算法的边界处理,以下是博主对一些二分算法查找的情况分析。 需要说明的是,以下二分算法都是基于有序序列为升序有序的情况…...

html css js网页制作成品——HTML+CSS榴莲商城网页设计(4页)附源码
目录 一、👨🎓网站题目 二、✍️网站描述 三、📚网站介绍 四、🌐网站效果 五、🪓 代码实现 🧱HTML 六、🥇 如何让学习不再盲目 七、🎁更多干货 一、👨…...
Mysql中select查询语句的执行过程
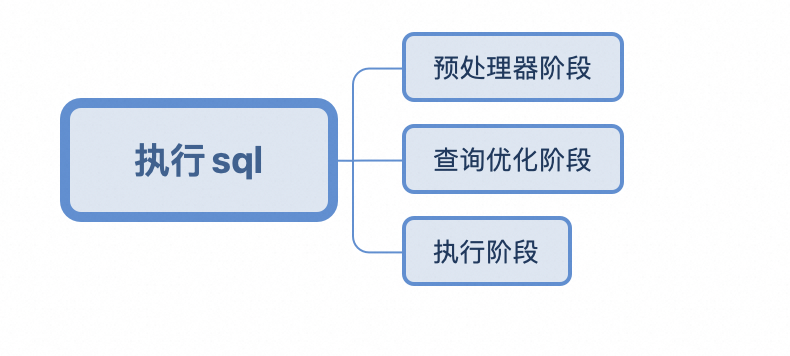
目录 1、介绍 1.1、组件介绍 1.2、Sql执行顺序 2、执行流程 2.1. 连接与认证 2.2. 查询缓存 2.3. 语法解析(Parser) 2.4、执行sql 1. 预处理(Preprocessor) 2. 查询优化器(Optimizer) 3. 执行器…...

日常一水C
多态 言简意赅:就是一个对象面对同一事件时做出的不同反应 而之前的继承中说过,当子类和父类的函数名相同时,会隐藏父类的同名函数转而调用子类的同名函数,如果要调用父类的同名函数,那么就需要对父类进行引用&#…...

离线语音识别方案分析
随着人工智能技术的不断发展,语音识别技术也得到了广泛的应用,从智能家居到车载系统,语音识别正在改变我们与设备的交互方式。尤其是离线语音识别,由于其在没有网络连接的情况下仍然能提供稳定、准确的语音处理能力,广…...
ubuntu22.04有线网络无法连接,图标也没了
今天突然无法有线网络无法连接任何设备,并且图标都没了 错误案例 往上一顿搜索,试了很多博客都不行,比如 Ubuntu22.04右上角网络图标消失 最后解决的办法 下载网卡驱动,重新安装 操作步骤 查看自己网卡的型号 lspci | gre…...

Pydantic + Function Calling的结合
1、Pydantic Pydantic 是一个 Python 库,用于数据验证和设置管理,通过 Python 类型注解强制执行数据类型。它广泛用于 API 开发(如 FastAPI)、配置管理和数据解析,核心功能包括: 数据验证:通过…...
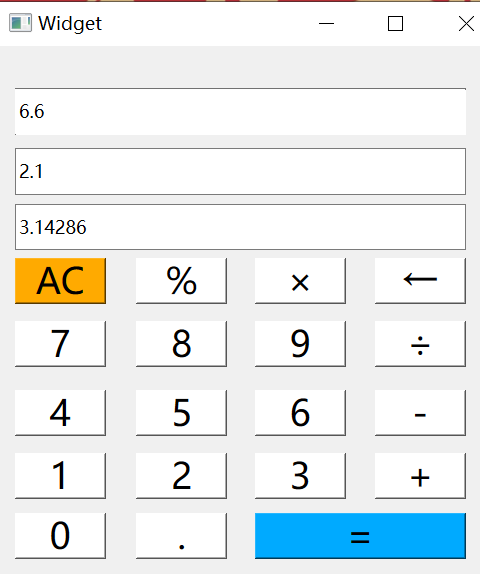
6.9-QT模拟计算器
源码: 头文件: widget.h #ifndef WIDGET_H #define WIDGET_H#include <QWidget> #include <QMouseEvent>QT_BEGIN_NAMESPACE namespace Ui { class Widget; } QT_END_NAMESPACEclass Widget : public QWidget {Q_OBJECTpublic:Widget(QWidget *parent nullptr);…...

当下AI智能硬件方案浅谈
背景: 现在大模型出来以后,打破了常规的机械式的对话,人机对话变得更聪明一点。 对话用到的技术主要是实时音视频,简称为RTC。下游硬件厂商一般都不会去自己开发音视频技术,开发自己的大模型。商用方案多见为字节、百…...