【项目设计】—— 负载均衡式在线OJ平台

目录
一、项目的相关背景
二、所用技术栈和开发环境
三、项目的宏观结构
四、compile_server模块设计
1. 编译服务(compiler模块)
2. 运行服务(runner模块)
3. 编译并运行服务(compile_run模块)
4. 打包成网络服务(compile_server模块)
五、基于MVC结构的oj_server模块设计
1. 什么是MVC结构
2. oj_model模块
3. oj_view模块
4. oj_control模块
5. 打包成网络服务(oj_server)
六、前端页面的设计
1. indx.html
2. all_questions.html
3. one_question.html
七、项目总结
项目源码:https://gitee.com/lu-code-xiaomiao/load-balancing-online---oj
一、项目的相关背景
学习编程的小伙伴,大家对力扣、牛客或其他在线编程的网站一定都不陌生,这些编程网站除了提供了在线编程,还有其他的一些功能。我们这个项目只是做出能够在线编程的功能。
二、所用技术栈和开发环境
技术栈:
- C++ STL 标准库
- Boost 准标准库(字符串切割)
- cpp-httplib 第三方开源网络库
- ctemplate 第三方开源前端网页渲染库
- jsoncpp 第三方开源序列化、反序列化库
- 负载均衡设计
- 多进程、多线程
- MySQL C connect
- Ace前端在线编辑器(了解)
- html/css/js/jquery/ajax (了解)
开发环境:
- Centos 7 云服务器
- vscode
三、项目的宏观结构
我们的项目核心是三个模块:
- comm : 公共模块(主要包含:httplib<网络服务>、log<日志信息>、util<项目中都需要使用到的工具类的集合>)
- compile_server : 编译与运行模块(主要包含:编译服务、运行服务、编译和运行服务)
- oj_server : 获取题目列表,查看题目编写题目界面,负载均衡
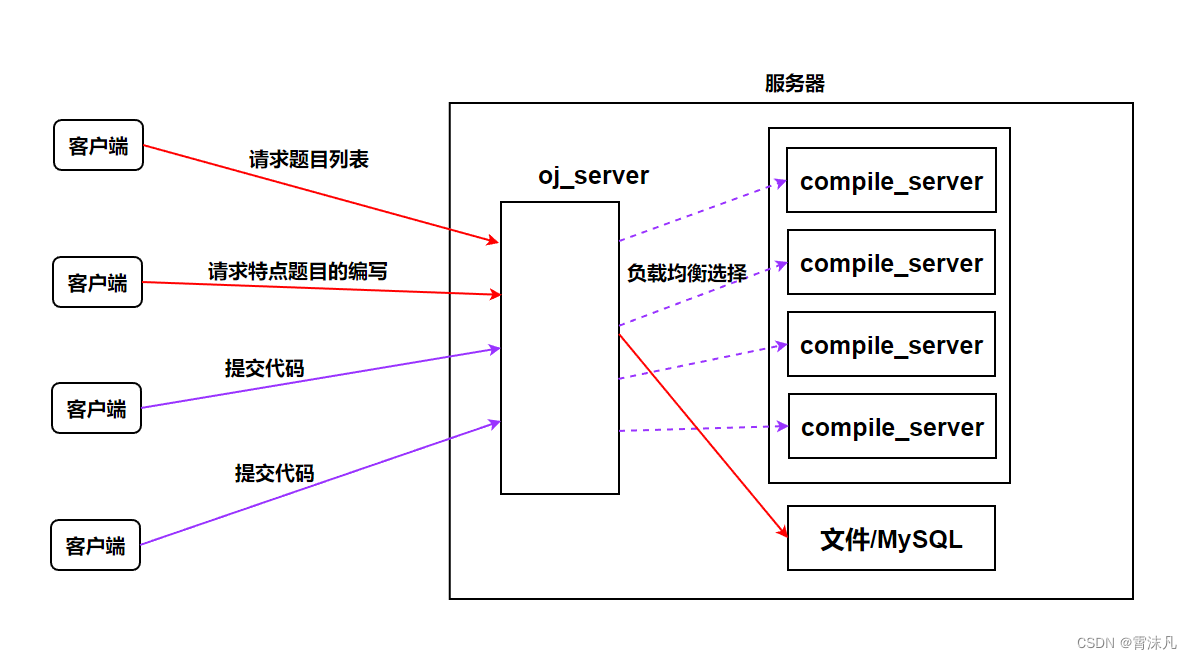
客户端向服务器的oj_server发起请求,有可能是请求题目的列表、请求特定题目的编写、请求代码提交;对于请求题目列表和编写,只需要向文件或MySQL获取数据,并显示成网页即可,但是提交代码的时候,我们就要考虑多用户提交的情况,所以oj_server在收到不同客户端发来的提交代码的请求时,就要需要负载均衡式的选择我们后端的complie_server进行编译并运行,然后反馈最终结果。
四、compile_server模块设计
compile_server模块,主要包括编译服务、运行服务和编译运行服务,最后打包成网络服务。
1. 编译服务(compiler模块)
compiler模块只负责代码的编译,要对代码进行编译,那么我们就需要有file_name(文件名)(如:1234.cpp)
对代码进行编译,有可能成功,形成.exe文件,后续可以直接运行。也有可能失败,对于编译失败了的原因,我们也需要保存起来,用于反馈给用户,否则客户怎么知道错误在哪里。
对于客户提交过来的文件(如1234),我们需要对文件进行路径拼接,拼接出(1234.cpp、1234.exe、1234.compiler_error) 所以我们将这个功能编写到我们的comm模块中:
#pragma once#include <iostream>
#include <string>
#include <vector>
#include <unistd.h>namespace ns_util {const std::string temp_path = "./temp/";//temp目录用来存放这些文件class PathUtil {public:static std::string AddSuffix(const std::string &file_name, const std::string &suffix) {// 拼接路径名+文件名+后缀名std::string path_name = temp_path;//路径名path_name += file_name;//文件名path_name += suffix;//后缀名return path_name;}// 编译时需要的临时文件// 构建源文件路径 + 后缀的完整文件名// 1234 -> ./temp/1234.cppstatic std::string Src(const std::string &file_name) {return AddSuffix(file_name, ".cpp");}// 构建可执行程序的完整路径 + 后缀名static std::string Exe(const std::string &file_name) {return AddSuffix(file_name, ".exe");}static std::string CompilerError(const std::string &file_name) {return AddSuffix(file_name, ".compile_error");}};}
其中./temp是对用户提交过来的文件名进行路径的拼接,形成三个文件的存放位置,这是编译时需要的三个临时文件,有了这三个临时文件后,我们就可以对用户的代码进行编译的操作了。
#pragma once#include <iostream>
#include <unistd.h>
#include <sys/wait.h>
#include <sys/types.h>
#include <sys/stat.h>
#include <fcntl.h>#include "../comm/util.hpp"
#include "../comm/log.hpp"// 只负责进行代码的编译namespace ns_compiler {// 引入路径拼接功能using namespace ns_util;using namespace ns_log;class Compiler {public:Compiler() {}~Compiler() {}//返回值:编译成功:true,否则:false//输入参数:编译的文件名//file_name: 1234//1234 -> ./temp/1234.cpp//1234 -> ./temp/1234.exe//1234 -> ./temp/1234.compiler_errorstatic bool Compile(const std::string &file_name) {pid_t pid = fork();//创建子进程,成功,就给子进程返回0,给父进程返回pidif (pid < 0) {LOG(ERROR) << "内部错误,创建子进程失败" << "\n";return false;} else if (pid == 0) {umask(0);//将umask设置为0,以防系统修改我们设置的权限//_stderr文件用来保存编译出错时,产生的信息int _stderr = open(PathUtil::CompilerError(file_name).c_str(), O_CREAT | O_WRONLY, 0644);if (_stderr < 0) {LOG(WARNING) << "没有成功形成stderr文件" << "\n";exit(1);}//我们不需要显示到显示器上,所以重定向标准错误到_stderrdup2(_stderr, 2);//程序替换,并不影响进程的文件描述符表//子进程: 调用编译器,完成对代码的编译工作//g++ -o target src -std=c++11execlp("g++", "g++", "-o", PathUtil::Exe(file_name).c_str(), PathUtil::Src(file_name).c_str(), "-std=c++11", nullptr);//这个函数替换的时候不要忘记最后给个nullptrLOG(ERROR) << "启动编译器g++失败,可能是参数错误" << "\n";exit(2);} else {waitpid(pid, nullptr, 0);//编译是否成功,就看有没有形成对应的可执行程序if (FileUtil::IsFileExists(PathUtil::Exe(file_name))) {LOG(INFO) << PathUtil::Src(file_name) << " 编译成功!" << "\n";return true;}}LOG(ERROR) << "编译失败,没有形成可执行程序" << "\n";return false;}};
}
其中关于LOG,你暂时可以理解为std::cout; 后面我会给出完整的代码;
2. 运行服务(runner模块)
我们已经完成的编译服务,相应的会在temp目录下形成三个临时文件,当然编译成功会形成.exe文件,失败会形成compiler_error文件不会形成.exe文件,相应的错误信息回报存在这个文件中。有了.exe文件后,我们接下来的工作就是对可执行程序进行运行了。
用户提交的代码,虽然经过编译器编译后,形成了可执行程序,但是对于代码的运行也需要三个临时文件(1234.stdin、1234.stdout、1234.stderr) 这三个文件分别表示:1234.stdin:用户外部自测输入的参数(但是我们不考虑,直接使我们提供参数)1234.stdout:代表运行成功后的结果,我们不需要显示到显示器上,用文件保存起来,用于反馈给客户;1234.stderr:代表运行失败后的结果,我们不需要显示到显示器上,用文件保存起来,用于反馈给客户;所以我们在util中再添加三个运行时需要的临时文件:
#pragma once#include <iostream>
#include <string>
#include <vector>
#include <unistd.h>namespace ns_util {const std::string temp_path = "./temp/";//temp目录用来存放这些文件class PathUtil {public:// 拼接路径名+文件名+后缀名static std::string AddSuffix(const std::string &file_name, const std::string &suffix) {std::string path_name = temp_path;//路径名path_name += file_name;//文件名path_name += suffix;//后缀名return path_name;}// 编译时需要的临时文件// 构建源文件路径 + 后缀的完整文件名// 1234 -> ./temp/1234.cppstatic std::string Src(const std::string &file_name) {return AddSuffix(file_name, ".cpp");}// 构建可执行程序的完整路径 + 后缀名static std::string Exe(const std::string &file_name) {return AddSuffix(file_name, ".exe");}static std::string CompilerError(const std::string &file_name) {return AddSuffix(file_name, ".compile_error");}// 运行时需要的临时文件static std::string Stdin(const std::string &file_name) {return AddSuffix(file_name, ".stdin");}static std::string Stdout(const std::string &file_name) {return AddSuffix(file_name, ".stdout");}// 构建该程序对应的标准错误完整路径 + 后缀名static std::string Stderr(const std::string &file_name) {return AddSuffix(file_name, ".stderr");}};}
运行时需要的三个临时文件,我们已经可以进行路径拼接了,接下来我们来完成运行模块:
#pragma once#include <iostream>
#include <string>
#include <unistd.h>
#include <sys/types.h>
#include <sys/stat.h>
#include <fcntl.h>
#include <sys/wait.h>
#include "../comm/util.hpp"
#include "../comm/log.hpp"namespace ns_runner {using namespace ns_log;using namespace ns_util;class Runner {public:Runner() {}~Runner() {}public:// 指明文件名即可,不需要代路径,不需要带后缀/** 返回值 >  0:程序异常了,退出时收到了信号,返回值就是对应的信号编号* 返回值 == 0:正常运行完毕了,结果保存到了对应的临时文件中* 返回值 <  0:内部错误* */static int Run(const std::string &file_name, int cpu_limit, int mem_limit) {/** 程序运行:* 1. 代码跑完,结果正确* 2. 代码跑完,结果不正确* 3. 代码没跑完,异常了* Run需要考虑代码跑完,结果正确是否吗??不考虑* 结果正确是否:是由我们的测试用例决定的!* 我们只考虑是否正确运行完毕** 我们必须知道可执行程序是谁?* 一个程序在默认启动时:* 标准输入:--我们不处理--* 标准输出:程序运行完成,输出结果是什么* 标准错误:运行时错误信息,*/std::string _execute = PathUtil::Exe(file_name);   //可执行程序的名字std::string _stdin = PathUtil::Stdin(file_name);   //运行时产生的标准输入文件std::string _stdout = PathUtil::Stdout(file_name); //运行时产生的标准输出文件std::string _stderr = PathUtil::Stderr(file_name); //运行时产生的标准错误文件umask(0);int _stdin_fd = open(_stdin.c_str(), O_CREAT | O_RDONLY, 0644);int _stdout_fd = open(_stdout.c_str(), O_CREAT | O_WRONLY, 0644);int _stderr_fd = open(_stderr.c_str(), O_CREAT | O_WRONLY, 0644);if (_stdin_fd < 0 || _stdout_fd < 0 || _stderr_fd < 0) {LOG(ERROR) << "运行时打开标准文件失败" << "\n";return -1; // 打开文件失败}pid_t pid = fork();if (pid < 0) {LOG(ERROR) << "运行时创建子进程失败" << "\n";close(_stdin_fd);close(_stdout_fd);close(_stderr_fd);return -2;// 代表创建子进程失败} else if (pid == 0) {//重定向dup2(_stdin_fd, 0);dup2(_stdout_fd, 1);dup2(_stderr_fd, 2);/*我要执行谁       我想在命令行上如何执行该程序*/execl(_execute.c_str(), _execute.c_str(), nullptr);exit(1);} else {close(_stdin_fd);close(_stdout_fd);close(_stderr_fd);int status = 0;waitpid(pid, &status, 0);// 程序运行异常,一定是因为收到了信号!LOG(INFO) << "运行完毕,info" << (status & 0x7F) << "\n";return status & 0x7F;}}};
}
虽然上面已经基本完成了运行模块,但是还是有缺陷的,我们常常在力扣或牛客上刷题时,明确标注了时间限制和内存限制,或者栈的限制。所以我们对资源的限制也需要做一些处理,我们这里只处理时间和内存上的限制。在运行模块中添加如下的函数,是一个系统调用:
#include <sys/resource.h>//系统调用接口// 设置进程占用资源大小的接口
static void SetProcLimit(int _cpu_limit, int _mem_limit) {// 设置cpu时长struct rlimit cpu_limit;//调用setrlimit所需的结构体cpu_limit.rlim_max = RLIM_INFINITY;//硬约束——无穷(INFINITY)cpu_limit.rlim_cur = _cpu_limit;   //软约束——当前cpu能跑的时长setrlimit(RLIMIT_CPU, &cpu_limit);//系统调用接口// 设置内存大小struct rlimit mem_limit;//调用setrlimit所需的结构体mem_limit.rlim_max = RLIM_INFINITY;//硬约束——无穷(INFINITY)mem_limit.rlim_cur = _mem_limit * 1024; //(单位是字节) 转化为KB  //软约束——当前内存最大上限setrlimit(RLIMIT_AS, &mem_limit);//系统调用接口
}
3. 编译并运行服务(compile_run模块)
编译模块和运行模块有了之后,我们将其整合到一起(编译并运行服务)
- 在编译模块中,我们是根据用户传过来的文件名,先形成三个临时文件(1234.cpp、1234.exe、1234.compiler_error)然后对1234.cpp进行编译,形成1234.exe。
- 在运行模块中,我们是对1234.exe进行运行,形成三个临时文件(1234.stdin、1234.stdout、1234.stderr)
- 在编译并运行的模块中,才是真正的接收用户传过来的数据信息,通过编译和运行模块的分别处理,完成用户的请求编译运行工作,这些数据信息是通过网络传输过来的,我们知道通过网络接收用户传过来json串的(其原因可以看上一篇项目博客中的介绍),其中json串中应该包含如下:
in_json:
{code: “#include <iostream> ....int main(){...}”,input: "用户的输入(像牛客哪些)",cpu_limit: "1024",mem_limit: "30"
}
我们提供一个start函数,用于解析这个in_json串,将数据解析出来;
然后将提取出来的代码写入到特定的文件中,但是存在多个用户提交代码,我们就需要保证每个文件的唯一性。
如何保证每个文件的唯一性呢?我们采用毫秒级时间戳+原子递增的唯一值,来实现:
#pragma once#include <iostream>
#include <string>
#include <vector>
#include <atomic>
#include <fstream>
#include <sys/types.h>
#include <sys/stat.h>
#include <unistd.h>
#include <sys/time.h>namespace ns_util {class TimeUtil {public:/*struct timeval{_time.tv_sec;//秒_time.tv_usec;//微秒};*/// 获取秒级别时间戳(这是为日志模块提供的函数)static std::string GetTimeStamp() {struct timeval _time;gettimeofday(&_time, nullptr);return std::to_string(_time.tv_sec);}// 获取毫秒级别时间戳static std::string GetTimeMs() {struct timeval _time;gettimeofday(&_time, nullptr);return std::to_string(_time.tv_sec * 1000 + _time.tv_usec / 1000);}};const std::string temp_path = "./temp/";class PathUtil {public:static std::string AddSuffix(const std::string &file_name, const std::string &suffix) {// 拼接路径名+文件名+后缀名std::string path_name = temp_path;//路径名path_name += file_name;//文件名path_name += suffix;//后缀名return path_name;}/// 编译时需要的临时文件// 构建源文件路径 + 后缀的完整文件名// 1234 -> ./temp/1234.cppstatic std::string Src(const std::string &file_name) {return AddSuffix(file_name, ".cpp");}// 构建可执行程序的完整路径 + 后缀名static std::string Exe(const std::string &file_name) {return AddSuffix(file_name, ".exe");}static std::string CompilerError(const std::string &file_name) {return AddSuffix(file_name, ".compile_error");}/// 运行时需要的临时文件static std::string Stdin(const std::string &file_name) {return AddSuffix(file_name, ".stdin");}static std::string Stdout(const std::string &file_name) {return AddSuffix(file_name, ".stdout");}// 构建该程序对应的标准错误完整路径 + 后缀名static std::string Stderr(const std::string &file_name) {return AddSuffix(file_name, ".stderr");}};class FileUtil {public://判断文件是否存在static bool IsFileExists(const std::string &path_name) {// 获取文件属性的函数stat,成功返回0struct stat st;if (stat(path_name.c_str(), &st) == 0) {// 获取属性成功,文件已经存在return true;}return false;}//形成唯一的临时文件static std::string UniqFileName() {static std::atomic_uint id(0);id++;// 毫秒级时间戳+原子递增唯一值:来保证唯一性std::string ms = TimeUtil::GetTimeMs();std::string uniq_id = std::to_string(id);return ms + "_" + uniq_id;}//文件的写入static bool WriteFile(const std::string &target, const std::string &content) {std::ofstream out(target);if (!out.is_open()) {return false;}out.write(content.c_str(), content.size());out.close();return true;}//文件的读取static bool ReadFile(const std::string &target, std::string *content, bool keep = false) {(*content).clear();std::ifstream in(target);if (!in.is_open()) {return false;}std::string line;// getline:不保存分隔符,但有些时候需要保留\n// getline:内部重载了强制类型转换while (std::getline(in, line)) {(*content) += line;(*content) += (keep ? "\n" : "");}in.close();return true;}};}
我们可以获取到唯一的文件后,我们将获取到的in_json串进行解析, 提供路径拼接函数,形成唯一的源文件,将in_json中的代码,写入到文件中(它保存在我们的temp目录下),然后进行编译工作,编译是通过创建子进程执行函数替换,其中所需的源文件和可执行程序文件都可以通过路径拼接来完成,最终线程可执行程序;紧接着就是去调用runner模块进行程序的运行,也是通过路径拼接的方式找到文件,它的返回值是int(大于0:程序异常,退出时收到了信号,返回值就是对应的信号;小于0:内部错误,子进程创建失败;等于0:正常运行完毕,结果保存到对应的临时文件中)。我们可以通过这个返回值来进行判断程序运行的结果,并自行设置状态码,将状态码对应到不同的信息,我们可以通过实现一个CodeToDesc函数。
当然,在temp目录下会不断的形成临时文件,我们还需要做个处理,就是清理工作。
#pragma once#include "compiler.hpp"
#include "runner.hpp"
#include "../comm/log.hpp"
#include "../comm/util.hpp"
#include <signal.h>
#include <jsoncpp/json/json.h>namespace ns_compile_and_run {using namespace ns_log;using namespace ns_util;using namespace ns_runner;using namespace ns_compiler;class CompileAndRun {public:// code > 0:进程收到了信号导致异常崩溃// code < 0:整个过程非运行报错(代码为空,编译报错等)// code = 0:整个过程全部完成// 将错误代码转为描述(CodeToDesc())static std::string CodeToDesc(int code, const std::string &file_name) {std::string desc;switch (code) {case 0:desc = "编译运行成功";break;case -1:desc = "提交的代码为空";break;case -2:desc = "未知错误";break;case -3:FileUtil::ReadFile(PathUtil::CompilerError(file_name), &desc, true);break;case SIGABRT: //6号信号desc = "内存超过了范围";break;case SIGXCPU: //24号信号desc = "CPU使用超时";break;case SIGFPE: //8号信号desc = "浮点数溢出";break;default :desc = "未知" + std::to_string(code);break;}return desc;}//清理temp目录下的临时文件static void RemoveTempFile(const std::string &file_name) {/*清理文件的个数是不确定的,但是有哪些我们是知道的*///unlink函数:是Linux下删除特定文件的一个函数,参数是字符串形式//清理源文件std::string _src = PathUtil::Src(file_name);if (FileUtil::IsFileExists(_src)) unlink(_src.c_str());//清理编译出错文件std::string _compiler_error = PathUtil::CompilerError(file_name);if (FileUtil::IsFileExists(_compiler_error)) unlink(_compiler_error.c_str());//清理可执行程序文件std::string _execute = PathUtil::Exe(file_name);if (FileUtil::IsFileExists(_execute)) unlink(_execute.c_str());//清理标准输入文件std::string _stdin = PathUtil::Stdin(file_name);if (FileUtil::IsFileExists(_stdin)) unlink(_stdin.c_str());//清理标准输出文件std::string _stdout = PathUtil::Stdout(file_name);if (FileUtil::IsFileExists(_stdout)) unlink(_stdout.c_str());//清理标准错误文件std::string _stderr = PathUtil::Stderr(file_name);if (FileUtil::IsFileExists(_stderr)) unlink(_stderr.c_str());}/** 输入:*      code:用户提交的代码*      input:用户给自己提交代码对应的输入,不做处理*      cpu_limit:时间要求*      mem_limit:空间要求** 输出:* 必填字段:*      status:状态码*      reason:请求结果* 选填字段:*      stdout:我的程序运行完的结果*      stderr:我的程序运行完的错误结果* *//** start函数功能:*      通过网络接收用户传过来的json串(in_json),其中in_json包含如下:*          in_json:*          {*              code: “#include <iostream> ....int main(){...}”,*              input: "用户的输入(像牛客哪些)",*              cpu_limit: "1024",*              mem_limit: "30"*          }*       我们start函数就需要去解析这个in_json串,将数据取出来;*       然后将提取出来的代码写入到特定的文件中,因为存在多个用户提交代码,我们就需要保证每个文件的唯一性;** */static void Start(const std::string &in_json, std::string *out_json) {Json::Value in_value;Json::Reader reader;reader.parse(in_json, in_value);//in_json——你要解析是谁;in_value——解析的结果放到哪里std::string code = in_value["code"].asString();   //提取用户的代码std::string input = in_value["input"].asString(); //提取用户的输入int cpu_limit = in_value["cpu_limit"].asInt(); int mem_limit = in_value["mem_limit"].asInt(); int status_code = 0;//状态码int run_result = 0;// 在goto之间定义的变量是不允许的,我们提前定义std::string file_name;// 需要内部形成的唯一文件名(为后续编译和运行提供好文件名)Json::Value out_value;if (code.size() == 0) {status_code = -1;// 表示代码为空goto END;}// 形成的文件名只具有唯一性,没有目录没有后缀// 毫秒级时间戳+原子性递增的唯一值:来保证唯一性file_name = FileUtil::UniqFileName();if (!FileUtil::WriteFile(PathUtil::Src(file_name), code)) // 形成临时源文件{status_code = -2; // 表示未知错误goto END;}if (!Compiler::Compile(file_name)) { //编译文件// 编译失败status_code = -3; // 表示代码编译时发生了错误goto END;}run_result = Runner::Run(file_name, cpu_limit, mem_limit);//运行可执行程序文件if (run_result < 0) {status_code = -2; // 表示未知错误goto END;} else if (run_result > 0) {// 程序运行崩溃了(源于某种信号)status_code = run_result;} else {status_code = 0;// 表示运行成功}END:out_value["status"] = status_code;out_value["reason"] = CodeToDesc(status_code, file_name);if (status_code == 0) {// 整个过程全部成功std::string _stdout;FileUtil::ReadFile(PathUtil::Stdout(file_name), &_stdout, true);out_value["stdout"] = _stdout;std::string _stderr;FileUtil::ReadFile(PathUtil::Stderr(file_name), &_stderr, true);out_value["stderr"] = _stderr;}Json::StyledWriter writer;*out_json = writer.write(out_value);RemoveTempFile(file_name);}};
}
4. 打包成网络服务(compile_server模块)
#include "compile_run.hpp"
#include "../comm/httplib.h"
using namespace ns_compile_and_run;
using namespace httplib;
// 编译服务随时可能被多个人请求,必须保证传递上来的code,形成源文件名称的时候,要具有
// 唯一性,要不然多个用户之间会相互影响void Usage(std::string proc){std::cerr << "Usage: " << "\n\t" << proc << std::endl;
}// ./compile_server port
int main(int argc, char* argv[]){if(argc != 2){Usage(argv[0]);return 1;}Server svr;svr.Post("/compile_and_run", [](const Request& req, Response& resp){// 用户请求的服务正文是我们想要的json stringstd::string in_json = req.body;std::string out_json;if(!in_json.empty()){CompileAndRun::Start(in_json, &out_json);resp.set_content(out_json,"application/json;charset=utf-8");}});svr.listen("0.0.0.0", atoi(argv[1])); // 启动http服务/** 这里是测试代码in_json:{"code": "#include...", "input":" ", "cpu_limit":1, "mem_limit":10240}out_json:{"status":"0", "reason":"", "stdout":"", "stderr":""}通过http 让client 给我们上传一个json string下面的工作,充当客户端请求的json串std::string in_json;Json::Value in_value;in_value["code"] = R"(#include <iostream>int main(){std::cout << "你可以看见我了" << std::endl;return 0;})";in_value["input"] = "";in_value["cpu_limit"] = 1;in_value["mem_limit"] = 10240 * 3;Json::FastWriter writer;in_json = writer.write(in_value);//std::cout << in_json << std::endl;std::string out_json; // 这个是将来给客户返回的json串CompileAndRun::Start(in_json, &out_json);std::cout << out_json << std::endl;*/return 0;
}
五、基于MVC结构的oj_server模块设计
1. 什么是MVC结构
经典MVC模式中,M是指业务模型,V是指用户界面(视图),C则是控制器,使用MVC的目的是将M和V的实现代码分离,从而使同一个程序可以使用不同的表现形式。其中,View的定义比较清晰,就是用户界面。
- M:model表示的是模型,代表业务规则。在MVC的三个部件中,模型拥有最多的处理任务。被模型返回的数据时中立的,模型与数据格式无关,这样一个模型就能够为多个视图提供数据,由于应用于模型的代码只需要写一次就可以被多个视图重用,所以减少了代码的重复性,
- V:view表示的视图,代表用户看到并与之交互的界面。在视图中没有真正的处理发生,它只是作为一种输出数据并允许用户操作的方式。
- C:controller表示的是控制器,控制器接收用户的输入并调用模型(M)和视图(V)去完成用户需求。控制器本身不输出任何东西和任何处理。它只接收请求并决定调用那个模型构建去处理请求,然后再确定用那个视图来显示返回的数据。

2. oj_model模块
oj_model模块主要是和数据交互的,这里的数据就是我们后端文件或者数据库当中的题目信息,题目应该包含如下的信息:
- 题目的编号(1)
- 题目的标题(求最大值)
- 题目的难度(简单、中等、困难)
- 题目的时间要求(1s)
- 题目的空间要求(30000KB)
- 题目的描述(给定一个数组,求最大值)
- 题目预设给用户在线编辑的代码(#include<iostream>...)
- 题目的测试用例
到这里我们剧需要有自己对应的题库啦,我们这个模块当中新增一个目录questions,用来存放我们的题库,这个questions目录下包含题目列表(文件形式)和每个题目的文件夹(其中又包含题目的描述、题目预设给用户在线编辑的代码header和题目的测试用例tail)

#pragma once#include "../comm/log.hpp"
#include "../comm/util.hpp"
#include <iostream>
#include <string>
#include <vector>
#include <cassert>
#include <fstream>
#include <cstdlib>
#include <unordered_map>
// 根据题目list文件,加载所有的题目信息到内存中
// model:主要用来和数据进行交互,对外提供访问数据接口namespace ns_model {using namespace std;using namespace ns_log;using namespace ns_util;//题目的相关信息节点struct Question {string number; // 题目的编号string title;  // 题目的标题string star;   // 难度:简单/中等/困难int cpu_limit; // 题目的时间要求int mem_limit; // 题目的空间要求string desc;   // 题目的描述string header; // 题目预设给用户在线编辑的代码string tail;   // 题目的测试用例,需要和header拼接,形成完整代码};const string questions_list = "./questions/questions.list"; //题目列表的路径const string question_path = "./questions/"; //题库路径class Model {private:// kv ---> k:题号 v:题目细节unordered_map<string, Question> questions;public:Model() {assert(LoadQuestionList(questions_list));}// 加载配置文件:questions/questions.list + 题目编号文件bool LoadQuestionList(const string &question_list) {ifstream in(question_list);//打开配置文件if (!in.is_open()) {LOG(FATAL) << "加载题库失败,请检查是否存在题库文件" << "\n";return false;}string line;//按行读取题目列表的路径中的内容while (getline(in, line)) {//题目列表的路径的内容如:// 1 判断回文数 简单 1 30000// 2 找出最大值 简单 1 30000vector<string> tokens;//保存切分的子串:如:vector{1,判断回文数,简单,1,30000}StringUtil::SplitString(line, &tokens, " ");//按空格进行切分if (tokens.size() != 5) {LOG(WARNING) << "加载部分题目失败,请检查文件格式" << "\n";continue;}//填充Question:Question q;q.number = tokens[0]; //填写题目编号:1q.title = tokens[1];  //填写题目标题:判断回文数q.star = tokens[2];   //填写题目难度:简单q.cpu_limit = atoi(tokens[3].c_str()); //填写cpu限制:1q.mem_limit = atoi(tokens[4].c_str()); //填写内存限制:30000//拼接题目路径//题库路径在 questions/ 如:// questions///      1///      2/string _path = question_path; //_path:题目路径_path += q.number;_path += "/";FileUtil::ReadFile(_path + "desc.txt", &(q.desc), true);    //读取:题目的描述路径(true表示需要换行)FileUtil::ReadFile(_path + "header.cpp", &(q.header), true);//读取:题目预设给用户在线编辑的代码的路径FileUtil::ReadFile(_path + "tail.cpp", &(q.tail), true);    //读取:题目的测试用例路径questions.insert({q.number, q});//插入到unordered_map中}LOG(INFO) << "加载题库......成功" << "\n";in.close();return true;}//获取所有题目bool GetAllQuestions(vector<Question> *out) {//如果没有题目if (questions.size() == 0) {LOG(ERROR) << "用户获取题库失败" << "\n";return false;}//遍历questions(题目和题目细节的映射)放到vector中for (const auto &q: questions) {out->push_back(q.second);}return true;}//获取一道题目bool GetOneQuestion(const string &number, Question *q) {const auto &iter = questions.find(number);//去映射表中查找对应的题目if (iter == questions.end()) {LOG(ERROR) << "用户获取题目失败,题目编号:" << number << "\n";return false;}(*q) = iter->second;return true;}~Model() {}};
}
3. oj_view模块
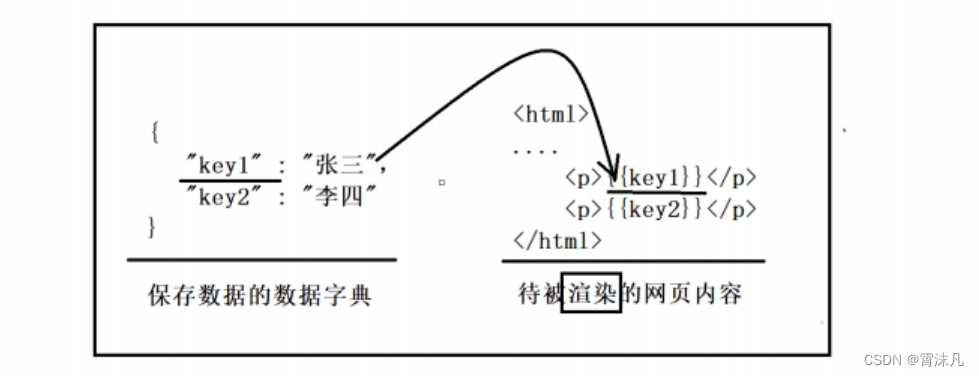
oj_view模块是将model中的数据进行渲染构建出网页,所以我们需要引入一个第三方库ctemplate;功能如下:
#pragma once#include <iostream>
#include <string>
#include <ctemplate/template.h>
#include "oj_model.hpp"namespace ns_view {using namespace ns_model;const std::string template_path = "./template_html/";class View {public:View() {}~View() {}public://所有题目的网页void AllExpandHtmml(const std::vector<Question> &questions, std::string *html) {// 题目的编号 题目的标题 题目的难度// 推荐使用表格显示//1.形成路径std::string src_html = template_path + "all_questions.html";//被渲染的网页//2.形成数据字典ctemplate::TemplateDictionary root("all_questions.html");for (const auto &q: questions) {ctemplate::TemplateDictionary *sub = root.AddSectionDictionary("question_list");sub->SetValue("number", q.number);sub->SetValue("title", q.title);sub->SetValue("star", q.star);}//3.获取被渲染的网页ctemplate::Template *tpl = ctemplate::Template::GetTemplate(src_html, ctemplate::DO_NOT_STRIP);//4.开始完成渲染功能tpl->Expand(html, &root);}//一道题目的网页void OneExpandHtmml(const Question &q, std::string *html) {//1.形成路径std::string src_html = template_path + "one_question.html";//被渲染的网页//2.形成数据字典ctemplate::TemplateDictionary root("one_question.html");root.SetValue("number", q.number);root.SetValue("title", q.title);root.SetValue("star", q.star);root.SetValue("desc", q.desc);root.SetValue("pre_code", q.header);//3.获取被渲染的网页ctemplate::Template *tpl = ctemplate::Template::GetTemplate(src_html, ctemplate::DO_NOT_STRIP);//4.开始完成渲染功能tpl->Expand(html, &root);}};
}
4. oj_control模块
oj_control模块主要是控制,通过获取用户的输入调用不同的模型构建view。但是我们还需要完成一个负载均衡的概念,因为在后端进行编译服务的时候,如果只提供一台主机,当用户请求比较多或主机挂了,则会影响用户体验。
#pragma once#include <iostream>
#include <string>
#include <vector>
#include <mutex>
#include <cassert>
#include <fstream>
#include <algorithm>
#include <jsoncpp/json/json.h>#include "../comm/httplib.h"
#include "../comm/util.hpp"
#include "../comm/log.hpp"
#include "oj_model.hpp"
#include "oj_view.hpp"namespace ns_control {using namespace std;using namespace ns_log;using namespace ns_util;using namespace ns_model;using namespace ns_view;using namespace httplib;//提供服务的主机class Machine {public:std::string ip; //编译服务的ipint port;       //编译服务的portuint64_t load;  //编译服务的负载数量std::mutex *mtx;//C++中mutex是禁止拷贝的,所有使用指针来完成public:Machine() : ip(""), port(0), load(0), mtx(nullptr) {}~Machine() {}public://递增负载void IncLoad() {if (mtx) mtx->lock();++load;if (mtx) mtx->unlock();}//递减负载void DecLoad() {if (mtx) mtx->lock();--load;if (mtx) mtx->unlock();}// 清除负载void ResetLoad(){if (mtx) mtx->lock();load = 0;if (mtx) mtx->unlock();}//获取主机负载uint64_t Load() {uint64_t _load = 0;if (mtx) mtx->lock();_load = load;if (mtx) mtx->unlock();return _load;}};const std::string service_machine = "./conf/service_machine.conf";//负载均衡模块class LoadBlance {private:// 可以提供给我们服务编译的所有主机,每一台主机都有自己的下标,充当当前主机的idstd::vector<Machine> machines;// 所有在线主机idstd::vector<int> online;// 所有离线主机idstd::vector<int> offline;//保证LoadBlance它的数据安全std::mutex mtx;public:LoadBlance() {assert(LoadConf(service_machine));LOG(INFO) << "加载 " << service_machine << " 成功" << "\n";}~LoadBlance() {}public:// 加载主机bool LoadConf(const std::string &machine_conf) {std::ifstream in(machine_conf);if (!in.is_open()) {LOG(FATAL) << " 加载: " << machine_conf << " 失败" << "\n";return false;}std::string line;while (std::getline(in, line)) {std::vector<std::string> tokens;StringUtil::SplitString(line, &tokens, ":");if (tokens.size() != 2) {LOG(WARNING) << " 切分 " << line << " 失败" << "\n";continue;}Machine m;m.ip = tokens[0];m.port = atoi(tokens[1].c_str());m.load = 0;m.mtx = new std::mutex();online.push_back(machines.size());machines.push_back(m);}in.close();return true;}// 智能选择bool SmartChoice(int *id, Machine **m) {//1.使用选择好的主机(更新该主机的负载)//2.我们需要可能离线该主机mtx.lock();//负载均衡的算法://1.随机数算法;2.轮询+随机算法int online_num = online.size();if (online_num == 0) {mtx.unlock();LOG(WARNING) << " 所有的后端编译主机已经全部离线,请运维的同事尽快查看" << "\n";return false;}//通过遍历的方式,找到所有负载最小的机器*id = online[0];*m = &machines[online[0]];uint64_t min_load = machines[online[0]].Load();for (int i = 1; i < online_num; i++) {uint64_t curr_load = machines[online[i]].Load();if (min_load > curr_load) {min_load = curr_load;*id = online[i];*m = &machines[online[i]];}}mtx.unlock();return true;}// 离线主机void OfflineMachine(int which) {mtx.lock();for (auto iter = online.begin(); iter != online.end(); iter++) {if (*iter == which) {machines[which].ResetLoad();//负载清0//要离线的主机找到了online.erase(iter);offline.push_back(which);break;//因为break的存在,所以我们暂时不考虑迭代器失效的问题}}mtx.unlock();}// 在线主机void OnlineMachine() {//当所有主机都离线的时候,我们统一上线mtx.lock();online.insert(online.end(), offline.begin(), offline.end());offline.erase(offline.begin(), offline.end());mtx.unlock();LOG(INFO) << "所有的离线主机已上线......" << "\n";}//for testvoid ShowMachine() {mtx.lock();std::cout << "当前在线主机列表:";for (auto id: online) {std::cout << id << " ";}std::cout << std::endl;std::cout << "当前离线主机列表:";for (auto id: offline) {std::cout << id << " ";}std::cout << std::endl;mtx.unlock();}};//这是我么核心业务逻辑的控制器class Control {private:Model model_;            //model_:主要用来和数据进行交互,对外提供访问数据接口View view_;              //提供html渲染功能LoadBlance load_blance_; //核心负载均衡器public:Control() {}~Control() {}public:// 恢复离线主机上线void RecoveryMachine(){load_blance_.OnlineMachine();}// 根据全部题目数据构建网页bool AllQuestions(string *html) {bool ret = true;vector<Question> all;if (model_.GetAllQuestions(&all)) {// 1. 先对题号进行排序sort(all.begin(), all.end(), [](const Question &q1, const Question &q2){return atoi(q1.number.c_str()) < atoi(q2.number.c_str());//升序排序});// 2. 获取题目信息成功,将所有的题目数据构建成网页view_.AllExpandHtmml(all, html);} else {*html = "获取题目失败, 形成题目列表失败";ret = false;}return ret;}// 根据一道题目数据构建网页bool OneQuestion(const string &number, string *html) {bool ret = true;Question q;if (model_.GetOneQuestion(number, &q)) {// 获取指定题目信息成功,将指定题目数据构建成网页view_.OneExpandHtmml(q, html);} else {*html = "指定题目:" + number + " 不存在!";ret = false;}return ret;}//in_json包含://code:#include...//input:“”void Judge(const std::string &number, const std::string in_json, std::string *out_json) {//LOG(DEBUG) << in_json << "\nnumnber:" << number << "\n";//1.根据题目编号拿到题目细节Question q;model_.GetOneQuestion(number, &q);//2.对in_json进行反序列化,得到题目id和用户提交的源代码Json::Reader reader;Json::Value in_value;reader.parse(in_json, in_value);std::string code = in_value["code"].asString();//3.重新拼接用户代码+测试用例代码,形成新的代码Json::Value compile_value;compile_value["input"] = in_value["input"].asString();compile_value["code"] = code + "\n" + q.tail;//这里加\n是为了展示的代码和测试用例代码,在编译的时候,不发生错误(能够去掉那个#ifdefine)compile_value["cpu_limit"] = q.cpu_limit;compile_value["mem_limit"] = q.mem_limit;Json::FastWriter writer;std::string compile_string = writer.write(compile_value);//4.选择负载最低的主机//规则:一直选择,直到主机可用,否则,就是全部挂掉while (true) {int id = 0;Machine *m = nullptr;if (!load_blance_.SmartChoice(&id, &m)) {break;}//5.然后发起http请求,得到结果Client cli(m->ip, m->port);m->IncLoad();LOG(INFO) << " 选择主机成功,主机id:" << id << " 详情:" << m->ip << ":" << m->port << "当前主机的负载是:" << m->Load() << "\n";if (auto res = cli.Post("/compile_and_run", compile_string, "application/json;charset=utf-8")) {//6.将结果赋值给out_jsonif (res->status == 200) {*out_json = res->body;m->DecLoad();LOG(INFO) << " 请求编译和运行服务成功......" << "\n";break;}m->DecLoad();} else {//请求失败LOG(ERROR) << " 选择当前请求的主机的id:" << id << " 详情:" << m->ip << ":" << m->port << " 可能已经离线"<< "\n";load_blance_.OfflineMachine(id);load_blance_.ShowMachine();//仅仅是为了调式}}}};
}
5. 打包成网络服务(oj_server)
#include <iostream>
#include <signal.h>
#include "../comm/httplib.h"
#include "oj_control.hpp"using namespace httplib;
using namespace ns_control;static Control *ctrl_ptr = nullptr;
void Recovery(int signo){ctrl_ptr->RecoveryMachine();
}
int main()
{signal(SIGQUIT, Recovery);// 用户请求的服务路由功能Server svr;Control ctrl;ctrl_ptr = &ctrl;// 获取所有的题目列表svr.Get("/all_questions", [&ctrl](const Request& req, Response& resp){// 返回一张包含所有题目的html网页std::string html;ctrl.AllQuestions(&html);// 用户看到的是什么?网页数据+拼上了题目相关的数据resp.set_content(html, "text/html; charset=utf-8");});// 用户要根据题目编号,获取题目内容// /question/100 -> 正则匹配// R"()" 原始字符串raw string,保持字符串内容的原貌,不用做相关的转义svr.Get(R"(/question/(\d+))", [&ctrl](const Request& req, Response& resp){std::string number = req.matches[1];//获取题目编号std::string html;ctrl.OneQuestion(number, &html);resp.set_content(html, "text/html; charset=utf-8");});// 用户提交代码,使用我们的判题功能(1.每道题的测试用例 2.执行compile_and_run)svr.Post(R"(/judge/(\d+))", [&ctrl](const Request& req, Response& resp){std::string number = req.matches[1];std::string result_json;ctrl.Judge(number, req.body, &result_json);resp.set_content(result_json, "application/json;charset=utf-8");});svr.set_base_dir("./wwwroot");svr.listen("0.0.0.0", 8080);return 0;
}
六、前端页面的设计
1. indx.html
当用户访问根目录时显示的网页
<!DOCTYPE html>
<html lang="en"><head><meta charset="UTF-8"><meta http-equiv="X-UA-Compatible" content="IE=edge"><meta name="viewport" content="width=device-width, initial-scale=1.0"><title>这是我的个人oj系统</title><style>/*起手式:100%保证我们的样式设置可以不受默认影响*/* {margin: 0px;/*消除网页的默认外边距*/padding: 0px;/*消除网页的默认内边距*/}html,body {width: 100%;height: 100%;}.container .navbar{width: 100%;height: 50px;background-color:black;/* 给父级标签overflow,取消后续float带来的影响 */overflow: hidden;}.container .navbar a{/* 设置a标签是行内块元素,允许你设置宽度*/display: inline-block;/* 设置a标签的宽度,默认a标签是行内元素,无法设置宽度*/width: 80px;/* 设置字体的颜色 */color: white;/* 设置字体的大小 */font-size: large;/* 设置文字的高度和导航栏一样的高度 */line-height: 50px;/* 去掉a标签的下划线 */text-decoration: none;/* 设置a标签的文字居中 */text-align: center;}/* 设置鼠标事件 */.container .navbar a:hover{background-color:green;}/* 设置浮动 */.container .navbar .login{float:right;}.container .content {/* 设置标签的宽度 */width: 800px;/* background-color: #ccc; *//* 整体居中 */margin: 0px auto;/* 设置文字居中 */text-align: center;/* 设置上外边距 */margin-top: 200px;}.container .content .front_ {/* 设置标签为块级元素,独占一行,可以设置高度宽度等属性 */display: block;/* 设置每个文字的上外边距 */margin-top: 20px;/* 去掉a标签的下划线 */text-decoration: none;}</style>
</head><!-- <body background="C:\Users\MLG\Desktop\壁纸.jpg"> --><body background="./壁纸.jpg">
<div class="container"><!--导航栏--><div class="navbar"><a href="/">首页</a><a href="/all_questions">题库</a><a href="#">竞赛</a><a href="#">讨论</a><a href="#">求职</a><a class="login" href="#">登录</a></div><!--网页的内容--><div class="content"><h1 class="front_">欢迎来到我的Online_Judge平台</h1><a class="front_" href="/all_questions">点击我开始编程啦!</a></div>
</div>
</body></html>
2. all_questions.html
当用户获取题目列表的时候显示的网页
<!DOCTYPE html>
<html lang="en"><head><meta charset="UTF-8"><meta name="viewport"content="width=device-width, user-scalable=no, initial-scale=1.0, maximum-scale=1.0, minimum-scale=1.0"><meta http-equiv="X-UA-Compatible" content="ie=edge"><title>在线OJ-题目列表</title><style>/*起手式:100%保证我们的样式设置可以不受默认影响*/* {margin: 0px;/*消除网页的默认外边距*/padding: 0px;/*消除网页的默认内边距*/}html,body {width: 100%;height: 100%;}.container .navbar {width: 100%;height: 50px;background-color: black;/* 给父级标签overflow,取消后续float带来的影响 */overflow: hidden;}.container .navbar a {/* 设置a标签是行内块元素,允许你设置宽度*/display: inline-block;/* 设置a标签的宽度,默认a标签是行内元素,无法设置宽度*/width: 80px;/* 设置字体的颜色 */color: white;/* 设置字体的大小 */font-size: large;/* 设置文字的高度和导航栏一样的高度 */line-height: 50px;/* 去掉a标签的下划线 */text-decoration: none;/* 设置a标签的文字居中 */text-align: center;}/* 设置鼠标事件 */.container .navbar a:hover {background-color: green;}.container .navbar .login{float: right;}.container .question_list {padding-top: 50px;width: 800px;height: 600px;margin: 0px auto;/* background-color: #ccc; */text-align: center;}.container .question_list table {width: 100%;font-size: large;font-family:'Lucida Sans', 'Lucida Sans Regular', 'Lucida Grande', 'Lucida Sans Unicode', Geneva, Verdana, sans-serif;margin-top: 50px;background-color: #c6cbcc;}.container .question_list h1{color: green;}.container .question_list table .item{width: 100px;height: 40px;font-size: large;font-family:'Times New Roman', Times, serif;}.container .question_list table .item a{text-decoration: none;color:black;}.container .question_list table .item a:hover{color: blue;text-decoration: underline;}</style>
</head><body>
<div class="container"><div class="navbar"><!--导航栏--><div class="navbar"><a href="/">首页</a><a href="/all_questions">题库</a><a href="#">竞赛</a><a href="#">讨论</a><a href="#">求职</a><a class="login" href="#">登录</a></div></div><div class="question_list"><h1>Online_Judge题目列表</h1><table><tr><th class="item">编号</th><th class="item">标题</th><th class="item">难度</th></tr>{{#question_list}}<tr><td class="item">{{number}}</td><td class="item"><a href="/question/{{number}}">{{title}}</a></td><td class="item">{{star}}</td></tr>{{/question_list}}</table></div></div></body></html>
3. one_question.html
当用户获取单道题目所显示的网页
<!DOCTYPE html>
<html lang="en"><head><meta charset="UTF-8"><meta name="viewport"content="width=device-width, user-scalable=no, initial-scale=1.0, maximum-scale=1.0, minimum-scale=1.0"><meta http-equiv="X-UA-Compatible" content="ie=edge"><title>{{number}}.{{title}}</title><!-- 引入ACE CDN --><script src="https://cdnjs.cloudflare.com/ajax/libs/ace/1.2.6/ace.js" type="text/javascript"charset="utf-8"></script><!-- 引入语法 --><script src="https://cdnjs.cloudflare.com/ajax/libs/ace/1.2.6/ext-language_tools.js" type="text/javascript"charset="utf-8"></script><script src="http://code.jquery.com/jquery-2.1.1.min.js"></script><style>* {margin: 0;padding: 0;}html,body {width: 100%;height: 100%;}.container .navbar {width: 100%;height: 50px;background-color: black;/* 给父级标签overflow,取消后续float带来的影响 */overflow: hidden;}.container .navbar a {/* 设置a标签是行内块元素,允许你设置宽度*/display: inline-block;/* 设置a标签的宽度,默认a标签是行内元素,无法设置宽度*/width: 80px;/* 设置字体的颜色 */color: white;/* 设置字体的大小 */font-size: large;/* 设置文字的高度和导航栏一样的高度 */line-height: 50px;/* 去掉a标签的下划线 */text-decoration: none;/* 设置a标签的文字居中 */text-align: center;}/* 设置鼠标事件 */.container .navbar a:hover {background-color: green;}.container .navbar .login {float: right;}.container .part1 {width: 100%;height: 600px;overflow: hidden;}.container .part1 .left_desc {width: 50%;height: 600px;float: left;overflow: scroll;/* 添加滚动条*/}.container .part1 .left_desc h3 {padding-top: 10px;padding-left: 10px;}.container .part1 .left_desc pre {padding-top: 10px;padding-left: 10px;font-size: medium;font-family: 'Franklin Gothic Medium', 'Arial Narrow', Arial, sans-serif;}.container .part1 .right_code {width: 50%;float: right;}.container .part1 .right_code .ace_editor {height: 600px;}.container .part2 {width: 100%;overflow: hidden;}.container .part2 .result {width: 300px;float: left;}.container .part2 .btn-submit {width: 100px;height: 30px;margin-top: 1px;margin-right: 1px;font-size: large;float: right;background-color: #26bb9c;color: #FFF;border-radius: 1ch;/* 给按钮带圆角*/border: 0px;}.container .part2 button:hover {color: green;}.container .part2 .result{margin-top: 15px;margin-left: 15px;}.container .part2 .result pre{font-size: larger;}</style>
</head><body>
<div class="container"><div class="navbar"><a href="/">首页</a><a href="/all_questions">题库</a><a href="#">竞赛</a><a href="#">讨论</a><a href="#">求职</a><a class="login" href="#">登录</a></div><!-- 左右呈现,题目描述和预设代码 --><div class="part1"><div class="left_desc"><h3><span id="number">{{number}}</span>.{{title}}.{{star}}</h3><pre>{{desc}}</pre></div><div class="right_code"><pre id="code" class="ace_editor"><textarea class="ace_text-input">{{pre_code}}</textarea></pre></div></div><!-- 提交结果并显示 --><div class="part2"><div class="result"></div><button class="btn-submit" onclick="submit()">提交代码</button></div>
</div><script>//初始化对象editor = ace.edit("code");//设置风格和语言(更多风格和语言,请到github上相应目录查看)// 主题大全:http://www.manongjc.com/detail/25-cfpdrwkkivkikmk.htmleditor.setTheme("ace/theme/monokai");editor.session.setMode("ace/mode/c_cpp");// 字体大小editor.setFontSize(16);// 设置默认制表符的大小:editor.getSession().setTabSize(4);// 设置只读(true时只读,用于展示代码)editor.setReadOnly(false);// 启用提示菜单ace.require("ace/ext/language_tools");editor.setOptions({enableBasicAutocompletion: true,enableSnippets: true,enableLiveAutocompletion: true});function submit() {// 1. 收集当前页面的有关数据:1.题号 2.代码我们采用JQuery// console.log("哈哈!");var code = editor.getSession().getValue();//console.log(code);var number = $(".container .part1 .left_desc h3 #number").text();//console.log(number);var judge_url = "/judge/" + number;console.log(judge_url);// 2. 构建json,并向后台发起基于http的json请求$.ajax({method: 'Post',    //向后端发起请求的方式(post、get)url: judge_url,    //向后端指定的url发起请求dataType: 'json',  //告知server,我们需要什么格式contentType: 'application/json;charset=utf-8', //告知server我给你的是什么格式data: JSON.stringify({'code': code,'input': ''}),success: function (data) {//成功得到结果//console.log(data);show_result(data);}});// 3. 得到结果,解析并显示到result中function show_result(data) {// console.log(data.status);// console.log(data.reason);// 拿到result结果标签var result_div = $(".container .part2 .result");// 清空上一次的运行结果result_div.empty();// 首先拿到结果的状态码和原因结果var _status = data.status;var _reason = data.reason;var reson_lable = $("<p>",{text: _reason});reson_lable.appendTo(result_div);if (status == 0) {// 请求是成功的,编译运行没出问题,但是结果是否通过看测试用例的结果var _stdout = data.stdout;var _stderr = data.stderr;var reson_lable = $("<p>",{text: _reason});var stdout_lable = $("<pre>",{text: _stdout});var stderr_lable = $("<pre>",{text: _stderr});stdout_lable.appendTo(result_div);stderr_lable.appendTo(result_div);} else {}}}
</script>
</body></html>
七、项目总结
- 基于注册和登陆的录题功能
- 业务扩展,自己写一个论坛,接入到在线OJ中
- 即便是编译服务在其他机器上,也其实是不太安全的,可以将编译服务部署在docker
- 4. 目前后端compiler的服务我们使用的是http方式请求(仅仅是因为简单),但是也可以将我们的compiler服务,设计成为远程过程调用,推荐:rest_rpc,替换我们的httplib
- 功能上更完善一下,判断一道题目正确之后,自动下一道题目
- navbar中的功能可以一个一个的都实现一下
相关文章:
【项目设计】—— 负载均衡式在线OJ平台
目录 一、项目的相关背景 二、所用技术栈和开发环境 三、项目的宏观结构 四、compile_server模块设计 1. 编译服务(compiler模块) 2. 运行服务(runner模块) 3. 编译并运行服务(compile_run模块) 4…...
Docker学习笔记
1:docker安装步骤Linux 2:docker安装步骤Windows 3:docker官方文档 4:docker官方远程仓库 docker常用命令 1: docker images----查看docker中安装的镜像 2: docker pull nginx------在docker中安装Nginx镜…...

【爬虫理论实战】详解常见头部反爬技巧与验证方式 | 有 Python 代码实现
以下是常见头部反爬技巧与验证方式的大纲: User-Agent 字段的伪装方式,Referer 字段的伪装方式,Cookie 字段的伪装方式。 文章目录1. ⛳️ 头部反爬技巧1.1. User-Agent 字段&User-Agent 的作用1.2. 常见 User-Agent 的特征1.3. User-Age…...
基于SpringBoot+Vue的鲜花商场管理系统
【辰兮要努力】:hello你好我是辰兮,很高兴你能来阅读,昵称是希望自己能不断精进,向着优秀程序员前行! 博客来源于项目以及编程中遇到的问题总结,偶尔会有读书分享,我会陆续更新Java前端、后台、…...
)
华为OD机试 - 静态扫描最优成本(JS)
静态扫描最优成本 题目 静态扫描快速识别源代码的缺陷,静态扫描的结果以扫描报告作为输出: 文件扫描的成本和文件大小相关,如果文件大小为 N ,则扫描成本为 N 个金币扫描报告的缓存成本和文件大小无关,每缓存一个报告需要 M 个金币扫描报告缓存后,后继再碰到该文件则不…...
多层感知机
多层感知机理论部分 本文系统的讲解多层感知机的pytorch复现,以及详细的代码解释。 部分文字和代码来自《动手学深度学习》!! 目录多层感知机理论部分隐藏层多层感知机数学逻辑激活函数1. ReLU函数2. sigmoid函数3. tanh函数多层感知机的从零…...

python在windows调用svn-pysvn
作为EBS开发人员,开发工具用的多,部署代码类型多,管理程序麻烦,操作繁琐,一直是我最讨厌的事情。部署一次程序要使用好几个工具,改来改去,上传下载,实在难受。 扣了一下python&#…...
office365 word 另存为 pdf 的注意事项和典型设置
0. 操作环境介绍 Office 版本:Office 365 版本 不同版本的操作可能有所不同 1. 基本操作 – 另存为 pdf 【文件】 --> 【另存为】,选择适当的文件路径、文件名保存类型选择【PDF】点击【保存】 1. 导出的pdf包含目录标签 word中,可使用…...
Spring IoC容器之常见常用注解以及注解编程模型简介
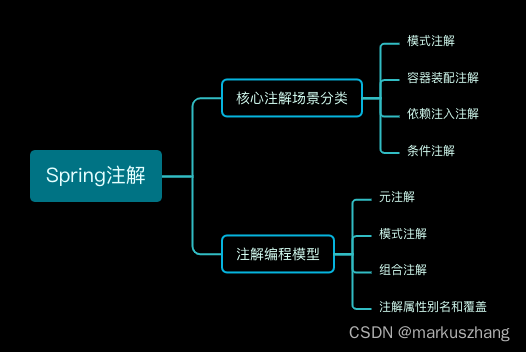
一、全文概览 本篇文章主要学习记录Spring中的核心注解,罗列常见常用的注解以及Spring中的注解编程模型介绍 二、核心注解 1、Spring模式注解 常用注解场景描述Spring起始支持版本Component通用组件模式注解,是所有组件类型注解的元注解Spring 2.5Repo…...

超详细讲解文件函数
超详细讲解文件函数!!!!字符输入/输出函数fgetcfputc文本行输入/输出函数fgetsfputs格式化输入/输出函数fscanffprintf二进制输入/输出函数freadfwrite打开/关闭文件函数fopenfclose字符输入/输出函数 fgetc fgetc函数可以从指定…...

【挣值分析】
名称解释 拼写解释PV计划费用,预估预算EV挣值,实际预估预算AC实际费用,实际花费CV成本偏差 (EV - AC)SV进度偏差(EV - PV)CPI成本绩效指数 (EV / AC)SPI进度绩效指数 &a…...

Python3-基础语法
Python3 基础语法 编码 默认情况下,Python 3 源码文件以 UTF-8 编码,所有字符串都是 unicode 字符串。 当然你也可以为源码文件指定不同的编码: # -*- coding: cp-1252 -*-上述定义允许在源文件中使用 Windows-1252 字符集中的字符编码&…...

【计算机网络】数据链路层(下)
文章目录媒体接入控制媒体接入控制-静态划分信道随机接入 CSMACD协议随机接入 CSMACA协议MAC地址MAC地址作用MAC地址格式MAC地址种类MAC地址的发送顺序单播MAC地址广播MAC地址多播MAC地址随机MAC地址IP地址区分网络编号IP地址与MAC地址的封装位置转发过程中IP地址与MAC地址的变…...

系统分析师考试大纲
系统分析师考试大纲 1.考试目标 通过本考试的合格人员应熟悉应用领域的业务,能分析用户的需求和约束条件,写出信息系统需求规格说明书,制订项目开发计划,协调信息系统开发与运行所涉及的各类人员;能指导制…...

2023上半年软考报名时间已定,你准备好了吗?
港城软考公众号于2023年2月17日发布了2023年度计算机软考工作计划,从该计划内容得知,2023年计算机软考上半年报名3月13日开始,请相关报考人员提前做好报名准备工作。 其他各省市还暂未公布2023上半年软考报名时间,每年都有很多…...
DPDK — Userspace PMD 源码分析
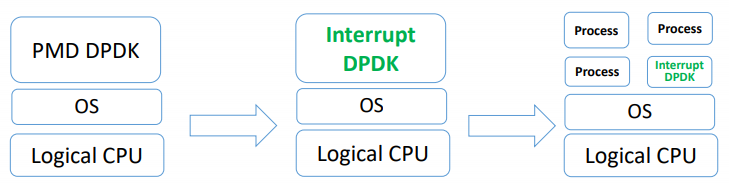
目录 文章目录目录PMD driver 通过 IGB_UIO 与 UIO 进行交互注册一个 UIO 设备PMD 的应用层实现PMD 同样支持中断处理方式PMD driver 通过 IGB_UIO 与 UIO 进行交互 IGB_UIO 内核模块的另一个主要功能就是让用于态的 PMD 网卡驱动程序得以与 UIO 进行交互。对于 PMD 的实现来说…...
javase基础学习(终)
9、网络通信协议 /* InetAddress类的常用方法 1、getLocalHost()public static InetAddress getLocalHost() throws UnknownHostException返回本地主机的地址。 这是通过从系统检索主机的名称,然后将该名称解析为InetAddress 。2、getByName()public static InetAd…...

Scala
1、Scala语言有什么特点?什么是函数式编程?有什么优点? 1、scala语⾔集成⾯向对象和函数式编程 2、函数式编程是⼀种典范,将电脑的运算视作是函数的运算 3、与过程化编程相⽐,函数式编程⾥的函数计算可以随时调⽤&…...

《数据分析方法论和业务实战》读书笔记
《数据分析方法和业务实战》读书笔记 共9章:前两章入门,3-7章介绍基本方法,8章从项目实战介绍数据分析,9章答疑常见问题。 1 数据分析基础 数据分析的完整流程 数据-》信息-〉了解现状-》发现原因-〉获取洞察-》问题机会-〉驱动…...
)
华为OD机试 - 射击比赛(Python)
射击比赛 题目 给定一个射击比赛成绩单 包含多个选手若干次射击的成绩分数 请对每个选手按其最高三个分数之和进行降序排名 输出降序排名后的选手 ID 序列 条件如下: 一个选手可以有多个射击成绩的分数 且次序不固定如果一个选手成绩小于三个 则认为选手的所有成绩无效 排名忽…...
树莓派超全系列教程文档--(61)树莓派摄像头高级使用方法
树莓派摄像头高级使用方法 配置通过调谐文件来调整相机行为 使用多个摄像头安装 libcam 和 rpicam-apps依赖关系开发包 文章来源: http://raspberry.dns8844.cn/documentation 原文网址 配置 大多数用例自动工作,无需更改相机配置。但是,一…...

MySQL 隔离级别:脏读、幻读及不可重复读的原理与示例
一、MySQL 隔离级别 MySQL 提供了四种隔离级别,用于控制事务之间的并发访问以及数据的可见性,不同隔离级别对脏读、幻读、不可重复读这几种并发数据问题有着不同的处理方式,具体如下: 隔离级别脏读不可重复读幻读性能特点及锁机制读未提交(READ UNCOMMITTED)允许出现允许…...

STM32F4基本定时器使用和原理详解
STM32F4基本定时器使用和原理详解 前言如何确定定时器挂载在哪条时钟线上配置及使用方法参数配置PrescalerCounter ModeCounter Periodauto-reload preloadTrigger Event Selection 中断配置生成的代码及使用方法初始化代码基本定时器触发DCA或者ADC的代码讲解中断代码定时启动…...

C++ 求圆面积的程序(Program to find area of a circle)
给定半径r,求圆的面积。圆的面积应精确到小数点后5位。 例子: 输入:r 5 输出:78.53982 解释:由于面积 PI * r * r 3.14159265358979323846 * 5 * 5 78.53982,因为我们只保留小数点后 5 位数字。 输…...
Android 之 kotlin 语言学习笔记三(Kotlin-Java 互操作)
参考官方文档:https://developer.android.google.cn/kotlin/interop?hlzh-cn 一、Java(供 Kotlin 使用) 1、不得使用硬关键字 不要使用 Kotlin 的任何硬关键字作为方法的名称 或字段。允许使用 Kotlin 的软关键字、修饰符关键字和特殊标识…...
处理vxe-table 表尾数据是单独一个接口,表格tableData数据更新后,需要点击两下,表尾才是正确的
修改bug思路: 分别把 tabledata 和 表尾相关数据 console.log() 发现 更新数据先后顺序不对 settimeout延迟查询表格接口 ——测试可行 升级↑:async await 等接口返回后再开始下一个接口查询 ________________________________________________________…...

RabbitMQ入门4.1.0版本(基于java、SpringBoot操作)
RabbitMQ 一、RabbitMQ概述 RabbitMQ RabbitMQ最初由LShift和CohesiveFT于2007年开发,后来由Pivotal Software Inc.(现为VMware子公司)接管。RabbitMQ 是一个开源的消息代理和队列服务器,用 Erlang 语言编写。广泛应用于各种分布…...
三分算法与DeepSeek辅助证明是单峰函数
前置 单峰函数有唯一的最大值,最大值左侧的数值严格单调递增,最大值右侧的数值严格单调递减。 单谷函数有唯一的最小值,最小值左侧的数值严格单调递减,最小值右侧的数值严格单调递增。 三分的本质 三分和二分一样都是通过不断缩…...

多模态图像修复系统:基于深度学习的图片修复实现
多模态图像修复系统:基于深度学习的图片修复实现 1. 系统概述 本系统使用多模态大模型(Stable Diffusion Inpainting)实现图像修复功能,结合文本描述和图片输入,对指定区域进行内容修复。系统包含完整的数据处理、模型训练、推理部署流程。 import torch import numpy …...
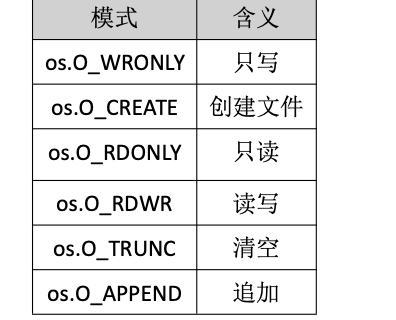
Golang——9、反射和文件操作
反射和文件操作 1、反射1.1、reflect.TypeOf()获取任意值的类型对象1.2、reflect.ValueOf()1.3、结构体反射 2、文件操作2.1、os.Open()打开文件2.2、方式一:使用Read()读取文件2.3、方式二:bufio读取文件2.4、方式三:os.ReadFile读取2.5、写…...