使用自定义 C ++类扩展 TorchScript
使用自定义 C ++类扩展 TorchScript
本教程是自定义运算符教程的后续教程,并介绍了我们为将 C ++类同时绑定到 TorchScript 和 Python 而构建的 API。 该 API 与 pybind11 非常相似,如果您熟悉该系统,则大多数概念都将转移过来。
在 C ++中实现和绑定类
在本教程中,我们将定义一个简单的 C ++类,该类在成员变量中保持持久状态。
// This header is all you need to do the C++ portions of this
// tutorial
#include <torch/script.h>
// This header is what defines the custom class registration
// behavior specifically. script.h already includes this, but
// we include it here so you know it exists in case you want
// to look at the API or implementation.
#include <torch/custom_class.h>#include <string>
#include <vector>template <class T>
struct Stack : torch::jit::CustomClassHolder {std::vector<T> stack_;Stack(std::vector<T> init) : stack_(init.begin(), init.end()) {}void push(T x) {stack_.push_back(x);}T pop() {auto val = stack_.back();stack_.pop_back();return val;}c10::intrusive_ptr<Stack> clone() const {return c10::make_intrusive<Stack>(stack_);}void merge(const c10::intrusive_ptr<Stack>& c) {for (auto& elem : c->stack_) {push(elem);}}
};
有几件事要注意:
torch/custom_class.h是您需要使用自定义类扩展 TorchScript 的标头。- 注意,无论何时使用自定义类的实例,我们都通过
c10::intrusive_ptr<>的实例来实现。 将intrusive_ptr视为类似于std::shared_ptr的智能指针。 使用此智能指针的原因是为了确保在语言(C ++,Python 和 TorchScript)之间对对象实例进行一致的生命周期管理。 - 注意的第二件事是用户定义的类必须继承自
torch::jit::CustomClassHolder。 这确保了所有设置都可以处理前面提到的生命周期管理系统。
现在让我们看一下如何使该类对 TorchScript 可见,该过程称为_绑定_该类:
// Notice a few things:
// - We pass the class to be registered as a template parameter to
//   `torch::jit::class_`. In this instance, we've passed the
//   specialization of the Stack class ``Stack<std::string>``.
//   In general, you cannot register a non-specialized template
//   class. For non-templated classes, you can just pass the
//   class name directly as the template parameter.
// - The single parameter to ``torch::jit::class_()`` is a
//   string indicating the name of the class. This is the name
//   the class will appear as in both Python and TorchScript.
//   For example, our Stack class would appear as ``torch.classes.Stack``.
static auto testStack =torch::jit::class_<Stack<std::string>>("Stack")// The following line registers the contructor of our Stack// class that takes a single `std::vector<std::string>` argument,// i.e. it exposes the C++ method `Stack(std::vector<T> init)`.// Currently, we do not support registering overloaded// constructors, so for now you can only `def()` one instance of// `torch::jit::init`..def(torch::jit::init<std::vector<std::string>>())// The next line registers a stateless (i.e. no captures) C++ lambda// function as a method. Note that a lambda function must take a// `c10::intrusive_ptr<YourClass>` (or some const/ref version of that)// as the first argument. Other arguments can be whatever you want..def("top", [](const c10::intrusive_ptr<Stack<std::string>>& self) {return self->stack_.back();})// The following four lines expose methods of the Stack<std::string>// class as-is. `torch::jit::class_` will automatically examine the// argument and return types of the passed-in method pointers and// expose these to Python and TorchScript accordingly. Finally, notice// that we must take the *address* of the fully-qualified method name,// i.e. use the unary `&` operator, due to C++ typing rules..def("push", &Stack<std::string>::push).def("pop", &Stack<std::string>::pop).def("clone", &Stack<std::string>::clone).def("merge", &Stack<std::string>::merge);
使用 CMake 将示例构建为 C ++项目
现在,我们将使用 CMake 构建系统来构建上述 C ++代码。 首先,将到目前为止介绍的所有 C ++代码放入class.cpp文件中。 然后,编写一个简单的CMakeLists.txt文件并将其放置在同一目录中。 CMakeLists.txt的外观如下:
cmake_minimum_required(VERSION 3.1 FATAL_ERROR)
project(custom_class)find_package(Torch REQUIRED)# Define our library target
add_library(custom_class SHARED class.cpp)
set(CMAKE_CXX_STANDARD 14)
# Link against LibTorch
target_link_libraries(custom_class "${TORCH_LIBRARIES}")另外,创建一个build目录。 您的文件树应如下所示:
custom_class_project/class.cppCMakeLists.txtbuild/现在,要构建项目,请继续从 PyTorch 网站下载适当的 libtorch 二进制文件。 将 zip 存档解压缩到某个位置(在项目目录中可能很方便),并记下将其解压缩到的路径。 接下来,继续调用 cmake,然后进行构建项目:
$ cd build
$ cmake -DCMAKE_PREFIX_PATH=/path/to/libtorch ..-- The C compiler identification is GNU 7.3.1-- The CXX compiler identification is GNU 7.3.1-- Check for working C compiler: /opt/rh/devtoolset-7/root/usr/bin/cc-- Check for working C compiler: /opt/rh/devtoolset-7/root/usr/bin/cc -- works-- Detecting C compiler ABI info-- Detecting C compiler ABI info - done-- Detecting C compile features-- Detecting C compile features - done-- Check for working CXX compiler: /opt/rh/devtoolset-7/root/usr/bin/c++-- Check for working CXX compiler: /opt/rh/devtoolset-7/root/usr/bin/c++ -- works-- Detecting CXX compiler ABI info-- Detecting CXX compiler ABI info - done-- Detecting CXX compile features-- Detecting CXX compile features - done-- Looking for pthread.h-- Looking for pthread.h - found-- Looking for pthread_create-- Looking for pthread_create - not found-- Looking for pthread_create in pthreads-- Looking for pthread_create in pthreads - not found-- Looking for pthread_create in pthread-- Looking for pthread_create in pthread - found-- Found Threads: TRUE-- Found torch: /torchbind_tutorial/libtorch/lib/libtorch.so-- Configuring done-- Generating done-- Build files have been written to: /torchbind_tutorial/build
$ make -jScanning dependencies of target custom_class[ 50%] Building CXX object CMakeFiles/custom_class.dir/class.cpp.o[100%] Linking CXX shared library libcustom_class.so[100%] Built target custom_class
您会发现,构建目录中现在有一个动态库文件。 在 Linux 上,它可能名为libcustom_class.so。 因此,文件树应如下所示:
custom_class_project/class.cppCMakeLists.txtbuild/libcustom_class.so从 Python 和 TorchScript 使用 C ++类
现在我们已经将我们的类及其注册编译为.so文件,我们可以将 <cite>.so</cite> 加载到 Python 中并进行尝试。 这是一个演示脚本的脚本:
import torch# `torch.classes.load_library()` allows you to pass the path to your .so file
# to load it in and make the custom C++ classes available to both Python and
# TorchScript
torch.classes.load_library("libcustom_class.so")
# You can query the loaded libraries like this:
print(torch.classes.loaded_libraries)
# prints {'/custom_class_project/build/libcustom_class.so'}# We can find and instantiate our custom C++ class in python by using the
# `torch.classes` namespace:
#
# This instantiation will invoke the Stack(std::vector<T> init) constructor
# we registered earlier
s = torch.classes.Stack(["foo", "bar"])# We can call methods in Python
s.push("pushed")
assert s.pop() == "pushed"# Returning and passing instances of custom classes works as you'd expect
s2 = s.clone()
s.merge(s2)
for expected in ["bar", "foo", "bar", "foo"]:assert s.pop() == expected# We can also use the class in TorchScript
# For now, we need to assign the class's type to a local in order to
# annotate the type on the TorchScript function. This may change
# in the future.
Stack = torch.classes.Stack@torch.jit.script
def do_stacks(s : Stack): # We can pass a custom class instance to TorchScripts2 = torch.classes.Stack(["hi", "mom"]) # We can instantiate the classs2.merge(s) # We can call a method on the classreturn s2.clone(), s2.top()  # We can also return instances of the class# from TorchScript function/methodsstack, top = do_stacks(torch.classes.Stack(["wow"]))
assert top == "wow"
for expected in ["wow", "mom", "hi"]:assert stack.pop() == expected
使用自定义类保存,加载和运行 TorchScript 代码
我们也可以在使用 libtorch 的 C ++进程中使用自定义注册的 C ++类。 举例来说,让我们定义一个简单的nn.Module,该实例在我们的 Stack 类上实例化并调用一个方法:
import torchtorch.classes.load_library('libcustom_class.so')class Foo(torch.nn.Module):def __init__(self):super().__init__()def forward(self, s : str) -> str:stack = torch.classes.Stack(["hi", "mom"])return stack.pop() + sscripted_foo = torch.jit.script(Foo())
print(scripted_foo.graph)scripted_foo.save('foo.pt')我们文件系统中的foo.pt现在包含我们刚刚定义的序列化 TorchScript 程序。
现在,我们将定义一个新的 CMake 项目,以展示如何加载此模型及其所需的.so 文件。 有关如何执行此操作的完整说明,请查看在 C ++教程中加载 TorchScript 模型。
与之前类似,让我们创建一个包含以下内容的文件结构:
cpp_inference_example/infer.cppCMakeLists.txtfoo.ptbuild/custom_class_project/class.cppCMakeLists.txtbuild/请注意,我们已经复制了序列化的foo.pt文件以及上面custom_class_project的源代码树。 我们将添加custom_class_project作为对此 C ++项目的依赖项,以便我们可以将自定义类构建到二进制文件中。
让我们用以下内容填充infer.cpp:
#include <torch/script.h>#include <iostream>
#include <memory>int main(int argc, const char* argv[]) {torch::jit::script::Module module;try {// Deserialize the ScriptModule from a file using torch::jit::load().module = torch::jit::load("foo.pt");}catch (const c10::Error& e) {std::cerr << "error loading the model\n";return -1;}std::vector<c10::IValue> inputs = {"foobarbaz"};auto output = module.forward(inputs).toString();std::cout << output->string() << std::endl;
}同样,让我们定义我们的 CMakeLists.txt 文件:
cmake_minimum_required(VERSION 3.1 FATAL_ERROR)
project(infer)find_package(Torch REQUIRED)add_subdirectory(custom_class_project)# Define our library target
add_executable(infer infer.cpp)
set(CMAKE_CXX_STANDARD 14)
# Link against LibTorch
target_link_libraries(infer "${TORCH_LIBRARIES}")
# This is where we link in our libcustom_class code, making our
# custom class available in our binary.
target_link_libraries(infer -Wl,--no-as-needed custom_class)您知道练习:cd build,cmake和make:
$ cd build
$ cmake -DCMAKE_PREFIX_PATH=/path/to/libtorch ..-- The C compiler identification is GNU 7.3.1-- The CXX compiler identification is GNU 7.3.1-- Check for working C compiler: /opt/rh/devtoolset-7/root/usr/bin/cc-- Check for working C compiler: /opt/rh/devtoolset-7/root/usr/bin/cc -- works-- Detecting C compiler ABI info-- Detecting C compiler ABI info - done-- Detecting C compile features-- Detecting C compile features - done-- Check for working CXX compiler: /opt/rh/devtoolset-7/root/usr/bin/c++-- Check for working CXX compiler: /opt/rh/devtoolset-7/root/usr/bin/c++ -- works-- Detecting CXX compiler ABI info-- Detecting CXX compiler ABI info - done-- Detecting CXX compile features-- Detecting CXX compile features - done-- Looking for pthread.h-- Looking for pthread.h - found-- Looking for pthread_create-- Looking for pthread_create - not found-- Looking for pthread_create in pthreads-- Looking for pthread_create in pthreads - not found-- Looking for pthread_create in pthread-- Looking for pthread_create in pthread - found-- Found Threads: TRUE-- Found torch: /local/miniconda3/lib/python3.7/site-packages/torch/lib/libtorch.so-- Configuring done-- Generating done-- Build files have been written to: /cpp_inference_example/build
$ make -jScanning dependencies of target custom_class[ 25%] Building CXX object custom_class_project/CMakeFiles/custom_class.dir/class.cpp.o[ 50%] Linking CXX shared library libcustom_class.so[ 50%] Built target custom_classScanning dependencies of target infer[ 75%] Building CXX object CMakeFiles/infer.dir/infer.cpp.o[100%] Linking CXX executable infer[100%] Built target infer
现在我们可以运行令人兴奋的 C ++二进制文件:
$ ./infermomfoobarbaz难以置信!
定义自定义 C ++类的序列化/反序列化方法
如果您尝试将具有自定义绑定 C ++类的ScriptModule保存为属性,则会出现以下错误:
# export_attr.py
import torchtorch.classes.load_library('libcustom_class.so')class Foo(torch.nn.Module):def __init__(self):super().__init__()self.stack = torch.classes.Stack(["just", "testing"])def forward(self, s : str) -> str:return self.stack.pop() + sscripted_foo = torch.jit.script(Foo())scripted_foo.save('foo.pt')
$ python export_attr.py
RuntimeError: Cannot serialize custom bound C++ class __torch__.torch.classes.Stack. Please define serialization methods via torch::jit::pickle_ for this class. (pushIValueImpl at ../torch/csrc/jit/pickler.cpp:128)这是因为 TorchScript 无法自动找出 C ++类中保存的信息。 您必须手动指定。 这样做的方法是使用class_上的特殊def_pickle方法在类上定义__getstate__和__setstate__方法。
注意
TorchScript 中__getstate__和__setstate__的语义与 Python pickle 模块的语义相同。 您可以有关如何使用这些方法的信息。
这是一个如何更新Stack类的注册码以包含序列化方法的示例:
static auto testStack =torch::jit::class_<Stack<std::string>>("Stack").def(torch::jit::init<std::vector<std::string>>()).def("top", [](const c10::intrusive_ptr<Stack<std::string>>& self) {return self->stack_.back();}).def("push", &Stack<std::string>::push).def("pop", &Stack<std::string>::pop).def("clone", &Stack<std::string>::clone).def("merge", &Stack<std::string>::merge)// class_<>::def_pickle allows you to define the serialization// and deserialization methods for your C++ class.// Currently, we only support passing stateless lambda functions// as arguments to def_pickle.def_pickle(// __getstate__// This function defines what data structure should be produced// when we serialize an instance of this class. The function// must take a single `self` argument, which is an intrusive_ptr// to the instance of the object. The function can return// any type that is supported as a return value of the TorchScript// custom operator API. In this instance, we've chosen to return// a std::vector<std::string> as the salient data to preserve// from the class.[](const c10::intrusive_ptr<Stack<std::string>>& self)-> std::vector<std::string> {return self->stack_;},// __setstate__// This function defines how to create a new instance of the C++// class when we are deserializing. The function must take a// single argument of the same type as the return value of// `__getstate__`. The function must return an intrusive_ptr// to a new instance of the C++ class, initialized however// you would like given the serialized state.[](std::vector<std::string> state)-> c10::intrusive_ptr<Stack<std::string>> {// A convenient way to instantiate an object and get an// intrusive_ptr to it is via `make_intrusive`. We use// that here to allocate an instance of Stack<std::string>// and call the single-argument std::vector<std::string>// constructor with the serialized state.return c10::make_intrusive<Stack<std::string>>(std::move(state));});Note
我们采用与 pickle API 中的 pybind11 不同的方法。 pybind11 作为传递给class_::def()的特殊功能pybind11::pickle(),为此我们有一个单独的方法def_pickle。 这是因为名称torch::jit::pickle已经被使用,我们不想引起混淆。
以这种方式定义(反)序列化行为后,脚本现在可以成功运行:
import torchtorch.classes.load_library('libcustom_class.so')class Foo(torch.nn.Module):def __init__(self):super().__init__()self.stack = torch.classes.Stack(["just", "testing"])def forward(self, s : str) -> str:return self.stack.pop() + sscripted_foo = torch.jit.script(Foo())scripted_foo.save('foo.pt')
loaded = torch.jit.load('foo.pt')print(loaded.stack.pop())
$ python ../export_attr.py
testing结论
本教程向您介绍了如何向 TorchScript(以及扩展为 Python)公开 C ++类,如何注册其方法,如何从 Python 和 TorchScript 使用该类以及如何使用该类保存和加载代码以及运行该代码。 在独立的 C ++过程中。 现在,您可以使用与第三方 C ++库接口的 C ++类扩展 TorchScript 模型,或实现需要 Python,TorchScript 和 C ++之间的界线才能平滑融合的任何其他用例。
与往常一样,如果您遇到任何问题或疑问,可以使用我们的论坛或 GitHub 问题进行联系。 另外,我们的常见问题解答(FAQ)页面可能包含有用的信息。
相关文章:

使用自定义 C ++类扩展 TorchScript
使用自定义 C 类扩展 TorchScript 本教程是自定义运算符教程的后续教程,并介绍了我们为将 C 类同时绑定到 TorchScript 和 Python 而构建的 API。 该 API 与 pybind11 非常相似,如果您熟悉该系统,则大多数概念都将转移过来。 在 C 中实现和…...

UITableView自定义TableHeader和TableFooter
UITableView自定义TableHeader和TableFooter 我猜你希望的效果是这样的 我猜你希望的效果是这样的 自定义页眉视图 让我们创建一个文件名 UITableViewHeaderFooterView 的 CustomerHeaderView 子类。 现在让我们创建视图的 Xib 文件并将其命名为 CustomHeaderView。 更改高度标…...
【TA 挖坑03】雾效 | 透光材质 | Impostor | 厚度转球谐
仍旧是记录下半年想要做的东西,很有趣,实现“一团雾效” “面片也有立体感” 等等效果的一些技术上的方法。 仅粗浅记录,保证之后自己填坑的时候看得懂就行! 透光 -> 透光材质ShadingModel 《永劫无间》透光材质的渲染&…...
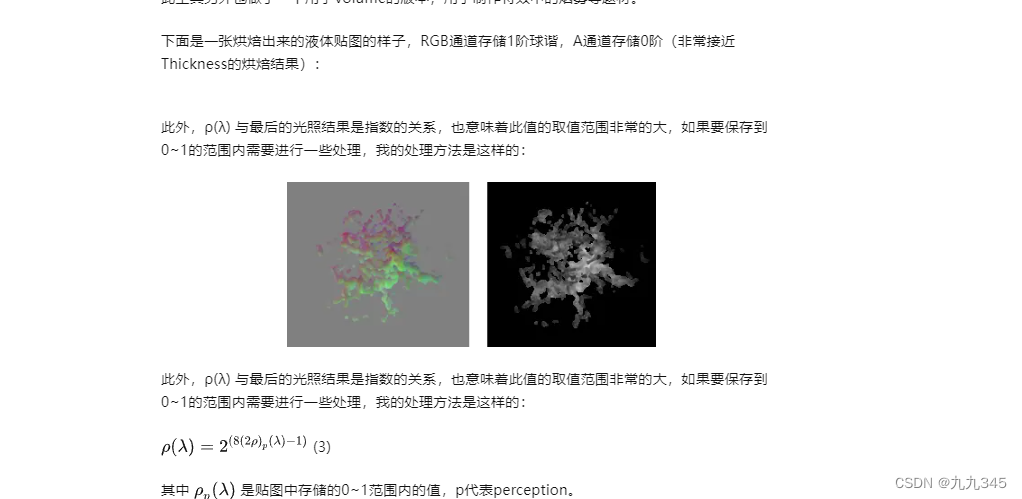
案例-基于MVC和三层架构实现商品表的增删改查
文章目录 0. 项目介绍1. 环境准备2. 查看所有2.1 编写BrandMapper接口2.2 编写服务类,创建BrandService,用于调用该方法2.5 编写Servlet2.4 编写brand.jsp页面2.5 测试 3.添加3.1 编写BrandMapper接口 添加方法3.2 编写服务3.3 改写Brand.jsp页面&#x…...
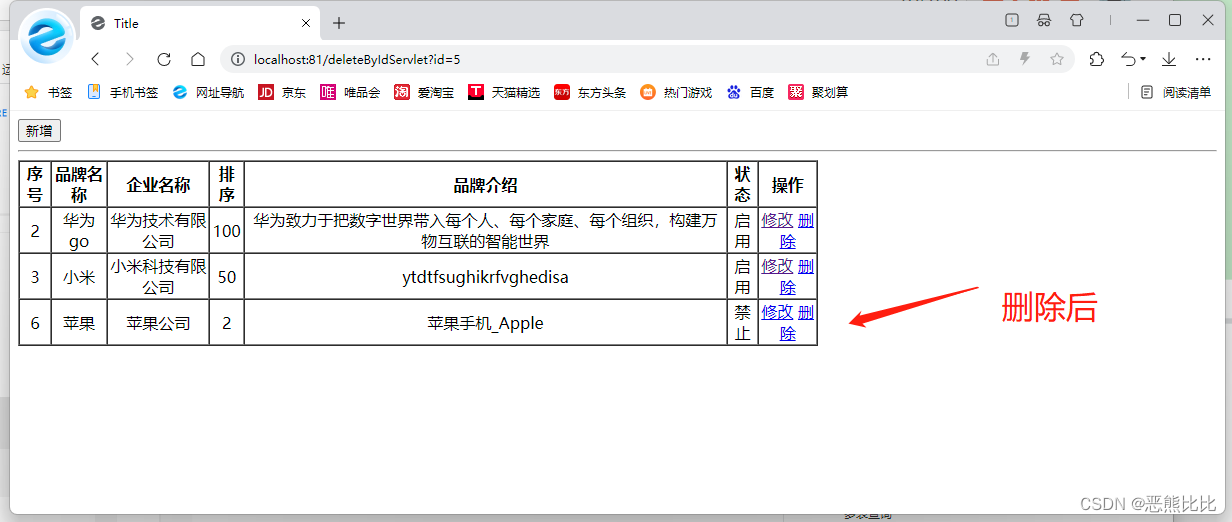
Java——一个简单的计算器程序
该代码是一个简单的计算器程序,使用了Java的图形化界面库Swing。具体分析如下: 导入必要的类和包: import java.awt.*; import java.awt.event.ActionEvent; import java.awt.event.ActionListener; import java.util.Objects; import javax.…...

自定义滑动到底部触发指令,elementUI实现分页下拉框
在 main.js 中添加 // 自定义滑动到底部指令 Vue.directive(selectLoadMore, {bind(el, binding) {// 获取element-ui定义好的scroll盒子const SELECTWRAP_DOM el.querySelector(.el-select-dropdown .el-select-dropdown__wrap)SELECTWRAP_DOM.addEventListener(scroll, fun…...
【Windows 常用工具系列 10 -- linux ssh登录脚本输入密码】
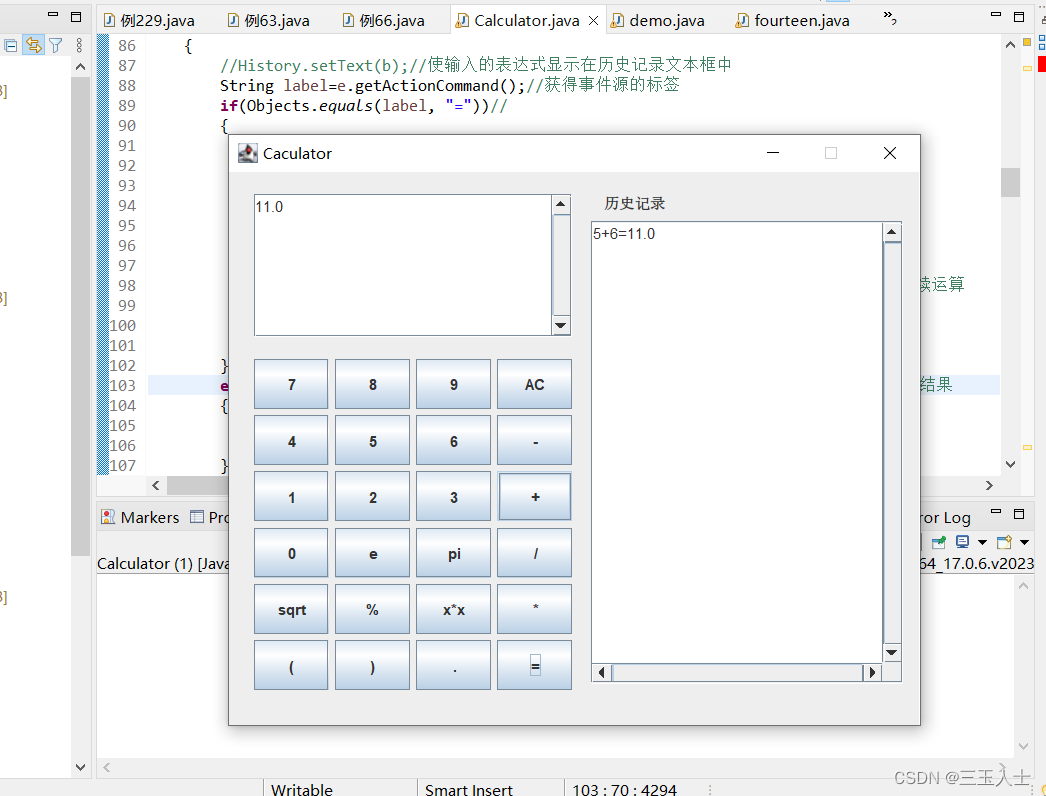
文章目录 脚本输入SSH登录密码scp 脚本免密传输 脚本输入SSH登录密码 sshpass 是一个用于运行时非交互式ssh密码提供的工具,它允许你直接在命令行中为ssh命令提供密码。这就意味着你可以在脚本中使用ssh命令,而不需要用户交互地输入密码。 一般来说&am…...

C#的索引器
索引器 在 C# 中,索引器(Indexer)是一种特殊的属性,允许通过类的实例像访问数组一样访问对象的元素。索引器允许将类的实例作为集合来使用,可以按照自定义的方式访问类中的元素。 索引器的定义类似于属性,…...
软件配置安装(破解)--- maven下载配置
检查环境是否已有 首先检查一下电脑里有无maven环境,有的话就不用安装了 查看path环境中没有maven,开始准备接下来的重头戏 下载maven 下载bin.zip版 解压mavenxxxbin.zip (建议把解压的文件放在一个文件夹内,命名英文的env…...
python解析小说
前言 在信息爆炸的时代,网络上充斥着大量的小说资源,让人们能够随时随地尽享阅读的乐趣。然而,有些小说网站要求用户付费才能获取完整的内容,这给许多人带来了困扰,尤其是像我这类对金钱概念模糊的人。不过࿰…...

SQL Server 执行报错: “minus“ 附近有语法错误。
sql server 执行带 minus 的语句一直报错,如下图: 找了好久才知道minus是Oracle里面的语法,SQL server 应用 EXCEPT。...

kali linux查看局域网下所有IP,并对指定IP攻击
kali linux查看局域网下所有IP,并对指定IP实施局域网内攻击 首先我们打开我们熟悉的kali linux操作系统,利用指令: ifconfig来确认本机的ip地址 确认了本机的ip地址之后,利用一下的指令查看局域网下所有ip: fping -g 本机IP地址…...
基于QCC_BES 平台的LMS自适应滤波算法实现
+我V hezkz17进数字音频系统研究开发交流答疑群(课题组) LMS算法是最小均方(Least Mean Square)算法的缩写。它是一种自适应滤波算法,常用于信号处理、系统辨识和自适应滤波等领域。 LMS算法的目标是通过对输入信号和期望输出信号之间的误差进行最小化,来调整滤波器的权重…...

大疆飞卡30运载无人机技术分享
大疆飞卡30是大疆公司面向运输领域推出的一款专业运载无人机。它采用了优秀的设计,装备了多种先进传感器,以解决运输中的难题。以下我们来了解一下其主要特点: 【应用领域】 飞卡30适用于山地救灾、农业化肥施用、工程材料运送等交通不便的山区应用,也适用于海岛联通等运输链…...

单片机的串口通信
今天,完整地总结一下普中科技的单片机的串口通信的硬件与编程,记录一下以后如果需要也比较方便捡起来。 单片机的串口部分的电路图。开发板上集成了 1 个串口通信电路,是 USB 转串口模块,它既可下载程序也可实现串口通信功能。 对…...

【C/C++】STL学习所得
文章目录 STL 框架核心组成部分STL 序列容器分类STL 容器适配器分类STL 迭代器分类STL 中一些易混淆知识点一些重要的简述 STL 框架核心组成部分 算法容器迭代器适配器空间配置器访函数 STL 序列容器分类 vectorqueuelistarrayforward_list STL 容器适配器分类 stack 栈qu…...

leetcode几个数组题
数组理论基础 数组是存放在连续内存空间上的相同类型数据的集合 因为数组的在内存空间的地址是连续的,所以我们在删除或者增添元素的时候,就难免要移动其他元素的地址 二分查找 移除元素 有序数组的平方 209.长度最小的子数组...
【LeetCode】模拟实现FILE以及认识缓冲区
模拟实现FILE以及认识缓冲区 刷新缓冲逻辑图自定义实现如何强制刷新内核缓冲区例子 刷新缓冲逻辑图 自定义实现 mystdio.h #pragma once #include <stdio.h>#define NUM 1024 #define BUFF_NOME 0x1 #define BUFF_LINE 0x2 #define BUFF_ALL 0x4typedef struct _MY_FIL…...
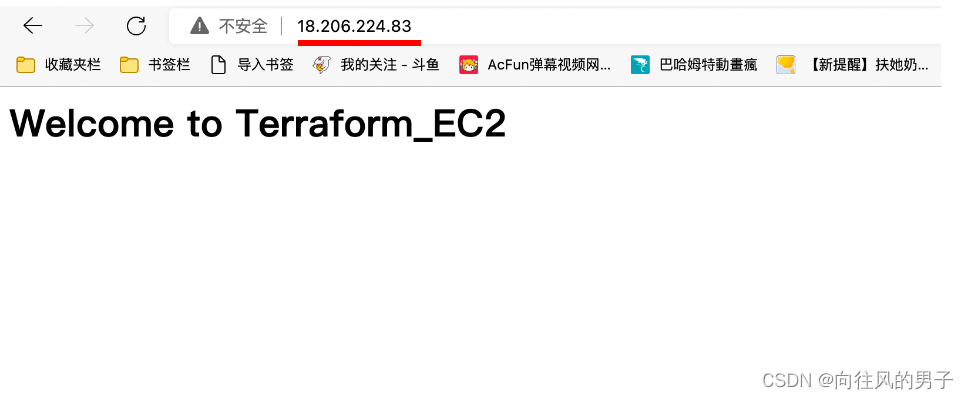
【Terraform学习】使用 Terraform 将 EC2 实例作为 Web 服务器启动(Terraform-AWS最佳实战学习)
使用 Terraform 将 EC2 实例作为 Web 服务器启动 实验步骤 前提条件 安装 Terraform: 地址 下载仓库代码模版 本实验代码位于 task_ec2 文件夹中。 变量文件 variables.tf 在上面的代码中,您将声明,aws_access_key,aws_secr…...

WebGL 变量uniform、gl.getUniformLocation、gl.uniform4f及其同族函数相关
目录 uniform变量命名规范 获取 uniform 变量的存储地址 gl.getUniformLocation 向uniform变量赋值 gl.uniform4f 编辑 gl.uniform4f()的同族函数 demo:点击webgl坐标系的四个象限绘制各自不同颜色的点 uniform变量命名规范 var FSHADER_SOURCE uniform vec4…...
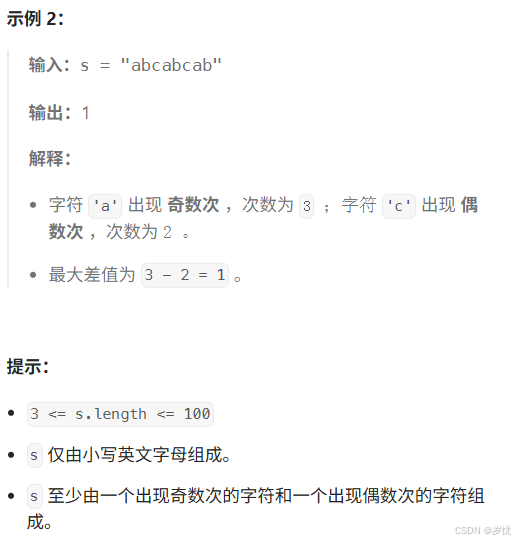
(LeetCode 每日一题) 3442. 奇偶频次间的最大差值 I (哈希、字符串)
题目:3442. 奇偶频次间的最大差值 I 思路 :哈希,时间复杂度0(n)。 用哈希表来记录每个字符串中字符的分布情况,哈希表这里用数组即可实现。 C版本: class Solution { public:int maxDifference(string s) {int a[26]…...

工业安全零事故的智能守护者:一体化AI智能安防平台
前言: 通过AI视觉技术,为船厂提供全面的安全监控解决方案,涵盖交通违规检测、起重机轨道安全、非法入侵检测、盗窃防范、安全规范执行监控等多个方面,能够实现对应负责人反馈机制,并最终实现数据的统计报表。提升船厂…...

.Net框架,除了EF还有很多很多......
文章目录 1. 引言2. Dapper2.1 概述与设计原理2.2 核心功能与代码示例基本查询多映射查询存储过程调用 2.3 性能优化原理2.4 适用场景 3. NHibernate3.1 概述与架构设计3.2 映射配置示例Fluent映射XML映射 3.3 查询示例HQL查询Criteria APILINQ提供程序 3.4 高级特性3.5 适用场…...
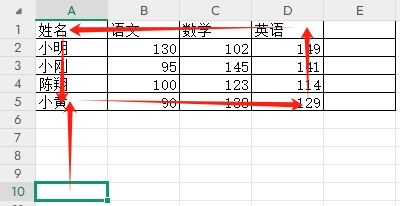
3-11单元格区域边界定位(End属性)学习笔记
返回一个Range 对象,只读。该对象代表包含源区域的区域上端下端左端右端的最后一个单元格。等同于按键 End 向上键(End(xlUp))、End向下键(End(xlDown))、End向左键(End(xlToLeft)End向右键(End(xlToRight)) 注意:它移动的位置必须是相连的有内容的单元格…...

【Android】Android 开发 ADB 常用指令
查看当前连接的设备 adb devices 连接设备 adb connect 设备IP 断开已连接的设备 adb disconnect 设备IP 安装应用 adb install 安装包的路径 卸载应用 adb uninstall 应用包名 查看已安装的应用包名 adb shell pm list packages 查看已安装的第三方应用包名 adb shell pm list…...

省略号和可变参数模板
本文主要介绍如何展开可变参数的参数包 1.C语言的va_list展开可变参数 #include <iostream> #include <cstdarg>void printNumbers(int count, ...) {// 声明va_list类型的变量va_list args;// 使用va_start将可变参数写入变量argsva_start(args, count);for (in…...

python爬虫——气象数据爬取
一、导入库与全局配置 python 运行 import json import datetime import time import requests from sqlalchemy import create_engine import csv import pandas as pd作用: 引入数据解析、网络请求、时间处理、数据库操作等所需库。requests:发送 …...

Kafka主题运维全指南:从基础配置到故障处理
#作者:张桐瑞 文章目录 主题日常管理1. 修改主题分区。2. 修改主题级别参数。3. 变更副本数。4. 修改主题限速。5.主题分区迁移。6. 常见主题错误处理常见错误1:主题删除失败。常见错误2:__consumer_offsets占用太多的磁盘。 主题日常管理 …...
DeepSeek源码深度解析 × 华为仓颉语言编程精粹——从MoE架构到全场景开发生态
前言 在人工智能技术飞速发展的今天,深度学习与大模型技术已成为推动行业变革的核心驱动力,而高效、灵活的开发工具与编程语言则为技术创新提供了重要支撑。本书以两大前沿技术领域为核心,系统性地呈现了两部深度技术著作的精华:…...

人工智能 - 在Dify、Coze、n8n、FastGPT和RAGFlow之间做出技术选型
在Dify、Coze、n8n、FastGPT和RAGFlow之间做出技术选型。这些平台各有侧重,适用场景差异显著。下面我将从核心功能定位、典型应用场景、真实体验痛点、选型决策关键点进行拆解,并提供具体场景下的推荐方案。 一、核心功能定位速览 平台核心定位技术栈亮…...