vue3学习源码笔记(小白入门系列)------ 组件是如何渲染成dom挂载到指定位置的?
文章目录
- os
- 准备
- 组件如何被挂载到页面上
- 第一步 createApp 做了哪些工作?
- ensureRenderer
- baseCreateRenderer
- createAppAPI
- mount
- render
- patch
- processComponent
- processElement
- 总结
os
学习一下vue3 源码,顺便记录分享下
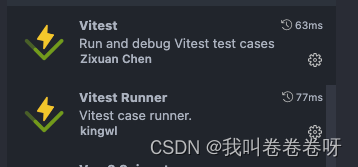
使用vitest 插件调试源码 辅助阅读
准备
去 github 下载 vue3源码 最新仓库名 为 core-main 使用 版本 为3.3.4
安装好依赖
npm i pnpm -g pnpm install
vscode 准备两个插件 方便代码调试
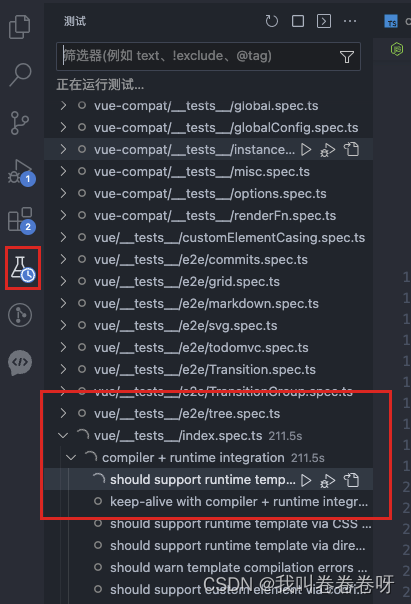
安装后会出现调试icon 未生效 可以重启vscode 。
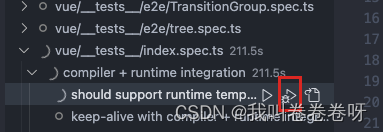
代码打上 断点, 开启debug 调试
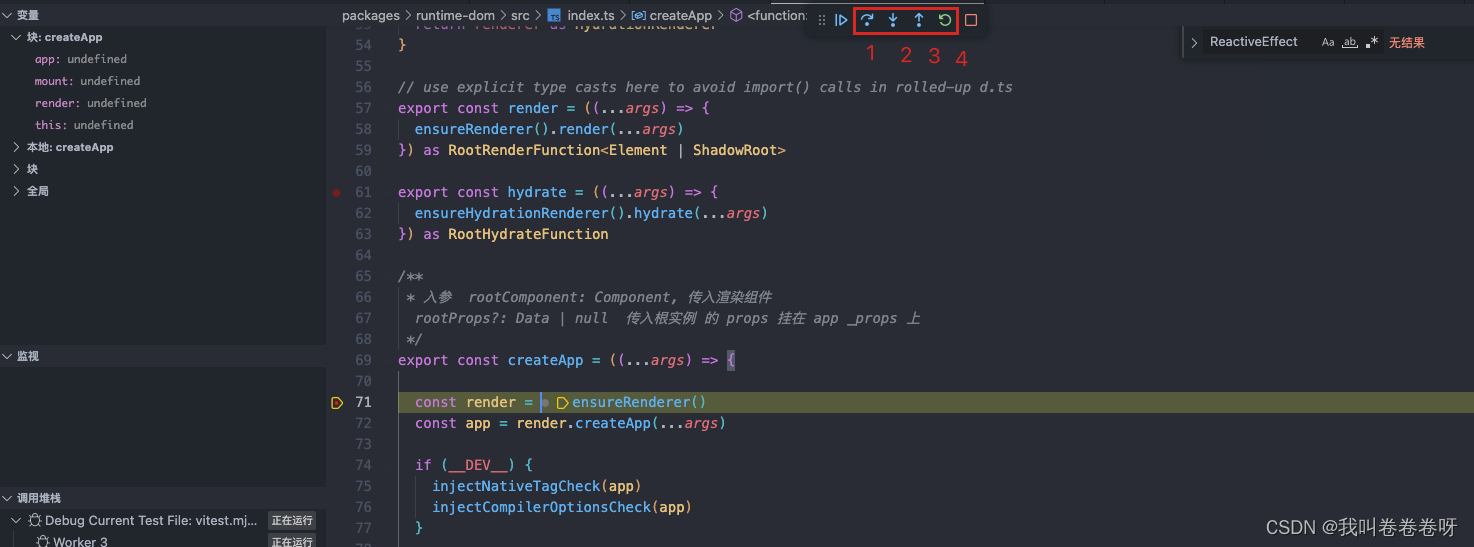
1 跳到下一个方法体
2 逐步执行
3 回退到上一步
4 重新执行
最后一个按钮就是 结束执行
组件如何被挂载到页面上
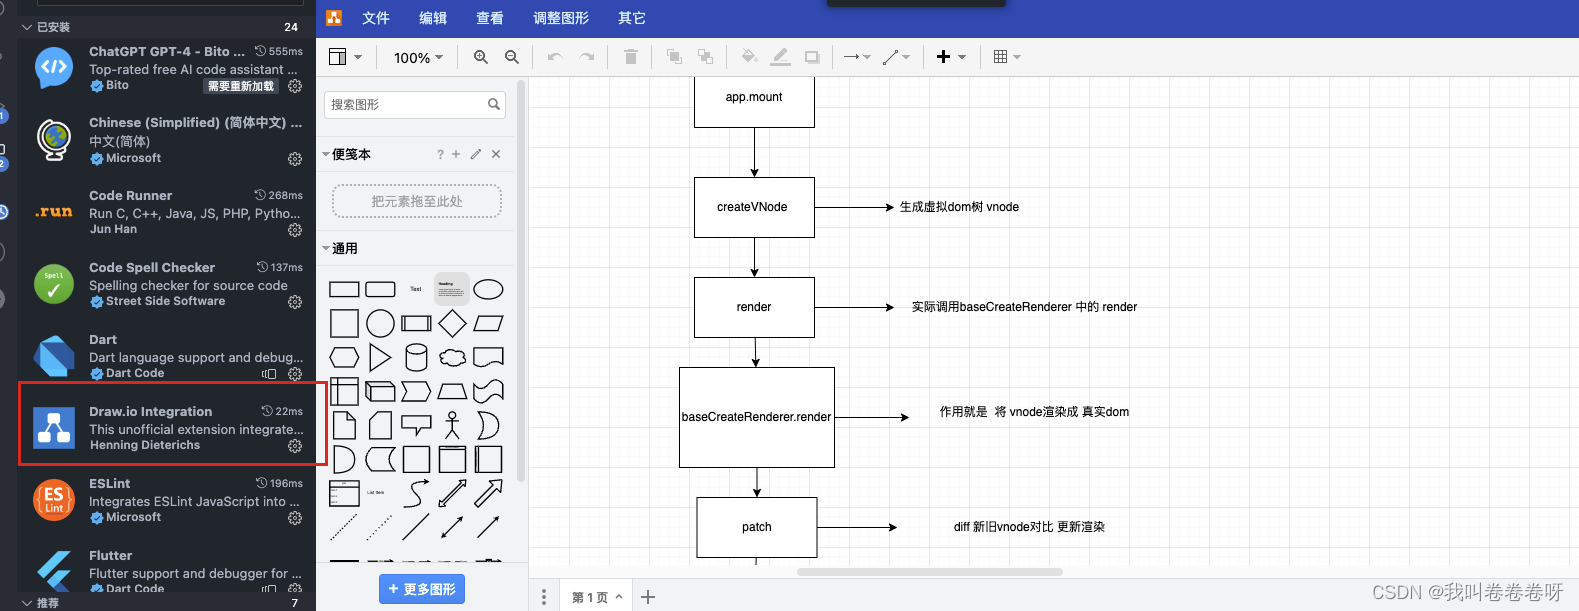
createApp(App).mount('#app')
第一步 createApp 做了哪些工作?
先看下入参和出参
export type CreateAppFunction<HostElement> = (rootComponent: Component,rootProps?: Data | null
) => App<HostElement> 入参: rootComponent 需要渲染的组件 App 也就是我们编写的 App.vue 文件rootProps 传入根实例 的 props 最后会被 挂在 app _props 上
出参 : 返回app 实例对象
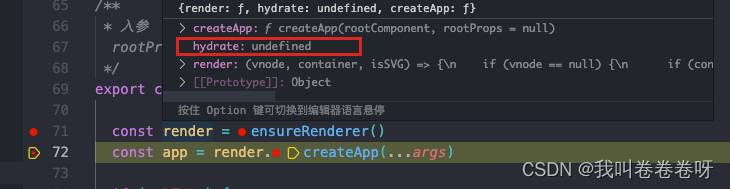
// packages/runtime-dom/src/index.ts
export const createApp = ((...args) => {// 调用 ensureRender 生成render 对象 const render = ensureRenderer()// 再调用 render中 createApp 方法 来生成 app实例 const app = render.createApp(...args)···· 下面先省略return app
})
ensureRenderer
// packages/runtime-dom/src/renderer.ts
// 实际调用的是 createRenderer
function ensureRenderer() {
/*
大致意思是 判断renderer实例是否存在,有就直接返回
没有执行 createRender 方法并 赋值 renderer 再返回
这里返回的 renderer 对象,可以认为是一个跨平台的渲染器对象,
针对不同的平台,会创建出不同的 renderer 对象,
上述是创建浏览器环境的 renderer 对象,对于服务端渲染的场景,
则会创建 server render 的 renderer*/return (renderer ||(renderer = createRenderer<Node, Element | ShadowRoot>(rendererOptions)))
}// 实际调用 baseCreateRenderer
function createRenderer<HostNode = RendererNode,HostElement = RendererElement
>(options: RendererOptions<HostNode, HostElement>) {return baseCreateRenderer<HostNode, HostElement>(options)
}
baseCreateRenderer
有两种模式 hydration 模式是 服务端渲染的 我们只考虑 no-hydration 浏览器渲染
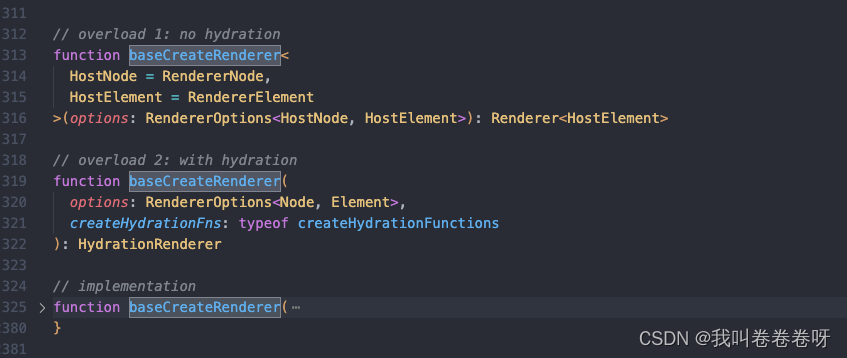
no-hydration 下
入参: options 初始化 渲染的参数
出参 :render  export interface Renderer<HostElement = RendererElement> {render: RootRenderFunction<HostElement>createApp: CreateAppFunction<HostElement>
}
具体伪代码 实现
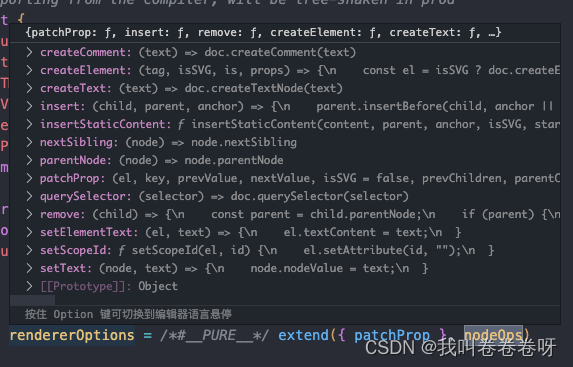
// packages/runtime-core/src/renderer.ts
export function createRenderer(options) {// ...// 这里不介绍 hydrate 模式return {render,hydrate, // no-hydration 为空createApp: createAppAPI(render, hydrate),}
}
createAppAPI
// packages/runtime-core/src/apiCreateApp.ts
function createAppAPI(render, hydrate) {// createApp createApp 方法接收的两个参数:根组件的对象和 propreturn function createApp(rootComponent, rootProps = null) {// 。。。 省略const app = {// ... 省略很多不需要在这里介绍的属性_component: rootComponent,_props: rootProps,mount(rootContainer, isHydrate, isSVG) {// ...}}return app}
}
Vue 3 初始化根组件的核心方法,也就是入口文件 createApp 真正执行的内容就是这里的 createAppAPI 函数中的 createApp 函数,该函数接收了 组件作为根组件 rootComponent,返回了一个包含 mount 方法的 app 对象,再看看 mount 具体实现
mount
// packages/runtime-core/src/apiCreateApp.ts
mount(rootContainer, isHydrate, isSVG) {if (!isMounted) {// ... 省略部分不重要的代码// 1. 创建根组件的 vnodeconst vnode = createVNode(rootComponent,rootProps)// 2. 渲染根组件  这里render方法 其实是baseCreateRenderer // 返回的render对象带的 render方法 // 作用就是 将 vnode 渲染成真实domrender(vnode, rootContainer, isSVG)isMounted = true}
}
render
// packages/runtime-core/src/renderer.ts
const render: RootRenderFunction = (vnode, container, isSVG) => {// console.log('render-----');//第一个 入参 没传 代表 需要卸载 if (vnode == null) {if (container._vnode) {unmount(container._vnode, null, null, true)}} else {// 否则走 挂载 或更新 操作patch(container._vnode || null, vnode, container, null, null, null, isSVG)}flushPreFlushCbs()flushPostFlushCbs()container._vnode = vnode}
// patch  所有vnode diff 比对 更新 转化新dom 操作全在里面
patch
const patch: PatchFn = (n1, // 需要 对比的 旧 vnoden2, // 新生成的 vnode container, // 最后生成的元素 需要挂载到的 目标组件元素anchor = null, // 挂载的参考元素;parentComponent = null, // 父组件parentSuspense = null,isSVG = false,slotScopeIds = null,optimized = __DEV__ && isHmrUpdating ? false : !!n2.dynamicChildren) => {//n1 n2 完全一致 就 直接返回 不做更新 或 挂载if (n1 === n2) {return}// patching & not same type, unmount old tree 新旧 vnode 类型 不一样 直接 卸载 n1 if (n1 && !isSameVNodeType(n1, n2)) {anchor = getNextHostNode(n1)unmount(n1, parentComponent, parentSuspense, true)n1 = null}if (n2.patchFlag === PatchFlags.BAIL) {optimized = falsen2.dynamicChildren = null}// shapeFlag 判断vnode 实例是什么类型 有的是元素类型 函数类型 组件类型等const { type, ref, shapeFlag } = n2switch (type) {//文本节点case Text:processText(n1, n2, container, anchor)break// 注释节点case Comment:processCommentNode(n1, n2, container, anchor)breakcase Static:if (n1 == null) {mountStaticNode(n2, container, anchor, isSVG)} else if (__DEV__) {patchStaticNode(n1, n2, container, isSVG)}breakcase Fragment:// 处理 template 的虚拟标签processFragment(n1,n2,container,anchor,parentComponent,parentSuspense,isSVG,slotScopeIds,optimized)breakdefault:// 其它类型//ShapeFlags 是一个二进制左移操作符生成的对象if (shapeFlag & ShapeFlags.ELEMENT) {// 这里走的是 组件内部元素普通dom的比对更新挂载逻辑processElement(n1,n2,container,anchor,parentComponent,parentSuspense,isSVG,slotScopeIds,optimized)} else if (shapeFlag & ShapeFlags.COMPONENT) {// 这里是 组件对比 component 逻辑 processComponent(n1,n2,container,anchor,parentComponent,parentSuspense,isSVG,slotScopeIds,optimized)} 。。。 // 其它省略// set refif (ref != null && parentComponent) {/*通过 ref 参数获取组件的引用对象。通过 n1 参数获取前一个 VNode 的引用对象(如果存在)。通过 n2 参数获取当前 VNode 的引用对象(如果存在)。如果前一个 VNode 的引用对象存在(即 n1.ref 存在),则将其置为 null,解除对前 一个组件引用的绑定。如果当前 VNode 的引用对象存在(即 n2.ref 存在),则将其绑定到组件的引用上。如果当前 VNode 不存在(即 !n2),则将组件的引用对象置为 null*/setRef(ref, n1 && n1.ref, parentSuspense, n2 || n1, !n2)}}
初始化挂载 会进入到 processComponent方法
processComponent
// packages/runtime-core/src/renderer.ts
function processComponent(n1, n2, container, parentComponent) {// 如果 n1 没有值的话,那么就是 mountif (!n1) {// 初始化 componentmountComponent(n2, container, parentComponent);} else {updateComponent(n1, n2, container);}
}// packages/runtime-core/src/renderer.ts
function mountComponent(initialVNode, container, parentComponent) {// 1. 先创建一个 component instance const instance = (initialVNode.component = createComponentInstance(initialVNode,parentComponent));// 2. 初始化 instance 上的 props, slots, 执行组件的 setup 函数...setupComponent(instance);// 3. 设置并运行带副作用的渲染函数setupRenderEffect(instance, initialVNode, container);
}// packages/runtime-core/src/component.ts
function createComponentInstance(vnode: VNode,parent: ComponentInternalInstance | null,suspense: SuspenseBoundary | null
) {const type = vnode.type as ConcreteComponent// inherit parent app context - or - if root, adopt from root vnodeconst appContext =(parent ? parent.appContext : vnode.appContext) || emptyAppContextconst instance: ComponentInternalInstance = {uid: uid++,vnode,type,parent,appContext,root: null!, // to be immediately setnext: null,subTree: null!, // will be set synchronously right after creationeffect: null!,update: null!, // will be set synchronously right after creationscope: new EffectScope(true /* detached */),render: null,proxy: null,//。。。 省略 属性}if (__DEV__) {instance.ctx = createDevRenderContext(instance)} else {instance.ctx = { _: instance }}instance.root = parent ? parent.root : instanceinstance.emit = emit.bind(null, instance)// apply custom element special handlingif (vnode.ce) {vnode.ce(instance)}return instance
}// packages/runtime-core/src/component.ts
export function setupComponent(instance) {// 1. 处理 props// 取出存在 vnode 里面的 props const { props, children } = instance.vnode;initProps(instance, props);// 2. 处理 slotsinitSlots(instance, children);// 3. 调用 setup 并处理 setupResultsetupStatefulComponent(instance);
}// packages/runtime-core/src/renderer.ts
/*
componentUpdateFn 这个函数,
核心是调用了 renderComponentRoot 来生成 subTree,
然后再把 subTree 挂载到 container 中
*/
const setupRenderEffect = (instance, initialVNode, container, anchor, parentSuspense, isSVG, optimized) => {function componentUpdateFn() {if (!instance.isMounted) {// 渲染子树的 vnodeconst subTree = (instance.subTree = renderComponentRoot(instance))// 挂载子树 vnode 到 container 中 // 会重新进入 patch 方法 会走到 processElement 方法中patch(null, subTree, container, anchor, instance, parentSuspense, isSVG)// 把渲染生成的子树根 DOM 节点存储到 el 属性上initialVNode.el = subTree.elinstance.isMounted = true}else {// 更新相关,后面介绍}}// 创建副作用渲染函数instance.update = effect(componentUpdateFn, prodEffectOptions)
}/*
返回 vnode
*/
function renderComponentRoot(instance: ComponentInternalInstance
): VNode {const {type: Component,vnode,proxy,withProxy,props,propsOptions: [propsOptions],slots,attrs,emit,render,renderCache,data,setupState,ctx,inheritAttrs} = instanceconst proxyToUse = withProxy || proxy// 省略一部分逻辑判断 normalizeVNode
/*render 方法 其实是调用instance.render 方法 就是在 初始化instance 方法 中 将 template 模版 编译成 render 方法 用于 生成  vnode
*/result = normalizeVNode(render!.call(proxyToUse,proxyToUse!,renderCache,props,setupState,data,ctx))return result
}
processElement
// packages/runtime-core/src/renderer.ts
function processElement(n1, n2, container, anchor, parentComponent) {if (!n1) {// 挂载元素节点mountElement(n2, container, anchor);} else {// 更新元素节点updateElement(n1, n2, container, anchor, parentComponent);}
}// packages/runtime-core/src/renderer.ts
const mountElement = (vnode, container, anchor, parentComponent, parentSuspense, isSVG, optimized) => {let elconst { type, props, shapeFlag, transition, patchFlag, dirs } = vnode// ...// 根据 vnode 创建 DOM 节点el = vnode.el = hostCreateElement(vnode.type, isSVG, props && props.is)if (props) {// 处理 props 属性for (const key in props) {if (!isReservedProp(key)) {hostPatchProp(el, key, null, props[key], isSVG)}}}// 文本节点处理if (shapeFlag & ShapeFlags.TEXT_CHILDREN) {hostSetElementText(el, vnode.children)} else if (shapeFlag & ShapeFlags.ARRAY_CHILDREN) {// 如果节点是个数据类型,则递归子节点mountChildren(vnode.children, el)}// 把创建好的 el 元素挂载到容器中hostInsert(el, container, anchor)
}
总结
以上就完成了 组件初始化工作。下面画了 几个流程图来辅助理解 。最好阅读的时候自己 也可以画下
安利一个好用的vscode流程图插件

下一篇:准备写 数据代理这块
相关文章:
vue3学习源码笔记(小白入门系列)------ 组件是如何渲染成dom挂载到指定位置的?
文章目录 os准备组件如何被挂载到页面上第一步 createApp 做了哪些工作?ensureRendererbaseCreateRenderercreateAppAPImountrenderpatchprocessComponentprocessElement 总结 os 学习一下vue3 源码,顺便记录分享下 使用vitest 插件调试源码 辅助阅读 …...

【编码规范】从代码之丑聊代码规范
最近看了代码之丑,就打算整理下,总结一下。 代码命名 首先从命名来说的话,其实对于大多数程序员来说,可能基本都是翻译软件翻译下,然后就直接改成对应的类名、参数名、函数名等。其实仔细一想,命名其实是…...
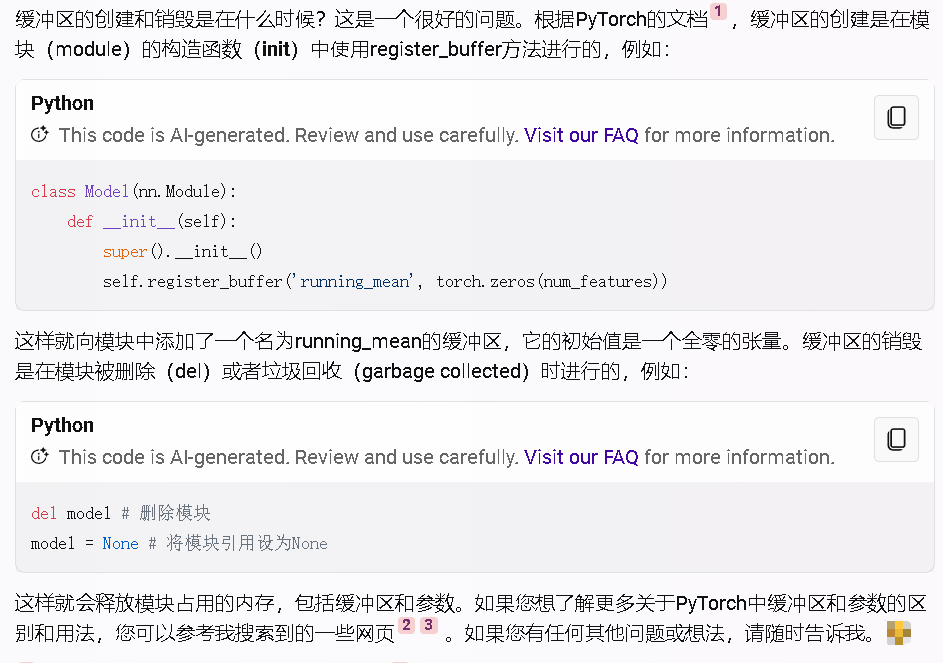
pytorch中的register_buffer
今天在一个模型的init中遇到了self.register_buffer(‘running_mean’, torch.zeros(num_features)) register_buffer(self, name, tensor)是一个PyTorch中的方法,它的作用是向模块(module)中添加一个持久的缓冲区(buffer…...
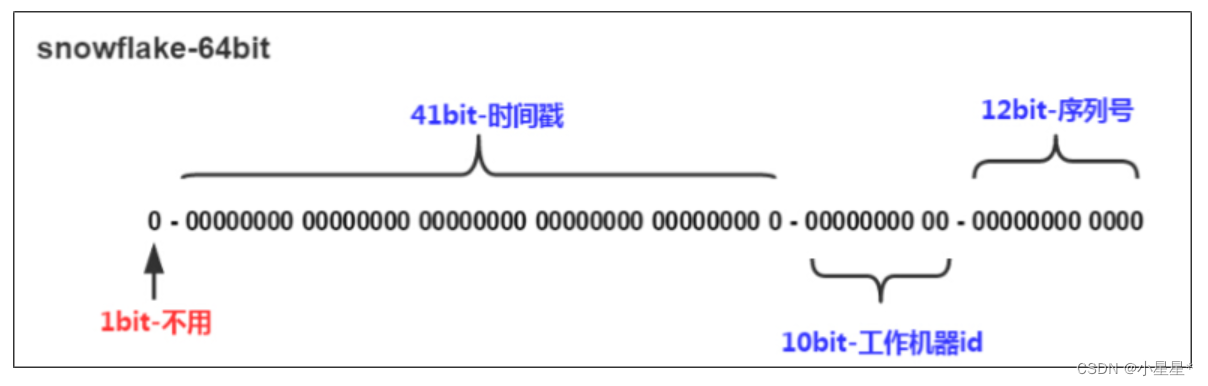
【Java笔记】分布式id生成-雪花算法
随着业务的增长,有些表可能要占用很大的物理存储空间,为了解决该问题,后期使用数据库分片技术。将一个数据库进行拆分,通过数据库中间件连接。如果数据库中该表选用ID自增策略,则可能产生重复的ID,此时应该…...
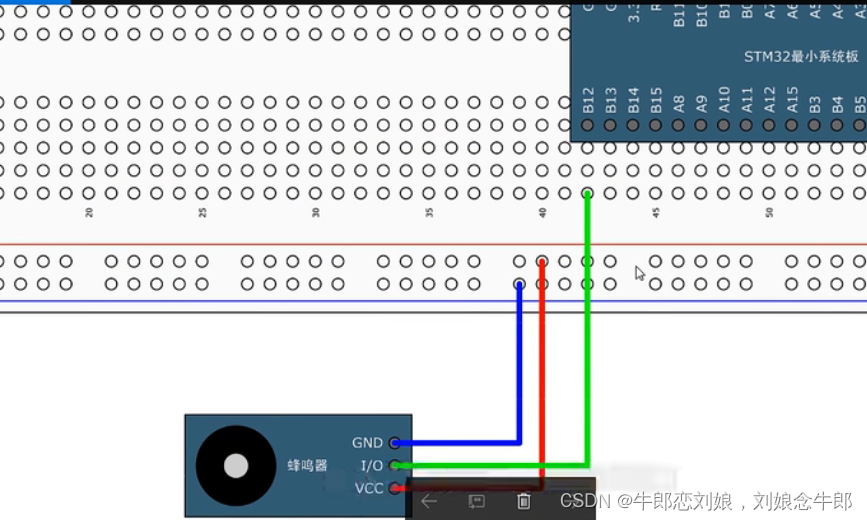
STM32f103入门(2)流水灯蜂鸣器
流水灯 /* #define GPIO_Pin_0 ((uint16_t)0x0001) /*!< Pin 0 selected */ #define GPIO_Pin_1 ((uint16_t)0x0002) /*!< Pin 1 selected */ #define GPIO_Pin_2 ((uint16_t)0x0004) /*!< Pin 2 selected */ #de…...

Web Worker的使用
Web Worker 前言一、Web Worker是什么?二、使用步骤2.1 创建 Web Worker2.2 监听消息2.3 发送消息 三、优点与缺点3.1 优点3.2 缺点 四、Vue中使用Web Worker 前言 JavaScript采用的是单线程模型,也就是说,所有任务只能在一个线程上完成&…...
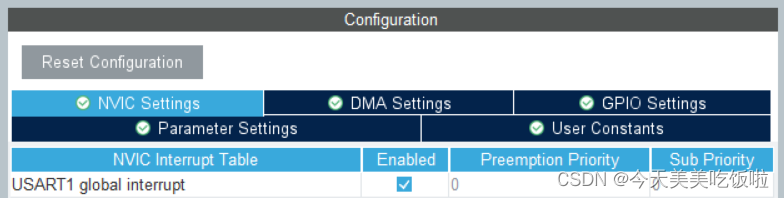
STM32 Cubemx配置串口收发
文章目录 前言注意事项Cubemx配置printf重定向修改工程属性修改源码 测试函数 前言 最近学到了串口收发,简单记录一下注意事项。 注意事项 Cubemx配置 以使用USART1为例。 USART1需配置成异步工作模式Asynchronous。 并且需要使能NVIC。 printf重定向 我偏向…...

ndoe+mysql+express基础应用
介绍 1.express 为不同 URL 路径中使用不同 HTTP 动词的请求(路由)编写处理程序。集成了“视图”渲染引擎,以便通过将数据插入模板来生成响应。设置常见 web 应用设置,比如用于连接的端口,以及渲染响应模板的位置。在…...

后端项目开发:集成日志
SpringBoot 默认选择的是slf4j做日志门面,logback做日志实现。由于log4j有性能问题,不建议使用。 由于log4j2的表现性能更好,我们需要集成log4j2,同时排除旧的日志实现包。 <!-- Spring Boot 启动器 --> <dependency>…...

20-GIT版本控制
GIT 一 简介 场景 团队协作的时候,我们项目开发会遇到代码需要进行管理的场景。 多个开发者之间,每天写的代码可能需要合并,共享。 例子:我写的用户模块、小王写的订单模块,用户模块最终需要跟订单模块合并。 每天写完代码,qq、u盘拷贝,代码合并一个项目中。 希望…...

解决前后端交互Long类型精度丢失的问题
1、全局注解 package com.jiawa.train.common.config;import com.fasterxml.jackson.databind.ObjectMapper; import com.fasterxml.jackson.databind.module.SimpleModule; import com.fasterxml.jackson.databind.ser.std.ToStringSerializer; import org.springframework.c…...

回归预测 | MATLAB实现GA-ELM遗传算法优化极限学习机多输入单输出回归预测(多指标,多图)
回归预测 | MATLAB实现GA-ELM遗传算法优化极限学习机多输入单输出回归预测(多指标,多图) 目录 回归预测 | MATLAB实现GA-ELM遗传算法优化极限学习机多输入单输出回归预测(多指标,多图)效果一览基本介绍程序…...

SpringCloud学习笔记(九)_使用Java类加载SpringBoot、SpringCloud配置文件
我们都知道平常在使用SpringBoot和SpringCloud的时候,如果需要加载一两个配置文件的话我们通常使用Value(“${属性名称}”)注解去加载。但是如果配置文件属性特别多的时候使用这种方式就显得特别的不友好了。 比如说,我们要加载下方这个名为application.…...

三次握手四次挥手之全连接半连接队列
什么是全连接半连接 在 TCP 三次握手的时候,Linux 内核会维护两个队列,分别是: 半连接队列,也称 Listen 队列;全连接队列,也称 accept 队列; 工作原理 每一个socket执行listen时,…...

Racknerd便宜高性价比服务器汇总
介绍 Racknerd是近年来比较良心的高性价比主机商了 我制作了Racknerd服务器看板,统计所有在售的VPS和独立服务器 支持多栏目筛选以及排序,帮助你挑选目前在售的主机 也支持筛选最近上架、补货的机器 注意 1.爬虫数据可能有延迟性、不准确性ÿ…...

JavaScript 基础知识回顾与复习---关于this
在JavaScript中,this是一个关键字,它在不同的上下文中引用不同的对象,其this的绑定是动态的,这主要取决于函数的调用方式。this的绑定是函数运行时才确定的而不是编写是就绑定。在我看来this就像魔法一样让人难以理解掌握…...
Lua之Lua源文件批量转换为luac字节码文件
准备的工具:luac.exe CSDNhttps://mp.csdn.net/mp_download/manage/download/UpDetailed Unity版: using System; using System.Collections; using System.Collections.Generic; using System.IO; using UnityEditor; using UnityEngine;public static class Bat…...

简历V1.0问题合集 8/25-26
记录完 去看相应的知识点 对应着修改 (带着问题总结 效果更好 把这一部分先过完) Axois 1.axios.interceptors.request.use 和 response.use主要操作了什么了 你简历说了封装。这个要了解 2.axios get post put delete 请求里payload 、query string …...

P1052 [NOIP2005 提高组] 过河
[P1052 NOIP2005 提高组] 过河 - 洛谷 | 计算机科学教育新生态 (luogu.com.cn) 问题描述:给定长度L,和一次可以跳动的长度 s 到 t,给定m个石头的位置,求最少经过多少个石头可以超过L。 思路:如果L很小的话࿰…...

ArrayList和Vector及LinkedList的区别
1.ArrayList和Vector的区别 第一句话:ArrayList和Vector底层都是数组实现的,初始容量都为10;在ArrayList的底层,是通过定义一个DEFAULT_CAPACITY的常量来指定的,而Vector的底层,是直接在空参构造中&#x…...

B站会员购抢票脚本:5大智能通知系统让你的抢票成功率提升300%
B站会员购抢票脚本:5大智能通知系统让你的抢票成功率提升300% 【免费下载链接】biliTickerBuy b站会员购购票辅助工具 项目地址: https://gitcode.com/GitHub_Trending/bi/biliTickerBuy 你是否曾在B站会员购抢票时,因为错过开售时间或无法及时获…...

Qwen3.5-9B惊艳案例:古籍扫描图上传→OCR文字识别→繁体转简体→语义注释
Qwen3.5-9B惊艳案例:古籍扫描图上传→OCR文字识别→繁体转简体→语义注释 1. 古籍数字化全流程展示 1.1 案例背景与价值 古籍数字化是文化传承的重要工作,但传统流程需要经过扫描、OCR识别、文字转换、语义标注等多个环节,耗时耗力。Qwen3…...

OFA模型企业级部署方案:基于Docker和Kubernetes的高可用架构
OFA模型企业级部署方案:基于Docker和Kubernetes的高可用架构 1. 引言 想象一下这样的场景:你的电商平台每天需要处理数百万张商品图片和对应的英文描述,人工审核图文一致性几乎是不可能完成的任务。这时候,OFA(One-F…...
)
AIAgent与人类协作的4个致命断点,92%团队正在踩坑,SITS2026实战专家手把手修复(含可即插即用的协作SOP模板)
第一章:SITS2026专家:AIAgent与人类协作模式 2026奇点智能技术大会(https://ml-summit.org) 协作范式的根本转变 传统人机交互以“指令-执行”为单向闭环,而SITS2026框架定义的AIAgent已进化为具备意图解析、上下文记忆与协同推理能力的认知…...

2026 年 Intel 酷睿 Ultra 平台装机:华硕主板全系列专业主板测评与精准选购指南
进入 2026 年,Intel 酷睿 Ultra 200S Plus新品的到来,完成消费级市场的全面落地,新一代硬件架构为游戏、内容创作、AI 应用带来了全新的性能体验。在整机搭建过程中,主板怎么选成为多数用户的核心疑问,华硕主板作为 Intel 平台的核心合作产品,覆盖了从旗舰到入门的全价位段需求…...

如何从Ralph的progress.txt日志中提取开发洞察:完整指南
如何从Ralph的progress.txt日志中提取开发洞察:完整指南 【免费下载链接】ralph Ralph is an autonomous AI agent loop that runs repeatedly until all PRD items are complete. 项目地址: https://gitcode.com/GitHub_Trending/ralph1/ralph Ralph是一个…...

The Ultimate Guide to Ruby Timeouts:如何为第三方服务API设置超时
The Ultimate Guide to Ruby Timeouts:如何为第三方服务API设置超时 【免费下载链接】the-ultimate-guide-to-ruby-timeouts Timeouts for popular Ruby gems 项目地址: https://gitcode.com/gh_mirrors/th/the-ultimate-guide-to-ruby-timeouts 在Ruby开发中…...
)
用Matlab App Designer给杨氏双缝干涉实验做个交互式GUI(附完整源码)
用Matlab App Designer打造杨氏双缝干涉实验交互式GUI 在光学实验教学中,杨氏双缝干涉是理解波动光学基础的重要实验。传统实验室操作需要精密调节光路、严格控制环境条件,而Matlab仿真可以突破这些限制。本文将带你从零开始,使用App Designe…...

DS:具体详细介绍常见的DDR性能瓶颈和解决方案
DDR的性能瓶颈本质上是其内部“资源池”在并发访问下的限制。理解并解决这些瓶颈,是释放系统潜能的关键。 📊 DDR性能瓶颈与解决方案全景图 为了让你快速把握核心脉络,我将这些瓶颈和对应的优化策略总结为下表:瓶颈类别核心问题影…...

从 “存得下” 到 “算得快”:工业物联网需要新一代时序数据平台
工业物联网领域,为什么数据库“只存数据”已经不够了? 以前,大多数工业企业在谈数据库时,关注点还非常集中:能不能把数据存下来?能不能扛住设备数量?写入吞吐够不够?于是࿰…...