Cento7 Docker安装Zabbix,定制自定义模板
1.先安装docker环境
yum -y install  yum-utils device-mapper-persistent-data lvm2#导入docker安装库
yum-config-manager \--add-repo \https://download.docker.com/linux/centos/docker-ce.repo
#按指定版本安装好docker
yum install docker-ce-20.10.5 docker-ce-cli-20.10.5 docker-ce-rootless-extras-20.10.5 -ysystemctl restart docker.service
2.安装zabbix
拉取相关镜像
docker pull mysql:8.0.28
docker pull zabbix/zabbix-server-mysql:alpine-6.0.6
docker pull zabbix/zabbix-web-nginx-mysql:alpine-6.0.6
docker pull zabbix/zabbix-agent2
docker pull zabbix/zabbix-snmptraps:alpine-6.0.6
建立一个docker网络
docker network create --subnet 172.17.0.0/16 --ip-range 172.17.200.0/24 zabbix-netdocker rm $(docker container ls -aq)docker run --name zabbix-mysql -t -e MYSQL_DATABASE="zabbix" -e MYSQL_USER="zabbix" -e MYSQL_PASSWORD="zabbix" -e MYSQL_ROOT_PASSWORD="root123" -e TZ="Asia/Shanghai" -e ZBX_DBTLSCONNECT="required" --network=zabbix-net --ip=172.17.201.1 --restart=always --privileged=true -d mysql:8.0.28docker run --name zabbix-server-mysql -v /usr/lib/zabbix/alertscripts:/usr/lib/zabbix/alertscripts -t -e DB_SERVER_HOST="zabbix-mysql" -e MYSQL_DATABASE="zabbix" -e MYSQL_USER="zabbix" -e MYSQL_PASSWORD="zabbix" -e MYSQL_ROOT_PASSWORD="root123" -e TZ="Asia/Shanghai" --network=zabbix-net --ip=172.17.201.3 -p 10051:10051 --restart=always --privileged=true -d zabbix/zabbix-server-mysql:alpine-6.0.6docker run --name zabbix-web-nginx-mysql -t -e ZBX_SERVER_HOST="zabbix-server-mysql" -e DB_SERVER_HOST="zabbix-mysql" -e MYSQL_DATABASE="zabbix" -e MYSQL_USER="zabbix" -e MYSQL_PASSWORD="zabbix" -e MYSQL_ROOT_PASSWORD="root123" -e TZ="Asia/Shanghai" -e PHP_TZ="Asia/shanghai" --network=zabbix-net --ip=172.17.201.4 -p 8081:8080 --restart=always --privileged=true -d zabbix/zabbix-web-nginx-mysql:alpine-6.0.6docker run --name zabbix-agent-2 -e ZBX_SERVER_HOST="zabbix-server-mysql" -e ZBX_HOSTNAME="Zabbix server" -e TZ="Asia/Shanghai" --network=zabbix-net --ip=172.17.201.5 -p 10050:10050 --restart=always --privileged=true -d zabbix/zabbix-agent2docker run --name zabbix-snmptraps -e ZBX_SERVER_HOST="zabbix-server-mysql" -e ZBX_HOSTNAME="Zabbix server" -e TZ="Asia/Shanghai" --network=zabbix-net --ip=172.17.201.15 -p 161:161 --restart=always --privileged=true -d zabbix/zabbix-snmptraps:alpine-6.0.6
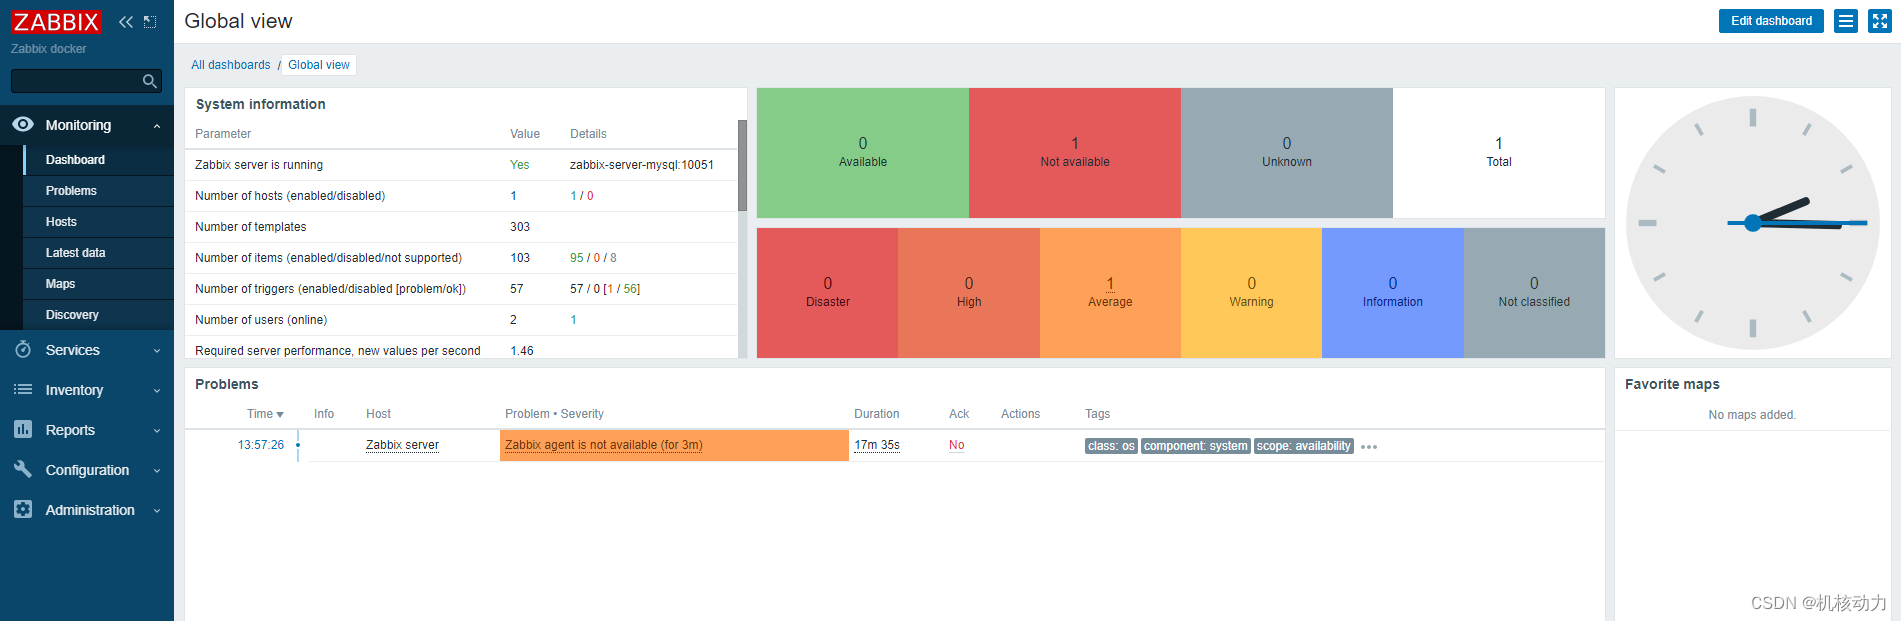
这样整个zabbix就运行起来了,然后通过ip访问8081端口。默认用户名:Admin 密码:zabbix
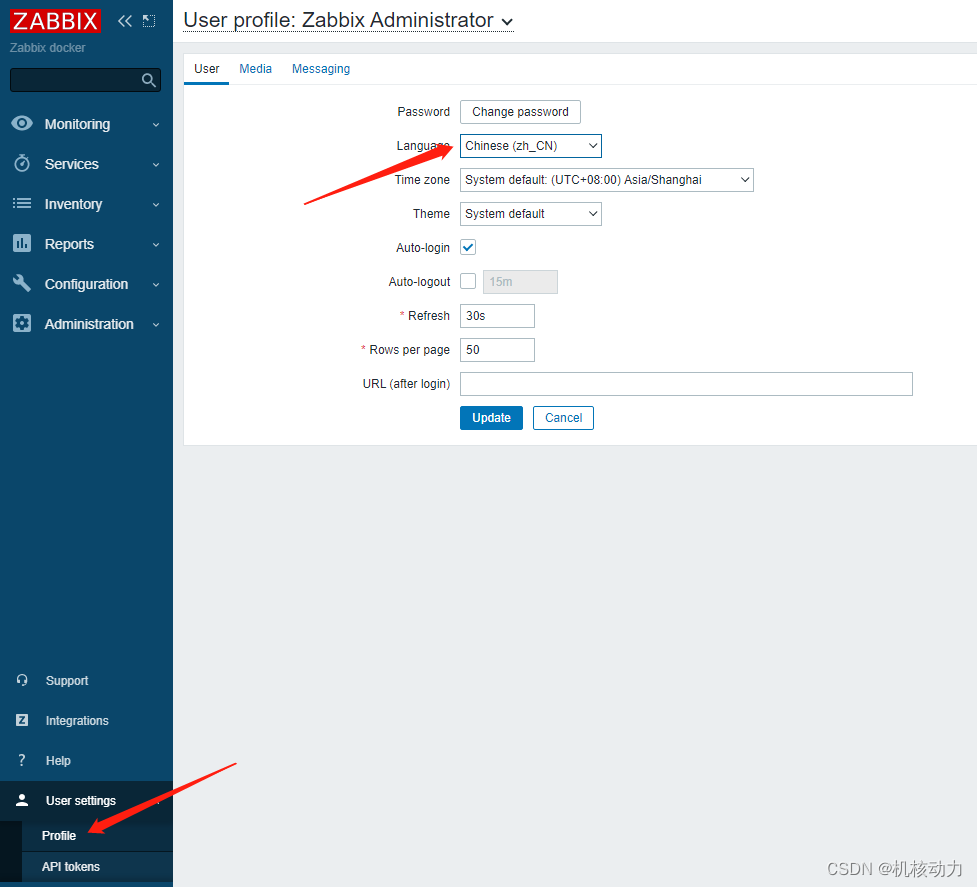
通过下面的设置,设置zabbix为中文
设置完成之后,开始配置需要监控的客户机,在客户机上安装zabbix-agent。
Centos的安装
yum -y install zabbix6.0-agentsystemctl restart zabbix-agent
systemctl enable zabbix-agent
Ubuntu的安装
apt install zabbix-agent
systemctl start zabbix-agent.service###查看状态
systemctl status zabbix-agent.service###重新启动服务
systemctl restart zabbix-agent.service###设置成开机自启动
systemctl enable zabbix-agent.service
修改agent的配置,增加如下选项
vi /etc/zabbix_agentd.conf
Server=192.168.124.141 //zabbixserver
ServerActive=192.168.124.141 //zabbixserver
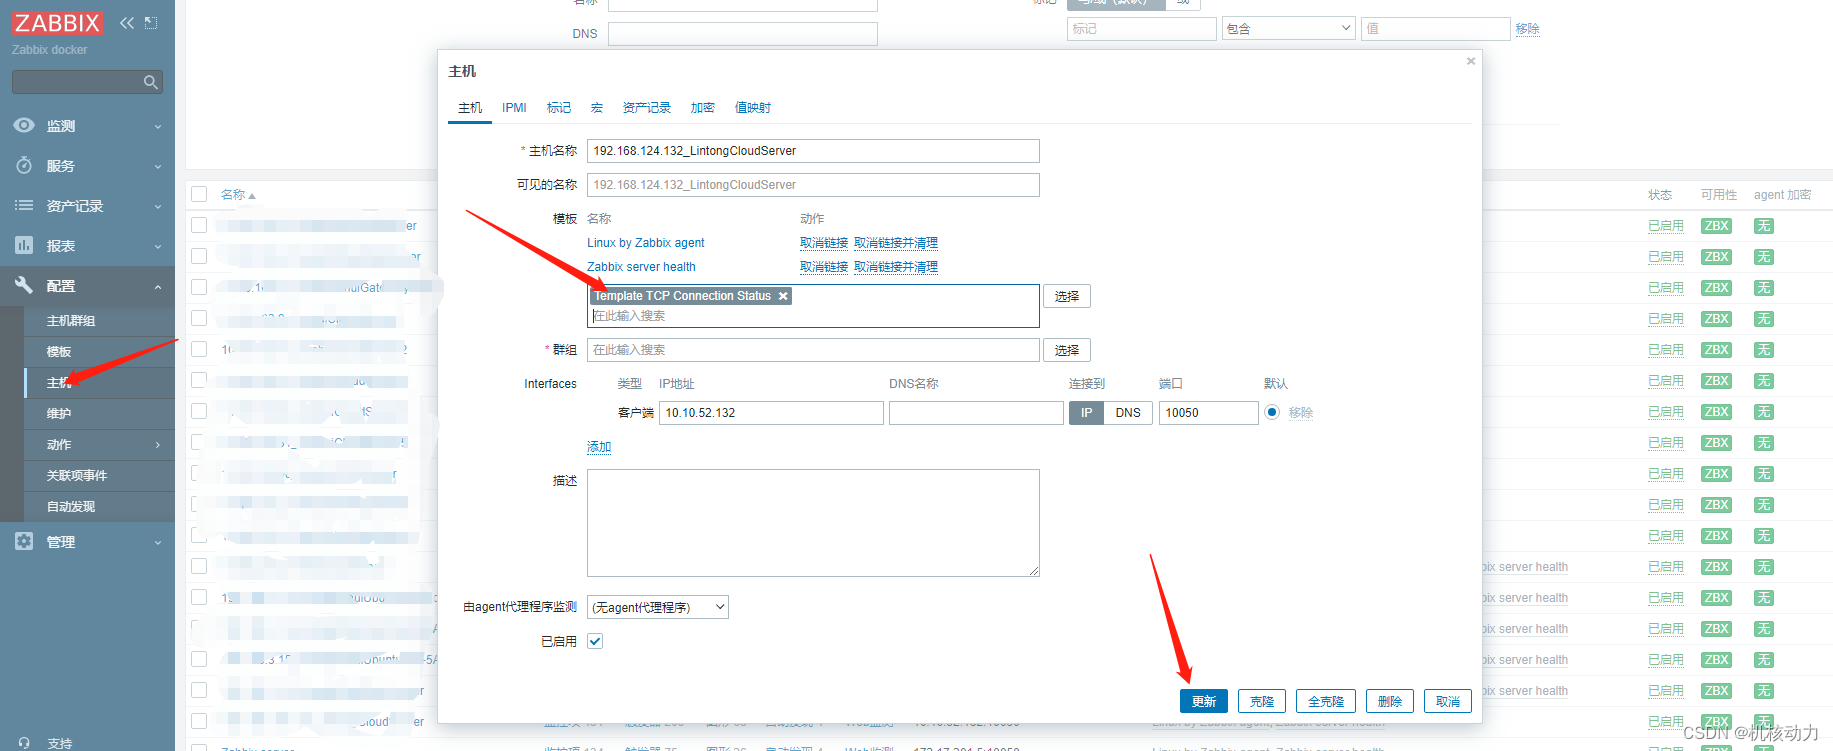
Hostname=192.168.124.132_LintongCloudServer //这个Hostname要与zabbix server上的hostname一致。
然后配置zabbix server web服务端主机配置,如下:

配置好后,在zabbix web端会这样显示。

由于zabbix没有监控Tcp的连接状态,这里需要我们自己用shell来实现这些,并且通过自己的自定义模板导入到zabbix
登录需要监控的客户机运行以下命令,用以下脚本安装tcp数据的监控,因为我已经做成了自动化安装脚本,所以脚本的内容如下:
mkdir -p /usr/local/zabbix-agent/scripts/
mkdir -p /etc/zabbix/zabbix_agentd.d/is_ubuntu=`cat /proc/version  | grep "Ubuntu" -c`
if [ $is_ubuntu -ge "1" ] ; thenecho "Ubuntu System"isExist=$(grep "^#" /etc/zabbix/zabbix_agentd.conf -v | grep UnsafeUserParameters -c ) && test -n "$isExist" || echo "UnsafeUserParameters=1" >> /etc/zabbix/zabbix_agentd.confisExist=$(grep "^#" /etc/zabbix/zabbix_agentd.conf -v | grep Include -c ) && test -n "$isExist" || echo "Include=/etc/zabbix/zabbix_agentd.d/*.conf" >> /etc/zabbix/zabbix_agentd.confecho "UserParameter=tcp.status[*],/usr/local/zabbix-agent/scripts/tcp_conn_status.sh \$1" > /etc/zabbix/zabbix_agentd.conf.d/tcp-status-params.conf
elseecho "Not Ubuntu System"isExist=$(grep "^#" /etc/zabbix_agentd.conf -v | grep UnsafeUserParameters -c ) && test -n "$isExist" || echo "UnsafeUserParameters=1" >> /etc/zabbix_agentd.confisExist=$(grep "^#" /etc/zabbix_agentd.conf -v | grep Include -c ) && test -n "$isExist" || echo "Include=/etc/zabbix/zabbix_agentd.d/*.conf" >> /etc/zabbix_agentd.confecho "UserParameter=tcp.status[*],/usr/local/zabbix-agent/scripts/tcp_conn_status.sh \$1" > /etc/zabbix/zabbix_agentd.d/tcp-status-params.conf
ficurl -u "test:test123" -O  http://10.10.52.134:88/wxmessage/tcp_conn_status.sh ; mv tcp_conn_status.sh /usr/local/zabbix-agent/scripts/
chmod 711 /usr/local/zabbix-agent/scripts/tcp_conn_status.sh
chown zabbix:zabbix /usr/local/zabbix-agent/scripts/tcp_conn_status.sh/usr/local/zabbix-agent/scripts/tcp_conn_status.sh listenservice zabbix-agent restartzabbix_agentd -t tcp.status[listen]
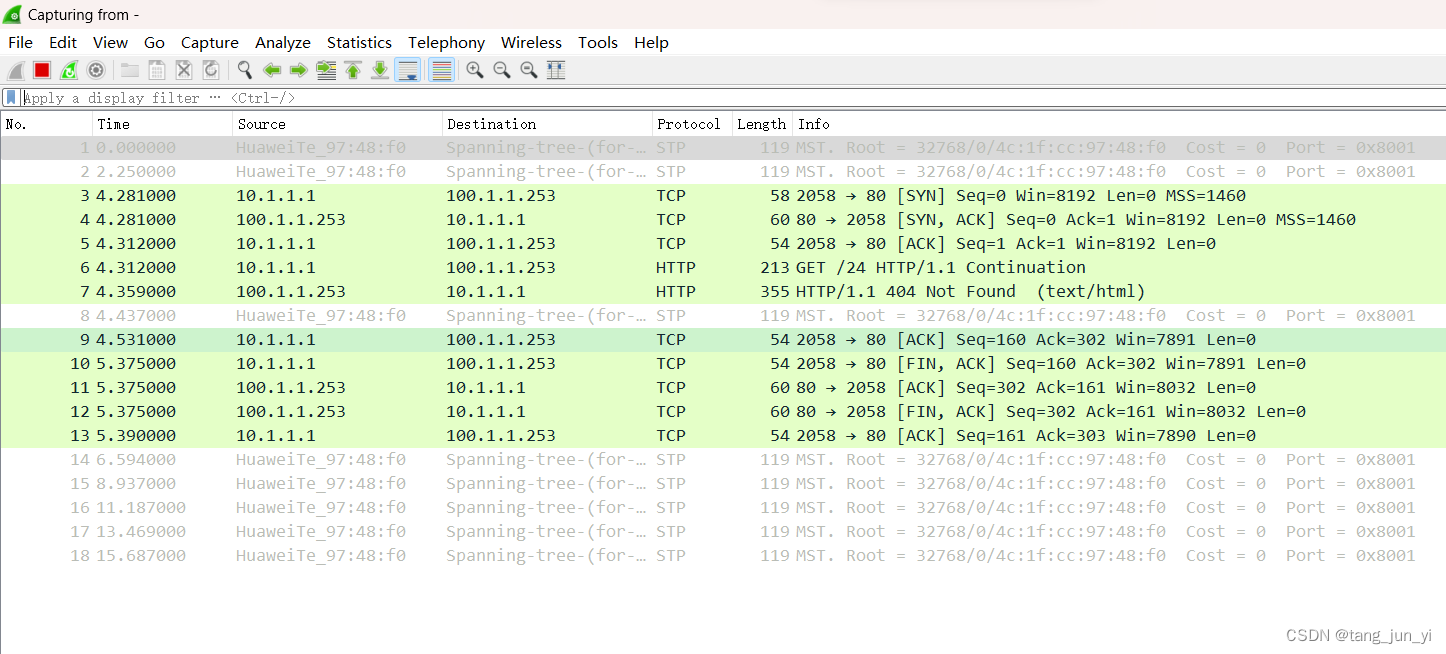
执行成功后,会出现zabbix_agentd执行的结果

这里还有一个执行被监控机器的tcp状态的shell脚本,内容如下:
#!/bin/bash
#this script is used to get tcp and udp connetion status
#tcp status
source /etc/profile
metric=$1
tmp_file=/tmp/tcp_status.txt
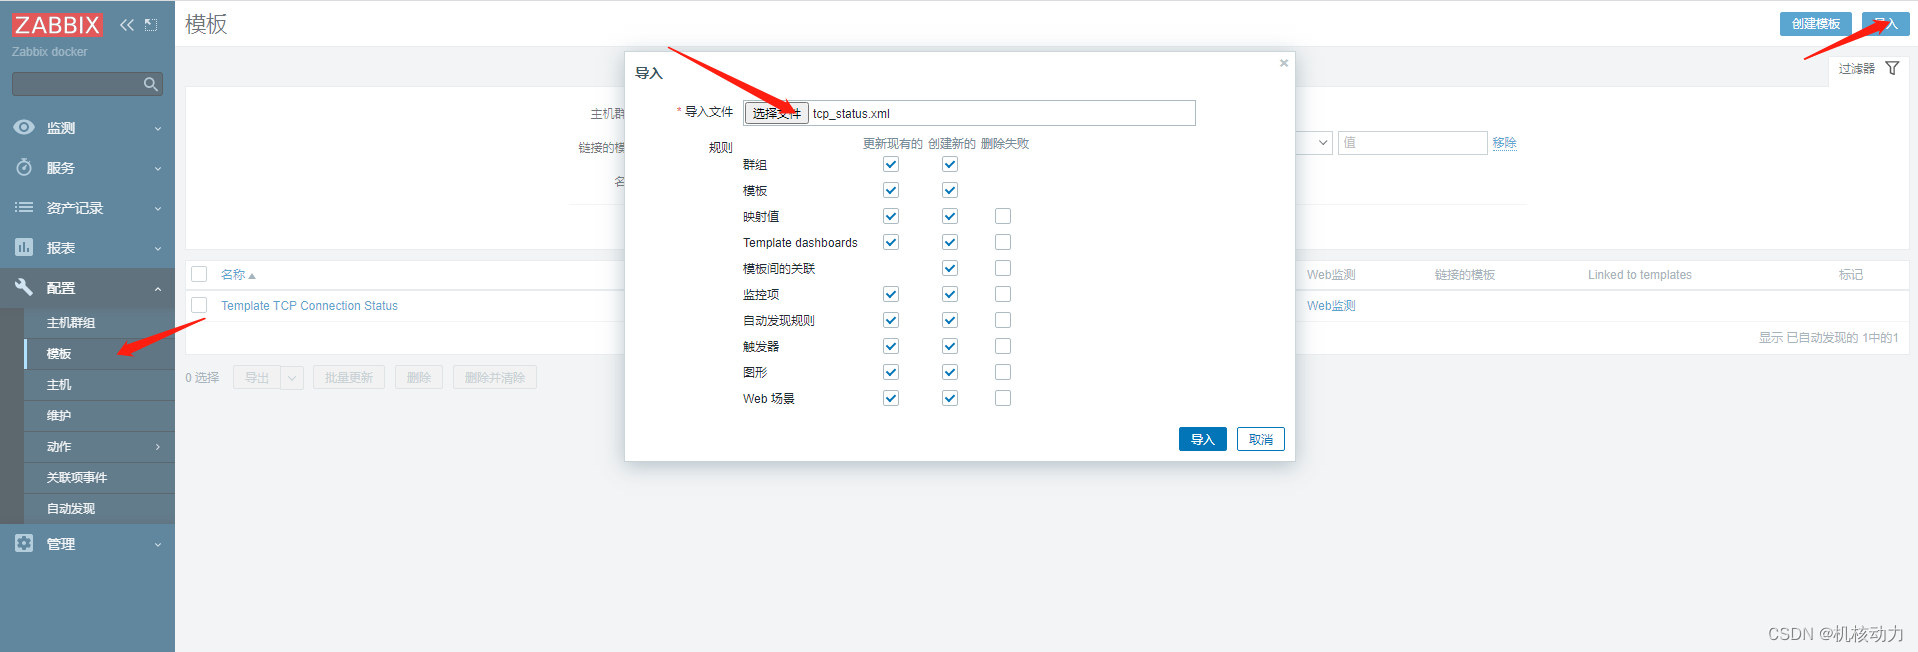
ss -an | grep "^tcp" | awk '{print $2}' | sort | uniq -c | awk '{print $2" "$1}' > $tmp_filecase $metric inclosed)output=$(awk '/CLOSED/{print $2}' $tmp_file)if [ "$output" == "" ];thenecho 0elseecho $outputfi;;listen)output=$(awk '/LISTEN/{print $2}' $tmp_file)if [ "$output" == "" ];thenecho 0elseecho $outputfi;;synrecv)output=$(awk '/SYN-RECV/{print $2}' $tmp_file)if [ "$output" == "" ];thenecho 0elseecho $outputfi;;synsent)output=$(awk '/SYN-SENT/{print $2}' $tmp_file)if [ "$output" == "" ];thenecho 0elseecho $outputfi;;established)output=$(awk '/ESTAB/{print $2}' $tmp_file)if [ "$output" == "" ];thenecho 0elseecho $outputfi;;timewait)output=$(awk '/TIME-WAIT/{print $2}' $tmp_file)if [ "$output" == "" ];thenecho 0elseecho $outputfi;;closing)output=$(awk '/CLOSING/{print $2}' $tmp_file)if [ "$output" == "" ];thenecho 0elseecho $outputfi;;closewait)output=$(awk '/CLOSE-WAIT/{print $2}' $tmp_file)if [ "$output" == "" ];thenecho 0elseecho $outputfi;;lastack)output=$(awk '/LAST-ACK/{print $2}' $tmp_file)if [ "$output" == "" ];thenecho 0elseecho $outputfi;;finwait1)output=$(awk '/FIN-WAIT-1/{print $2}' $tmp_file)if [ "$output" == "" ];thenecho 0elseecho $outputfi;;finwait2)output=$(awk '/FIN-WAIT-2/{print $2}' $tmp_file)if [ "$output" == "" ];thenecho 0elseecho $outputfi;;*)echo -e "\e[033mUsage: sh $0 [closed|closing|closewait|synrecv|synsent|finwait1|finwait2|listen|established|lastack|timewait]\e[0m"esac如果被监控客户端机器已经把脚本都安装完整,然后我们在zabbix server的web端添加模板。模板是一个xml文件,内容如下。
<?xml version="1.0" encoding="UTF-8"?>
<zabbix_export><version>2.0</version><date>2023-09-20T09:41:57Z</date><groups><group><name>Templates</name></group></groups><templates><template><template>Template TCP Connection Status</template><name>Template TCP Connection Status</name><groups><group><name>Templates</name></group></groups><applications><application><name>TCP Status</name></application></applications><items><item><name>CLOSED</name><type>0</type><snmp_community/><multiplier>0</multiplier><snmp_oid/><key>tcp.status[closed]</key><delay>60</delay><history>90</history><trends>365</trends><status>0</status><value_type>3</value_type><allowed_hosts/><units/><delta>0</delta><snmpv3_contextname/><snmpv3_securityname/><snmpv3_securitylevel>0</snmpv3_securitylevel><snmpv3_authprotocol>0</snmpv3_authprotocol><snmpv3_authpassphrase/><snmpv3_privprotocol>0</snmpv3_privprotocol><snmpv3_privpassphrase/><formula>1</formula><delay_flex/><params/><ipmi_sensor/><data_type>0</data_type><authtype>0</authtype><username/><password/><publickey/><privatekey/><port/><description/><inventory_link>0</inventory_link><applications><application><name>TCP Status</name></application></applications><valuemap/></item><item><name>CLOSE_WAIT</name><type>0</type><snmp_community/><multiplier>0</multiplier><snmp_oid/><key>tcp.status[closewait]</key><delay>60</delay><history>90</history><trends>365</trends><status>0</status><value_type>3</value_type><allowed_hosts/><units/><delta>0</delta><snmpv3_contextname/><snmpv3_securityname/><snmpv3_securitylevel>0</snmpv3_securitylevel><snmpv3_authprotocol>0</snmpv3_authprotocol><snmpv3_authpassphrase/><snmpv3_privprotocol>0</snmpv3_privprotocol><snmpv3_privpassphrase/><formula>1</formula><delay_flex/><params/><ipmi_sensor/><data_type>0</data_type><authtype>0</authtype><username/><password/><publickey/><privatekey/><port/><description/><inventory_link>0</inventory_link><applications><application><name>TCP Status</name></application></applications><valuemap/></item><item><name>CLOSING</name><type>0</type><snmp_community/><multiplier>0</multiplier><snmp_oid/><key>tcp.status[closing]</key><delay>60</delay><history>90</history><trends>365</trends><status>0</status><value_type>3</value_type><allowed_hosts/><units/><delta>0</delta><snmpv3_contextname/><snmpv3_securityname/><snmpv3_securitylevel>0</snmpv3_securitylevel><snmpv3_authprotocol>0</snmpv3_authprotocol><snmpv3_authpassphrase/><snmpv3_privprotocol>0</snmpv3_privprotocol><snmpv3_privpassphrase/><formula>1</formula><delay_flex/><params/><ipmi_sensor/><data_type>0</data_type><authtype>0</authtype><username/><password/><publickey/><privatekey/><port/><description/><inventory_link>0</inventory_link><applications><application><name>TCP Status</name></application></applications><valuemap/></item><item><name>ESTABLISHED</name><type>0</type><snmp_community/><multiplier>0</multiplier><snmp_oid/><key>tcp.status[established]</key><delay>60</delay><history>90</history><trends>365</trends><status>0</status><value_type>3</value_type><allowed_hosts/><units/><delta>0</delta><snmpv3_contextname/><snmpv3_securityname/><snmpv3_securitylevel>0</snmpv3_securitylevel><snmpv3_authprotocol>0</snmpv3_authprotocol><snmpv3_authpassphrase/><snmpv3_privprotocol>0</snmpv3_privprotocol><snmpv3_privpassphrase/><formula>1</formula><delay_flex/><params/><ipmi_sensor/><data_type>0</data_type><authtype>0</authtype><username/><password/><publickey/><privatekey/><port/><description/><inventory_link>0</inventory_link><applications><application><name>TCP Status</name></application></applications><valuemap/></item><item><name>FIN_WAIT1</name><type>0</type><snmp_community/><multiplier>0</multiplier><snmp_oid/><key>tcp.status[finwait1]</key><delay>60</delay><history>90</history><trends>365</trends><status>0</status><value_type>3</value_type><allowed_hosts/><units/><delta>0</delta><snmpv3_contextname/><snmpv3_securityname/><snmpv3_securitylevel>0</snmpv3_securitylevel><snmpv3_authprotocol>0</snmpv3_authprotocol><snmpv3_authpassphrase/><snmpv3_privprotocol>0</snmpv3_privprotocol><snmpv3_privpassphrase/><formula>1</formula><delay_flex/><params/><ipmi_sensor/><data_type>0</data_type><authtype>0</authtype><username/><password/><publickey/><privatekey/><port/><description/><inventory_link>0</inventory_link><applications><application><name>TCP Status</name></application></applications><valuemap/></item><item><name>FIN_WAIT2</name><type>0</type><snmp_community/><multiplier>0</multiplier><snmp_oid/><key>tcp.status[finwait2]</key><delay>60</delay><history>90</history><trends>365</trends><status>0</status><value_type>3</value_type><allowed_hosts/><units/><delta>0</delta><snmpv3_contextname/><snmpv3_securityname/><snmpv3_securitylevel>0</snmpv3_securitylevel><snmpv3_authprotocol>0</snmpv3_authprotocol><snmpv3_authpassphrase/><snmpv3_privprotocol>0</snmpv3_privprotocol><snmpv3_privpassphrase/><formula>1</formula><delay_flex/><params/><ipmi_sensor/><data_type>0</data_type><authtype>0</authtype><username/><password/><publickey/><privatekey/><port/><description/><inventory_link>0</inventory_link><applications><application><name>TCP Status</name></application></applications><valuemap/></item><item><name>LAST_ACK</name><type>0</type><snmp_community/><multiplier>0</multiplier><snmp_oid/><key>tcp.status[lastack]</key><delay>60</delay><history>90</history><trends>365</trends><status>0</status><value_type>3</value_type><allowed_hosts/><units/><delta>0</delta><snmpv3_contextname/><snmpv3_securityname/><snmpv3_securitylevel>0</snmpv3_securitylevel><snmpv3_authprotocol>0</snmpv3_authprotocol><snmpv3_authpassphrase/><snmpv3_privprotocol>0</snmpv3_privprotocol><snmpv3_privpassphrase/><formula>1</formula><delay_flex/><params/><ipmi_sensor/><data_type>0</data_type><authtype>0</authtype><username/><password/><publickey/><privatekey/><port/><description/><inventory_link>0</inventory_link><applications><application><name>TCP Status</name></application></applications><valuemap/></item><item><name>LISTEN</name><type>0</type><snmp_community/><multiplier>0</multiplier><snmp_oid/><key>tcp.status[listen]</key><delay>60</delay><history>90</history><trends>365</trends><status>0</status><value_type>3</value_type><allowed_hosts/><units/><delta>0</delta><snmpv3_contextname/><snmpv3_securityname/><snmpv3_securitylevel>0</snmpv3_securitylevel><snmpv3_authprotocol>0</snmpv3_authprotocol><snmpv3_authpassphrase/><snmpv3_privprotocol>0</snmpv3_privprotocol><snmpv3_privpassphrase/><formula>1</formula><delay_flex/><params/><ipmi_sensor/><data_type>0</data_type><authtype>0</authtype><username/><password/><publickey/><privatekey/><port/><description/><inventory_link>0</inventory_link><applications><application><name>TCP Status</name></application></applications><valuemap/></item><item><name>SYN_RECV</name><type>0</type><snmp_community/><multiplier>0</multiplier><snmp_oid/><key>tcp.status[synrecv]</key><delay>60</delay><history>90</history><trends>365</trends><status>0</status><value_type>3</value_type><allowed_hosts/><units/><delta>0</delta><snmpv3_contextname/><snmpv3_securityname/><snmpv3_securitylevel>0</snmpv3_securitylevel><snmpv3_authprotocol>0</snmpv3_authprotocol><snmpv3_authpassphrase/><snmpv3_privprotocol>0</snmpv3_privprotocol><snmpv3_privpassphrase/><formula>1</formula><delay_flex/><params/><ipmi_sensor/><data_type>0</data_type><authtype>0</authtype><username/><password/><publickey/><privatekey/><port/><description/><inventory_link>0</inventory_link><applications><application><name>TCP Status</name></application></applications><valuemap/></item><item><name>SYN_SENT</name><type>0</type><snmp_community/><multiplier>0</multiplier><snmp_oid/><key>tcp.status[synsent]</key><delay>60</delay><history>90</history><trends>365</trends><status>0</status><value_type>3</value_type><allowed_hosts/><units/><delta>0</delta><snmpv3_contextname/><snmpv3_securityname/><snmpv3_securitylevel>0</snmpv3_securitylevel><snmpv3_authprotocol>0</snmpv3_authprotocol><snmpv3_authpassphrase/><snmpv3_privprotocol>0</snmpv3_privprotocol><snmpv3_privpassphrase/><formula>1</formula><delay_flex/><params/><ipmi_sensor/><data_type>0</data_type><authtype>0</authtype><username/><password/><publickey/><privatekey/><port/><description/><inventory_link>0</inventory_link><applications><application><name>TCP Status</name></application></applications><valuemap/></item><item><name>TIME_WAIT</name><type>0</type><snmp_community/><multiplier>0</multiplier><snmp_oid/><key>tcp.status[timewait]</key><delay>60</delay><history>90</history><trends>365</trends><status>0</status><value_type>3</value_type><allowed_hosts/><units/><delta>0</delta><snmpv3_contextname/><snmpv3_securityname/><snmpv3_securitylevel>0</snmpv3_securitylevel><snmpv3_authprotocol>0</snmpv3_authprotocol><snmpv3_authpassphrase/><snmpv3_privprotocol>0</snmpv3_privprotocol><snmpv3_privpassphrase/><formula>1</formula><delay_flex/><params/><ipmi_sensor/><data_type>0</data_type><authtype>0</authtype><username/><password/><publickey/><privatekey/><port/><description/><inventory_link>0</inventory_link><applications><application><name>TCP Status</name></application></applications><valuemap/></item></items><discovery_rules/><macros/><templates/><screens/></template></templates><triggers><trigger><expression>{Template TCP Connection Status:tcp.status[timewait].last()}>3000</expression><name>There are too many TCP TIME_WAIT status</name><url/><status>0</status><priority>4</priority><description/><type>0</type><dependencies/></trigger></triggers><graphs><graph><name>TCP Status</name><width>900</width><height>200</height><yaxismin>0.0000</yaxismin><yaxismax>100.0000</yaxismax><show_work_period>1</show_work_period><show_triggers>1</show_triggers><type>0</type><show_legend>1</show_legend><show_3d>0</show_3d><percent_left>0.0000</percent_left><percent_right>0.0000</percent_right><ymin_type_1>0</ymin_type_1><ymax_type_1>0</ymax_type_1><ymin_item_1>0</ymin_item_1><ymax_item_1>0</ymax_item_1><graph_items><graph_item><sortorder>0</sortorder><drawtype>0</drawtype><color>C80000</color><yaxisside>0</yaxisside><calc_fnc>2</calc_fnc><type>0</type><item><host>Template TCP Connection Status</host><key>tcp.status[closed]</key></item></graph_item><graph_item><sortorder>1</sortorder><drawtype>0</drawtype><color>00C800</color><yaxisside>0</yaxisside><calc_fnc>2</calc_fnc><type>0</type><item><host>Template TCP Connection Status</host><key>tcp.status[closewait]</key></item></graph_item><graph_item><sortorder>2</sortorder><drawtype>0</drawtype><color>0000C8</color><yaxisside>0</yaxisside><calc_fnc>2</calc_fnc><type>0</type><item><host>Template TCP Connection Status</host><key>tcp.status[closing]</key></item></graph_item><graph_item><sortorder>3</sortorder><drawtype>0</drawtype><color>C800C8</color><yaxisside>0</yaxisside><calc_fnc>2</calc_fnc><type>0</type><item><host>Template TCP Connection Status</host><key>tcp.status[established]</key></item></graph_item><graph_item><sortorder>4</sortorder><drawtype>0</drawtype><color>00C8C8</color><yaxisside>0</yaxisside><calc_fnc>2</calc_fnc><type>0</type><item><host>Template TCP Connection Status</host><key>tcp.status[finwait1]</key></item></graph_item><graph_item><sortorder>5</sortorder><drawtype>0</drawtype><color>C8C800</color><yaxisside>0</yaxisside><calc_fnc>2</calc_fnc><type>0</type><item><host>Template TCP Connection Status</host><key>tcp.status[finwait2]</key></item></graph_item><graph_item><sortorder>6</sortorder><drawtype>0</drawtype><color>C8C8C8</color><yaxisside>0</yaxisside><calc_fnc>2</calc_fnc><type>0</type><item><host>Template TCP Connection Status</host><key>tcp.status[lastack]</key></item></graph_item><graph_item><sortorder>7</sortorder><drawtype>0</drawtype><color>960000</color><yaxisside>0</yaxisside><calc_fnc>2</calc_fnc><type>0</type><item><host>Template TCP Connection Status</host><key>tcp.status[listen]</key></item></graph_item><graph_item><sortorder>8</sortorder><drawtype>0</drawtype><color>009600</color><yaxisside>0</yaxisside><calc_fnc>2</calc_fnc><type>0</type><item><host>Template TCP Connection Status</host><key>tcp.status[synrecv]</key></item></graph_item><graph_item><sortorder>9</sortorder><drawtype>0</drawtype><color>000096</color><yaxisside>0</yaxisside><calc_fnc>2</calc_fnc><type>0</type><item><host>Template TCP Connection Status</host><key>tcp.status[synsent]</key></item></graph_item><graph_item><sortorder>10</sortorder><drawtype>0</drawtype><color>960096</color><yaxisside>0</yaxisside><calc_fnc>2</calc_fnc><type>0</type><item><host>Template TCP Connection Status</host><key>tcp.status[timewait]</key></item></graph_item></graph_items></graph></graphs>
</zabbix_export>
添加模板成功后,主机开始绑定这个模板。
然后监视的主机里面就可以看到数据了。

相关文章:
Cento7 Docker安装Zabbix,定制自定义模板
1.先安装docker环境 yum -y install yum-utils device-mapper-persistent-data lvm2#导入docker安装库 yum-config-manager \--add-repo \https://download.docker.com/linux/centos/docker-ce.repo #按指定版本安装好docker yum install docker-ce-20.10.5 docker-ce-cli-20…...
网络防御--防火墙
拓扑 Cloud 1 作为电脑与ENSP的桥梁 防火墙配置 登录防火墙 配置IP地址及安全区域 添加地址对象 配置策略 1、内网可以访问服务器 结果 2、内网可以访问公网 结果 配置NAT策略 结果...
淘宝商品详情数据采集
淘宝商品详情数据采集的方法如下: 确定采集目标:明确要采集的商品信息,如商品标题、价格、销量、评论、图片等。选择采集工具:可以选择Scrapy框架、Java的WebMagic框架等。编写爬虫程序:进入目标文件夹,输…...

mac安装virtualenv和virtualenvwrapper
1.安装(推荐用sudo安装,直接pip3安装会有坑) sudo pip3 install virtualenv sudo pip3 install virtualenvwrapper 2.查看python virtualenvwrapper.sh 位置 # 查看python默认解释器 which python3 # 查看virtualenvwrapper.sh which virtualenvwrapper.sh 3.打…...

利用PCA科学确定各个指标的权重系数
背景参考: 1、提取主成分 对样本进行PCA分析,查看不同变量贡献率,确定主要的指标。我们可以通过下列代码获取需要的所有数据: import numpy as np from sklearn.decomposition import PCA# 创建一个数据 np.random.seed(0) data = np.random.random((100,5)) y = np.ra…...

代码随想录 -- day55 --392.判断子序列 、115.不同的子序列
392.判断子序列 dp[i][j] 表示以下标i-1为结尾的字符串s,和以下标j-1为结尾的字符串t,相同子序列的长度为dp[i][j]。 if (s[i - 1] t[j - 1]) t中找到了一个字符在s中也出现了if (s[i - 1] ! t[j - 1]) 相当于t要删除元素,继续匹配 if (s…...

mysql5升级到mysql8的血泪教训
核心问题1:下载中断这个包就会有问题,下载中断的话一定要重新下载 核心问题2:低版本向高版本迁移 无法整库备份 只能单库备份 1.数据备份 我这里备份了全库,所以后面数据没恢复回来,把DDL语句拆出来了单独建表 mysqldump -u root -p --al…...

Unity 开发人员转CGE(castle Game engine)城堡游戏引擎指导手册
Unity 开发人员的城堡游戏引擎概述 一、简介2. Unity相当于什么GameObject?3. 如何设计一个由多种资产、生物等组成的关卡?4. 在哪里放置特定角色的代码(例如生物、物品)?Unity 中“向 GameObject 添加 MonoBehaviour”…...

卷运维不如卷网络安全
最近发现很多从事运维的选择了辞职,重新规划自己的职业发展方向。运维工程师这个岗位在IT行业里面确实是处于最底层的,不管什么环节出现问题,基本都是运维背锅。背锅也就罢了,薪资水平也比不上别的岗位。 一般运维的薪资水平大多数…...

Digger PRO - Voxel enhanced terrains
资源链接在文末 Digger PRO 是一个简单但强大的工具,可以直接从 Unity 编辑器或游戏中创建天然洞穴和悬岩。会让你感觉自己手中握有一个体素地形,且毫无瑕疵。它实际上保持着最新、最快且可靠的 Unity 地形系统,并在你需要的地方无缝创建洞穴/悬岩峭壁网格。Digger 内…...

文字处理工具 word 2019 mac中文版改进功能
Microsoft Word 2019 是微软公司的文字处理软件,是 office 2019 套件中的一部分。它是一个功能强大、易于使用的工具,可以帮助用户创建各种类型的文档,包括信函、简历、报告、手册等。 Word 2019 提供了许多功能和改进,包括更好的…...

LeetCode 54. 螺旋矩阵
题目链接 力扣(LeetCode)官网 - 全球极客挚爱的技术成长平台 题目解析 1、求出当前矩阵左上角的元素和右下角的元素。 2、根据这两个元素来确定我们需要遍历的具体位置。 3、当遍历完一圈的时候更新左上角元素和右下角元素。 细节: 当遍历最…...
每天几道Java面试题:集合(第四天)
目录 第四幕 、第一场)大厦楼下门口第二场)大门口 友情提醒 背面试题很枯燥,加入一些戏剧场景故事人物来加深记忆。PS:点击文章目录可直接跳转到文章指定位置。 第四幕 、 第一场)大厦楼下门口 【面试者老王,门卫甲…...
【论文解读】Faster sorting algorithm
一、简要介绍 基本的算法,如排序或哈希,在任何一天都被使用数万亿次。随着对计算需求的增长,这些算法的性能变得至关重要。尽管在过去的2年中已经取得了显著的进展,但进一步改进这些现有的算法路线的有效性对人类科学家和计算方法…...

latexocr安装过程中遇到的问题解决办法
环境要求:需要Python版本3.7,并安装相应依赖文件 具体的详细安装步骤可见我上次写的博文:Mathpix替代者|科研人必备公式识别插件|latexocr安装教程 ‘latexocr‘ 不是内部或外部命令,也不是可运行的程序或批处理文件的相关解决办…...

如何判断linux 文件(或lib)是由uclibc还是glibc编译出来的?
工作中使用的编译环境有2套编译器,一个是glibc,一个是uclibc。 有些项目使用的glibc编译的lib,和使用uclibc编译的工程,在一起就会出现reference的编译错误如下: 那和如何来判断一个文件是由哪个编译器编译的呢&#…...

WorkPlus | 好用、专业、安全的局域网即时通讯及协同办公平台
自国家于2022年发布的《关于加强数字政府建设的指导意见》以来,我国数字政府建设已经迈入了一个全新的里程碑,迎来了全面改革和深化升级的全新阶段。 WorkPlus作为自主可控、可信安全、专属定制的数字化平台,扮演着政务机关、政府单位以及各…...

ARM Linux DIY(十二)NES 游戏
文章目录 前言交叉编译工具链使能 Cnes 游戏模拟器移植游戏手柄调试 前言 很多小伙伴为了不让自己的 V3s 吃灰,进而将其打造成游戏机。 我们 DIY 的板子具备屏幕、扬声器、USB Host(可以接游戏手柄),当然也要凑一凑热闹。 交叉编…...

MOEA算法的背景知识
MOEA算法 多目标进化算法优化MOEA工作原理举个例子 为什么单一策略可能会导致种群中的个体过于相似?种群在MOEA里面做什么?举例说明 多目标进化算法优化MOEA Multi-objective evolutionary algorithm optimization (MOEA) 多目标进化算法优化࿰…...
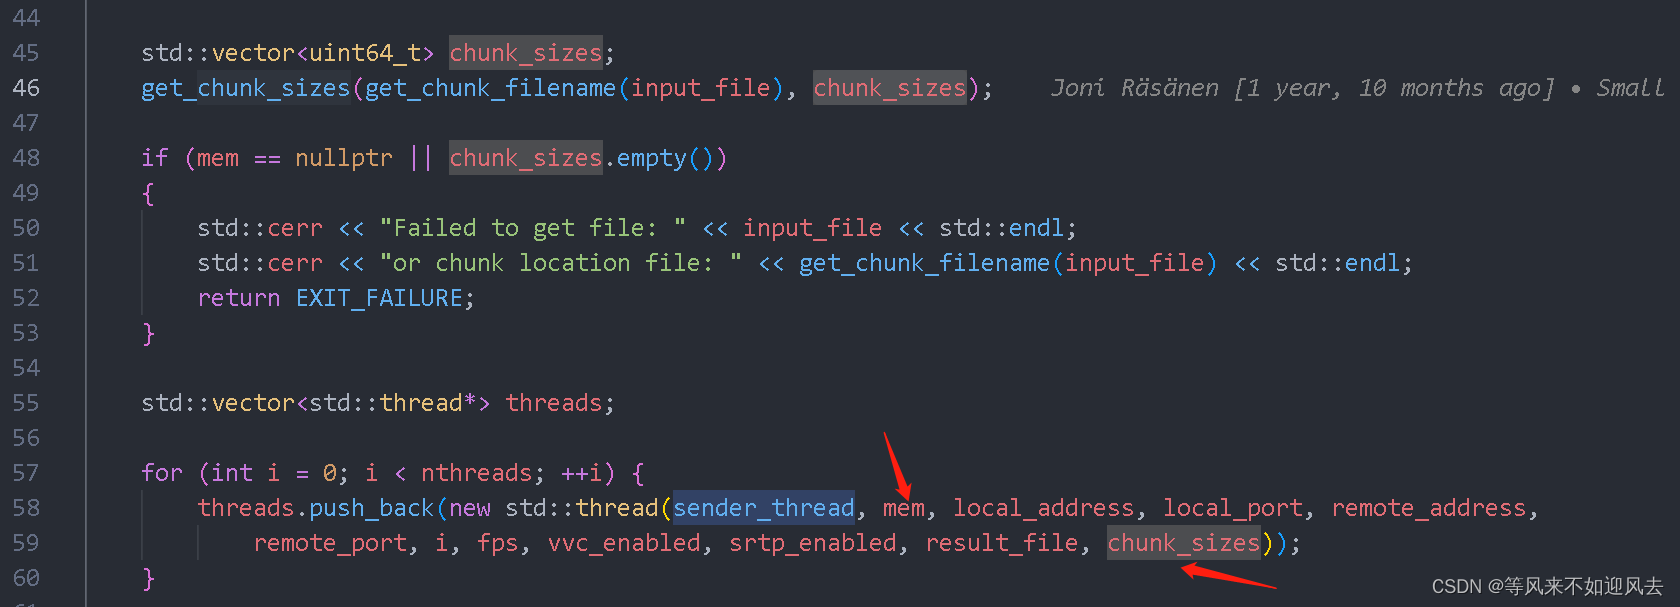
【rtp-benchmarks】读取本地文件基于uvgRtp实现多线程发送
input 文件做内存映射 : get_mem D:\XTRANS\soup\uvg-rtp-dev\rtp-benchmarks\util\util.cc 文件中读取chunksize 到 vector 里作为chunks 创建多个线程进行发送 std::vector<std::thread*> threads;...

Qwen-Image开源大模型实战:RTX4090D上Qwen-VL支持视频关键帧图文理解
Qwen-Image开源大模型实战:RTX4090D上Qwen-VL支持视频关键帧图文理解 1. 环境准备与快速部署 1.1 硬件与镜像准备 在RTX 4090D显卡上部署Qwen-VL模型需要特定的环境配置。以下是关键硬件要求: GPU:NVIDIA RTX 4090D(24GB显存&…...

阿里Qwen2.5-0.5B-Instruct部署指南:简单几步搞定网页推理
阿里Qwen2.5-0.5B-Instruct部署指南:简单几步搞定网页推理 1. 引言:轻量级大语言模型入门 Qwen2.5-0.5B-Instruct是阿里通义千问系列中的轻量级指令微调模型,虽然参数规模仅为5亿,但在知识量、编程能力和数学推理方面表现出色。…...

中文理解能力测试:国产AI模型 vs 海外AI模型,这次能赢吗?
中文,作为全球最难掌握的语言之一,一直是AI模型的一道“隐形门槛”。从“意思意思”到“方便的时候方便”,从“差点没赶上”到“差点赶上了”——这些让老外崩溃的中文陷阱,恰恰是检验AI语言理解能力的试金石。2026年,…...

阿里云代理商:阿里云无影云电脑部署 OpenClaw 接入钉钉机器人全攻略
在数智化办公时代,将 AI 助手与办公工具深度集成已成为企业提效的关键。阿里云无影云电脑支持 OpenClaw 部署后,接入钉钉机器人可实现智能问答、任务处理等自动化场景。以下为详细接入指南,助您一步到位!一、准备工作阿里云无影云…...

ccmusic-database代码实例:自定义修改MODEL_PATH切换不同流派分类模型
ccmusic-database代码实例:自定义修改MODEL_PATH切换不同流派分类模型 1. 引言 你有没有想过,让AI来当你的私人音乐DJ,自动识别你播放列表里每首歌的风格?无论是激昂的交响乐,还是慵懒的爵士,它都能瞬间告…...

【MCP 2.0安全审计黄金标准】:2026年首批通过CNAS认证的12项测试用例与自动化检测工具链
第一章:MCP 2.0安全审计黄金标准的演进逻辑与战略定位MCP(Managed Cloud Platform)2.0安全审计黄金标准并非对旧版的简单增强,而是面向云原生纵深防御体系重构的安全治理范式跃迁。其演进逻辑根植于三大现实驱动力:零信…...
)
SEO_如何通过内容优化有效提升SEO效果?(143 )
如何通过内容优化有效提升SEO效果?在当今互联网时代,搜索引擎优化(SEO)已经成为任何网站或博客成功的关键因素之一。SEO不仅仅是关于关键词排名,更是关于如何通过内容优化来提升SEO效果。如何通过内容优化有效提升SEO效…...

STM32F103精简OneWire驱动:DS1820温度传感器裸机实现
1. DS1820数字温度传感器驱动库深度解析:面向STM32F103的精简型OneWire协议实现 1.1 项目定位与工程背景 DS1820是Maxim(现为Analog Devices)推出的经典单总线(1-Wire)数字温度传感器,采用TO-92封装&…...

如何快速掌握动态模板:Obsidian效率提升终极指南
如何快速掌握动态模板:Obsidian效率提升终极指南 【免费下载链接】Templater A template plugin for obsidian 项目地址: https://gitcode.com/gh_mirrors/te/Templater 你是否厌倦了在笔记中重复输入相同的日期格式?是否希望笔记能够自动获取最新…...

RMBG-2.0场景应用:人像证件照换背景预处理完整流程
RMBG-2.0场景应用:人像证件照换背景预处理完整流程 1. 引言:证件照换背景的痛点与解决方案 你有没有遇到过这样的尴尬时刻?公司突然要求提交电子版证件照,背景必须是白色或蓝色,而你手头只有一张红色背景的生活照。或…...