tensorrt的安装和使用
安装
提前安装好 CUDA 和 CUDNN,登录 NVIDIA 官方网站下载和主机 CUDA 版本适配的 TensorRT 压缩包即可。
以 CUDA 版本是 10.2 为例,选择适配 CUDA 10.2 的 tar 包,然后执行类似如下的命令安装并测试:
#安装c++版本
cd /the/path/of/tensorrt/tar/gz/file
tar -zxvf TensorRT-8.2.5.1.linux.x86_64-gnu.cuda-10.2.cudnn8.2.tar.gz
export TENSORRT_DIR=$(pwd)/TensorRT-8.2.5.1
export LD_LIBRARY_PATH=$TENSORRT_DIR/lib:$LD_LIBRARY_PATH #安装python版本
pip install TensorRT-8.2.5.1/python/tensorrt-8.2.5.1-cp37-none-linux_x86_64.whl
python -c "import tensorrt;print(tensorrt.__version__)" #打印8.2.5.1,则说明安装成功
构建trt模型
手动搭建
使用python接口
import tensorrt as trt verbose = True
IN_NAME = 'input'
OUT_NAME = 'output'
IN_H = 224
IN_W = 224
BATCH_SIZE = 1 EXPLICIT_BATCH = 1 << (int)( trt.NetworkDefinitionCreationFlag.EXPLICIT_BATCH) TRT_LOGGER = trt.Logger(trt.Logger.VERBOSE) if verbose else trt.Logger()
with trt.Builder(TRT_LOGGER) as builder, builder.create_builder_config(
) as config, builder.create_network(EXPLICIT_BATCH) as network: # define network input_tensor = network.add_input( name=IN_NAME, dtype=trt.float32, shape=(BATCH_SIZE, 3, IN_H, IN_W)) pool = network.add_pooling( input=input_tensor, type=trt.PoolingType.MAX, window_size=(2, 2)) pool.stride = (2, 2) pool.get_output(0).name = OUT_NAME network.mark_output(pool.get_output(0)) # serialize the model to engine file profile = builder.create_optimization_profile() profile.set_shape_input('input', *[[BATCH_SIZE, 3, IN_H, IN_W]]*3)  builder.max_batch_size = 1 config.max_workspace_size = 1 << 30 engine = builder.build_engine(network, config) with open('model_python_trt.engine', mode='wb') as f: f.write(bytearray(engine.serialize())) print("generating file done!")
使用c++接口
#include <fstream>
#include <iostream> #include <NvInfer.h>
#include <../samples/common/logger.h> using namespace nvinfer1;
using namespace sample; const char* IN_NAME = "input";
const char* OUT_NAME = "output";
static const int IN_H = 224;
static const int IN_W = 224;
static const int BATCH_SIZE = 1;
static const int EXPLICIT_BATCH = 1 << (int)(NetworkDefinitionCreationFlag::kEXPLICIT_BATCH); int main(int argc, char** argv)
{ // Create builder Logger m_logger; IBuilder* builder = createInferBuilder(m_logger); IBuilderConfig* config = builder->createBuilderConfig(); // Create model to populate the network INetworkDefinition* network = builder->createNetworkV2(EXPLICIT_BATCH); ITensor* input_tensor = network->addInput(IN_NAME, DataType::kFLOAT, Dims4{ BATCH_SIZE, 3, IN_H, IN_W }); IPoolingLayer* pool = network->addPoolingNd(*input_tensor, PoolingType::kMAX, DimsHW{ 2, 2 }); pool->setStrideNd(DimsHW{ 2, 2 }); pool->getOutput(0)->setName(OUT_NAME); network->markOutput(*pool->getOutput(0)); // Build engine IOptimizationProfile* profile = builder->createOptimizationProfile(); profile->setDimensions(IN_NAME, OptProfileSelector::kMIN, Dims4(BATCH_SIZE, 3, IN_H, IN_W)); profile->setDimensions(IN_NAME, OptProfileSelector::kOPT, Dims4(BATCH_SIZE, 3, IN_H, IN_W)); profile->setDimensions(IN_NAME, OptProfileSelector::kMAX, Dims4(BATCH_SIZE, 3, IN_H, IN_W)); config->setMaxWorkspaceSize(1 << 20); ICudaEngine* engine = builder->buildEngineWithConfig(*network, *config); // Serialize the model to engine file IHostMemory* modelStream{ nullptr }; assert(engine != nullptr); modelStream = engine->serialize(); std::ofstream p("model.engine", std::ios::binary); if (!p) { std::cerr << "could not open output file to save model" << std::endl; return -1; } p.write(reinterpret_cast<const char*>(modelStream->data()), modelStream->size()); std::cout << "generating file done!" << std::endl; // Release resources modelStream->destroy(); network->destroy(); engine->destroy(); builder->destroy(); config->destroy(); return 0;
}
onnx模型转换
trtexec
使用python接口
import torch
import onnx
import tensorrt as trt onnx_model = 'model.onnx' class NaiveModel(torch.nn.Module): def __init__(self): super().__init__() self.pool = torch.nn.MaxPool2d(2, 2) def forward(self, x): return self.pool(x) device = torch.device('cuda:0') # generate ONNX model
torch.onnx.export(NaiveModel(), torch.randn(1, 3, 224, 224), onnx_model, input_names=['input'], output_names=['output'], opset_version=11)
onnx_model = onnx.load(onnx_model) # create builder and network
logger = trt.Logger(trt.Logger.ERROR)
builder = trt.Builder(logger)
EXPLICIT_BATCH = 1 << (int)( trt.NetworkDefinitionCreationFlag.EXPLICIT_BATCH)
network = builder.create_network(EXPLICIT_BATCH) # parse onnx
parser = trt.OnnxParser(network, logger) if not parser.parse(onnx_model.SerializeToString()): error_msgs = '' for error in range(parser.num_errors): error_msgs += f'{parser.get_error(error)}\n' raise RuntimeError(f'Failed to parse onnx, {error_msgs}') config = builder.create_builder_config()
config.max_workspace_size = 1<<20
profile = builder.create_optimization_profile() profile.set_shape('input', [1,3 ,224 ,224], [1,3,224, 224], [1,3 ,224 ,224])
config.add_optimization_profile(profile)
# create engine
with torch.cuda.device(device): engine = builder.build_engine(network, config) with open('model.engine', mode='wb') as f: f.write(bytearray(engine.serialize())) print("generating file done!")
使用c++接口
#include <fstream>
#include <iostream> #include <NvInfer.h>
#include <NvOnnxParser.h>
#include <../samples/common/logger.h> using namespace nvinfer1;
using namespace nvonnxparser;
using namespace sample; int main(int argc, char** argv)
{ // Create builder Logger m_logger; IBuilder* builder = createInferBuilder(m_logger); const auto explicitBatch = 1U << static_cast<uint32_t>(NetworkDefinitionCreationFlag::kEXPLICIT_BATCH); IBuilderConfig* config = builder->createBuilderConfig(); // Create model to populate the network INetworkDefinition* network = builder->createNetworkV2(explicitBatch); // Parse ONNX file IParser* parser = nvonnxparser::createParser(*network, m_logger); bool parser_status = parser->parseFromFile("model.onnx", static_cast<int>(ILogger::Severity::kWARNING)); // Get the name of network input Dims dim = network->getInput(0)->getDimensions(); if (dim.d[0] == -1)  // -1 means it is a dynamic model { const char* name = network->getInput(0)->getName(); IOptimizationProfile* profile = builder->createOptimizationProfile(); profile->setDimensions(name, OptProfileSelector::kMIN, Dims4(1, dim.d[1], dim.d[2], dim.d[3])); profile->setDimensions(name, OptProfileSelector::kOPT, Dims4(1, dim.d[1], dim.d[2], dim.d[3])); profile->setDimensions(name, OptProfileSelector::kMAX, Dims4(1, dim.d[1], dim.d[2], dim.d[3])); config->addOptimizationProfile(profile); } // Build engine config->setMaxWorkspaceSize(1 << 20); ICudaEngine* engine = builder->buildEngineWithConfig(*network, *config); // Serialize the model to engine file IHostMemory* modelStream{ nullptr }; assert(engine != nullptr); modelStream = engine->serialize(); std::ofstream p("model.engine", std::ios::binary); if (!p) { std::cerr << "could not open output file to save model" << std::endl; return -1; } p.write(reinterpret_cast<const char*>(modelStream->data()), modelStream->size()); std::cout << "generate file success!" << std::endl; // Release resources modelStream->destroy(); network->destroy(); engine->destroy(); builder->destroy(); config->destroy(); return 0;
}
模型推理
使用python接口
#输入一个 1x3x224x224 的张量,输出一个 1x3x112x112 的张量
from typing import Union, Optional, Sequence,Dict,Any import torch
import tensorrt as trt class TRTWrapper(torch.nn.Module): def __init__(self,engine: Union[str, trt.ICudaEngine], output_names: Optional[Sequence[str]] = None) -> None: super().__init__() self.engine = engine if isinstance(self.engine, str): with trt.Logger() as logger, trt.Runtime(logger) as runtime: with open(self.engine, mode='rb') as f: engine_bytes = f.read() self.engine = runtime.deserialize_cuda_engine(engine_bytes) self.context = self.engine.create_execution_context() names = [_ for _ in self.engine] input_names = list(filter(self.engine.binding_is_input, names)) self._input_names = input_names self._output_names = output_names if self._output_names is None: output_names = list(set(names) - set(input_names)) self._output_names = output_names def forward(self, inputs: Dict[str, torch.Tensor]): assert self._input_names is not None assert self._output_names is not None bindings = [None] * (len(self._input_names) + len(self._output_names)) profile_id = 0 for input_name, input_tensor in inputs.items(): # check if input shape is valid profile = self.engine.get_profile_shape(profile_id, input_name) assert input_tensor.dim() == len( profile[0]), 'Input dim is different from engine profile.' for s_min, s_input, s_max in zip(profile[0], input_tensor.shape, profile[2]): assert s_min <= s_input <= s_max, \ 'Input shape should be between ' \ + f'{profile[0]} and {profile[2]}' \ + f' but get {tuple(input_tensor.shape)}.' idx = self.engine.get_binding_index(input_name) # All input tensors must be gpu variables assert 'cuda' in input_tensor.device.type input_tensor = input_tensor.contiguous() if input_tensor.dtype == torch.long: input_tensor = input_tensor.int() self.context.set_binding_shape(idx, tuple(input_tensor.shape)) bindings[idx] = input_tensor.contiguous().data_ptr() # create output tensors outputs = {} for output_name in self._output_names: idx = self.engine.get_binding_index(output_name) dtype = torch.float32 shape = tuple(self.context.get_binding_shape(idx)) device = torch.device('cuda') output = torch.empty(size=shape, dtype=dtype, device=device) outputs[output_name] = output bindings[idx] = output.data_ptr() self.context.execute_async_v2(bindings, torch.cuda.current_stream().cuda_stream) return outputs model = TRTWrapper('model.engine', ['output'])
output = model(dict(input = torch.randn(1, 3, 224, 224).cuda()))
print(output)
c++接口
#include <fstream>
#include <iostream> #include <NvInfer.h>
#include <../samples/common/logger.h> #define CHECK(status) \ do\ {\ auto ret = (status);\ if (ret != 0)\ {\ std::cerr << "Cuda failure: " << ret << std::endl;\ abort();\ }\ } while (0) using namespace nvinfer1;
using namespace sample; const char* IN_NAME = "input";
const char* OUT_NAME = "output";
static const int IN_H = 224;
static const int IN_W = 224;
static const int BATCH_SIZE = 1;
static const int EXPLICIT_BATCH = 1 << (int)(NetworkDefinitionCreationFlag::kEXPLICIT_BATCH); void doInference(IExecutionContext& context, float* input, float* output, int batchSize)
{ const ICudaEngine& engine = context.getEngine(); // Pointers to input and output device buffers to pass to engine. // Engine requires exactly IEngine::getNbBindings() number of buffers. assert(engine.getNbBindings() == 2); void* buffers[2]; // In order to bind the buffers, we need to know the names of the input and output tensors. // Note that indices are guaranteed to be less than IEngine::getNbBindings() const int inputIndex = engine.getBindingIndex(IN_NAME); const int outputIndex = engine.getBindingIndex(OUT_NAME); // Create GPU buffers on device CHECK(cudaMalloc(&buffers[inputIndex], batchSize * 3 * IN_H * IN_W * sizeof(float))); CHECK(cudaMalloc(&buffers[outputIndex], batchSize * 3 * IN_H * IN_W /4 * sizeof(float))); // Create stream cudaStream_t stream; CHECK(cudaStreamCreate(&stream)); // DMA input batch data to device, infer on the batch asynchronously, and DMA output back to host CHECK(cudaMemcpyAsync(buffers[inputIndex], input, batchSize * 3 * IN_H * IN_W * sizeof(float), cudaMemcpyHostToDevice, stream)); context.enqueue(batchSize, buffers, stream, nullptr); CHECK(cudaMemcpyAsync(output, buffers[outputIndex], batchSize * 3 * IN_H * IN_W / 4 * sizeof(float), cudaMemcpyDeviceToHost, stream)); cudaStreamSynchronize(stream); // Release stream and buffers cudaStreamDestroy(stream); CHECK(cudaFree(buffers[inputIndex])); CHECK(cudaFree(buffers[outputIndex]));
} int main(int argc, char** argv)
{ // create a model using the API directly and serialize it to a stream char *trtModelStream{ nullptr }; size_t size{ 0 }; std::ifstream file("model.engine", std::ios::binary); if (file.good()) { file.seekg(0, file.end); size = file.tellg(); file.seekg(0, file.beg); trtModelStream = new char[size]; assert(trtModelStream); file.read(trtModelStream, size); file.close(); } Logger m_logger; IRuntime* runtime = createInferRuntime(m_logger); assert(runtime != nullptr); ICudaEngine* engine = runtime->deserializeCudaEngine(trtModelStream, size, nullptr); assert(engine != nullptr); IExecutionContext* context = engine->createExecutionContext(); assert(context != nullptr); // generate input data float data[BATCH_SIZE * 3 * IN_H * IN_W]; for (int i = 0; i < BATCH_SIZE * 3 * IN_H * IN_W; i++) data[i] = 1; // Run inference float prob[BATCH_SIZE * 3 * IN_H * IN_W /4]; doInference(*context, data, prob, BATCH_SIZE); // Destroy the engine context->destroy(); engine->destroy(); runtime->destroy(); return 0;
}
相关文章:

tensorrt的安装和使用
安装 提前安装好 CUDA 和 CUDNN,登录 NVIDIA 官方网站下载和主机 CUDA 版本适配的 TensorRT 压缩包即可。 以 CUDA 版本是 10.2 为例,选择适配 CUDA 10.2 的 tar 包,然后执行类似如下的命令安装并测试: #安装c版本 cd /the/pat…...
电压放大器在电子测试中的应用有哪些方面
电压放大器是一种常见的电子设备,广泛应用于各种测试和测量应用中。以下是电压放大器在电子测试中的几个主要方面应用的简要介绍。 信号采集与处理:电压放大器通常用于信号采集和处理,在测试过程中将低电平信号放大到适合进一步处理或分析的水…...

39.地址算术运算
如果p是一个指向数组中某个元素的指针,那么p将会对p进行自增运算并指向下一个元素,而pi将对p进行加i的增量运算,使其指向指针p当前所指向的元素之后的第i个元素。这类运算时指针或地址算术运算中最简单的形式。 allocbuf中的空间使用状况也是…...

没有外网的麒麟系统上搭建GitLab服务并且无需客户端账号密码验证
要在没有外网的麒麟系统上搭建GitLab服务并且无需客户端账号密码验证,可以按照以下步骤进行操作: 安装必要的依赖包和软件 sudo yum install curl policycoreutils-python openssh-server openssh-clients sudo systemctl enable sshd sudo systemctl …...

微服务生态系统:使用Spring Cloud构建分布式系统
文章目录 什么是微服务?为什么选择Spring Cloud?Spring Cloud的关键组件示例:构建一个简单的微服务步骤1:创建Spring Boot项目步骤2:配置Eureka服务发现步骤3:创建REST控制器步骤4:运行项目步骤…...
DIY 一个汽车方向盘游戏外设(MMOS OSW DIY)
OSW-MMOS直驱方向盘DIY过程记录 - 简书 (jianshu.com) DIY 一个汽车方向盘游戏外设(MMOS OSW DIY) 首先讲一下这个直驱系统大概的框架,首先是电脑,电脑里装MMOS的软件(这个软件国内高手把它汉化了的),电脑通过USB线&a…...

校园网络技术需求分析
路由技术: 路由协议工作在 OSI 参考模型的第 3 层,因此它的作用主要是在通信 子网间路由数据包。路由器具有在网络中传递数据时选择最佳路径的能力。 除了可以完成主要的路由任务,利用访问控制列表(Access Control List&#x…...
计算机网络(二):TCP篇
文章目录 1. TCP头部包含哪些内容?2. 为什么需要 TCP 协议? TCP 工作在哪一层?3. 什么是 TCP ?4. 什么是 TCP 连接?5. 如何唯一确定一个 TCP 连接呢?6. UDP头部大小是多少?包含哪些内容…...

测试登录界面:Python
import unittest from selenium import webdriver class LoginTest(unittest.TestCase): def setUp(self): self.driver webdriver.Chrome() def test_login(self): # 打开登录页面 self.driver.get("http://example.com/login") # 输入用户名和密码 user…...

Rust踩雷笔记(7)——两个链表题例子初识裸指针
目录 leetcode 234leetcode 19 leetcode 234 题目在这https://leetcode.cn/problems/palindrome-linked-list/,leetcode 234的回文链表,思路很简单,就是fast和slow两个指针,fast一次移动两个、slow一次一个,最后slow指…...

用什么命令看Linux系统的体系架构
要查看Linux系统的体系架构,可以使用uname命令。在终端中运行以下命令: uname -m该命令将返回系统的体系架构,例如x86_64表示64位系统,i686表示32位系统。 uname 使用方法 uname命令用于获取操作系统的相关信息。它可以用于显示…...

消息中间件大揭秘:选择之前你必须知道的关键信息
Hello大家好!我是小米,很高兴再次和大家见面!今天的话题非常精彩,我们将深入探讨消息中间件,并了解一些常见的消息队列:RabbitMQ、RocketMQ、Kafka以及Redis。如果你正在准备面试,或者只是对这些…...

【Unity基础】4.动画Animation
【Unity基础】4.动画Animation 大家好,我是Lampard~~ 欢迎来到Unity基础系列博客,所学知识来自B站阿发老师~感谢 (一)Unity动画编辑器 (1)Animation组件 这一张我们要学习如何在unity编辑器中&…...
FreeRTOS移植以及核心功能
文章目录 freertos和ucos区别,优缺点比较移植步骤核心功能内存管理(5种内存管理策略)FreeRTOS任务调度算法有三种时间管理通信管理 栈管理 freertos和ucos区别,优缺点比较 FreeRTOS(Free Real-Time Operating System&…...
重装系统(配置环境)
这里写目录标题 0.重装系统1.python1.1 anaconda1.2 pycharm1.3 深度学习环境配置 2.java2.1.安装JDK2.2.配置JDK环境变量2.3IDEA2.4 Maven 3.大数据3.1 虚拟机3.2 Hadoop平台3.3 存储3.4 采集3.5 计算3.6 查询3.7 可视化 0.重装系统 // An highlighted block var foo bar;1.…...

docker系列-报错以及解决指南
1. windows运行docker报错Windows Hypervisor is not presentDocker Desktop is unable to detect a Hypervisor.Hardware assisted virtualization and data execution protection must be enabled in the BIOS. Docker Desktop - Windows Hypervisor is not presentDocker D…...
Vue3快速上手
1.Vue3简介 2020年9月18日,Vue.js发布3.0版本,代号:One Piece(海贼王)耗时2年多、2600次提交、30个RFC、600次PR、99位贡献者github上的tags地址:Release v3.0.0 One Piece vuejs/core GitHub 2.Vue3带…...

二叉搜索树(BST,Binary Search Tree)
文章目录 1. 二叉搜索树1.1 二叉搜索树概念1.2 二叉搜索树的查找1.3 二叉搜索树的插入1.4 二叉搜索树的删除 2 二叉搜索树的实现3 二叉搜索树的应用3.1二叉搜索树的性能分析 1. 二叉搜索树 1.1 二叉搜索树概念 二叉搜索树又称二叉排序树,它或者是一棵空树…...
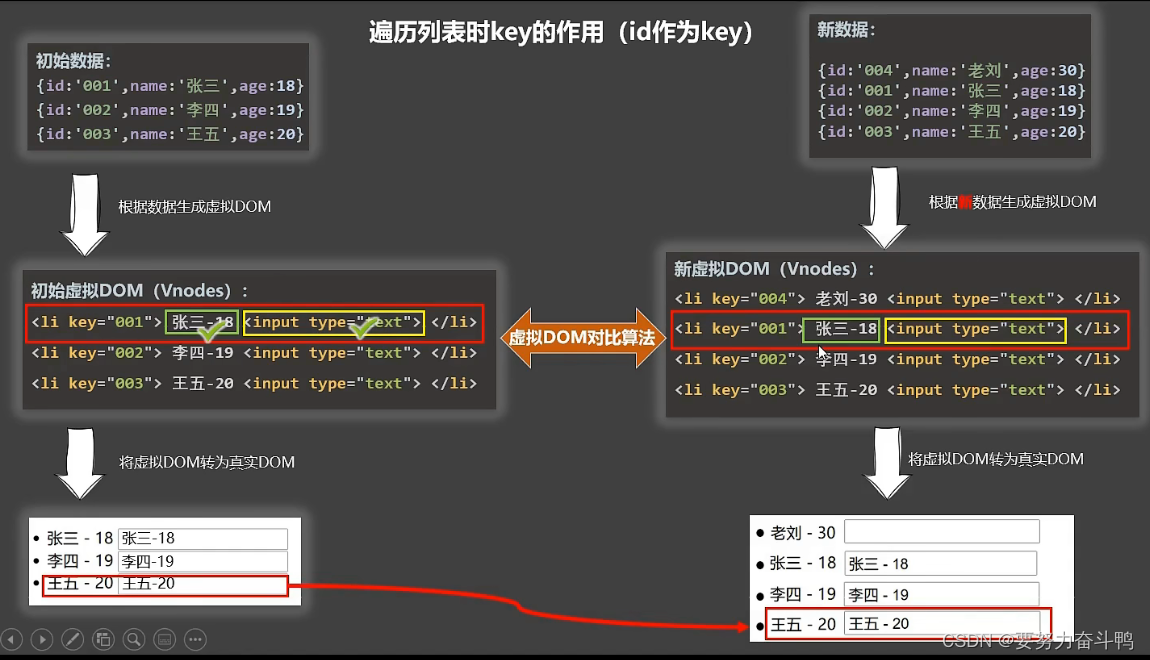
分析key原理
总结: key是虚拟dom对象的标识,当数据发生变化时,vue会根据新数据生成新的虚拟dom,随后vue进行新虚拟dom与旧虚拟dom的差异比较 比较规则: ①旧虚拟dom中找到了与新虚拟dom相同的key 若虚拟dom中的内容没变,…...
[CISCN2019 华东南赛区]Web11 SSTI
这道SSTI 差点给我渗透的感觉了 全是API 我还想去访问API看看 发现这里读取了我们的ip 我们抓包看看是如何做到的 没有东西 我们看看还有什么提示 欸 那我们可不可以直接修改参数呢 我们传递看看 发现成功了 是受控的 这里我就开始没有思路了 于是看了wp 说是ssti 那我们看…...

Unity AudioSource播放控制全攻略:从Play到UnPause,新手也能搞定的UI交互实战
Unity音频交互实战:从零构建专业级音乐控制器 在游戏和多媒体应用开发中,音频控制是提升用户体验的关键环节。Unity的AudioSource组件提供了强大的音频处理能力,但如何将其与UI系统无缝结合,打造直观易用的音频控制器,…...

企业级视频上云实战:基于SRS5与GB28181构建安防监控流媒体中台
1. 为什么需要流媒体中台? 最近几年,我帮不少制造业客户搭建过视频监控上云方案,发现一个普遍痛点:企业内网往往部署了几十甚至上百个不同品牌的GB28181摄像头(比如海康、大华),这些设备分散在厂…...

Docker Rootless模式深度体验:它真的能替代传统Docker吗?聊聊那些官方没明说的限制
Docker Rootless模式技术评估:生产环境适配性全景分析 当容器技术逐渐成为现代基础设施的标配,安全隔离的短板却始终如达摩克利斯之剑高悬。传统Docker守护进程以root权限运行的架构设计,使得容器逃逸漏洞可能演变为整个宿主机的灾难。Rootle…...

AI记忆系统核心:向量数据库原理与memU开源实践
1. 项目概述:一个为AI记忆而生的开源工具最近在折腾AI应用开发,特别是那些需要长期记忆和上下文管理的场景时,总是绕不开一个核心痛点:如何让AI记住过去的关键信息,并在需要时精准地回忆起来?无论是构建一个…...
)
别再手动加图例了!用MATLAB的text函数给你的图表做精准标注(附TeX公式写法)
别再手动加图例了!用MATLAB的text函数实现精准标注与TeX公式嵌入 科研绘图和工程报告中,图表标注的精确性直接影响信息传达效率。传统图例往往无法满足复杂数据场景的需求——比如在特定峰值标注微分方程、在拐点添加统计显著性符号,或在多组…...

3分钟掌握人类微生物组数据分析:curatedMetagenomicData终极指南
3分钟掌握人类微生物组数据分析:curatedMetagenomicData终极指南 【免费下载链接】curatedMetagenomicData Curated Metagenomic Data of the Human Microbiome 项目地址: https://gitcode.com/gh_mirrors/cu/curatedMetagenomicData 还在为宏基因组数据分析…...
)
STM32F103ZET6内存不够用?手把手教你用W25Q64 Flash扩展TFT-LCD图片库(附完整代码)
STM32F103ZET6内存不够用?手把手教你用W25Q64 Flash扩展TFT-LCD图片库(附完整代码) 在嵌入式图形界面开发中,STM32F103ZET6凭借其出色的性价比成为许多开发者的首选。然而,当面对240*320分辨率的TFT-LCD屏幕时…...
:覆盖Power Apps/Logic Apps/Canvas App的断点穿透与变量热观测技术)
VSCode低代码调试实战手册(2024最新版):覆盖Power Apps/Logic Apps/Canvas App的断点穿透与变量热观测技术
更多请点击: https://intelliparadigm.com 第一章:VSCode低代码调试的核心价值与演进脉络 在现代开发范式中,VSCode 已超越传统编辑器角色,成为低代码/无代码平台与专业开发深度协同的关键枢纽。其核心价值在于将可视化逻辑编排与…...
)
C++26合约编程实战手册(2024 Q3唯一经LLVM 19+GCC 14实测通过的工程化方案)
更多请点击: https://intelliparadigm.com 第一章:C26合约编程的演进脉络与工程价值 从契约精神到语言原生支持 C26 将首次将合约(Contracts)以标准化、可移植的方式纳入核心语言特性,终结了 C20 中因编译器分歧导致…...

React Hooks原理:为什么不能写在if里?揭开Hook的“魔法”面纱
前言 Hooks刚出的时候,大家都觉得是“黑魔法”:一个函数组件,居然能记住自己的状态?还能模拟生命周期?很多人用了很久,却不知道原理。导致遇到奇怪的问题(比如无限循环、状态不更新)…...