三、飞行和射击
目录
1.飞行的实现
2.限制玩家视角
3.射击的实现
4.附录
1.飞行的实现
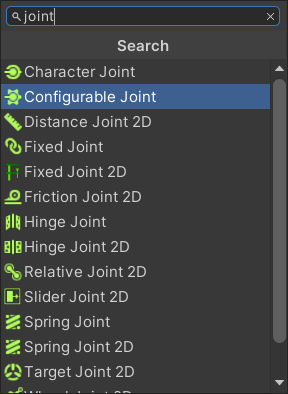
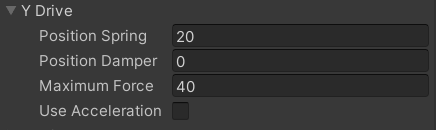
(1)在Player预制体上挂载Configuration Joint组件,并修改其Y Drive属性
(2) 修改PlayerInput.cs和PlayerController.cs以实现飞行
- PlayerInput.cs
添加以下属性
[SerializeField]
private float thrusterForce = 20f;
[SerializeField]
private ConfigurableJoint joint
在其Start方法中添加以下语句
joint = GetComponent<ConfigurableJoint>();在其Update方法中添加以下语句
Vector3 force = Vector3.zero;
if (Input.GetButton("Jump"))
{force = Vector3.up * thrusterForce;joint.yDrive = new JointDrive{positionSpring = 0f,positionDamper = 0f,maximumForce = 0f,};
}
else
{joint.yDrive = new JointDrive{positionSpring = 20f,positionDamper = 0f,maximumForce = 40f,};}
playerControllor.Thrust(force);- PlayerController.cs
添加以下属性
private Vector3 thrusterForce = Vector3.zero;//向上的推力添加以下方法
public void Thrust(Vector3 _thrusterForce)
{thrusterForce = _thrusterForce;
}
在其PerformMovement方法中添加以下语句
if (thrusterForce != Vector3.zero)
{rb.AddForce(thrusterForce);//作用Time.fixedDeltaTime秒:0.02秒thrusterForce = Vector3.zero;
}
2.限制玩家视角
修改PlayerController.cs
添加以下属性
private float cameraRoatationTotal = 0f;//累计转了多少度
[SerializeField]
private float cameraRotationLimit = 85f;
对其PerformRotation方法进行一下修改
private void PerformRotation()
{if (yRotation != Vector3.zero){rb.transform.Rotate(yRotation);}if (xRotation != Vector3.zero){cam.transform.Rotate(xRotation);cameraRoatationTotal += xRotation.x;cameraRoatationTotal = Mathf.Clamp(cameraRoatationTotal, -cameraRotationLimit, +cameraRotationLimit);cam.transform.localEulerAngles = new Vector3(cameraRoatationTotal, 0f, 0f);}
}
3.射击的实现
(1) 创建并编写PlayerWeapon.cs,将其移动至Assets/Scripts/Player
using System;[Serializable]
public class PlayerWeapon
{public string name = "M16";public int damage = 10;public float range = 100f;
}
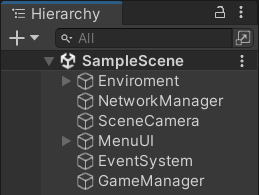
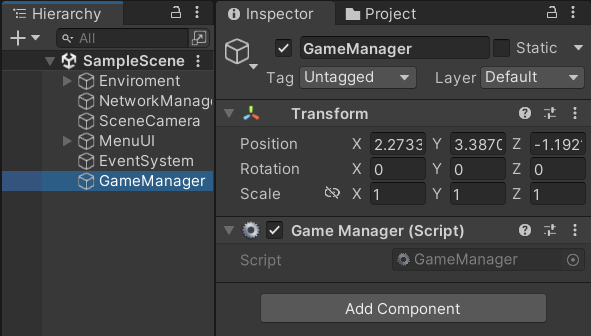
(2)在场景中创建空物体“GameManager”,创建并编写GameManager.cs并挂载至空物体“GameManager”
- GameManager.cs
using System;
using UnityEngine;public class GameManager : MonoBehaviour
{private static string info;public static void UpdateInfo(String _info){info = _info;}private void OnGUI(){GUILayout.BeginArea(new Rect(200f,200f,200f,400f));GUILayout.BeginVertical();GUILayout.Label(info);GUILayout.EndVertical();GUILayout.EndArea();}
}
(3)创建并编写PlayerShooting.cs并将其挂载至Player预制体,将其移至Assets/Scripts/Player
using Unity.Netcode;
using UnityEngine;public class PlayerShooting : NetworkBehaviour
{[SerializeField]private PlayerWeapon weapon;[SerializeField] private LayerMask mask;private Camera cam;// Start is called before the first frame updatevoid Start(){cam = GetComponentInChildren<Camera>();}// Update is called once per framevoid Update(){if(Input.GetButton("Fire1")){Shoot();}}private void Shoot(){RaycastHit hit;if (Physics.Raycast(cam.transform.position, cam.transform.forward, out hit,weapon.range,mask)){ShootServerRpc(hit.collider.name,weapon.damage);}}[ServerRpc]private void ShootServerRpc(string hittedName,int damage){GameManager.UpdateInfo(transform.name+" hit "+hittedName);}
}
(4) 修改NetworkUI.cs,实现“点击按钮后按钮消失”
using Unity.Netcode;
using UnityEngine;
using UnityEngine.UI;public class NetworkManagerUI : MonoBehaviour
{[SerializeField] private Button hostBtn;[SerializeField] private Button serverBtn;[SerializeField] private Button clientBtn;// Start is called before the first frame updatevoid Start(){hostBtn.onClick.AddListener(() =>{NetworkManager.Singleton.StartHost();DestroyAllButtons();});serverBtn.onClick.AddListener(() =>{NetworkManager.Singleton.StartServer();DestroyAllButtons();});clientBtn.onClick.AddListener(() =>{NetworkManager.Singleton.StartClient();DestroyAllButtons();});}private void DestroyAllButtons(){Destroy(hostBtn.gameObject);Destroy(serverBtn.gameObject);Destroy(clientBtn.gameObject);}
}
4.附录
(1)测试效果图
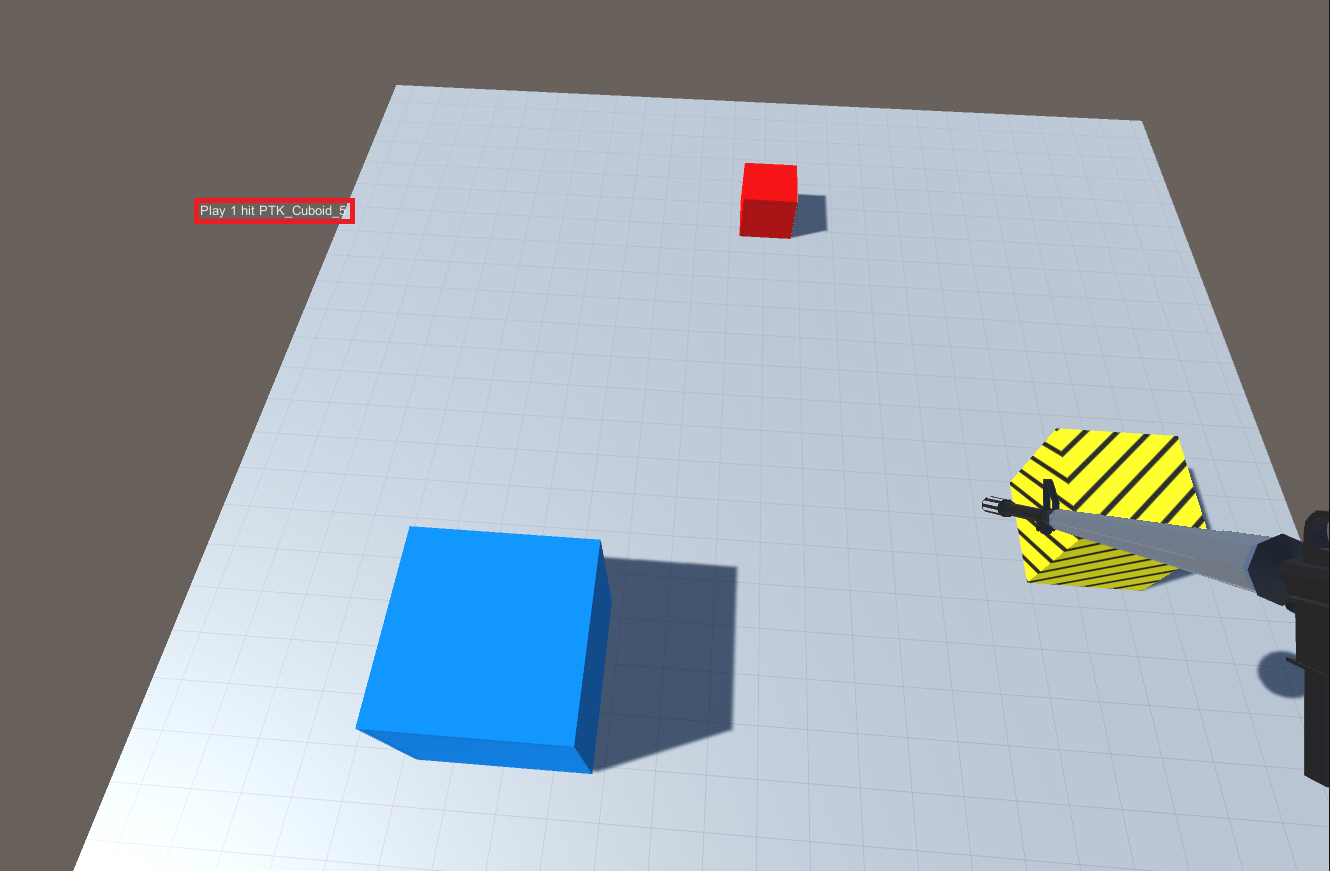
(按住空格起飞,朝向任意碰撞体按下鼠标左键,屏幕左上方出现命中提示)
(2)部分工程文件完整代码
- PlayerInput.cs
using UnityEngine;public class PlayerInput : MonoBehaviour
{[SerializeField]private float speed = 5f;[SerializeField] private float thrusterForce = 20f;[SerializeField] private PlayerController playerControllor;[SerializeField] private float lookSensitivity = 8f;[SerializeField] private ConfigurableJoint joint;// Start is called before the first frame updatevoid Start(){Cursor.lockState = CursorLockMode.Locked;joint = GetComponent<ConfigurableJoint>();}// Update is called once per framevoid Update(){float xMov = Input.GetAxisRaw("Horizontal");float yMov = Input.GetAxisRaw("Vertical");Vector3 velocity = (transform.right * xMov + transform.forward * yMov).normalized*speed;playerControllor.Move(velocity);float xMouse = Input.GetAxisRaw("Mouse X");float yMouse = Input.GetAxisRaw("Mouse Y");Vector3 yRotation = new Vector3(0f, xMouse, 0f)*lookSensitivity;Vector3 xRotation = new Vector3(-yMouse, 0f, 0f)*lookSensitivity;playerControllor.Rotate(yRotation,xRotation);Vector3 force = Vector3.zero;if (Input.GetButton("Jump")){force = Vector3.up * thrusterForce;joint.yDrive = new JointDrive{positionSpring = 0f,positionDamper = 0f,maximumForce = 0f,};}else{joint.yDrive = new JointDrive{positionSpring = 20f,positionDamper = 0f,maximumForce = 40f,};}playerControllor.Thrust(force);}
}- PlayerController.cs
using UnityEngine;public class PlayerController : MonoBehaviour
{[SerializeField] private Rigidbody rb;[SerializeField] private Camera cam;private Vector3 velocity = Vector3.zero;//速度:每秒钟移动的距离private Vector3 yRotation=Vector3.zero;//旋转角色private Vector3 xRotation = Vector3.zero;//旋转视角private float cameraRoatationTotal = 0f;//累计转了多少度[SerializeField]private float cameraRotationLimit = 85f;private Vector3 thrusterForce = Vector3.zero;//向上的推力public void Move(Vector3 _velocity){velocity = _velocity;}public void Rotate(Vector3 _yRotation, Vector3 _xRotation){yRotation = _yRotation;xRotation = _xRotation;}public void Thrust(Vector3 _thrusterForce){thrusterForce = _thrusterForce;}private void PerformMovement(){if (velocity != Vector3.zero){rb.MovePosition(rb.position+velocity*Time.fixedDeltaTime);}if (thrusterForce != Vector3.zero){rb.AddForce(thrusterForce);//作用Time.fixedDeltaTime秒:0.02秒thrusterForce = Vector3.zero;}}private void PerformRotation(){if (yRotation != Vector3.zero){rb.transform.Rotate(yRotation);}if (xRotation != Vector3.zero){cam.transform.Rotate(xRotation);cameraRoatationTotal += xRotation.x;cameraRoatationTotal = Mathf.Clamp(cameraRoatationTotal, -cameraRotationLimit, +cameraRotationLimit);cam.transform.localEulerAngles = new Vector3(cameraRoatationTotal, 0f, 0f);}}private void FixedUpdate(){PerformMovement();PerformRotation();}
}
相关文章:
三、飞行和射击
目录 1.飞行的实现 2.限制玩家视角 3.射击的实现 4.附录 1.飞行的实现 (1)在Player预制体上挂载Configuration Joint组件,并修改其Y Drive属性 (2) 修改PlayerInput.cs和PlayerController.cs以实现飞行 PlayerIn…...
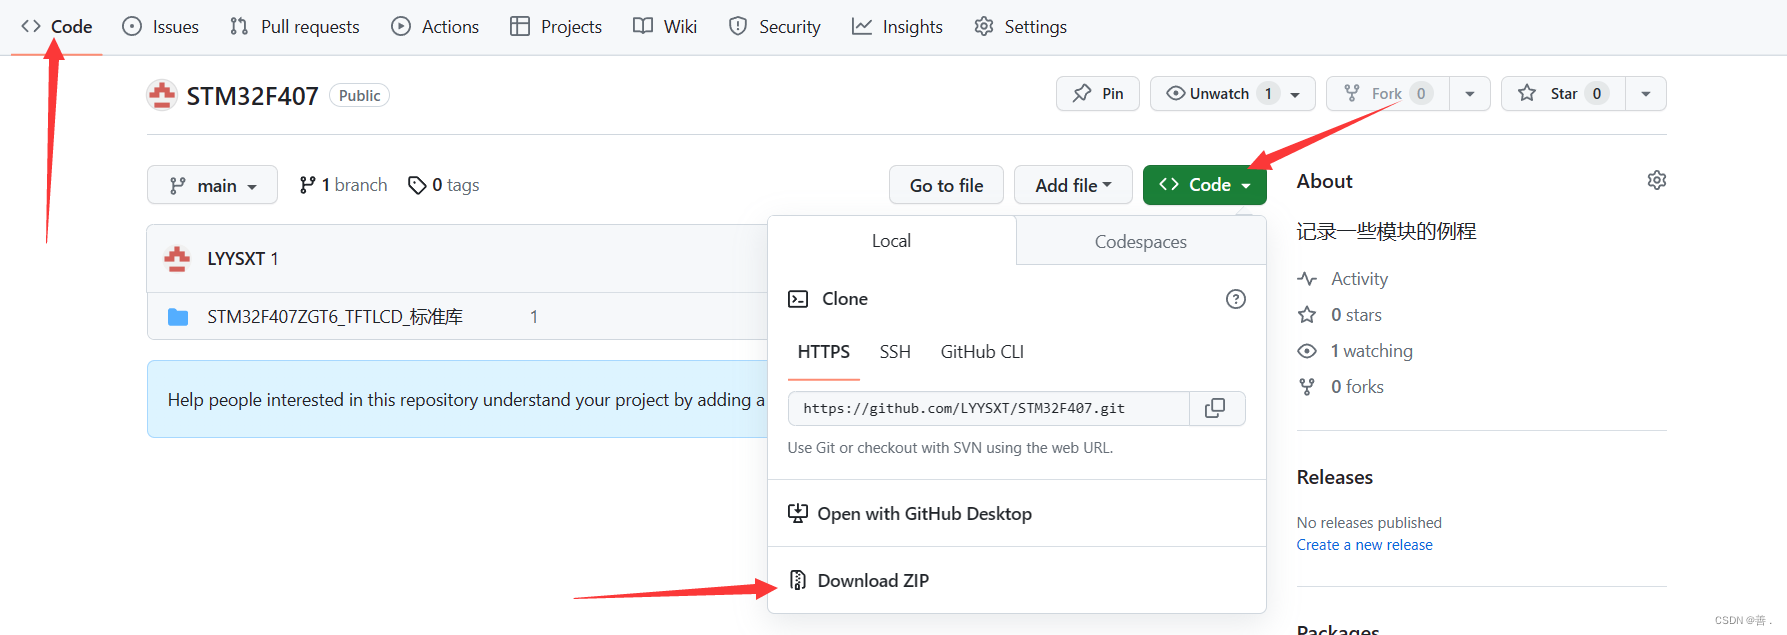
GitHub与GitHubDesktop的使用
1、介绍 见天来学习使用GitHub与GitHubDesktop。 学习前先来介绍一下什么是GitHub。 GitHub是一个基于Git的代码托管平台和开发者社区。它提供了一个Web界面,让开发者能够轻松地托管、共享和管理他们的软件项目。 在GitHub上,开发者可以创建自己的代…...

AIGC 微调的方法
AIGC 的微调方法可以分为以下步骤: 数据准备:收集尽可能多的数据,包括输入和输出数据,并将其划分为训练集、验证集和测试集。 模型选择:选择合适的模型结构,例如多层感知器(MLP)、卷…...

gcc编译webrtc x64
gcc使用Ubuntu系统已经有的gcc version 7.5.0 (Ubuntu 7.5.0-3ubuntu1~18.04) 1、下载离线版webrtc(也可以翻墙下载webrtc) 百度云链接: 链接: https://pan.baidu.com/s/1oHVz9bxXlW3Q6uO996c5XA 提取码: ojbs 2、下载gn https://github.com/timnieder…...

uni-app 实现凸起的 tabbar 底部导航栏
效果图 在 pages.json 中设置隐藏自带的 tabbar 导航栏 "custom": true, // 开启自定义tabBar(不填每次原来的tabbar在重新加载时都回闪现) 新建一个 custom-tabbar.vue 自定义组件页面 custom-tabbar.vue <!-- 自定义底部导航栏 --> <template><v…...
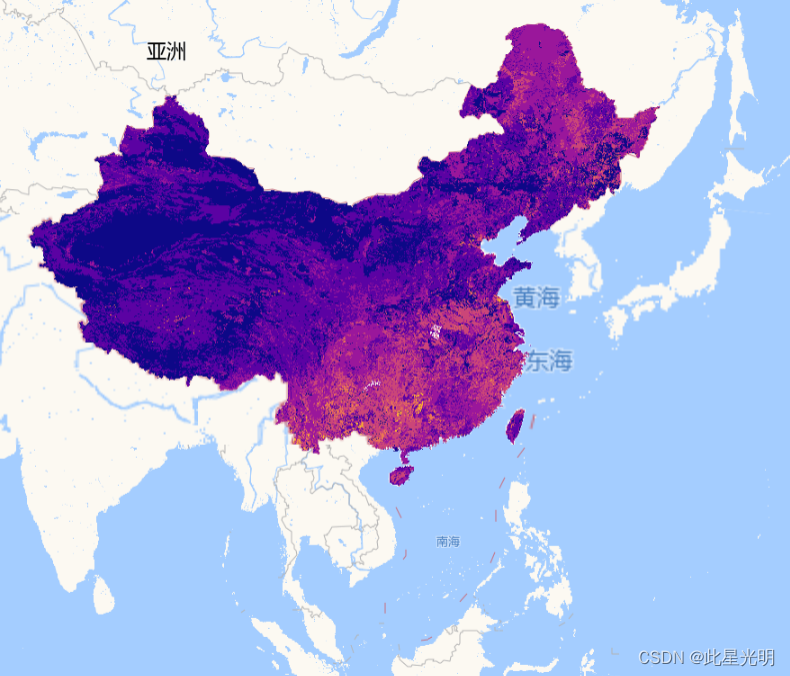
中国1km土壤特征数据集(2010年)
简介: 中国1km土壤特征数据集(2010)是基于第二次全国土壤调查的中国1:1000000比例尺土壤图和8595个土壤剖面图,以及美国农业部(USDA)中国区域土地和气候模拟标准,开发了一个多层土壤粒度分布数…...
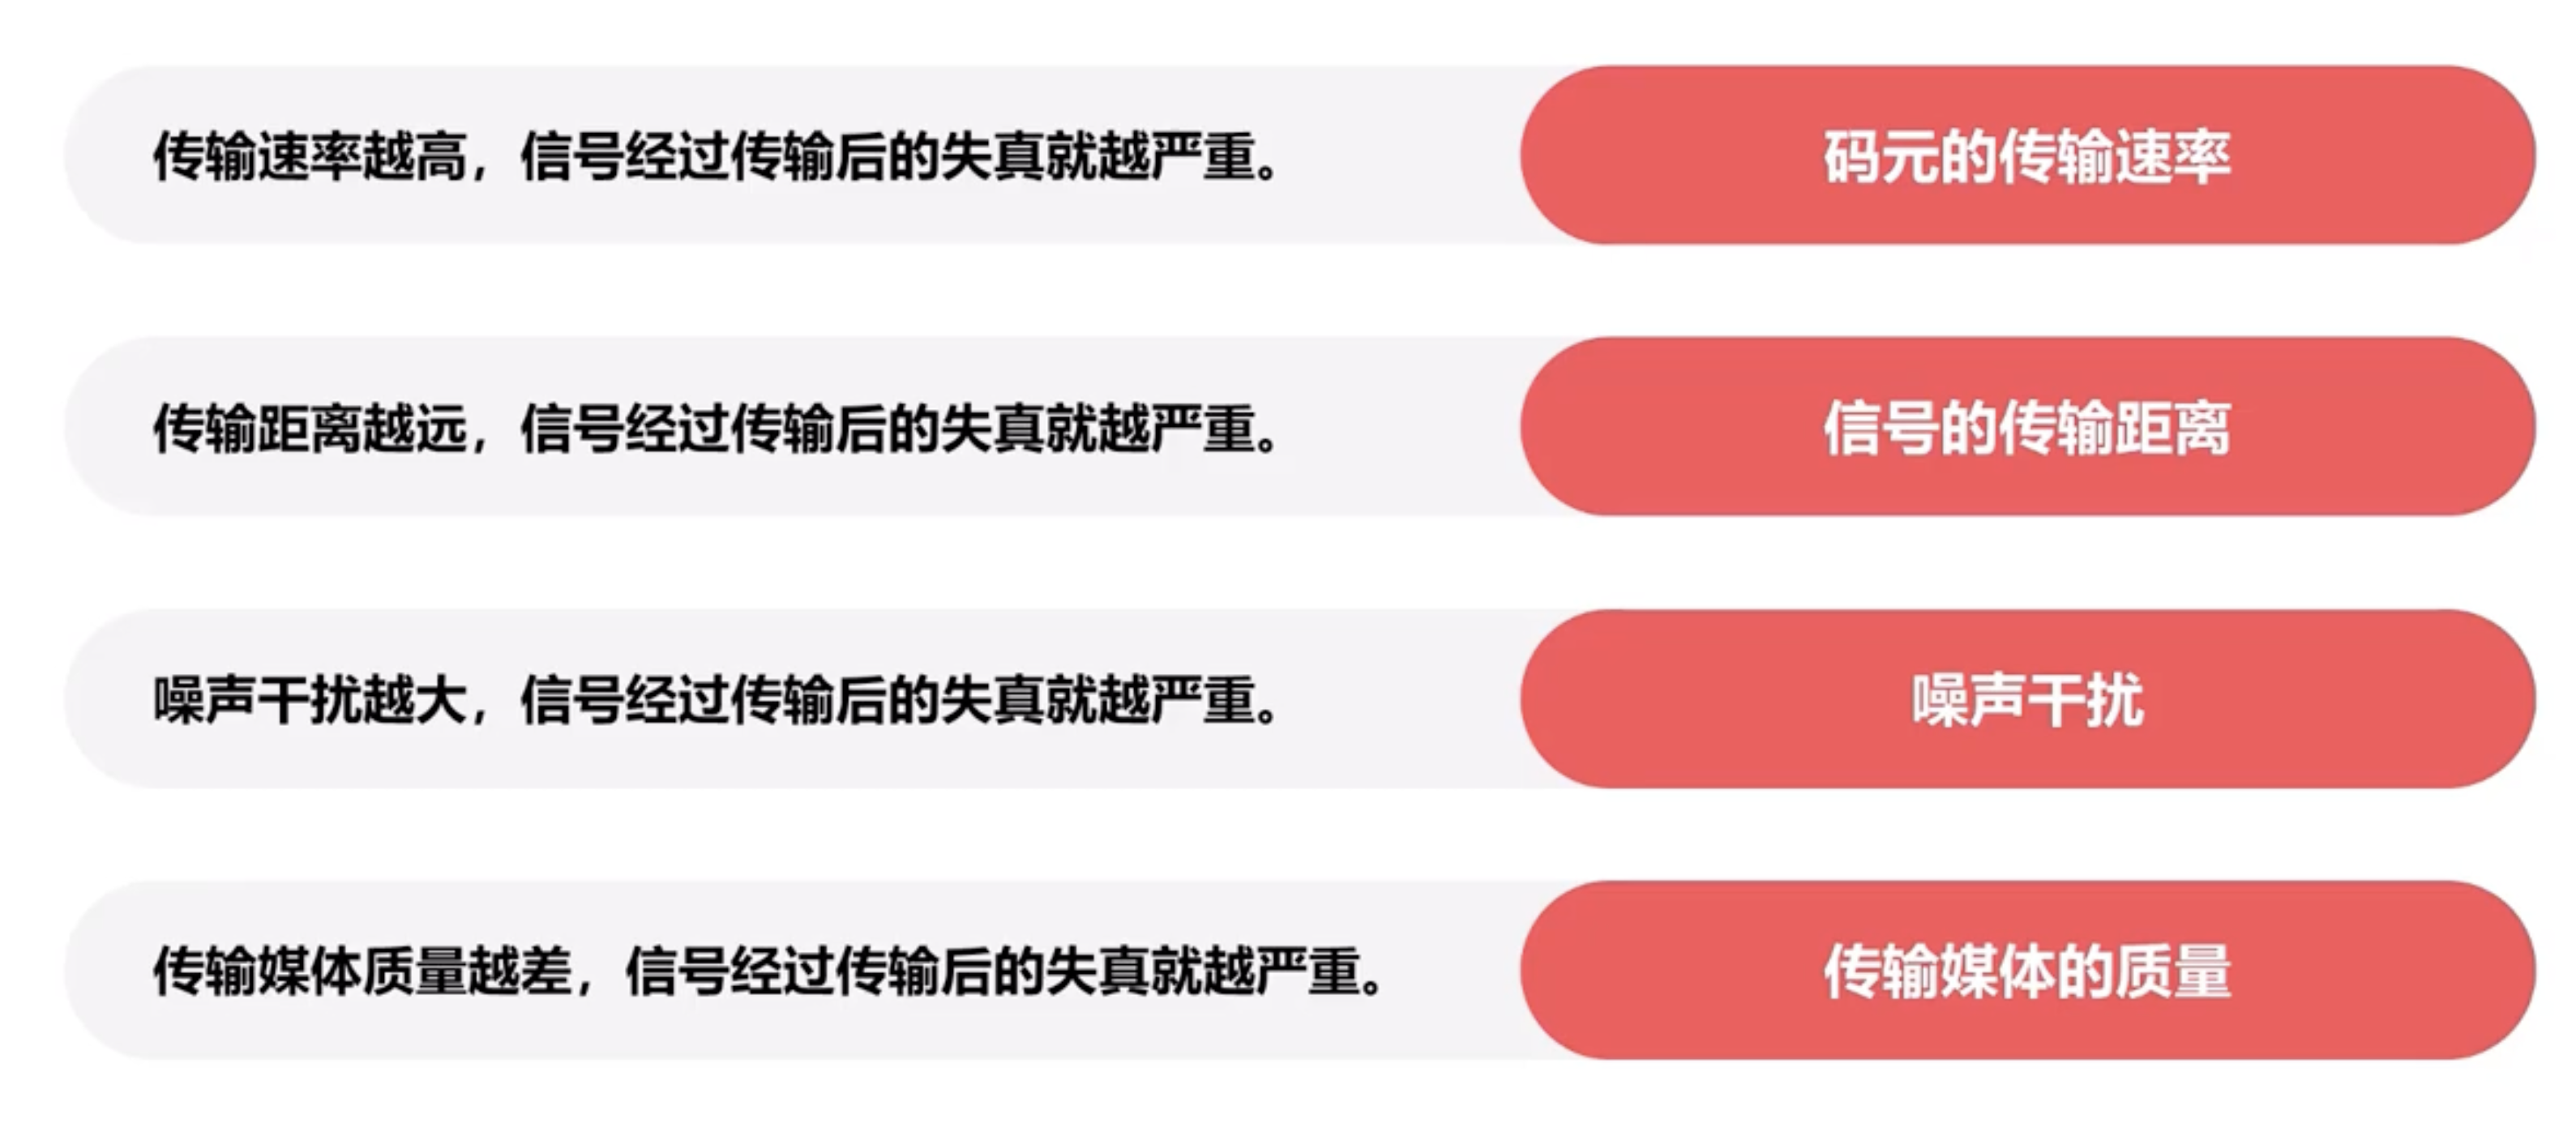
计算机网络笔记 第二章 物理层
2.1 物理层概述 物理层要实现的功能 物理层接口特性 机械特性 形状和尺寸引脚数目和排列固定和锁定装置 电气特性 信号电压的范围阻抗匹配的情况传输速率距离限制 功能特性 -规定接口电缆的各条信号线的作用 过程特性 规定在信号线上传输比特流的一组操作过程࿰…...
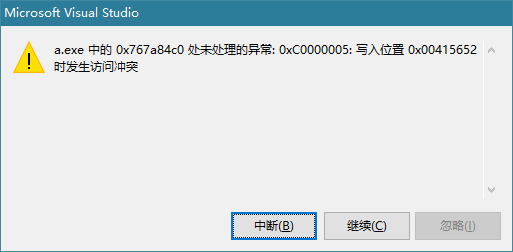
使用CreateProcess崩溃:处未处理的异常: 0xC0000005: 写入位置 0x00415652 时发生访问冲突
问题代码 if (!CreateProcess(NULL,L"pela.exe",NULL,NULL,TRUE,NULL,NULL,NULL,&si,&pi)){return 0;}如果CreateProcess的第二个参数字符串是常量或者是储存在堆中的就会被写保护,崩溃。如果字符串定义到栈或者全局变量就不存在此问题了。 正确的…...
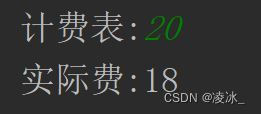
Java 华为真题-出租车计费
需求 程序员小明打了一辆出租车去上班。出于职业敏感,他注意到这辆出租车的计费表有点问题,总是偏大。 出租车司机解释说他不喜欢数字4,所以改装了计费表,任何数字位置遇到数字4就直接跳过,其余功能都正常。 比如&…...

开源layui前端框架 收款码生成系统源码 多合一收款码生成源码 带50多套UI模板
Layui前端的多合一收款码在线生成系统源码_附多套前端UI模板。 卡特三合一收款码生成系统源码,和收款啦采用一样的原理。 内部多达50多套模板,前端跟付款界面都特别好看。 识别收款码之后会自动加密,非常安全。 一样没有后台,一样…...

微服务moleculer01
1.官网地址: Moleculer - Progressive microservices framework for Node.js 2. github代码地址: GitHub - moleculerjs/moleculer: :rocket: Progressive microservices framework for Node.js Moleculer是基于Node.js的一款快速、多功能的微服务框…...

C++中将指针传递给函数
C中将指针传递给函数 指针是一种将内存空间传递给函数的有效方式,其中可包含函数完成其工作所需的数据,也可包含操作结果。将指针作为函数参数时,确保函数只能修改您希望它修改的参数很重要。例如,如果函数根据以指针方式传入的半…...
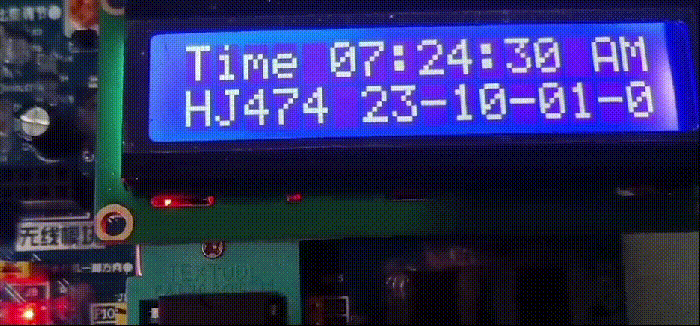
【51单片机编写占空比按秒渐亮与渐暗】2023-10-2
昨天刚在W10上安装CH340驱动,又下载到板子上LCD1602定时器时钟程序,为了调试,调用了一个LED观察控制蜂鸣器按秒响的变量,几经调试才发觉该开发板用的是有源蜂鸣器,不用IO取反操作,直接控制IO的高低电平即可…...
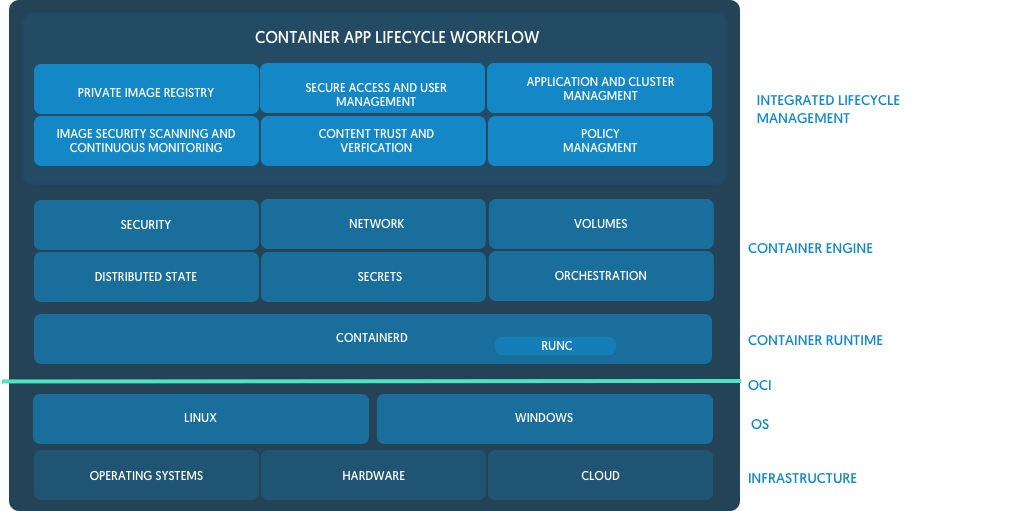
OCI 发布了容器运行时和镜像规范!
7 月 19 日是开放容器计划Open Container Initiative(OCI)的一个重要里程碑,OCI 发布了容器运行时和镜像规范的 1.0 版本,而 Docker 在这过去两年中一直充当着推动和引领的核心角色。 我们的目标是为社区、客户以及更广泛的容器行…...

C++学习笔记一: 变量和基本类型
本章讲解C内置的数据类型(如:字符、整型、浮点数等)和自定义数据类型的机制。下一章讲解C标准库里面定义的更加复杂的数据类型,比如可变长字符串和向量等。 1.基本内置类型 C内置的基本类型包括:算术类型和空类型。算…...

探索ClickHouse——同时支持导入导出功能的文件格式
在《探索ClickHouse——安装和测试》中,我们使用clickhouse直接从文件中读取数据。clickhouse支持多种格式文件的导入导出,本节我们对此进行分类介绍。 按常见格式区分 JSON 原始的JSON格式只支持导入,不支持导入。同时支持导入和导出的是…...

Scipy库提供了多种正态性检验和假设检验方法
Scipy库提供了多种正态性检验和假设检验方法。以下是一些常用的检验方法的列表: 正态性检验方法: Shapiro-Wilk检验:scipy.stats.shapiroAnderson-Darling检验:scipy.stats.andersonKolmogorov-Smirnov检验:scipy.st…...
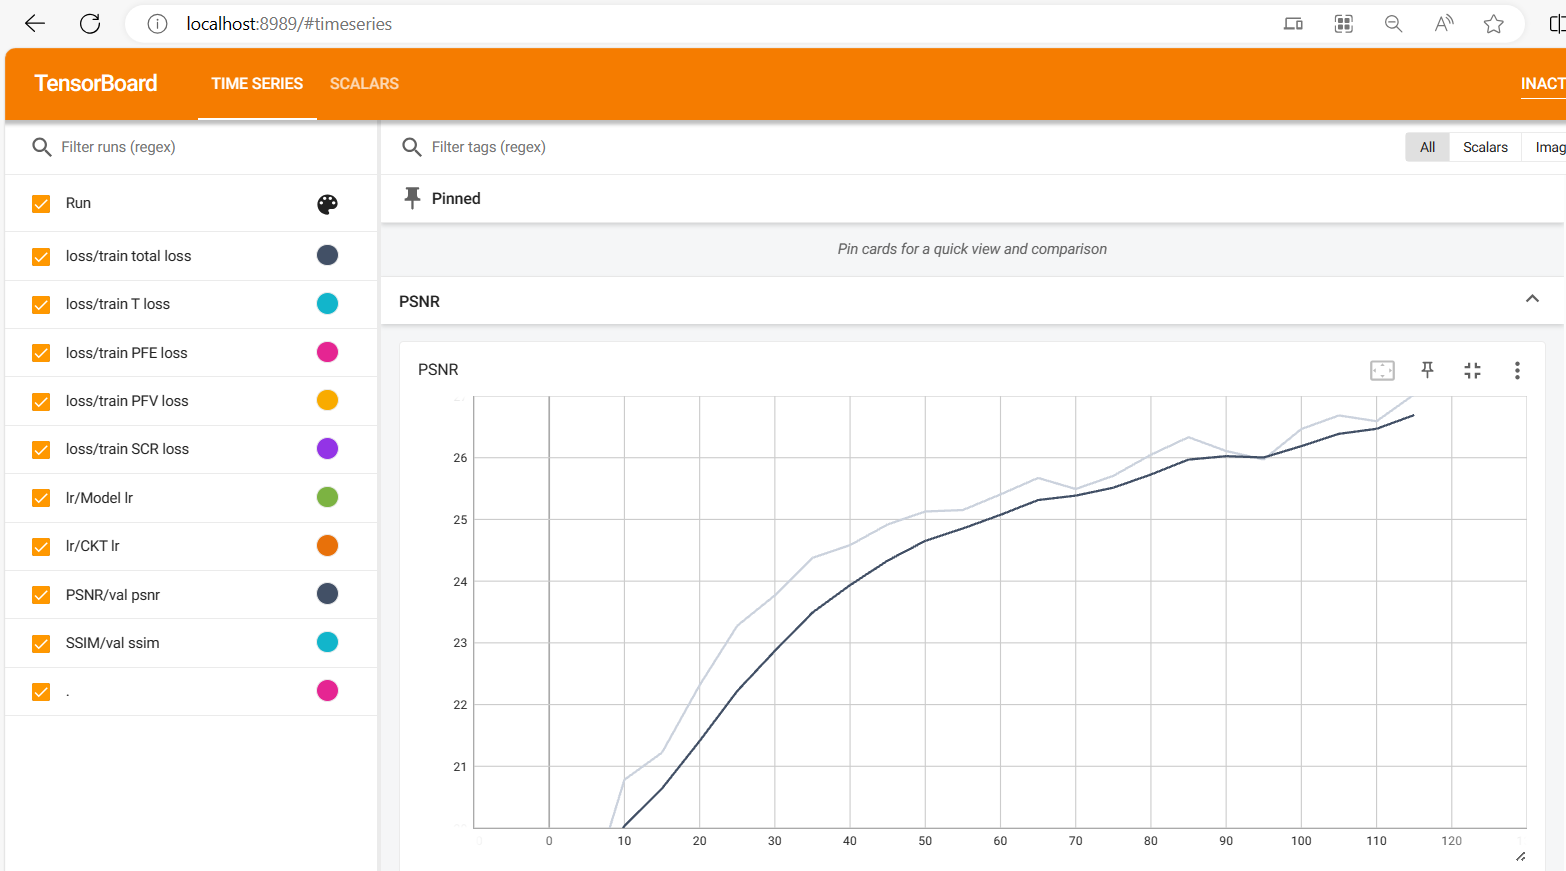
去雨去雪去雾算法之本地与服务器的TensorBoard使用教程
在进行去雨去雾去雪算法实验时,需要注意几个参数设置,num_workers只能设置为0,否则会报各种稀奇古怪的错误。 本地使用TensorBoard 此外,发现生成的文件是events.out.tfevents格式的,查询了一番得知该文件是通过Tens…...
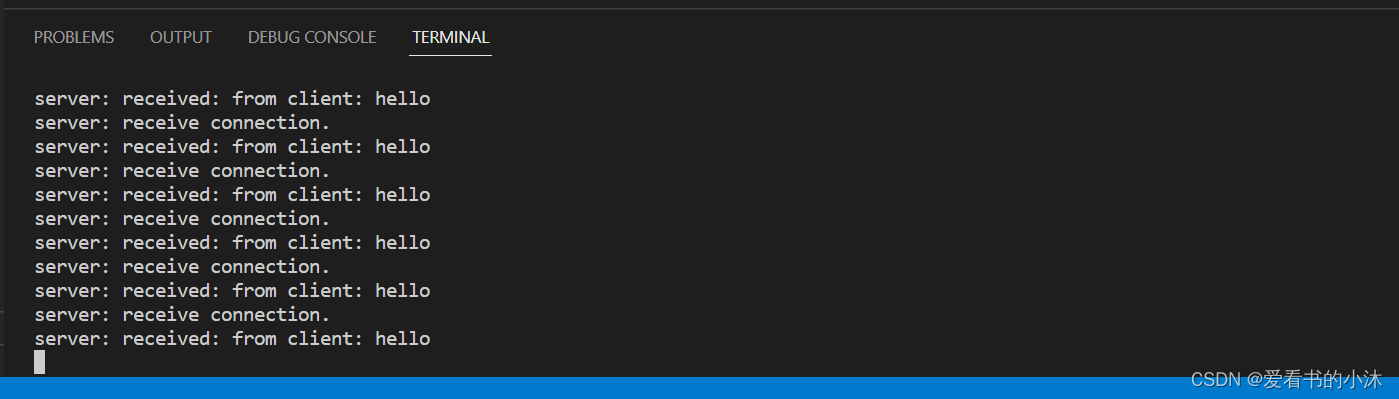
【小沐学前端】Node.js实现基于Protobuf协议的WebSocket通信
文章目录 1、简介1.1 Node1.2 WebSocket1.3 Protobuf 2、安装2.1 Node2.2 WebSocket2.2.1 nodejs-websocket2.2.2 ws 2.3 Protobuf 3、代码测试3.1 例子1:websocket(html)3.1.1 客户端:yxy_wsclient1.html3.1.2 客户端:…...

MySQL学习笔记24
MySQL的物理备份: xtrabackup备份介绍: xtrabackup优缺点: 优点: 1、备份过程快速、可靠(因为是物理备份);直接拷贝物理文件。 2、支持增量备份,更为灵活; 3、备份…...

用STM32CubeMX和HAL库快速上手WS2812B:告别手动计算延时,一键生成驱动框架
基于STM32CubeMX的WS2812B智能灯光控制:从零构建现代化驱动方案在智能硬件和物联网设备快速发展的今天,WS2812B可编程LED灯带因其丰富的色彩表现和简单的单线控制方式,成为创客和工程师们最喜爱的显示组件之一。然而,传统的寄存器…...

BurpSuite 2025插件开发JDK版本兼容性实战指南
1. 为什么BurpSuite插件开发环境总在JDK版本上翻车?你是不是也经历过:下载好BurpSuite最新版2025.4,兴冲冲打开插件开发文档,照着官方示例写完第一个HelloWorld插件,一编译——java.lang.UnsupportedClassVersionError…...

AI圈内火热的Agent、MCP、Skill、CLI是啥?用装修房子讲透,看完秒懂
本文用装修房子的比喻,详细解释了AI领域的四个核心概念:Agent如同会自主规划任务的私人助理;MCP是AI与外部工具数据的统一接口,类似USB-C;Skill是指导AI按标准操作执行的手册;CLI则是不依赖图形界面的命令行…...

CausalVLR基准测试报告:在IU X-Ray和MIMIC-CXR数据集上的性能分析
CausalVLR基准测试报告:在IU X-Ray和MIMIC-CXR数据集上的性能分析 【免费下载链接】CausalVLR CausalVLR: A Toolbox and Benchmark for Vision-Language Causal Reasoning (多模态因果推理开源框架) 项目地址: https://gitcode.com/gh_mirrors/ca/CausalVLR …...
用Azure Kinect DK和Body Tracking SDK,5分钟实现一个实时人体骨骼点检测Demo(C++版)
5分钟实战:用Azure Kinect DK实现实时人体骨骼点追踪(C版) 当你第一次拿到Azure Kinect DK时,最令人兴奋的莫过于它强大的人体追踪能力。这款深度相机不仅能捕捉高清彩色图像,更能通过AI算法实时重建人体骨骼关节点。本…...

DeepSeek重复代码识别失效了?5个被90%团队忽略的AST解析盲区及修复清单
更多请点击: https://codechina.net 第一章:DeepSeek代码重复检测失效的真相与影响 DeepSeek-R1 模型在代码理解任务中表现出色,但其内置的代码重复检测机制在特定场景下存在系统性失效。根本原因在于模型对语义等价但语法结构差异显著的代…...

WMPFDebugger与微信开发者工具对比:哪个更适合你的调试需求?
WMPFDebugger与微信开发者工具对比:哪个更适合你的调试需求? 【免费下载链接】WMPFDebugger Yet another WeChat miniapp debugger on Windows 项目地址: https://gitcode.com/gh_mirrors/wm/WMPFDebugger 在Windows平台的微信小程序开发中&#…...

别再乱建索引了!用Explain的key_len字段,一眼看穿你的MySQL联合索引到底生效了几个字段
解密MySQL联合索引:用key_len精准判断索引生效范围 在数据库性能优化领域,联合索引的使用一直是个既基础又容易踩坑的话题。很多开发者虽然知道"最左匹配原则"这个名词,但在实际业务场景中,面对复杂的查询条件组合时&a…...

CentOS 8/Stream 8系统DNF换源后,安装软件还是慢?试试这几个排查命令和优化技巧
CentOS 8/Stream 8系统DNF换源后安装缓慢的深度排查与优化指南当你已经按照教程将CentOS 8/Stream 8的DNF源切换为国内镜像,却发现软件安装速度依然不尽如人意时,这种体验确实令人沮丧。作为长期使用CentOS系统的技术专家,我完全理解这种&quo…...

ncmdumpGUI终极指南:深度解析网易云音乐NCM加密文件转换技术
ncmdumpGUI终极指南:深度解析网易云音乐NCM加密文件转换技术 【免费下载链接】ncmdumpGUI C#版本网易云音乐ncm文件格式转换,Windows图形界面版本 项目地址: https://gitcode.com/gh_mirrors/nc/ncmdumpGUI ncmdumpGUI是一款专为Windows平台设计…...