FME+YOLOV7写DNF自动刷图脚本
目录
前言
一、难点分析
二、实现流程
1.DNF窗口位置获取
2.获取训练数据
3.数据标注
4.数据格式转换
5.数据训练
5.刷图逻辑编写
前言
这是一篇不务正业的研究,首先说明,这不是外挂!这不是外挂!这不是外挂!这只是用ai做图像识别、目标检测然后通过模拟键鼠实现的一个外部自动化脚本。求生欲极强!哈哈哈哈
一、难点分析
在不读取内存又想拿到信息的情况下,只有走图像识别一条路了。一个完整的刷图应该包括打怪,拾取物品,找门过图。那么YOLOV7的轻量级框架能支持140fps的图像实时解析,必定非常符合我们的要求。
剩下的难点就是怎么让人物移动的固定坐标点,怎么设计打怪逻辑,怎么读取技能cd时间让人物合理释放技能。
二、实现流程
1.DNF窗口位置获取
这里当然是使用过pywin32是快捷的,下载一个spy++,拿到dnf窗口句柄,然后用过win32gui来获取窗口坐标。
def get_window_rect(hwnd):try:f = ctypes.windll.dwmapi.DwmGetWindowAttributeexcept WindowsError:f = Noneif f:rect = ctypes.wintypes.RECT()DWMWA_EXTENDED_FRAME_BOUNDS = 9f(ctypes.wintypes.HWND(hwnd),ctypes.wintypes.DWORD(DWMWA_EXTENDED_FRAME_BOUNDS),ctypes.byref(rect),ctypes.sizeof(rect))return rect.left, rect.top, rect.right, rect.bottomhid = win32gui.FindWindow("地下城与勇士", "地下城与勇士:创新世纪")
left, top, right, bottom = get_window_rect(hid)
2.获取训练数据
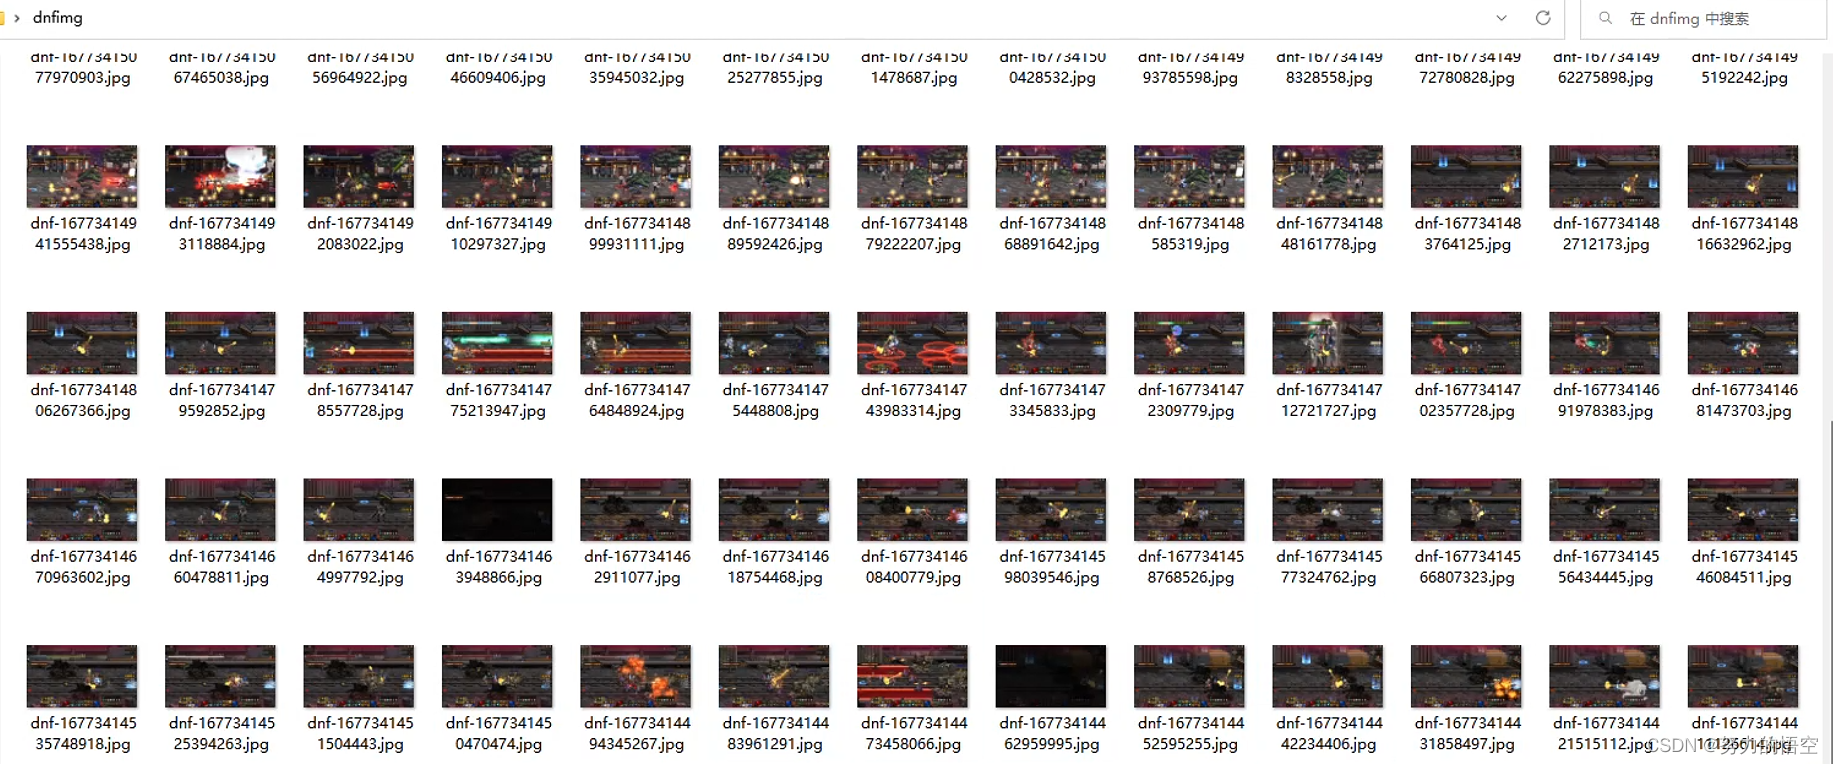
拿到DNF窗口位置后,我们需要截屏具体位置来获取训练的图像,截屏我们使用pyautogui这个库来完成,因为这个库非常强大,能实现0.004秒一张图截屏速度,只需要手动刷一遍图,就能截取大量素材。
im = pyautogui.screenshot(region=[left, top, abs(right - left), abs(top - bottom)])然后我们拿到了大量的图片
3.数据标注
这就到了整个环节最痛苦的流程了,使用labme工具标注数据,标注门、物品、角色、怪物

4.数据格式转换
labme标注完成后,会导出一个json文件,为了将json文件转换成标准训练集数据格式,我们用fme写了一个模板来完成数据转换。

转换前数据:
{"version": "4.5.6","flags": {},"shapes": [{"label": "i","points": [[541.21768707483,298.85034013605446],[642.578231292517,428.78231292517006]],"group_id": null,"shape_type": "rectangle","flags": {}},{"label": "guai","points": [[267.7482993197279,228.10204081632654],[380.6734693877551,379.12244897959187]],"group_id": null,"shape_type": "rectangle","flags": {}}],"imagePath": "dnf-16773414691978383.jpg","imageData": "","imageHeight": 600,"imageWidth": 1067
}
转换后数据:(将数据用路径+标注类别+坐标表示)
942,619,996,635,2 786,609,961,630,2 824,563,879,589,2 880,531,1004,555,2 1017,544,1091,572,2
C:\Users\Administrator\Desktop\dnfimg\dnf-73bc62b1-f305-4a76-809e-72f7564a9633.jpg 639,413,771,677,0 746,625,817,653,2 977,598,1174,632,2 942,619,996,635,2 786,609,961,630,2 824,563,879,589,2 880,531,1004,555,2 1017,544,1091,572,2
C:\Users\Administrator\Desktop\dnfimg\dnf-73bc62b1-f305-4a76-809e-72f7564a9633.jpg 639,413,771,677,0 746,625,817,653,2 977,598,1174,632,2 942,619,996,635,2 786,609,961,630,2 824,563,879,589,2 880,531,1004,555,2 1017,544,1091,572,2
C:\Users\Administrator\Desktop\dnfimg\dnf-73bc62b1-f305-4a76-809e-72f7564a9633.jpg 639,413,771,677,0 746,625,817,653,2 977,598,1174,632,2 942,619,996,635,2 786,609,961,630,2 824,563,879,589,2 880,531,1004,555,2 1017,544,1091,572,2
C:\Users\Administrator\Desktop\dnfimg\dnf-73bc62b1-f305-4a76-809e-72f7564a9633.jpg 639,413,771,677,0 746,625,817,653,2 977,598,1174,632,2 942,619,996,635,2 786,609,961,630,2 824,563,879,589,2 880,531,1004,555,2 1017,544,1091,572,2
C:\Users\Administrator\Desktop\dnfimg\dnf-73bc62b1-f305-4a76-809e-72f7564a9633.jpg 639,413,771,677,0 746,625,817,653,2 977,598,1174,632,2 942,619,996,635,2 786,609,961,630,2 824,563,879,589,2 880,531,1004,555,2 1017,544,1091,572,2
C:\Users\Administrator\Desktop\dnfimg\dnf-73bc62b1-f305-4a76-809e-72f7564a9633.jpg 639,413,771,677,0 746,625,817,653,2 977,598,1174,632,2 942,619,996,635,2 786,609,961,630,2 824,563,879,589,2 880,531,1004,555,2 1017,544,1091,572,2
C:\Users\Administrator\Desktop\dnfimg\dnf-73bc62b1-f305-4a76-809e-72f7564a9633.jpg 639,413,771,677,0 746,625,817,653,2 977,598,1174,632,2 942,619,996,635,2 786,609,961,630,2 824,563,879,589,2 880,531,1004,555,2 1017,544,1091,572,2
C:\Users\Administrator\Desktop\dnfimg\dnf-73bc62b1-f305-4a76-809e-72f7564a9633.jpg 639,413,771,677,0 746,625,817,653,2 977,598,1174,632,2 942,619,996,635,2 786,609,961,630,2 824,563,879,589,2 880,531,1004,555,2 1017,544,1091,572,2
C:\Users\Administrator\Desktop\dnfimg\dnf-e2bbbe68-605b-4021-960b-e75c9f01dcd1.jpg 1207,452,1312,690,0 1080,446,1174,658,1 299,628,363,663,2 879,397,1071,474,1
C:\Users\Administrator\Desktop\dnfimg\dnf-e2bbbe68-605b-4021-960b-e75c9f01dcd1.jpg 1207,452,1312,690,0 1080,446,1174,658,1 299,628,363,663,2 879,397,1071,474,1
C:\Users\Administrator\Desktop\dnfimg\dnf-e2bbbe68-605b-4021-960b-e75c9f01dcd1.jpg 1207,452,1312,690,0 1080,446,1174,658,1 299,628,363,663,2 879,397,1071,474,1
C:\Users\Administrator\Desktop\dnfimg\dnf-e2bbbe68-605b-4021-960b-e75c9f01dcd1.jpg 1207,452,1312,690,0 1080,446,1174,658,1 299,628,363,663,2
5.数据训练
将yolov7代码封装到fme的pythoncaller中。
import fme
import fmeobjects
import datetime
import os
from functools import partialimport tensorflow as tf
import tensorflow.keras.backend as K
from tensorflow.keras.callbacks import (EarlyStopping, LearningRateScheduler,TensorBoard)
from tensorflow.keras.optimizers import SGD, Adamfrom nets.yolo import get_train_model, yolo_body
from nets.yolo_training import get_lr_scheduler
from utils.callbacks import LossHistory, ModelCheckpoint, EvalCallback
from utils.dataloader import YoloDatasets
from utils.utils import get_anchors, get_classes, show_config
from utils.utils_fit import fit_one_epochos.environ['TF_CPP_MIN_LOG_LEVEL'] = '2'
eager           = False
#---------------------------------------------------------------------#
#   train_gpu   训练用到的GPU
#               默认为第一张卡、双卡为[0, 1]、三卡为[0, 1, 2]
#               在使用多GPU时,每个卡上的batch为总batch除以卡的数量。
#---------------------------------------------------------------------#
train_gpu       = [0,]
#---------------------------------------------------------------------#
#   classes_path    指向model_data下的txt,与自己训练的数据集相关
#                   训练前一定要修改classes_path,使其对应自己的数据集
#---------------------------------------------------------------------#
classes_path    = 'model_data/voc_classes.txt'
#---------------------------------------------------------------------#
#   anchors_path    代表先验框对应的txt文件,一般不修改。
#   anchors_mask    用于帮助代码找到对应的先验框,一般不修改。
#---------------------------------------------------------------------#
anchors_path    = 'model_data/yolo_anchors.txt'
anchors_mask    = [[6, 7, 8], [3, 4, 5], [0, 1, 2]]
#----------------------------------------------------------------------------------------------------------------------------#
#   权值文件的下载请看README,可以通过网盘下载。模型的 预训练权重 对不同数据集是通用的,因为特征是通用的。
#   模型的 预训练权重 比较重要的部分是 主干特征提取网络的权值部分,用于进行特征提取。
#   预训练权重对于99%的情况都必须要用,不用的话主干部分的权值太过随机,特征提取效果不明显,网络训练的结果也不会好
#
#   如果训练过程中存在中断训练的操作,可以将model_path设置成logs文件夹下的权值文件,将已经训练了一部分的权值再次载入。
#   同时修改下方的 冻结阶段 或者 解冻阶段 的参数,来保证模型epoch的连续性。
#
#   当model_path = ''的时候不加载整个模型的权值。
#
#   此处使用的是整个模型的权重,因此是在train.py进行加载的。
#   如果想要让模型从0开始训练,则设置model_path = '',下面的Freeze_Train = Fasle,此时从0开始训练,且没有冻结主干的过程。
#
#   一般来讲,网络从0开始的训练效果会很差,因为权值太过随机,特征提取效果不明显,因此非常、非常、非常不建议大家从0开始训练!
#   从0开始训练有两个方案:
#   1、得益于Mosaic数据增强方法强大的数据增强能力,将UnFreeze_Epoch设置的较大(300及以上)、batch较大(16及以上)、数据较多(万以上)的情况下,
#      可以设置mosaic=True,直接随机初始化参数开始训练,但得到的效果仍然不如有预训练的情况。(像COCO这样的大数据集可以这样做)
#   2、了解imagenet数据集,首先训练分类模型,获得网络的主干部分权值,分类模型的 主干部分 和该模型通用,基于此进行训练。
#----------------------------------------------------------------------------------------------------------------------------#
model_path      = 'model_data/best_epoch_weights.h5'
#------------------------------------------------------#
#   input_shape     输入的shape大小,一定要是32的倍数
#------------------------------------------------------#
input_shape     = [640, 640]
#------------------------------------------------------#
#   phi             所使用的YoloV7的版本。l、x
#------------------------------------------------------#
phi             = 'l'
#------------------------------------------------------------------#
#   mosaic              马赛克数据增强。
#   mosaic_prob         每个step有多少概率使用mosaic数据增强,默认50%。
#
#   mixup               是否使用mixup数据增强,仅在mosaic=True时有效。
#                       只会对mosaic增强后的图片进行mixup的处理。
#   mixup_prob          有多少概率在mosaic后使用mixup数据增强,默认50%。
#                       总的mixup概率为mosaic_prob * mixup_prob。
#
#   special_aug_ratio   参考YoloX,由于Mosaic生成的训练图片,远远脱离自然图片的真实分布。
#                       当mosaic=True时,本代码会在special_aug_ratio范围内开启mosaic。
#                       默认为前70%个epoch,100个世代会开启70个世代。
#------------------------------------------------------------------#
mosaic              = True
mosaic_prob         = 0.5
mixup               = True
mixup_prob          = 0.5
special_aug_ratio   = 0.7
#------------------------------------------------------------------#
#   label_smoothing     标签平滑。一般0.01以下。如0.01、0.005。
#------------------------------------------------------------------#
label_smoothing     = 0#----------------------------------------------------------------------------------------------------------------------------#
#   训练分为两个阶段,分别是冻结阶段和解冻阶段。设置冻结阶段是为了满足机器性能不足的同学的训练需求。
#   冻结训练需要的显存较小,显卡非常差的情况下,可设置Freeze_Epoch等于UnFreeze_Epoch,Freeze_Train = True,此时仅仅进行冻结训练。
#
#   在此提供若干参数设置建议,各位训练者根据自己的需求进行灵活调整:
#   (一)从整个模型的预训练权重开始训练:
#       Adam:
#           Init_Epoch = 0,Freeze_Epoch = 50,UnFreeze_Epoch = 100,Freeze_Train = True,optimizer_type = 'adam',Init_lr = 1e-3,weight_decay = 0。(冻结)
#           Init_Epoch = 0,UnFreeze_Epoch = 100,Freeze_Train = False,optimizer_type = 'adam',Init_lr = 1e-3,weight_decay = 0。(不冻结)
#       SGD:
#           Init_Epoch = 0,Freeze_Epoch = 50,UnFreeze_Epoch = 300,Freeze_Train = True,optimizer_type = 'sgd',Init_lr = 1e-2,weight_decay = 5e-4。(冻结)
#           Init_Epoch = 0,UnFreeze_Epoch = 300,Freeze_Train = False,optimizer_type = 'sgd',Init_lr = 1e-2,weight_decay = 5e-4。(不冻结)
#       其中:UnFreeze_Epoch可以在100-300之间调整。
#   (二)从0开始训练:
#       Init_Epoch = 0,UnFreeze_Epoch >= 300,Unfreeze_batch_size >= 16,Freeze_Train = False(不冻结训练)
#       其中:UnFreeze_Epoch尽量不小于300。optimizer_type = 'sgd',Init_lr = 1e-2,mosaic = True。
#   (三)batch_size的设置:
#       在显卡能够接受的范围内,以大为好。显存不足与数据集大小无关,提示显存不足(OOM或者CUDA out of memory)请调小batch_size。
#       受到BatchNorm层影响,batch_size最小为2,不能为1。
#       正常情况下Freeze_batch_size建议为Unfreeze_batch_size的1-2倍。不建议设置的差距过大,因为关系到学习率的自动调整。
#----------------------------------------------------------------------------------------------------------------------------#
#------------------------------------------------------------------#
#   冻结阶段训练参数
#   此时模型的主干被冻结了,特征提取网络不发生改变
#   占用的显存较小,仅对网络进行微调
#   Init_Epoch          模型当前开始的训练世代,其值可以大于Freeze_Epoch,如设置:
#                       Init_Epoch = 60、Freeze_Epoch = 50、UnFreeze_Epoch = 100
#                       会跳过冻结阶段,直接从60代开始,并调整对应的学习率。
#                       (断点续练时使用)
#   Freeze_Epoch        模型冻结训练的Freeze_Epoch
#                       (当Freeze_Train=False时失效)
#   Freeze_batch_size   模型冻结训练的batch_size
#                       (当Freeze_Train=False时失效)
#------------------------------------------------------------------#
Init_Epoch          = 0
Freeze_Epoch        = 50
Freeze_batch_size   = 14
#------------------------------------------------------------------#
#   解冻阶段训练参数
#   此时模型的主干不被冻结了,特征提取网络会发生改变
#   占用的显存较大,网络所有的参数都会发生改变
#   UnFreeze_Epoch          模型总共训练的epoch
#                           SGD需要更长的时间收敛,因此设置较大的UnFreeze_Epoch
#                           Adam可以使用相对较小的UnFreeze_Epoch
#   Unfreeze_batch_size     模型在解冻后的batch_size
#------------------------------------------------------------------#
UnFreeze_Epoch      = 50
Unfreeze_batch_size = 4
#------------------------------------------------------------------#
#   Freeze_Train    是否进行冻结训练
#                   默认先冻结主干训练后解冻训练。
#------------------------------------------------------------------#
Freeze_Train        = True#------------------------------------------------------------------#
#   其它训练参数:学习率、优化器、学习率下降有关
#------------------------------------------------------------------#
#------------------------------------------------------------------#
#   Init_lr         模型的最大学习率
#                   当使用Adam优化器时建议设置  Init_lr=1e-3
#                   当使用SGD优化器时建议设置   Init_lr=1e-2
#   Min_lr          模型的最小学习率,默认为最大学习率的0.01
#------------------------------------------------------------------#
Init_lr             = 1e-2
Min_lr              = Init_lr * 0.01
#------------------------------------------------------------------#
#   optimizer_type  使用到的优化器种类,可选的有adam、sgd
#                   当使用Adam优化器时建议设置  Init_lr=1e-3
#                   当使用SGD优化器时建议设置   Init_lr=1e-2
#   momentum        优化器内部使用到的momentum参数
#   weight_decay    权值衰减,可防止过拟合
#                   adam会导致weight_decay错误,使用adam时建议设置为0。
#------------------------------------------------------------------#
optimizer_type      = "sgd"
momentum            = 0.937
weight_decay        = 5e-4
#------------------------------------------------------------------#
#   lr_decay_type   使用到的学习率下降方式,可选的有'step'、'cos'
#------------------------------------------------------------------#
lr_decay_type       = 'cos'
#------------------------------------------------------------------#
#   save_period     多少个epoch保存一次权值
#------------------------------------------------------------------#
save_period         = 10
#------------------------------------------------------------------#
#   save_dir        权值与日志文件保存的文件夹
#------------------------------------------------------------------#
save_dir            = 'logs'
#------------------------------------------------------------------#
#   eval_flag       是否在训练时进行评估,评估对象为验证集
#                   安装pycocotools库后,评估体验更佳。
#   eval_period     代表多少个epoch评估一次,不建议频繁的评估
#                   评估需要消耗较多的时间,频繁评估会导致训练非常慢
#   此处获得的mAP会与get_map.py获得的会有所不同,原因有二:
#   (一)此处获得的mAP为验证集的mAP。
#   (二)此处设置评估参数较为保守,目的是加快评估速度。
#------------------------------------------------------------------#
eval_flag           = True
eval_period         = 10
#------------------------------------------------------------------#
#   num_workers     用于设置是否使用多线程读取数据,1代表关闭多线程
#                   开启后会加快数据读取速度,但是会占用更多内存
#                   keras里开启多线程有些时候速度反而慢了许多
#                   在IO为瓶颈的时候再开启多线程,即GPU运算速度远大于读取图片的速度。
#------------------------------------------------------------------#
num_workers         = 1#------------------------------------------------------#
#   train_annotation_path   训练图片路径和标签
#   val_annotation_path     验证图片路径和标签
#------------------------------------------------------#
train_annotation_path   = '2007_train.txt'
val_annotation_path     = '2007_val.txt'#------------------------------------------------------#
#   设置用到的显卡
#------------------------------------------------------#
os.environ["CUDA_VISIBLE_DEVICES"]  = ','.join(str(x) for x in train_gpu)
ngpus_per_node                      = len(train_gpu)gpus = tf.config.experimental.list_physical_devices(device_type='GPU')
for gpu in gpus:tf.config.experimental.set_memory_growth(gpu, True)#------------------------------------------------------#
#   判断当前使用的GPU数量与机器上实际的GPU数量
#------------------------------------------------------#
if ngpus_per_node > 1 and ngpus_per_node > len(gpus):raise ValueError("The number of GPUs specified for training is more than the GPUs on the machine")if ngpus_per_node > 1:strategy = tf.distribute.MirroredStrategy()
else:strategy = None
print('Number of devices: {}'.format(ngpus_per_node))
class FeatureProcessor(object):"""Template Class Interface:When using this class, make sure its name is set as the value of the 'Classto Process Features' transformer parameter."""def __init__(self):"""Base constructor for class members."""passdef input(self, feature):class_names, num_classes = get_classes(classes_path)print("类名{},类数量{}".format(class_names, num_classes))anchors, num_anchors     = get_anchors(anchors_path)#----------------------------------------------------##   判断是否多GPU载入模型和预训练权重#----------------------------------------------------#if True:#------------------------------------------------------##   创建yolo模型#------------------------------------------------------#model_body  = yolo_body((None, None, 3), anchors_mask, num_classes, phi, weight_decay)if model_path != '':pass#------------------------------------------------------##   载入预训练权重#------------------------------------------------------##  print('Load weights {}.'.format(model_path))# model_body.load_weights(model_path, by_name=True, skip_mismatch=True)if not eager:model = get_train_model(model_body, input_shape, num_classes, anchors, anchors_mask, label_smoothing)model.summary()#---------------------------##   读取数据集对应的txt#---------------------------#with open(train_annotation_path, encoding='utf-8') as f:train_lines = f.readlines()with open(val_annotation_path, encoding='utf-8') as f:val_lines   = f.readlines()num_train   = len(train_lines)num_val     = len(val_lines)show_config(classes_path = classes_path, anchors_path = anchors_path, anchors_mask = anchors_mask, model_path = model_path, input_shape = input_shape, \Init_Epoch = Init_Epoch, Freeze_Epoch = Freeze_Epoch, UnFreeze_Epoch = UnFreeze_Epoch, Freeze_batch_size = Freeze_batch_size, Unfreeze_batch_size = Unfreeze_batch_size, Freeze_Train = Freeze_Train, \Init_lr = Init_lr, Min_lr = Min_lr, optimizer_type = optimizer_type, momentum = momentum, lr_decay_type = lr_decay_type, \save_period = save_period, save_dir = save_dir, num_workers = num_workers, num_train = num_train, num_val = num_val)#---------------------------------------------------------##   总训练世代指的是遍历全部数据的总次数#   总训练步长指的是梯度下降的总次数 #   每个训练世代包含若干训练步长,每个训练步长进行一次梯度下降。#   此处仅建议最低训练世代,上不封顶,计算时只考虑了解冻部分#----------------------------------------------------------#wanted_step = 5e4 if optimizer_type == "sgd" else 1.5e4total_step  = num_train // Unfreeze_batch_size * UnFreeze_Epochif total_step <= wanted_step:if num_train // Unfreeze_batch_size == 0:raise ValueError('数据集过小,无法进行训练,请扩充数据集。')wanted_epoch = wanted_step // (num_train // Unfreeze_batch_size) + 1print("\n\033[1;33;44m[Warning] 使用%s优化器时,建议将训练总步长设置到%d以上。\033[0m"%(optimizer_type, wanted_step))print("\033[1;33;44m[Warning] 本次运行的总训练数据量为%d,Unfreeze_batch_size为%d,共训练%d个Epoch,计算出总训练步长为%d。\033[0m"%(num_train, Unfreeze_batch_size, UnFreeze_Epoch, total_step))print("\033[1;33;44m[Warning] 由于总训练步长为%d,小于建议总步长%d,建议设置总世代为%d。\033[0m"%(total_step, wanted_step, wanted_epoch))#------------------------------------------------------##   主干特征提取网络特征通用,冻结训练可以加快训练速度#   也可以在训练初期防止权值被破坏。#   Init_Epoch为起始世代#   Freeze_Epoch为冻结训练的世代#   UnFreeze_Epoch总训练世代#   提示OOM或者显存不足请调小Batch_size#------------------------------------------------------#if True:if Freeze_Train:freeze_layers = {'n':118, 's': 118, 'm': 167, 'l': 216, 'x': 265}[phi]#print(freeze_layers)for i in range(50): model_body.layers[i].trainable = False# print('Freeze the first {} layers of total {} layers.'.format(freeze_layers, len(model_body.layers)))#-------------------------------------------------------------------##   如果不冻结训练的话,直接设置batch_size为Unfreeze_batch_size#-------------------------------------------------------------------#batch_size  = Freeze_batch_size if Freeze_Train else Unfreeze_batch_size#-------------------------------------------------------------------##   判断当前batch_size,自适应调整学习率#-------------------------------------------------------------------#nbs             = 64lr_limit_max    = 1e-3 if optimizer_type == 'adam' else 5e-2lr_limit_min    = 3e-4 if optimizer_type == 'adam' else 5e-4Init_lr_fit     = min(max(batch_size / nbs * Init_lr, lr_limit_min), lr_limit_max)Min_lr_fit      = min(max(batch_size / nbs * Min_lr, lr_limit_min * 1e-2), lr_limit_max * 1e-2)#---------------------------------------##   获得学习率下降的公式#---------------------------------------#lr_scheduler_func = get_lr_scheduler(lr_decay_type, Init_lr_fit, Min_lr_fit, UnFreeze_Epoch)epoch_step      = num_train // batch_sizeepoch_step_val  = num_val // batch_sizeif epoch_step == 0 or epoch_step_val == 0:raise ValueError('数据集过小,无法进行训练,请扩充数据集。')train_dataloader    = YoloDatasets(train_lines, input_shape, anchors, batch_size, num_classes, anchors_mask, Init_Epoch, UnFreeze_Epoch, \mosaic=mosaic, mixup=mixup, mosaic_prob=mosaic_prob, mixup_prob=mixup_prob, train=True, special_aug_ratio=special_aug_ratio)val_dataloader      = YoloDatasets(val_lines, input_shape, anchors, batch_size, num_classes, anchors_mask, Init_Epoch, UnFreeze_Epoch, \mosaic=False, mixup=False, mosaic_prob=0, mixup_prob=0, train=False, special_aug_ratio=0)optimizer = {'adam'  : Adam(lr = Init_lr, beta_1 = momentum),'sgd'   : SGD(lr = Init_lr, momentum = momentum, nesterov=True)}[optimizer_type]if eager:start_epoch     = Init_Epochend_epoch       = UnFreeze_EpochUnFreeze_flag   = Falsegen     = tf.data.Dataset.from_generator(partial(train_dataloader.generate), (tf.float32, tf.float32, tf.float32, tf.float32, tf.float32))gen_val = tf.data.Dataset.from_generator(partial(val_dataloader.generate), (tf.float32, tf.float32, tf.float32, tf.float32, tf.float32))gen     = gen.shuffle(buffer_size = batch_size).prefetch(buffer_size = batch_size)gen_val = gen_val.shuffle(buffer_size = batch_size).prefetch(buffer_size = batch_size)if ngpus_per_node > 1:gen     = strategy.experimental_distribute_dataset(gen)gen_val = strategy.experimental_distribute_dataset(gen_val)time_str        = datetime.datetime.strftime(datetime.datetime.now(),'%Y_%m_%d_%H_%M_%S')log_dir         = os.path.join(save_dir, "loss_" + str(time_str))loss_history    = LossHistory(log_dir)eval_callback   = EvalCallback(model_body, input_shape, anchors, anchors_mask, class_names, num_classes, val_lines, log_dir, \eval_flag=eval_flag, period=eval_period)#---------------------------------------##   开始模型训练#---------------------------------------#for epoch in range(start_epoch, end_epoch):#---------------------------------------##   如果模型有冻结学习部分#   则解冻,并设置参数#---------------------------------------#if epoch >= Freeze_Epoch and not UnFreeze_flag and Freeze_Train:batch_size      = Unfreeze_batch_size#-------------------------------------------------------------------##   判断当前batch_size,自适应调整学习率#-------------------------------------------------------------------#nbs             = 64lr_limit_max    = 1e-3 if optimizer_type == 'adam' else 5e-2lr_limit_min    = 3e-4 if optimizer_type == 'adam' else 5e-4Init_lr_fit     = min(max(batch_size / nbs * Init_lr, lr_limit_min), lr_limit_max)Min_lr_fit      = min(max(batch_size / nbs * Min_lr, lr_limit_min * 1e-2), lr_limit_max * 1e-2)#---------------------------------------##   获得学习率下降的公式#---------------------------------------#lr_scheduler_func = get_lr_scheduler(lr_decay_type, Init_lr_fit, Min_lr_fit, UnFreeze_Epoch)for i in range(len(model_body.layers)): model_body.layers[i].trainable = Trueepoch_step      = num_train // batch_sizeepoch_step_val  = num_val // batch_sizeif epoch_step == 0 or epoch_step_val == 0:raise ValueError("数据集过小,无法继续进行训练,请扩充数据集。")train_dataloader.batch_size    = batch_sizeval_dataloader.batch_size      = batch_sizegen     = tf.data.Dataset.from_generator(partial(train_dataloader.generate), (tf.float32, tf.float32, tf.float32, tf.float32, tf.float32))gen_val = tf.data.Dataset.from_generator(partial(val_dataloader.generate), (tf.float32, tf.float32, tf.float32, tf.float32, tf.float32))gen     = gen.shuffle(buffer_size = batch_size).prefetch(buffer_size = batch_size)gen_val = gen_val.shuffle(buffer_size = batch_size).prefetch(buffer_size = batch_size)if ngpus_per_node > 1:gen     = strategy.experimental_distribute_dataset(gen)gen_val = strategy.experimental_distribute_dataset(gen_val)UnFreeze_flag = Truelr = lr_scheduler_func(epoch)K.set_value(optimizer.lr, lr)fit_one_epoch(model_body, loss_history, eval_callback, optimizer, epoch, epoch_step, epoch_step_val, gen, gen_val, end_epoch, input_shape, anchors, anchors_mask, num_classes, label_smoothing, save_period, save_dir, strategy)train_dataloader.on_epoch_end()val_dataloader.on_epoch_end()else:start_epoch = Init_Epochend_epoch   = Freeze_Epoch if Freeze_Train else UnFreeze_Epochif ngpus_per_node > 1:with strategy.scope():model.compile(optimizer = optimizer, loss={'yolo_loss': lambda y_true, y_pred: y_pred})else:model.compile(optimizer = optimizer, loss={'yolo_loss': lambda y_true, y_pred: y_pred})#-------------------------------------------------------------------------------##   训练参数的设置#   logging         用于设置tensorboard的保存地址#   checkpoint      用于设置权值保存的细节,period用于修改多少epoch保存一次#   lr_scheduler       用于设置学习率下降的方式#   early_stopping  用于设定早停,val_loss多次不下降自动结束训练,表示模型基本收敛#-------------------------------------------------------------------------------#model.load_weights(model_path)time_str        = datetime.datetime.strftime(datetime.datetime.now(),'%Y_%m_%d_%H_%M_%S')log_dir         = os.path.join(save_dir, "loss_" + str(time_str))logging         = TensorBoard(log_dir)loss_history    = LossHistory(log_dir)checkpoint      = ModelCheckpoint(os.path.join(save_dir, "ep{epoch:03d}-loss{loss:.3f}-val_loss{val_loss:.3f}.h5"), monitor = 'val_loss', save_weights_only = True, save_best_only = False, period = save_period)checkpoint_last = ModelCheckpoint(os.path.join(save_dir, "last_epoch_weights.h5"), monitor = 'val_loss', save_weights_only = True, save_best_only = False, period = 1)checkpoint_best = ModelCheckpoint(os.path.join(save_dir, "best_epoch_weights.h5"), monitor = 'val_loss', save_weights_only = True, save_best_only = True, period = 1)early_stopping  = EarlyStopping(monitor='val_loss', min_delta = 0, patience = 10, verbose = 1)lr_scheduler    = LearningRateScheduler(lr_scheduler_func, verbose = 1)eval_callback   = EvalCallback(model_body, input_shape, anchors, anchors_mask, class_names, num_classes, val_lines, log_dir, \eval_flag=eval_flag, period=eval_period)callbacks       = [logging, loss_history, checkpoint, checkpoint_last, checkpoint_best, lr_scheduler, eval_callback]if start_epoch < end_epoch:print('Train on {} samples, val on {} samples, with batch size {}.'.format(num_train, num_val, batch_size))model.fit(x                   = train_dataloader,steps_per_epoch     = epoch_step,validation_data     = val_dataloader,validation_steps    = epoch_step_val,epochs              = end_epoch,initial_epoch       = start_epoch,use_multiprocessing = True if num_workers > 1 else False,workers             = num_workers,callbacks           = callbacks)self.pyoutput(feature)def close(self):"""This method is called once all the FME Features have been processedfrom input()."""passdef process_group(self):"""When 'Group By' attribute(s) are specified, this method is called once all the FME Features in a current group have been sent to input().FME Features sent to input() should generally be cached for group-by processing in this method when knowledge of all Features is required. The resulting Feature(s) from the group-by processing should be emitted through self.pyoutput().FME will continue calling input() a number of times followedby process_group() for each 'Group By' attribute, so this implementation should reset any class members for the next group."""pass
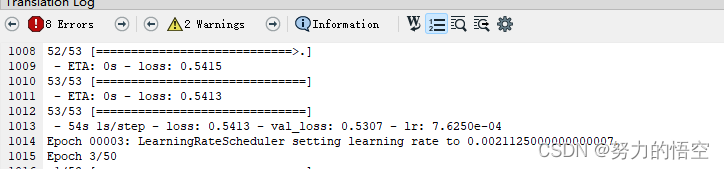
开始训练

训练需要注意几个事项,首先是需要加载主干网络预训练权重,然后是训练50个epoch后,冻结模型部分层继续训练,使得模型能更加匹配数据。
5.刷图逻辑编写
这里我们需要自己做两个类,一个键鼠控制类,一个是人物行为类。以下是部分类代码
def get_thing(yolo_list):door_list = []guai_list = []wuping_list = []person_xy = []if len(yolo_list) != 0:# 解析当前状态for i in yolo_list:if i["label"] == str("i"):# 获取人物所在屏幕真实坐标点person_x = (i["right"] + i["left"]) / 2person_y = i["bottom"]person_xy.append(person_x)person_xy.append(person_y)if "door" in str(i["label"]):# 获取门所在真实坐标点door_x = (i["right"] + i["left"]) / 2door_y = i["bottom"] - 10door_list.append([door_x, door_y])if "guai" in str(i["label"]):# 获取门所在真实坐标点guai_x = (i["right"] + i["left"]) / 2guai_y = i["bottom"] - 30guai_list.append([guai_x, guai_y])if "wuping" in str(i["label"]):# 获取物品所在真实坐标点wuping_x = (i["right"] + i["left"]) / 2wuping_y = i["bottom"] + 33wuping_list.append([wuping_x, wuping_y])return person_xy,door_list,guai_list,wuping_listdef recognize(img):ocr = ddddocr.DdddOcr()res = ocr.classification(img)return res
class Action(object):"""-------------------------------------------------------------------------该类为dnf人物角色动作类,目前适配大部分职业-------------------------------------------------------------------------"""def __init__(self, dnf_win_box,speed):self.dnf_win_box = dnf_win_boxself.speed = speedself.skill_button = ["q", "w", "e", "r", "t", "y", "a", "s", "d", "f", "h", "ctrl","alt"]passdef buff(self):"""添加角色buff,默认右右空格,上上空格,上下空格,左右空格都按一遍"""pydirectinput.press(['right','right','space'])pydirectinput.press(['up', 'up', 'space'])#pydirectinput.press(['right', 'right', 'space'])pydirectinput.press(['down', 'down', 'space'])pydirectinput.press(['left', 'right', 'z'])passdef move_to_wuping(self,target_xy,person_xy):"""输入目标坐标,人物会移动到该坐标"""speed=self.speedtarget_x=target_xy[0]target_y = target_xy[1]person_x = person_xy[0]person_y = person_xy[1]if target_x - person_x > 30:x_button_name = "right"time1 = abs(target_x - person_x) / (400*speed)pydirectinput.keyDown(x_button_name)time.sleep(time1)pydirectinput.keyUp(x_button_name)elif target_x - person_x < -30:x_button_name = "le
然后就是角色cd判定机制,为了能匹配所有职业,我选择再做一个轻量级的ai神经网络来干这个事情。
截取各种角色的技能图标作为训练集
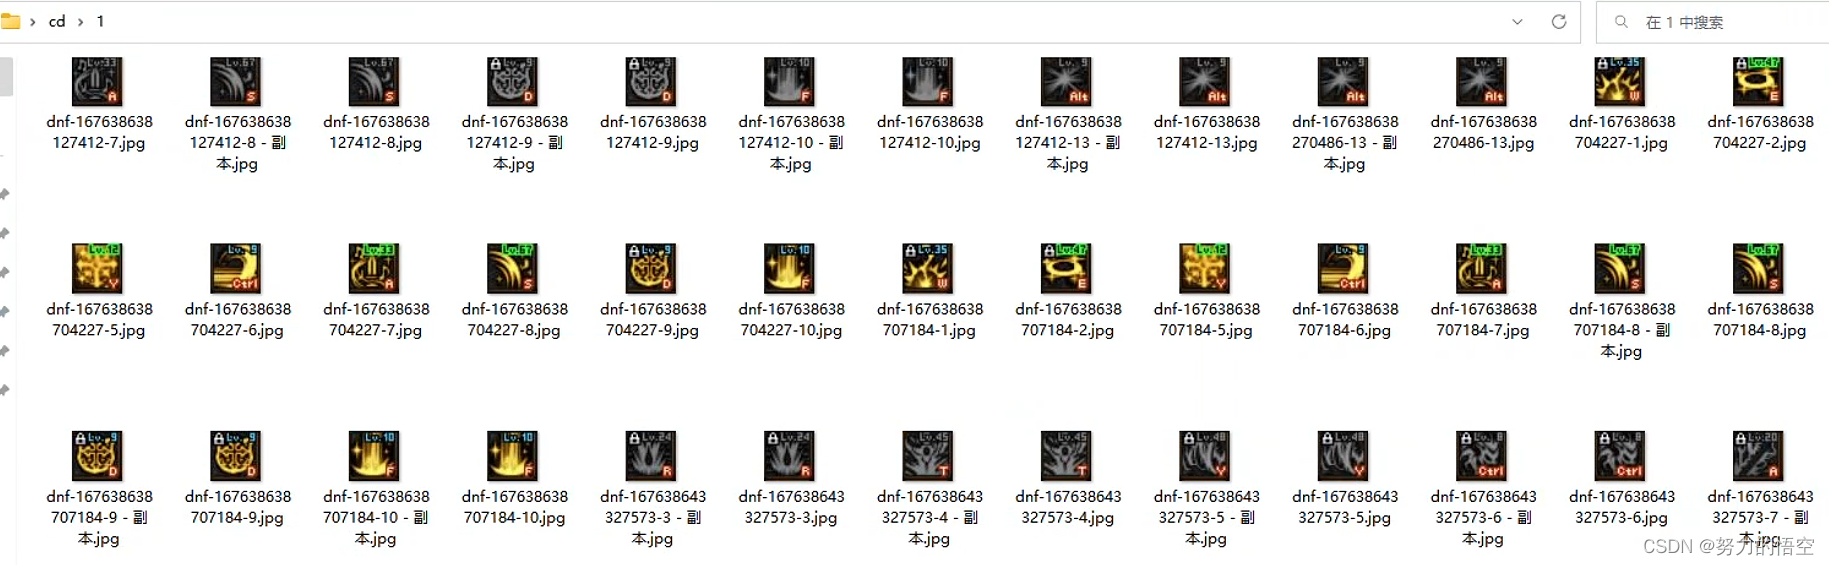
搭建轻量级网络进行模型训练

然后写一个技能判断的类,完成技能自动识别
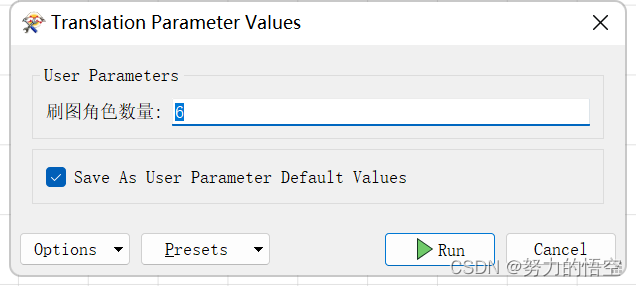
def getcdpic(img,model):h=47next_img = img.crop((649, 796, 977, 895))buttonlist1=["q","w","e","r","t","y","ctrl"]buttonlist2=["a","s","d","f","g","h","alt"]new_buttonlist=[]for i in range(14):if i <=6:aa=next_img.crop((0+(i*h),0,h+(i*h),h))b= havecd(aa,model)if b == 1:new_buttonlist.append(buttonlist1[i])else:i=i-7aa=next_img.crop((0+(i*h),h,h+(i*h),h*2))b= havecd(aa,model)if b == 1:new_buttonlist.append(buttonlist2[i])return new_buttonlist最后就是整体的刷图逻辑,包括过图,角色切换等


通过FME多层循环,来保证整体的流程控制,最终实现只需要输入,刷图的角色数量,即可完成搬砖自动化
总结
该研究仅为个人学习研究使用,主要为展示FME在深度学习领域的作用。代码只展示部分,不接受任何形式的购买行为。前前后后用空闲时间折腾了几个月,算是完成了一个有趣的课题研究。yolo真的是一个非常牛逼的算法,最近才推出了yolov8,性能和精度都获得了较大提升。
相关文章:
FME+YOLOV7写DNF自动刷图脚本
目录 前言 一、难点分析 二、实现流程 1.DNF窗口位置获取 2.获取训练数据 3.数据标注 4.数据格式转换 5.数据训练 5.刷图逻辑编写 前言 这是一篇不务正业的研究,首先说明,这不是外挂!这不是外挂!这不是外挂!这只是用a…...

Java语法面试题
多线程锁 Synchronized:一次只能被一个线程占有ReadWriteLock:被多个线程持有,写锁只能被一个线程占有ReentrantLock:一个线程的多个流程能获取同一把锁,就是可重入锁,即在一个线程中可以被重复的获取自旋锁…...

location
目录 匹配的目标 格式 匹配符号: 优先级 要表达不匹配条件,则用 if 实现 例子:根目录的匹配最弱 例子:区分大小写 和 不区分大小写 例子:以根开头 和 不区分大小写 例子:等号 匹配的目标 ng…...

简述RBAC模型
RBAC(Role-Based Access Control)模型是一种常用的访问控制模型,用于管理和控制用户对系统资源的访问权限。RBAC模型通过将用户分配给角色,并授予角色相应的权限,来实现安全的资源访问管理。 在RBAC模型中,…...

倒计时2天:中国工程院院士谭建荣等嘉宾确认出席,“警务+”时代来临...
近日伴随公安部、科技部联合印发通知,部署推进科技兴警三年行动计划(2023-2025年),现代科技手段与警务工作相结合的方式,正式被定义为未来警务发展的新趋势。 21世纪以来,随着科技的不断发展和创新…...
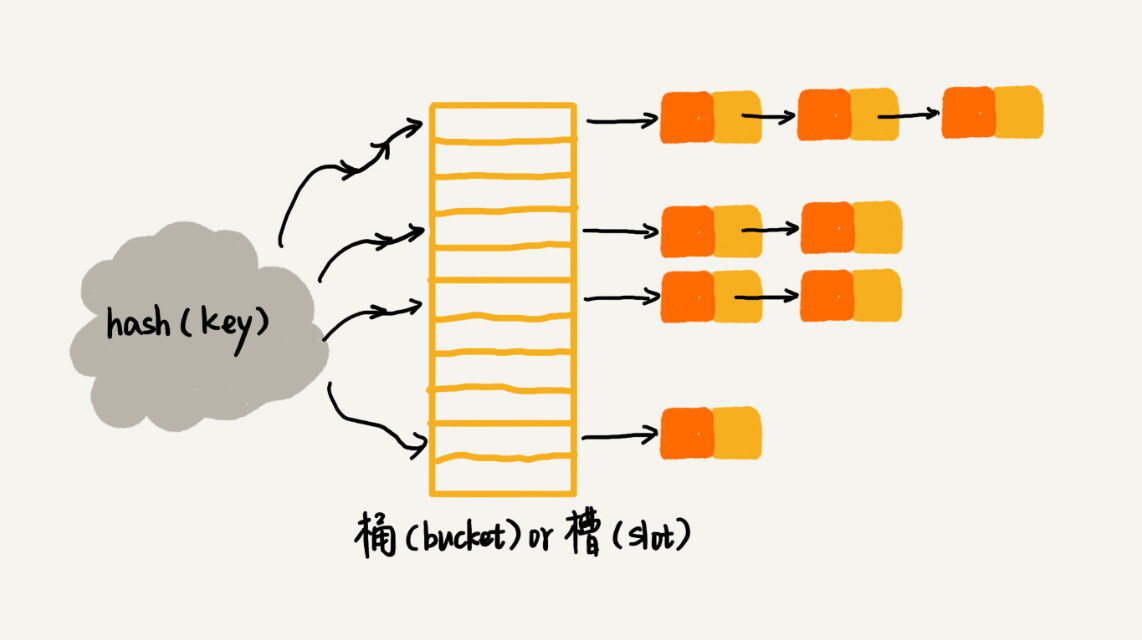
Python蓝桥杯训练:基本数据结构 [哈希表]
Python蓝桥杯训练:基本数据结构 [哈希表] 文章目录Python蓝桥杯训练:基本数据结构 [哈希表]一、哈希表理论基础知识1、开放寻址法2、链式法二、有关哈希表的一些常见操作三、力扣上面一些有关哈希表的题目练习1、[有效的字母异位词](https://leetcode.cn…...

MacOS 配置 Fvm环境
系统环境:MacOS 13,M1芯片 1. 安装HomeBrew: /bin/zsh -c "$(curl -fsSL https://gitee.com/cunkai/HomebrewCN/raw/master/Homebrew.sh)" speed 2. 使用brew安装Fvm: brew tap leoafarias/fvm brew install fvm 3…...
 介绍 Python 编程语言)
Python小白入门- 01( 第一章,第1节) 介绍 Python 编程语言
1. 介绍 Python 编程语言 1.1 Python 是什么 Python 是一种高级的、解释型、面向对象的编程语言,具有简洁、易读、易写的语法特点。Python 由 Guido van Rossum 于 1989 年在荷兰创造,并于 1991 年正式发布。 Python 语言广泛应用于数据科学、Web 开发、人工智能、自动化测…...

高并发系统设计之缓存
本文已收录至Github,推荐阅读 👉 Java随想录 这篇文章来讲讲缓存。缓存是优化网站性能的第一手段,目的是让访问速度更快。 说起缓存,第一反应可能想到的就是Redis。目前比较好的方案是使用多级缓存,如CPU→Ll/L2/L3→…...
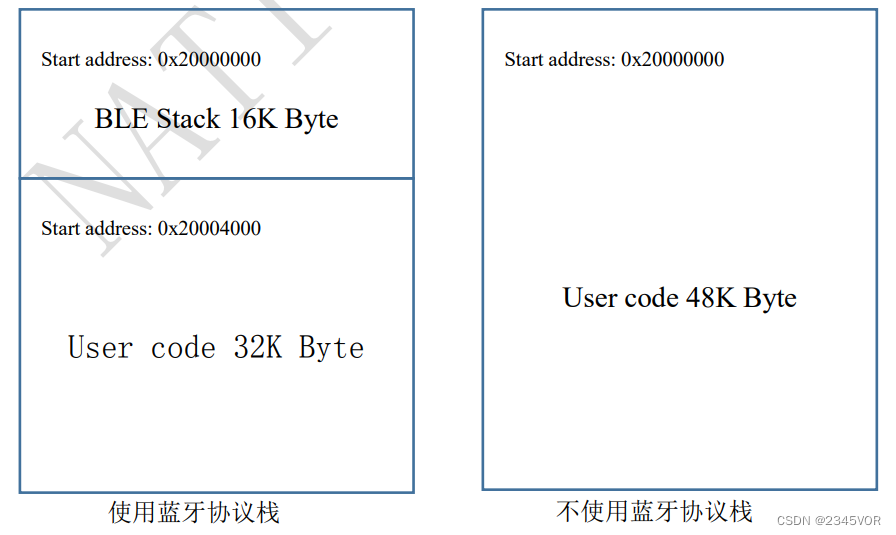
【N32WB03x SDK使用指南】
【N32WB03x SDK使用指南】1. 简介1.1 产品简介1.2 主要资源1.3 典型应用2. SDK/开发固件文件目录结构2.1 doc2.2 firmware2.3 middleware2.4 utilities2.5 projects Projects3. 项目配置与烧录3.1 编译环境安装3.2 固件支持包安装3.3 编译环境配置3.4 编译与下载3.5 BLE工程目录…...

pytest测试框架——pytest.ini用法
这里写目录标题一、pytest用法总结二、pytest.ini是什么三、改变运行规则pytest.inicheck_demo.py执行测试用例四、添加默认参数五、指定执行目录六、日志配置七、pytest插件分类八、pytest常用插件九、改变测试用例的执行顺序十、pytest并行与分布式执行十一、pytest内置插件h…...
2023版)
KAFKA安装与配置(带Zookeeper)2023版
KAFKA安装与配置(带Zookeeper) 一、环境准备: Ubuntu 64位 22.04,三台 二、安装JDK1.8 下载JDK1.8,我这边用的版本是jdk1.8.0_2022、解压jdk tar -zxvf jdk1.8.0_202.tar.gz 3、在/usr/local创建java文件夹,并将解压的jdk移动到/usr/local/java sudo mv jdk1.8.0_202…...

深入浅出解析ChatGPT引领的科技浪潮【AI行研商业价值分析】
Rocky Ding写在前面 【AI行研&商业价值分析】栏目专注于分享AI行业中最新热点/风口的思考与判断。也欢迎大家提出宝贵的意见或优化ideas,一起交流学习💪 大家好,我是Rocky。 2022年底,ChatGPT横空出世,火爆全网&a…...

.net 批量导出文件,以ZIP压缩方式导出
1. 首先Nuget ICSharpCode.SharpZipLib <script type"text/javascript">$(function () {$("#OutPutLink").click(function () { // 单击下文件时$.ajax({ // 先判断条件时间内没有文件url: "/Home/ExistsFile?statTime" $(&q…...
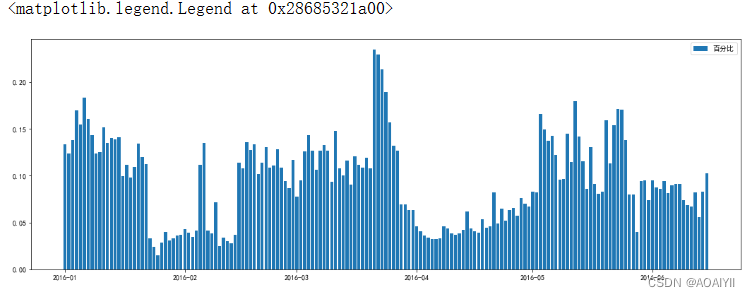
数据分析:某电商优惠卷数据分析
数据分析:某电商优惠卷数据分析 作者:AOAIYI 专栏:python数据分析 作者简介:Python领域新星作者、多项比赛获奖者:AOAIYI首页 😊😊😊如果觉得文章不错或能帮助到你学习,可…...
性能测试流程
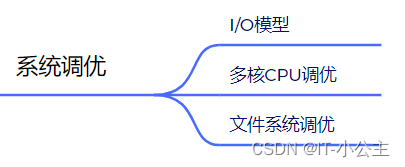
性能测试实战一.资源指标分析1.判断CPU是否瓶颈的方法2.判断内存是否瓶颈的方法3.判断磁盘I/O是否瓶颈的方法4.判断网络带宽是否是瓶颈的方法二.系统指标分析三.性能调优四.性能测试案例1.项目背景2.实施规划(1)需求分析(2)测试方…...

zookeeper集群的搭建,菜鸟升级大神必看
一、下载安装zookeeperhttp://archive.apache.org/dist/zookeeper/下载最新版本2.8.1http://archive.apache.org/dist/zookeeper/zookeeper-3.8.1/二、上传安装包到服务器上并且解压,重命名tar -zxvf apache-zookeeper-3.8.1-bin.tar.gzmv apache-zookeeper-3.8.1-b…...

C语言之习题练习集
💗 💗 博客:小怡同学 💗 💗 个人简介:编程小萌新 💗 💗 如果博客对大家有用的话,请点赞关注再收藏 🌞 文章目录牛客网题号: JZ17 打印从1到最大的n位数牛客网题号&#x…...

Buuctf [ACTF新生赛2020]Universe_final_answer 题解
1.程序逻辑 程序逻辑并不复杂: 首先输入字符串,然后对字符串进行一个判断是否满足条件的操作 如果满足则对字符串进行处理并输出,输出的就是flag 2.judge_860函数 显然根据这十个条件可以通过矩阵解线性方程组,这里对变量的命名做了一些调整,让Vi对应flag[i]方便读 …...
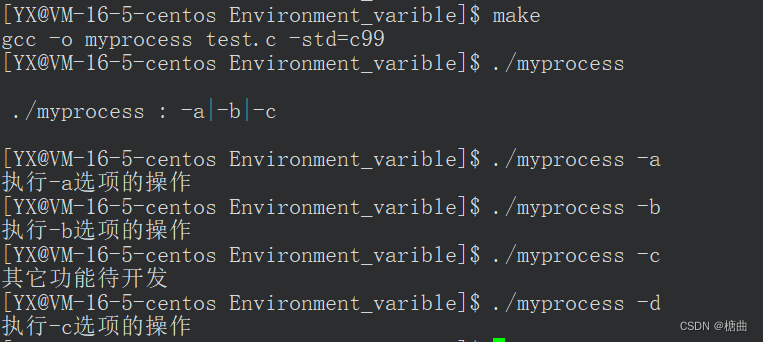
【Linux】环境变量
目录背景1.概念2.常见环境变量2.1 PATH指令和自定义程序向环境变量PATH中添加路径删除PATH中的路径2.2 env:显示所有环境变量2.3 环境变量相关的命令3.通过代码获取环境变量1.char* envp[]2.第三方变量enciron3.getenv函数获取指定环境变量4.利用获取的环境变量自制…...

Cursor实现用excel数据填充word模版的方法
cursor主页:https://www.cursor.com/ 任务目标:把excel格式的数据里的单元格,按照某一个固定模版填充到word中 文章目录 注意事项逐步生成程序1. 确定格式2. 调试程序 注意事项 直接给一个excel文件和最终呈现的word文件的示例,…...

Python:操作 Excel 折叠
💖亲爱的技术爱好者们,热烈欢迎来到 Kant2048 的博客!我是 Thomas Kant,很开心能在CSDN上与你们相遇~💖 本博客的精华专栏: 【自动化测试】 【测试经验】 【人工智能】 【Python】 Python 操作 Excel 系列 读取单元格数据按行写入设置行高和列宽自动调整行高和列宽水平…...

安宝特方案丨XRSOP人员作业标准化管理平台:AR智慧点检验收套件
在选煤厂、化工厂、钢铁厂等过程生产型企业,其生产设备的运行效率和非计划停机对工业制造效益有较大影响。 随着企业自动化和智能化建设的推进,需提前预防假检、错检、漏检,推动智慧生产运维系统数据的流动和现场赋能应用。同时,…...

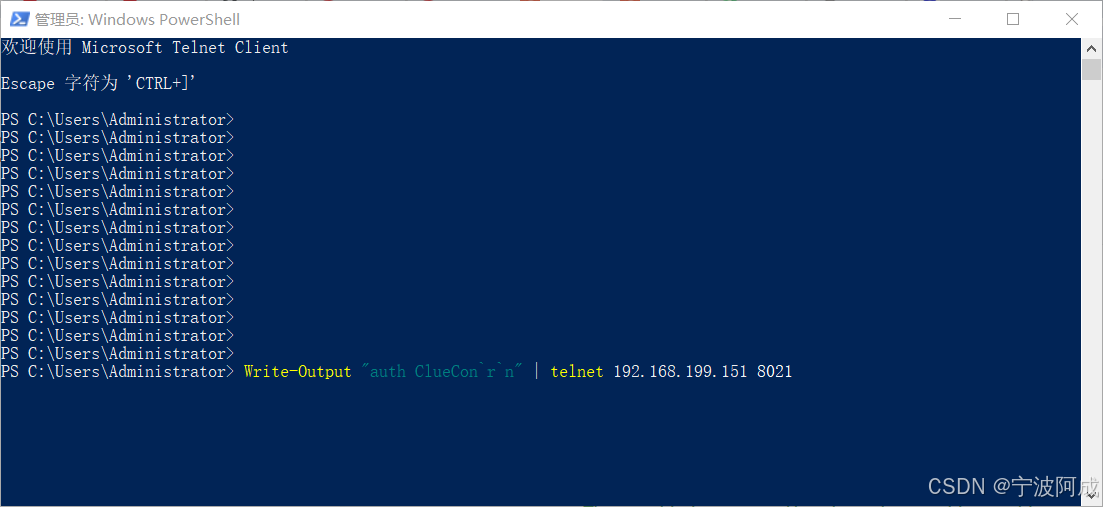
在 Nginx Stream 层“改写”MQTT ngx_stream_mqtt_filter_module
1、为什么要修改 CONNECT 报文? 多租户隔离:自动为接入设备追加租户前缀,后端按 ClientID 拆分队列。零代码鉴权:将入站用户名替换为 OAuth Access-Token,后端 Broker 统一校验。灰度发布:根据 IP/地理位写…...

五年级数学知识边界总结思考-下册
目录 一、背景二、过程1.观察物体小学五年级下册“观察物体”知识点详解:由来、作用与意义**一、知识点核心内容****二、知识点的由来:从生活实践到数学抽象****三、知识的作用:解决实际问题的工具****四、学习的意义:培养核心素养…...
)
【服务器压力测试】本地PC电脑作为服务器运行时出现卡顿和资源紧张(Windows/Linux)
要让本地PC电脑作为服务器运行时出现卡顿和资源紧张的情况,可以通过以下几种方式模拟或触发: 1. 增加CPU负载 运行大量计算密集型任务,例如: 使用多线程循环执行复杂计算(如数学运算、加密解密等)。运行图…...
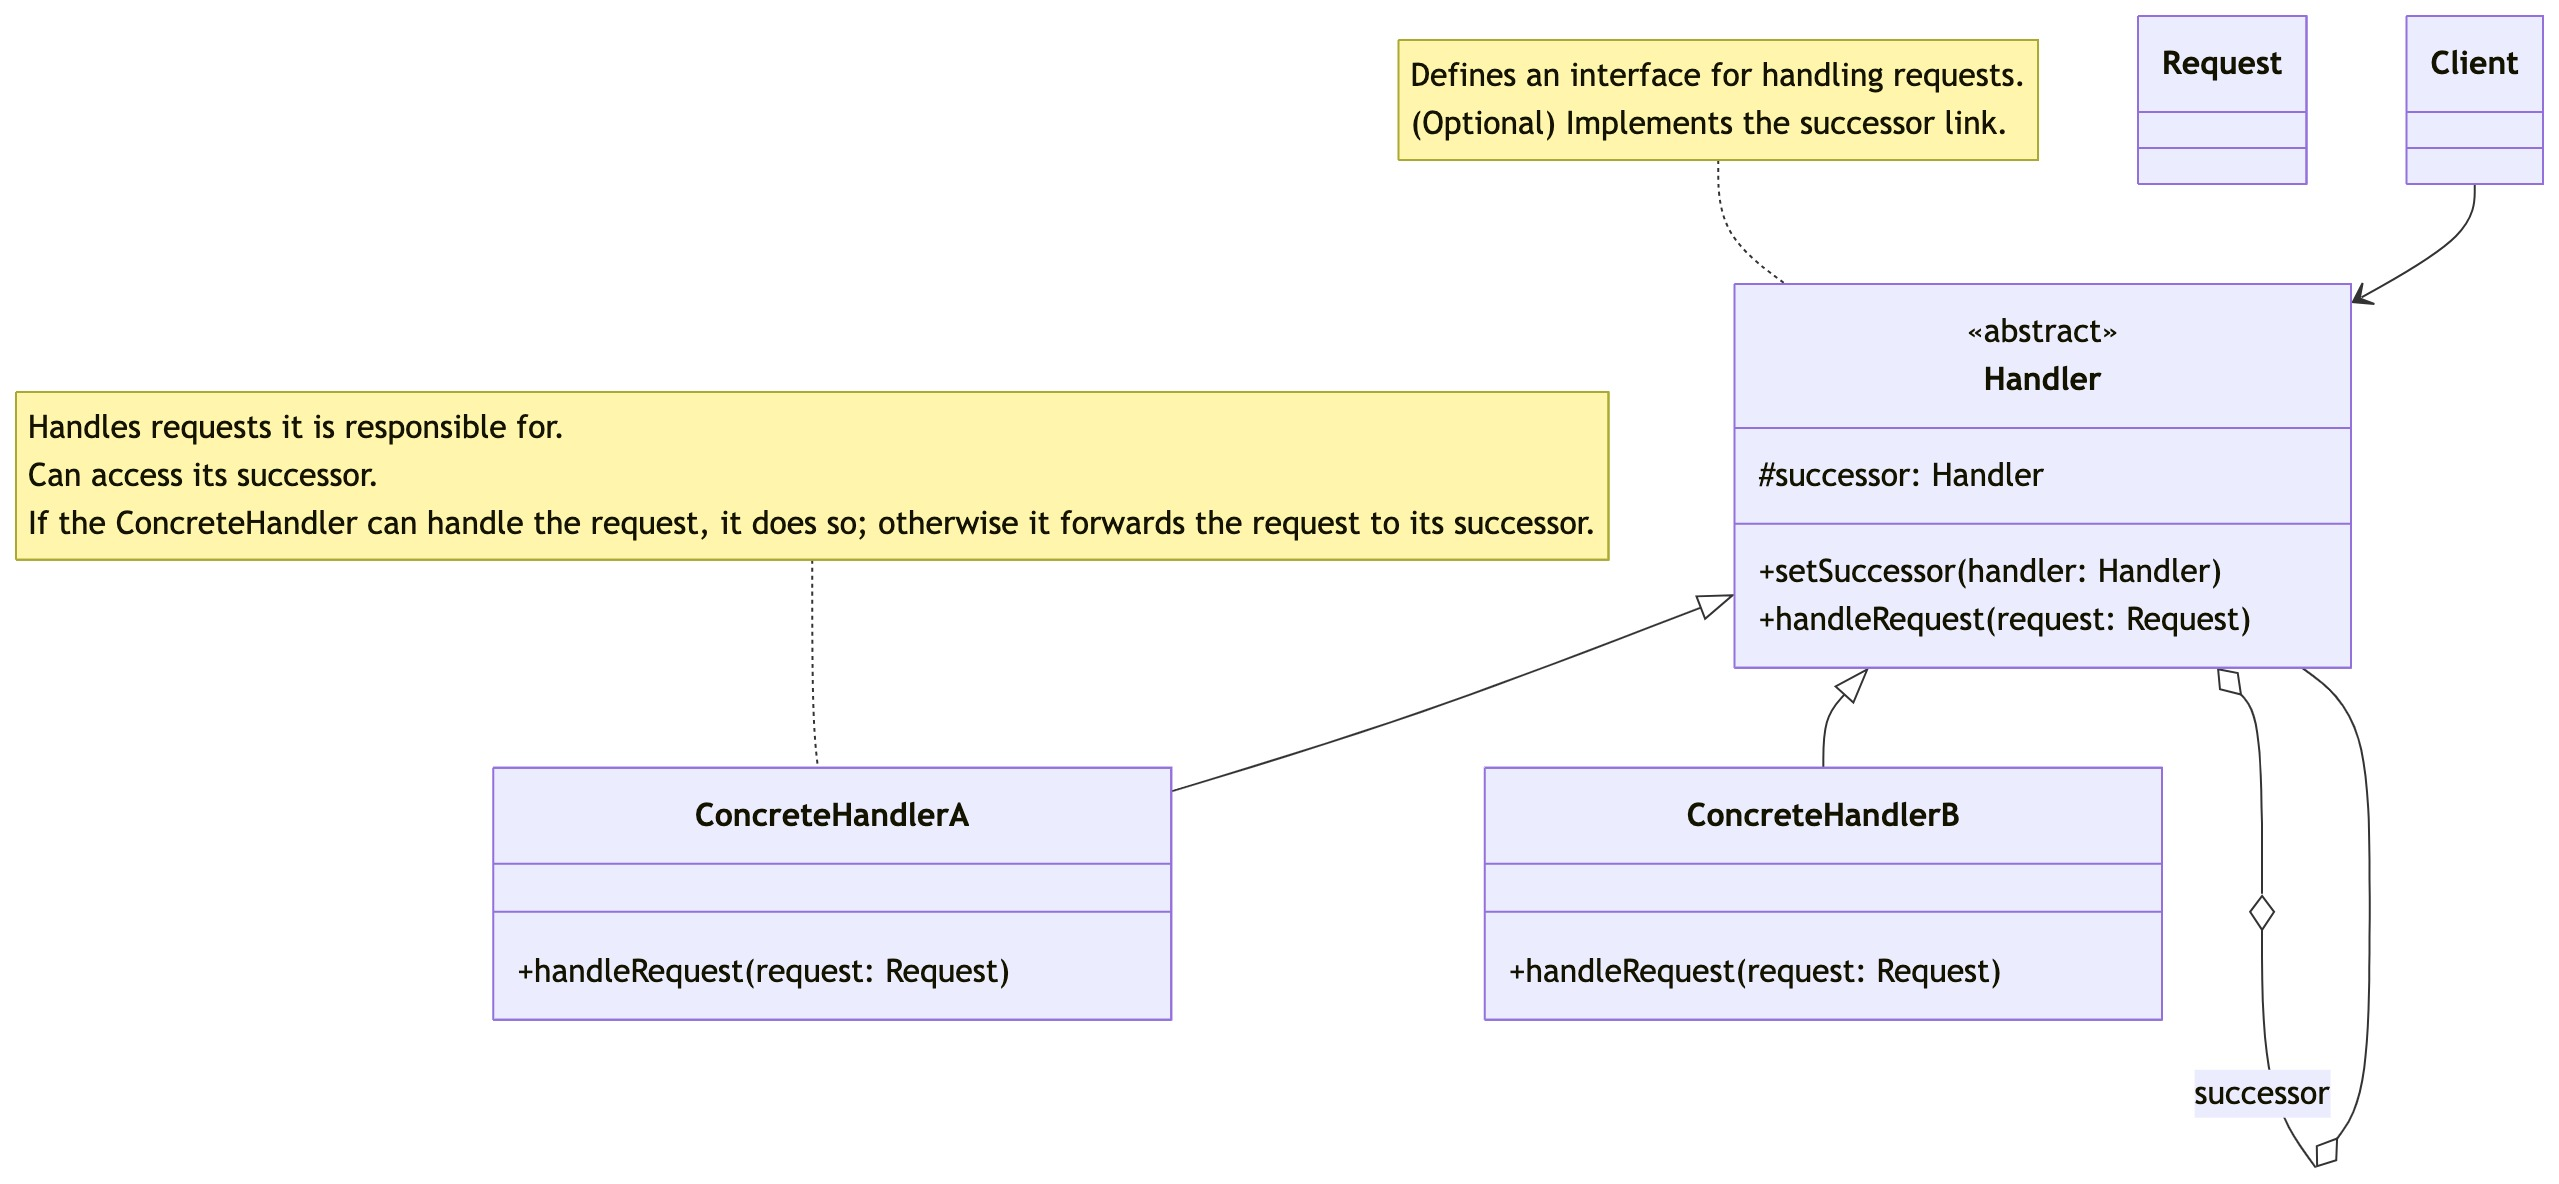
零基础设计模式——行为型模式 - 责任链模式
第四部分:行为型模式 - 责任链模式 (Chain of Responsibility Pattern) 欢迎来到行为型模式的学习!行为型模式关注对象之间的职责分配、算法封装和对象间的交互。我们将学习的第一个行为型模式是责任链模式。 核心思想:使多个对象都有机会处…...
用docker来安装部署freeswitch记录
今天刚才测试一个callcenter的项目,所以尝试安装freeswitch 1、使用轩辕镜像 - 中国开发者首选的专业 Docker 镜像加速服务平台 编辑下面/etc/docker/daemon.json文件为 {"registry-mirrors": ["https://docker.xuanyuan.me"] }同时可以进入轩…...
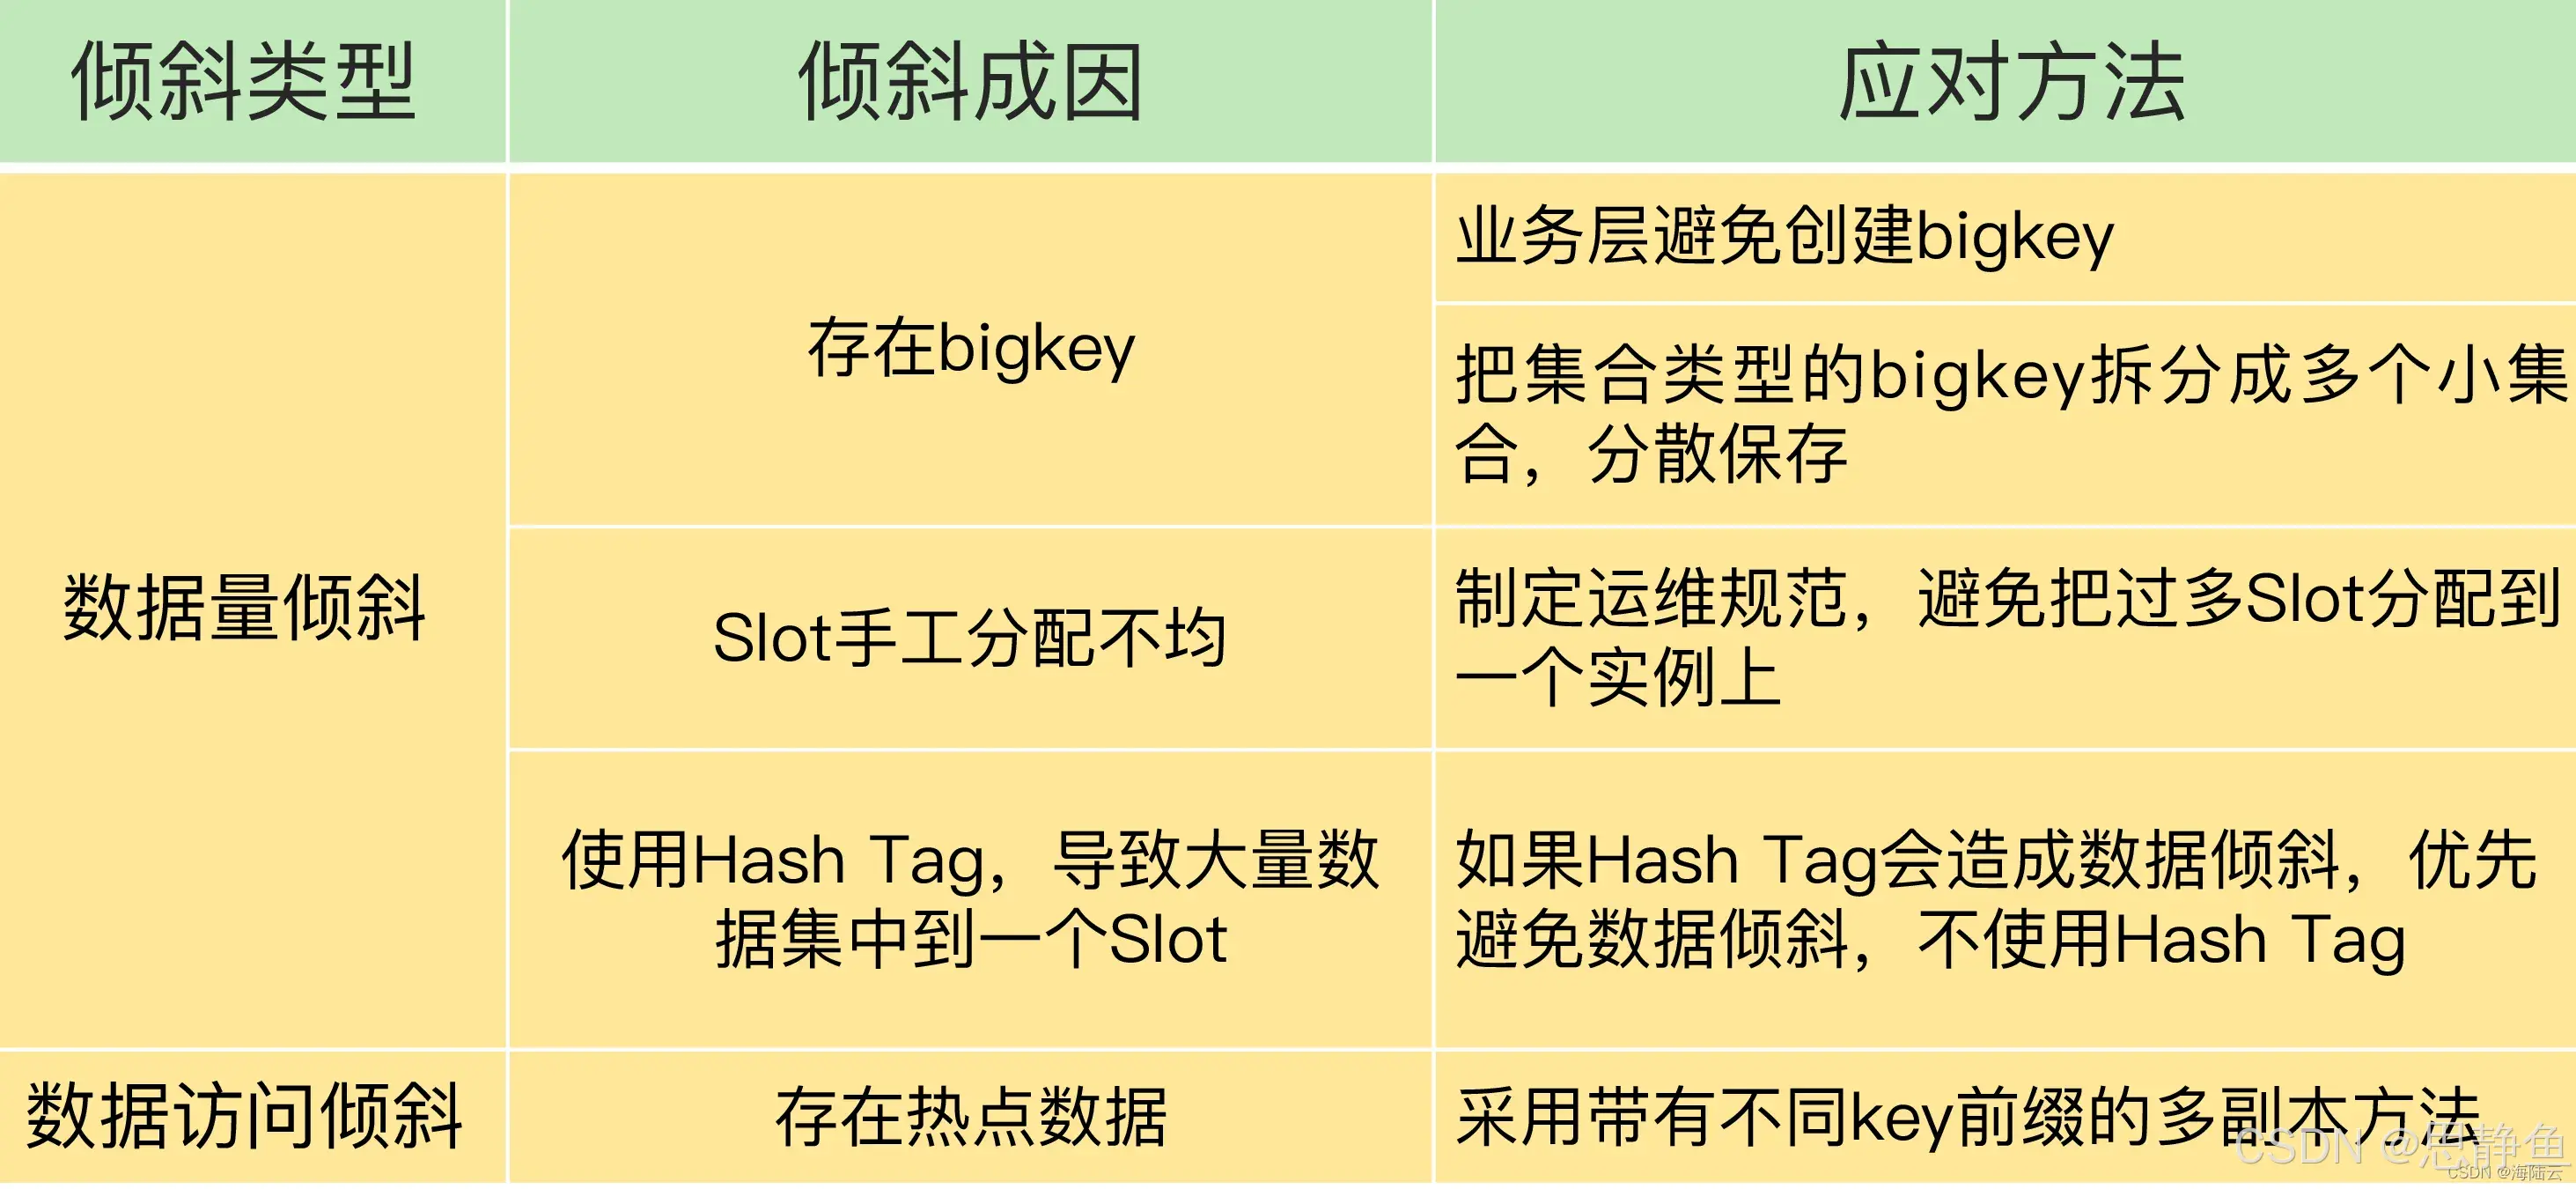
Redis数据倾斜问题解决
Redis 数据倾斜问题解析与解决方案 什么是 Redis 数据倾斜 Redis 数据倾斜指的是在 Redis 集群中,部分节点存储的数据量或访问量远高于其他节点,导致这些节点负载过高,影响整体性能。 数据倾斜的主要表现 部分节点内存使用率远高于其他节…...
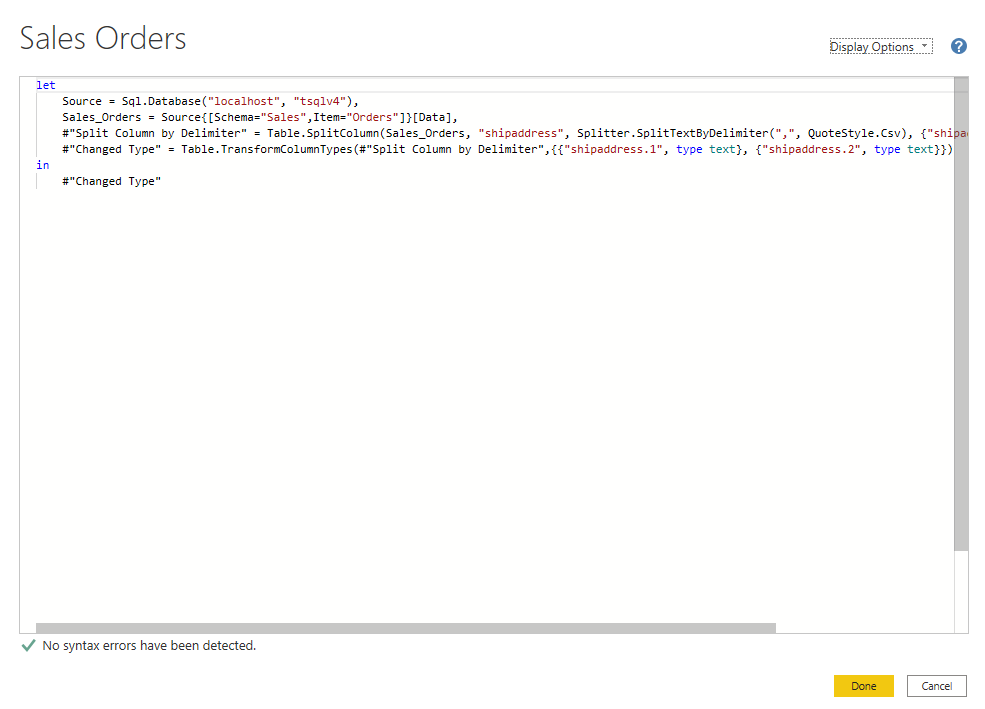
微软PowerBI考试 PL300-在 Power BI 中清理、转换和加载数据
微软PowerBI考试 PL300-在 Power BI 中清理、转换和加载数据 Power Query 具有大量专门帮助您清理和准备数据以供分析的功能。 您将了解如何简化复杂模型、更改数据类型、重命名对象和透视数据。 您还将了解如何分析列,以便知晓哪些列包含有价值的数据,…...