关于测试组件junit切换testng的示例以及切换方式分享
文章目录
- 概要
- 首先看看junit和testng的区别
- 实践篇
- 摸拟业务逻辑代码
- 简单对象
- 数据层摸拟类
- 业务逻辑层摸拟类
- 后台任务摸拟类
- 基于spring+mock+junit
- 基于spring+mock+testng
- 示例的差异点
- junit与testng的主要变动不大,有以下几个点需要注意
- 注解部分
- 在before,after中
- testng多出按配置执行功能
- 附上关于mock 新旧写法改进
- 小结
概要
本文作者之前写单元测试都是使用junit
场景有以下三种场景
仅junit
spring+junit
mock+spring+junit
本文会用第三种场景写简单的实例列出junit和testng的代码相关说明
并会将涉及的修改点一一说明
目的帮助大家了解testng及具体的切换方式
首先看看junit和testng的区别
JUnit和TestNG是两种流行的Java测试框架,用于测试Java应用程序中的代码。它们具有以下区别:
-
组织方式:JUnit使用Annotations来标注测试方法,而TestNG使用XML文件来组织测试。
-
支持的测试类型:JUnit 4支持单元测试,而TestNG支持功能测试、集成测试和端到端测试。
-
并发测试:TestNG支持并发测试,可以在同一时间运行多个测试用例,而JUnit不支持并发测试。
-
数据提供者:TestNG支持数据提供者,可以在不同参数上运行相同的测试用例,而JUnit不支持数据提供者。
-
测试套件:TestNG支持测试套件,可以组织不同的测试用例,而JUnit不支持测试套件。
-
依赖测试:TestNG支持依赖测试,可以在一组测试之前运行必需的测试,而JUnit不支持依赖测试。JUnit和TestNG是两种流行的Java测试框架,用于测试Java应用程序中的代码。它们具有以下区别:
实践篇
摸拟业务逻辑代码
场景,有三层以上代码层次的业务场景,需要摸拟最底层数据层代码
简单对象
package com.riso.junit;/*** DemoEntity* @author jie01.zhu* date 2023/10/29*/
public class DemoEntity implements java.io.Serializable {private long id;private String name;public long getId() {return id;}public void setId(long id) {this.id = id;}public String getName() {return name;}public void setName(String name) {this.name = name;}@Overridepublic String toString() {return "DemoEntity{" + "id=" + id + ", name='" + name + '\'' + '}';}}
数据层摸拟类
package com.riso.junit;import org.springframework.stereotype.Component;/*** DemoDaoImpl* @author jie01.zhu* date 2023/10/29*/
@Component
public class DemoDaoImpl {public int insert(DemoEntity demoEntity) {System.out.println("dao.insert:" + demoEntity.toString());return 1;}
}
业务逻辑层摸拟类
package com.riso.junit;import org.springframework.stereotype.Service;import javax.annotation.Resource;/*** DemoServiceImpl* @author jie01.zhu* date 2023/10/29*/
@Service
public class DemoServiceImpl {@ResourceDemoDaoImpl demoDao;public int insert(DemoEntity demoEntity) {System.out.println("service.insert:" + demoEntity.toString());return demoDao.insert(demoEntity);}}
后台任务摸拟类
package com.riso.junit;import org.springframework.stereotype.Component;/*** DemoTaskImpl* @author jie01.zhu* date 2023/10/29*/
@Component
public class DemoTaskImpl {DemoServiceImpl demoService;public int insert(DemoEntity demoEntity) {System.out.println("task.insert:" + demoEntity.toString());return demoService.insert(demoEntity);}
}
基于spring+mock+junit
maven依赖
<!-- test --><dependency><groupId>junit</groupId><artifactId>junit</artifactId><scope>test</scope></dependency><dependency><groupId>org.springframework</groupId><artifactId>spring-test</artifactId><scope>test</scope></dependency><dependency><groupId>org.mockito</groupId><artifactId>mockito-core</artifactId><version>3.12.4</version><scope>test</scope></dependency>
package com.riso.junit.test;import com.riso.junit.DemoDaoImpl;
import com.riso.junit.DemoEntity;
import com.riso.junit.DemoServiceImpl;
import com.riso.junit.DemoTaskImpl;
import org.junit.Assert;
import org.junit.Test;
import org.junit.runner.RunWith;
import org.mockito.InjectMocks;
import org.mockito.Mock;
import org.mockito.Mockito;
import org.springframework.test.context.ContextConfiguration;
import org.springframework.test.context.junit4.SpringJUnit4ClassRunner;import javax.annotation.Resource;/***  junit test* @author jie01.zhu* date 2023/10/29*/
@RunWith(SpringJUnit4ClassRunner.class)
@ContextConfiguration(locations = {"classpath:applicationContext.xml"}, inheritLocations = true)
public class Test1 {/*** 测试入口类*/@Resource@InjectMocksDemoTaskImpl demoTask;/*** mock的类的中间传递类*/@Resource@InjectMocksDemoServiceImpl demoService;/*** 被mock的类*/@MockDemoDaoImpl demoDao;@Testpublic void test1() {// 初始化mock环境MockitoAnnotations.openMocks(this);DemoEntity demoEntity = new DemoEntity();demoEntity.setId(1L);demoEntity.setName("name1");Mockito.doReturn(0).when(demoDao).insert(Mockito.any());int result = demoTask.insert(demoEntity);Assert.assertEquals(result, 0);}
}
基于spring+mock+testng
有二个测试类,测试参数不同,主要体现在单元测试外,控制二个测试类,按并发场景做简单的集成测试
maven依赖
<dependency><groupId>org.testng</groupId><artifactId>testng</artifactId><version>6.14.3</version><scope>test</scope></dependency><dependency><groupId>org.springframework.boot</groupId><artifactId>spring-boot-test</artifactId><version>2.4.13</version><scope>test</scope></dependency><dependency><groupId>org.springframework</groupId><artifactId>spring-test</artifactId><scope>test</scope></dependency><dependency><groupId>org.mockito</groupId><artifactId>mockito-core</artifactId><version>3.12.4</version><scope>test</scope></dependency>
package com.riso.testng.test;import com.riso.testng.ContextConfig;
import com.riso.testng.DemoDaoImpl;
import com.riso.testng.DemoEntity;
import com.riso.testng.DemoTaskImpl;
import org.mockito.Mockito;
import org.springframework.boot.test.context.SpringBootTest;
import org.springframework.boot.test.mock.mockito.MockitoTestExecutionListener;
import org.springframework.boot.test.mock.mockito.SpyBean;
import org.springframework.test.context.TestExecutionListeners;
import org.springframework.test.context.testng.AbstractTestNGSpringContextTests;
import org.testng.Assert;
import org.testng.annotations.Test;import javax.annotation.Resource;/*** junit test* @author jie01.zhu* date 2023/10/29*/
@SpringBootTest(classes = {ContextConfig.class})
@TestExecutionListeners(listeners = MockitoTestExecutionListener.class)
public class Test1 extends AbstractTestNGSpringContextTests {/*** 测试入口类*/@ResourceDemoTaskImpl demoTask;/*** 被mock的类 选用spy方式 默认使用原生逻辑,仅mock的方法才被mock*/@SpyBeanDemoDaoImpl demoDao;@Testpublic void test1() {// 初始化mock环境MockitoAnnotations.openMocks(this);DemoEntity demoEntity = new DemoEntity();demoEntity.setId(1L);demoEntity.setName("name1");Mockito.doReturn(0).when(demoDao).insert(Mockito.any());int result = demoTask.insert(demoEntity);Assert.assertEquals(result, 0);}
}package com.riso.testng.test;import com.riso.testng.ContextConfig;
import com.riso.testng.DemoDaoImpl;
import com.riso.testng.DemoEntity;
import com.riso.testng.DemoTaskImpl;
import org.mockito.Mockito;
import org.springframework.boot.test.context.SpringBootTest;
import org.springframework.boot.test.mock.mockito.MockitoTestExecutionListener;
import org.springframework.boot.test.mock.mockito.SpyBean;
import org.springframework.test.context.TestExecutionListeners;
import org.springframework.test.context.testng.AbstractTestNGSpringContextTests;
import org.testng.Assert;
import org.testng.annotations.Test;import javax.annotation.Resource;/*** junit test* @author jie01.zhu* date 2023/10/29*/
@SpringBootTest(classes = {ContextConfig.class})
@TestExecutionListeners(listeners = MockitoTestExecutionListener.class)
public class Test2 extends AbstractTestNGSpringContextTests {/*** 测试入口类*/@ResourceDemoTaskImpl demoTask;/*** 被mock的类 选用spy方式 默认使用原生逻辑,仅mock的方法才被mock*/@SpyBeanDemoDaoImpl demoDao;@Testpublic void test2() {// 初始化mock环境MockitoAnnotations.openMocks(this);DemoEntity demoEntity = new DemoEntity();demoEntity.setId(2L);demoEntity.setName("name2");Mockito.doReturn(2).when(demoDao).insert(Mockito.any());int result = demoTask.insert(demoEntity);Assert.assertEquals(result, 2);}
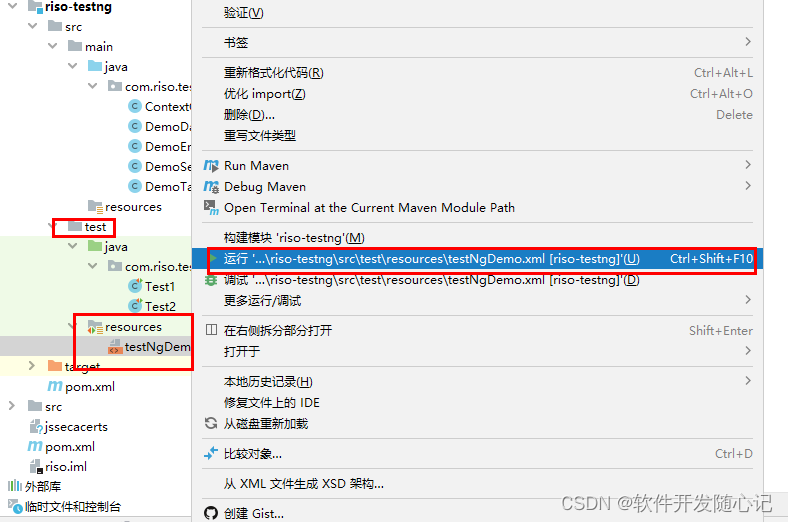
}testNg的 配置文件,也是执行入口
<!DOCTYPE suite SYSTEM "http://testng.org/testng-1.0.dtd" >
<suite name="test" parallel="tests" thread-count="2"><test name="test1" group-by-instances="true"><classes><class name="com.riso.testng.test.Test1"/></classes></test><test name="test2" group-by-instances="true"><classes><class name="com.riso.testng.test.Test2"></class></classes></test>
</suite>
运行方式如下:
示例的差异点
junit与testng的主要变动不大,有以下几个点需要注意
注解部分
junit此处注解
@RunWith(SpringJUnit4ClassRunner.class)
testng不再使用此注解
需要继承 org.springframework.test.context.testng.AbstractTestNGSpringContextTests
在before,after中
testng完全兼容,但会多出Suite ,它代替xml配置中,单元测试类之上的生命周期
testng多出按配置执行功能
首先testng的单元测试可以与junit一样,单独运行
在这个基础上,也能通过testng xml按配置运行,可以见上面的例子
附上关于mock 新旧写法改进
以前要摸拟调用对象的跨二层以上类时,需要通过InjectMocks 做为中间传递,才能成功mock掉二层以上的类
换成spyBean后,不需要再使用InjectMocks ,会自动从注入中找到
这个小插曲也是我自己对以前mock的修正,一并附上
小结
通过以上说明,及示例
testng是完全兼容junit的,且改动很小
注解,断言都是直接兼容的(只需要更换导入的包路径既可)
当然,我不是为了使用而使用,一切都要建立上有需求的基础上
junit对我来讲,已经满足不了我的需求,
为了能够编写集成测试,同时复用已有的单元测试,我选择了testng
希望以上分享,可以对读都有用
朱杰
2023-10-29
相关文章:
关于测试组件junit切换testng的示例以及切换方式分享
文章目录 概要首先看看junit和testng的区别实践篇摸拟业务逻辑代码简单对象数据层摸拟类业务逻辑层摸拟类后台任务摸拟类 基于springmockjunit基于springmocktestng 示例的差异点junit与testng的主要变动不大,有以下几个点需要注意注解部分在before,after中testng多出按配置执行…...
nginx 内存管理(二)
共享内存 共享内存结构与接口定义nginx共享内存在操作系统上的兼容性设计互斥锁锁的结构体锁的一系列操作(core/ngx_shmtx.c)创建锁 原子操作nginx的上锁操作尝试加锁获取锁释放锁强迫解锁唤醒等待进程 slab共享内存块管理nginx的slab大小规格内存池结构…...
【DevChat】智能编程助手 - 使用评测
写在前面:博主是一只经过实战开发历练后投身培训事业的“小山猪”,昵称取自动画片《狮子王》中的“彭彭”,总是以乐观、积极的心态对待周边的事物。本人的技术路线从Java全栈工程师一路奔向大数据开发、数据挖掘领域,如今终有小成…...
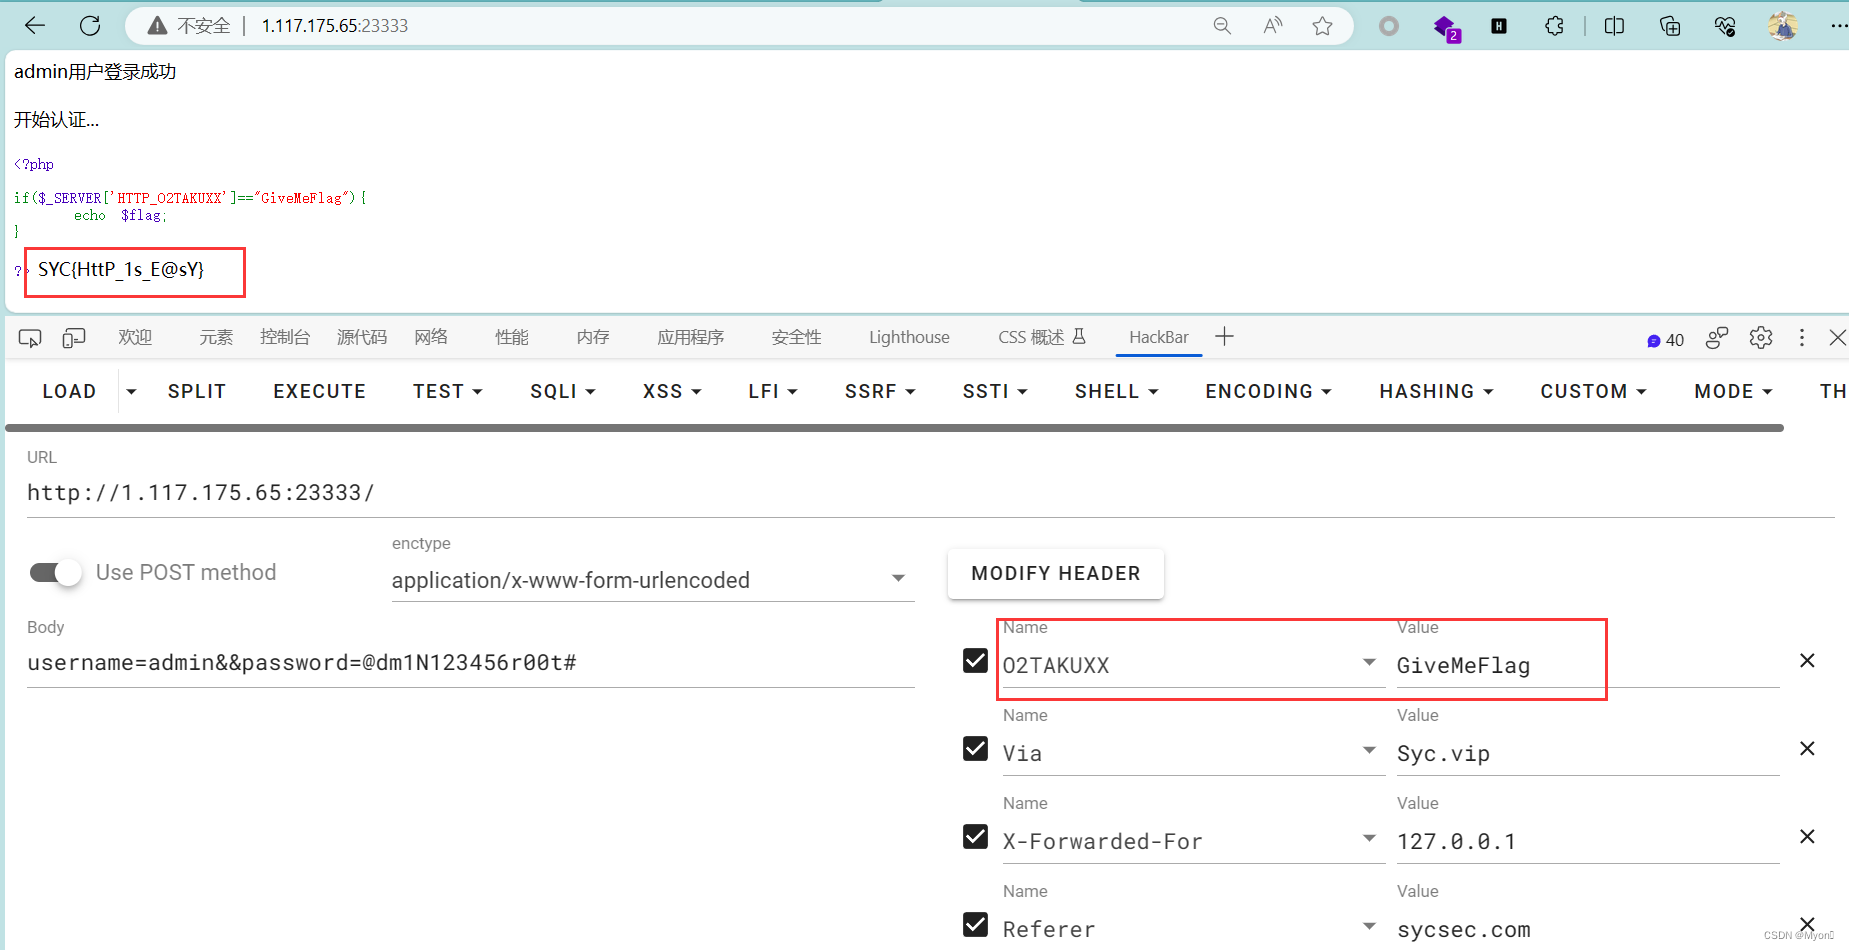
Geek challenge 2023 EzHttp
打开链接需要使用post请求提交username和password 查看源码得到提示,爬虫想到robots协议 访问robots.txt 访问得到的路径:/o2takuXXs_username_and_password.txt 拿到用户名和密码: username:admin password:dm1N123456r00t# 进行post传参…...
matlabR2021a正版免费使用
目录 matlab介绍: 安装: matlab介绍: MATLAB(Matrix Laboratory的缩写)是一种高级技术计算和编程环境,由MathWorks公司开发。它在科学、工程、数据分析和数学建模领域中广泛应用,为用户提供了…...
天气数据可视化平台-计算机毕业设计vue
天气变幻无常,影响着我们生活的方方面面,应用天气预报信息可以及时了解天气的趋势,给人们的工作、生活等带来便利,也可以为我们为未来的事情做安排和打算,所以一个精准的、易读 通过利用 程序对气象网站大量的气象信息…...

揭秘Java switch语句中的case穿透现象
揭秘Java switch语句中的case穿透现象 1. switch 语句简介2. case穿透现象的原因关于 goto 3. switch和if的区别4. 总结 导语:在 Java 开发中,我们经常使用switch语句来进行条件判断和分支选择。然而,有一个令人困惑的现象就是,当…...
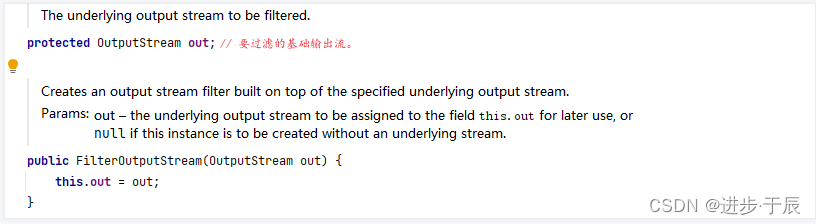
Java-API简析_java.io.FilterOutputStream类(基于 Latest JDK)(浅析源码)
【版权声明】未经博主同意,谢绝转载!(请尊重原创,博主保留追究权) https://blog.csdn.net/m0_69908381/article/details/134106510 出自【进步*于辰的博客】 因为我发现目前,我对Java-API的学习意识比较薄弱…...
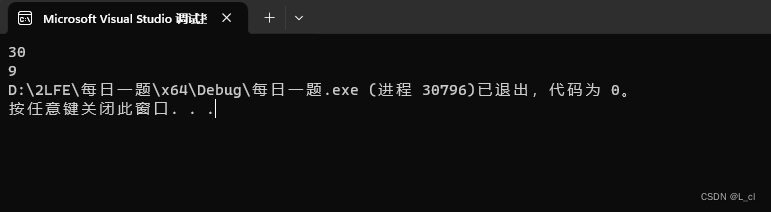
C语言 每日一题 PTA 10.29 day7
1.特殊a串数列求和 给定两个均不超过9的正整数a和n,要求编写程序求a aa aaa⋯ aa⋯a(n个a)之和。 输入格式: 输入在一行中给出不超过9的正整数a和n。 输出格式: 在一行中按照“s 对应的和”的格式输出。 思路 n…...

持续集成部署-k8s-服务发现-Ingress 路径匹配与虚拟主机匹配
持续集成部署-k8s-服务发现-Ingress 路径匹配与虚拟主机匹配 1. 安装 Ingress-Nginx2. 创建要代理的 Service3. 创建一个新的 Ingress-Nginx1. 安装 Ingress-Nginx 要使用 Ingress-Nginx 首先第一步是需要先安装它,安装的步骤可以参考:持续集成部署-k8s-服务发现-Ingress 2…...
selenium工作原理和反爬分析
一、 Selenium Selenium是最广泛使用的开源Web UI(用户界面)自动化测试套件之一,支持并行测试执行。Selenium通过使用特定于每种语言的驱动程序支持各种编程语言。Selenium支持的语言包括C#,Java,Perl,PHP,Python和Ru…...
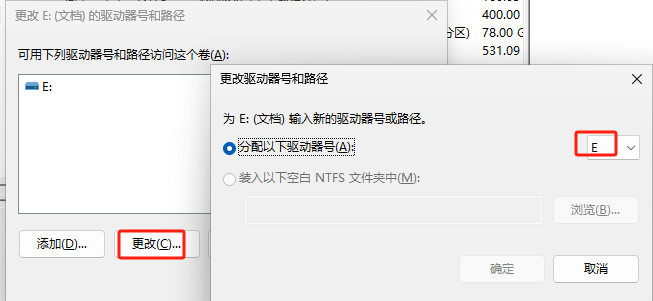
windows电脑安装系统后固态硬盘和机械硬盘的盘符号顺序显示错乱,解决方法
一、场景 由于电脑磁盘是SSD固态硬盘自己拓展的1T机械硬盘组成,固态硬盘分为C、D两个盘区,机械硬盘分为E、F两个盘区。为了提升运行速度,系统安装在C盘,安装完成后按照习惯盘区顺应该为C、D、E、F,但实际情况却是D、E…...
方法))
自定义控件的子控件布局(onLayout()方法)
onLayout()方法用于指定布局中子控件的位置,该方法通常在自定义的ViewGroup容器中重写。 重写onLayout()方法中的常用方法: getChildCount() 获取子控件数量 getChildAt( int index ) 获取指定index的子控件,返回View view.getVisibilit…...

vscode提取扩展出错xhr
在 Visual Studio Code (VSCode) 中提取扩展出现 XHR 错误通常意味着在下载扩展或进行扩展管理操作时出现了网络请求问题。XHR (XMLHttpRequest) 是一种用于在浏览器中进行 HTTP 请求的技术,通常用于获取数据或资源。在 VSCode 中,它也可用于管理扩展的下…...

Docker 笔记(上篇)
Docker 概述 Docker 概念 Docker 是一个开源的应用容器引擎,让开发者可以打包他们的应用以及依赖包到一个可移植的镜像中,然后发布到任何流行的 Linux或Windows操作系统的机器上,也可以实现虚拟化。容器是完全使用沙箱机制,相互之…...
python自动化测试(六):唯品会商品搜索-练习
目录 一、配置代码 二、操作 2.1 输入框“运动鞋” 2.2 点击搜索按钮 2.3 选择品牌 2.4 选择主款 2.5 适用性别 2.6 选择尺码 2.7 选择商品:(通过css的属性去匹配) 2.8 点击配送地址选项框 一、配置代码 # codingutf-8 from selen…...

深度强化学习用于博弈类游戏-基础测试与说明【1】
深度强化学习用于博弈类游戏-基础【1】 1. 强化学习方法2. 强化学习在LOL中的应⽤2.1 环境搭建2.2 游戏特征元素提取1)小地图人物位置:2)人物血量等信息3)在整个图像上寻找小兵、防御塔的位置4)自编码器提取3. 策略梯度算法简介参考资料1. 强化学习方法 伴随着人工智能的潮起…...

通过requests库使用HTTP编写的爬虫程序
使用Python的requests库可以方便地编写HTTP爬虫程序。以下是一个使用requests库的示例: import requests# 发送HTTP GET请求 response requests.get("http://example.com")# 检查响应状态码 if response.status_code 200:# 获取响应内容html response.…...

550MW发电机变压器组继电保护的整定计算及仿真
摘要 电力系统继电保护设计是根据系统接线图及要求选择保护方式,进行整定计算,电力系统继电保护的设计与配置是否合理直接影响到电力系统的安全运行。如果设计与配置不当,保护将不能正确工作,会扩大事故停电范围,造成…...
Linux 命令|服务器相关
1. 在公共 linux 上创建 python 虚拟环境 【精选】在公共Linux服务器上创建自己的python虚拟环境_服务器创建自己的环境-CSDN博客 2. 查看现存的状态,看有没有程序在跑 nvidia-smi命令详解-CSDN博客 3. 上传本地文件到服务器 在本地 Mac 计算机的终端中&#x…...

终极魔兽争霸3兼容性修复指南:5分钟让经典游戏在现代电脑上重生
终极魔兽争霸3兼容性修复指南:5分钟让经典游戏在现代电脑上重生 【免费下载链接】WarcraftHelper Warcraft III Helper , support 1.20e, 1.24e, 1.26a, 1.27a, 1.27b 项目地址: https://gitcode.com/gh_mirrors/wa/WarcraftHelper 还在为魔兽争霸3在现代Win…...

如何深度优化Wand应用体验:Wand-Enhancer配置增强实践指南
如何深度优化Wand应用体验:Wand-Enhancer配置增强实践指南 【免费下载链接】Wand-Enhancer Advanced UX and interoperability extension for Wand (WeMod) app 项目地址: https://gitcode.com/gh_mirrors/we/Wand-Enhancer 在游戏修改工具的使用过程中&…...
)
别再套table了!手把手教你用LaTeX的longtable搞定跨页表格(附字体调整避坑指南)
LaTeX长表格排版实战:从table到longtable的平滑迁移与字体优化 第一次在LaTeX中遇到需要跨页的表格时,我像大多数初学者一样,本能地在longtable外面套了一层table环境——结果表格不仅无法正确分页,还出现了各种诡异的格式错乱。经…...

图数据库 TuGraph 基本操作 作业一
一、基础知识介绍(一) 图数据库图数据库以顶点 (Vertex / Node)、边 (Edge / Relationship) 与属性 (Property) 三种元素表达事物及其关联关系。顶点对应实体, 边对应实体之间的关系, 属性以键值对形式附着在顶点或边上。相较关系数据库, 图数据库把 "关系" 提升为存…...

终极指南:3分钟掌握TMSpeech,打造完全本地的实时语音转文字神器
终极指南:3分钟掌握TMSpeech,打造完全本地的实时语音转文字神器 【免费下载链接】TMSpeech 腾讯会议摸鱼工具 项目地址: https://gitcode.com/gh_mirrors/tm/TMSpeech 你是否厌倦了云端语音识别服务的隐私担忧和网络延迟?想要一个真正…...

Amphenol DRPC11A009040线束解析
随着服务器、高速通信设备以及工业控制系统对高速传输性能要求不断提升,越来越多工程师开始关注高可靠性线束组件的选型问题。其中,来自 Amphenol ICC 的 DRPC11A009040 线束组件,近年来在高速连接领域中被广泛关注。 作为国际连接器品牌的重…...

仓库盘点、物流交接?用UniApp+PDA扫码提升效率的实战配置与避坑指南
UniAppPDA扫码在仓储物流中的实战配置与效率提升指南 当仓储管理员小李第一次使用传统扫码枪配合PC系统进行月度盘点时,他需要反复核对Excel表格与实物位置,8小时的工作量常常延长到深夜。而现在,通过UniApp开发的移动端应用配合工业级PDA设备…...

超越跑分:深入CoreMark源码,看它如何“拷问”RISC-V CPU的三大核心能力
超越跑分:深入CoreMark源码,看它如何“拷问”RISC-V CPU的三大核心能力 在嵌入式处理器性能评估领域,CoreMark早已成为行业标准测试工具。但大多数开发者仅关注最终得分,却鲜少探究这个不足3000行代码的基准测试程序如何精准"…...

Cadence软件安装后找不到图标?别慌,手把手教你从开始菜单启动Capture和Allegro
Cadence软件安装后找不到图标?别慌,手把手教你从开始菜单启动Capture和Allegro 刚完成Cadence软件安装的兴奋感,往往会被桌面上空空如也的现状瞬间浇灭。这就像拿到一台新电脑却发现没有电源键——明明安装了专业EDA工具,却连入口…...

433MHz无线模块解码避坑指南:从示波器抓波形到STM32代码实现的完整流程
433MHz无线模块解码实战:从波形分析到STM32代码优化的全流程解析 1. 解码前的硬件准备与信号捕获 当你第一次拿到433MHz无线模块时,最令人困惑的往往是"为什么我的代码无法正确解码?"要解决这个问题,我们需要从最基础的…...