【Arduino环境下驱动合宙esp32c3单片机基本外设】
【esp32c3基本外设驱动】
- 1. GPIO调试
- 1.1 源码分享
- 2.2 实验效果
- 2. ADC调试
- 2.1 源码分享
- 2.2 实验效果
- 3. WS2812驱动
- 3.1 源码分享
- 3.2 实验效果
- 4. 旋转编码器
- 4.1 源码分享
- 4.2 测试效果
- 5. SSD1306屏幕驱动
- 5.1 源码分享
- 5.2 测试效果
- 6. 双cpu同时工作测试
- 6.1 源码分享
- 6.2 测试效果
- 7. BLE蓝牙和安卓端蓝牙数据交互实验
- 7.1 源码分享
- 7.2 实验效果
- 8. Servo调试
- 8.1 源码分享
- 8.2 实验效果
- 9. 总结

本教程是参加FastBond2活动主题4 - 测量仪器中的【Arduino环境下驱动合宙esp32c3单片机基本外设】。
围绕FastBond2阶段1——基于ESP32C3开发的简易IO调试设备项目需求开发。
设计目标:
- 多种数字和模拟信号的输入输出:用户可以选择不同的输入输出模式,并通过设备的操作界面进行设置。例如,用户可以选择某个GPIO口作为模拟输入引脚,然后通过设备的操作界面设置输入的电压值,以模拟外部信号的输入,达到调试简易传感器读取和执行器输出功能。
- 支持PWM输出、舵机控制特性:用户可以选择某个GPIO口作为PWM输出引脚,并通过设备的操作界面设置PWM输出的频率和占空比。用户还可以选择某个GPIO口作为舵机控制引脚,并通过设备的操作界面设置舵机的角度。
- 因此系统具有一定的电流输出能力、信号辨识能力和显示交互功能。
1. GPIO调试
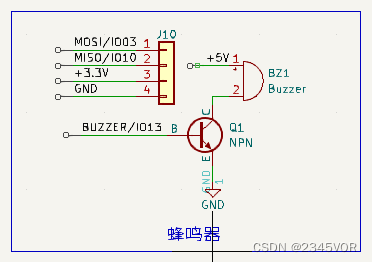
查看对应D5LED匹配IO13和蜂鸣器,源码修改如下,即可实现呼吸灯效果
1.1 源码分享
/*FadeThis example shows how to fade an LED on pin 9 using the analogWrite()function.The analogWrite() function uses PWM, so if you want to change the pin you'reusing, be sure to use another PWM capable pin. On most Arduino, the PWM pinsare identified with a "~" sign, like ~3, ~5, ~6, ~9, ~10 and ~11.This example code is in the public domain.https://www.arduino.cc/en/Tutorial/BuiltInExamples/Fade
*/int led = 13;         // the PWM pin the LED is attached to
int brightness = 0;  // how bright the LED is
int fadeAmount = 5;  // how many points to fade the LED by// the setup routine runs once when you press reset:
void setup() {// declare pin 9 to be an output:pinMode(led, OUTPUT);
}// the loop routine runs over and over again forever:
void loop() {// set the brightness of pin 9:analogWrite(led, brightness);// change the brightness for next time through the loop:brightness = brightness + fadeAmount;// reverse the direction of the fading at the ends of the fade:if (brightness <= 0 || brightness >= 255) {fadeAmount = -fadeAmount;}// wait for 30 milliseconds to see the dimming effectdelay(30);
}
它使用analogWrite()函数来控制连接到引脚9上的LED的亮度变化。代码使用了一个for循环来逐步改变LED的亮度,直到达到最大或最小亮度为止,然后反转亮度的变化方向。该程序设置了一个延时来允许人眼看到LED逐渐变亮或变暗的效果。
2.2 实验效果
板载LED灯会呈现呼吸效果
2. ADC调试
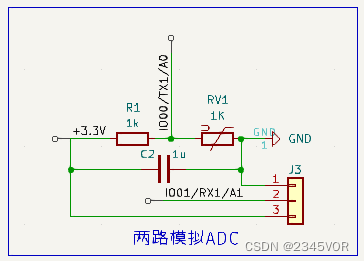
在文件实例基础中选择AnalogRead
查看对应模拟量端口匹配IO00~01,源码修改如下,即可实现A0、A1端口读取模拟量并打印效果
2.1 源码分享
void setup() {// initialize serial communication at 115200 bits per second:Serial.begin(115200);//set the resolution to 12 bits (0-4096)analogReadResolution(12);
}void loop() {// read the analog / millivolts value for pin 2:int analogValue = analogRead(0);int analogVolts = analogReadMilliVolts(1);// print out the values you read:Serial.printf("ADC analog value = %d\n",analogValue);Serial.printf("ADC millivolts value = %d\n",analogVolts);delay(100);  // delay in between reads for clear read from serial
}
在setup()函数中,初始化串口通信模块,设置波特率为115200bps,同时设置模数转换器(Analog-to-Digital Converter,ADC)的分辨率到12位。
在loop()函数中:
- 读取从板子的第1个模拟端口(analog pin 1)获得模拟值,并存储在变量analogValue中;
- 将该模拟值转换成mV,并存储在变量analogVolts中;
- 输出两个值到串口中;
- 延时100ms,以防止误读。
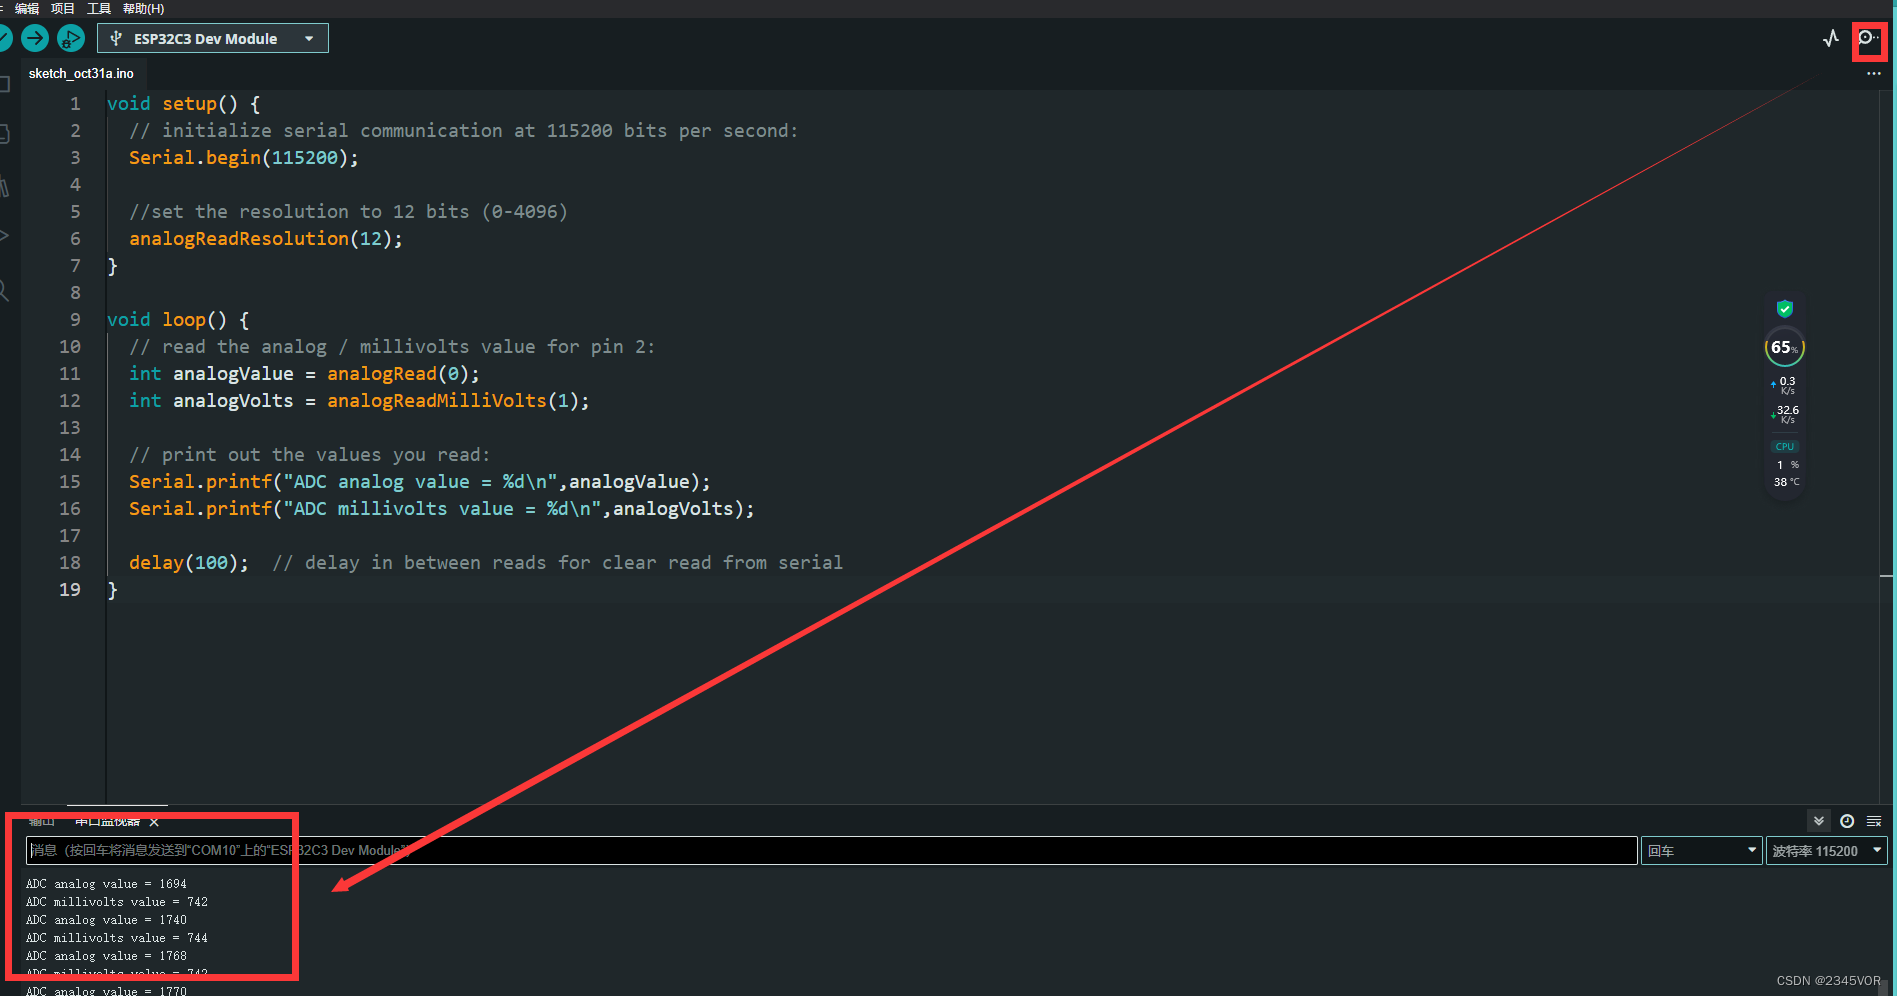
2.2 实验效果
IO00接光敏电阻,手掌适当遮罩可发现其变化,可用铅笔触碰IO01,看其变化,打印效果如下
3. WS2812驱动
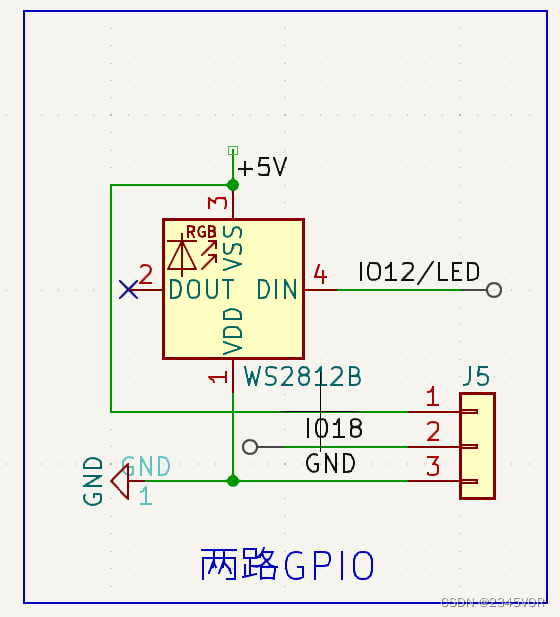
安装WS2812FX和 FastLED库,打开WS2812FX里面的ws2812fx_custom_FastLED例程,我连接IO18,选择合适数量这里是4
3.1 源码分享
/*Demo sketch showing how to use the functions and features of the FastLEDlibrary to create custom effects. For this example we're going to implementMark Kriegsman's Fire2012 effect from the FastLED examples folder here:https://github.com/FastLED/FastLED/tree/master/examples/Fire2012The basic idea is to use FastLED to create the LED color data, thencopy the data to the ws2812fx instance for display.Keith Lord - 2018LICENSEThe MIT License (MIT)Copyright (c) 2018  Keith Lord Permission is hereby granted, free of charge, to any person obtaining a copyof this software and associated documentation files (the "Software"), to dealin the Software without restriction, including without limitation the rightsto use, copy, modify, merge, publish, distribute, sub-license, and/or sellcopies of the Software, and to permit persons to whom the Software isfurnished to do so, subject to the following conditions:The above copyright notice and this permission notice shall be included inall copies or substantial portions of the Software.THE SOFTWARE IS PROVIDED "AS IS", WITHOUT WARRANTY OF ANY KIND, EXPRESS ORIMPLIED, INCLUDING BUT NOT LIMITED TO THE WARRANTIES OF MERCHANTABILITY,FITNESS FOR A PARTICULAR PURPOSE AND NONINFRINGEMENT. IN NO EVENT SHALL THEAUTHORS OR COPYRIGHT HOLDERS BE LIABLE FOR ANY CLAIM, DAMAGES OR OTHERLIABILITY, WHETHER IN AN ACTION OF CONTRACT, TORT OR OTHERWISE, ARISING FROM,OUT OF OR IN CONNECTION WITH THE SOFTWARE OR THE USE OR OTHER DEALINGS INTHE SOFTWARE.CHANGELOG2018-05-13 initial version
*/
#include "FastLED.h" // be sure to install and include the FastLED lib
#include <WS2812FX.h>#define NUM_LEDS 4
#define LED_PIN 18WS2812FX ws2812fx = WS2812FX(NUM_LEDS, LED_PIN, NEO_GRB + NEO_KHZ800);// declare global parameters used by Fire2012
bool gReverseDirection = false;void setup() {Serial.begin(115200);// init WS2812FX to use a custom effectws2812fx.init();ws2812fx.setBrightness(255);ws2812fx.setColor(BLUE);ws2812fx.setSpeed(1000);ws2812fx.setMode(FX_MODE_CUSTOM);ws2812fx.setCustomMode(myCustomEffect);ws2812fx.start();
}void loop() {ws2812fx.service();
}// in the custom effect run the Fire2012 algorithm
uint16_t myCustomEffect() {Fire2012();// return the animation speed based on the ws2812fx speed settingreturn (ws2812fx.getSpeed() / NUM_LEDS);
}/** paste in the Fire2012 code with a small edit at the end which uses the* setPixelColor() function to copy the color data to the ws2812fx instance.
*/// Fire2012 by Mark Kriegsman, July 2012
// as part of "Five Elements" shown here: http://youtu.be/knWiGsmgycY

// This basic one-dimensional 'fire' simulation works roughly as follows:
// There's a underlying array of 'heat' cells, that model the temperature
// at each point along the line.  Every cycle through the simulation,
// four steps are performed:
//  1) All cells cool down a little bit, losing heat to the air
//  2) The heat from each cell drifts 'up' and diffuses a little
//  3) Sometimes randomly new 'sparks' of heat are added at the bottom
//  4) The heat from each cell is rendered as a color into the leds array
//     The heat-to-color mapping uses a black-body radiation approximation.
//
// Temperature is in arbitrary units from 0 (cold black) to 255 (white hot).
//
// This simulation scales it self a bit depending on NUM_LEDS; it should look
// "OK" on anywhere from 20 to 100 LEDs without too much tweaking.
//
// I recommend running this simulation at anywhere from 30-100 frames per second,
// meaning an interframe delay of about 10-35 milliseconds.
//
// Looks best on a high-density LED setup (60+ pixels/meter).
//
//
// There are two main parameters you can play with to control the look and
// feel of your fire: COOLING (used in step 1 above), and SPARKING (used
// in step 3 above).
//
// COOLING: How much does the air cool as it rises?
// Less cooling = taller flames.  More cooling = shorter flames.
// Default 50, suggested range 20-100
#define COOLING  55// SPARKING: What chance (out of 255) is there that a new spark will be lit?
// Higher chance = more roaring fire.  Lower chance = more flickery fire.
// Default 120, suggested range 50-200.
#define SPARKING 120void Fire2012()
{
// Array of temperature readings at each simulation cellstatic byte heat[NUM_LEDS];// Step 1.  Cool down every cell a littlefor( int i = 0; i < NUM_LEDS; i++) {heat[i] = qsub8( heat[i],  random8(0, ((COOLING * 10) / NUM_LEDS) + 2));}// Step 2.  Heat from each cell drifts 'up' and diffuses a littlefor( int k= NUM_LEDS - 1; k >= 2; k--) {heat[k] = (heat[k - 1] + heat[k - 2] + heat[k - 2] ) / 3;}// Step 3.  Randomly ignite new 'sparks' of heat near the bottomif( random8() < SPARKING ) {int y = random8(7);heat[y] = qadd8( heat[y], random8(160,255) );}// Step 4.  Map from heat cells to LED colorsfor( int j = 0; j < NUM_LEDS; j++) {CRGB color = HeatColor( heat[j]);int pixelnumber;if( gReverseDirection ) {pixelnumber = (NUM_LEDS-1) - j;} else {pixelnumber = j;}// **** modified for use with WS2812FX ****
//    leds[pixelnumber] = color;ws2812fx.setPixelColor(pixelnumber, color.red, color.green, color.blue);
// **** modified for use with WS2812FX ****}
}
定义了数字灯的数量NUM_LEDS和LED引脚编号LED_PIN。
使用FastLED库中的WS2812FX初始化led控制器,配置颜色模式、亮度、速度等参数。
在loop()函数中,调用service()函数更新led状态。
在myCustomEffect()函数中,运行Fire2012算法并返回动画速度,该速度基于ws2812fx的速度设置。
Fire2012是一个简单的模拟火焰燃烧效果的算法,它包括四个步骤:冷却、上升和扩散热量、随机产生火花和渲染温度到颜色。
在Fire2012()函数中:
- 对每个像素点进行降温操作;
- 让每个像素点的热量向上传递并扩散;
- 随机产生新火花;
- 根据热量计算像素点的颜色,并修改ws2812fx的状态。
3.2 实验效果
ws2812会来回显示不同灯光效果
4. 旋转编码器

安装Encoder库,点击例程NoInterrupts
修改源码,端口为IO06/IO07
4.1 源码分享
#define ENCODER_DO_NOT_USE_INTERRUPTS
#include <Encoder.h>Encoder myEnc(7, 6);
//   avoid using pins with LEDs attachedvoid setup() {Serial.begin(9600);Serial.println("Basic NoInterrupts Test:");
}long position  = -999;void loop() {long newPos = myEnc.read();if (newPos != position) {position = newPos;Serial.println(position);}// With any substantial delay added, Encoder can only track// very slow motion.  You may uncomment this line to see// how badly a delay affects your encoder.//delay(50);
}
设置串口波特率为9600bps。
在setup()函数中,初始化Serial通信模块,准备用于输出调试信息。
在loop()函数中:
- 调用myEnc.read()方法读取编码器的当前位置,得到新的位置值newPos;
- 如果newPos与上一时刻的位置值position不同,则更新position为newPos; 输出更新后的position值;
- 如果对程序进行任何形式的延迟处理,编码器只能跟踪非常慢的动作。您可以取消此行的注释来查看延迟对您的编码器的影响程度。
4.2 测试效果
打开串口旋转编码器,有打印数值变化
5. SSD1306屏幕驱动
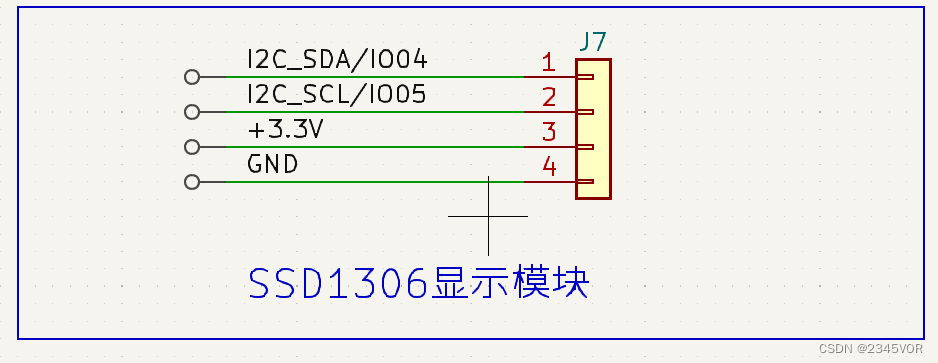
安装 U8g2库,打开FontTest例程,修改SCL为IO05,SDA为IO04
5.1 源码分享
/*UpdateArea.inoDemonstration for the UpdateDisplayArea commandUniversal 8bit Graphics Library (https://github.com/olikraus/u8g2/)Copyright (c) 2016, olikraus@gmail.comAll rights reserved.Redistribution and use in source and binary forms, with or without modification, are permitted provided that the following conditions are met:* Redistributions of source code must retain the above copyright notice, this list of conditions and the following disclaimer.* Redistributions in binary form must reproduce the above copyright notice, this list of conditions and the following disclaimer in the documentation and/or other materials provided with the distribution.THIS SOFTWARE IS PROVIDED BY THE COPYRIGHT HOLDERS AND CONTRIBUTORS "AS IS" AND ANY EXPRESS OR IMPLIED WARRANTIES, INCLUDING, BUT NOT LIMITED TO, THE IMPLIED WARRANTIES OF MERCHANTABILITY AND FITNESS FOR A PARTICULAR PURPOSE ARE DISCLAIMED. IN NO EVENT SHALL THE COPYRIGHT HOLDER OR CONTRIBUTORS BE LIABLE FOR ANY DIRECT, INDIRECT, INCIDENTAL, SPECIAL, EXEMPLARY, OR CONSEQUENTIAL DAMAGES (INCLUDING, BUT NOT LIMITED TO, PROCUREMENT OF SUBSTITUTE GOODS OR SERVICES; LOSS OF USE, DATA, OR PROFITS; OR BUSINESS INTERRUPTION) HOWEVER CAUSED AND ON ANY THEORY OF LIABILITY, WHETHER IN CONTRACT, STRICT LIABILITY, OR TORT (INCLUDING NEGLIGENCE OR OTHERWISE) ARISING IN ANY WAY OUT OF THE USE OF THIS SOFTWARE, EVEN IF ADVISED OF THE POSSIBILITY OF SUCH DAMAGE.  */#include <Arduino.h>
#include <U8g2lib.h>#ifdef U8X8_HAVE_HW_SPI
#include <SPI.h>
#endif
#ifdef U8X8_HAVE_HW_I2C
#include <Wire.h>
#endif/*U8g2lib Example Overview:Frame Buffer Examples: clearBuffer/sendBuffer. Fast, but may not work with all Arduino boards because of RAM consumptionPage Buffer Examples: firstPage/nextPage. Less RAM usage, should work with all Arduino boards.U8x8 Text Only Example: No RAM usage, direct communication with display controller. No graphics, 8x8 Text only.*/// Please UNCOMMENT one of the contructor lines below
// U8g2 Contructor List (Frame Buffer)
// The complete list is available here: https://github.com/olikraus/u8g2/wiki/u8g2setupcpp
// Please update the pin numbers according to your setup. Use U8X8_PIN_NONE if the reset pin is not connectedU8G2_SSD1306_128X64_NONAME_F_SW_I2C u8g2(U8G2_R0, /* clock=*/ 5, /* data=*/ 4, /* reset=*/ U8X8_PIN_NONE);   // ESP32 Thing, pure SW emulated I2C// End of constructor listint16_t offset;				// current offset for the scrolling text
u8g2_uint_t width;			// pixel width of the scrolling text (must be lesser than 128 unless U8G2_16BIT is defined
const char *text = "U8g2";	// scroll this text from right to leftconst uint8_t tile_area_x_pos = 2;	// Update area left position (in tiles)
const uint8_t tile_area_y_pos = 3;	// Update area upper position (distance from top in tiles)
const uint8_t tile_area_width = 12;
const uint8_t tile_area_height = 3;	// this will allow cour18 chars to fit into the areaconst u8g2_uint_t pixel_area_x_pos = tile_area_x_pos*8;
const u8g2_uint_t pixel_area_y_pos = tile_area_y_pos*8;
const u8g2_uint_t pixel_area_width = tile_area_width*8;
const u8g2_uint_t pixel_area_height = tile_area_height*8;void setup(void) {u8g2.begin();u8g2.clearBuffer();					// clear the internal memoryu8g2.setFont(u8g2_font_helvR10_tr);	// choose a suitable fontu8g2.drawStr(0,12,"UpdateDisplayArea");	// write something to the internal memory// draw a frame, only the content within the frame will be updated// the frame is never drawn again, but will stay on the displayu8g2.drawBox(pixel_area_x_pos-1, pixel_area_y_pos-1, pixel_area_width+2, pixel_area_height+2);u8g2.sendBuffer();					// transfer internal memory to the displayu8g2.setFont(u8g2_font_courB18_tr);	// set the target font for the text width calculationwidth = u8g2.getUTF8Width(text);		// calculate the pixel width of the textoffset = width+pixel_area_width;}void loop(void) {u8g2.clearBuffer();						// clear the complete internal memory// draw the scrolling text at current offsetu8g2.setFont(u8g2_font_courB18_tr);		// set the target fontu8g2.drawUTF8(pixel_area_x_pos-width+offset, pixel_area_y_pos+pixel_area_height+u8g2.getDescent()-1, text);								// draw the scolling text// now only update the selected area, the rest of the display content is not changedu8g2.updateDisplayArea(tile_area_x_pos, tile_area_y_pos, tile_area_width, tile_area_height);offset--;								// scroll by one pixelif ( offset == 0 )	offset = width+pixel_area_width;			// start over againdelay(10);							// do some small delay
}
5.2 测试效果
上传代码,滑动显示U8g2
6. 双cpu同时工作测试
ESP32-C3 系列芯片,搭载 RISC-V 32 位单核处理器。不过可以跑多线程,下面就是两个线程。程序中避免有过多的延迟函数😘😘😘
6.1 源码分享
int testdata0 = 10;
int testdata1 = 0;void CpuLoop(void *pvParameters){while(1){Serial.println("cpu1 "+String(testdata0));testdata1 ++;if(testdata1 == 10)testdata1 = 0;delay(2000);}vTaskDelete(NULL);
}
void setup() {Serial.begin(9600);xTaskCreatePinnedToCore(CpuLoop,    //具体实现的函数"CPU_LOOP",  //任务名称8192,       //堆栈大小NULL,       //输入参数1,          //任务优先级NULL,       //1           //核心  0\1);
}void loop() {Serial.println("cpu0 "+String(testdata1));testdata0 --;if(testdata0 == 0)testdata0 = 10;delay(1000);
}
设置串口波特率为9600bps。
在setup()函数中创建一个名为“CPU_LOOP”的任务,并将其实现的函数appCpuLoop()、堆栈大小为8192、输入参数为空、优先级为1、绑定到核心1上进行运行。
在CpuLoop()函数中,当while循环条件为真时,持续执行循环体内的内容。首先打印出字符串“Cpu1”和变量testdata0相加的结果,然后让testdata1自增1,如果testdata1等于10,则将其值设为0;最后延时2000毫秒后继续下一次循环。
在loop()函数中,打印出字符串“cpu0”和变量testdata1相加的结果,然后让testdata0自减1,如果testdata0等于0,则将其值设为10;最后延时1000毫秒后继续下一次循环。
6.2 测试效果
打开串口显示两个内核运行效果

7. BLE蓝牙和安卓端蓝牙数据交互实验
🔖ESP32低功耗(BLE)蓝牙实验.
🛠调试工具
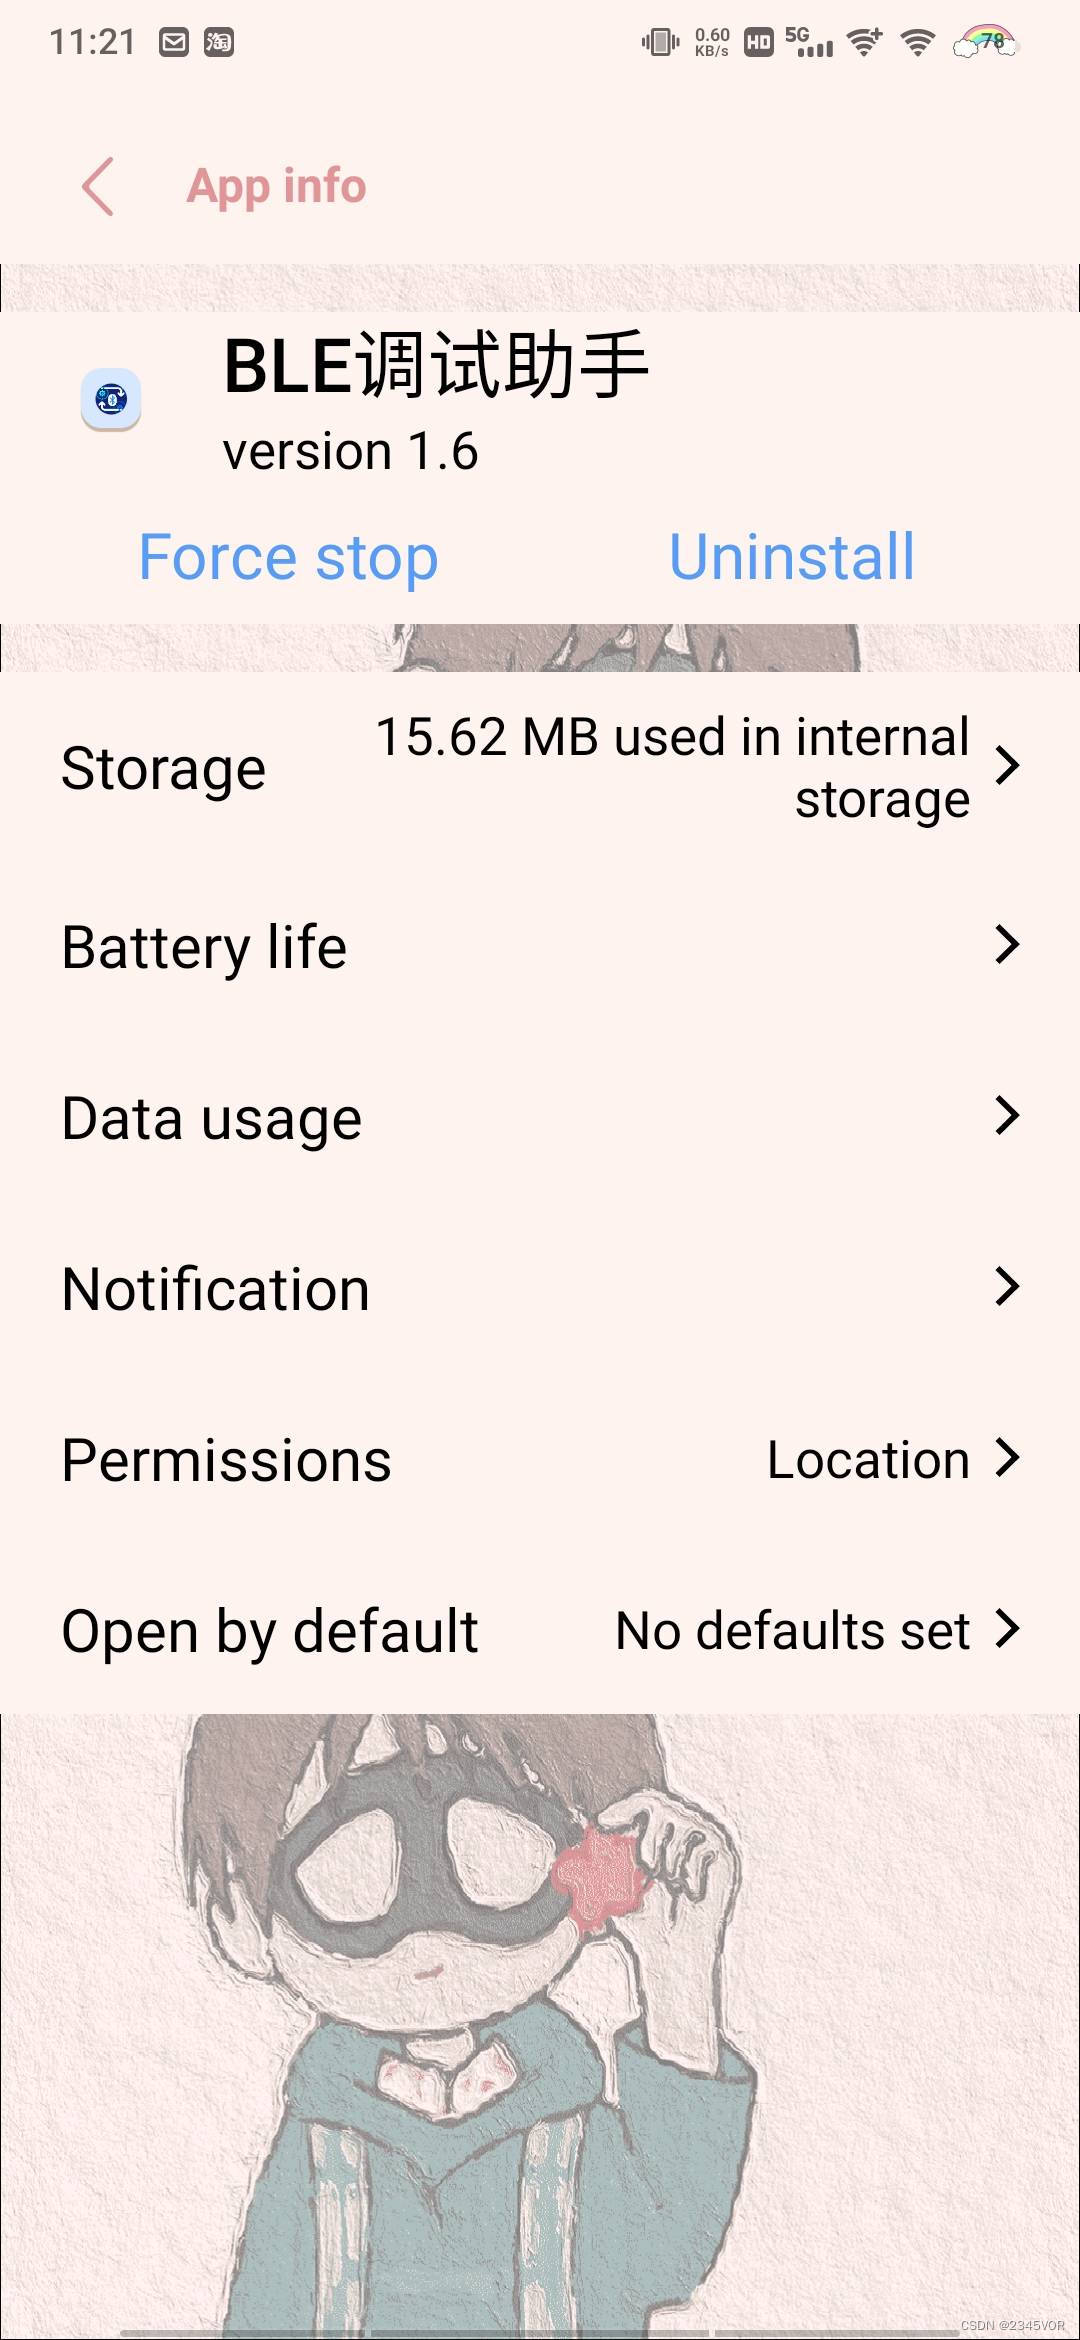
🔧安卓系统BLE调试工具:BLEAssist
📍APP下载地址:http://www.wch.cn/downloads/BLEAssist_ZIP.html
首先安装BLE调试助手
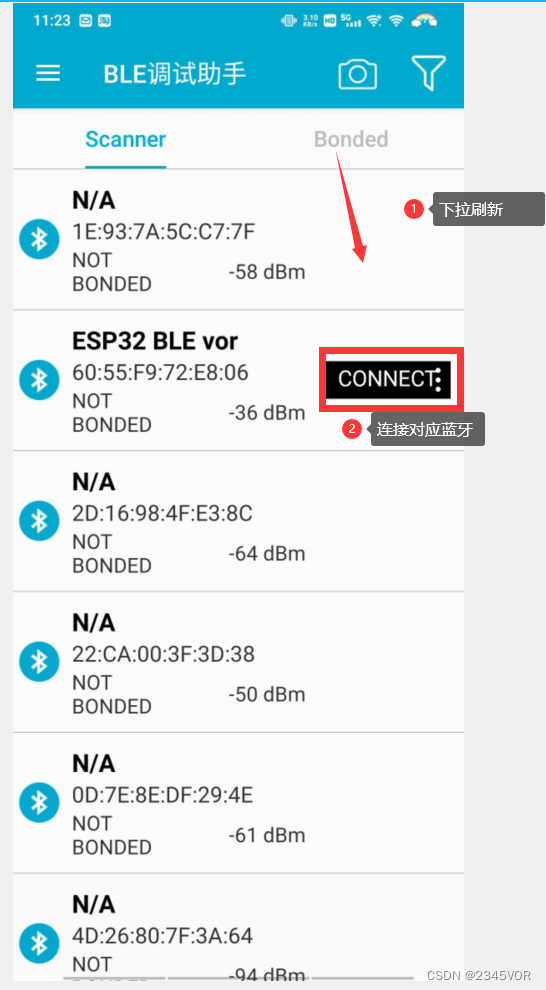
安装后打开,下拉刷新蓝牙,连接对应蓝牙
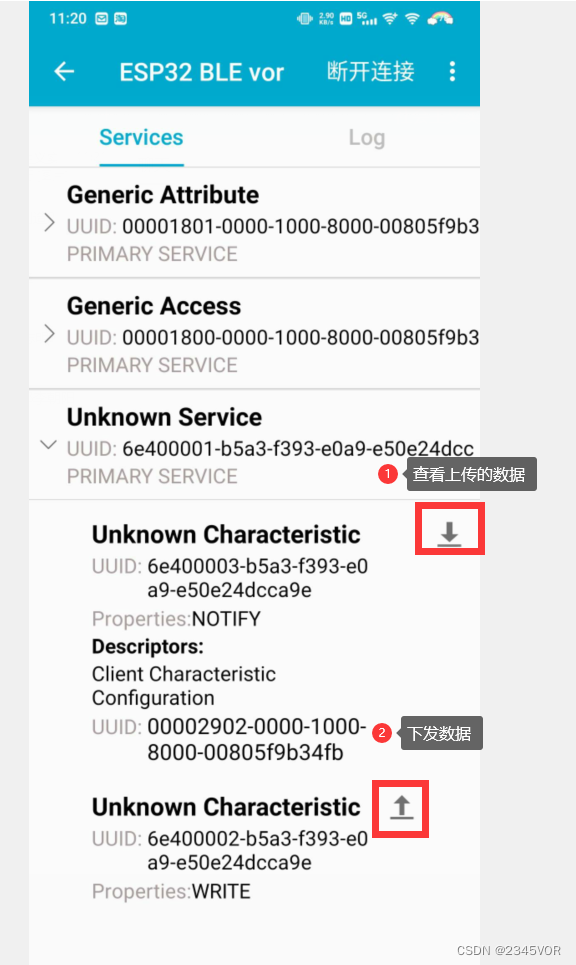
在第三项中选择查看和发送数据
7.1 源码分享
#include <BLEDevice.h>
#include <BLEServer.h>
#include <BLEUtils.h>
#include <BLE2902.h>BLECharacteristic *pCharacteristic;
bool deviceConnected = false;
char BLEbuf[32] = { 0 };
uint32_t cnt = 0;
String message_c;
int i = 0;
#define SERVICE_UUID "6E400001-B5A3-F393-E0A9-E50E24DCCA9E"  // UART service UUID
#define CHARACTERISTIC_UUID_RX "6E400002-B5A3-F393-E0A9-E50E24DCCA9E"
#define CHARACTERISTIC_UUID_TX "6E400003-B5A3-F393-E0A9-E50E24DCCA9E"class MyServerCallbacks : public BLEServerCallbacks {void onConnect(BLEServer *pServer) {deviceConnected = true;};void onDisconnect(BLEServer *pServer) {deviceConnected = false;}
};class MyCallbacks : public BLECharacteristicCallbacks {void onWrite(BLECharacteristic *pCharacteristic) {std::string rxValue = pCharacteristic->getValue();if (rxValue.length() > 0) {Serial.print("------>Received Value: ");for (int i = 0; i < rxValue.length(); i++) {Serial.print(rxValue[i]);}Serial.println();}}
};
void setup() {Serial.begin(115200);// Create the BLE DeviceBLEDevice::init("ESP32 BLE Test");// 创建蓝牙服务器BLEServer *pServer = BLEDevice::createServer();pServer->setCallbacks(new MyServerCallbacks());// // 创建广播服务的UUIDBLEService *pService = pServer->createService(SERVICE_UUID);// 创建广播服务的UUIDpCharacteristic = pService->createCharacteristic(CHARACTERISTIC_UUID_TX, BLECharacteristic::PROPERTY_NOTIFY);pCharacteristic->addDescriptor(new BLE2902());BLECharacteristic *pCharacteristic = pService->createCharacteristic(CHARACTERISTIC_UUID_RX, BLECharacteristic::PROPERTY_WRITE);pCharacteristic->setCallbacks(new MyCallbacks());// 开始蓝牙服务pService->start();// 开始广播pServer->getAdvertising()->start();Serial.println("Waiting a client connection to notify...");
}void loop() {if (deviceConnected) {  //设备连接后,每秒钟发送txValue。memset(BLEbuf, 0, 32);message_c = "s  " + String(i) + "\r\n";i++;char *p = const_cast<char *>(message_c.c_str());memcpy(BLEbuf, p, 32);pCharacteristic->setValue(BLEbuf);pCharacteristic->notify();  // Send the value to the app!Serial.print("*** Sent Value: ");Serial.print(BLEbuf);Serial.println(" ***");}delay(1000);
}
设置串口波特率为115200bps。
在setup()函数中:
- 使用BLEDevice类初始化Bluetooth Low Energy设备,并设定其名称为"ESP32 BLE Test";
- 创建并返回一个服务器对象,并将其回调函数设置为MyServerCallbacks类型的实例;
- 使用BLEServer类创建一个服务,并使用SERVICE_UUID定义该服务的唯一标识符;
- 在创建的服务中添加一个特性,该特性具有可写属性,其唯一标识符为CHARACTERISTIC_UUID_RX;
- 将可写特性的回调函数设置为MyCallbacks类型的实例; 启动创建的服务; 启动广告活动。
在loop()函数中:
- 检查设备是否已连接。如果设备已连接,则按照以下步骤执行: 清空BLEbuf数组;
- 定义一个字符串message_c,其中包含字符’s’和变量i的当前值,两者之间用空格分隔,并在其末尾添加换行符;
- 将message_c转换为字符指针类型,并复制到BLEbuf数组中; 设置特性值为BLEbuf数组的内容;
- 调用notify()方法向应用程序发送数据; 打印已经发送的数据;
延迟1000ms后继续下一次循环。
7.2 实验效果
-
esp32c3发送数据,手机接收数据


-
esp32c3接收数据,手机发送数据


8. Servo调试

安装库《ESP32Servo》
打开库的Sweep例程,修改端口为19
8.1 源码分享
/* Sweepby BARRAGAN <http://barraganstudio.com>This example code is in the public domain.modified 8 Nov 2013by Scott Fitzgeraldmodified for the ESP32 on March 2017by John Bennettsee http://www.arduino.cc/en/Tutorial/Sweep for a description of the original code* Different servos require different pulse widths to vary servo angle, but the range is * an approximately 500-2500 microsecond pulse every 20ms (50Hz). In general, hobbyist servos* sweep 180 degrees, so the lowest number in the published range for a particular servo* represents an angle of 0 degrees, the middle of the range represents 90 degrees, and the top* of the range represents 180 degrees. So for example, if the range is 1000us to 2000us,* 1000us would equal an angle of 0, 1500us would equal 90 degrees, and 2000us would equal 1800* degrees.* * Circuit: (using an ESP32 Thing from Sparkfun)* Servo motors have three wires: power, ground, and signal. The power wire is typically red,* the ground wire is typically black or brown, and the signal wire is typically yellow,* orange or white. Since the ESP32 can supply limited current at only 3.3V, and servos draw* considerable power, we will connect servo power to the VBat pin of the ESP32 (located* near the USB connector). THIS IS ONLY APPROPRIATE FOR SMALL SERVOS. * * We could also connect servo power to a separate external* power source (as long as we connect all of the grounds (ESP32, servo, and external power).* In this example, we just connect ESP32 ground to servo ground. The servo signal pins* connect to any available GPIO pins on the ESP32 (in this example, we use pin 18.* * In this example, we assume a Tower Pro MG995 large servo connected to an external power source.* The published min and max for this servo is 1000 and 2000, respectively, so the defaults are fine.* These values actually drive the servos a little past 0 and 180, so* if you are particular, adjust the min and max values to match your needs.*/#include <ESP32Servo.h>Servo myservo;  // create servo object to control a servo
// 16 servo objects can be created on the ESP32int pos = 0;    // variable to store the servo position
// Recommended PWM GPIO pins on the ESP32 include 2,4,12-19,21-23,25-27,32-33
// Possible PWM GPIO pins on the ESP32-S2: 0(used by on-board button),1-17,18(used by on-board LED),19-21,26,33-42
// Possible PWM GPIO pins on the ESP32-S3: 0(used by on-board button),1-21,35-45,47,48(used by on-board LED)
// Possible PWM GPIO pins on the ESP32-C3: 0(used by on-board button),1-7,8(used by on-board LED),9-10,18-21
// #if defined(CONFIG_IDF_TARGET_ESP32S2) || defined(CONFIG_IDF_TARGET_ESP32S3)
int servoPin = 19;
// #elif defined(CONFIG_IDF_TARGET_ESP32C3)
// int servoPin = 7;
// #else
// int servoPin = 18;
// #endifvoid setup() {// Allow allocation of all timersESP32PWM::allocateTimer(0);ESP32PWM::allocateTimer(1);ESP32PWM::allocateTimer(2);ESP32PWM::allocateTimer(3);myservo.setPeriodHertz(50);    // standard 50 hz servomyservo.attach(servoPin, 1000, 2000); // attaches the servo on pin 18 to the servo object// using default min/max of 1000us and 2000us// different servos may require different min/max settings// for an accurate 0 to 180 sweep
}void loop() {for (pos = 0; pos <= 180; pos += 1) { // goes from 0 degrees to 180 degrees// in steps of 1 degreemyservo.write(pos);    // tell servo to go to position in variable 'pos'delay(15);             // waits 15ms for the servo to reach the position}for (pos = 180; pos >= 0; pos -= 1) { // goes from 180 degrees to 0 degreesmyservo.write(pos);    // tell servo to go to position in variable 'pos'delay(15);             // waits 15ms for the servo to reach the position}
}
这个程序是用来控制servo电机转动的一个示例程序,在ESP32上可以工作。在代码中,servoPin被定义为ESP32-S2和ESP32-S3的19号引脚,以及ESP32-C3的7号引脚。这可以通过条件编译选项CONFIG_IDF_TARGET_ESP32S2或CONFIG_IDF_TARGET_ESP32S3选择要使用的硬件平台,然后定义对应的引脚号。如果没有这些选项,那么就使用默认的18号引脚。
在setup函数中,我们调用了ESP32PWM::allocateTimer()函数分配了所有可用的定时器资源,并设置了伺服电机的频率为标准的50Hz。接着通过myservo.attach(servoPin, 1000, 2000)命令把电机连接到指定的引脚上,并且设置了最小和最大周期分别为1000和2000微秒。这样可以让电机在一个准确的0~180度范围内转动。
在主循环中,pos变量被用来记录电机的位置角度。外层for循环会让电机从0度转到180度,而内层for循环则让电机再从180度转回0度,每次移动1度,并等待15ms的时间,让电机有足够的时间到达指定的角度位置。
8.2 实验效果
esp32c3会控制舵机来回转动180度
9. 总结
本教程是参加FastBond2活动主题4 - 测量仪器中的【Arduino环境下驱动合宙esp32c3单片机基本外设】。
围绕FastBond2阶段1——基于ESP32C3开发的简易IO调试设备项目需求开发。
这次fastbond2活动提供了How to make自主设计的机会,而且给到各种技术支持,非常值得大学生们来参加活动。现在是阶段二实物验证阶段,我会用博客和视频慢慢记录这一次次有趣的开发过程。
相关文章:
【Arduino环境下驱动合宙esp32c3单片机基本外设】
【esp32c3基本外设驱动】 1. GPIO调试1.1 源码分享2.2 实验效果 2. ADC调试2.1 源码分享2.2 实验效果 3. WS2812驱动3.1 源码分享3.2 实验效果 4. 旋转编码器4.1 源码分享4.2 测试效果 5. SSD1306屏幕驱动5.1 源码分享5.2 测试效果 6. 双cpu同时工作测试6.1 源码分享6.2 测试效…...

一站式迁移,人大金仓助力大地保险业务无感升级
2021年3月,国家发布《中华人民共和国国民经济和社会发展第十四个五年规划和2035年远景目标纲要》,纲要明确提出“稳妥发展金融科技,加快金融机构数字化转型”、“推进金融业信息化核心技术安全可控,维护金融基础设施安全”。 202…...
基于SSM的模具制造企业订单跟踪管理系统设计与实现
末尾获取源码 开发语言:Java Java开发工具:JDK1.8 后端框架:SSM 前端:采用JSP技术开发 数据库:MySQL5.7和Navicat管理工具结合 服务器:Tomcat8.5 开发软件:IDEA / Eclipse 是否Maven项目&#x…...
计算机基础知识41
前端 # 前端是所有跟用户直接打交道 比如:PC页面、手机页面、汽车显示屏,肉眼可以看见的 # 后端:一堆代码,用户不能够直接看到,不直接与用户打交道 常见的后端:Python、Java、Go等 # 学了前端就可以做全栈…...

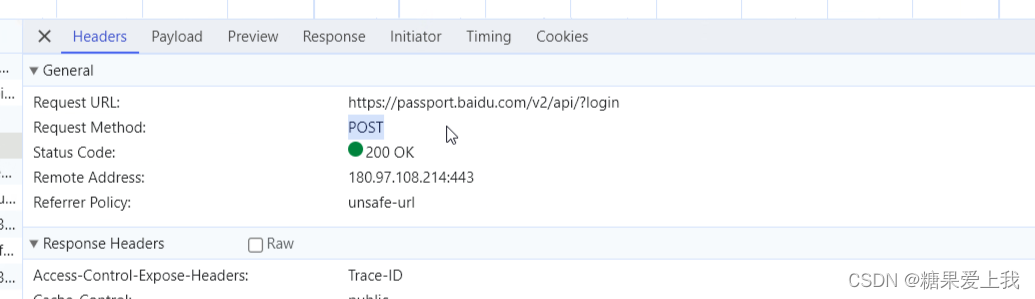
requests之get请求实例-百度搜索
视频版教程:一天掌握python爬虫【基础篇】 涵盖 requests、beautifulsoup、selenium 百度搜索请求地址: https://www.baidu.com/s?wd宝马 如果我们直接用requests.get()进行访问,发现没有返回内容,因为百度服务器通过headers头…...
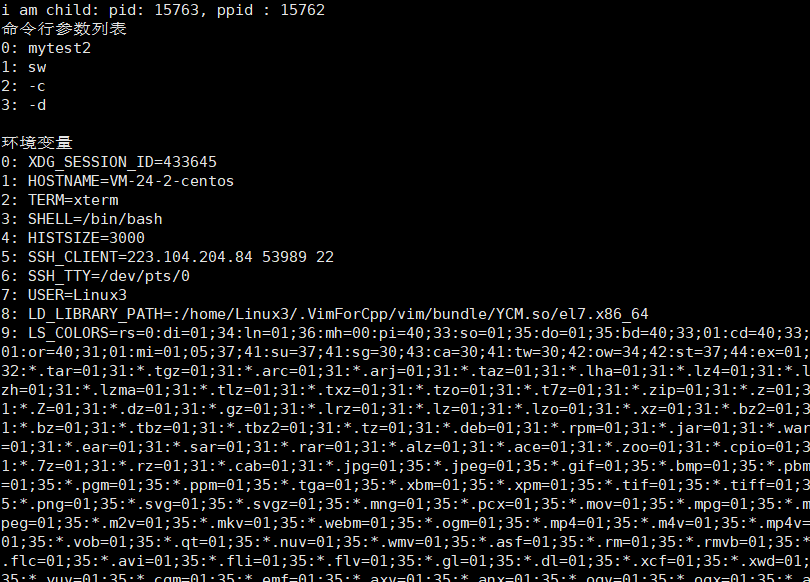
Linux进程程序替换
文章目录 进程程序替换程序替换函数execl()函数调用另外一个可执行程序 execlp()函数ecexv()函数execle()函数 替换函数总结 进程程序替换 什么是进程程序替换?为什么要有程序替换? 顾名思义,进程程序替换就是把该进程中的程序替换掉&#x…...
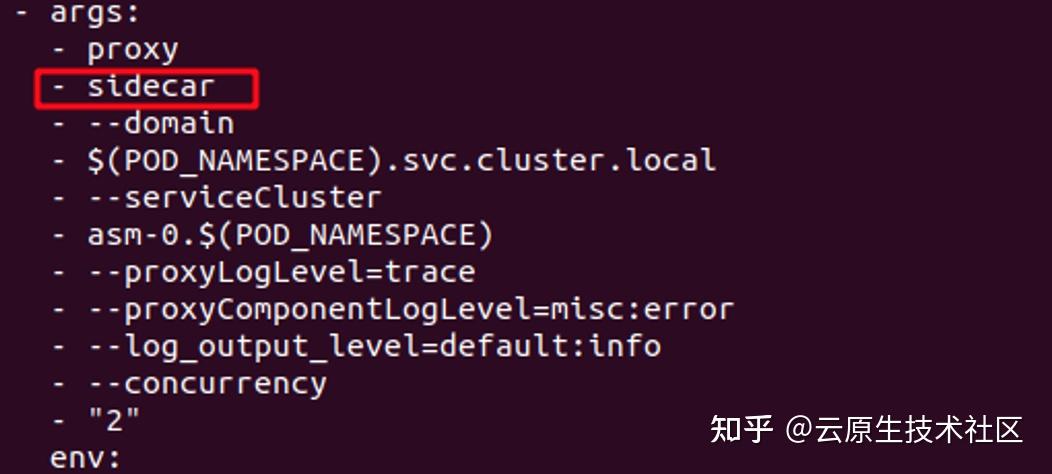
Istio实战(九)-Envoy 流量劫持
前言 Envoy 是一款面向 Service Mesh 的高性能网络代理服务。它与应用程序并行运行,通过以平台无关的方式提供通用功能来抽象网络。当基础架构中的所有服务流量都通过 Envoy 网格时,通过一致的可观测性,很容易地查看问题区域,调整整体性能。 Envoy也是istio的核心组件之一…...

Node.js 的pm2 库
Node.js 是一个非常流行的 JavaScript 运行时环境,用于编写服务器端代码。随着 Node.js 应用程序的增长, 我们需要一种可靠的方式来管理应用程序的生命周期。这就是 pm2 库的作用。它是一个流行的 Node.js 应用程序进程管理器,可以帮助我们管…...
AutoX.js - openCV多分辨率找图
AutoX.js - openCV多分辨率找图 一、起因 AutoXjs 中有两个找图相关的方法 findImage 和 matchTemplate,之前一直没发现什么问题,但最近在一次测试找图时,明明大图和模板图的轮廓都清晰,却怎么也找不到图,降低阈值参…...

Python爬虫实战案例——第七例
文章中所有内容仅供学习交流使用,不用于其他任何目的!严禁将文中内容用于任何商业与非法用途,由此产生的一切后果与作者无关。若有侵权,请联系删除。 目标:LI视频采集 地址:aHR0cHM6Ly93d3cucGVhcnZpZGVv…...

C# 图解教程 第5版 —— 第13章 数组
文章目录 13.1 数组13.1.1 定义13.1.2 重要细节 13.2 数组的类型13.3 数组是对象13.4 一维数组和矩形数组13.5 实例化一维数组或矩形数组13.6 访问数组元素(*)13.7 初始化数组13.7.1 显示初始化一维数组13.7.2 显示初始化矩形数组13.7.3 初始化矩形数组的…...

android studio启动Task配置
Android studio 高版本默认不开启Task配置,需要自己手动开启 1.低版本配置路径:(复制他人图片) 2.高版本路径:添加下图勾选配置即可 3.gradle task 3.1 初识task gradle中所有的构建工作都是由task完成的,它帮我们处…...
Xcode运行程序提示 Executable Path is a Directory 问题解决
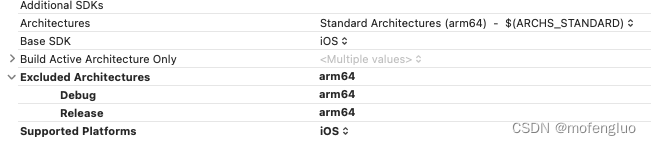
一、首先运行模拟器报错(没有记录),解决办法: TARGET->Build Settings->Architectures -> Exclude Architectures里面填入arm64,后运行模拟器成功 二、其次模拟器开发完成后,xcode运行真机调试&…...

决策树的优缺点
决策树优点 1. 易于理解和解释,因为树木可以画出来被看见 2. 需要很少的数据准备。其他很多算法通常都需要数据规范化,需要创建虚拟变量并删除空值等。但请注意, sklearn中的决策树模块不支持对缺失值的处理。 3. 使用树的成本(比…...
 - 功能实现和项目总结)
Flask后端开发(二) - 功能实现和项目总结
目录 1. 功能1:修改文件参数值1.1. 获取网页端传参1.2. 读取文件1.2.1. 一般文件读取方式1.2.2. 特殊文件 —— mlx文件1.2.3. 特殊文件 —— .xlx文件1.3. 查找数据修改位置,替换数据2. 功能2:读取结果数据2.1. 实时数据展示如何存储相关数据?2.2. 读取相关数据,整理、打…...

思维训练第五课插入语和主谓一致
系列文章目录 文章目录 系列文章目录前言一、插入语插入语的分类1、常用作插入语的副词 Indeed的确 certainly 当然 surely 无疑地 however 然而 等2、形容词及词组作插入语3、常作插入语的介词短语4、常作插入语的分词短语 Strictly speaking严格地说,generally sp…...
开源利器:it-tools 项目介绍
作为一名开发人员,我们在日常工作和学习中常常需要使用一系列小工具,如JSON格式化、JSON转表格、当前时间戳、XML格式化、SQL格式化、密码生成以及UUID生成等。通常情况下,我们会在网上搜索各种在线工具来满足这些需求。然而,这些…...

基于和声算法的无人机航迹规划-附代码
基于和声算法的无人机航迹规划 文章目录 基于和声算法的无人机航迹规划1.和声搜索算法2.无人机飞行环境建模3.无人机航迹规划建模4.实验结果4.1地图创建4.2 航迹规划 5.参考文献6.Matlab代码 摘要:本文主要介绍利用和声算法来优化无人机航迹规划。 1.和声搜索算法 …...

[Linux]线程池
[Linux]线程池 文章目录 [Linux]线程池线程池的概念线程池的优点线程池的应用场景线程池的实现 线程池的概念 线程池是一种线程使用模式。线程池是一种特殊的生产消费模型,用户作为生产者,线程池作为消费者和缓冲区。 线程过多会带来调度开销,…...

使用es实现轻量级分布式锁
文章目录 [toc] 1.前言2.实现3.总结 1.前言 一般来说,实现分布式锁的方式有哪几种? 一:Redisson实现 二:ZK实现 这两种实现网上的实现是千篇一律,在本文就不做过多的讲解了 其它方式好像没有了,真的是这…...

电源管理入门-4子系统reset
之前的文章电源管理入门-1关机重启详解介绍了整机SoC的重启也可以说是reset,那么子系统的reset,例如某个驱动(网卡、USB等)或者某个子系统(NPU、ISP等运行在独立的M核或者R核上的AI系统),这些零…...

GLM-4.1V-9B-Base基础教程:Web界面支持的图片格式/大小/分辨率清单
GLM-4.1V-9B-Base基础教程:Web界面支持的图片格式/大小/分辨率清单 1. 模型简介 GLM-4.1V-9B-Base是智谱开源的视觉多模态理解模型,专门用于处理图像内容识别、场景描述、目标问答和中文视觉理解任务。这个模型已经完成了Web化封装,可以直接…...

原创:行业空白:从约束崩塌到系统闭环的工程新论
行业空白:从约束崩塌到系统闭环的工程新论 作者:华夏之光永存 #工程约束 #底层架构 #系统稳定性 #软件开发 #高端制造 #工程方法论 #逻辑闭环 #零缺陷工程 #源头治理 #技术架构 摘要 本文直指当前工程领域普遍存在的核心问题:缺乏统一、刚性的…...

mitmproxy实战:从环境搭建到HTTPS抓包全攻略
1. 认识mitmproxy:你的网络调试瑞士军刀 第一次听说mitmproxy时,你可能觉得这是个复杂的安全工具。但实际用过后就会发现,它就像网络调试领域的瑞士军刀,能解决各种数据抓包难题。简单来说,mitmproxy是个开源的交互式中…...

Ostrakon-VL-8B打通企业数据流:与内部CRM系统集成实现智能客户分析
Ostrakon-VL-8B打通企业数据流:与内部CRM系统集成实现智能客户分析 你有没有遇到过这样的情况?销售团队抱怨客户画像太模糊,营销活动像在“盲人摸象”,投入了大量资源,转化率却总是不尽如人意。传统的客户关系管理&am…...

3步突破显卡限制:如何让AMD/Intel显卡实现DLSS级画质?
3步突破显卡限制:如何让AMD/Intel显卡实现DLSS级画质? 【免费下载链接】OptiScaler OptiScaler bridges upscaling/frame gen across GPUs. Supports DLSS2/XeSS/FSR2 inputs, replaces native upscalers, enables FSR3 FG on non-FG titles. Supports N…...

Hunyuan-MT-7B与SpringBoot整合实战:企业级翻译服务开发
Hunyuan-MT-7B与SpringBoot整合实战:企业级翻译服务开发 1. 引言 在全球化业务快速发展的今天,企业经常需要处理多语言内容。传统翻译方案要么成本高昂,要么响应速度慢,很难满足实时业务需求。腾讯开源的Hunyuan-MT-7B翻译模型&…...
)
别再手动改稿了!用LaTeX的soul包搞定论文批注(删除线/高亮/引用兼容)
LaTeX高效批注指南:用soul包实现学术协作的优雅排版 当导师的红色批注铺满论文初稿,或是合作者发来二十处修改意见时,大多数研究者都会面临一个共同困境——如何在保留原始内容的同时清晰标记修改痕迹?传统的手动添加删除线或高亮…...

Z-Image-GGUF模型量化与压缩教程:在低显存GPU上运行大模型
Z-Image-GGUF模型量化与压缩教程:在低显存GPU上运行大模型 想用AI生成图片,但一看模型大小和显存要求就头疼?手头只有一张8GB显存的消费级显卡,是不是就只能和那些功能强大的图像生成模型说再见了? 别急着放弃。今天…...

RMBG-2.0多场景落地指南:短视频素材制作+电商主图抠图完整流程
RMBG-2.0多场景落地指南:短视频素材制作电商主图抠图完整流程 想快速给商品换个背景,又怕抠图不干净?想给短视频做个炫酷的片头,却被复杂的背景处理劝退?今天,咱们就来聊聊一个能让你彻底告别繁琐抠图的神…...