C#图像处理OpenCV开发指南(CVStar,07)——通用滤波(Filter2D)的实例代码
1 函数定义
void Filter2D (Mat src,
Mat dst,
int ddepth,
InputArray kernel,
Point anchor = Point(-1,-1),
double delta = 0,
int borderType = BORDER_DEFAULT
)
1.1 原型
#include <opencv2/imgproc.hpp>
Convolves an image with the kernel.
使用内核对图像进行卷积。
The function applies an arbitrary linear filter to an image. In-place operation is supported. When the aperture is partially outside the image, the function interpolates outlier pixel values according to the specified border mode.
该函数将任意线性滤波器应用于图像。支持就地操作。当光圈部分位于图像之外时,该函数会根据指定的边界模式对异常像素值进行插值。
The function does actually compute correlation, not the convolution:

That is, the kernel is not mirrored around the anchor point. If you need a real convolution, flip the kernel using flip and set the new anchor to (kernel.cols - anchor.x - 1, kernel.rows - anchor.y - 1).
The function uses the DFT-based algorithm in case of sufficiently large kernels (~11 x 11 or larger) and the direct algorithm for small kernels.
1.2 参数说明 Parameters
- src input image. 输入图像。
- dst output image of the same size and the same number of channels as src. 输出与src具有相同大小和相同通道数的图像。
- ddepth desired depth of the destination image, see combinations 目标图像的所需深度,请参阅组合
- kernel convolution kernel (or rather a correlation kernel), a single-channel floating point matrix; if you want to apply different kernels to different channels, split the image into separate color planes using split and process them individually. 核卷积核(或者更确切地说是相关核)、单通道浮点矩阵;如果要将不同的内核应用于不同的通道,请使用split将图像拆分为单独的颜色平面,然后分别进行处理。
- anchor anchor of the kernel that indicates the relative position of a filtered point within the kernel; the anchor should lie within the kernel; default value (-1,-1) means that the anchor is at the kernel center. 所述内核的锚定锚,所述锚定锚指示所述内核内的滤波点的相对位置;锚应该位于内核内;默认值(-1,-1)表示锚点位于内核中心。
- delta optional value added to the filtered pixels before storing them in dst. 可选值,在将滤波像素存储在dst中之前添加到滤波像素。
- borderType pixel extrapolation method, see BorderTypes. BORDER_WRAP is not supported. 像素外推法,请参见BorderTypes。不支持BORDER_WRAP。
2 代码解释
2.1 核心代码
private void Filter2D(object? sender, EventArgs? e)
{Mat src = Cv2.ImRead(sourceImage);Mat dst = new Mat();// 自定义卷积核(通用过滤)InputArray arr = InputArray.Create<float>(new float[3, 3] {{ 0, -1, 0 },{ -1, 5, -1 },{ 0, -1, 0 }});Cv2.Filter2D(src: src,dst: dst,ddepth: -1,kernel: arr,anchor: new OpenCvSharp.Point(-1, -1),delta: 0,borderType: BorderTypes.Default);picResult.Image = CVUtility.Mat2Bitmap(dst);PicAutosize(picResult);
}
通过修改 arr 卷积核矩阵,可获得不同的效果。
2.2 Form1.cs 完整源程序
using OpenCvSharp;#pragma warning disable CS8602namespace Legal.Truffer.CVStar
{public partial class Form1 : Form{string[] ImgExtentions = {"*.*|*.*","JPEG|*.jpg;*.jpeg","GIF|*.gif","PNG|*.png","TIF|*.tif;*.tiff","BMP|*.bmp"};private int original_width { get; set; } = 0;private int original_height { get; set; } = 0;private string sourceImage { get; set; } = "";Panel? panelTop { get; set; } = null;Panel? panelBotton { get; set; } = null;PictureBox? picSource { get; set; } = null;PictureBox? picResult { get; set; } = null;Button? btnLoad { get; set; } = null;Button? btnSave { get; set; } = null;Button? btnFunction { get; set; } = null;public Form1(){InitializeComponent();this.Text = "OPENCV C#编程入手教程 POWERED BY 深度混淆(CSDN.NET)";this.StartPosition = FormStartPosition.CenterScreen;GUI();this.Resize += FormResize;}private void FormResize(object? sender, EventArgs? e){if (this.Width < 200) { this.Width = 320; return; }if (this.Height < 200) { this.Height = 320; return; }GUI();}private void GUI(){if (panelTop == null) panelTop = new Panel();panelTop.Parent = this;panelTop.Top = 5;panelTop.Left = 5;panelTop.Width = this.Width - 26;panelTop.Height = 85;panelTop.BorderStyle = BorderStyle.FixedSingle;panelTop.BackColor = Color.FromArgb(200, 200, 255);if (panelBotton == null) panelBotton = new Panel();panelBotton.Parent = this;panelBotton.Top = panelTop.Top + panelTop.Height + 3;panelBotton.Left = 5;panelBotton.Width = panelTop.Width;panelBotton.Height = this.Height - panelBotton.Top - 55;panelBotton.BorderStyle = BorderStyle.FixedSingle;if (picSource == null) picSource = new PictureBox();picSource.Parent = panelBotton;picSource.Left = 5;picSource.Top = 5;picSource.Width = (panelBotton.Width - 10) / 2;picSource.Height = (panelBotton.Height - 10);picSource.BorderStyle = BorderStyle.FixedSingle;if (picResult == null) picResult = new PictureBox();picResult.Parent = panelBotton;picResult.Left = picSource.Left + picSource.Width + 5;picResult.Top = picSource.Top;picResult.Width = picSource.Width;picResult.Height = picSource.Height;picResult.BorderStyle = BorderStyle.FixedSingle;original_width = picSource.Width;original_height = picSource.Height;if (btnLoad == null) btnLoad = new Button();btnLoad.Parent = panelTop;btnLoad.Left = 5;btnLoad.Top = 5;btnLoad.Width = 90;btnLoad.Height = 38;btnLoad.Cursor = Cursors.Hand;btnLoad.Text = "Load";btnLoad.Click += Load_Image;btnLoad.BackColor = Color.LightCoral;if (btnSave == null) btnSave = new Button();btnSave.Parent = panelTop;btnSave.Left = panelTop.Width - btnSave.Width - 25;btnSave.Top = btnLoad.Top;btnSave.Width = 90;btnSave.Height = 38;btnSave.Cursor = Cursors.Hand;btnSave.Text = "Save";btnSave.Click += Save;btnSave.BackColor = Color.LightCoral;if (btnFunction == null) btnFunction = new Button();btnFunction.Parent = panelTop;btnFunction.Left = btnLoad.Left + btnLoad.Width + 5;btnFunction.Top = btnLoad.Top;btnFunction.Width = 90;btnFunction.Height = 38;btnFunction.Cursor = Cursors.Hand;btnFunction.Text = "Filter2D";btnFunction.Click += Filter2D;btnFunction.BackColor = Color.LightCoral;PicAutosize(picSource);PicAutosize(picResult);}private void Load_Image(object? sender, EventArgs? e){OpenFileDialog openFileDialog = new OpenFileDialog();openFileDialog.Filter = String.Join("|", ImgExtentions);if (openFileDialog.ShowDialog() == DialogResult.OK){sourceImage = openFileDialog.FileName;picSource.Image = Image.FromFile(sourceImage);picResult.Image = picSource.Image;PicAutosize(picSource);PicAutosize(picResult);}}private void PicAutosize(PictureBox pb){if (pb == null) return;if (pb.Image == null) return;Image img = pb.Image;int w = original_width;int h = w * img.Height / img.Width;if (h > original_height){h = original_height;w = h * img.Width / img.Height;}pb.SizeMode = PictureBoxSizeMode.Zoom;pb.Width = w;pb.Height = h;pb.Image = img;pb.Refresh();}private void Save(object? sender, EventArgs? e){SaveFileDialog saveFileDialog = new SaveFileDialog();saveFileDialog.Filter = String.Join("|", ImgExtentions);if (saveFileDialog.ShowDialog() == DialogResult.OK){picResult.Image.Save(saveFileDialog.FileName);MessageBox.Show("Image Save to " + saveFileDialog.FileName);}}private void Filter2D(object? sender, EventArgs? e){Mat src = Cv2.ImRead(sourceImage);Mat dst = new Mat();// 自定义卷积核(通用过滤)InputArray arr = InputArray.Create<float>(new float[3, 3] {{ 0, -1, 0 },{ -1, 5, -1 },{ 0, -1, 0 }});Cv2.Filter2D(src: src,dst: dst,ddepth: -1,kernel: arr,anchor: new OpenCvSharp.Point(-1, -1),delta: 0,borderType: BorderTypes.Default);picResult.Image = CVUtility.Mat2Bitmap(dst);PicAutosize(picResult);}}
}
3 运行效果
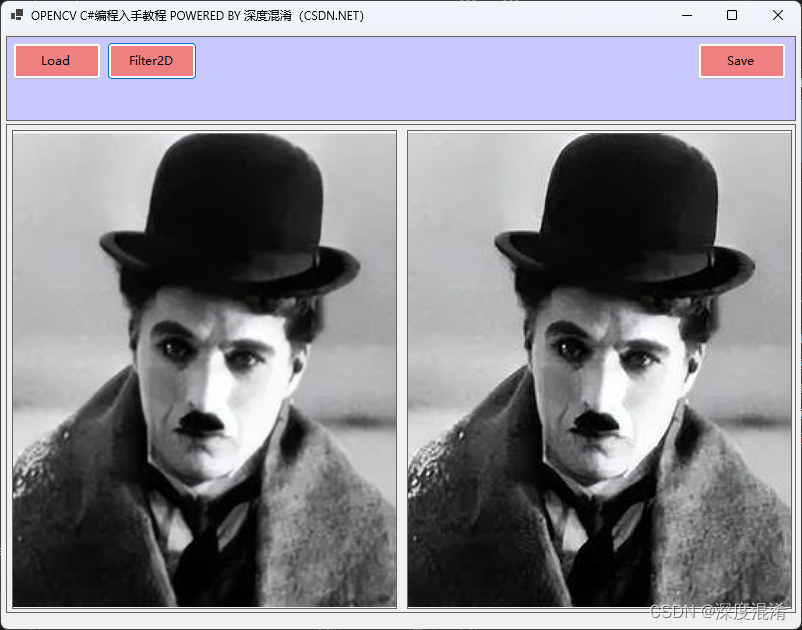
3x3的卷积核显然太小了,效果不明显。
相关文章:
C#图像处理OpenCV开发指南(CVStar,07)——通用滤波(Filter2D)的实例代码
1 函数定义 void Filter2D (Mat src, Mat dst, int ddepth, InputArray kernel, Point anchor Point(-1,-1), double delta 0, int borderType BORDER_DEFAULT ) 1.1 原型 #include <opencv2/imgproc.hpp> Convolves an image wit…...
c++函数模板STL详解
函数模板 函数模板语法 所谓函数模板,实际上是建立一个通用函数,其函数类型和形参类型不具体指定,用一个虚拟的类型来代表。这个通用函数就称为函数模板。 凡是函数体相同的函数都可以用这个模板来代替,不必定义多个函数…...

Java利用UDP实现简单群聊
一、创建新项目 首先新建一个新的项目,并按如下操作 二、实现代码 界面ChatFrame类 package 群聊; import javax.swing.*; import java.awt.*; import java.awt.event.*; import java.net.InetAddress; public abstract class ChatFrame extends JFrame { p…...
fastapi.templating与HTMLResponse
要声明一个模板对象,应将存储html模板的文件夹作为参数提供。在当前工作目录中,我们将创建一个 “templates “目录。 templates Jinja2Templates(directory“templates”) 我们现在要把这个页面的HTML代码渲染成HTMLResponse。让我们修改一下hello()函…...

当初为什么选择计算机这类的行业?
CSDN给了这么一个话题: 还记得当初自己为什么选择计算机? 当初你问我为什么选择计算机,我笑着回答:“因为我梦想成为神奇的码农!我想像编织魔法一样编写程序,创造出炫酷的虚拟世界!”谁知道&…...

tif文件转png、Excel
l利用gdal读取tif中的地理信息和波段数组,然后保存想要的格式即可。 from osgeo import gdal from PIL import Image import numpy as np import cv2 as cv from matplotlib import pyplot as plt# 读取.tif文件 def read_tif(file_path):dataset gdal.Open(file_…...
【PyTorch】训练过程可视化
文章目录 1. 训练过程中的可视化1.1. alive_progress1.2. rich.progress 2. 训练结束后的可视化2.1. tensorboardX2.1.1. 安装2.1.2. 使用 1. 训练过程中的可视化 主要是监控训练的进度。 1.1. alive_progress 安装 pip install alive_progress使用 from alive_progress i…...

深入理解Go语言GC机制
1、Go 1.3之前的标记-清除(mark and sweep)算法 Go 1.3之前的时候主要用的是普通的标记-清除算法,此算法主要由两个主要的步骤: 标记(Mark phase)清除(Sweep phase) 1)…...

qt-C++笔记之组件-分组框QGroupBox
qt-C笔记之组件-分组框QGroupBox code review! 文章目录 qt-C笔记之组件-分组框QGroupBox1.《Qt 6 C开发指南》p752.《Qt 官方文档》3.《Qt 5.12实战》——5.9 分组框控件 1.《Qt 6 C开发指南》p75 2.《Qt 官方文档》 中间段落翻译: 我把示例补充完整: …...

qt 定时器用法
在qt开发中,定时器是我们经常用到的。我们接下来说一下定时器的三种用法,需要注意的是定时器事件是在主线程中触发的,因此在处理耗时操作时应特别小心,以避免阻塞应用程序的事件循环。 1. 三种定时器使用 1.1 QObject的定时器 …...
用23种设计模式打造一个cocos creator的游戏框架----(九)访问者模式
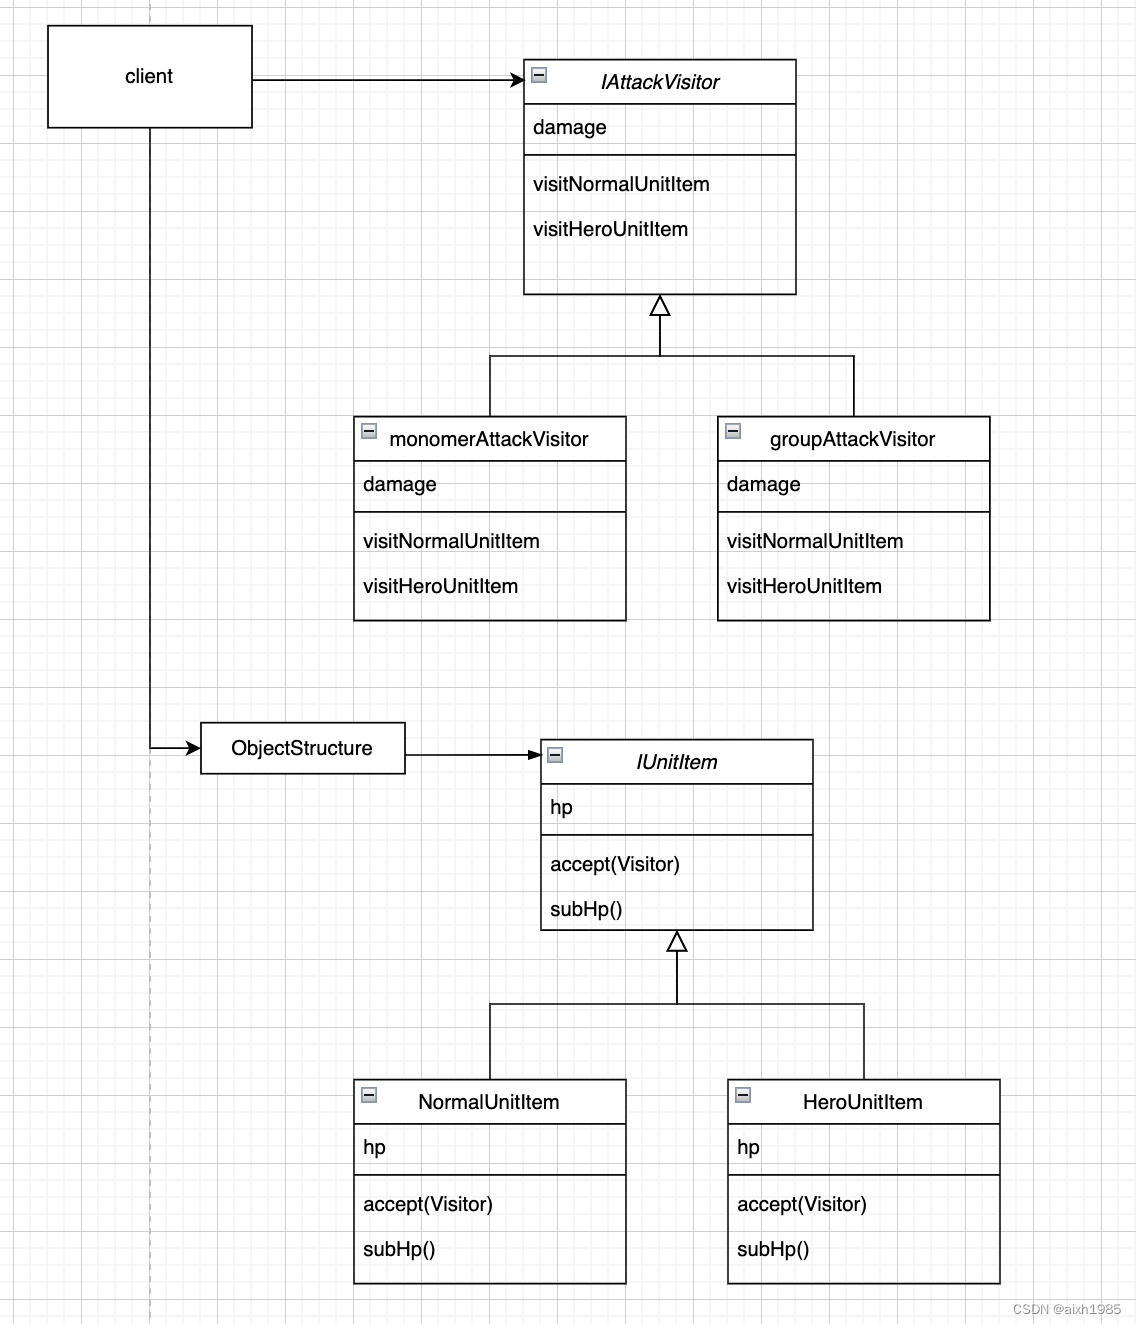
1、模式标准 模式名称:访问者模式 模式分类:行为型 模式意图:将数据操作与数据结构分离,使得在不修改数据结构的前提下,可以添加或改变对数据的操作。 结构图: 适用于: 当你需要对一个复杂对…...
根文件系统初步测试
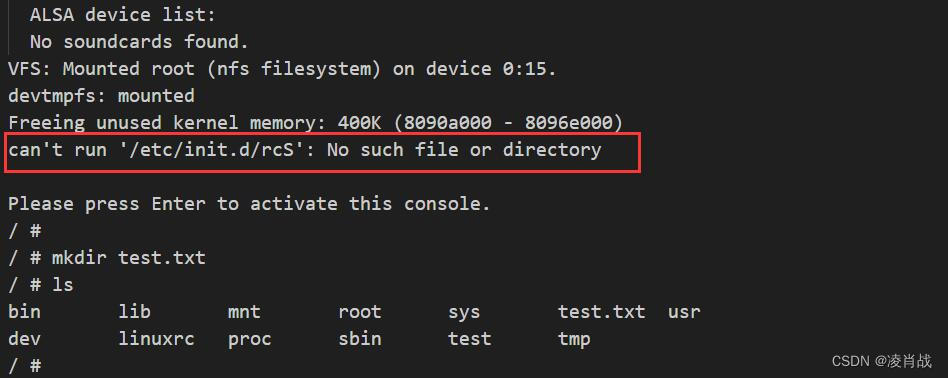
一. 简介 上一篇文章学习了向所编译生成的根文件系统中加入 lib库文件。文章地址如下: 根文件系统lib库添加与初步测试-CSDN博客 本文继上一篇文章的学习,本文对之前制作的根文件系统进行一次初步测试。 二. 根文件系统初步测试 为了方便测试&#…...

【精选】设计模式——策略设计模式-两种举例说明,具体代码实现
Java策略设计模式 简介 策略设计模式是一种行为型设计模式,它允许在运行时选择算法的行为。 在软件开发中,我们常常需要根据不同情况采取不同的行为。通常的做法是使用大量的条件语句来实现这种灵活性,但这会导致代码变得复杂、难以维护和扩…...

外包干了3个月,技术倒退2年。。。
先说情况,大专毕业,18年通过校招进入湖南某软件公司,干了接近6年的功能测试,今年年初,感觉自己不能够在这样下去了,长时间呆在一个舒适的环境会让一个人堕落!而我已经在一个企业干了四年的功能测试…...

微信小程序:chooseimage从本地相册选择图片或使用相机拍照
文档 https://uniapp.dcloud.net.cn/api/media/image.html#chooseimage https://developers.weixin.qq.com/miniprogram/dev/api/media/image/wx.chooseImage.html 代码示例 const res await uni.chooseImage({count: 1, //默认9sizeType: [original, compressed], //可以…...
「Swift」取消UITableView起始位置在状态栏下方开始
前言:在写页面UI时发现,当隐藏了NavigationBar时,即使UITableView是从(0,0)进行布局,也会一直在手机状态栏下方进行展示布局,而我的想法是希望UITableView可以从状态栏处就进行展示布局 当前页面展示: 问题…...

android高版本适配使用Tools.java
随着android版本的提升,原生Tools不公开并且不能被正常使用,为了延续项目的功能,修改如下: /** Copyright (C) 2006 The Android Open Source Project** Licensed under the Apache License, Version 2.0 (the "License&quo…...
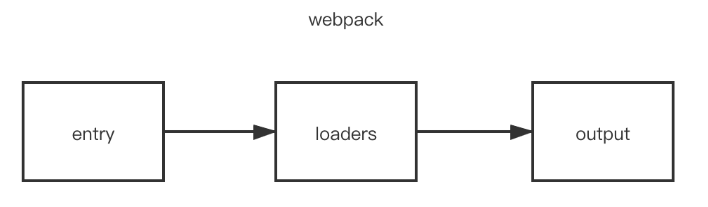
面试官:说说webpack中常见的Loader?解决了什么问题?
面试官:说说webpack中常见的Loader?解决了什么问题? 一、是什么 loader 用于对模块的"源代码"进行转换,在 import 或"加载"模块时预处理文件 webpack做的事情,仅仅是分析出各种模块的依赖关系&a…...
【蓝桥杯省赛真题50】Scratch智能计价器 蓝桥杯scratch图形化编程 中小学生蓝桥杯省赛真题讲解
目录 scratch智能计价器 一、题目要求 编程实现 二、案例分析 1、角色分析...
)
折半查找(数据结构实训)
题目: 标准输入输出 题目描述: 实现折半查找。要求查找给定的值在数据表中相应的存储位置。本题目假定输入元素均按非降序输入。 输入: 输入包含若干个测试用例,第一行为测试用例个数k。每个测试用例占3行,其中第一行为…...

YOLOv8实战:从检测框到中心坐标的精准提取与应用
1. 为什么需要提取物体中心坐标? 在目标检测任务中,我们通常使用边界框(bounding box)来标识物体的位置。但很多时候,仅仅知道物体的边界框是不够的。比如在做物体追踪时,我们需要一个更简洁的表示方式——…...

BGP线路 vs 传统线路:如何为你的业务选择最佳服务器方案?
BGP线路与传统线路深度对比:企业级服务器选型实战指南 当企业业务规模扩张到需要跨地域服务时,服务器线路的选择直接决定了终端用户的访问体验。我曾为多家电商平台做过基础设施优化,最深刻的教训莫过于某次因线路选择不当导致的"南北互…...
)
GitHub多账户管理指南:Ubuntu下用SSH切换工作与个人账号(附密钥冲突解决方案)
GitHub多账户管理指南:Ubuntu下用SSH切换工作与个人账号 作为开发者,同时管理公司GitHub账号和个人项目账号是常见需求。当你在Ubuntu系统上频繁切换两个账号进行代码提交时,传统的单密钥配置方式会带来诸多不便——每次切换都需要重新配置全…...

VSCode远程开发踩坑实录:解决Failed to parse remote port错误的3种方法
VSCode远程开发踩坑实录:解决Failed to parse remote port错误的3种方法 远程开发已成为现代程序员工作流中不可或缺的一环,而VSCode凭借其强大的Remote-SSH插件,让开发者能够轻松连接到远程服务器进行编码。然而,当你在午休后满…...
)
从零搭建一个AUTOSAR软件组件:手把手教你定义和使用AUTOSAR接口(含ARXML配置)
从零搭建AUTOSAR软件组件:实战ARXML接口配置与RTE集成 在汽车电子架构快速迭代的今天,AUTOSAR已成为嵌入式软件开发的事实标准。但许多工程师在理论学习后,面对实际工具链操作时仍会感到无从下手。本文将使用Vector DaVinci工具套件ÿ…...

超实用 M3U8 在线播放器!m3u8live.cn让流媒体调试更高效
作为开发人员,日常做 HLS 流媒体开发、测试时,是不是总被 M3U8 链接验证、视频流调试的问题困扰?找一款免安装、兼容性强、无广告的在线播放器,能大幅提升开发效率,而m3u8live.cn就是这样一款专为开发者打造的 M3U8 在…...

编写程序实现智能耳机佩戴检测,摘下耳机自动暂停播放,戴上继续播放,省电便捷。
智能耳机佩戴检测系统 - 音乐体验与节能解决方案 一、实际应用场景描述 某音乐APP开发团队接到用户反馈,现有耳机产品存在以下使用痛点: - 用户在办公室临时起身接电话,忘记暂停音乐,导致隐私泄露和电量浪费 - 通勤途中摘下耳机听…...

树莓派硬件接口全解析:从GPIO到高速总线的实战指南
1. 树莓派硬件接口全景图 树莓派虽然只有信用卡大小,但它的硬件接口丰富程度远超大多数人的想象。我第一次拿到树莓派4B时,就被它那两排40针的GPIO接口震撼到了——这简直就是通往物理世界的万能钥匙。经过多年实战,我发现这些接口可以分为三…...

分人群建站解决方案:中小企业、创业者、外贸人怎么选对AI建站工具?
同样是“想建个网站”,中小企业主、刚起步的创业者、做外贸生意的卖家,他们心里的“网站”其实千差万别。需求不同,适配的建站方案自然也不同。本文针对几类典型人群,拆解他们的核心痛点,并提供对应的建站思路与工具选…...

OpenCV颜色查找表LUT的5个高级用法:从图像反转到颜色空间缩减
OpenCV颜色查找表LUT的5个高级用法:从图像反转到颜色空间缩减 在数字图像处理领域,颜色查找表(Look Up Table,简称LUT)是一种高效且强大的工具。它通过预先计算的映射关系,能够实现像素值的快速转换&#x…...