Aloha 机械臂的学习记录2——AWE:AWE + ACT
继续下一个阶段:
Train policy
python act/imitate_episodes.py \ --task_name [TASK] \ --ckpt_dir data/outputs/act_ckpt/[TASK]_waypoint \ --policy_class ACT --kl_weight 10 --chunk_size 50 --hidden_dim 512 --batch_size 8 --dim_feedforward 3200 \ --num_epochs 8000 --lr 1e-5 \ --seed 0 --temporal_agg --use_waypoint
For human datasets, set --kl_weight=80, as suggested by the ACT authors. To evaluate the policy, run the same command with --eval.
翻译:对于人类数据集,如ACT作者所建议的,设置--kl_weight=80。若要评估策略,请使用-eval运行相同的命令。
在完成了Bimanual Simulation Suite(Save waypoints)的这个博客内容之后,即
Save waypoints的操作完成后,下面便可以进行sim_transfer_cube_scripted这一任务的训练,即
Train policy:
首先进入awe的文件夹目录中,在linux的终端中输入以下的命令:
python act/imitate_episodes.py \ --task_name sim_transfer_cube_scripted \ --ckpt_dir data/outputs/act_ckpt/sim_transfer_cube_scripted_waypoint \ --policy_class ACT --kl_weight 10 --chunk_size 50 --hidden_dim 512 --batch_size 8 --dim_feedforward 3200 \ --num_epochs 8000 --lr 1e-5 \ --seed 0 --temporal_agg --use_waypoint
终端会进行训练进度的显示,截图如下:
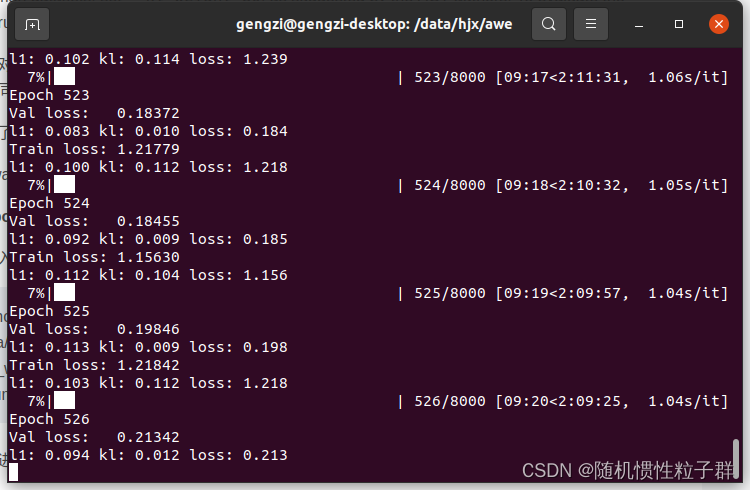
这时说明Train policy已经在进行了,等待训练结束即可。
在运行这个Train policy时,遇到了一些小bug(报错),记录如下:
ModuleNotFoundError: No module named 'gym' 的解决方案:
pip install gym
ModuleNotFoundError: No module named 'gym' 错误表示你的Python环境中缺少了名为 gym 的Python模块。gym 是用于开发和测试强化学习算法的一个常用库,通常与OpenAI Gym一起使用。
ModuleNotFoundError: No module named 'dm_control' 的解决方案:
pip install dm_control
ModuleNotFoundError: No module named 'dm_control' 错误表示你的Python环境中缺少了名为 dm_control 的Python模块。dm_control 是DeepMind开发的一个用于机器人控制和物理仿真的库,通常与MuJoCo一起使用。
FileNotFoundError: [Errno 2] Unable to synchronously open file (unable to open file: name = 'data/act/sim_transfer_cube_scripted_copy/episode_0.hdf5', errno = 2, error message = 'No such file or directory', flags = 0, o_flags = 0) 的解决方案:
在awe/data/act/的文件路径中将sim_transfer_cube_scripted文件夹复制一份后更名为sim_transfer_cube_scripted_copy
FileNotFoundError 错误表示在指定的路径下找不到文件。具体来说,错误消息中提到了文件路径 'data/act/sim_transfer_cube_scripted_copy/episode_0.hdf5',但系统无法找到该文件,因为文件或路径不存在。
raise AssertionError("Torch not compiled with CUDA enabled") AssertionError: Torch not compiled with CUDA enabled 的的解决方案:
nvidia-smi # 查看显卡的CUDA Version: 12.2 我这里是 12.2,在去查找CUDA 12.2的PyTorch版本是1.10.0
pip install torch==1.10.0 # 安装CUDA 12.2的对应版本
请根据你的PyTorch版本和需求进行安装。
pip install torch==1.10.0安装完成后,接着进行Train policy时,又遇到了:
ERROR: pip's dependency resolver does not currently take into account all the packages that are installed. This behaviour is the source of the following dependency conflicts. torchvision 0.16.0 requires torch==2.1.0, but you have torch 1.10.0 which is incompatible.
其解决方案为:
pip install torchvision --upgrade
这将安装 torchvision 的最新版本,该版本可能与你的 PyTorch 版本兼容。
这个错误消息表明 torchvision 需要与特定版本的 PyTorch 兼容,但你当前的 PyTorch 版本与 torchvision 不兼容。为了解决这个问题,你需要升级 torchvision 或降级 PyTorch,以使它们兼容。
最后有必要解读一下 act/imitate_episodes.py 这个python文件,部分代码粘贴如下:
def main(args):set_seed(1)# command line parametersis_eval = args["eval"]ckpt_dir = args["ckpt_dir"]policy_class = args["policy_class"]onscreen_render = args["onscreen_render"]task_name = args["task_name"]batch_size_train = args["batch_size"]batch_size_val = args["batch_size"]num_epochs = args["num_epochs"]use_waypoint = args["use_waypoint"]constant_waypoint = args["constant_waypoint"]if use_waypoint:print("Using waypoint")if constant_waypoint is not None:print(f"Constant waypoint: {constant_waypoint}")# get task parameters# is_sim = task_name[:4] == 'sim_'is_sim = True # hardcode to True to avoid finding constants from alohaif is_sim:from constants import SIM_TASK_CONFIGStask_config = SIM_TASK_CONFIGS[task_name]else:from aloha_scripts.constants import TASK_CONFIGStask_config = TASK_CONFIGS[task_name]dataset_dir = task_config["dataset_dir"]num_episodes = task_config["num_episodes"]episode_len = task_config["episode_len"]camera_names = task_config["camera_names"]# fixed parametersstate_dim = 14lr_backbone = 1e-5backbone = "resnet18"if policy_class == "ACT":enc_layers = 4dec_layers = 7nheads = 8policy_config = {"lr": args["lr"],"num_queries": args["chunk_size"],"kl_weight": args["kl_weight"],"hidden_dim": args["hidden_dim"],"dim_feedforward": args["dim_feedforward"],"lr_backbone": lr_backbone,"backbone": backbone,"enc_layers": enc_layers,"dec_layers": dec_layers,"nheads": nheads,"camera_names": camera_names,}elif policy_class == "CNNMLP":policy_config = {"lr": args["lr"],"lr_backbone": lr_backbone,"backbone": backbone,"num_queries": 1,"camera_names": camera_names,}else:raise NotImplementedErrorconfig = {"num_epochs": num_epochs,"ckpt_dir": ckpt_dir,"episode_len": episode_len,"state_dim": state_dim,"lr": args["lr"],"policy_class": policy_class,"onscreen_render": onscreen_render,"policy_config": policy_config,"task_name": task_name,"seed": args["seed"],"temporal_agg": args["temporal_agg"],"camera_names": camera_names,"real_robot": not is_sim,}if is_eval:ckpt_names = [f"policy_best.ckpt"]results = []for ckpt_name in ckpt_names:success_rate, avg_return = eval_bc(config, ckpt_name, save_episode=True)results.append([ckpt_name, success_rate, avg_return])for ckpt_name, success_rate, avg_return in results:print(f"{ckpt_name}: {success_rate=} {avg_return=}")print()exit()train_dataloader, val_dataloader, stats, _ = load_data(dataset_dir,num_episodes,camera_names,batch_size_train,batch_size_val,use_waypoint,constant_waypoint,)# save dataset statsif not os.path.isdir(ckpt_dir):os.makedirs(ckpt_dir)stats_path = os.path.join(ckpt_dir, f"dataset_stats.pkl")with open(stats_path, "wb") as f:pickle.dump(stats, f)best_ckpt_info = train_bc(train_dataloader, val_dataloader, config)best_epoch, min_val_loss, best_state_dict = best_ckpt_info# save best checkpointckpt_path = os.path.join(ckpt_dir, f"policy_best.ckpt")torch.save(best_state_dict, ckpt_path)print(f"Best ckpt, val loss {min_val_loss:.6f} @ epoch{best_epoch}")这段代码是一个主程序,用于训练或评估一个深度学习模型。以下是代码的主要功能:
-
从命令行参数中获取模型训练和评估的相关配置。
-
根据任务名称和配置获取任务参数,例如数据集目录、任务类型等。
-
定义模型的架构和超参数,包括学习率、网络结构、层数等。
-
创建数据加载器,加载训练和验证数据集。
-
训练模型并保存最佳模型的权重。如果模型已经在以前的训练中保存了最佳权重,可以选择加载这些权重并进行评估。
-
如果设置为评估模式,加载保存的模型权重并在验证集上评估模型性能,计算成功率和平均回报。
-
最后,将结果打印出来。
请注意,这段代码需要其他模块和库的支持,例如数据加载、模型定义、训练和评估函数等。要运行这段代码,你需要确保所有的依赖项都已安装,并提供正确的命令行参数以配置模型训练或评估的行为。
def make_policy(policy_class, policy_config):if policy_class == "ACT":policy = ACTPolicy(policy_config)elif policy_class == "CNNMLP":policy = CNNMLPPolicy(policy_config)else:raise NotImplementedErrorreturn policy这个函数根据指定的policy_class(策略类别)和policy_config(策略配置)创建一个策略模型对象。策略模型用于执行某种任务或动作,通常是在强化学习中使用的。
函数的工作流程如下:
-
接受两个参数:
policy_class表示要创建的策略模型的类别,policy_config表示策略模型的配置参数。 -
根据
policy_class的值,决定创建哪种类型的策略模型。目前支持两种类型:"ACT"和"CNNMLP"。 -
创建指定类型的策略模型,并使用传递的
policy_config来配置模型的超参数和设置。 -
返回创建的策略模型对象。
这个函数的主要作用是根据需要创建不同类型的策略模型,并提供一个统一的接口供其他部分的代码使用。根据具体的应用和任务,可以选择不同的策略模型类型,以满足任务的需求。如果需要了解更多关于不同策略模型类型的详细信息,可以查看对应的策略模型的定义(例如,ACTPolicy和CNNMLPPolicy)。
def make_optimizer(policy_class, policy):if policy_class == "ACT":optimizer = policy.configure_optimizers()elif policy_class == "CNNMLP":optimizer = policy.configure_optimizers()else:raise NotImplementedErrorreturn optimizer这个函数用于创建策略模型的优化器(optimizer),并返回创建的优化器对象。优化器的作用是根据策略模型的损失函数来更新模型的参数,以使损失函数尽量减小。
函数的工作流程如下:
-
接受两个参数:
policy_class表示策略模型的类别,policy表示已经创建的策略模型对象。 -
根据
policy_class的值,决定使用哪种类型的优化器配置。目前支持两种类型:"ACT"和"CNNMLP"。 -
调用策略模型的
configure_optimizers方法,该方法通常会返回一个用于优化模型的优化器对象。 -
返回创建的优化器对象。
这个函数的主要作用是根据策略模型的类别和已经创建的策略模型对象来创建相应的优化器。不同的策略模型可能需要不同的优化器配置,因此通过调用策略模型的方法来创建优化器,以确保配置的一致性。优化器对象通常用于后续的训练过程中,用于更新模型的参数以最小化损失函数。
def get_image(ts, camera_names):curr_images = []for cam_name in camera_names:curr_image = rearrange(ts.observation["images"][cam_name], "h w c -> c h w")curr_images.append(curr_image)curr_image = np.stack(curr_images, axis=0)curr_image = torch.from_numpy(curr_image / 255.0).float().cuda().unsqueeze(0)return curr_image这个函数的作用是获取一个时间步(ts)的图像数据。函数接受两个参数:ts和camera_names。
-
ts是一个时间步的数据,包含了多个相机(摄像头)拍摄的图像。ts.observation["images"]包含了各个相机拍摄的图像数据,而camera_names是一个列表,包含了要获取的相机的名称。 -
函数通过循环遍历
camera_names中的相机名称,从ts.observation["images"]中获取对应相机的图像数据。这些图像数据首先通过rearrange函数重新排列维度,将"height-width-channels"的顺序变为"channels-height-width",以适应PyTorch的数据格式。 -
获取的图像数据被放入
curr_images列表中。 -
接下来,函数将
curr_images列表中的所有图像数据堆叠成一个张量(tensor),np.stack(curr_images, axis=0)这一行代码实现了这个操作。 -
接着,图像数据被归一化到[0, 1]的范围,然后转换为PyTorch的
float类型,并移到GPU上(如果可用)。最后,图像数据被增加了一个额外的维度(unsqueeze(0)),以适应模型的输入要求。
最终,函数返回包含时间步图像数据的PyTorch张量。这个图像数据可以被用于输入到神经网络模型中进行处理。
def eval_bc(config, ckpt_name, save_episode=True):set_seed(1000)ckpt_dir = config["ckpt_dir"]state_dim = config["state_dim"]real_robot = config["real_robot"]policy_class = config["policy_class"]onscreen_render = config["onscreen_render"]policy_config = config["policy_config"]camera_names = config["camera_names"]max_timesteps = config["episode_len"]task_name = config["task_name"]temporal_agg = config["temporal_agg"]onscreen_cam = "angle"# load policy and statsckpt_path = os.path.join(ckpt_dir, ckpt_name)policy = make_policy(policy_class, policy_config)loading_status = policy.load_state_dict(torch.load(ckpt_path))print(loading_status)policy.cuda()policy.eval()print(f"Loaded: {ckpt_path}")stats_path = os.path.join(ckpt_dir, f"dataset_stats.pkl")with open(stats_path, "rb") as f:stats = pickle.load(f)pre_process = lambda s_qpos: (s_qpos - stats["qpos_mean"]) / stats["qpos_std"]post_process = lambda a: a * stats["action_std"] + stats["action_mean"]# load environmentif real_robot:from aloha_scripts.robot_utils import move_grippers # requires alohafrom aloha_scripts.real_env import make_real_env # requires alohaenv = make_real_env(init_node=True)env_max_reward = 0else:from act.sim_env import make_sim_envenv = make_sim_env(task_name)env_max_reward = env.task.max_rewardquery_frequency = policy_config["num_queries"]if temporal_agg:query_frequency = 1num_queries = policy_config["num_queries"]max_timesteps = int(max_timesteps * 1) # may increase for real-world tasksnum_rollouts = 50episode_returns = []highest_rewards = []for rollout_id in range(num_rollouts):rollout_id += 0### set taskif "sim_transfer_cube" in task_name:BOX_POSE[0] = sample_box_pose() # used in sim resetelif "sim_insertion" in task_name:BOX_POSE[0] = np.concatenate(sample_insertion_pose()) # used in sim resetts = env.reset()### onscreen renderif onscreen_render:ax = plt.subplot()plt_img = ax.imshow(env._physics.render(height=480, width=640, camera_id=onscreen_cam))plt.ion()### evaluation loopif temporal_agg:all_time_actions = torch.zeros([max_timesteps, max_timesteps + num_queries, state_dim]).cuda()qpos_history = torch.zeros((1, max_timesteps, state_dim)).cuda()image_list = [] # for visualizationqpos_list = []target_qpos_list = []rewards = []with torch.inference_mode():for t in range(max_timesteps):### update onscreen render and wait for DTif onscreen_render:image = env._physics.render(height=480, width=640, camera_id=onscreen_cam)plt_img.set_data(image)plt.pause(DT)### process previous timestep to get qpos and image_listobs = ts.observationif "images" in obs:image_list.append(obs["images"])else:image_list.append({"main": obs["image"]})qpos_numpy = np.array(obs["qpos"])qpos = pre_process(qpos_numpy)qpos = torch.from_numpy(qpos).float().cuda().unsqueeze(0)qpos_history[:, t] = qposcurr_image = get_image(ts, camera_names)### query policyif config["policy_class"] == "ACT":if t % query_frequency == 0:all_actions = policy(qpos, curr_image)if temporal_agg:all_time_actions[[t], t : t + num_queries] = all_actionsactions_for_curr_step = all_time_actions[:, t]actions_populated = torch.all(actions_for_curr_step != 0, axis=1)actions_for_curr_step = actions_for_curr_step[actions_populated]k = 0.01exp_weights = np.exp(-k * np.arange(len(actions_for_curr_step)))exp_weights = exp_weights / exp_weights.sum()exp_weights = (torch.from_numpy(exp_weights).cuda().unsqueeze(dim=1))raw_action = (actions_for_curr_step * exp_weights).sum(dim=0, keepdim=True)else:raw_action = all_actions[:, t % query_frequency]elif config["policy_class"] == "CNNMLP":raw_action = policy(qpos, curr_image)else:raise NotImplementedError### post-process actionsraw_action = raw_action.squeeze(0).cpu().numpy()action = post_process(raw_action)target_qpos = action### step the environmentts = env.step(target_qpos)### for visualizationqpos_list.append(qpos_numpy)target_qpos_list.append(target_qpos)rewards.append(ts.reward)plt.close()if real_robot:move_grippers([env.puppet_bot_left, env.puppet_bot_right],[PUPPET_GRIPPER_JOINT_OPEN] * 2,move_time=0.5,) # openpassrewards = np.array(rewards)episode_return = np.sum(rewards[rewards != None])episode_returns.append(episode_return)episode_highest_reward = np.max(rewards)highest_rewards.append(episode_highest_reward)print(f"Rollout {rollout_id}\n{episode_return=}, {episode_highest_reward=}, {env_max_reward=}, Success: {episode_highest_reward==env_max_reward}")if save_episode:save_videos(image_list,DT,video_path=os.path.join(ckpt_dir, f"video{rollout_id}.mp4"),)success_rate = np.mean(np.array(highest_rewards) == env_max_reward)avg_return = np.mean(episode_returns)summary_str = f"\nSuccess rate: {success_rate}\nAverage return: {avg_return}\n\n"for r in range(env_max_reward + 1):more_or_equal_r = (np.array(highest_rewards) >= r).sum()more_or_equal_r_rate = more_or_equal_r / num_rolloutssummary_str += f"Reward >= {r}: {more_or_equal_r}/{num_rollouts} = {more_or_equal_r_rate*100}%\n"print(summary_str)# save success rate to txtresult_file_name = "result_" + ckpt_name.split(".")[0] + ".txt"with open(os.path.join(ckpt_dir, result_file_name), "w") as f:f.write(summary_str)f.write(repr(episode_returns))f.write("\n\n")f.write(repr(highest_rewards))return success_rate, avg_return这个函数用于评估一个行为克隆(behavior cloning)模型。它接受以下参数:
config:配置信息,包含了模型、训练参数等。ckpt_name:要加载的模型权重的文件名。save_episode:一个布尔值,表示是否要保存评估过程中的图像数据。
函数的主要步骤如下:
-
加载行为克隆模型的权重文件,根据配置信息初始化模型,并将模型移动到GPU上。
-
加载数据集统计信息,用于对观测数据进行归一化和反归一化。
-
根据配置信息创建模拟环境或真实机器人环境。
-
设置评估的循环次数(
num_rollouts),每次循环都会进行一次评估。 -
在每次循环中,初始化环境,执行模型生成的动作并观测环境的响应。
-
将每个时间步的观测数据(包括图像、关节位置等)存储在相应的列表中。
-
计算每次评估的总回报,以及每次评估的最高回报,并记录成功率。
-
如果指定了保存评估过程中的图像数据,将每次评估的图像数据保存为视频。
-
输出评估结果,包括成功率、平均回报以及回报分布。
-
将评估结果保存到文本文件中。
最终,函数返回成功率和平均回报。这些结果可以用于评估模型的性能。
def forward_pass(data, policy):image_data, qpos_data, action_data, is_pad = dataimage_data, qpos_data, action_data, is_pad = (image_data.cuda(),qpos_data.cuda(),action_data.cuda(),is_pad.cuda(),)return policy(qpos_data, image_data, action_data, is_pad) # TODO remove None这个函数用于执行前向传播(forward pass)操作,以生成模型的输出。它接受以下参数:
data:包含输入数据的元组,其中包括图像数据、关节位置数据、动作数据以及填充标志。policy:行为克隆模型。
函数的主要步骤如下:
-
将输入数据转移到GPU上,以便在GPU上进行计算。
-
调用行为克隆模型的前向传播方法(
policy),将关节位置数据、图像数据、动作数据和填充标志传递给模型。 -
返回模型的输出,这可能是模型对动作数据的预测结果。
在这里,需要注意的是,在调用模型的前向传播方法时,传递了四个参数:qpos_data、image_data、action_data 和 is_pad。
def train_bc(train_dataloader, val_dataloader, config):num_epochs = config["num_epochs"]ckpt_dir = config["ckpt_dir"]seed = config["seed"]policy_class = config["policy_class"]policy_config = config["policy_config"]set_seed(seed)policy = make_policy(policy_class, policy_config)# if ckpt_dir is not empty, prompt the user to load the checkpointif os.path.isdir(ckpt_dir) and len(os.listdir(ckpt_dir)) > 1:print(f"Checkpoint directory {ckpt_dir} is not empty. Load checkpoint? (y/n)")load_ckpt = input()if load_ckpt == "y":# load the latest checkpointlatest_idx = max([int(f.split("_")[2])for f in os.listdir(ckpt_dir)if f.startswith("policy_epoch_")])ckpt_path = os.path.join(ckpt_dir, f"policy_epoch_{latest_idx}_seed_{seed}.ckpt")print(f"Loading checkpoint from {ckpt_path}")loading_status = policy.load_state_dict(torch.load(ckpt_path))print(loading_status)else:print("Not loading checkpoint")latest_idx = 0else:latest_idx = 0policy.cuda()optimizer = make_optimizer(policy_class, policy)train_history = []validation_history = []min_val_loss = np.infbest_ckpt_info = Nonefor epoch in tqdm(range(latest_idx, num_epochs)):print(f"\nEpoch {epoch}")# validationwith torch.inference_mode():policy.eval()epoch_dicts = []for batch_idx, data in enumerate(val_dataloader):forward_dict = forward_pass(data, policy)epoch_dicts.append(forward_dict)epoch_summary = compute_dict_mean(epoch_dicts)validation_history.append(epoch_summary)epoch_val_loss = epoch_summary["loss"]if epoch_val_loss < min_val_loss:min_val_loss = epoch_val_lossbest_ckpt_info = (epoch, min_val_loss, deepcopy(policy.state_dict()))print(f"Val loss: {epoch_val_loss:.5f}")summary_string = ""for k, v in epoch_summary.items():summary_string += f"{k}: {v.item():.3f} "print(summary_string)# trainingpolicy.train()optimizer.zero_grad()for batch_idx, data in enumerate(train_dataloader):forward_dict = forward_pass(data, policy)# backwardloss = forward_dict["loss"]loss.backward()optimizer.step()optimizer.zero_grad()train_history.append(detach_dict(forward_dict))e = epoch - latest_idxepoch_summary = compute_dict_mean(train_history[(batch_idx + 1) * e : (batch_idx + 1) * (epoch + 1)])epoch_train_loss = epoch_summary["loss"]print(f"Train loss: {epoch_train_loss:.5f}")summary_string = ""for k, v in epoch_summary.items():summary_string += f"{k}: {v.item():.3f} "print(summary_string)if epoch % 100 == 0:ckpt_path = os.path.join(ckpt_dir, f"policy_epoch_{epoch}_seed_{seed}.ckpt")torch.save(policy.state_dict(), ckpt_path)plot_history(train_history, validation_history, epoch, ckpt_dir, seed)ckpt_path = os.path.join(ckpt_dir, f"policy_last.ckpt")torch.save(policy.state_dict(), ckpt_path)best_epoch, min_val_loss, best_state_dict = best_ckpt_infockpt_path = os.path.join(ckpt_dir, f"policy_epoch_{best_epoch}_seed_{seed}.ckpt")torch.save(best_state_dict, ckpt_path)print(f"Training finished:\nSeed {seed}, val loss {min_val_loss:.6f} at epoch {best_epoch}")# save training curvesplot_history(train_history, validation_history, num_epochs, ckpt_dir, seed)return best_ckpt_info这个函数用于训练行为克隆(Behavior Cloning)模型。它接受以下参数:
train_dataloader:训练数据的数据加载器,用于从训练集中获取批次的数据。val_dataloader:验证数据的数据加载器,用于从验证集中获取批次的数据。config:包含训练配置信息的字典。
函数的主要步骤如下:
-
初始化训练过程所需的各种参数和配置。
-
创建行为克隆模型,并根据是否存在之前的训练检查点来加载模型权重。
-
定义优化器,用于更新模型的权重。
-
进行训练循环,每个循环迭代一个 epoch,包括以下步骤:
- 验证:在验证集上计算模型的性能,并记录验证结果。如果当前模型的验证性能优于历史最佳模型,则保存当前模型的权重。
- 训练:在训练集上进行模型的训练,计算损失并执行反向传播来更新模型的权重。
- 每隔一定周期,保存当前模型的权重和绘制训练曲线图。
-
训练完成后,保存最佳模型的权重和绘制训练曲线图。
总体来说,这个函数负责管理模型的训练过程,包括训练循环、验证和模型参数的保存。训练过程中的损失、性能指标等信息都会被记录下来以供后续分析和可视化。
def plot_history(train_history, validation_history, num_epochs, ckpt_dir, seed):# save training curvesfor key in train_history[0]:plot_path = os.path.join(ckpt_dir, f"train_val_{key}_seed_{seed}.png")plt.figure()train_values = [summary[key].item() for summary in train_history]val_values = [summary[key].item() for summary in validation_history]plt.plot(np.linspace(0, num_epochs - 1, len(train_history)),train_values,label="train",)plt.plot(np.linspace(0, num_epochs - 1, len(validation_history)),val_values,label="validation",)# plt.ylim([-0.1, 1])plt.tight_layout()plt.legend()plt.title(key)plt.savefig(plot_path)print(f"Saved plots to {ckpt_dir}")这个函数用于绘制训练过程中的损失曲线以及其他指标的曲线。它接受以下参数:
train_history:包含训练过程中损失和其他指标的历史记录。validation_history:包含验证过程中损失和其他指标的历史记录。num_epochs:总的训练周期数。ckpt_dir:检查点文件的保存目录。seed:用于随机种子的值。
该函数的主要功能是遍历 train_history 和 validation_history 中的指标,并为每个指标创建一个绘图,其中包括训练集和验证集的曲线。具体步骤如下:
-
对于每个指标(如损失、准确率等),创建一个绘图并设置其标题。
-
从
train_history和validation_history中提取相应指标的值,并分别绘制训练集和验证集的曲线。 -
将绘图保存到指定的文件路径(使用随机种子和指标名称命名文件)。
-
最后,输出已保存绘图的信息。
这个函数的作用是帮助可视化训练过程中的指标变化,以便更好地理解模型的训练效果。
if __name__ == "__main__":parser = argparse.ArgumentParser()parser.add_argument("--eval", action="store_true")parser.add_argument("--onscreen_render", action="store_true")parser.add_argument("--ckpt_dir", action="store", type=str, help="ckpt_dir", required=True)parser.add_argument("--policy_class",action="store",type=str,help="policy_class, capitalize",required=True,)parser.add_argument("--task_name", action="store", type=str, help="task_name", required=True)parser.add_argument("--batch_size", action="store", type=int, help="batch_size", required=True)parser.add_argument("--seed", action="store", type=int, help="seed", required=True)parser.add_argument("--num_epochs", action="store", type=int, help="num_epochs", required=True)parser.add_argument("--lr", action="store", type=float, help="lr", required=True)# for ACTparser.add_argument("--kl_weight", action="store", type=int, help="KL Weight", required=False)parser.add_argument("--chunk_size", action="store", type=int, help="chunk_size", required=False)parser.add_argument("--hidden_dim", action="store", type=int, help="hidden_dim", required=False)parser.add_argument("--dim_feedforward",action="store",type=int,help="dim_feedforward",required=False,)parser.add_argument("--temporal_agg", action="store_true")# for waypointsparser.add_argument("--use_waypoint", action="store_true")parser.add_argument("--constant_waypoint",action="store",type=int,help="constant_waypoint",required=False,)main(vars(parser.parse_args()))这段代码是一个入口点,用于执行训练和评估操作。它首先解析命令行参数,然后根据这些参数执行不同的操作。以下是每个参数的简要说明:
--eval:是否执行评估操作(可选参数)。--onscreen_render:是否进行屏幕渲染(可选参数)。--ckpt_dir:检查点文件的保存目录(必需参数)。--policy_class:策略类别,首字母大写(必需参数)。--task_name:任务名称(必需参数)。--batch_size:批处理大小(必需参数)。--seed:随机种子(必需参数)。--num_epochs:训练周期数(必需参数)。--lr:学习率(必需参数)。
接下来是一些与特定策略(如ACT策略)和路点(waypoints)相关的可选参数,以及一些用于控制训练过程的参数。最后,它调用了 main 函数,并传递解析后的参数作为参数。根据参数的不同组合,代码将执行训练或评估操作,具体操作由 main 函数中的逻辑决定。
相关文章:
Aloha 机械臂的学习记录2——AWE:AWE + ACT
继续下一个阶段: Train policy python act/imitate_episodes.py \ --task_name [TASK] \ --ckpt_dir data/outputs/act_ckpt/[TASK]_waypoint \ --policy_class ACT --kl_weight 10 --chunk_size 50 --hidden_dim 512 --batch_size 8 --dim_feedforward 3200 \ --n…...

Spring Boot 项目的创建、配置文件、日志
文章目录 Spring Boot 优点创建 Spring Boot 项目创建项目认识目录网页创建(了解) 约定大于配置Spring Boot 配置文件配置文件格式读取配置项properties 配置文件yml 配置文件基本语法进阶语法配置对象配置集合yml 设置不同环境的配置文件 Spring Boot 日…...

MySQL:drop、delete与truncate区别
一、用法不同 1、drop(丢弃数据): drop table 表名 ,直接将表都删除掉,在删除表的时候使用。 2、truncate (清空数据) : truncate table 表名 ,只删除表中的数据,再插入数据的时候自增长 id 又从 1 开始,在清空表中数…...
2024年顶级的9个 Android 数据恢复工具(免费和付费)
不同的事情可能会损坏您的Android手机并导致您丢失数据。但大多数时候,您可以使用取证工具恢复部分或全部文件。 问题可能来自手机的物理损坏、磁盘的逻辑故障、完整的系统擦除,或者只是简单的粗心大意。 但是,无论数据丢失的原因是什么&am…...

c# Aspose.Cells 导出Excel表格 使用随记
/// <summary>/// 导出Excel表格/// </summary>/// <param name"list">数据集合</param>/// <param name"header">数据表头</param>/// <param name"sumColumn">求和列</param>/// <param n…...

SAP UI5 walkthrough step3 Controls
在上一步,我们是直接用index.html 中的body 里面的DIVision去输出 hello world, 在这个章节,我们将用SAP UI5 的标准控件 sap/m/Text 首先,我们去修改 webapp/index.html <!DOCTYPE html> <html> <head><…...
【分布式微服务专题】从单体到分布式(一、SpringCloud项目初步升级)
目录 前言阅读对象阅读导航前置知识笔记正文一、单体服务介绍二、服务拆分三、分布式微服务升级前的思考3.1 关于SpringBoot/SpringCloud的思考【有点门槛】 四、SpringCloud升级整合4.1 新建父子项目 学习总结感谢 前言 从本节课开始,我将自己手写一个基于SpringC…...
python安装与工具PyCharm
摘要: 周末闲来无事学习一下python!不是你菜鸡,只不过是对手太强了!所以你要不断努力,去追求更高的未来!下面先了解python与环境的安装与工具的配置! python安装: 官网 进入官网下载…...
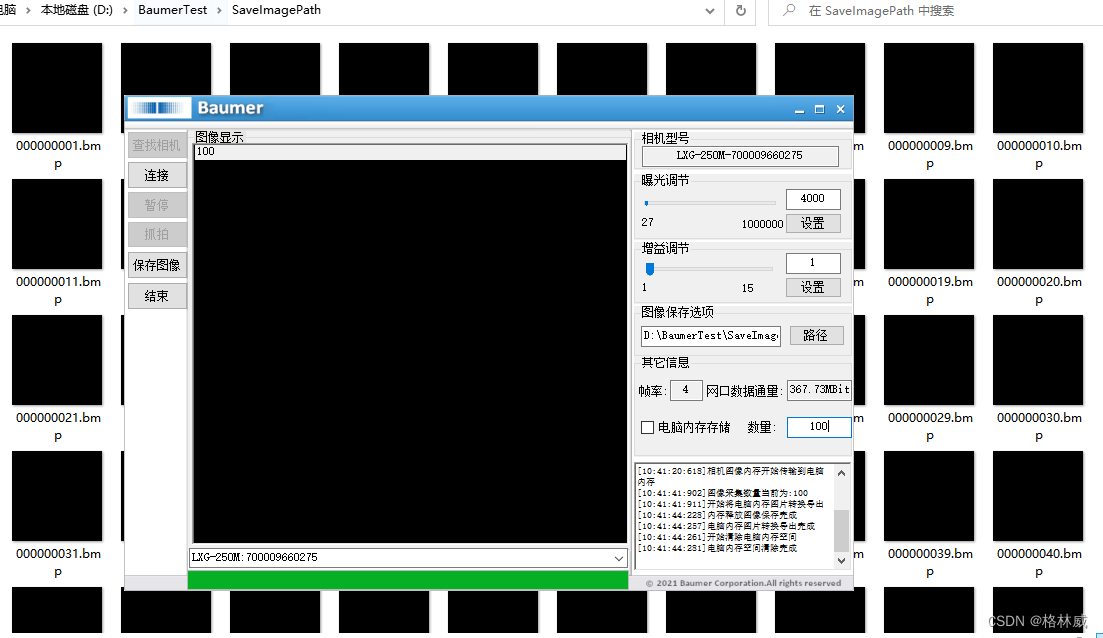
Baumer工业相机堡盟工业相机如何通过BGAPISDK将相机图像高速保存到电脑内存(C#)
Baumer工业相机堡盟工业相机如何通过BGAPISDK将相机图像高速保存到电脑内存(C#) Baumer工业相机Baumer工业相机图像保存到电脑内存的技术背景代码分析注册SDK回调函数BufferEvent声明可以存储相机图像的内存序列和名称在图像回调函数中将图像保存在内存序…...
)
iOS 防截屏方法(一)
利用UITextField的安全输入secureTextEntry来实现防截屏效果,上代码: // 将 textField 添加到父视图UITextField *textField [[UITextField alloc] init];textField.backgroundColor [UIColor whiteColor];textField.secureTextEntry YES;[self.view …...

【SpringBoot篇】5种类型参数传递json数据传参的操作
🎊专栏【SpringBoot】 🍔喜欢的诗句:天行健,君子以自强不息。 🎆音乐分享【如愿】 🎄欢迎并且感谢大家指出小吉的问题🥰 文章目录 🌺普通参数🌺POJO参数🌺嵌套…...

Mac系统升级node.js版本和npm版本
升级node.js版本 第一步:查询当前node.js版本 node -v 第二步:清除node.js的缓存 sudo npm cache clean -f 第三步:验证缓存是否清空 npm cache verify 第四步:安装n工具,n工具是专门用于管理node.js版本的工具…...

风力发电对讲 IP语音对讲终端IP安防一键呼叫对讲 医院对讲终端SV-6005网络音频终端
风力发电对讲 IP语音对讲终端IP安防一键呼叫对讲 医院对讲终端SV-6005网络音频终端 目 录 1、产品规格 2、接口使用 2.1、侧面接口功能 2.2、背面接口功能 2.3、面板接口功能 3、功能使用 1、产品规格 输入电源: 12V~24V的直流电源 网络接口&am…...

智能优化算法应用:基于蜉蝣算法3D无线传感器网络(WSN)覆盖优化 - 附代码
智能优化算法应用:基于蜉蝣算法3D无线传感器网络(WSN)覆盖优化 - 附代码 文章目录 智能优化算法应用:基于蜉蝣算法3D无线传感器网络(WSN)覆盖优化 - 附代码1.无线传感网络节点模型2.覆盖数学模型及分析3.蜉蝣算法4.实验参数设定5.算法结果6.参考文献7.MA…...

pymysql报错: unable to rollback、Already closed
参考: https://www.coder.work/article/4516746 https://www.cnblogs.com/leijiangtao/p/11882107.html https://stackoverflow.com/questions/55116007/pymysql-query-unable-to-rollback unable to rollback处理: # 关闭光标对象 cursor.close() # 关…...

[Linux] Web基础知识与http协议
一、HTML 1.1 HTML 的概念 HTML被称为超文本标记语言。 它是规范和标准. 它通过标记符号来标记网页中出现的各个部分。网页文件本身就是一种文本文件。 通过向文本文件添加标记,您可以告诉浏览器如何显示其中的内容。 HTML命令可以描述文本、图形、动画、声音、表格…...
2020年第九届数学建模国际赛小美赛B题血氧饱和度的变异性解题全过程文档及程序
2020年第九届数学建模国际赛小美赛 B题 血氧饱和度的变异性 原题再现: 脉搏血氧饱和度是监测患者血氧饱和度的常规方法。在连续监测期间,我们希望能够使用模型描述血氧饱和度的模式。 我们有36名受试者的数据,每个受试者以1 Hz的频率连…...

【Flink on k8s】- 11 - 使用 Flink kubernetes operator 运行 Flink 作业
目录 1、创建本地镜像库 1.1 拉取私人仓库镜像 1.2 运行 1.3 本地浏览器访问 5000 端口...
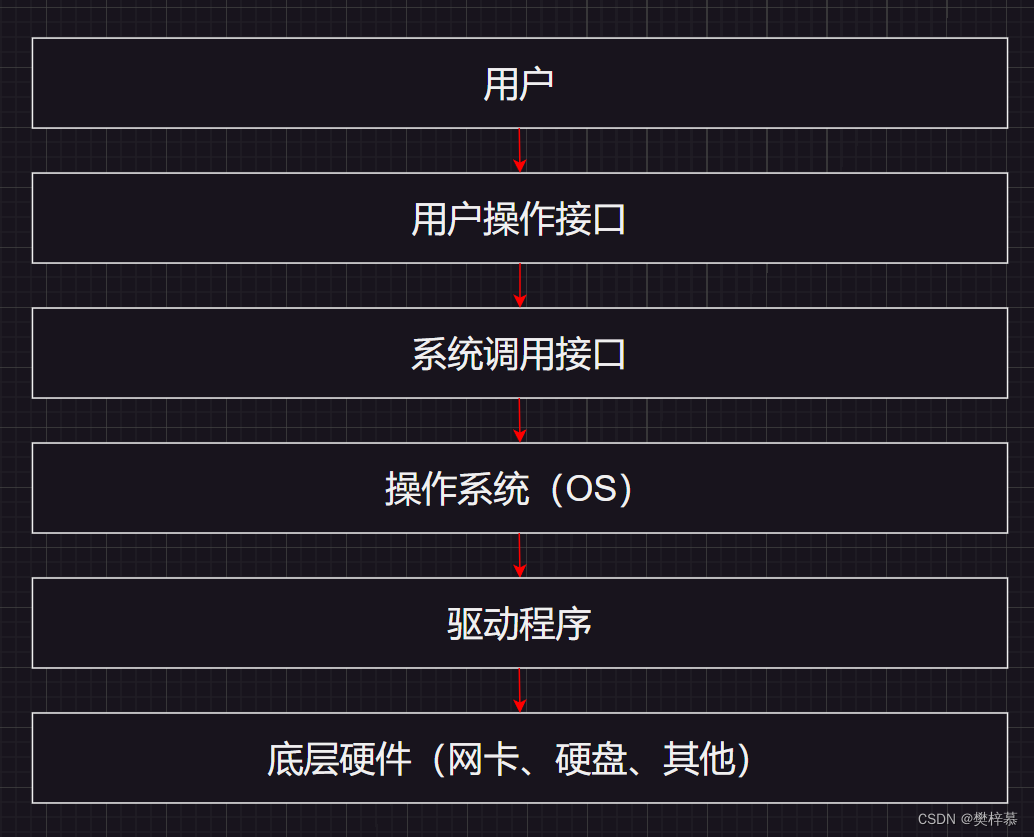
【Linux】系统初识之冯诺依曼体系结构与操作系统
👀樊梓慕:个人主页 🎥个人专栏:《C语言》《数据结构》《蓝桥杯试题》《LeetCode刷题笔记》《实训项目》《C》《Linux》 🌝每一个不曾起舞的日子,都是对生命的辜负 目录 前言 1.冯诺依曼体系结构 2.操作…...

【PyTorch】模型训练过程优化分析
文章目录 1. 模型训练过程划分1.1. 定义过程1.1.1. 全局参数设置1.1.2. 模型定义 1.2. 数据集加载过程1.2.1. Dataset类:创建数据集1.2.2. Dataloader类:加载数据集 1.3. 训练循环 2. 模型训练过程优化的总体思路2.1. 提升数据从硬盘转移到CPU内存的效率…...

手游刚开服就被攻击怎么办?如何防御DDoS?
开服初期是手游最脆弱的阶段,极易成为DDoS攻击的目标。一旦遭遇攻击,可能导致服务器瘫痪、玩家流失,甚至造成巨大经济损失。本文为开发者提供一套简洁有效的应急与防御方案,帮助快速应对并构建长期防护体系。 一、遭遇攻击的紧急应…...
)
云计算——弹性云计算器(ECS)
弹性云服务器:ECS 概述 云计算重构了ICT系统,云计算平台厂商推出使得厂家能够主要关注应用管理而非平台管理的云平台,包含如下主要概念。 ECS(Elastic Cloud Server):即弹性云服务器,是云计算…...
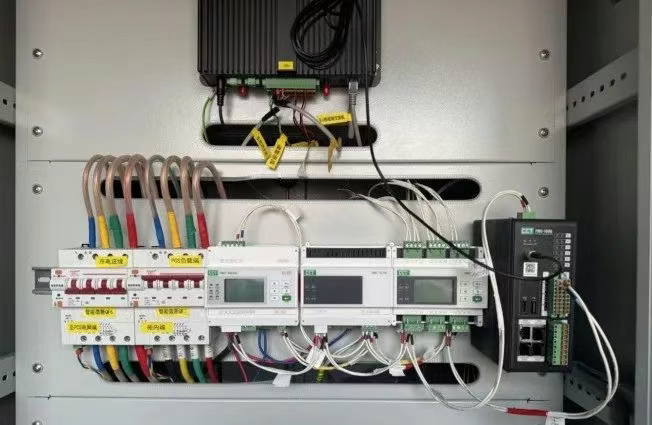
IT供电系统绝缘监测及故障定位解决方案
随着新能源的快速发展,光伏电站、储能系统及充电设备已广泛应用于现代能源网络。在光伏领域,IT供电系统凭借其持续供电性好、安全性高等优势成为光伏首选,但在长期运行中,例如老化、潮湿、隐裂、机械损伤等问题会影响光伏板绝缘层…...

SiFli 52把Imagie图片,Font字体资源放在指定位置,编译成指定img.bin和font.bin的问题
分区配置 (ptab.json) img 属性介绍: img 属性指定分区存放的 image 名称,指定的 image 名称必须是当前工程生成的 binary 。 如果 binary 有多个文件,则以 proj_name:binary_name 格式指定文件名, proj_name 为工程 名&…...

【Android】Android 开发 ADB 常用指令
查看当前连接的设备 adb devices 连接设备 adb connect 设备IP 断开已连接的设备 adb disconnect 设备IP 安装应用 adb install 安装包的路径 卸载应用 adb uninstall 应用包名 查看已安装的应用包名 adb shell pm list packages 查看已安装的第三方应用包名 adb shell pm list…...

Caliper 配置文件解析:fisco-bcos.json
config.yaml 文件 config.yaml 是 Caliper 的主配置文件,通常包含以下内容: test:name: fisco-bcos-test # 测试名称description: Performance test of FISCO-BCOS # 测试描述workers:type: local # 工作进程类型number: 5 # 工作进程数量monitor:type: - docker- pro…...
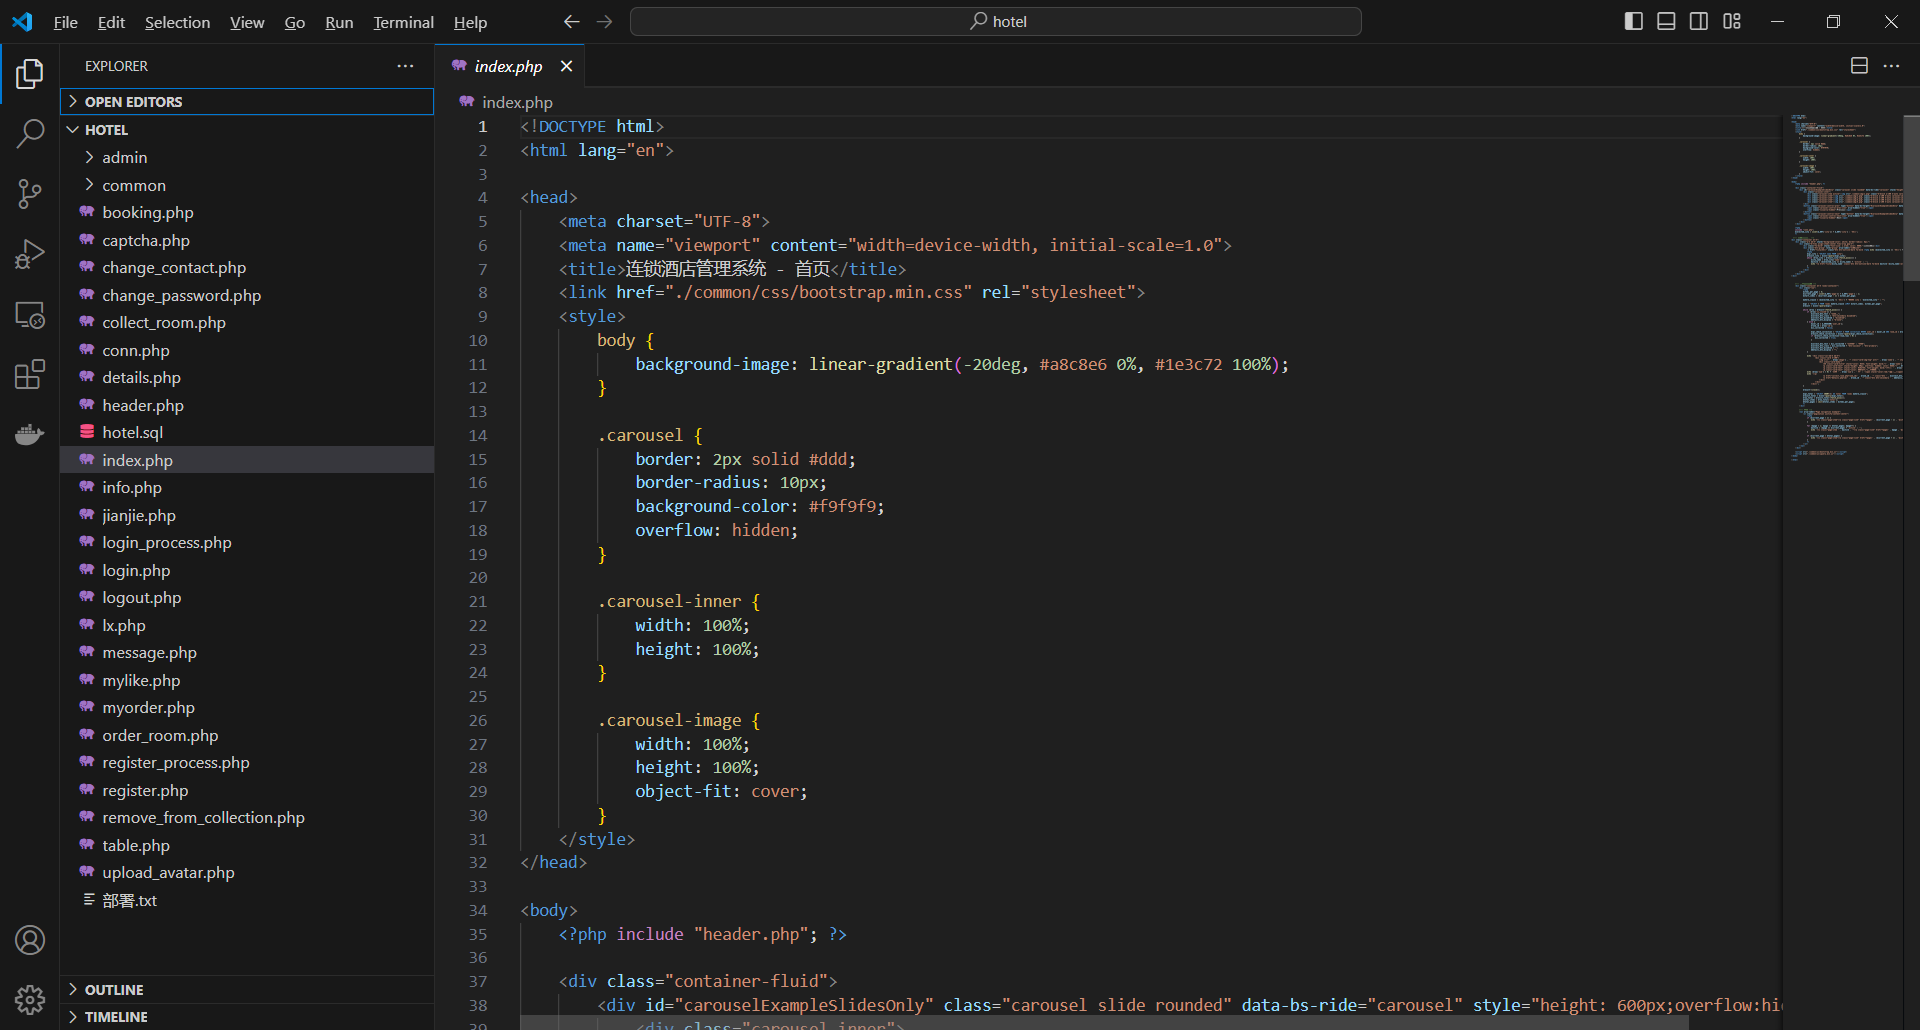
基于PHP的连锁酒店管理系统
有需要请加文章底部Q哦 可远程调试 基于PHP的连锁酒店管理系统 一 介绍 连锁酒店管理系统基于原生PHP开发,数据库mysql,前端bootstrap。系统角色分为用户和管理员。 技术栈 phpmysqlbootstrapphpstudyvscode 二 功能 用户 1 注册/登录/注销 2 个人中…...

BLEU评分:机器翻译质量评估的黄金标准
BLEU评分:机器翻译质量评估的黄金标准 1. 引言 在自然语言处理(NLP)领域,衡量一个机器翻译模型的性能至关重要。BLEU (Bilingual Evaluation Understudy) 作为一种自动化评估指标,自2002年由IBM的Kishore Papineni等人提出以来,…...

【堆垛策略】设计方法
堆垛策略的设计是积木堆叠系统的核心,直接影响堆叠的稳定性、效率和容错能力。以下是分层次的堆垛策略设计方法,涵盖基础规则、优化算法和容错机制: 1. 基础堆垛规则 (1) 物理稳定性优先 重心原则: 大尺寸/重量积木在下…...

云原生周刊:k0s 成为 CNCF 沙箱项目
开源项目推荐 HAMi HAMi(原名 k8s‑vGPU‑scheduler)是一款 CNCF Sandbox 级别的开源 K8s 中间件,通过虚拟化 GPU/NPU 等异构设备并支持内存、计算核心时间片隔离及共享调度,为容器提供统一接口,实现细粒度资源配额…...