Spring定时任务动态更改(增、删、改)Cron表达式方案实例详解
Spring定时任务动态更改(增、删、改)Cron表达式方案实例详解
最近在做一个需求,用户可以在平台上配置任务计划数据(就是任务的执行和描述的相关信息,包括任务参数、cron表达式),配置后,后端可以根据配置的计划信息在cron表示式的时间生成相应的一条任务记录。这里用户可以新增任务计划、修改任务计划、删除任务计划,后端要根据用户的配置动态的生成相应的任务记录。
我这里的做法都是定时(比如每隔30s)扫描数据库中所有可用的用户任务配置,根据每次扫描到的配置信息,对已有的调度信息做增加、删除、修改。虽然服务是分布式部署的,因为我们的场景是根据用户的任务配置信息,在用户配置的时间点向数据库生成一条任务信息(给下游使用),并不是马上执行任务的内容,所以资源的消耗不大,为了简化开发,我们要求任务生成要只会在一台机器上执行。
这我们的方案中,不考虑用户实时修改后马上生效,这里主要原因是服务可能是分布式部署的,如果不同的任务信息分布到不同的机器,用户修改后要实时生效,就必须将变化的任务分配到调度信息所在的机器上才能实时更新。
这里我实现了两个版本。方案一是基于延迟队列做的,方案二是基于Spring的SchedulingConfigurer做的。
方案一:基于延迟队列
延迟队列DelayQueue的做法,是基于延迟的属性,让服务在固定的时间根据用户的配置,生成一条任务信息。使用消息的生产和消费模式。延迟消息的延迟时间根据cron表达式生成。
每隔30s扫描一次用户的配置表,根据用户的各个任务配置信息,分别生产一条延迟消息,同时使用Map记录消息信息,Map的key使用这个任务配置信息的json字符串(数据库的一条数据)对应的md5值,value是这条任务配置的数据对象。
每次生产消息时,校验Map中是否已经存在相同的md5值,如果存在相同的md5值,说明配置信息没有更新,并且延迟队列中已经有未消费的消息,本次就不生成新的消息。如果不存在相同的md5值,说明是一个新任务配置或是用户修改后的任务配置(不管是修改cron表达式还是任务的其他参数),这时就生成新的延迟消息。因此,对应任务的修改,同一个任务配置,在Map中会有多条消息,在消费时需要校验哪条消息才是有效的,无效的消息消费后被过滤掉。
首先,定义一个消息对象,实现Delayed接口:
package com.XXXXX.or.algo.full.warehouse.bo.msg;import com.XXXXX.or.algo.full.warehouse.entity.db1.WarehouseAdjustmentPlan;
import lombok.Data;
import org.jetbrains.annotations.NotNull;import java.util.concurrent.Delayed;
import java.util.concurrent.TimeUnit;/*** 延迟队列的消息*/
@Data
public class PlanMsg implements Delayed {private String planId;// 延迟时间 秒private long delaySec;// 过期时间 纳秒 对与cpu来说毫秒太大private long expire;// 数据库中的任务计划配置private WarehouseAdjustmentPlan detail;// 本条消息中数据库的md5private String md5;public PlanMsg(String planId, long delaySec,WarehouseAdjustmentPlan detail,String md5) {this.planId = planId;this.delaySec = delaySec;// 过期时间 纳秒this.expire = System.nanoTime() + TimeUnit.NANOSECONDS.convert(delaySec,TimeUnit.SECONDS);this.detail = detail;this.md5 = md5;}@Overridepublic long getDelay(@NotNull TimeUnit unit) {return unit.convert(this.expire - System.nanoTime(),TimeUnit.NANOSECONDS);}@Overridepublic int compareTo(@NotNull Delayed o) {long time = getDelay(TimeUnit.NANOSECONDS) - o.getDelay(TimeUnit.NANOSECONDS);return time == 0 ? 0 : ( time > 0 ? 1 : -1);}
}
使用一个组件对消息做生产和消费:
cron表达式依赖:
<!-- cron表达式相关--><dependency><groupId>com.cronutils</groupId><artifactId>cron-utils</artifactId><version>9.1.5</version></dependency>
这里的生产使用@Scheduled(cron = “0/30 * * * * ?”)定期扫描数据库中计划配置信息,和planMd5Map比较后决定是否生成新的消息。这里的消息的延迟时间根据cron表达式生成。
消息的消费,项目启动后,使用@PostConstruct启动一个线程消费消息,如果消息没有到延迟的时间,会阻塞在delayQueue.take()位置。当消费到消息后,根据消息的id到数据库中找到这条配置消息,通过比较md5决定是否向数据库插入一条任务。如果消息中的md5和根据消息id到数据库中查询的记录的md5一致,则插入一条任务数据;否则丢弃该消息。这样用户对任务配置的参数增删改都能很好的覆盖了。
package com.XXXXX.or.algo.full.warehouse.job;import com.alibaba.fastjson.JSON;
import com.cronutils.model.CronType;
import com.cronutils.model.definition.CronDefinition;
import com.cronutils.model.definition.CronDefinitionBuilder;
import com.cronutils.model.time.ExecutionTime;
import com.cronutils.parser.CronParser;
import com.dangdang.ddframe.job.api.ShardingContext;
import com.dangdang.ddframe.job.api.simple.SimpleJob;
import com.XXXXX.or.algo.full.warehouse.bo.PlanningCommitReq;
import com.XXXXX.or.algo.full.warehouse.bo.msg.PlanMsg;
import com.XXXXX.or.algo.full.warehouse.entity.db1.WarehouseAdjustmentPlan;
import com.XXXXX.or.algo.full.warehouse.service.WarehouseAdjustmentService;
import com.XXXXX.or.algo.full.warehouse.util.CommUtil;
import lombok.extern.slf4j.Slf4j;
import org.springframework.beans.factory.annotation.Autowired;
import org.springframework.scheduling.annotation.Scheduled;
import org.springframework.stereotype.Component;
import org.springframework.util.CollectionUtils;import javax.annotation.PostConstruct;
import java.time.Duration;
import java.time.ZonedDateTime;
import java.util.*;
import java.util.concurrent.DelayQueue;
import java.util.concurrent.ExecutorService;
import java.util.concurrent.Executors;@Component
@Slf4j
public class CronExpTaskJob implements SimpleJob {// 每个plan的一条或多条消息(如果用户修改计划,会生成多条消息)private DelayQueue<PlanMsg> delayQueue =  new DelayQueue<>();// 每个md5 对应的计划数据private Map<String, WarehouseAdjustmentPlan> planMd5Map = new HashMap<>();private ExecutorService singleThreadExecutor = Executors.newSingleThreadExecutor();@Autowiredprivate WarehouseAdjustmentService warehouseAdjustmentService;@PostConstructpublic void loadValidPlans(){// 监听消息 生成任务singleThreadExecutor.execute(()->{while (true) {String planId = "";String msgMd5 = "";try {// 阻塞队列PlanMsg msg = delayQueue.take();log.info("消费消息:{}",JSON.toJSONString(msg));planId = msg.getPlanId();msgMd5 = msg.getMd5();// 校验WarehouseAdjustmentPlan dbPlan = warehouseAdjustmentService.query(planId);String dbPlanMd5 = CommUtil.getMD5(JSON.toJSONString(dbPlan));// 消息的md5值和数据中数据的md5值不一样,说明数据有变,不生成任务if(! msgMd5.equals(dbPlanMd5)){log.info("计划改变,不提交任务。改变前消息:{}; 改变后数据库:{}", JSON.toJSONString(msg.getDetail()), JSON.toJSONString(dbPlan));continue;}PlanningCommitReq req = new PlanningCommitReq();req.setPlanId(msg.getPlanId());req.setUserId("sys");req.setUserName("sys");// 生成任务warehouseAdjustmentService.commit(req);log.info("计划id:{},提交成功。时间{}",msg.getPlanId(),new Date());} catch (Exception e) {log.info("计划id:{},提交失败,提交时间{}", planId, new Date(), e);}finally {planMd5Map.remove(msgMd5);}}});}@Scheduled(cron = "0/30 * * * * ?") // 30秒一次测试使用  线上分布式部署使用elastic-jobpublic void generateMsg(){// 找到所有计划List<WarehouseAdjustmentPlan> planList = warehouseAdjustmentService.loadValidPlans();if(CollectionUtils.isEmpty(planList)){return;}for (WarehouseAdjustmentPlan plan : planList) {try {String dbPlanMd5 = CommUtil.getMD5(JSON.toJSONString(plan));// 不同md5值的相同计划id,都可以提交;相同md5值计划,不能重复提交if(planMd5Map.containsKey(dbPlanMd5)){// 消息已经存 并且未被消费log.info("存在未消费的相同信息,不生成当前消息,plan_id:{}",plan.getPlanId());continue;}CronDefinition cronDefinition = CronDefinitionBuilder.instanceDefinitionFor(CronType.QUARTZ);CronParser parser = new CronParser(cronDefinition);ExecutionTime executionTime = ExecutionTime.forCron(parser.parse(plan.getCronExpression()));// 离下一次执行还有多久Optional<Duration> duration = executionTime.timeToNextExecution(ZonedDateTime.now());PlanMsg planMsg = new PlanMsg(plan.getPlanId(), duration.get().getSeconds(),plan,dbPlanMd5);// 发消息log.info("生产消息成功。计划:{}", JSON.toJSONString(plan));delayQueue.add(planMsg);// 记录队列中planId的最新的一个md5值planMd5Map.put(dbPlanMd5, plan);}catch (Exception e){log.info("任务消息生产失败。计划:{}", JSON.toJSONString(plan), e);}}}
}
方案二:基于Spring的SchedulingConfigurer接口
实现SchedulingConfigurer接口中的public void configureTasks(ScheduledTaskRegistrar taskRegistrar)方法,方法的入参ScheduledTaskRegistrar是个关键变量。
为了适合用户配置计划任务较多的场景,使用ThreadPoolTaskScheduler线程池。
这里的关键是自定义的freshTasks()方法,这个方法有两处调用,一个是configureTasks方法中的调用,一个是通过@Scheduled(cron = “0/30 * * * * ?”)定时调用。freshTasks()方案中,首先全量查询数据库中的用户任务配置数据,和上一次查询的全量配置数据进行比较,找到哪些是用户新增的,哪些是用户修改的,哪些是用户删除的(停止的)。然后针对这三种数据,分别调用对应的方法修改ScheduledTaskRegistrar 中已经加载的任务信息。
成员变量Map<String,ScheduledTask>是一个自定义的关键变量,key是数据库中用户的配置计划的id,value是Spring调度器中的每个任务,任务的增、删、改都是操作这个map。
package com.XXXXX.or.algo.full.warehouse.job;import com.alibaba.fastjson.JSON;
import com.XXXXX.or.algo.full.warehouse.bo.PlanningCommitReq;
import com.XXXXX.or.algo.full.warehouse.entity.db1.WarehouseAdjustmentPlan;
import com.XXXXX.or.algo.full.warehouse.service.WarehouseAdjustmentService;
import com.XXXXX.or.algo.full.warehouse.util.CommUtil;
import lombok.extern.slf4j.Slf4j;
import org.springframework.beans.factory.annotation.Autowired;
import org.springframework.context.annotation.Bean;
import org.springframework.context.annotation.Configuration;
import org.springframework.scheduling.annotation.Scheduled;
import org.springframework.scheduling.annotation.SchedulingConfigurer;
import org.springframework.scheduling.concurrent.ThreadPoolTaskScheduler;
import org.springframework.scheduling.config.CronTask;
import org.springframework.scheduling.config.ScheduledTask;
import org.springframework.scheduling.config.ScheduledTaskRegistrar;
import org.springframework.util.CollectionUtils;import java.util.ArrayList;
import java.util.HashMap;
import java.util.List;
import java.util.Map;
import java.util.function.Function;
import java.util.stream.Collectors;/*** 定期扫描数据库的最新配置信息,对任务做增、删、改*/
@Configuration
@Slf4j
@SuppressWarnings("Duplicates")
public class MyScheduleConfig implements SchedulingConfigurer{// 用于查询数据库中每一个任务配置信息:包括任务id,对应的cron表达式@Autowiredprivate WarehouseAdjustmentService warehouseAdjustmentService;// 上一次查询到的数据库任务配置信息 用于和本次查询进行对比后对existedTask任务做增、删、改private List<WarehouseAdjustmentPlan> historyConfList = new ArrayList<>();// 根据数据库任务配置信息生成的任务, 任务的增、删、改都是操作这个mapprivate Map<String,ScheduledTask> existedTask = new HashMap<>();private ScheduledTaskRegistrar taskRegistrar;/*** 用线程池执行任务* @return*/@Beanpublic ThreadPoolTaskScheduler threadPoolTaskScheduler(){ThreadPoolTaskScheduler threadPool = new ThreadPoolTaskScheduler();threadPool.setPoolSize(20);threadPool.setThreadNamePrefix("plan-to-task");return threadPool;}@Overridepublic void configureTasks(ScheduledTaskRegistrar taskRegistrar) {// 将taskRegistrar作为成员变量 便于后续任务的增删改this.taskRegistrar = taskRegistrar;// 通过线程池去启动不同的定时任务。适合定时任务较多的场景。ThreadPoolTaskScheduler threadPool = threadPoolTaskScheduler();taskRegistrar.setScheduler(threadPool);// 根据数据库配置 启动全量刷新任务 分布式部署时这里不能加载 // freshTasks();}/*** 根据数据库配置 定期全量刷新任务*/@Scheduled(cron = "0/30 * * * * ?")  // 分布式部署时需要考虑其他方案,比如@Scheduled+分布式锁 或使用elastic-job等public void shceduled(){freshTasks();}/*** 通过比较数据库中配置信息变化 找到增、删、改的任务,并刷新任务列表*/public synchronized void freshTasks(){// 找到数据库最新的全量有效配置List<WarehouseAdjustmentPlan> newestConfList = warehouseAdjustmentService.loadValidPlans();// 上一次的全量有效配置List<WarehouseAdjustmentPlan> historyConfList = this.historyConfList;if(CollectionUtils.isEmpty(newestConfList)){newestConfList = new ArrayList<>();}if(CollectionUtils.isEmpty(historyConfList)){historyConfList = new ArrayList<>();}// list转mapMap<String, WarehouseAdjustmentPlan> newestConfMap = newestConfList.stream().collect(Collectors.toMap(WarehouseAdjustmentPlan::getPlanId, Function.identity(), (o1, o2) -> o1));Map<String, WarehouseAdjustmentPlan> historyConfMap = historyConfList.stream().collect(Collectors.toMap(WarehouseAdjustmentPlan::getPlanId, Function.identity(), (o1, o2) -> o1));// 找到哪些是新增的、哪些是修改的、哪些是删除的List<WarehouseAdjustmentPlan> addList = findAddList(newestConfMap,historyConfMap);List<WarehouseAdjustmentPlan> modifyList = findModifyList(newestConfMap,historyConfMap);List<WarehouseAdjustmentPlan> delList = findDelList(newestConfMap,historyConfMap);// 新增任务for(WarehouseAdjustmentPlan tmp : addList){addTask(tmp.getPlanId(),tmp.getCronExpression());}// 修改任务for(WarehouseAdjustmentPlan tmp : modifyList){modifyTask(tmp.getPlanId(),tmp.getCronExpression());}// 删除任务for(WarehouseAdjustmentPlan tmp : delList){stopTask(tmp.getPlanId());}// 将本次查询的列表做历史列表this.historyConfList = newestConfList;}/***  找到新增的用户配置*/private List<WarehouseAdjustmentPlan> findAddList(Map<String, WarehouseAdjustmentPlan> newestConfMap, Map<String, WarehouseAdjustmentPlan> historyConfMap) {List<WarehouseAdjustmentPlan> result = new ArrayList<>();for(Map.Entry<String, WarehouseAdjustmentPlan> n : newestConfMap.entrySet()){// 只在新map中存在 即为新增if(! historyConfMap.containsKey(n.getKey())){result.add(n.getValue());}}return result;}/***  找到修改的用户配置*/private List<WarehouseAdjustmentPlan> findModifyList(Map<String, WarehouseAdjustmentPlan> newestConfMap, Map<String, WarehouseAdjustmentPlan> historyConfMap) {List<WarehouseAdjustmentPlan> result = new ArrayList<>();for(Map.Entry<String, WarehouseAdjustmentPlan> n : newestConfMap.entrySet()){// 新老map同时存在 并且md5值不一样 即为修改if(historyConfMap.containsKey(n.getKey())){String newMd5 = CommUtil.getMD5(JSON.toJSONString(n.getValue()));String oldMd5 = CommUtil.getMD5(JSON.toJSONString(historyConfMap.get(n.getKey())));if(!newMd5.equals(oldMd5)){result.add(n.getValue());}}}return result;}/***  找到删除的用户配置*/private List<WarehouseAdjustmentPlan> findDelList(Map<String, WarehouseAdjustmentPlan> newestConfMap, Map<String, WarehouseAdjustmentPlan> historyConfMap) {List<WarehouseAdjustmentPlan> result = new ArrayList<>();for(Map.Entry<String, WarehouseAdjustmentPlan> h : historyConfMap.entrySet()){// 只在老的map中存在 即为删除if(! newestConfMap.containsKey(h.getKey())){result.add(h.getValue());}}return result;}/*** 添加任务* @param taskId* @param cronExp*/public void addTask(String taskId, String cronExp){if(existedTask.containsKey(taskId)){log.info("任务添加失败,重复。{}", taskId);return;}cronExp = CommUtil.corn7To6(cronExp);try {// 执行的具体内容Runnable task = ()->{PlanningCommitReq req = new PlanningCommitReq();req.setPlanId(taskId);req.setUserId("sys");req.setUserName("sys");// 生成任务warehouseAdjustmentService.commit(req);log.info("计划提交成功。planId:{}",taskId);};// 组成具体任务CronTask cronTask = new CronTask(task,cronExp);ScheduledTask scheduledTask = taskRegistrar.scheduleCronTask(cronTask);// 保存任务信息existedTask.put(taskId,scheduledTask);log.info("任务添加成功。{}", taskId);}catch (Exception e){log.info("任务添加失败。{}", taskId, e);}}/*** 修改任务* @param taskId* @param cronExp*/public void modifyTask(String taskId,String cronExp){if(! existedTask.containsKey(taskId)){log.info("任务修改失败,不存在。{}", taskId);return;}cronExp = CommUtil.corn7To6(cronExp);try {ScheduledTask currTask = existedTask.get(taskId);Runnable runnable = currTask.getTask().getRunnable();// 停止currTask任务currTask.cancel();// 重新添加,并修改触发时间ScheduledTask newTask = taskRegistrar.scheduleCronTask(new CronTask(runnable, cronExp));// 保存修改后的任务信息existedTask.put(taskId,newTask);log.info("任务修改成功。{}", taskId);}catch (Exception e){log.info("任务修改失败。{}", taskId, e);}}/*** 停止任务* @param taskId*/public void stopTask(String taskId){if(! existedTask.containsKey(taskId)){log.info("任务删除失败,不存在。{}", taskId);return;}try{ScheduledTask currTask = existedTask.get(taskId);// 停止currTask任务currTask.cancel();// 删除任务信息existedTask.remove(taskId);log.info("任务删除成功。{}", taskId);}catch (Exception e){log.info("任务删除失败。{}", taskId, e);}}
}
相关文章:
Cron表达式方案实例详解)
Spring定时任务动态更改(增、删、改)Cron表达式方案实例详解
Spring定时任务动态更改(增、删、改)Cron表达式方案实例详解 最近在做一个需求,用户可以在平台上配置任务计划数据(就是任务的执行和描述的相关信息,包括任务参数、cron表达式),配置后…...

常用登录加密之Shiro与Spring Security的使用对比
Shiro与Spring Security都是主流的身份认证和权限控制安全框架,Shiro偏向于前后端不分离平台,而Spring Security更偏向于前后端分离平台。接下来简单列一下两种登录验证的执行流程和示例,了解实际运用中的登录执行流程,然后重点剖…...
)
获取文件路径里的文件名(不包含扩展名)
“./abc/abc/llf.jpg” 写一个代码,让我获得“llf”这段字符串 import osfile_path "./abc/abc/llf.jpg" file_name os.path.splitext(os.path.basename(file_path))[0] print(file_name)在这个代码中,我们使用了os.path模块来处理文件路径…...
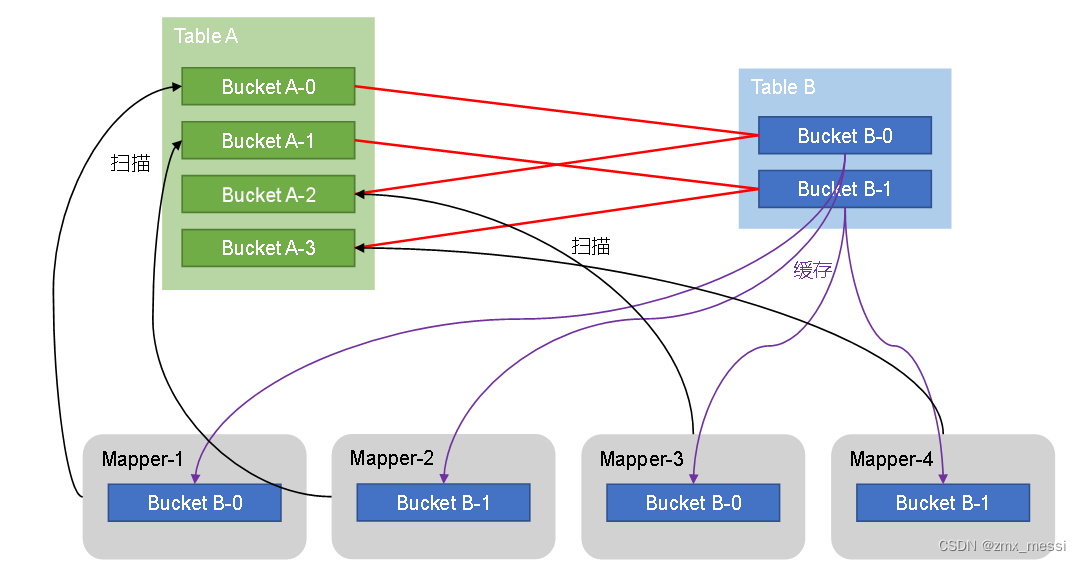
HiveSql语法优化二 :join算法
Hive拥有多种join算法,包括Common Join,Map Join,Bucket Map Join,Sort Merge Buckt Map Join等,下面对每种join算法做简要说明: Common Join Common Join是Hive中最稳定的join算法,其通过一个M…...

Leetcode—459.重复的子字符串【简单】
2023每日刷题(五十九) Leetcode—459.重复的子字符串 算法思想 巧解的算法思想 实现代码 从第一个位置开始到s.size()之前,看s字符串是否是ss的子串 class Solution { public:bool repeatedSubstringPattern(string s) {return (s s).fin…...
Mac安装Typora实现markdown自由
一、什么是markdown Markdown 是一种轻量级标记语言,创始人为约翰格鲁伯(John Gruber)。 它允许人们使用易读易写的纯文本格式编写文档,然后转换成有效的 XHTML(或者HTML)文档。这种语言吸收了很多在电子邮…...

前后端传参格式
前端发送 Serialize()方法 是指将一个抽象的JavaScript对象(数据结构)转换成字符串。这个字符串可以利用标准格式发送到服务器,被视为URL查询字符串或者POST数据,或者由于复杂的AJAX请求。这个方法使用的数据结构可以是JavaScri…...

【后端学前端】第三天 css动画 动态搜索框(定位、动态设置宽度)
1、学习信息 视频地址:css动画 动态搜索框(定位、动态设置宽度)_哔哩哔哩_bilibili 2、源码 <!DOCTYPE html> <html lang"en"> <head><meta charset"UTF-8"><title>test3</title>…...
)
51.0/表单(详细版)
目录 51.1 输入元素 input 51.1.1 文本域 51.1.2 密码输入框 51.1.3 单选框 51.1.4 复选框 51.1.5 提交按钮 51.1.6 重置按钮 51.1.7 普通按钮 51.1.8 图片按钮 51.1.9 隐藏域 51.1.10 文件域 51.2 多行文本框 51.3 下拉列表框 51.4 表单的综合示例 表单是网页中…...

动态规划(Dynamic Programming)
动态规划(Dynamic Programming):是运筹学的一种最优化方法,只不过在计算机问题上应用比较多 DP常见步骤: 暴力递归/穷举记忆化搜索(傻缓存 递归),使用备忘录/ DP Table 来优化穷举过程严格表结…...
linux使用文件描述符0、1和2来处理输入和输出
文件描述符012 在Linux中,文件描述符0、1和2分别代表标准输入(stdin)、标准输出(stdout)和标准错误(stderr)。它们用于处理进程的输入和输出。 文件描述符0(stdin)&…...

how to write and run .ps1
use .txt filechange the suffix to .ps1 from .txt 3)how to run .ps1 3.1) PS D:> .\test.ps1 1 2 3 4 5 6 7 8 9 10 3.2) PS D:> tes then press tab key to compensate and complete the whole file name...

如何在PHP中处理跨域请求?
在 PHP 中处理跨域请求(CORS,Cross-Origin Resource Sharing),通常需要在服务器端设置相应的 HTTP 头,以允许来自其他域的请求。以下是一些处理跨域请求的方法: 设置 HTTP 头: 在服务器端&#…...

spring boot 配置多数据源 踩坑 BindingException: Invalid bound statement (not found)
在上一篇:《【已解决】Spring Boot多数据源的时候,mybatis报错提示:Invalid bound statement (not found)》 凯哥(凯哥Java) 已经接受了,在Spring Boot配置多数据源时候,因为自己马虎,导致的一个坑。下面&a…...
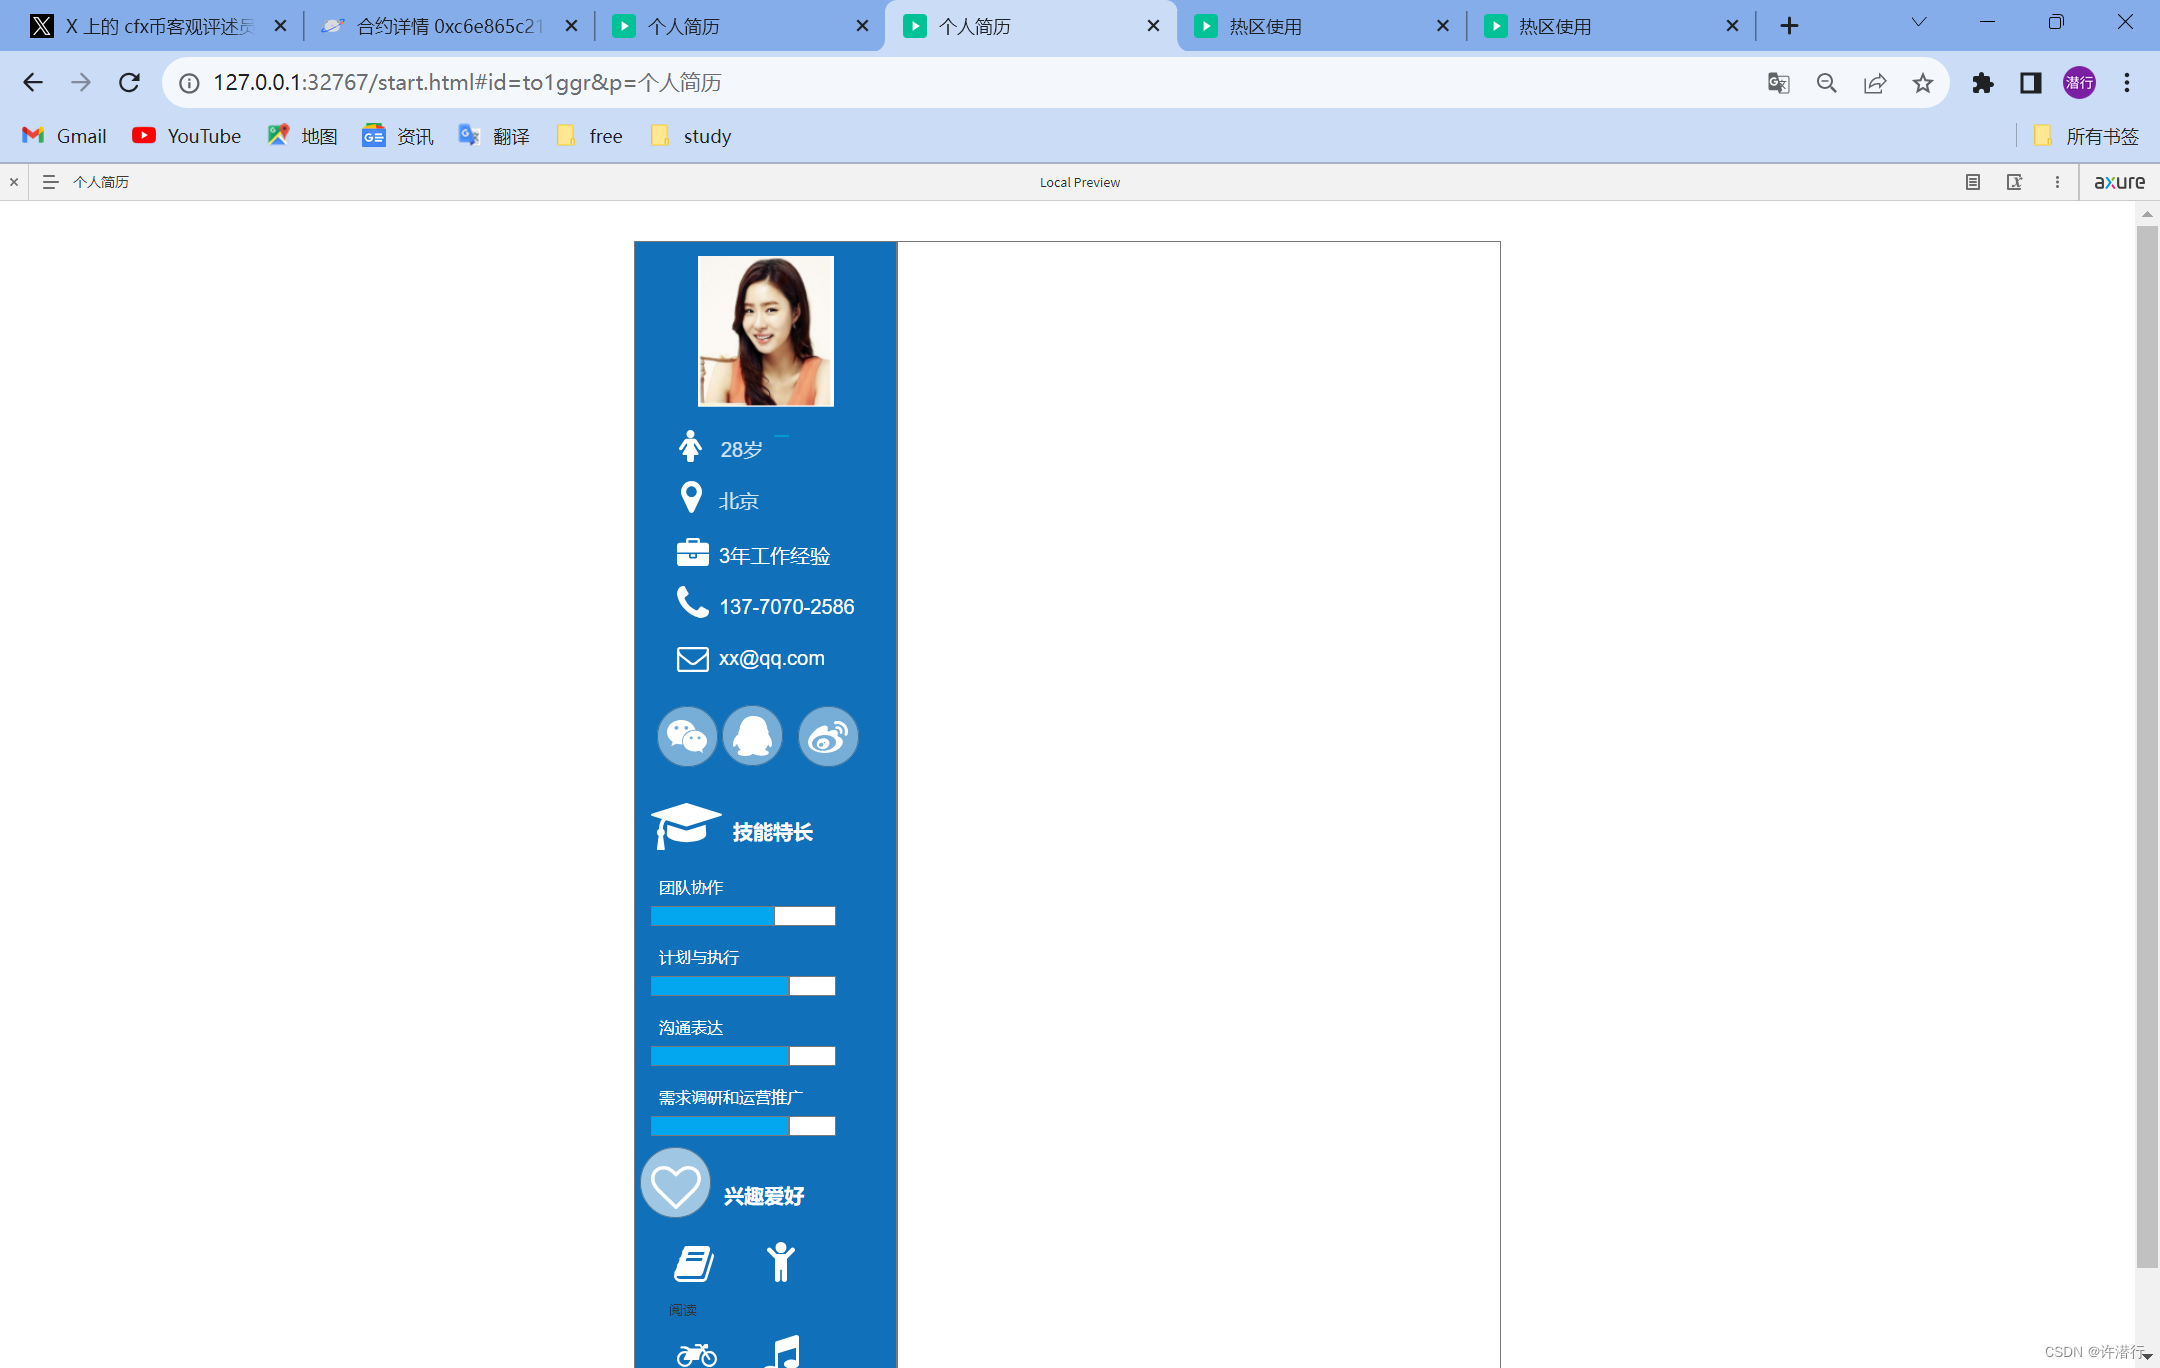
【产品】Axure的基本使用(二)
文章目录 一、元件基本介绍1.1 概述1.2 元件操作1.3 热区的使用 二、表单型元件的使用2.1 文本框2.2 文本域2.3 下拉列表2.4 列表框2.5 单选按钮2.6 复选框2.7 菜单与表格元件的使用 三、实例3.1 登录2.2 个人简历 一、元件基本介绍 1.1 概述 在Axure RP中,元件是…...
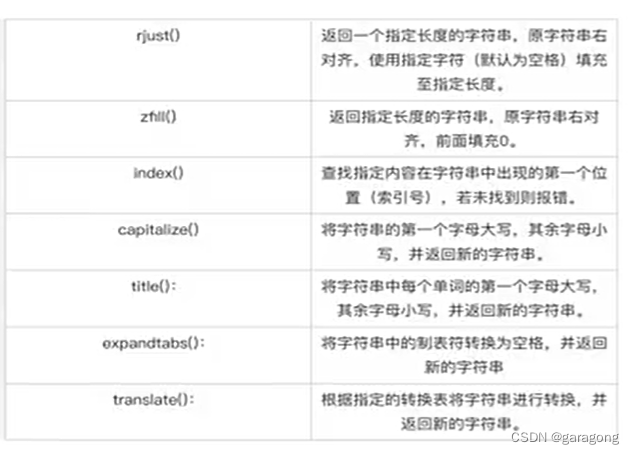
Python语言学习笔记之十(字符串处理)
本课程对于有其它语言基础的开发人员可以参考和学习,同时也是记录下来,为个人学习使用,文档中有此不当之处,请谅解。 字符串处理:以实现字符串的分割、替换、格式化、大小写转换,Python字符串处理是指对Py…...
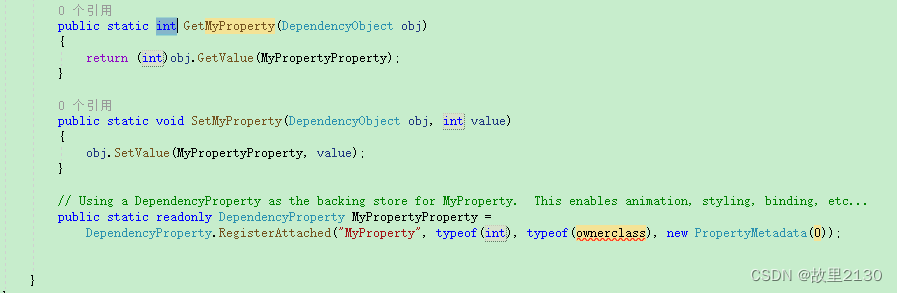
WPF-附加属性《十二》
非常重要 依赖属性和附加属性,两者是有关系的,也是有些区别的,很多时候,可能会把两者混淆了。 附加属性(Attach Property) 顾名思义,就是附加上面的属性,自身是没有的,…...

算法通关第十九关-青铜挑战理解动态规划
大家好我是苏麟 , 今天聊聊动态规划 . 动态规划是最热门、最重要的算法思想之一,在面试中大量出现,而且题目整体都偏难一些对于大部人来说,最大的问题是不知道动态规划到底是怎么回事。很多人看教程等,都被里面的状态子问题、状态…...

2023 GitHub年度排行榜,JEECG上榜第三名,势头依然很猛~
2023 GitHub年度排行榜TOP10,JeecgBoot上榜第三名,势头依然很猛~...
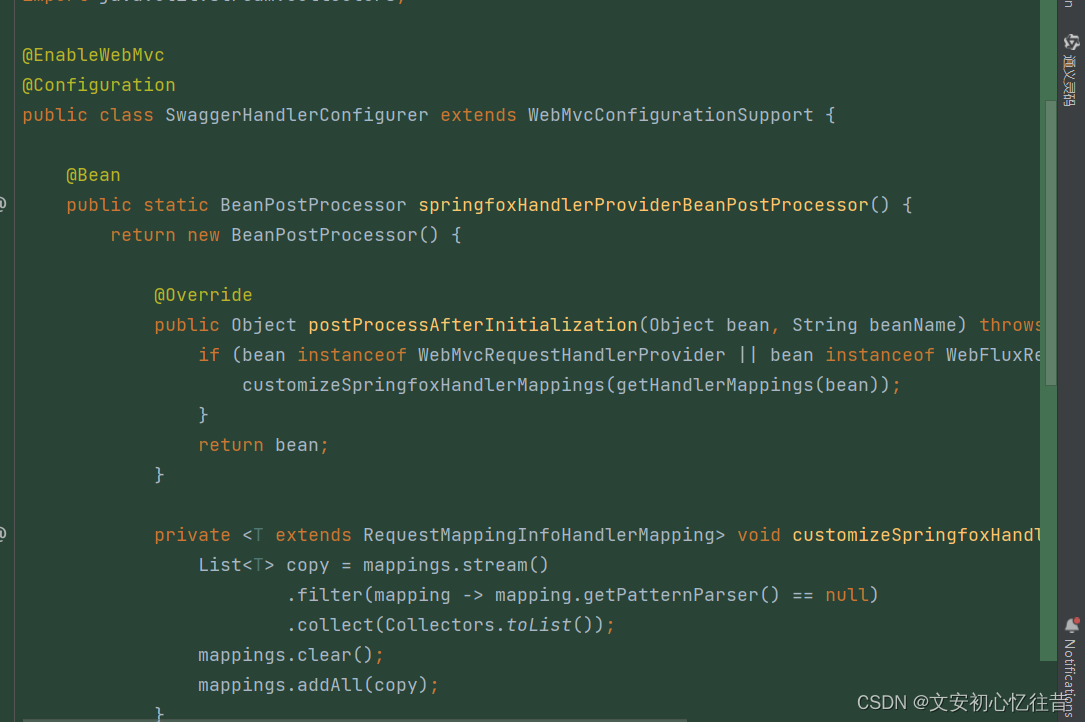
由@EnableWebMvc注解引发的Jackson解析异常
同事合了代码到开发分支,并没有涉及到改动的类却报错。错误信息如下: Servlet.service() for servlet [dispatcherServlet] in context with path [] threw exception [Request processing failed; nested exception is org.springframework.http.conv…...

Beam Search超参数调优指南:从原理到实践,如何为你的NLP任务选择最佳beam width?
Beam Search超参数调优实战:如何在生成质量与推理效率间找到平衡点 当GPT-3生成那段令人惊艳的诗歌时,背后其实经历了几百次候选序列的评估与筛选——这正是beam search算法的魔力所在。作为自然语言生成任务中最核心的解码策略之一,beam wid…...

可视化跨平台Node.js管理:如何告别命令行依赖,实现高效多版本切换
可视化跨平台Node.js管理:如何告别命令行依赖,实现高效多版本切换 【免费下载链接】nvm-desktop Node Version Manager Desktop - A desktop application to manage multiple active node.js versions. 项目地址: https://gitcode.com/gh_mirrors/nv/n…...

Hermes Agent 自定义供应商配置指向 Taotoken 的步骤
🚀 告别海外账号与网络限制!稳定直连全球优质大模型,限时半价接入中。 👉 点击领取海量免费额度 Hermes Agent 自定义供应商配置指向 Taotoken 的步骤 对于使用 Hermes Agent 进行 AI 应用开发的团队而言,统一管理模型…...

3个关键技巧:用ProperTree告别Plist编辑的繁琐与混乱
3个关键技巧:用ProperTree告别Plist编辑的繁琐与混乱 【免费下载链接】ProperTree Cross platform GUI plist editor written in python. 项目地址: https://gitcode.com/gh_mirrors/pr/ProperTree 你是否曾经面对macOS配置文件时感到手足无措?那…...

实战指南:5个技巧高效部署BBS-Go开源社区平台
实战指南:5个技巧高效部署BBS-Go开源社区平台 【免费下载链接】bbs-go A lightweight community and Q&A platform for forums, knowledge bases, and discussions. 项目地址: https://gitcode.com/gh_mirrors/bb/bbs-go 想快速搭建一个功能完备的在线社…...

3步掌握暗黑2存档编辑:从游戏小白到修改高手的完整教程
3步掌握暗黑2存档编辑:从游戏小白到修改高手的完整教程 【免费下载链接】d2s-editor 项目地址: https://gitcode.com/gh_mirrors/d2/d2s-editor 你是否曾在暗黑破坏神2中花费数百小时刷装备却一无所获?是否因为角色build配置不当而不得不重新练级…...

激光辅助侧信道攻击技术解析与应用
1. 激光辅助侧信道攻击技术概述在硬件安全研究领域,侧信道分析(Side-Channel Analysis, SCA)已经发展成为破解加密系统的重要手段。这种攻击方式不直接攻击算法本身的数学强度,而是通过测量设备运行时的物理特性变化(如功耗、电磁辐射、时序等…...

Office RibbonX Editor:免费开源Office界面定制终极解决方案
Office RibbonX Editor:免费开源Office界面定制终极解决方案 【免费下载链接】office-ribbonx-editor An overhauled fork of the original Custom UI Editor for Microsoft Office, built with WPF 项目地址: https://gitcode.com/gh_mirrors/of/office-ribbonx-…...

免费开源神器:SMUDebugTool让你轻松掌控AMD Ryzen处理器的秘密
免费开源神器:SMUDebugTool让你轻松掌控AMD Ryzen处理器的秘密 【免费下载链接】SMUDebugTool A dedicated tool to help write/read various parameters of Ryzen-based systems, such as manual overclock, SMU, PCI, CPUID, MSR and Power Table. 项目地址: ht…...

抖音批量下载神器:免费开源工具解决你的视频保存难题
抖音批量下载神器:免费开源工具解决你的视频保存难题 【免费下载链接】douyin-downloader A practical Douyin downloader for both single-item and profile batch downloads, with progress display, retries, SQLite deduplication, and browser fallback suppor…...