MongoDB系列:管道操作:聚合阶段操作符(二)
MongoDB系列:管道操作:聚合阶段操作符(二)
聚合阶段操作符介绍
本节只编写了个人认为可能用到的操作符,详细更多的操作符以及使用注意事项请前往MongoDB官网。
$match
过滤匹配数据。
// 插入数据
db.orders.insertMany( [{ "_id" : 1, "item" : "almonds", "price" : 12, "ordered" : 2 },{ "_id" : 2, "item" : "pecans", "price" : 20, "ordered" : 1 },{ "_id" : 3, "item" : "cookies", "price" : 10, "ordered" : 60 }
] )// 查询 item = almonds的文档
db.orders.aggregate([{$match: {item:"almonds"}
}])
// 查询orice >=10 的数据
db.orders.aggregate([{$match: {price:{$gte:10}}
}])
$group
聚合分组,类似于sql种的分组用法。
{$group:{_id: <expression>, // Group key<field1>: { <accumulator1> : <expression1> }, // 返回的值,通常是聚合函数...}}
$limit
限制输出文档的个数。
// 获取books表中第一条数据
db.getCollection("books").aggregate([{$limit: 1
}])
$skip
跳过指定的个数的文档。
// 语法
{ $skip: <positive 64-bit integer> }
1、跳过第一条数据
// 插入10条数据
db.stastistic.insertMany([{ "_id": "2019Q1", "sales": 1950, "purchased": 1200 },{ "_id": "2019Q2", "sales": 500, "purchased": 1700 },{ "_id": "2019Q3", "sales": 1950, "purchased": 1200 },{ "_id": "2019Q4", "sales": 500, "purchased": 1700 },{ "_id": "2019Q5", "sales": 1950, "purchased": 1200 },{ "_id": "2019Q6", "sales": 500, "purchased": 1700 },{ "_id": "2019Q7", "sales": 1950, "purchased": 1200 },{ "_id": "2019Q8", "sales": 500, "purchased": 1700 },{ "_id": "2019Q9", "sales": 1950, "purchased": 1200 },{ "_id": "2019Q10", "sales": 500, "purchased": 1700 },
])// 跳过第一条数据
db.stastistic.aggregate([{$skip: 1}
])
2、配合上述$limit可以完成分页查询的效果
如按照每页5条,查询第二页的数据。
设 pageNumber:第几页,pageSize:数量,则
$skip 的 变量是 (pageNumber - 1) * pageSize。
// 每页5条,查询第二页的树。
// (2 - 1) * 5 = 5
db.stastistic.aggregate([{$skip: 5},{$limit: 5}
])
$sort
排序。
// 说明:1:正序排列;-1:倒叙排列。也可以指定计算规则进行排序。
{ $sort: { <field1>: <sort order>, <field2>: <sort order> ... } }
1、按照id正序排列
db.stastistic.aggregate([{$sort: {_id:1}}
])
$count
统计文档的数量。
// 查询score>80分的数据的个数为passing_scores
db.scores.aggregate([{$match: {score: {$gt: 80}}},{$count: "passing_scores"}]
)
$unionWith
类似于sql中的union all的用法,将结果集进行合并。
// 定义
{ $unionWith: { coll: "<collection>", pipeline: [ <stage1>, ... ] } }
或
{ $unionWith: "<collection>" }  // Include all documents from the specified collection
1、合并数据
// 插入数据
db.suppliers.insertMany([{ _id: 1, supplier: "Aardvark and Sons", state: "Texas" },{ _id: 2, supplier: "Bears Run Amok.", state: "Colorado"},{ _id: 3, supplier: "Squid Mark Inc. ", state: "Rhode Island" },
])db.warehouses.insertMany([{ _id: 1, warehouse: "A", region: "West", state: "California" },{ _id: 2, warehouse: "B", region: "Central", state: "Colorado"},{ _id: 3, warehouse: "C", region: "East", state: "Florida" },
])// 获取两个表中state
db.suppliers.aggregate([{$project: { state: 1, _id: 0 }},{$unionWith: {coll: "warehouses", pipeline: [{$project: { state: 1, _id: 0 }}]}}, {$group: { _id: "$state" }}
])
- 第一阶段:只查询
state属性 - 第二阶段:合并
warehouses的state属性 - 第三阶段:利用分组过滤数据
2、统计多表中的数据进行分析
// 插入2017、2018、2019、2020销售数据清单
db.sales_2017.insertMany( [{ store: "General Store", item: "Chocolates", quantity: 150 },{ store: "ShopMart", item: "Chocolates", quantity: 50 },{ store: "General Store", item: "Cookies", quantity: 100 },{ store: "ShopMart", item: "Cookies", quantity: 120 },{ store: "General Store", item: "Pie", quantity: 10 },{ store: "ShopMart", item: "Pie", quantity: 5 }
] )db.sales_2018.insertMany( [{ store: "General Store", item: "Cheese", quantity: 30 },{ store: "ShopMart", item: "Cheese", quantity: 50 },{ store: "General Store", item: "Chocolates", quantity: 125 },{ store: "ShopMart", item: "Chocolates", quantity: 150 },{ store: "General Store", item: "Cookies", quantity: 200 },{ store: "ShopMart", item: "Cookies", quantity: 100 },{ store: "ShopMart", item: "Nuts", quantity: 100 },{ store: "General Store", item: "Pie", quantity: 30 },{ store: "ShopMart", item: "Pie", quantity: 25 }
] )db.sales_2019.insertMany( [{ store: "General Store", item: "Cheese", quantity: 50 },{ store: "ShopMart", item: "Cheese", quantity: 20 },{ store: "General Store", item: "Chocolates", quantity: 125 },{ store: "ShopMart", item: "Chocolates", quantity: 150 },{ store: "General Store", item: "Cookies", quantity: 200 },{ store: "ShopMart", item: "Cookies", quantity: 100 },{ store: "General Store", item: "Nuts", quantity: 80 },{ store: "ShopMart", item: "Nuts", quantity: 30 },{ store: "General Store", item: "Pie", quantity: 50 },{ store: "ShopMart", item: "Pie", quantity: 75 }
] )db.sales_2020.insertMany( [{ store: "General Store", item: "Cheese", quantity: 100, },{ store: "ShopMart", item: "Cheese", quantity: 100},{ store: "General Store", item: "Chocolates", quantity: 200 },{ store: "ShopMart", item: "Chocolates", quantity: 300 },{ store: "General Store", item: "Cookies", quantity: 500 },{ store: "ShopMart", item: "Cookies", quantity: 400 },{ store: "General Store", item: "Nuts", quantity: 100 },{ store: "ShopMart", item: "Nuts", quantity: 200 },{ store: "General Store", item: "Pie", quantity: 100 },{ store: "ShopMart", item: "Pie", quantity: 100 }
] )// 统计四年各个产品的销售数量
db.sales_2017.aggregate([{$unionWith: "sales_2018"},{$unionWith: "sales_2019"},{$unionWith: "sales_2020"},{$group: {_id: "$item",total: {$sum: "$quantity"}}}
])// 执行结果
{ "_id" : "Chocolates", "total" : 1250 }
{ "_id" : "Cookies", "total" : 1720 }
{ "_id" : "Pie", "total" : 395 }
{ "_id" : "Cheese", "total" : 350 }
{ "_id" : "Nuts", "total" : 510 }
$unset
删除字段,在管道中等同于$project庄涛为0的操作。
// 删除单个属性
{ $unset: "<field>" }
// 删除多个属性
{ $unset: [ "<field1>", "<field2>", ... ] }
插入数据:
db.books.insertMany([{ "_id" : 1, title: "Antelope Antics", isbn: "0001122223334", author: { last:"An", first: "Auntie" }, copies: [ { warehouse: "A", qty: 5 }, { warehouse: "B", qty: 15 } ] },{ "_id" : 2, title: "Bees Babble", isbn: "999999999333", author: { last:"Bumble", first: "Bee" }, copies: [ { warehouse: "A", qty: 2 }, { warehouse: "B", qty: 5 } ] }
])
1、删除单个及多个字段
// 删除title字段
db.books.aggregate([{$unset: "title"
}])
// 删除title和isbn字段
db.books.aggregate([{$unset: ["title", "isbn"]
}])
2、删除对象以及数组中对象
// 删除对象中first属性
db.books.aggregate([{$unset: "author.first"
}])// 删除数组中对象的属性warehouse
db.books.aggregate([{$unset: "copies.warehouse"
}])
$unwind
将数组元素进行平铺并提取到外层。
// 语法
{$unwind:{path: <field path>,			// 数组元素字段名includeArrayIndex: <string>,	// 指定平铺出来之后当前数据位于数组索引的名称preserveNullAndEmptyArrays: <boolean>	//当数组元素为null或空数组的处理}
}
preserveNullAndEmptyArrays:true 若为null或空数组的时候保留数据,false忽略数据。默认false
1、提取数组到外层
// 插入数据
db.inventory.insertOne({ "_id" : 1, "item" : "ABC1", sizes: [ "S", "M", "L"] })// 将数组元素提取出来平铺到外层
db.inventory.aggregate([{$unwind: {path: "$sizes"}
}])// 执行结果
{ "_id" : 1, "item" : "ABC1", "sizes" : "S" }
{ "_id" : 1, "item" : "ABC1", "sizes" : "M" }
{ "_id" : 1, "item" : "ABC1", "sizes" : "L" }
2、元素为null或空数组的处理,以及输出在数组中的索引位置
// 插入元素
db.inventory2.insertMany([{ "_id" : 1, "item" : "ABC", price: NumberDecimal("80"), "sizes": [ "S", "M", "L"] },{ "_id" : 2, "item" : "EFG", price: NumberDecimal("120"), "sizes" : [ ] },{ "_id" : 3, "item" : "IJK", price: NumberDecimal("160"), "sizes": "M" },{ "_id" : 4, "item" : "LMN" , price: NumberDecimal("10") },{ "_id" : 5, "item" : "XYZ", price: NumberDecimal("5.75"), "sizes" : null }
])// 当为false时,忽略null和空数组的数据,平铺到外层时在数组的索引指定为arrayIndex
db.inventory2.aggregate([{$unwind: {path: "$sizes",includeArrayIndex: "arrayIndex",preserveNullAndEmptyArrays: false}
}])// 执行结果
{ "_id" : 1, "item" : "ABC", "price" : { "$numberDecimal" : "80" }, "sizes" : "S", "arrayIndex" : { "$numberLong" : "0" } }
{ "_id" : 1, "item" : "ABC", "price" : { "$numberDecimal" : "80" }, "sizes" : "M", "arrayIndex" : { "$numberLong" : "1" } }
{ "_id" : 1, "item" : "ABC", "price" : { "$numberDecimal" : "80" }, "sizes" : "L", "arrayIndex" : { "$numberLong" : "2" } }
{ "_id" : 3, "item" : "IJK", "price" : { "$numberDecimal" : "160" }, "sizes" : "M", "arrayIndex" : null }// 修改preserveNullAndEmptyArrays为true,展示出列所有的数据
{ "_id" : 1, "item" : "ABC", "price" : { "$numberDecimal" : "80" }, "sizes" : "S", "arrayIndex" : { "$numberLong" : "0" } }
{ "_id" : 1, "item" : "ABC", "price" : { "$numberDecimal" : "80" }, "sizes" : "M", "arrayIndex" : { "$numberLong" : "1" } }
{ "_id" : 1, "item" : "ABC", "price" : { "$numberDecimal" : "80" }, "sizes" : "L", "arrayIndex" : { "$numberLong" : "2" } }
{ "_id" : 2, "item" : "EFG", "price" : { "$numberDecimal" : "120" }, "arrayIndex" : null }
{ "_id" : 3, "item" : "IJK", "price" : { "$numberDecimal" : "160" }, "sizes" : "M", "arrayIndex" : null }
{ "_id" : 4, "item" : "LMN", "price" : { "$numberDecimal" : "10" }, "arrayIndex" : null }
{ "_id" : 5, "item" : "XYZ", "price" : { "$numberDecimal" : "5.75" }, "sizes" : null, "arrayIndex" : null }
3、平铺数组中是对象的且对象中还是数组
插入数据
db.sales.insertMany([{_id: "1","items" : [{"name" : "pens","tags" : [ "writing", "office", "school", "stationary" ],"price" : NumberDecimal("12.00"),"quantity" : NumberInt("5")},{"name" : "envelopes","tags" : [ "stationary", "office" ],"price" : NumberDecimal("19.95"),"quantity" : NumberInt("8")}]},{_id: "2","items" : [{"name" : "laptop","tags" : [ "office", "electronics" ],"price" : NumberDecimal("800.00"),"quantity" : NumberInt("1")},{"name" : "notepad","tags" : [ "stationary", "school" ],"price" : NumberDecimal("14.95"),"quantity" : NumberInt("3")}]}
])
执行命令:
db.sales.aggregate([// First Stage{ $unwind: "$items" },// Second Stage{ $unwind: "$items.tags" },// Third Stage{$group:{_id: "$items.tags",totalSalesAmount:{$sum: { $multiply: [ "$items.price", "$items.quantity" ] }}}}
])db.sales.aggregate([{$unwind: {path: "$items"}
}, {$unwind: {path: "$items.tags"}
}, {$group: {_id: "$items.tags",sumSale: { $sum: { $multiply: ["$items.price", "$items.quantity"] } }}
}, {$sort: {sumSale: 1}
}])// 输出结果
{"_id" : "writing","sumSale" : 60.0
}
{"_id" : "school","sumSale" : 104.85
}
{"_id" : "stationary","sumSale" : 264.45
}
{"_id" : "electronics","sumSale" : 800.0
}
{"_id" : "office","sumSale" : 1019.6
}- 第一阶段:将
items的数组进行平铺提取,这时tags成了items中的一个属性。 - 第二阶段:将
items中的tags再次平铺提取。 - 第三阶段:按照
tages进行分组,计算销售额,price * quantity再求和。
$addFields / $set
添加字段,可以添加一个普通的字段以及添加嵌入式字段如对象中添加新的属性。
创建并插入数据到文档中:
db.vehicles.insertMany([{ _id: 1, type: "car", specs: { doors: 4, wheels: 4 }, times: [2, 3, 4, 5] },{ _id: 2, type: "motorcycle", specs: { doors: 0, wheels: 2 }, times: [77, 89, 21] },{ _id: 3, type: "jet ski" }]
)
1、直接插入字段值到文档中
// 插入了sumTimes是根据times的和,address是American。
db.vehicles.aggregate([{$addFields: {sumTimes: { $sum: "$times" },address: "American"}}
])// 结果
{ "_id" : 1, "type" : "car", "specs" : { "doors" : 4, "wheels" : 4 }, "times" : [ 2, 3, 4, 5 ], "sumTimes" : 14, "address" : "American" }
{ "_id" : 2, "type" : "motorcycle", "specs" : { "doors" : 0, "wheels" : 2 }, "times" : [ 77, 89, 21 ], "sumTimes" : 187, "address" : "American" }
{ "_id" : 3, "type" : "jet ski", "sumTimes" : 0, "address" : "American" }
2、插入文档到对象类型中
// 在specs对象中添加ball属性,值设置为 小球
// 下面有两种写发,第一种就是点来进行对象下穿,第二种就是利用json分层,最终效果是一样的
db.vehicles.aggregate([{$addFields: {//"specs.ball": "小球",specs: { ball: "小球" }}
}])// 结果
{ "_id" : 1, "type" : "car", "specs" : { "doors" : 4, "wheels" : 4, "ball" : "小球" }, "times" : [ 2, 3, 4, 5 ] }
{ "_id" : 2, "type" : "motorcycle", "specs" : { "doors" : 0, "wheels" : 2, "ball" : "小球" }, "times" : [ 77, 89, 21 ] }
{ "_id" : 3, "type" : "jet ski", "specs" : { "ball" : "小球" } }
3、插入文档到数组类型中
利用$concatArrays操作符,指定一个数组表达式,然后拼接数组类型的数据
$concatArrays合并数组,按照输入文档的顺序合并,后续会详细介绍。
// 将id等于1的数据,times数组中将 1 插入到 times的前面。
db.vehicles.aggregate([{ $match: { _id: 1 } },{$addFields: {times: { $concatArrays: [[1], "$times"] }}}])// 结果,原本是 2,3,4,5
{ "_id" : 1, "type" : "car", "specs" : { "doors" : 4, "wheels" : 4 }, "times" : [ 1, 2, 3, 4, 5 ] }
$bucket
$bucket 是 MongoDB 聚合管道中的一个阶段,它用于将文档按照指定的范围进行分组成桶(buckets)。每个桶都包含一个特定范围的文档数量。
创建并插入数据
db.artists.insertMany([{ "_id" : 1, "last_name" : "Bernard", "first_name" : "Emil", "year_born" : 1868, "year_died" : 1941, "nationality" : "France" },{ "_id" : 2, "last_name" : "Rippl-Ronai", "first_name" : "Joszef", "year_born" : 1861, "year_died" : 1927, "nationality" : "Hungary" },{ "_id" : 3, "last_name" : "Ostroumova", "first_name" : "Anna", "year_born" : 1871, "year_died" : 1955, "nationality" : "Russia" },{ "_id" : 4, "last_name" : "Van Gogh", "first_name" : "Vincent", "year_born" : 1853, "year_died" : 1890, "nationality" : "Holland" },{ "_id" : 5, "last_name" : "Maurer", "first_name" : "Alfred", "year_born" : 1868, "year_died" : 1932, "nationality" : "USA" },{ "_id" : 6, "last_name" : "Munch", "first_name" : "Edvard", "year_born" : 1863, "year_died" : 1944, "nationality" : "Norway" },{ "_id" : 7, "last_name" : "Redon", "first_name" : "Odilon", "year_born" : 1840, "year_died" : 1916, "nationality" : "France" },{ "_id" : 8, "last_name" : "Diriks", "first_name" : "Edvard", "year_born" : 1855, "year_died" : 1930, "nationality" : "Norway" }
])
示例:
$bucket 有一下几个参数配置:
groupBy:分组字段boundaries:桶的边界项,数组default:没有分配给桶的项,_id使用默认的值output:输出项。
// 按照year_born分组,分成[1840,1850),[1850,1860),[1860,1870),[1870,1880)的组称为桶。
// 输出每个桶的数量为count,并将桶中的name,year_born组成对象用$push放入到数组中。
// 最后获取count>3的数据db.artists.aggregate( [// First Stage{$bucket: {groupBy: "$year_born",                        // Field to group byboundaries: [ 1840, 1850, 1860, 1870, 1880 ], // Boundaries for the bucketsdefault: "Other",                             // Bucket ID for documents which do not fall into a bucketoutput: {                                     // Output for each bucket"count": { $sum: 1 },"artists" :{$push: {"name": { $concat: [ "$first_name", " ", "$last_name"] },"year_born": "$year_born"}}}}},// Second Stage{$match: { count: {$gt: 3} }}
] )// 输出结果:
{ "_id" : 1860.0, "count" : 4.0, "artists" : [ { "name" : "Emil Bernard", "year_born" : 1868 }, { "name" : "Joszef Rippl-Ronai", "year_born" : 1861 }, { "name" : "Alfred Maurer", "year_born" : 1868 }, { "name" : "Edvard Munch", "year_born" : 1863 } ] }
$fill
填充为null的值或者缺失的字段值。
{$fill: {partitionBy: <expression>,		//分组表达式,如按照部门分组partitionBy:$orgpartitionByFields: [ <field 1>, <field 2>, ... , <field n> ],sortBy: {<sort field 1>: <sort order>,<sort field 2>: <sort order>,...,<sort field n>: <sort order>	//排序表达式:create_time:1正序排列},output: {<field 1>: { value: <expression> },<field 2>: { method: <string> },	// 当前阶段输出,填充score:99或score:{method:linear or locf}...}}
}
linear:线性填充locf:获取排序分组后同一组的前一个值
// 按照时间正序并且按照restaurant属性分组之后,填充score为每一组当前填充排序的前一个值
db.restaurantReviewsMultiple.aggregate( [{$fill:{sortBy: { date: 1 },partitionBy:  "$restaurant",output:{"score": { method: "locf" }}}}
] )
创建并插入数
db.sales.insertMany([{ "_id" : 1, "item" : "abc", "price" : Decimal128("10"), "quantity" : Int32("2"), "date" : ISODate("2014-03-01T08:00:00Z") },{ "_id" : 2, "item" : "jkl", "price" : Decimal128("20"), "quantity" : Int32("1"), "date" : ISODate("2014-03-01T09:00:00Z") },{ "_id" : 3, "item" : "xyz", "price" : Decimal128("5"), "quantity" : Int32( "10"), "date" : ISODate("2014-03-15T09:00:00Z") },{ "_id" : 4, "item" : "xyz", "price" : Decimal128("5"), "quantity" :  Int32("20") , "date" : ISODate("2014-04-04T11:21:39.736Z") },{ "_id" : 5, "item" : "abc", "price" : Decimal128("10"), "quantity" : Int32("10") , "date" : ISODate("2014-04-04T21:23:13.331Z") },{ "_id" : 6, "item" : "def", "price" : Decimal128("7.5"), "quantity": Int32("5" ) , "date" : ISODate("2015-06-04T05:08:13Z") },{ "_id" : 7, "item" : "def", "price" : Decimal128("7.5"), "quantity": Int32("10") , "date" : ISODate("2015-09-10T08:43:00Z") },{ "_id" : 8, "item" : "abc", "price" : Decimal128("10"), "quantity" : Int32("5" ) , "date" : ISODate("2016-02-06T20:20:13Z") },
])
1、查询文档种的数量
db.sales.aggregate( [{$group: {_id: null,count: { $count: { } }}}
] )// 结果
{ "_id" : null, "count" : 8 }// 等同于
// select count(1) from sales
2、分组之后过滤
// 查询每种类型的售出额,按照item分组,然后求售出额
// 最后获取售出额>=100的文档
db.sales.aggregate([// First Stage{$group :{_id : "$item",totalSaleAmount: { $sum: { $multiply: [ "$price", "$quantity" ] } }}},// Second Stage{$match: { "totalSaleAmount": { $gte: 100 } }}])
sql表达式:
select item,sum(price * quantity) as totalSaleAmount from sales group by item having totalSaleAmount>=100
3、分组之后添加合并分类
// 插入数据
db.books.insertMany([{ "_id" : 8751, "title" : "The Banquet", "author" : "Dante", "copies" : 2 },{ "_id" : 8752, "title" : "Divine Comedy", "author" : "Dante", "copies" : 1 },{ "_id" : 8645, "title" : "Eclogues", "author" : "Dante", "copies" : 2 },{ "_id" : 7000, "title" : "The Odyssey", "author" : "Homer", "copies" : 10 },{ "_id" : 7020, "title" : "Iliad", "author" : "Homer", "copies" : 10 }
])// 按照author分组,把每个组的数据插入到booksList数组中,最后统计每组复制的次数。
db.getCollection("books").aggregate([{$group: {_id: "$author",booksList: { $push: "$$ROOT" }}
}, {$addFields: {copyCount: { $sum: "$booksList.copies" }}
}])// 结果,以返回的一条数据为例
{"_id": "Dante","booksList": [{"_id": 8751,"title": "The Banquet","author": "Dante","copies": 2},{"_id": 8752,"title": "Divine Comedy","author": "Dante","copies": 1},{"_id": 8645,"title": "Eclogues","author": "Dante","copies": 2}],"copyCount": 5
}
$lookup
MongoDB的左外连接处理数据,也可用于子查询。
{$lookup:{from: <foreign collection>,	// 关联的表localField: <field from local collection's documents>,	// 当前表的关联字段foreignField: <field from foreign collection's documents>,	// 关联表的关联字段let: { <var_1>: <expression>, …, <var_n>: <expression> }, // 当前表的字段取别名,在pipeline使用pipeline: [ <pipeline to run> ],		// 当前表与关联表的关联关系,可多字段且配合表达式使用as: <output array field>	// 输出字段名}
}
1、通过单字段关联查询
// 插入数据
db.orders.insertMany( [{ "_id" : 1, "item" : "almonds", "price" : 12, "quantity" : 2 },{ "_id" : 2, "item" : "pecans", "price" : 20, "quantity" : 1 },{ "_id" : 3  }
] )db.inventory.insertMany( [{ "_id" : 1, "sku" : "almonds", "description": "product 1", "instock" : 120 },{ "_id" : 2, "sku" : "bread", "description": "product 2", "instock" : 80 },{ "_id" : 3, "sku" : "cashews", "description": "product 3", "instock" : 60 },{ "_id" : 4, "sku" : "pecans", "description": "product 4", "instock" : 70 },{ "_id" : 5, "sku": null, "description": "Incomplete" },{ "_id" : 6 }
] )// orders表左外关联inventory,然后根据item与sku的关联关系,对inventory的数据赋值到skuTt数组中
db.orders.aggregate([{$lookup: {from: "inventory",localField: "item",foreignField: "sku",as: "skuTt"}
}])// 结果
{"_id" : 1,"item" : "almonds","price" : 12,"quantity" : 2,"inventory_docs" : [{ "_id" : 1, "sku" : "almonds", "description" : "product 1", "instock" : 120 }]
}
{"_id" : 2,"item" : "pecans","price" : 20,"quantity" : 1,"inventory_docs" : [{ "_id" : 4, "sku" : "pecans", "description" : "product 4", "instock" : 70 }]
}
{"_id" : 3,"inventory_docs" : [{ "_id" : 5, "sku" : null, "description" : "Incomplete" },{ "_id" : 6 }]
}
其实和sql中的左外连接类似,以左表为基准,匹配右表中的数据,最后返回,但是MongoDB是将右表的数据输出到指定的字段数组上,而sql是平铺出来。值得注意的是,如果orders表中item字段是数组,该写法也同样适配。
sql写法为:
select o.*,i.* from orders o left join inventory i on o.item = i.sku
2、通过单字段关联,利用$mergeObjects将数据平铺
意思是返回和sql关联查询一对多场景中一样的结果,如A关联B,A有2条数据,B有4条数据,且相关联,则最终结果返回4条数据。
示例:
// 插入文档
db.orders.insertMany( [{ "_id" : 1, "item" : "almonds", "price" : 12, "quantity" : 2 },{ "_id" : 2, "item" : "pecans", "price" : 20, "quantity" : 1 }
] )
db.items.insertMany( [{ "_id" : 1, "item" : "almonds", description: "almond clusters", "instock" : 120 },{ "_id" : 2, "item" : "bread", description: "raisin and nut bread", "instock" : 80 },{ "_id" : 3, "item" : "pecans", description: "candied pecans", "instock" : 60 },{ "_id" : 4, "item" : "almonds", description: "almond clusters copy", "instock" : 240 }
] )//
db.orders.aggregate([// 第一阶段,形成了类似于 示例 1 中的格式{$lookup: {from: "items",	// 右表localField: "item",    // 左表关联字段foreignField: "item",  // 右表关联字段as: "fromItems" // 输出字段}},// 第二阶段// $unwind 这儿简要说明一下,意思是将数组进行平铺出来,每个数组中的值都成为了一条数据{$unwind: "$fromItems"},// 第三阶段// $mergeObjects 合并第二阶段的结果与左表的文档,若字段key一致则使用左表的值。将多个文档合并成单个文档。// $replaceRoot 替换回原文档中{$replaceRoot: { newRoot: { $mergeObjects: ["$fromItems", "$$ROOT"] } }},// 第四阶段,隐藏fromItems字段{$project: { "fromItems": 0 }}
])
解析:
-
第一阶段与上述 示例一 一个意思,把右表的数据根据关联关系生成
formItems的数组,成为左表orders表的一个属性。 -
第二阶段将
formItems数组平铺到orders表的上,formItems不再是一个数组而是一个对象,orders文档数据根据数组内的个数进行增加{ "_id" : 1, "item" : "almonds", "price" : 12, "quantity" : 2, "fromItems" : { "_id" : 1, "item" : "almonds", "description" : "almond clusters", "instock" : 120 } } { "_id" : 1, "item" : "almonds", "price" : 12, "quantity" : 2, "fromItems" : { "_id" : 4, "item" : "almonds", "description" : "都大大大大大", "instock" : 111 } } { "_id" : 2, "item" : "pecans", "price" : 20, "quantity" : 1, "fromItems" : { "_id" : 3, "item" : "pecans", "description" : "candied pecans", "instock" : 60 } } -
第三阶段提取
formItems内的数据到外面。 -
第四阶段隐藏
formItems属性,最终结果如下{ "_id" : 1, "item" : "almonds", "description" : "almond clusters", "instock" : 120, "price" : 12, "quantity" : 2 } { "_id" : 1, "item" : "almonds", "description" : "都大大大大大", "instock" : 111, "price" : 12, "quantity" : 2 } { "_id" : 2, "item" : "pecans", "description" : "candied pecans", "instock" : 60, "price" : 20, "quantity" : 1 }
3、多个条件的关联查询
//插入数据
db.orders.insertMany( [{ "_id" : 1, "item" : "almonds", "price" : 12, "ordered" : 2 },{ "_id" : 2, "item" : "pecans", "price" : 20, "ordered" : 1 },{ "_id" : 3, "item" : "cookies", "price" : 10, "ordered" : 60 }
] )db.warehouses.insertMany( [{ "_id" : 1, "stock_item" : "almonds", warehouse: "A", "instock" : 120 },{ "_id" : 2, "stock_item" : "pecans", warehouse: "A", "instock" : 80 },{ "_id" : 3, "stock_item" : "almonds", warehouse: "B", "instock" : 60 },{ "_id" : 4, "stock_item" : "cookies", warehouse: "B", "instock" : 40 },{ "_id" : 5, "stock_item" : "cookies", warehouse: "A", "instock" : 80 }
] )// orders与warehouses根据item与stock_item和warehouses.instock>orders.order_qty的文档关联。
// 不获取stock_item和_id
// pipeline内的写法是固定写法,太**了
db.orders.aggregate([{$lookup:{from: "warehouses",let: { order_item: "$item", order_qty: "$ordered" },pipeline: [{$match:{$expr:{$and:[{ $eq: ["$stock_item", "$$order_item"] },{ $gte: ["$instock", "$$order_qty"] }]}}},{ $project: { stock_item: 0, _id: 0 } }],as: "stockdata"}}
])// 结果
{ "_id" : 1, "item" : "almonds", "price" : 12, "ordered" : 2, "stockdata" : [ { "warehouse" : "A", "instock" : 120 }, { "warehouse" : "B", "instock" : 60 } ] }
{ "_id" : 2, "item" : "pecans", "price" : 20, "ordered" : 1, "stockdata" : [ { "warehouse" : "A", "instock" : 80 } ] }
{ "_id" : 3, "item" : "cookies", "price" : 10, "ordered" : 60, "stockdata" : [ { "warehouse" : "A", "instock" : 80 } ] }还可以利用localField和foreignField来进行关联item与stock_item。
$merge
合并数据,并输出到指定的表中,该阶段只能位于聚合得最后一个阶段中。
{ $merge: {into: <collection> -or- { db: <db>, coll: <collection> },on: <identifier field> -or- [ <identifier field1>, ...],  // Optionallet: <variables>,                                         // OptionalwhenMatched: <replace|keepExisting|merge|fail|pipeline>,  // OptionalwhenNotMatched: <insert|discard|fail>                     // Optional
} }
- into:必选;指定集合名称,有两种用法。一直接写表名,表示再当前数据库下输出;二指定数据库输出。
- into:xxx
- {db:xxx,coll:xxx}
- on:可选;指定输出时得唯一得字段,默认是
_id。换言之也就是输出到哪条数据上。 - let:可选:指定变量,应用在下面两个属性中。
- whenMatched:可选;管道输出结果与原文档匹配时:
replace、keepExisting、merge、fail,也可用表达式。replace:替换,管道数据直接覆盖原数据。keepExisting:使用原文档数据。merge:管道数据与原数据合并,若字段一致得使用管道数据。默认的fail:直接失败。
- whenNotMatched:可选;管道输出结果与原文档无匹配时:
insert、discard、fail。insert:直接插入,默认的。discard:丢弃。fail:直接失败。
1、统计数据合并到表中
// 插入数据
db.salaries.insertMany([{ "_id": 1, employee: "Ant", dept: "A", salary: 100000, fiscal_year: 2017 },{ "_id": 2, employee: "Bee", dept: "A", salary: 120000, fiscal_year: 2017 },{ "_id": 3, employee: "Cat", dept: "Z", salary: 115000, fiscal_year: 2017 },{ "_id": 4, employee: "Ant", dept: "A", salary: 115000, fiscal_year: 2018 },{ "_id": 5, employee: "Bee", dept: "Z", salary: 145000, fiscal_year: 2018 },{ "_id": 6, employee: "Cat", dept: "Z", salary: 135000, fiscal_year: 2018 },{ "_id": 7, employee: "Gecko", dept: "A", salary: 100000, fiscal_year: 2018 },{ "_id": 8, employee: "Ant", dept: "A", salary: 125000, fiscal_year: 2019 },{ "_id": 9, employee: "Bee", dept: "Z", salary: 160000, fiscal_year: 2019 },{ "_id": 10, employee: "Cat", dept: "Z", salary: 150000, fiscal_year: 2019 },{ "_id": 11, "employee": "Wren", "dept": "Z", "salary": 100000, "fiscal_year": 2019 },{ "_id": 12, "employee": "Zebra", "dept": "A", "salary": 150000, "fiscal_year": 2019 },{ "_id": 13, "employee": "headcount1", "dept": "Z", "salary": 120000, "fiscal_year": 2020 },{ "_id": 14, "employee": "headcount2", "dept": "Z", "salary": 120000, "fiscal_year": 2020 }
])// 查询统计某年某部门发放薪资得情况
db.getCollection("salaries").aggregate([{$group: {_id: { fiscal_yeal: "$fiscal_year", dept: "$dept" },employee: { $push: "$employee" },sumSalary: { $sum: "$salary" }}}, {$merge: {into: "my_statistics",on: "_id",whenMatched: "merge",whenNotMatched: "insert"}}
])// merge中into也可用{db:"my_database",coll:"my_statistics"}表示生成到my_database库中得my_statistics表中。
- 第一阶段:按照
fiscal_yeal和dept分组,将部门和年份绑定成一组,并求和salary和将员工放入数组。 - 第二阶段:将第一阶段的
_id作为唯一值区分,whenMatched定义了当聚合管道数据与表my_statistics中的_id相等的时候进行合并策略,whenNotMatched根据_id判断缺失时使用插入策略。
2、将多个表统计合并为一个表
统计季度销售额与支出额。
// 插入数据
db.purchaseorders.insertMany( [{ _id: 1, quarter: "2019Q1", region: "A", qty: 200, reportDate: new Date("2019-04-01") },{ _id: 2, quarter: "2019Q1", region: "B", qty: 300, reportDate: new Date("2019-04-01") },{ _id: 3, quarter: "2019Q1", region: "C", qty: 700, reportDate: new Date("2019-04-01") },{ _id: 4, quarter: "2019Q2", region: "B", qty: 300, reportDate: new Date("2019-07-01") },{ _id: 5, quarter: "2019Q2", region: "C", qty: 1000, reportDate: new Date("2019-07-01") },{ _id: 6, quarter: "2019Q2", region: "A", qty: 400, reportDate: new Date("2019-07-01") },
] )db.reportedsales.insertMany( [{ _id: 1, quarter: "2019Q1", region: "A", qty: 400, reportDate: new Date("2019-04-02") },{ _id: 2, quarter: "2019Q1", region: "B", qty: 550, reportDate: new Date("2019-04-02") },{ _id: 3, quarter: "2019Q1", region: "C", qty: 1000, reportDate: new Date("2019-04-05") },{ _id: 4, quarter: "2019Q2", region: "B", qty: 500, reportDate: new Date("2019-07-02") },
] )// 统计支出额
db.purchaseorders.aggregate([{$group: {_id: "$quarter",purchased: { $sum: "$qty" }}},{$merge: {into: "my_account",on: "_id",whenMatched: "merge",whenNotMatched: "insert"}}
])
// 计算销售额
db.reportedsales.aggregate([{$group: {_id: "$quarter",sales: { $sum: "$qty" }}},{$merge: {into: "my_account",on: "_id",whenMatched: "merge",whenNotMatched: "insert"}}
])
- 第一个聚合管道,统计支出额
purchased,并统计到my_account表中,结构如下:
{ "_id" : "2019Q1", "purchased" : 1200 }
{ "_id" : "2019Q2", "purchased" : 1700 }
- 第二个聚合管道,统计销售额
slaes,并用合并策略根据id作为唯一键与第一个聚合管道的数据进行合并。
{ "_id" : "2019Q1", "purchased" : 1200, "sales" : 1950 }
{ "_id" : "2019Q2", "purchased" : 1700, "sales" : 500 }
3、自定义匹配策略
$addFields和$set$project和$unset$replaceRoot和$replaceWith
// 插入数据
db.votes.insertMany( [{ date: new Date("2019-05-01"), "thumbsup" : 1, "thumbsdown" : 1 },{ date: new Date("2019-05-02"), "thumbsup" : 3, "thumbsdown" : 1 },{ date: new Date("2019-05-03"), "thumbsup" : 1, "thumbsdown" : 1 },{ date: new Date("2019-05-04"), "thumbsup" : 2, "thumbsdown" : 2 },{ date: new Date("2019-05-05"), "thumbsup" : 6, "thumbsdown" : 10 },{ date: new Date("2019-05-06"), "thumbsup" : 13, "thumbsdown" : 16 }
] )
// 先默认生成一个五月的统计数据,5.1-5.6的统计数据
db.monthlytotals.insertOne({ "_id" : "2019-05", "thumbsup" : 26, "thumbsdown" : 31 }
)
// 插入一条5.7号的数据
db.votes.insertOne({ date: new Date("2019-05-07"), "thumbsup" : 14, "thumbsdown" : 10 }
)// 将5.7日的数据也计算到月度统计表中。
db.votes.aggregate([{$match:{date: {$gte: new Date("2019-05-07")}}},{$project: { "_id": { $dateToString: { format: "%Y-%m", date: "$date" } }, thumbsup: 1, thumbsdown: 1 }},{$merge: {into: "monthlytotals",on: "_id",whenMatched: [{$addFields: {thumbsup: { $add: ["$thumbsup", "$$new.thumbsup"] },thumbsdown: { $add: ["$thumbsdown", "$$new.thumbsdown"] }}}]}}
])
- 第一阶段:过滤时间大于5.7号的数据
- 第二阶段:将年月日格式日期 转换成 年月输出
- 第三阶段:管道数据
thumbsup和thumbsdown与monthlytotals表匹配的数据相加。$thumbsup是monthlytotals表中的数据。$$new.thumbsup是管道前一阶段的数据。
//输出结果:统计5.1-5.7的数据
{ "_id" : "2019-05", "thumbsup" : 40.0, "thumbsdown" : 41.0 }
$out
算是上述$merge的简化版本,只能根据_id替换对应的数据。
{ $out: { db: "<output-db>", coll: "<output-collection>" } }
或者
{ $out: ""}
1、将结果输出到文档中
// 插入数据
db.getSiblingDB("test").books.insertMany([{ "_id" : 8751, "title" : "The Banquet", "author" : "Dante", "copies" : 2 },{ "_id" : 8752, "title" : "Divine Comedy", "author" : "Dante", "copies" : 1 },{ "_id" : 8645, "title" : "Eclogues", "author" : "Dante", "copies" : 2 },{ "_id" : 7000, "title" : "The Odyssey", "author" : "Homer", "copies" : 10 },{ "_id" : 7020, "title" : "Iliad", "author" : "Homer", "copies" : 10 }
])db.books.aggregate([{$group: {_id: "$author",books: { $push: "$title" }}},{$out:"authors"}
]){ "_id" : "Dante", "books" : [ "The Banquet", "Divine Comedy", "Eclogues" ] }
{ "_id" : "Homer", "books" : [ "The Odyssey", "Iliad" ] }
- 第一阶段:按照
author分组,将title放入到books数组中。 - 第二阶段:输出结果到
authors表中。
$replaceRoot / $replaceWith
替换数据,也可以理解为上述$merge的替换的简化版本。另有一些详细的注意地方请关注官网。
// 语法
{ $replaceRoot: { newRoot: <replacementDocument> } }{ $replaceWith: <replacementDocument> }
1、提取对象数据
// 插入数据
db.people.insertMany([{ "_id": 1, "name": "Arlene", "age": 34, "pets": { "dogs": 2, "cats": 1 } },{ "_id": 2, "name": "Sam", "age": 41, "pets": { "cats": 1, "fish": 3 } },{ "_id": 3, "name": "Maria", "age": 25 }
])
// 提取每个人宠物的个数
// $replaceRoot用法
db.people.aggregate([{$replaceRoot: { newRoot:{ $mergeObjects: [{ name:"$name","dogs": 0, "cats": 0, "fish": 0, "birds": 0 }, "$pets"] }}}
])
// $replaceWith用法
db.people.aggregate([{$replaceWith: { $mergeObjects: [{ name:"$name","dogs": 0, "cats": 0, "fish": 0, "birds": 0 }, "$pets"] }}
])// 输出结果
{ "name" : "Arlene", "dogs" : 2, "cats" : 1, "fish" : 0.0, "birds" : 0.0 }
{ "name" : "Sam", "dogs" : 0.0, "cats" : 1, "fish" : 3, "birds" : 0.0 }
{ "name" : "Maria", "dogs" : 0.0, "cats" : 0.0, "fish" : 0.0, "birds" : 0.0 }
2、提取数组对象数据
db.students.insertMany([{"_id" : 1,"grades" : [{ "test": 1, "grade" : 80, "mean" : 75, "std" : 6 },{ "test": 2, "grade" : 85, "mean" : 90, "std" : 4 },{ "test": 3, "grade" : 95, "mean" : 85, "std" : 6 }]},{"_id" : 2,"grades" : [{ "test": 1, "grade" : 90, "mean" : 75, "std" : 6 },{ "test": 2, "grade" : 87, "mean" : 90, "std" : 3 },{ "test": 3, "grade" : 91, "mean" : 85, "std" : 4 }]}
])// 获取分数大于等于90的学生数据
db.students.aggregate([{$unwind: "$grades"},{$match: {"grades.grade": { $gte: 90 }}},{ $replaceRoot: { newRoot: "$grades" } }
])// 执行结果
{ "test" : 3, "grade" : 95, "mean" : 85, "std" : 6 }
{ "test" : 1, "grade" : 90, "mean" : 75, "std" : 6 }
{ "test" : 3, "grade" : 91, "mean" : 85, "std" : 4 }-
第一阶段:提取
grades数组元素。{ "_id" : 1, "grades" : { "test" : 1, "grade" : 80, "mean" : 75, "std" : 6 } } { "_id" : 1, "grades" : { "test" : 2, "grade" : 85, "mean" : 90, "std" : 4 } } { "_id" : 1, "grades" : { "test" : 3, "grade" : 95, "mean" : 85, "std" : 6 } } { "_id" : 2, "grades" : { "test" : 1, "grade" : 90, "mean" : 75, "std" : 6 } } { "_id" : 2, "grades" : { "test" : 2, "grade" : 87, "mean" : 90, "std" : 3 } } { "_id" : 2, "grades" : { "test" : 3, "grade" : 91, "mean" : 85, "std" : 4 } } -
第二阶段:过滤
grade>=90的数据 -
第三阶段:将
grades提取到最外层
相关文章:
)
MongoDB系列:管道操作:聚合阶段操作符(二)
MongoDB系列:管道操作:聚合阶段操作符(二) 聚合阶段操作符介绍 本节只编写了个人认为可能用到的操作符,详细更多的操作符以及使用注意事项请前往MongoDB官网。 $match 过滤匹配数据。 // 插入数据 db.orders.inse…...

C++ //练习 5.12 修改统计元音字母的程序,使其能统计以下含有两个字符的字符序列的数量:ff、fl和fi。
C Primer(第5版) 练习 5.12 练习 5.12 修改统计元音字母的程序,使其能统计以下含有两个字符的字符序列的数量:ff、fl和fi。 环境:Linux Ubuntu(云服务器) 工具:vim 代码块 /****…...
C语言-----自定义类型-----结构体枚举联合
结构体和数组一样,都是一群数据的集合,不同的是数组当中的数据是相同的类型,但是结构体中的数据类型可以不相同,结构体里的成员叫做成员变量 结构体类型是C语言里面的一种自定义类型,我们前面已经了解到过int,char,fl…...
elasticsearch下载及可视化工具下载使用
elasticsearch下载及配置、启动 一、下载 Download Elasticsearch | Elastic 二、启动 双击bat即可。 出现如下说明启动成功: 访问测试: 三、注意 (1)因为es启动默认端口是:9200,所以需要检查此端口是否被占用。…...
vim常用命令以及配置文件
layout: article title: “vim文本编译器” vim文本编辑器 有三种模式: 命令模式 文本模式, 末行模式 vim命令大全 - 知乎 (zhihu.com) 命令模式 插入 i: 切换到输入模式,在光标当前位置开始输入文本。 a: 进入插入模式,在光标下一个位置开始输入文…...

2024年的VUE2下的无效指令npm install --save vue-i18n
vue官网已经声明了不再维护vue2, vue-i18n安装依赖的时候就只接安装vue3的vue-i18, 直接报错: > npm install --save vue-i18n npm ERR! code ERESOLVE npm ERR! ERESOLVE unable to resolve dependency tree npm ERR! npm ERR! While resolving: yudao-ui-admin…...

计算机视觉主要知识点
计算机视觉是指利用计算机和算法来解析和理解图片和视频中的内容。这是一个跨学科领域,融合了计算机科学、图像处理、机器学习和模式识别等多方面的技术。以下是一些计算机视觉入门的基本知识点: 图像基础: 像素:图片的最基本组成…...
python 基础知识点(蓝桥杯python科目个人复习计划35)
今日复习计划:阶段总结(新年贺礼) 1.python简介(定义,优点,缺点,应用领域) python:一种广泛使用的解释型,高级和通用的编程语言 python极简,生…...

使用HTML、CSS和JavaScript来创建一个粒子效果,粒子会跟随鼠标点击位置生成
文章目录 一、粒子效果二、JavaScript三、HTML四、CSS五、热门文章 一、粒子效果 以下是一个简单的示例,使用HTML、CSS和JavaScript来创建一个粒子效果,粒子会跟随鼠标点击位置生成: <!DOCTYPE html> <html> <head><t…...

优质项目追踪平台一览:助力项目管理与监控
项目追踪平台是现代项目管理中不可或缺的工具,它可以帮助团队高效地跟踪和管理项目进度、任务和资源分配。在当今快节奏的商业环境中,有许多热门的项目追踪平台可供选择。 本文总结了当下热门的项目追踪平台,供您参考~ 1、Zoho Projects&…...
Docker下安装GitLab
极狐GitLab Docker 镜像 | 极狐GitLab 安装所需最小配置 内存至少4G 系统内核至少3.10以上 uname -r 命令可以查看系统内核版本 安装Docker 1.更新 yum源 yum update 2.安装依赖(如果在操作第三步的时候提示yum-config-manager 未找到命令 就安装下面依赖) yum instal…...

2024/2最新升级ChatGPT Plus的方法
2024年2月最新升级方法:ChatGPT Plus全方位体验指南 随着2024年2月的到来,ChatGPT Plus迎来了全新的升级。对于追求更高效率和更强大功能的用户来说,升级至ChatGPT Plus无疑是提升工作和学习体验的关键。在本指南中,我将一步一步…...
github和gitee
github GitHub是一个面向开源及私有软件项目的托管平台,因为只支持Git作为唯一的版本库格式进行托管,故名GitHub。 github可以给提交的代码打上标签,方便版本的迭代和回退,也是一个存储代码的仓库 github工作区 gitee是gitHub的…...
3秒实现无痛基于Stable Diffusion WebUI安装ComfyUI!无需重复安装环境!无需重复下载模型!安装教程
标题略有夸张的表达了接下来这一套确实很简单,相较于直接下载或者通过秋叶包更新而言。大大节省磁盘空间,和下载时间。 这篇教程不需要你有: 代码基础。都是复制粘贴就完事。魔法。 这篇教程默认你已经有: 1. 本地能够正常使用…...
【UE】游戏运行流程的简单理解
流程图 官方的游戏流程图: 一般顺序为初始化引擎、创建并初始化 GameInstance、加载关卡,最后开始游戏。 总的来说就是: 开始游戏-》游戏实例-》关卡-》游戏模式-》玩家控制器-》Pawn、玩家状态、HUD、UMG(可有可无) …...
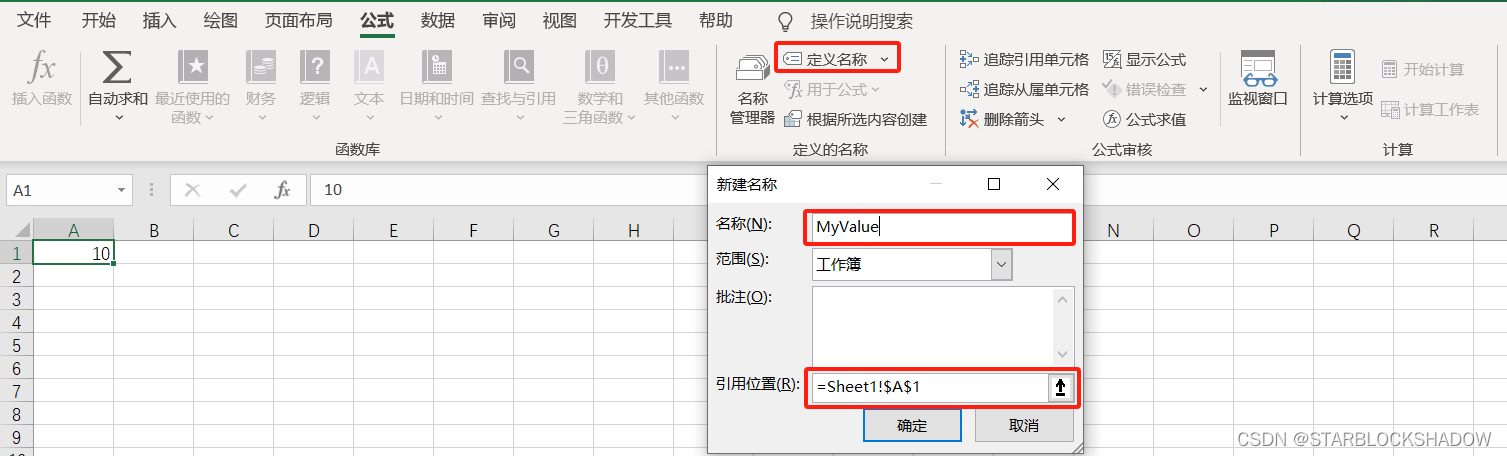
【数据分析】Excel中的常用函数公式总结
目录 0 引用方式0.1 相对引用0.2 绝对引用0.3 混合引用0.4 3D引用0.5 命名引用 1 基础函数1.1 加法、减法、乘法和除法1.2 平均数1.3 求和1.4 最大值和最小值 2 文本函数2.1 合并单元格内容2.2 查找2.3 替换 3 逻辑函数3.1 IF函数3.2 AND和OR函数3.3 IFERROR函数 4 统计函数4.1…...
ESLint prettier 配置代码风格
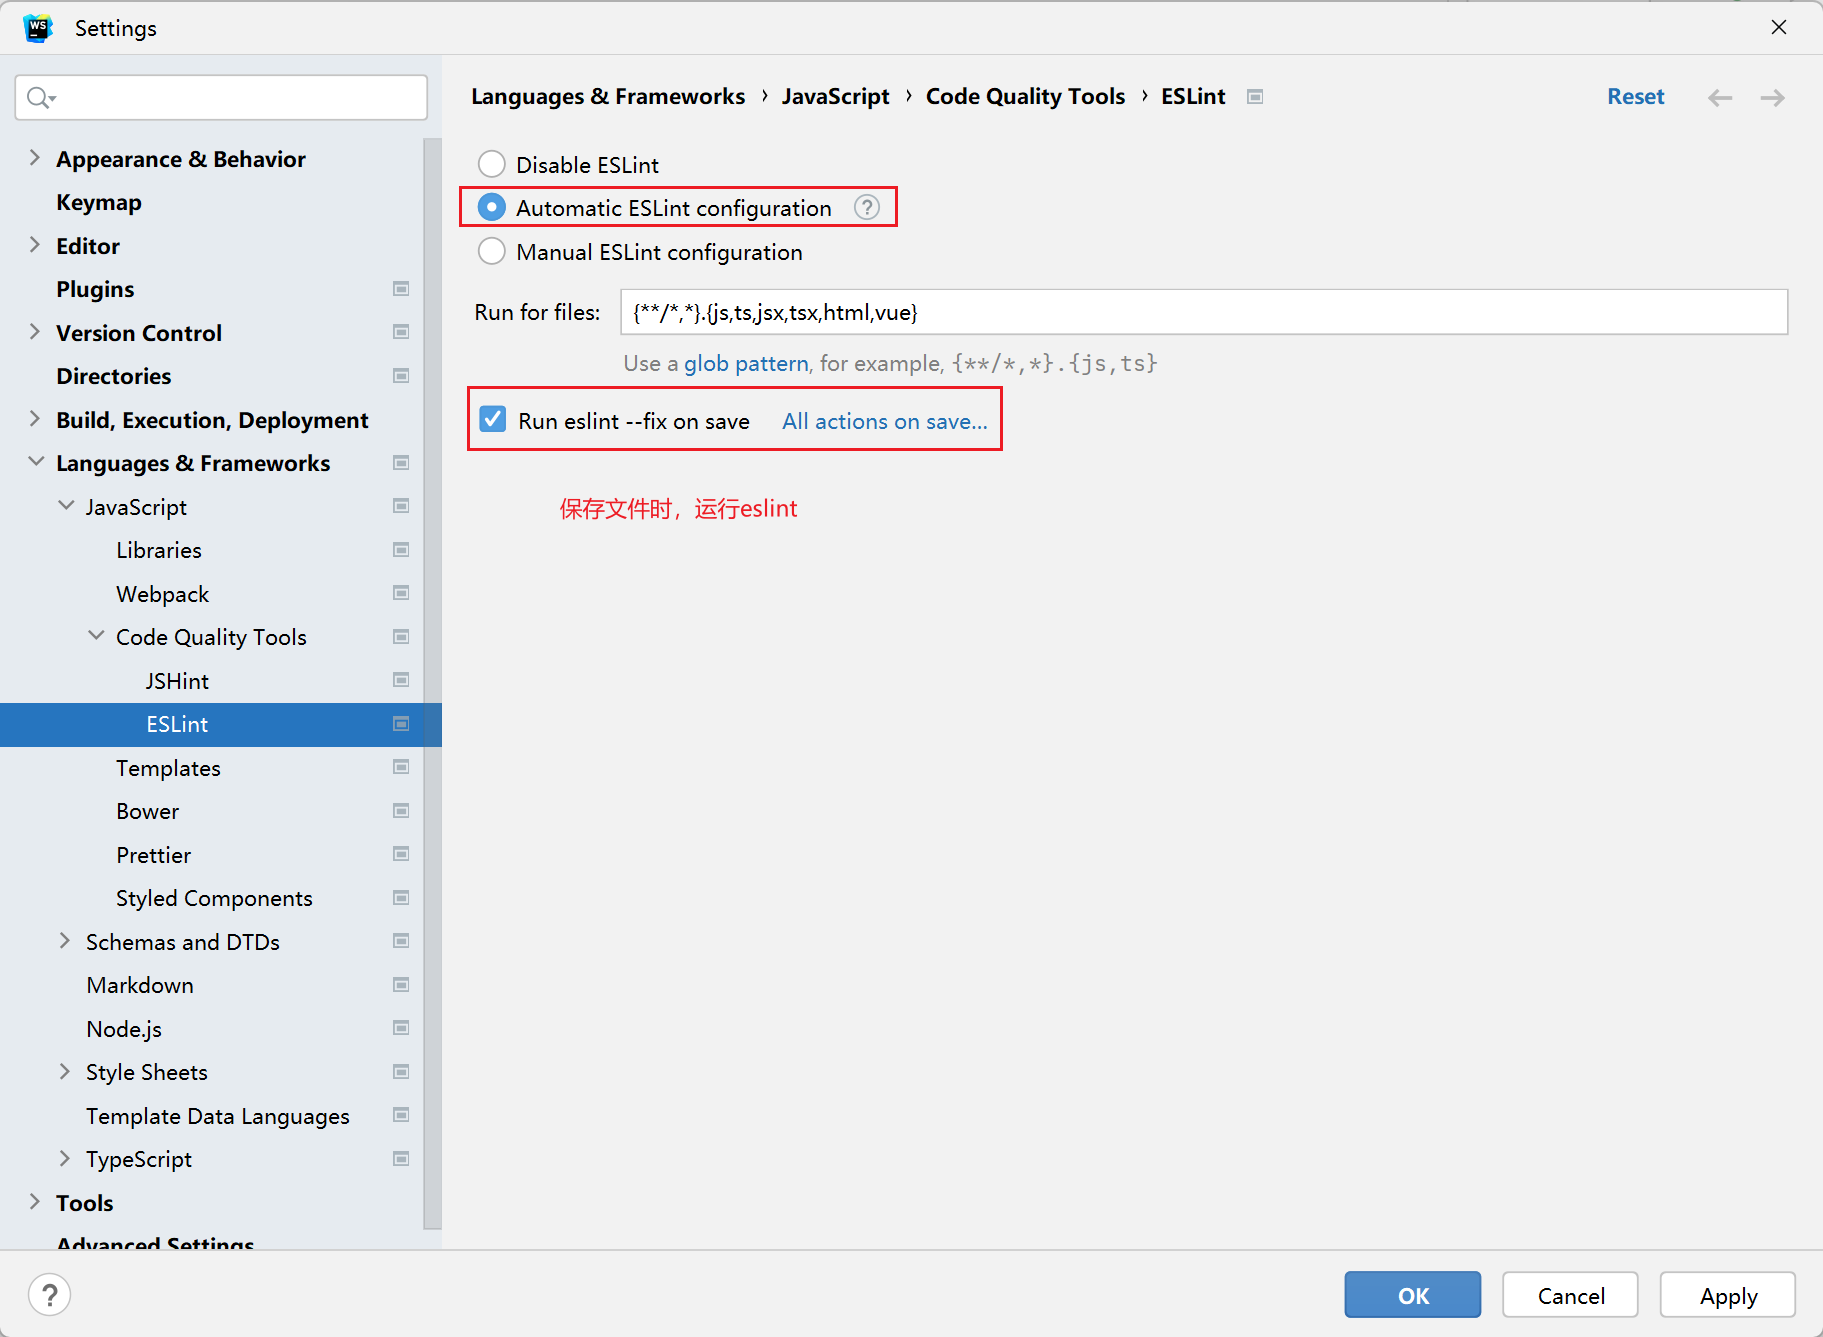
环境同步: 1、ESlint,开启保存自动修复 配置文件 .eslintrc.cjs prettier 风格配置 https://prettier.io 使用单引号 不使用分号 每行宽度至多80字符 不加对象|数组最后逗号 换行符号不限制(win mac 不一致) vue组件名称…...
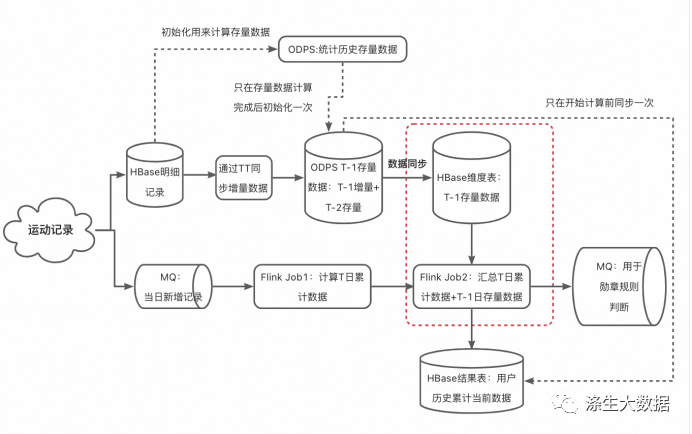
涤生大数据实战:基于Flink+ODPS历史累计计算项目分析与优化(上)
涤生大数据实战:基于FlinkODPS历史累计计算项目分析与优化(一) 1.前置知识 ODPS(Open Data Platform and Service)是阿里云自研的一体化大数据计算平台和数据仓库产品,在集团内部离线作为离线数据处理和存…...

jvm一级缓存
1、利用JVM缓存。脱离redis。 2、导包,springboot自带此包。如没有可以导:com.google.guava:guava:20.0的包。 3、直接上代码: package com.leo.cache;import com.alibaba.fastjson.JSONObject; import com.google.common.cache.Cache; im…...

鸿蒙(HarmonyOS)项目方舟框架(ArkUI)之Web组件
鸿蒙(HarmonyOS)项目方舟框架(ArkUI)之Web组件 一、操作环境 操作系统: Windows 10 专业版、IDE:DevEco Studio 3.1、SDK:HarmonyOS 3.1 二、Web组件 提供具有网页显示能力的Web组件,ohos.web.webview提供web控制能…...

AlienFX Tools:彻底掌控你的Alienware设备,告别臃肿原厂软件
AlienFX Tools:彻底掌控你的Alienware设备,告别臃肿原厂软件 【免费下载链接】alienfx-tools Alienware systems lights, fans, and power control tools and apps 项目地址: https://gitcode.com/gh_mirrors/al/alienfx-tools 你是否对Alienware…...

5分钟搞定老旧电脑的Windows 11安装:WinDiskWriter让你的Mac变身万能启动盘制作器
5分钟搞定老旧电脑的Windows 11安装:WinDiskWriter让你的Mac变身万能启动盘制作器 【免费下载链接】windiskwriter 🖥 Windows Bootable USB creator for macOS. 🛠 Patches Windows 11 to bypass TPM and Secure Boot requirements. &#x…...

如何用Ai2Psd脚本快速实现AI到PSD的无损转换?终极解决方案揭秘
如何用Ai2Psd脚本快速实现AI到PSD的无损转换?终极解决方案揭秘 【免费下载链接】ai-to-psd A script for prepare export of vector objects from Adobe Illustrator to Photoshop 项目地址: https://gitcode.com/gh_mirrors/ai/ai-to-psd 你是否曾经遇到过这…...

Audiveris免费开源乐谱识别工具:从图像到数字乐谱的完整转换方案
Audiveris免费开源乐谱识别工具:从图像到数字乐谱的完整转换方案 【免费下载链接】audiveris Latest generation of Audiveris OMR engine 项目地址: https://gitcode.com/gh_mirrors/au/audiveris 还在为手动输入乐谱而烦恼吗?Audiveris作为一款…...

猫抓插件终极指南:简单三步下载网页所有视频音频
猫抓插件终极指南:简单三步下载网页所有视频音频 【免费下载链接】cat-catch 猫抓 浏览器资源嗅探扩展 / cat-catch Browser Resource Sniffing Extension 项目地址: https://gitcode.com/GitHub_Trending/ca/cat-catch 你是否曾经在网上看到一个精彩的视频想…...

RISC-V指令集实战:从考研408真题看数据通路设计与控制信号优化
1. RISC-V指令集与考研408真题的实战结合 第一次看到2024年考研408真题中那道RISC处理器题目时,我仿佛回到了大学实验室调试处理器的日子。这道题完美展现了RISC-V指令集在实际数据通路设计中的应用,特别是控制信号的精确控制对处理器性能的影响。很多同…...

前端表单安全兵法:一个 textarea、一个 select,也能被黑?这份避坑指南请收好
多行文本域 textarea 和下拉框 select 看起来平平无奇,却是前端表单里最容易被攻击、最容易出事故的两个点。 本文从实战的角度讲清楚:怎么写、哪里坑、如何防注入、防越权,并送上可跑的代码与运行结果。 面向开发和测试同学,强烈建议收藏转发。 一、textarea 的正确打开方…...

集成AI 的 Redis 客户端 Rudist发布新版了诩
Qt是一个跨平台C图形界面开发库,利用Qt可以快速开发跨平台窗体应用程序,在Qt中我们可以通过拖拽的方式将不同组件放到指定的位置,实现图形化开发极大的方便了开发效率,本笔记将重点介绍QSpinBox数值微调组件的常用方法及灵活应用。…...
)
基于异步日志的存储系统 步骤二(文件输出与滚动日志实现详解)
引言 回顾上一节:同步日志器的核心架构(LogLevel、LogMessage、Logger、LogFlush)。 本节目标:将日志持久化到文件,支持自动滚动(按大小切割)。 设计思路 1. 文件输出(FileFlush…...

AIAgent如何实现类人推理?:从符号逻辑到神经符号融合的5层知识表示架构实战解析
第一章:AIAgent如何实现类人推理? 2026奇点智能技术大会(https://ml-summit.org) 类人推理并非简单地堆叠参数或延长上下文窗口,而是通过分层认知架构模拟人类“思考—质疑—修正—决策”的闭环过程。现代AIAgent借助多阶段推理链࿰…...