六、Spring/Spring Boot整合ActiveMQ
Spring/Spring Boot整合ActiveMQ
- 一、Spring整合ActiveMQ
- 1.pom.xml
- 2.Queue - 队列
- 2.1 applicationContext.xml
- 2.2 生产者
- 2.3 消费者
- 3.Topic - 主题
- 3.1 applicationContext.xml
- 3.2 生产者
- 3.3 消费者
- 4.消费者 - 监听器
- 4.1 编写监听器类
- 4.2 配置监听器
- 4.3 生产者+消费者一体
- 二、Spring Boot整合ActiveMQ
- 1.Queue - 队列
- 1.1 生产者
- 1.1.1 创建Maven工程
- 1.1.2 pom.xml
- 1.1.3 application.yml
- 1.1.4 创建配置文件Bean
- 1.1.5 生产者
- 1.1.6 主启动类
- 1.1.7 测试单元类
- 1.1.8 案例-定时投递
- 1.2 消费者
- 1.2.1 创建Maven工程
- 1.2.2 pom.xml
- 1.2.3 application.yml
- 1.2.4 消费者-监听类
- 1.2.5 主启动类
- 2.Topic - 主题
- 2.1 生产者
- 2.1.1 创建Maven工程
- 2.1.2 pom.xml
- 2.1.3 application.yml
- 2.1.4 创建配置文件Bean
- 2.1.5 生产者
- 2.1.6 主启动类
- 2.2 消费者
- 2.2.1 创建Maven工程
- 2.2.2 pom.xml
- 2.2.3 application.yml
- 2.2.4 消费者
- 2.2.5 主启动类
一、Spring整合ActiveMQ
1.pom.xml
<?xml version="1.0" encoding="UTF-8"?>
<project xmlns="http://maven.apache.org/POM/4.0.0"xmlns:xsi="http://www.w3.org/2001/XMLSchema-instance"xsi:schemaLocation="http://maven.apache.org/POM/4.0.0 http://maven.apache.org/xsd/maven-4.0.0.xsd"><modelVersion>4.0.0</modelVersion><groupId>com.qingsi.activemq</groupId><artifactId>activemq_test</artifactId><version>1.0-SNAPSHOT</version><properties><maven.compiler.source>8</maven.compiler.source><maven.compiler.target>8</maven.compiler.target></properties><dependencies><dependency><!-- activemq所需要的jar包配置 --><groupId>org.apache.activemq</groupId><artifactId>activemq-all</artifactId><version>5.15.11</version></dependency><!-- 池化技术 --><dependency><groupId>org.apache.activemq</groupId><artifactId>activemq-pool</artifactId><version>5.15.10</version></dependency><dependency><groupId>com.fasterxml.jackson.core</groupId><artifactId>jackson-databind</artifactId><version>2.10.1</version></dependency><!-- https://mvnrepository.com/artifact/org.apache.xbean/xbean-spring --><dependency><groupId>org.apache.xbean</groupId><artifactId>xbean-spring</artifactId><version>4.15</version></dependency><!-- https://mvnrepository.com/artifact/org.springframework/spring-jms --><dependency><groupId>org.springframework</groupId><artifactId>spring-jms</artifactId><version>5.2.1.RELEASE</version></dependency><!-- https://mvnrepository.com/artifact/org.springframework/spring-aop --><dependency><groupId>org.springframework</groupId><artifactId>spring-aop</artifactId><version>5.2.1.RELEASE</version></dependency><!--  下面是junit/logback等基础配置  --><dependency><groupId>ch.qos.logback</groupId><artifactId>logback-classic</artifactId><version>1.2.3</version></dependency><dependency><groupId>org.projectlombok</groupId><artifactId>lombok</artifactId><version>1.16.18</version><scope>provided</scope></dependency><dependency><groupId>junit</groupId><artifactId>junit</artifactId><version>4.12</version></dependency></dependencies></project>
2.Queue - 队列
2.1 applicationContext.xml
- 路径:src/main/resources/applicationContext.xml
<?xml version="1.0" encoding="UTF-8"?>
<beans xmlns="http://www.springframework.org/schema/beans"xmlns:xsi="http://www.w3.org/2001/XMLSchema-instance"xmlns:context="http://www.springframework.org/schema/context"xsi:schemaLocation="http://www.springframework.org/schema/beans http://www.springframework.org/schema/beans/spring-beans.xsd http://www.springframework.org/schema/context https://www.springframework.org/schema/context/spring-context.xsd"><!--  开启包的自动扫描  --><context:component-scan base-package="com.qingsi.activemq"/><!--  配置生产者  --><bean id="connectionFactory" class="org.apache.activemq.pool.PooledConnectionFactory" destroy-method="stop"><property name="connectionFactory"><!--      正真可以生产Connection的ConnectionFactory,由对应的JMS服务商提供  --><bean class="org.apache.activemq.spring.ActiveMQConnectionFactory"><property name="brokerURL" value="tcp://192.168.86.128:61616"/></bean></property><property name="maxConnections" value="100"/></bean><!--  这个是队列目的地,点对点的Queue  --><bean id="destinationQueue" class="org.apache.activemq.command.ActiveMQQueue"><!--    通过构造注入Queue名    --><constructor-arg index="0" value="spring-active-queue"/></bean><!--  Spring提供的JMS工具类,他可以进行消息发送,接收等  --><bean id="jmsTemplate" class="org.springframework.jms.core.JmsTemplate"><!--    传入连接工厂    --><property name="connectionFactory" ref="connectionFactory"/><!--    传入目的地    --><property name="defaultDestination" ref="destinationQueue"/><!--    消息自动转换器    --><property name="messageConverter"><bean class="org.springframework.jms.support.converter.SimpleMessageConverter"/></property></bean>
</beans>
2.2 生产者
package com.qingsi.activemq.spring;import org.apache.xbean.spring.context.ClassPathXmlApplicationContext;
import org.springframework.beans.factory.annotation.Autowired;
import org.springframework.context.ApplicationContext;
import org.springframework.jms.core.JmsTemplate;
import org.springframework.jms.core.MessageCreator;
import org.springframework.stereotype.Service;import javax.jms.JMSException;
import javax.jms.Message;
import javax.jms.Session;
import javax.jms.TextMessage;@Service
public class SpringMQProduce {@Autowiredprivate JmsTemplate jmsTemplate;public static void main(String[] args) {// 获取配置文件对象ApplicationContext ctx = new ClassPathXmlApplicationContext("applicationContext.xml");// 获取SpringMQProduce对象,用于调用jmsTemplate// 下面等同于 new SpringMQProduce(),但是交给Spring管理,他只会new一次,后续都是用同一个实例对象SpringMQProduce produce = ctx.getBean(SpringMQProduce.class);// 由于 目标队列 在配置文件指定了,所以在发送的时候不需要再指定produce.jmsTemplate.send(new MessageCreator() {@Overridepublic Message createMessage(Session session) throws JMSException {TextMessage textMessage = session.createTextMessage("Spring和Active整合的消息");return textMessage;}});// 下面是lambda表达式写法,和上面效果一样// produce.jmsTemplate.send((session -> {//     TextMessage textMessage = session.createTextMessage("Spring和Active整合的消息");//     return textMessage;// }));System.out.println("消息发送完毕");}}
2.3 消费者
package com.qingsi.activemq.spring;import org.apache.xbean.spring.context.ClassPathXmlApplicationContext;
import org.springframework.beans.factory.annotation.Autowired;
import org.springframework.context.ApplicationContext;
import org.springframework.jms.core.JmsTemplate;
import org.springframework.stereotype.Service;@Service
public class SpringMQConsumer {@Autowiredprivate JmsTemplate jmsTemplate;public static void main(String[] args) {// 获取配置文件对象ApplicationContext ctx = new ClassPathXmlApplicationContext("applicationContext.xml");// 获取SpringMQConsumer对象,用于调用jmsTemplate// 下面等同于 new SpringMQConsumer(),但是交给Spring管理,他只会new一次,后续都是用同一个实例对象SpringMQConsumer consumer = ctx.getBean(SpringMQConsumer.class);String retValue = (String) consumer.jmsTemplate.receiveAndConvert();System.out.println("spring消费者收到的消息:" + retValue);}}
3.Topic - 主题
3.1 applicationContext.xml
- 路径:src/main/resources/applicationContext.xml
<?xml version="1.0" encoding="UTF-8"?>
<beans xmlns="http://www.springframework.org/schema/beans"xmlns:xsi="http://www.w3.org/2001/XMLSchema-instance"xmlns:context="http://www.springframework.org/schema/context"xsi:schemaLocation="http://www.springframework.org/schema/beans http://www.springframework.org/schema/beans/spring-beans.xsd http://www.springframework.org/schema/context https://www.springframework.org/schema/context/spring-context.xsd"><!--  开启包的自动扫描  --><context:component-scan base-package="com.qingsi.activemq"/><!--  配置生产者  --><bean id="connectionFactory" class="org.apache.activemq.pool.PooledConnectionFactory" destroy-method="stop"><property name="connectionFactory"><!--      正真可以生产Connection的ConnectionFactory,由对应的JMS服务商提供  --><bean class="org.apache.activemq.spring.ActiveMQConnectionFactory"><property name="brokerURL" value="tcp://192.168.86.128:61616"/></bean></property><property name="maxConnections" value="100"/></bean><!--  这个是队列目的地,  发布订阅的主题Topic--><bean id="destinationTopic" class="org.apache.activemq.command.ActiveMQTopic"><constructor-arg index="0" value="spring-active-topic"/></bean><!--  Spring提供的JMS工具类,他可以进行消息发送,接收等  --><bean id="jmsTemplate" class="org.springframework.jms.core.JmsTemplate"><!--    传入连接工厂    --><property name="connectionFactory" ref="connectionFactory"/><!--    传入目的地    --><property name="defaultDestination" ref="destinationTopic"/><!--    消息自动转换器    --><property name="messageConverter"><bean class="org.springframework.jms.support.converter.SimpleMessageConverter"/></property></bean>
</beans>
3.2 生产者
- 和队列的代码一样,只是在配置文件里面改了destination
3.3 消费者
- 和队列的代码一样,只是在配置文件里面改了destination
4.消费者 - 监听器
- 实现目标:在Spring里面实现消费者不启动,直接通过配置监听完成
- 类似于前面setMessageListenner实时间提供消息
注意:配置了监听器,那么启动生产者,就会自动消费,不需要再启动消费者了
4.1 编写监听器类
package com.qingsi.activemq.spring;import org.springframework.stereotype.Component;import javax.jms.JMSException;
import javax.jms.Message;
import javax.jms.MessageListener;
import javax.jms.TextMessage;@Component
public class MyMessageListener implements MessageListener {@Overridepublic void onMessage(Message message) {if (message instanceof TextMessage){TextMessage textMessage = (TextMessage) message;try {System.out.println("收到消息: " + textMessage.getText());} catch (JMSException e) {e.printStackTrace();}}}
}
4.2 配置监听器
- applicationContext.xml
<?xml version="1.0" encoding="UTF-8"?>
<beans xmlns="http://www.springframework.org/schema/beans"xmlns:xsi="http://www.w3.org/2001/XMLSchema-instance"xmlns:context="http://www.springframework.org/schema/context"xsi:schemaLocation="http://www.springframework.org/schema/beans http://www.springframework.org/schema/beans/spring-beans.xsd http://www.springframework.org/schema/context https://www.springframework.org/schema/context/spring-context.xsd"><!--  开启包的自动扫描  --><context:component-scan base-package="com.qingsi.activemq"/><!--  配置生产者  --><bean id="connectionFactory" class="org.apache.activemq.pool.PooledConnectionFactory" destroy-method="stop"><property name="connectionFactory"><!--      正真可以生产Connection的ConnectionFactory,由对应的JMS服务商提供  --><bean class="org.apache.activemq.spring.ActiveMQConnectionFactory"><property name="brokerURL" value="tcp://192.168.86.128:61616"/></bean></property><property name="maxConnections" value="100"/></bean><!--  这个是队列目的地,  发布订阅的主题Topic--><bean id="destinationTopic" class="org.apache.activemq.command.ActiveMQTopic"><constructor-arg index="0" value="spring-active-topic"/></bean><!--  Spring提供的JMS工具类,他可以进行消息发送,接收等  --><bean id="jmsTemplate" class="org.springframework.jms.core.JmsTemplate"><!--    传入连接工厂    --><property name="connectionFactory" ref="connectionFactory"/><!--    传入目的地    --><property name="defaultDestination" ref="destinationTopic"/><!--    消息自动转换器    --><property name="messageConverter"><bean class="org.springframework.jms.support.converter.SimpleMessageConverter"/></property></bean><!--  配置Jms消息监听器  --><bean id="defaultMessageListenerContainer" class="org.springframework.jms.listener.DefaultMessageListenerContainer"><!--  Jms连接的工厂     --><property name="connectionFactory" ref="connectionFactory"/><!--   设置默认的监听目的地     --><property name="destination" ref="destinationTopic"/><!--  指定自己实现了MessageListener的类     --><property name="messageListener" ref="myMessageListener"/></bean>
</beans>
4.3 生产者+消费者一体
package com.qingsi.activemq.spring;import org.apache.xbean.spring.context.ClassPathXmlApplicationContext;
import org.springframework.beans.factory.annotation.Autowired;
import org.springframework.context.ApplicationContext;
import org.springframework.jms.core.JmsTemplate;
import org.springframework.jms.core.MessageCreator;
import org.springframework.stereotype.Service;import javax.jms.JMSException;
import javax.jms.Message;
import javax.jms.Session;
import javax.jms.TextMessage;@Service
public class SpringMQProduce {@Autowiredprivate JmsTemplate jmsTemplate;public static void main(String[] args) {// 获取配置文件对象ApplicationContext ctx = new ClassPathXmlApplicationContext("applicationContext.xml");// 获取SpringMQProduce对象,用于调用jmsTemplate// 下面等同于 new SpringMQProduce(),但是交给Spring管理,他只会new一次,后续都是用同一个实例对象SpringMQProduce produce = ctx.getBean(SpringMQProduce.class);// 由于 目标队列 在配置文件指定了,所以在发送的时候不需要再指定produce.jmsTemplate.send((session -> {TextMessage textMessage = session.createTextMessage("Spring和Active整合的消息");return textMessage;}));System.out.println("消息发送完毕");}}
二、Spring Boot整合ActiveMQ
1.Queue - 队列
1.1 生产者
1.1.1 创建Maven工程
- 这里有案例,根据实际来创建:https://qingsi.blog.csdn.net/article/details/136130132
- 我创建了
- 工程名:boot_activemq_test
- 包名:com.qingsi.boot.activemq
1.1.2 pom.xml
<?xml version="1.0" encoding="UTF-8"?>
<project xmlns="http://maven.apache.org/POM/4.0.0"xmlns:xsi="http://www.w3.org/2001/XMLSchema-instance"xsi:schemaLocation="http://maven.apache.org/POM/4.0.0 http://maven.apache.org/xsd/maven-4.0.0.xsd"><modelVersion>4.0.0</modelVersion><groupId>com.qingsi.boot.activemq</groupId><artifactId>boot_activemq_test</artifactId><version>1.0-SNAPSHOT</version><properties><maven.compiler.source>8</maven.compiler.source><maven.compiler.target>8</maven.compiler.target></properties><dependencies><!-- https://mvnrepository.com/artifact/org.springframework.boot/spring-boot-starter --><dependency><groupId>org.springframework.boot</groupId><artifactId>spring-boot-starter</artifactId><version>2.2.1.RELEASE</version></dependency><dependency><groupId>org.springframework.boot</groupId><artifactId>spring-boot-starter-web</artifactId><version>2.2.1.RELEASE</version></dependency><dependency><groupId>org.springframework.boot</groupId><artifactId>spring-boot-starter-test</artifactId><version>2.2.1.RELEASE</version><scope>test</scope></dependency><!-- https://mvnrepository.com/artifact/org.springframework.boot/spring-boot-starter --><dependency><groupId>org.springframework.boot</groupId><artifactId>spring-boot-starter-activemq</artifactId><version>2.2.1.RELEASE</version></dependency></dependencies><build><plugins><plugin><groupId>org.springframework.boot</groupId><artifactId>spring-boot-maven-plugin</artifactId><version>2.2.1.RELEASE</version></plugin></plugins></build></project>
1.1.3 application.yml
- 路径:src/main/resources/application.yml
#Springboot启动端口
server:port: 8080#ActiveMQ配置
spring:activemq:broker-url: tcp://192.168.86.128:61616 #ActiveMQ服务器IPuser: admin #ActiveMQ连接用户名password: admin #ActiveMQ连接密码jms:#指定连接队列还是主题pub-sub-domain: false # false = Queue |  true = Topic#定义服务上的队列名
myqueue: springboot-activemq-queue
1.1.4 创建配置文件Bean
package com.qingsi.boot.activemq.config;import javax.jms.Queue;import org.apache.activemq.command.ActiveMQQueue;
import org.springframework.beans.factory.annotation.Value;
import org.springframework.context.annotation.Bean;
import org.springframework.jms.annotation.EnableJms;
import org.springframework.stereotype.Component;@Component
@EnableJms
public class ConfigBean {// 从配置文件读取 队列名称@Value("${myqueue}")private String myQueue;// 通过 队列名称 创建队列@Beanpublic Queue queue() {return new ActiveMQQueue(myQueue);}
}
1.1.5 生产者
package com.qingsi.boot.activemq.produce;import org.springframework.beans.factory.annotation.Autowired;
import org.springframework.jms.core.JmsMessagingTemplate;
import org.springframework.stereotype.Component;import javax.jms.Queue;
import java.util.UUID;@Component
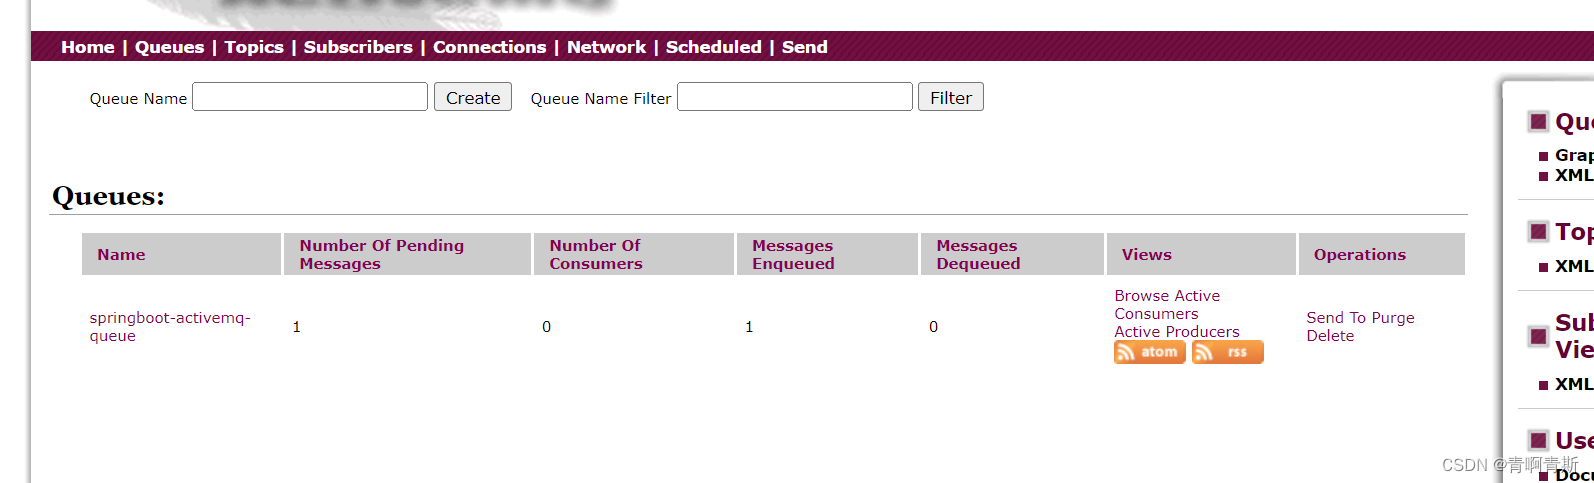
public class QueueProduce {@Autowiredprivate JmsMessagingTemplate jmsMessagingTemplate;@Autowiredprivate Queue queue;public void produceMsg() {jmsMessagingTemplate.convertAndSend(queue, "-----" + UUID.randomUUID().toString().substring(0, 6));}
}1.1.6 主启动类
package com.qingsi.boot.activemq;import org.springframework.boot.SpringApplication;
import org.springframework.boot.autoconfigure.SpringBootApplication;@SpringBootApplication
public class MainAppProduce {public static void main(String[] args) {SpringApplication.run(MainAppProduce.class, args);}
}
1.1.7 测试单元类
package com.qingsi.boot.activemq;import com.qingsi.boot.activemq.produce.QueueProduce;
import org.junit.Test;
import org.junit.runner.RunWith;
import org.springframework.boot.test.context.SpringBootTest;
import org.springframework.test.context.junit4.SpringJUnit4ClassRunner;
import org.springframework.test.context.web.WebAppConfiguration;import javax.annotation.Resource;@SpringBootTest(classes = MainAppProduce.class)
@RunWith(SpringJUnit4ClassRunner.class)
@WebAppConfiguration
public class TestActiveMQ {@Resourceprivate QueueProduce queueProduce;@Testpublic void testSend() {queueProduce.produceMsg();}
}
- 运行测试类
1.1.8 案例-定时投递
- 要求每隔3秒钟,往MQ推送消息
生产者
package com.qingsi.boot.activemq.produce;import org.springframework.beans.factory.annotation.Autowired;
import org.springframework.jms.core.JmsMessagingTemplate;
import org.springframework.scheduling.annotation.Scheduled;
import org.springframework.stereotype.Component;import javax.jms.Queue;
import java.util.UUID;@Component
public class QueueProduce {@Autowiredprivate JmsMessagingTemplate jmsMessagingTemplate;@Autowiredprivate Queue queue;public void produceMsg() {jmsMessagingTemplate.convertAndSend(queue, "-----" + UUID.randomUUID().toString().substring(0, 6));}// 间隔实际3秒定投@Scheduled(fixedDelay = 3000)public void produceMsgScheduled(){jmsMessagingTemplate.convertAndSend(queue, "-----" + UUID.randomUUID().toString().substring(0, 6));}
}
主启动类
- 开启Schedule
package com.qingsi.boot.activemq;import org.springframework.boot.SpringApplication;
import org.springframework.boot.autoconfigure.SpringBootApplication;
import org.springframework.scheduling.annotation.EnableScheduling;@SpringBootApplication
@EnableScheduling
public class MainAppProduce {public static void main(String[] args) {SpringApplication.run(MainAppProduce.class, args);}
}- 启动主启动类,就会定时发消息了
1.2 消费者
1.2.1 创建Maven工程
- 这里有案例,根据实际来创建:https://qingsi.blog.csdn.net/article/details/136130132
- 我创建了
- 工程名:boot_activemq_consumer
- 包名:com.qingsi.boot.activemq
1.2.2 pom.xml
<?xml version="1.0" encoding="UTF-8"?>
<project xmlns="http://maven.apache.org/POM/4.0.0"xmlns:xsi="http://www.w3.org/2001/XMLSchema-instance"xsi:schemaLocation="http://maven.apache.org/POM/4.0.0 http://maven.apache.org/xsd/maven-4.0.0.xsd"><modelVersion>4.0.0</modelVersion><groupId>com.qingsi.boot.activemq</groupId><artifactId>boot_activemq_consumer</artifactId><version>1.0-SNAPSHOT</version><properties><maven.compiler.source>8</maven.compiler.source><maven.compiler.target>8</maven.compiler.target></properties><dependencies><!-- https://mvnrepository.com/artifact/org.springframework.boot/spring-boot-starter --><dependency><groupId>org.springframework.boot</groupId><artifactId>spring-boot-starter</artifactId><version>2.2.1.RELEASE</version></dependency><dependency><groupId>org.springframework.boot</groupId><artifactId>spring-boot-starter-web</artifactId><version>2.2.1.RELEASE</version></dependency><dependency><groupId>org.springframework.boot</groupId><artifactId>spring-boot-starter-test</artifactId><version>2.2.1.RELEASE</version><scope>test</scope></dependency><!-- https://mvnrepository.com/artifact/org.springframework.boot/spring-boot-starter --><dependency><groupId>org.springframework.boot</groupId><artifactId>spring-boot-starter-activemq</artifactId><version>2.2.1.RELEASE</version></dependency></dependencies><build><plugins><plugin><groupId>org.springframework.boot</groupId><artifactId>spring-boot-maven-plugin</artifactId><version>2.2.1.RELEASE</version></plugin></plugins></build>
</project>
1.2.3 application.yml
#Springboot启动端口
server:port: 8888#ActiveMQ配置
spring:activemq:broker-url: tcp://192.168.86.128:61616 #ActiveMQ服务器IPuser: admin #ActiveMQ连接用户名password: admin #ActiveMQ连接密码jms:#指定连接队列还是主题pub-sub-domain: false # false = Queue |  true = Topic#定义服务上的队列名
myqueue: springboot-activemq-queue
1.2.4 消费者-监听类
package com.qingsi.activemq.consumer;import org.springframework.jms.annotation.JmsListener;
import org.springframework.stereotype.Component;import javax.jms.JMSException;
import javax.jms.TextMessage;@Component
public class QueueConsumer {// 开启监听@JmsListener(destination = "${myqueue}")public void receive(TextMessage textMessage) throws JMSException {System.out.println("消费者收到消息:" + textMessage.getText());}
}
1.2.5 主启动类
- 开启Jms监听
package com.qingsi.activemq;import org.springframework.boot.SpringApplication;
import org.springframework.boot.autoconfigure.SpringBootApplication;@SpringBootApplication
public class MainAppConsumer {public static void main(String[] args) {SpringApplication.run(MainAppConsumer.class, args);}
}
2.Topic - 主题
2.1 生产者
2.1.1 创建Maven工程
- 这里有案例,根据实际来创建:https://qingsi.blog.csdn.net/article/details/136130132
- 我创建了
- 工程名:boot_mq_topic_produce
- 包名:com.qingsi.boot.activemq.topic.produce
2.1.2 pom.xml
<?xml version="1.0" encoding="UTF-8"?>
<project xmlns="http://maven.apache.org/POM/4.0.0"xmlns:xsi="http://www.w3.org/2001/XMLSchema-instance"xsi:schemaLocation="http://maven.apache.org/POM/4.0.0 http://maven.apache.org/xsd/maven-4.0.0.xsd"><modelVersion>4.0.0</modelVersion><groupId>com.qingsi.boot.activemq.topic.produce</groupId><artifactId>boot_mq_topic_produce</artifactId><version>1.0-SNAPSHOT</version><properties><maven.compiler.source>8</maven.compiler.source><maven.compiler.target>8</maven.compiler.target></properties><dependencies><!-- https://mvnrepository.com/artifact/org.springframework.boot/spring-boot-starter --><dependency><groupId>org.springframework.boot</groupId><artifactId>spring-boot-starter</artifactId><version>2.2.1.RELEASE</version></dependency><dependency><groupId>org.springframework.boot</groupId><artifactId>spring-boot-starter-web</artifactId><version>2.2.1.RELEASE</version></dependency><dependency><groupId>org.springframework.boot</groupId><artifactId>spring-boot-starter-test</artifactId><version>2.2.1.RELEASE</version><scope>test</scope></dependency><!-- https://mvnrepository.com/artifact/org.springframework.boot/spring-boot-starter --><dependency><groupId>org.springframework.boot</groupId><artifactId>spring-boot-starter-activemq</artifactId><version>2.2.1.RELEASE</version></dependency></dependencies><build><plugins><plugin><groupId>org.springframework.boot</groupId><artifactId>spring-boot-maven-plugin</artifactId><version>2.2.1.RELEASE</version></plugin></plugins></build></project>
2.1.3 application.yml
#Springboot启动端口
server:port: 6666#ActiveMQ配置
spring:activemq:broker-url: tcp://192.168.86.128:61616 #ActiveMQ服务器IPuser: admin #ActiveMQ连接用户名password: admin #ActiveMQ连接密码jms:#指定连接队列还是主题pub-sub-domain: true # false = Queue |  true = Topic#定义服务上的队列名
myTopic: springboot-activemq-topic
2.1.4 创建配置文件Bean
package com.qingsi.boot.activemq.topic.config;import org.apache.activemq.command.ActiveMQTopic;
import org.springframework.beans.factory.annotation.Value;
import org.springframework.context.annotation.Bean;
import org.springframework.stereotype.Component;import javax.jms.Topic;@Component
public class ConfigBean {@Value("${myTopic}")private String topicName;@Beanpublic Topic topic(){return new ActiveMQTopic(topicName);}}
2.1.5 生产者
package com.qingsi.boot.activemq.topic.com.qingsi.boot.activemq.produce;import org.springframework.beans.factory.annotation.Autowired;
import org.springframework.jms.core.JmsMessagingTemplate;
import org.springframework.scheduling.annotation.Scheduled;
import org.springframework.stereotype.Component;import javax.jms.Topic;
import java.util.UUID;@Component
public class TopicProduce {@Autowiredprivate JmsMessagingTemplate jmsMessagingTemplate;@Autowiredprivate Topic topic;// 间隔实际3秒定投@Scheduled(fixedDelay = 3000)public void produceTopic() {jmsMessagingTemplate.convertAndSend(topic, "主题消息: " + UUID.randomUUID().toString().substring(0, 6));}}
2.1.6 主启动类
package com.qingsi.boot.activemq.topic;import org.springframework.boot.SpringApplication;
import org.springframework.boot.autoconfigure.SpringBootApplication;
import org.springframework.scheduling.annotation.EnableScheduling;@SpringBootApplication
@EnableScheduling
public class MainAppTopicProduce {public static void main(String[] args) {SpringApplication.run(MainAppTopicProduce.class, args);}}
2.2 消费者
2.2.1 创建Maven工程
- 这里有案例,根据实际来创建:https://qingsi.blog.csdn.net/article/details/136130132
- 我创建了
- 工程名:boot_mq_topic_consumer
- 包名:com.qingsi.boot.activemq.topic.consumer
2.2.2 pom.xml
<?xml version="1.0" encoding="UTF-8"?>
<project xmlns="http://maven.apache.org/POM/4.0.0"xmlns:xsi="http://www.w3.org/2001/XMLSchema-instance"xsi:schemaLocation="http://maven.apache.org/POM/4.0.0 http://maven.apache.org/xsd/maven-4.0.0.xsd"><modelVersion>4.0.0</modelVersion><groupId>com.qingsi.boot.activemq.topic.consumer</groupId><artifactId>boot_mq_topic_consumer</artifactId><version>1.0-SNAPSHOT</version><properties><maven.compiler.source>8</maven.compiler.source><maven.compiler.target>8</maven.compiler.target></properties><dependencies><!-- https://mvnrepository.com/artifact/org.springframework.boot/spring-boot-starter --><dependency><groupId>org.springframework.boot</groupId><artifactId>spring-boot-starter</artifactId><version>2.2.1.RELEASE</version></dependency><dependency><groupId>org.springframework.boot</groupId><artifactId>spring-boot-starter-web</artifactId><version>2.2.1.RELEASE</version></dependency><dependency><groupId>org.springframework.boot</groupId><artifactId>spring-boot-starter-test</artifactId><version>2.2.1.RELEASE</version><scope>test</scope></dependency><!-- https://mvnrepository.com/artifact/org.springframework.boot/spring-boot-starter --><dependency><groupId>org.springframework.boot</groupId><artifactId>spring-boot-starter-activemq</artifactId><version>2.2.1.RELEASE</version></dependency></dependencies><build><plugins><plugin><groupId>org.springframework.boot</groupId><artifactId>spring-boot-maven-plugin</artifactId><version>2.2.1.RELEASE</version></plugin></plugins></build></project>
2.2.3 application.yml
#Springboot启动端口
server:port: 5555#ActiveMQ配置
spring:activemq:broker-url: tcp://192.168.86.128:61616 #ActiveMQ服务器IPuser: admin #ActiveMQ连接用户名password: admin #ActiveMQ连接密码jms:#指定连接队列还是主题pub-sub-domain: true # false = Queue |  true = Topic#定义服务上的队列名
myTopic: springboot-activemq-topic
2.2.4 消费者
package com.qingsi.activemq.topic.consumer;import org.springframework.jms.annotation.JmsListener;
import org.springframework.stereotype.Component;import javax.jms.JMSException;
import javax.jms.TextMessage;@Component
public class TopicConsumer {// 开启监听@JmsListener(destination = "${myTopic}")public void receive(TextMessage textMessage) throws JMSException {System.out.println("消费者收到消息:" + textMessage.getText());}
}
2.2.5 主启动类
package com.qingsi.activemq.topic;import org.springframework.boot.SpringApplication;
import org.springframework.boot.autoconfigure.SpringBootApplication;@SpringBootApplication
public class MainAppTopicConsumer {public static void main(String[] args) {SpringApplication.run(MainAppTopicConsumer.class, args);}}
相关文章:
六、Spring/Spring Boot整合ActiveMQ
Spring/Spring Boot整合ActiveMQ 一、Spring整合ActiveMQ1.pom.xml2.Queue - 队列2.1 applicationContext.xml2.2 生产者2.3 消费者 3.Topic - 主题3.1 applicationContext.xml3.2 生产者3.3 消费者 4.消费者 - 监听器4.1 编写监听器类4.2 配置监听器4.3 生产者消费者一体 二、…...
使用docker搭建springBoot/springCloud服务)
树莓派4B(Raspberry Pi 4B)使用docker搭建springBoot/springCloud服务
树莓派4B(Raspberry Pi 4B)使用docker搭建springBoot/springCloud服务 前提:本文基于Ubuntu,Java8,SpringBoot 2.6.13讲解 准备工作 准备SpringBoot/SpringCloud项目jar包 用 maven 打包springBoot/springCloud项目&…...
数据库设计、JDBC、数据库连接池
数据库设计 数据库设计概念 数据库设计就是根据业务 系统的具体需求,结合我们所选用的DBMS,为这个业务系统构造出最优的数据存储模型。建立数据库中的表结构以及表与表之间的关联关系的过程。有哪些表?表里有哪些字段?表和表之间有什么关系? 数据库设计的步骤…...
SpringBoot实现OneDrive文件上传
SpringBoot实现OneDrive文件上传 源码 OneDriveUpload: SpringBoot实现OneDrive文件上传 获取accessToken步骤 参考文档:针对 OneDrive API 的 Microsoft 帐户授权 - OneDrive dev center | Microsoft Learn 1.访问Azure创建应用Microsoft Azure,使…...

C++初阶:容器适配器介绍、stack和queue常用接口详解及模拟实现
介绍完了list类的相关内容后:C初阶:适合新手的手撕list(模拟实现list) 接下来进入新的篇章,stack和queue的介绍以及模拟: 文章目录 1.stack的初步介绍2.stack的使用3.queue的初步介绍4.queue的使用5.容器适…...

GRUB and the Boot Process on UEFI-based x86 Systems
background info : BIOS and UEFI-CSDN博客 The UEFI-based platform reads the partition table on the system storage and mounts the EFI System Partition (ESP), a VFAT partition labeled with a particular globally unique identifier (GUID). The ESP contains EFI a…...
2.C语言——输入输出
1.字符输入输出函数 1.输入:getchar() 字面意思,接收单个字符,使用方法 char a; a getchar();实际上效果等同于char a; scanf("%c",&a);2.输出:putchar() 2.格式化输入输出函数 1.输入:scanf() 格式: scanf(“格式控制…...
MySQL篇之SQL优化
一、表的设计优化 表的设计优化(参考阿里开发手册《嵩山版》): 1. 比如设置合适的数值(tinyint int bigint),要根据实际情况选择。 2. 比如设置合适的字符串类型(char和varchar)…...
QGis —— 1、Windows10下载安装QGis及插件
QGis官网 QGIS(自由开源的地理信息系统)是一个专业的GIS应用程序,它建立在免费和开源软件(FOSS)之上,并为此而自豪。QGIS 是一个方便使用的开源地理信息系统 (GIS),根据 GNU 通用公共许可授权。…...
【打工日常】使用docker部署Dashdot工具箱
一、Dashdot介绍 dashdot是一个简洁清晰的服务器数据仪表板,基于React实现 ,主要是显示操作系统、进程、存储、内存、网络这五个的数据。 二、本次实践介绍 1. 本次实践简介 本次实践部署环境为个人测试环境 2. 本地环境规划 本次实践环境规划…...
使用client-only 解决组件不兼容SSR问题
目录 前言 一、解决方案 1.基于Nuxt 框架的SSR应用 2.基于vue2框架的应用 3.基于vue3框架的应用 二、总结 往期回顾 前言 最近在我的单页面SSR应用上开发JSON编辑器功能,在引入组件后直接客户端跳转OK,但是在直接加载服务端渲染的时候一直报这…...

基于Java SSM框架实现网上报名系统项目【项目源码+论文说明】
基于java的SSM框架实现网上报名系统演示 摘要 随着互联网时代的到来,同时计算机网络技术高速发展,网络管理运用也变得越来越广泛。因此,建立一个B/S结构的网上报名系统,会使网上报名系统工作系统化、规范化,也会提高网…...

7.1 Qt 中输入行与按钮
目录 前言: 技能: 内容: 参考: 前言: line edit 与pushbotton的一点联动 当输入行有内容时,按钮才能使用,并能读出输入行的内容 技能: pushButton->setEnabled(false) 按钮不…...
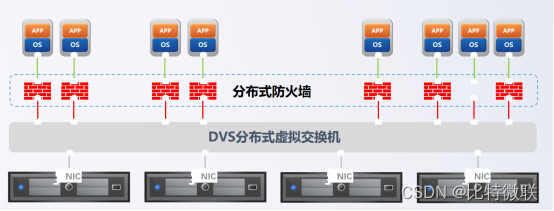
云计算基础-网络虚拟化
虚拟交换机 什么是虚拟交换机 虚拟交换机是一种运行在虚拟化环境中的网络设备,其运行在宿主机的内存中,通过软件方式在宿主机内部实现了部分物理交换机的功能,如 VLAN 划分、流量控制、QoS 支持和安全功能等网络管理特性 虚拟交换机在云平…...
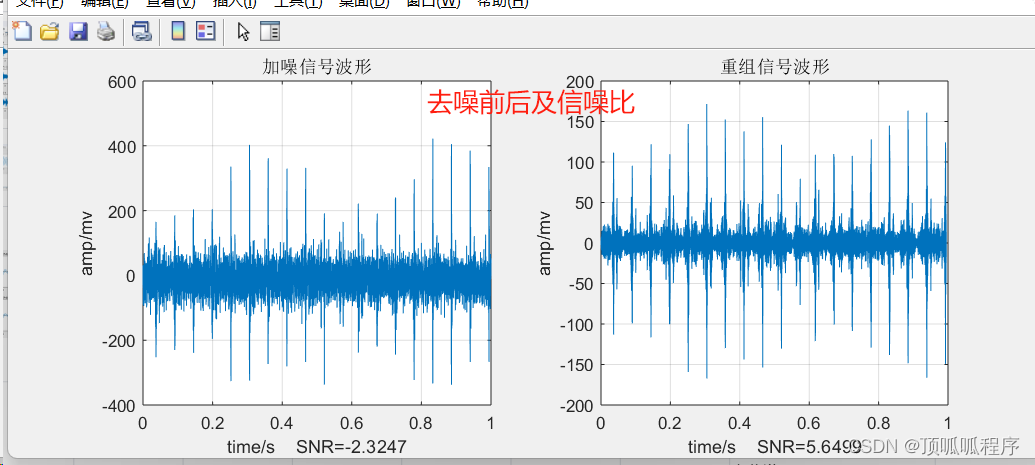
166基于matlab的通过峭度指标与互相关系数筛选IMF进行SVD分解去噪
基于matlab的通过峭度指标与互相关系数筛选IMF进行SVD分解去噪,分辨虚假imf,提取最大峭度imf图。输出去噪前后时域及其包络谱结果。程序已调通,可直接运行。 166 matlab SVD去噪 IMF筛选 包络谱 (xiaohongshu.com)...
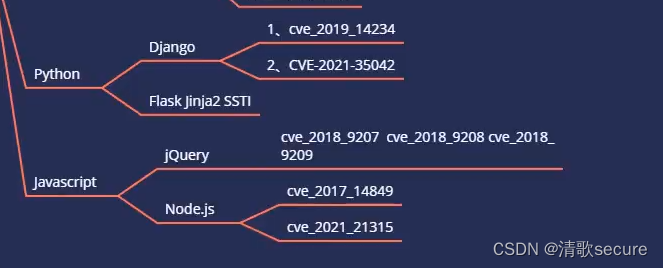
第六十三天 服务攻防-框架安全CVE复现DjangoFlaskNode.JSJQuery
第六十三天 服务攻防-框架安全&CVE复现&Django&Flask&Node.JS&JQuery 知识点: 中间件及框架列表: IIS,Apache,Nginx,Tomcat,Docker,K8s,Weblogic.JBoos,WebSphere, Jenkins,GlassFish,Jetty,Jira,Struts2,Laravel,Solr,Shiro,Thin…...

最大子序和+旅行问题——单调队列
一、最大子序和 输入一个长度为 n 的整数序列,从中找出一段长度不超过 m 的连续子序列,使得子序列中所有数的和最大。 注意: 子序列的长度至少是 1。 输入 第一行输入两个整数 n,m (1 ≤ n,m ≤ 300000)。 第二行输入 n 个数,代…...
Unity设备分级策略
Unity设备分级策略 前言 之前自己做的设备分级策略,在此做一个简单的记录和思路分享。希望能给大家带来帮助。 分级策略 根据拟定的评分标准,预生成部分已知机型的分级信息,且保存在包内;如果设备没有被评级过,则优…...

自己在开发AI应用的过程总结的 Prompt - 持续更新
自己在开发AI应用的过程总结的 Prompt - 持续更新 0. 引言1. 让模型以"中文"进行回复2. 控制模型仅输出"hi"3. 让模型"提供简单、清晰而具体的回答"4. 让模型"在最后说谢谢" 0. 引言 我想,我们多半有着相似的经历…...

STM32——OLED菜单
文章目录 一.补充二. 二级菜单代码 简介:首先在我的51 I2C里面有OLED详细讲解,本期代码从51OLED基础上移植过来的,可以先看完那篇文章,在看这个,然后按键我是用的定时器扫描不会堵塞程序,可以翻开我的文章有单独的定时…...

[特殊字符] 智能合约中的数据是如何在区块链中保持一致的?
🧠 智能合约中的数据是如何在区块链中保持一致的? 为什么所有区块链节点都能得出相同结果?合约调用这么复杂,状态真能保持一致吗?本篇带你从底层视角理解“状态一致性”的真相。 一、智能合约的数据存储在哪里…...
网络六边形受到攻击
大家读完觉得有帮助记得关注和点赞!!! 抽象 现代智能交通系统 (ITS) 的一个关键要求是能够以安全、可靠和匿名的方式从互联车辆和移动设备收集地理参考数据。Nexagon 协议建立在 IETF 定位器/ID 分离协议 (…...
业务系统对接大模型的基础方案:架构设计与关键步骤
业务系统对接大模型:架构设计与关键步骤 在当今数字化转型的浪潮中,大语言模型(LLM)已成为企业提升业务效率和创新能力的关键技术之一。将大模型集成到业务系统中,不仅可以优化用户体验,还能为业务决策提供…...

【Linux】shell脚本忽略错误继续执行
在 shell 脚本中,可以使用 set -e 命令来设置脚本在遇到错误时退出执行。如果你希望脚本忽略错误并继续执行,可以在脚本开头添加 set e 命令来取消该设置。 举例1 #!/bin/bash# 取消 set -e 的设置 set e# 执行命令,并忽略错误 rm somefile…...
iPhone密码忘记了办?iPhoneUnlocker,iPhone解锁工具Aiseesoft iPhone Unlocker 高级注册版分享
平时用 iPhone 的时候,难免会碰到解锁的麻烦事。比如密码忘了、人脸识别 / 指纹识别突然不灵,或者买了二手 iPhone 却被原来的 iCloud 账号锁住,这时候就需要靠谱的解锁工具来帮忙了。Aiseesoft iPhone Unlocker 就是专门解决这些问题的软件&…...

1688商品列表API与其他数据源的对接思路
将1688商品列表API与其他数据源对接时,需结合业务场景设计数据流转链路,重点关注数据格式兼容性、接口调用频率控制及数据一致性维护。以下是具体对接思路及关键技术点: 一、核心对接场景与目标 商品数据同步 场景:将1688商品信息…...

使用van-uploader 的UI组件,结合vue2如何实现图片上传组件的封装
以下是基于 vant-ui(适配 Vue2 版本 )实现截图中照片上传预览、删除功能,并封装成可复用组件的完整代码,包含样式和逻辑实现,可直接在 Vue2 项目中使用: 1. 封装的图片上传组件 ImageUploader.vue <te…...

python如何将word的doc另存为docx
将 DOCX 文件另存为 DOCX 格式(Python 实现) 在 Python 中,你可以使用 python-docx 库来操作 Word 文档。不过需要注意的是,.doc 是旧的 Word 格式,而 .docx 是新的基于 XML 的格式。python-docx 只能处理 .docx 格式…...
NFT模式:数字资产确权与链游经济系统构建
NFT模式:数字资产确权与链游经济系统构建 ——从技术架构到可持续生态的范式革命 一、确权技术革新:构建可信数字资产基石 1. 区块链底层架构的进化 跨链互操作协议:基于LayerZero协议实现以太坊、Solana等公链资产互通,通过零知…...
的原因分类及对应排查方案)
JVM暂停(Stop-The-World,STW)的原因分类及对应排查方案
JVM暂停(Stop-The-World,STW)的完整原因分类及对应排查方案,结合JVM运行机制和常见故障场景整理而成: 一、GC相关暂停 1. 安全点(Safepoint)阻塞 现象:JVM暂停但无GC日志,日志显示No GCs detected。原因:JVM等待所有线程进入安全点(如…...