协程源码 launch 流程跟踪学习
为了更深入学习协程的底层实现原理,了解协程线程切换的根本本质。也为了以后在工作中可以根据不同的需求场景,更加随心所欲的使用不同的协程。
今天通过 launch 跟踪一下协程的执行流程。
 fun getData() {Trace.beginSection("getData");Log.e(TAG, "getData before " + Thread.currentThread().name)val demoScope: suspend CoroutineScope.() -> Unit = {Trace.beginSection("DispatchersIO");Log.e(TAG, "getData IO 1  " + Thread.currentThread().name)Thread.sleep(1000)Log.e(TAG, "getData IO 2 " + Thread.currentThread().name)Trace.endSection();}viewModelScope.launch(Dispatchers.IO, block = demoScope)
}
1. 流程图
1.1 从 launch 源码开始
public fun CoroutineScope.launch(context: CoroutineContext = EmptyCoroutineContext,start: CoroutineStart = CoroutineStart.DEFAULT,block: suspend CoroutineScope.() -> Unit
): Job {//1,先通过参数Context构造一个新的CoroutineContextval newContext = newCoroutineContext(context)val coroutine = if (start.isLazy)LazyStandaloneCoroutine(newContext, block) elseStandaloneCoroutine(newContext, active = true)coroutine.start(start, coroutine, block)return coroutine
}
launch 方法有三个参数
-
context:常用的一般是 Dispatchers.Default,Dispatchers.Main,Dispatchers.Unconfined,Dispatchers.IO。
-
start:枚举类型共四种:DEFAULT,LAZY,ATOMIC,UNDISPATCHED
-
block:就是 launch 执行的协程体
1.2 我们来看 newCoroutineContext 方法
@ExperimentalCoroutinesApi
public actual fun CoroutineScope.newCoroutineContext(context: CoroutineContext): CoroutineContext {val combined = coroutineContext + context//1val debug = if (DEBUG) combined + CoroutineId(COROUTINE_ID.incrementAndGet()) else combinedreturn if (combined !== Dispatchers.Default && combined[ContinuationInterceptor] == null)debug + Dispatchers.Default else debug
}
刚开始看到代码 1 的+号,头都是蒙的,这是什么鬼?不是数字类型,为啥能加?
其实本质就是调用了 CoroutineContext 的 plus,是操作符的重载
/*** Returns a context containing elements from this context and elements from  other [context].* The elements from this context with the same key as in the other one are dropped.*/
public operator fun plus(context: CoroutineContext): CoroutineContext =if (context === EmptyCoroutineContext) this else // fast path -- avoid lambda creationcontext.fold(this) { acc, element ->//operation函数体。。。。。。。}
fold 函数比较难理解,我们先说结论,就是把参数 this 内部与 context 的 key 一样的 CoroutineContext 移除后,剩下的 CoroutineContext 与 context 组成新的 CoroutineContext 对象。下边慢慢分析
CoroutineContext 的子类重写 fold 函数的一共有三个 EmptyCoroutineContext,CombinedContext,Element
-
上述代码第 6 行已经判断过 context 是 EmptyCoroutineContext。所以当前的 context 不可能是 EmptyCoroutineContext。其 fold 方法直接返回 this。如下:
public override fun <R> fold(initial: R, operation: (R, Element) -> R): R = initial-
是 Element 时。acc 就是 fold 函数参数。element 就是 fold 函数调用者
public override fun <R> fold(initial: R, operation: (R, Element) -> R): R =operation(initial, this)-
是 CombinedContext 比较复杂
internal class CombinedContext(private val left: CoroutineContext,private val element: Element
) : CoroutineContext, Serializable {public override fun <R> fold(initial: R, operation: (R, Element) -> R): R =operation(left.fold(initial, operation), element)
}
要递归调用 fold 函数,并重复调用 operation 函数。直到最后调用 Element,或者 EmptyCoroutineContext 的 fold 函数。
最终需要分析的都是 Element 的 fold 函数执行情况
context.fold(this) { acc, element ->//acc就是fold函数参数。element就是fold函数调用者,当前就是Dispatchers.IO//如果acc的key和element的key是相同,就返回新的EmptyCoroutineContext//否则就返回accval removed = acc.minusKey(element.key) if (removed === EmptyCoroutineContext) element else {// make sure interceptor is always last in the context (and thus is fast to get when present)//此时removed为acc的left,也就是SupervisorJob//获得removed里key为ContinuationInterceptor.key的分发器。当前为nullval interceptor = removed[ContinuationInterceptor]//合并removed和element。也就是SupervisorJob+Dispatchers.IOif (interceptor == null) CombinedContext(removed, element) else {val left = removed.minusKey(ContinuationInterceptor)if (left === EmptyCoroutineContext) CombinedContext(element, interceptor) elseCombinedContext(CombinedContext(left, element), interceptor)}}
}
小结下:
newCoroutineContext 其实就是给自己传递的 context 添加一些附加技能。但是 key 相同的技能只包含一个
比如 ViewModel 中 viewModelScope 的 coroutineContext 的默认值 SupervisorJob() + Dispatchers.Main.immediate。默认主线程执行,并保证如果其中的某个子协程出现异常,不会影响子协程
比如切换 dispatcher,当前父协程 dispatcher 为 Dispatchers.Main.immediate,切换为 Dispatchers.IO
1.3 下面分析 StandaloneCoroutine 的 start 方法
public fun <R> start(start: CoroutineStart, receiver: R, block: suspend R.() -> T) {initParentJob()start(block, receiver, this)
}
internal fun initParentJob() {//当前的parentContext[job]就是SupervisorJobinitParentJobInternal(parentContext[Job])
}/*** Initializes parent job.* It shall be invoked at most once after construction after all other initialization.*/
internal fun initParentJobInternal(parent: Job?) {assert { parentHandle == null }if (parent == null) {parentHandle = NonDisposableHandlereturn}//start保证parent状态为isActiveparent.start() // make sure the parent is //...
}CoroutineStart 的 start 就是如下的 invoke 函数
public operator fun <R, T> invoke(block: suspend R.() -> T, receiver: R, completion: Continuation<T>): Unit =when (this) {DEFAULT -> block.startCoroutineCancellable(receiver, completion)ATOMIC -> block.startCoroutine(receiver, completion)UNDISPATCHED -> block.startCoroutineUndispatched(receiver, completion)LAZY -> Unit // will start lazily}通过这里可以大概猜测一下几种 start 的区别。当前我们只看 DEFAULT
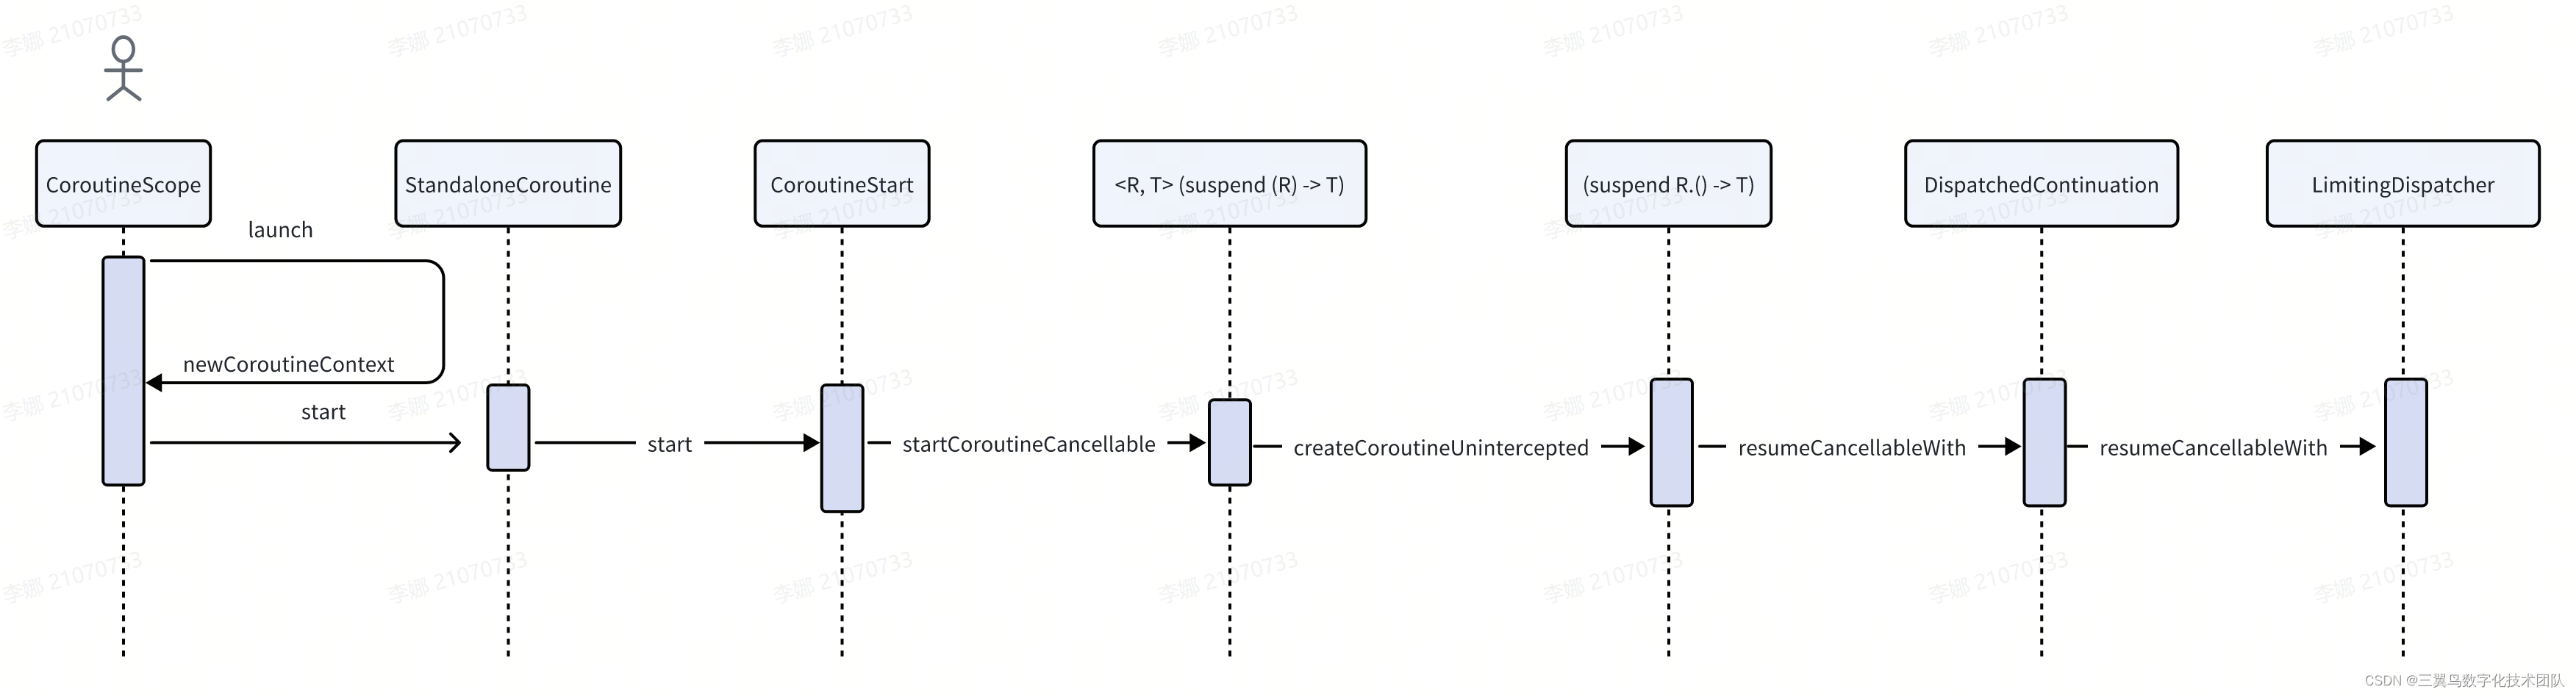
internal fun <R, T> (suspend (R) -> T).startCoroutineCancellable(receiver: R, completion: Continuation<T>,onCancellation: ((cause: Throwable) -> Unit)? = null
) =//runSafely就是添加了一个try catchrunSafely(completion) {createCoroutineUnintercepted(receiver, completion).intercepted().resumeCancellableWith(Result.success(Unit), onCancellation)}
createCoroutineUnintercepted 在文件 kotlin.coroutines.intrinsics.intrinsicsJvm.kt
public actual fun <R, T> (suspend R.() -> T).createCoroutineUnintercepted(receiver: R,completion: Continuation<T>
): Continuation<Unit> {val probeCompletion = probeCoroutineCreated(completion)//当前对象是BaseContinuationImpl的子类return if (this is BaseContinuationImpl)//这个方法在哪?create(receiver, probeCompletion)else {createCoroutineFromSuspendFunction(probeCompletion) {(this as Function2<R, Continuation<T>, Any?>).invoke(receiver, it)}}
}
create 方法在哪?需要反编译代码才能看的到
public final class MainViewModel extends ViewModel {public static final Companion Companion = new Companion(null);private static final String TAG = "MainViewModel";public final void getData() {Trace.beginSection("getData");StringBuilder stringBuilder = new StringBuilder();stringBuilder.append("getData before ");stringBuilder.append(Thread.currentThread().getName());Log.e("MainViewModel", stringBuilder.toString());MainViewModel$getData$eeeee$1 mainViewModel$getData$eeeee$1 = new MainViewModel$getData$eeeee$1(null);BuildersKt.launch$default(ViewModelKt.getViewModelScope(this), (CoroutineContext)Dispatchers.getIO(), null, mainViewModel$getData$eeeee$1, 2, null);}@Metadata(d1 = {"\000\022\n\002\030\002\n\002\020\000\n\002\b\002\n\002\020\016\n\000\b\003\030\0002\0020\001B\007\b\002¢\006\002\020\002R\016\020\003\032\0020\004XT¢\006\002\n\000¨\006\005"}, d2 = {"Lcom/haier/uhome/coroutine/ui/main/MainViewModel$Companion;", "", "()V", "TAG", "", "coroutine_debug"}, k = 1, mv = {1, 6, 0}, xi = 48)public static final class Companion {private Companion() {}}@Metadata(d1 = {"\000\n\n\000\n\002\020\002\n\002\030\002\020\000\032\0020\001*\0020\002H@"}, d2 = {"<anonymous>", "", "Lkotlinx/coroutines/CoroutineScope;"}, k = 3, mv = {1, 6, 0}, xi = 48)@DebugMetadata(c = "com.haier.uhome.coroutine.ui.main.MainViewModel$getData$eeeee$1", f = "MainViewModel.kt", i = {}, l = {}, m = "invokeSuspend", n = {}, s = {})static final class MainViewModel$getData$eeeee$1 extends SuspendLambda implements Function2<CoroutineScope, Continuation<? super Unit>, Object> {int label;MainViewModel$getData$eeeee$1(Continuation<? super MainViewModel$getData$eeeee$1> param1Continuation) {super(2, param1Continuation);}public final Continuation<Unit> create(Object param1Object, Continuation<?> param1Continuation) {return (Continuation<Unit>)new MainViewModel$getData$eeeee$1((Continuation)param1Continuation);}//。。。。。。。}
}
可以看到我们的协程体其实是一个基础 SuspendLambda 的 class 对象。当调用 create 时,用参数 probeCompletion 又构造了一个新的协程体对象
SuspendLambda 的继承关系如下:
SuspendLambda-->ContinuationImpl-->BaseContinuationImpl-->Continuation<Any?>, CoroutineStackFrame, Serializable
所以 intercepted()方法就是调用 ContinuationImpl 内部实现的
public fun intercepted(): Continuation<Any?> =intercepted?: (context[ContinuationInterceptor]?.interceptContinuation(this) ?: this).also { intercepted = it }context[ContinuationInterceptor]此时获得的就是 Dispatchers.IO,
其 interceptContinuation 方法如下
public final override fun <T> interceptContinuation(continuation: Continuation<T>): Continuation<T> =DispatchedContinuation(this, continuation)把 continuation 封装成了 DispatchedContinuation。其继承关系如下:
DispatchedContinuation-->DispatchedTask-->SchedulerTask-->Task-->Runnable
需要注意的是 continuation 就是协程体。就是我们要执行的内容
1.4 继续看 resumeCancellableWith 方法
在文件 kotlinx.coroutines.internal.DispatchedContinuation.kt
@Suppress("NOTHING_TO_INLINE")
inline fun resumeCancellableWith(result: Result<T>,noinline onCancellation: ((cause: Throwable) -> Unit)?
) {val state = result.toState(onCancellation)//dispatcher就是协程代码传入的分发器,//判断是否需要切换通过dispatcher执行,当前dispatcher.io,isDispatchNeeded是直接返回trueif (dispatcher.isDispatchNeeded(context)) {//代码1_state = stateresumeMode = MODE_CANCELLABLEdispatcher.dispatch(context, this)} else {executeUnconfined(state, MODE_CANCELLABLE) {if (!resumeCancelled(state)) {resumeUndispatchedWith(result)}}}
}
dispatcher.dispatch()方法就把上边生成的 runnable 放到了线程池队列中
文件 kotlinx.coroutines.scheduling.Dispatcher.kt#LimitingDispatcher
override fun dispatch(context: CoroutineContext, block: Runnable) = dispatch(block, false)private fun dispatch(block: Runnable, tailDispatch: Boolean) {var taskToSchedule = blockwhile (true) {// Commit in-flight tasks slotval inFlight = inFlightTasks.incrementAndGet()// Fast path, if parallelism limit is not reached, dispatch task and returnif (inFlight <= parallelism) {dispatcher.dispatchWithContext(taskToSchedule, this, tailDispatch)return}//....}}2. dispatche 具体是什么呢?
流程图如下
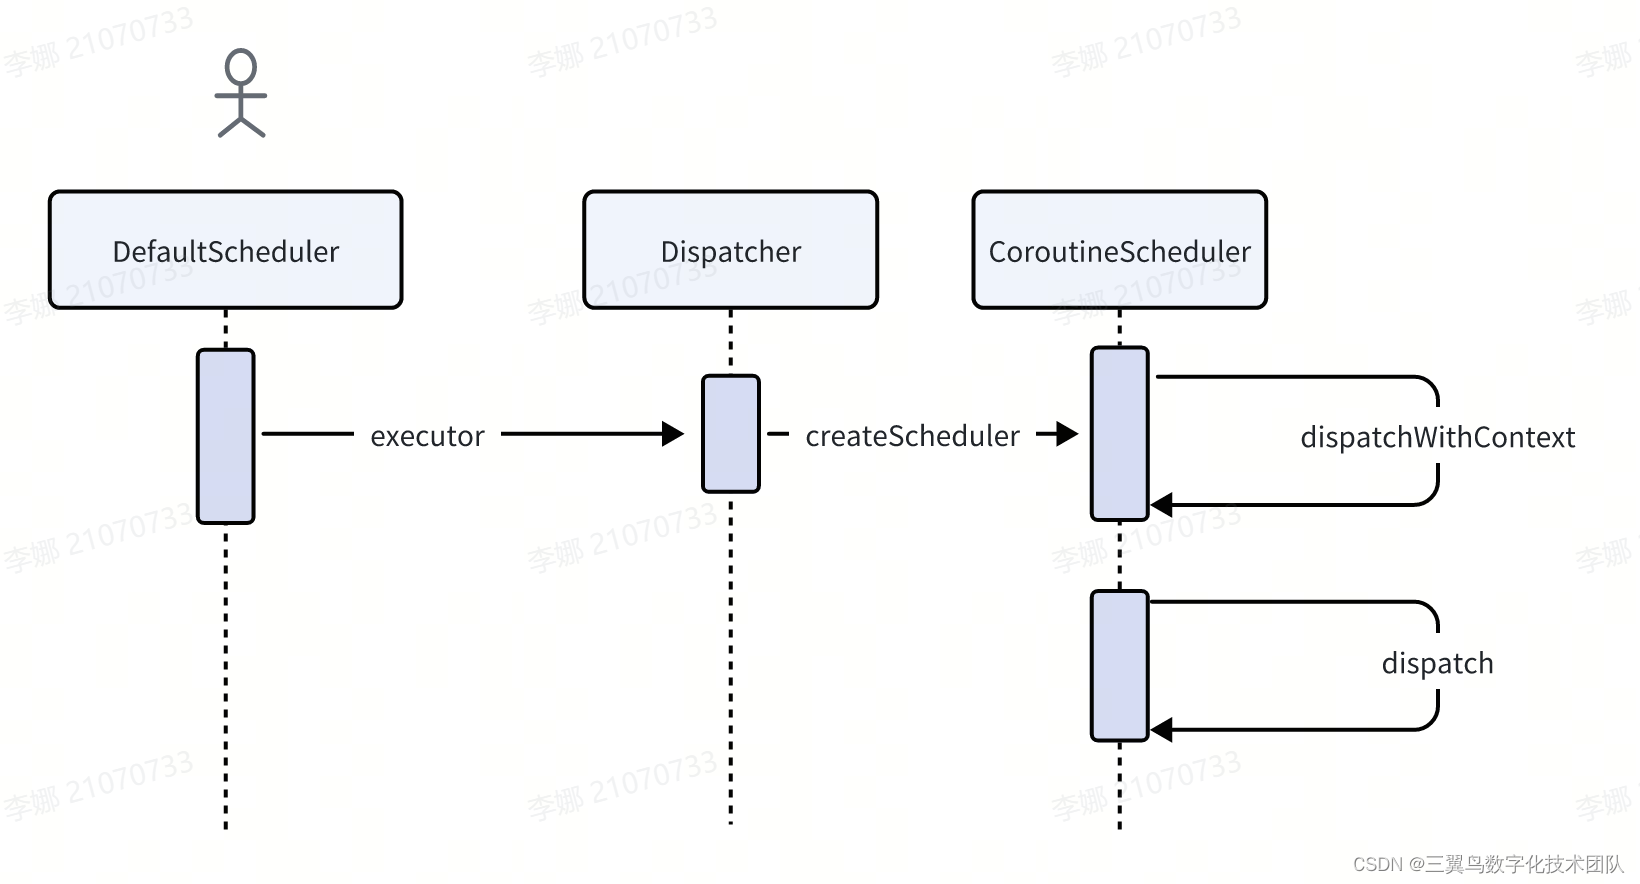
2.1 其实是在 Dispatchers.IO 实例化时的参数,DefaultScheduler 对象
internal object DefaultScheduler : ExperimentalCoroutineDispatcher() {val IO: CoroutineDispatcher = LimitingDispatcher(//这里实例化调度器对象this,systemProp(IO_PARALLELISM_PROPERTY_NAME, 64.coerceAtLeast(AVAILABLE_PROCESSORS)),"Dispatchers.IO",TASK_PROBABLY_BLOCKING)//....}而 DefaultScheduler 内部实例化了一个线程池
2.2 在文件 kotlinx.coroutines.scheduling.Dispatcher.kt
//kotlinx.coroutines.scheduling.Dispatcher.kt#ExperimentalCoroutineDispatcher
override val executor: Executorget() = coroutineScheduler
private var coroutineScheduler = createScheduler()
private fun createScheduler() = CoroutineScheduler(corePoolSize, maxPoolSize, idleWorkerKeepAliveNs, schedulerName)
dispatcher.dispatchWithContext,就是调用线程池的 dispatch,把任务放到 globalQueue 队列里,我们看一下
在文件 kotlinx.coroutines.scheduling.CoroutineScheduler.kt
internal fun dispatchWithContext(block: Runnable, context: TaskContext, tailDispatch: Boolean) {try {//coroutineScheduler就是线程池coroutineScheduler.dispatch(block, context, tailDispatch)} catch (e: RejectedExecutionException) {// CoroutineScheduler only rejects execution when it is being closed and this behavior is reserved// for testing purposes, so we don't have to worry about cancelling the affected Job here.// TaskContext shouldn't be lost here to properly invoke before/after taskDefaultExecutor.enqueue(coroutineScheduler.createTask(block, context))}
}fun dispatch(block: Runnable, taskContext: TaskContext = NonBlockingContext, tailDispatch: Boolean = false) {trackTask() // this is needed for virtual time support//当前block就继承之Taskval task = createTask(block, taskContext)// try to submit the task to the local queue and act depending on the result//当前线程池不是work,所以此时currentWorker返回为nullval currentWorker = currentWorker()//local放置失败val notAdded = currentWorker.submitToLocalQueue(task, tailDispatch)if (notAdded != null) {//放到global队列里if (!addToGlobalQueue(notAdded)) {// Global queue is closed in the last step of close/shutdown -- no more tasks should be acceptedthrow RejectedExecutionException("$schedulerName was terminated")}}
}
3. 任务具体如何执行?
时序图如下:
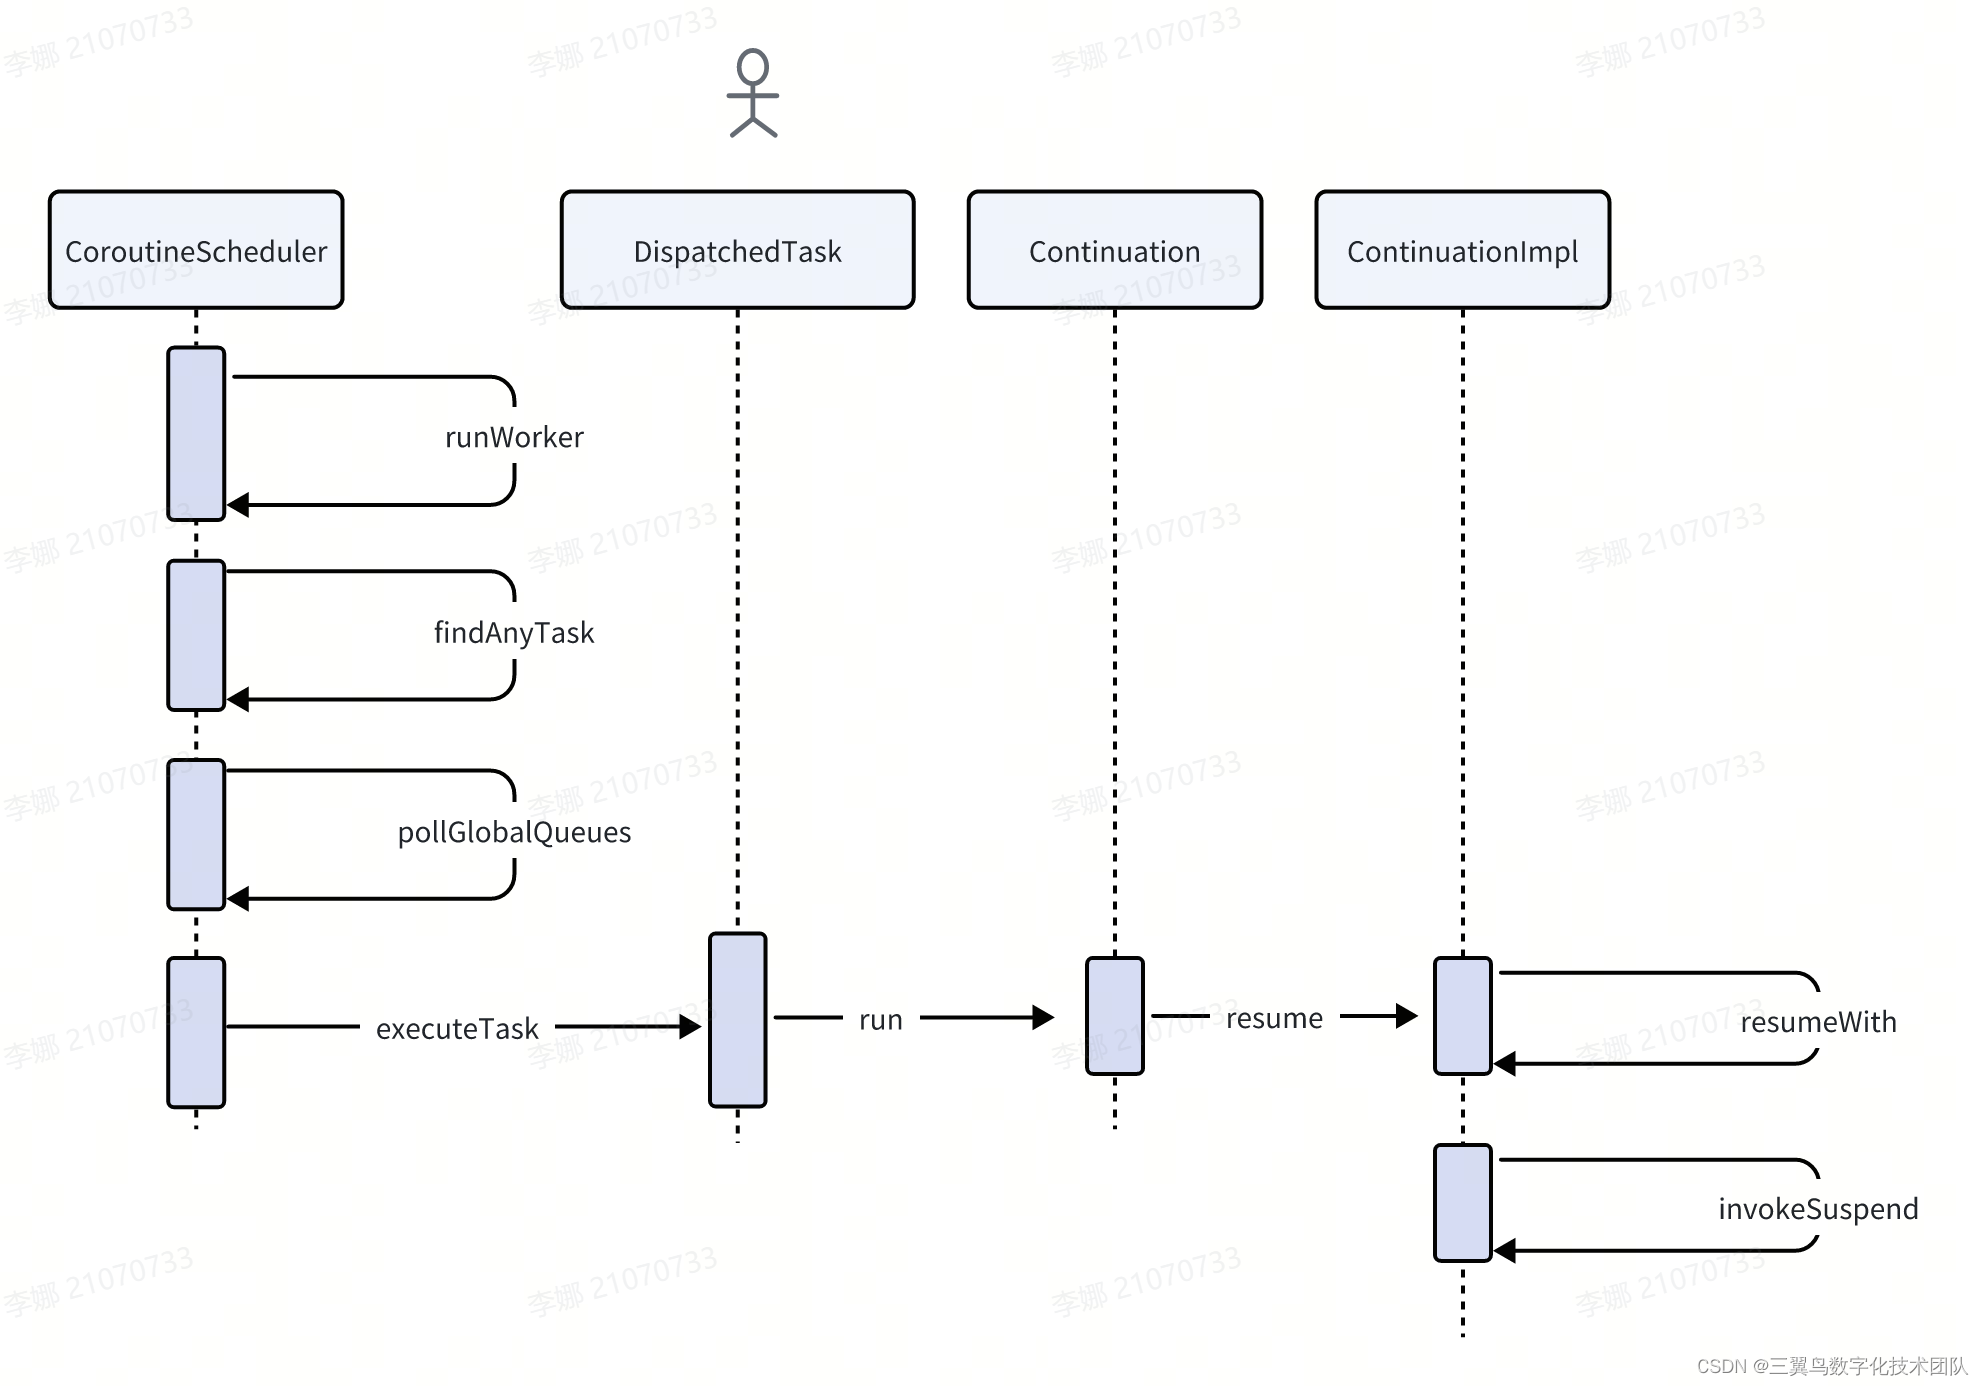
3.1 我们来看 kotlinx.coroutines.scheduling.CoroutineScheduler 文件
private fun runWorker() {var rescanned = falsewhile (!isTerminated && state != WorkerState.TERMINATED) {//通过上一步可以知道任务没有放置到local队列,mayHaveLocalTasks为falseval task = findTask(mayHaveLocalTasks)// Task found. Execute and repeatif (task != null) {rescanned = falseminDelayUntilStealableTaskNs = 0LexecuteTask(task)continue} else {mayHaveLocalTasks = false}//。。。。。。
}
private fun findAnyTask(scanLocalQueue: Boolean): Task? {/** Anti-starvation mechanism: probabilistically poll either local* or global queue to ensure progress for both external and internal tasks.*/if (scanLocalQueue) {val globalFirst = nextInt(2 * corePoolSize) == 0if (globalFirst) pollGlobalQueues()?.let { return it }localQueue.poll()?.let { return it }if (!globalFirst) pollGlobalQueues()?.let { return it }} else {//从glocal中取出任务pollGlobalQueues()?.let { return it }}return trySteal(blockingOnly = false)
}private fun pollGlobalQueues(): Task? {if (nextInt(2) == 0) {globalCpuQueue.removeFirstOrNull()?.let { return it }return globalBlockingQueue.removeFirstOrNull()} else {globalBlockingQueue.removeFirstOrNull()?.let { return it }return globalCpuQueue.removeFirstOrNull()}
}//参数task就是一个runnable
private fun executeTask(task: Task) {val taskMode = task.modeidleReset(taskMode)beforeTask(taskMode)//执行task里的run方法runSafely(task)afterTask(taskMode)
}
3.2 Task 的 run 方法的实现在 kotlinx.coroutines.DispatchedTask 里
public final override fun run() {
// should have been set before dispatchingval taskContext = this.taskContextvar fatalException: Throwable? = nulltry {//...withCoroutineContext(context, delegate.countOrElement) {//。。。。continuation.resume(getSuccessfulResult(state))//。。。。。}} catch (e: Throwable) {// This instead of runCatching to have nicer stacktrace and debug experiencefatalException = e} finally {val result = runCatching { taskContext.afterTask() }handleFatalException(fatalException, result.exceptionOrNull())}
}
3.3 continuation.resume 在 kotlin.coroutines.Continuation.kt 文件
public inline fun <T> Continuation<T>.resume(value: T): Unit =resumeWith(Result.success(value))3.4 最终执行内容在文件:kotlin.coroutines.jvm.internal.ContinuationImpl 里
public final override fun resumeWith(result: Result<Any?>) {// This loop unrolls recursion in current.resumeWith(param) to make saner and shorter stack traces on resumevar current = thisvar param = resultwhile (true) {// Invoke "resume" debug probe on every resumed continuation, so that a debugging library infrastructure// can precisely track what part of suspended callstack was already resumedprobeCoroutineResumed(current)with(current) {val completion = completion!! // fail fast when trying to resume continuation without completionval outcome: Result<Any?> =try {//执行协程体内容val outcome = invokeSuspend(param)if (outcome === COROUTINE_SUSPENDED) returnResult.success(outcome)} catch (exception: Throwable) {Result.failure(exception)}releaseIntercepted() // this state machine instance is terminatingif (completion is BaseContinuationImpl) {// unrolling recursion via loopcurrent = completionparam = outcome} else {// top-level completion reached -- invoke and returncompletion.resumeWith(outcome)return}}}
}
3.5 invokeSuspend 在哪呢?还是找不到!同样需要反编译查看。就是
public final class MainViewModel extends ViewModel {public static final Companion Companion = new Companion(null);private static final String TAG = "MainViewModel";public final void getData() {Trace.beginSection("getData");StringBuilder stringBuilder = new StringBuilder();stringBuilder.append("getData before ");stringBuilder.append(Thread.currentThread().getName());Log.e("MainViewModel", stringBuilder.toString());MainViewModel$getData$eeeee$1 mainViewModel$getData$eeeee$1 = new MainViewModel$getData$eeeee$1(null);BuildersKt.launch$default(ViewModelKt.getViewModelScope(this), (CoroutineContext)Dispatchers.getIO(), null, mainViewModel$getData$eeeee$1, 2, null);}@Metadata(d1 = {"\000\n\n\000\n\002\020\002\n\002\030\002\020\000\032\0020\001*\0020\002H@"}, d2 = {"<anonymous>", "", "Lkotlinx/coroutines/CoroutineScope;"}, k = 3, mv = {1, 6, 0}, xi = 48)@DebugMetadata(c = "com.haier.uhome.coroutine.ui.main.MainViewModel$getData$eeeee$1", f = "MainViewModel.kt", i = {}, l = {}, m = "invokeSuspend", n = {}, s = {})static final class MainViewModel$getData$eeeee$1 extends SuspendLambda implements Function2<CoroutineScope, Continuation<? super Unit>, Object> {int label;public final Object invokeSuspend(Object param1Object) {IntrinsicsKt.getCOROUTINE_SUSPENDED();if (this.label == 0) {ResultKt.throwOnFailure(param1Object);Trace.beginSection("DispatchersIO");param1Object = new StringBuilder();param1Object.append("getData IO 1  ");param1Object.append(Thread.currentThread().getName());Log.e("MainViewModel", param1Object.toString());Thread.sleep(1000L);param1Object = new StringBuilder();param1Object.append("getData IO 2 ");param1Object.append(Thread.currentThread().getName());Log.e("MainViewModel", param1Object.toString());Trace.endSection();return Unit.INSTANCE;} throw new IllegalStateException("call to 'resume' before 'invoke' with coroutine");}}
}
到此处协程 launch 内容就执行完了。
4. 总结
其底层使用的就是对线程池的封装,把协程体封装到 runnable 里,放到线程池执行。使用了的线程池线程复用,不必频繁的创建,销毁线程等优点。提升了性能
其他的 Dispatcher,我就不一一跟踪了,有兴趣的同学可以自己跟踪一下。这里简单介绍下我的理解:
Dispatchers.Main:其内部使用的 MainCoroutineDispatcher,把任务放到主线程的 handler 顺序执行
Dispatchers.Default:是一个使用 DefaultScheduler 的线程池,据说比较适合做逻辑性任务(这个我看不出来😋)
Dispatchers.Unconfined:跟随父协程的 context,直接执行,不做线程切换
launch 主要逻辑不是很复杂,主要就是线程池的调度。难以跟踪的原因大概是因为源码中到处在使用函数扩展。再加上协程体的具体实现是 kotlin 编译过程中生成的。所以花的时间比较多,需要有耐心!
5. 团队介绍
「三翼鸟数字化技术平台-场景设计交互平台」主要负责设计工具的研发,包括营销设计工具、家电VR设计和展示、水电暖通前置设计能力,研发并沉淀素材库,构建家居家装素材库,集成户型库、全品类产品库、设计方案库、生产工艺模型,打造基于户型和风格的AI设计能力,快速生成算量和报价;同时研发了门店设计师中心和项目中心,包括设计师管理能力和项目经理管理能力。实现了场景全生命周期管理,同时为水,空气,厨房等产业提供商机管理工具,从而实现了以场景贯穿的B端C端全流程系统。
相关文章:
协程源码 launch 流程跟踪学习
为了更深入学习协程的底层实现原理,了解协程线程切换的根本本质。也为了以后在工作中可以根据不同的需求场景,更加随心所欲的使用不同的协程。 今天通过 launch 跟踪一下协程的执行流程。 fun getData() {Trace.beginSection("getData");Log.…...
苍穹外卖Day02——总结2
前期文章 文章标题地址苍穹外卖Day01——总结1https://blog.csdn.net/qq_43751200/article/details/135466359?spm1001.2014.3001.5501苍穹外卖Day01——解决总结1中存在的问题https://lushimeng.blog.csdn.net/article/details/135473412 总结2 前期文章1. 新增员工模块1.1 …...

探索Nginx:一款高效、稳定的Web服务器和反向代理工具
在网站性能优化和架构设计中,Nginx以其高性能、低资源消耗和良好的扩展性成为了许多开发者和服务器管理员的首选。本文将为您详细介绍Nginx的概念、特点、安装、配置和使用,帮助您更好地了解并运用这款优秀的工具。 一、Nginx简介 Nginx(发…...

文案改写软件,高效改文案的方法
在互联网飞速发展的今天,文案的重要性在营销和传播中变得越发突出。而高质量的文案内能够吸引人们的注意力,打动他们的心弦,这样更能促使他们产生需求。然而,想要写一篇引人入胜的文案并不容易,需要时间和经验来调整和…...
黑马头条-day10
文章目录 app端文章搜索1、文章搜索1.1 ElasticSearch环境搭建1.2 索引库创建①需求分析②ES导入数据场景分析③创建索引和映射 1.3 索引数据同步①app文章历史数据导入ES②文章实时数据导入ES 1.4 文章搜索多条件复合查询①关键词搜索②搜索接口定义 2、搜索历史记录2.1 需求说…...
C++的stack容器->基本概念、常见接口
#include<iostream> using namespace std; #include <stack> //栈stack容器常用接口 void test01() { //创建栈容器 栈容器必须符合先进后出 stack<int> s; //向栈中添加元素,叫做 压栈 入栈 s.push(10); s.push(20); s…...

VUE中引入外部jquery.min.js文件
jquery官网:https://jquery.com/ cdn链接:https://code.jquery.com/jquery-3.7.1.js <template><div class"">测试jq<div id"jq">这是一个盒子</div></div> </template><script> import…...

MongoDB聚合运算符:$avg
$avg运算符返回给定数值的平均值 $avg可用于以下阶段: $addFields阶段(从MongoDB 3.4开始可用)$bucket阶段$bucketAuto阶段$group阶段包含$expr表达式的$match阶段$project阶段$replaceRoot阶段(从MongoDB 3.4开始可用)$replaceWith阶段(从MongoDB 4.2开始可用)$s…...
Web 前端 UI 框架Bootstrap简介与基本使用
Bootstrap 是一个流行的前端 UI 框架,用于快速开发响应式和移动设备优先的网页。它由 Twitter 的设计师和工程师开发,现在由一群志愿者维护。Bootstrap 提供了一套丰富的 HTML、CSS 和 JavaScript 组件,可以帮助开发者轻松地构建和定制网页和…...

【Python笔记-设计模式】惰性评价模式
一、说明 将某些对象的创建或计算延迟到真正需要它们的时候,以减少不必要的资源消耗和提高性能。 惰性评价在Python中实现也成为生成器,一般通过yield关键字实现。 (一) 解决问题 在处理大量数据时,使用惰性加载可以避免一次性加载所有数…...

每日学习总结20240221
每日总结 20240221 花自飘零水自流。一种相思,两处闲愁。 —— 李清照「一剪梅红藕香残玉簟秋」 1. stat 在Linux中,stat 是一个用于显示文件或文件系统状态的命令行工具。它提供了关于文件的详细信息,包括文件类型、权限、大小、所有者、修…...
学生成绩管理系统(C语言课设 )
这个学生成绩管理系统使用C语言编写,具有多项功能以方便管理学生信息和成绩。首先从文件中读取数据到系统中,并提供了多种功能(增删改查等)选项以满足不同的需求。 学生成绩管理系统功能: 显示学生信息增加学生信息删除学生信息…...
)
ChatGPT提示词(最新)
它能干什么? 包括但不限于: 类别描述学术论文它可以写各种类型的学术论文,包括科技论文、文学论文、社科论文等。它可以帮助你进行研究、分析、组织思路并编写出符合学术标准的论文。创意写作它可以写小说、故事、剧本、诗歌等创意性的文学作品&#…...
算法——模拟
1. 什么是模拟算法? 官方一点来说 模拟算法(Simulation Algorithm)是一种通过模拟现实或抽象系统的运行过程来研究、分析或解决问题的方法。它通常涉及创建一个模型,模拟系统中的各种事件和过程,以便观察系统的行为&a…...
如何进行高性能架构的设计
一、前端优化 减少请求次数页面静态化边缘计算 增加缓存控制:请求头 减少图像请求次数:多张图片变成 一张。 减少脚本的请求次数:css和js压缩,将多个文件压缩成一个文件。 二、页面静态化 三、边缘计算 后端优化 从三个方面进…...
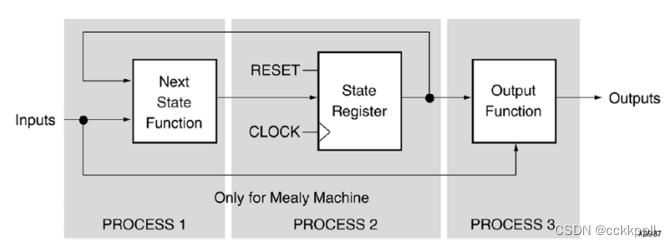
vivado FSM Components
Vivado合成功能 •同步有限状态机(FSM)组件的特定推理能力。 •内置FSM编码策略,以适应您的优化目标。 •FSM提取默认启用。 •使用-fsm_extraction off可禁用fsm提取。 FSM描述 Vivado综合支持Moore和Mealy中的有限状态机(…...
从零开始手写mmo游戏从框架到爆炸(十五)— 命令行客户端改造
导航:从零开始手写mmo游戏从框架到爆炸(零)—— 导航-CSDN博客 到现在,我们切实需要一个客户端来完整的进行英雄选择,选择地图,打怪等等功能。所以我们需要把之前极为简陋的客户端改造一下。 首先…...
Elasticsearch:什么是 kNN?
kNN - K-nearest neighbor 定义 kNN(即 k 最近邻算法)是一种机器学习算法,它使用邻近度将一个数据点与其训练并记忆的一组数据进行比较以进行预测。 这种基于实例的学习为 kNN 提供了 “惰性学习(lazy learning)” 名…...

掌握网络未来:深入解析RSVP协议及其在确保服务质量中的关键作用
第一部分:RSVP简介 资源预留协议(RSVP)是一种网络协议,用于在网络中的各个节点之间预留资源,以支持数据流的服务质量(QoS)要求。RSVP特别适用于需要固定带宽和处理延迟的应用,如视频…...

【Linux】一站式教会:Ubuntu(无UI界面)使用apache-jmeter进行压测
🏡浩泽学编程:个人主页 🔥 推荐专栏:《深入浅出SpringBoot》《java对AI的调用开发》 《RabbitMQ》《Spring》《SpringMVC》 🛸学无止境,不骄不躁,知行合一 文章目录 前言一、Java…...

基于Arduino与应变片传感器的高精度厨房电子秤DIY全攻略
1. 项目概述:用Arduino打造一台高精度厨房电子秤作为一个喜欢在厨房里折腾的硬件爱好者,我经常遇到需要精确称量食材的场合。市面上的电子秤要么精度不够,要么价格不菲,要么功能单一。于是,我萌生了自己动手做一台的想…...

收藏必看|2026 版大厂 AI 岗位薪资曝光!普通程序员转型大模型最全指南
深夜收到大厂 HR 好友发来的内部资料,再三叮嘱切勿对外泄露。如今网络信息传播速度极快,这份 2026 年企业 AI 岗真实薪资内幕,也值得给广大程序员、零基础入行小白参考借鉴。 翻看完整薪资台账后,真切感受到当下大模型赛道的薪资差…...

小米MIMO最新邀请码
欢迎使用,各得10元体验金...

上线前最后一道防线,DeepSeek代码审查如何帮你拦截87%的CVE类缺陷?
更多请点击: https://intelliparadigm.com 第一章:上线前最后一道防线,DeepSeek代码审查如何帮你拦截87%的CVE类缺陷? 在软件交付生命周期末期,传统人工代码审计与通用SAST工具常因误报率高、上下文理解弱而漏检高危漏…...

别再死记硬背了!用5个生活化比喻彻底搞懂Linux进程的fork、exec和wait
别再死记硬背了!用5个生活化比喻彻底搞懂Linux进程的fork、exec和wait想象你正在厨房准备一顿大餐。菜谱上写着"切菜"、"炒菜"、"装盘"等步骤,但突然发现需要同时处理多道菜品——这时候,你会本能地让家人分工…...

腾讯 Marvis 初级使用教程——从安装到上手
腾讯最新系统级AI助手Marvis(2026年5月20日发布),官网 https://marvis.qq.com,主打“一句话操作电脑”、跨端协同、GUI Agent执行。虽然是个【小龙虾】,但上手其实不难。这篇就简单写写 Marvis 的安装和基础使用&#…...

从安装到排错:手把手解决Linux服务器上Nacos启动失败的十大常见问题
从安装到排错:手把手解决Linux服务器上Nacos启动失败的十大常见问题当你在Linux服务器上部署Nacos时,是否遇到过启动失败却无从下手的困境?作为阿里巴巴开源的服务发现和配置管理平台,Nacos在微服务架构中扮演着重要角色。然而&am…...

保姆级教程:在Ubuntu上配置Frida环境,搞定Android App的IO重定向与签名绕过
在Ubuntu上构建Android逆向工程环境:Frida实战与IO重定向技术解析 对于习惯Linux环境的安全研究人员而言,Windows-centric的逆向工具链往往带来诸多不便。本文将系统性地介绍如何在Ubuntu上搭建完整的Android逆向环境,并深入探讨如何利用Frid…...

从NLP到RAG:AI标书生成系统的技术架构与落地路径深度剖析
引言2026年2月,国家发改委等八部门联合印发《关于加快招标投标领域人工智能推广应用的实施意见》,明确到2026年底招标文件检测、智能辅助评标、围串标识别等重点场景在部分省市实现全覆盖。同一时期,《招标投标法》修订草案经国务院常务会议原…...

模拟电路实现自主循线机器人:无MCU的硬件逻辑设计
1. 项目概述:用最纯粹的模拟电路,造一台会“思考”的机器人每次看到那些在赛道上灵巧穿梭的循线小车,你是不是也手痒,想自己动手做一个?但一听到“单片机”、“编程”、“Arduino”这些词,又觉得门槛太高&a…...