五、使用脚手架
五、使用脚手架
5.1 简单的实现
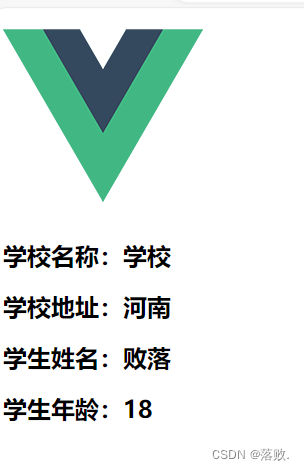
创建一个 School 组件
<template>
<div><h2>学校名称:{{name}}</h2><h2>学校地址:{{address}}</h2>
</div>
</template><script>
export default {name: "School",data(){return{name:'学校',address:'河南'}}
}
</script><style scoped></style>
创建一个Student组件
<template>
<div><h2>学生姓名:{{name}}</h2><h2>学生年龄:{{age}}</h2>
</div>
</template><script>
export default {name: "Student",data(){return{name:'败落',age:18}}
}
</script><style scoped></style>
将创建的两个组件注册入 App 父组件中
<template><div id="app"><img alt="Vue logo" src="./assets/logo.png"><School/><Student/></div>
</template><script>
import School from "@/components/School.vue";
import Student from "@/components/Student.vue";
export default {name: 'App',components: {School:School,Student:Student}
}
</script><style></style>-
启动的两个方式
- 终端运行
- 在 README.md 文件中运行
5.2 ref属性
- 被用来给元素或子组件注册引用信息(id的代替)
- 应用在 html 标签上获取的是真实DOM元素,应用在组件标签上是组件实例对象(VueComponent)
- 使用方式
- 打标识:
<h1 ref="xxx"> .....</h1> 或 <School ref="xxx"></School> - 获取:
this.$refs.xxx
- 打标识:
<template><div id="app"><img alt="Vue logo" src="./assets/logo.png"><h1 ref="title">欢迎学习Vue</h1><School ref="school"/><button ref="btn" @click="showDOM">点击我输出上方DOM元素</button><Student/></div>
</template>
<script>
import School from "@/components/School.vue";
import Student from "@/components/Student.vue";
export default {name: 'App',components: {School:School,Student:Student},methods:{showDOM(){console.log('title',this.$refs.title);console.log('school',this.$refs.school);console.log('btn',this.$refs.btn);}}
}
</script>
<style></style>

5.3 props 配置
5.3.1 父传子
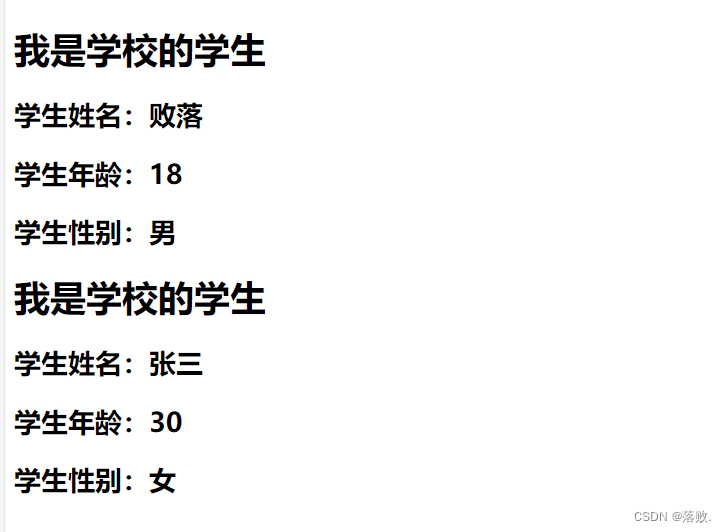
Student.Vue 组件
<template>
<div><h1>{{msg}}</h1><h2>学生姓名:{{name}}</h2><h2>学生年龄:{{age}}</h2><h2>学生性别:{{sex}}</h2>
</div>
</template><script>
export default {name: "Student",data(){return{msg:'我是学校的学生',}},props:["name","sex","age"]
}
</script><style scoped></style>
App 父组件
<template><div id="app"><img alt="Vue logo" src="./assets/logo.png"><Student name="败落" :age="18" sex="男"/><Student name="张三" :age="30" sex="女"/></div>
</template><script>
import Student from "@/components/Student.vue";
export default {name: 'App',components: {Student:Student},methods:{showDOM(){console.log(this);console.log('title',this.$refs.title);console.log('school',this.$refs.school);console.log('btn',this.$refs.btn);}}
}
</script><style></style>
如果
age前面不加上:传过去的数据就是字符串类型,:表示v-bind,从而无法对数据进行操作
5.3.2 限制数据类型
用于对接收的同时对数据类型限制
<script>
export default {name: "Student",data(){return{msg:'我是学校的学生',}},// props:["name","sex","age"] 简单的接收props:{name:String,age:Number,sex:String}
}
</script>
用于对接收的同时对数据类型限制、默认值的指定、必要性的限制
<script>
export default {name: "Student",data(){return{msg:'我是学校的学生',}},//用于对接收的同时对数据类型限制、默认值的指定、必要性的限制props:{name:{type:String,//name的类型是字符串required:true//name参数是必要的必须要传},age:{type:Number,default:88},sex:{type:String,required:true}}
}
</script>
5.4 mixin
-
mixin(混入)
- 功能:可以把多个组件共用的配置提取成一个混入对象
-
使用方式:
- 第一步定义混合,例如
{data(){...},methods:{...},...}- 第二部使用混合,例如
- 全局混合:Vue.mixin(xxx)
- 局部混合:mixins:[‘xxx’]
5.4.1 局部混合
创建一个js文件
export const mixin={methods:{showName(){alert(this.name)}}
}
学生组件
<template>
<div><h1>{{msg}}</h1><h2 @click="showName">学生姓名:{{name}}</h2><h2>学生年龄:{{age}}</h2><h2>学生性别:{{sex}}</h2>
</div>
</template><script>
import {mixin} from "../mixin"
export default {name: "Student",data(){return{msg:'我是学校的学生',name:'败落',age:18,sex:'男'}},mixins:[mixin]
}
</script><style scoped></style>
学校组件
<template>
<div><h2 @click="showName">学校名称:{{name}}</h2><h2>学校地址:{{address}}</h2>
</div>
</template><script>
import {mixin} from "@/mixin";"../mixin"
export default {name: "School",data(){return{name:"学校",address:'河南'}},mixins:[mixin]
}
</script><style scoped></style>
App 父组件
<template><div id="app"><img alt="Vue logo" src="./assets/logo.png"><Student/><hr><School/></div>
</template><script>
import Student from "@/components/Student.vue";
import School from "@/components/School.vue";export default {name: 'App',components: {School: School,Student: Student}
}
</script><style></style>
5.4.2 全局混合
只需要将mixin.js 引入到main.js 里就行了
import Vue from 'vue'
import App from './App.vue'Vue.config.productionTip = false
//全局混合
import {mixin} from "@/mixin";
Vue.mixin(mixin)
new Vue({render: h => h(App),
}).$mount('#app')
5.5 插件
5.5.1 install
- 功能:用于增强
Vue - 本质:包含
install方法的一个对象,install的第一个参数是Vue,第二个以后的参数是插件使用者传递的数据。 - 使用插件:
Vue.use()
定义一个插件
plugins.js文件
export default {install(Vue) {//全局过滤器Vue.filter('mySlice', (value) => {return value.slice(0, 4);})//全局自定义指令Vue.directive('fbind', {//指令与元素绑定成功时(一上来)bind(element, binding) {element.value = binding.value;},//指令所在的元素被插入页面时inserted(element, binding) {element.focus();},//指令所在的模板被重新解析时update(element, binding) {element.value = binding.value;}})//定义混入Vue.mixin({data() {return {x: 100,y: 100}}})//给Vue原型上定义一个方法(vm和vc都能用了)Vue.prototype.hello = () => {alert("你好啊")}}
}
School 组价n
<template>
<div><h2>学校名称:{{name | mySlice}}</h2><h2>学校地址:{{address}}</h2><button @click="test">点我测试一下hello方法</button>
</div>
</template><script>
export default {name: "School",data(){return{name:"学校aaaaaaaa",address:'河南'}},methods:{test(){this.hello();}}
}
</script><style scoped></style>
Student组件
<template>
<div><h1>{{msg}}</h1><h2>学生姓名:{{name}}</h2><h2>学生年龄:{{age}}</h2><h2>学生性别:{{sex}}</h2><input type="text" v-fbind:value="name">
</div>
</template><script>
export default {name: "Student",data(){return{msg:'我是学校的学生',name:'败落',age:18,sex:'男'}},
}
</script><style scoped></style>
App 父组件
<template><div id="app">
<!--    <img alt="Vue logo" src="./assets/logo.png">--><Student/><hr><School/></div>
</template><script>
import Student from "@/components/Student.vue";
import School from "@/components/School.vue";export default {name: 'App',components: {School: School,Student: Student}
}
</script><style></style>
main.js 文件
import Vue from 'vue'
import App from './App.vue'
Vue.config.productionTip = falseimport plugins from "@/plugins";
Vue.use(plugins,1,2,3)new Vue({render: h => h(App),
}).$mount('#app')
上来聚焦
install Vue参数后边传入的变量
点击测试hello方法
5.6 TodoLsit案例
main.js
import Vue from 'vue'
import App from './App.vue'
Vue.config.productionTip = falsenew Vue({render: h => h(App),
}).$mount('#app')
App.vue 组件
<template><div id="root"><div class="todo-container"><div class="todo-wrap"><MyHeader :addTodo="addTodo"/><MyList :todos="todos" :checkTodo="checkTodo" :deleteTodo="deleteTodo"/><MyFooter :todos="todos" :checkAllTodo="checkAllTodo" :clearAllTodo="clearAllTodo"/></div></div></div>
</template><script>
import MyHeader from "@/components/MyHeader.vue";
import MyList from "@/components/MyList.vue";
import MyFooter from "@/components/MyFooter.vue";export default {name: 'root',components: {MyHeader, MyList, MyFooter},data() {return {todos: [{id: "001", title: '抽烟', done: true},{id: "002", title: '喝酒', done: false},{id: "003", title: '开车', done: true}]}},methods: {//添加一个todoaddTodo(todo) {this.todos.unshift(todo)},//勾选或者取消勾选一个todocheckTodo(id) {this.todos.forEach((todo) => {if (todo.id === id) todo.done = !todo.done;})},//删除一个tododeleteTodo(id) {//过滤出一个新的数组this.todos = this.todos.filter((todo) => {return todo.id !== id;})},//全选或者全不选checkAllTodo(done){this.todos.forEach((todo)=>{todo.done=done;})},//删除所有已完成的clearAllTodo(){this.todos=this.todos.filter((todo)=>{return !todo.done;})}}
}
</script><style>
/*base*/
body {background: #fff;
}.btn {display: inline-block;padding: 4px 12px;margin-bottom: 0;font-size: 14px;line-height: 20px;text-align: center;vertical-align: middle;cursor: pointer;box-shadow: inset 0 1px 0 rgba(255, 255, 255, 0.2), 0 1px 2px rgba(0, 0, 0, 0.05);border-radius: 4px;
}.btn-danger {color: #fff;background-color: #da4f49;border: 1px solid #bd362f;
}.btn-danger:hover {color: #fff;background-color: #bd362f;
}.btn:focus {outline: none;
}.todo-container {width: 600px;margin: 0 auto;
}.todo-container .todo-wrap {padding: 10px;border: 1px solid #ddd;border-radius: 5px;
}</style>
MyList.vue 组件
<template><ul class="todo-main"><MyItem v-for="todo in todos" :key="todo.id" :todo="todo" :checkTodo="checkTodo" :deleteTodo="deleteTodo"/></ul>
</template><script>
import MyItem from "@/components/MyItem.vue";export default {name: "MyList",props:['todos','checkTodo','deleteTodo'],components: {MyItem}
}
</script><style scoped>
/*main*/.todo-main {margin-left: 0px;border: 1px solid #ddd;border-radius: 2px;padding: 0px;}.todo-empty {height: 40px;line-height: 40px;border: 1px solid #ddd;border-radius: 2px;padding-left: 5px;margin-top: 10px;}
</style>
MyItem.vue 组件
<template><li><label><input type="checkbox" :checked="todo.done" @change="handleCheck(todo.id)"/><span>{{todo.title}}</span></label><button class="btn btn-danger" @click="handleDelete(todo.id)">删除</button></li>
</template><script>
export default {name: "MyItem",props:["todo",'checkTodo','deleteTodo'],methods:{handleCheck(id){this.checkTodo(id)},handleDelete(id){if(confirm("确定删除吗")){this.deleteTodo(id);}}}
}
</script><style scoped>
/*item*/
li {list-style: none;height: 36px;line-height: 36px;padding: 0 5px;border-bottom: 1px solid #ddd;
}li label {float: left;cursor: pointer;
}li label li input {vertical-align: middle;margin-right: 6px;position: relative;top: -1px;
}li button {float: right;display: none;margin-top: 3px;
}li:before {content: initial;
}li:last-child {border-bottom: none;
}
li:hover{background-color: beige;
}
li:hover button{display: block;
}
</style>
MyHeader.vue 组件
<template><div class="todo-header"><input type="text" placeholder="请输入你的任务名称,按回车键确认" v-model="title" @keyup.enter="add"/></div>
</template><script>
import {nanoid} from "nanoid";export default {name: "MyHeader",data() {return {title: ''}},props:['addTodo'],methods: {add(event) {//校验数据 trim 是清空两边的空格if (!this.title.trim()) {return alert("输入框不能为空")}//将元素包装成一个 todo 对象const todo = {id: nanoid(), title: this.title, done: false};//通知 App 传过去一个数据this.addTodo(todo);this.title='';}}
}
</script><style scoped>
/*header*/
.todo-header input {width: 560px;height: 28px;font-size: 14px;border: 1px solid #ccc;border-radius: 4px;padding: 4px 7px;
}.todo-header input:focus {outline: none;border-color: rgba(82, 168, 236, 0.8);box-shadow: inset 0 1px 1px rgba(0, 0, 0, 0.075), 0 0 8px rgba(82, 168, 236, 0.6);
}
</style>
MyFooter.vue 组件
<template><div class="todo-footer"v-show="total"><label>
<!--      <input type="checkbox" :checked="isAll" @change="checkAll"/>--><input type="checkbox" v-model="isAll"/></label><span><span>已完成{{doneToral}}</span> / 全部{{total}}</span><button class="btn btn-danger" @click="clearAll">清除已完成任务</button></div>
</template><script>
export default {name: "MyFooter",props:['todos','checkAllTodo','clearAllTodo'],computed:{total(){return this.todos.length},doneToral(){return  this.todos.reduce((pre,tota)=>pre+(tota.done? 1:0),0)},// isAll(){//   return this.doneToral===this.total && this.total>0// }isAll:{get(){return this.doneToral===this.total && this.total>0},set(value){this.checkAllTodo(value)}},},methods:{// checkAll(e){//   this.checkAllTodo(e.target.checked)// }//删除所有完成的todoclearAll(){this.clearAllTodo();}}
}
</script><style scoped>
/*footer*/
.todo-footer {height: 40px;line-height: 40px;padding-left: 6px;margin-top: 5px;
}.todo-footer label {display: inline-block;margin-right: 20px;cursor: pointer;
}.todo-footer label input {position: relative;top: -1px;vertical-align: middle;margin-right: 5px;
}.todo-footer button {float: right;margin-top: 5px;
}</style>
5.6.2 TodoList 案例总结
- 组件化编码流程:
- 拆分静态组件:组件要按照功能点拆分,命名不要与html冲突
- 实现动态组件:考虑好数据的存放位置,数据是一个组件再用,还是一些组件再用。
- 一个组件再用:放在组件自身即可。
- 一些组件再用:放在他们共同的父组件上。
- 实现交互:从绑定事件开始。
- props适用于:
- 父组件==>子组件 通信
- 子组件==>父组件 通信(要求父先给子一个函数)
- 使用 v-model 时要切记:v-model 绑定的值不能是props传过来的值,因为props是只读不可以修改。
- props传过来的若是对象类的值,修改对象中的属性时Vue不会报错,但不推荐这样做。
5.7 自定义事件
5.7.1 绑定
App组件
<template><div id="app">
<!--    <img alt="Vue logo" src="./assets/logo.png">-->
<!--    通过父组件给子组件绑定一个自定义事件实现:子给父传递数据(第一种方式:通过 @或 v-on)-->
<!--    <Student v-on:atBailuo="getStudentName"/>--><!--    通过父组件给子组件绑定一个自定义事件实现:子给父传递数据(第二种方式:通过 ref)--><Student ref="student"/></div>
</template><script>
import Student from "@/components/Student.vue";export default {name: 'App',components: {Student: Student},methods:{getStudentName(name){console.log("App收到了学生名字:",name)}},mounted() {setTimeout(()=>{this.$refs.student.$on('atBailuo',this.getStudentName);},3000)}
}
</script><style></style>
Student事件
<template><div><h1>{{msg}}</h1><h2>学生姓名:{{name}}</h2><h2>学生年龄:{{age}}</h2><h2>学生性别:{{sex}}</h2><input type="text" v-fbind:value="name"></div></template><script>export default {name: "Student",data(){return{msg:'我是学校的学生',name:'败落',age:18,sex:'男'}},}</script><style scoped></style>
5.7.2 解绑$off()
methods:{sendStudentName(){this.$emit('atBailuo',this.name);},unbind(){this.$off('atBailuo');//解绑单个自定义事件this.$off(['atBailuo','demo']);//解绑多个自定义事件this.$off();//解绑所有自定义事件}}
5.7.3 自定义事件总结
-
一种组件间通信的方式,适用于:子组件==>父组件
-
使用场景:A是父组件,B是子组件,B想给A传数据,那么就要在A中给B绑定自定义事件(事件的回调在A中)。
-
绑定自定义事件:
-
第一种方式,在父组件中:
<Demo @atBaiLuo="test"/>或<Demo v-on:atBaiLuo="test"/> -
第二种方式,在父组件中:
<Demo ref="demo"/> ...... mounted(){ this.$refs.xxx.$on('atBaiLuo',this.text); }- 若想让自定义事件只能触发一次,可以使用
once修饰符,或$once方法。
- 若想让自定义事件只能触发一次,可以使用
-
-
触发自定义事件:
this.$emit('atBaiLuo',数据); -
解绑自定义事件:
this.$off('atBaiLuo'); -
组件上也可以绑定原生
DOM事件,需要使用native修饰符。 -
注意:通过
this.$refs.xxx.$on('atBaiLuo',回调)绑定自定义事件,回调要么配置在methos中,要么用箭头函数,否则this指向会出问题。
5.8 配置代理
5.8.1 方式一
<template>
<div><button @click="getStudent">获取学生信息</button>
</div>
</template><script>
import axiox from 'axios'
export default {name: 'root',methods:{getStudent(){axiox.get('http://localhost:8080/students').then(response=>{console.log("获取学生信息成功",response.data)},error=>{console.log("获取学生信息失败",error.message )})}}
}
</script>
在Vue.config.js 里修改Vue配置
devServer:{proxy:'http://localhost:5000',
},
- 优点:配置简单,请求资源时直接发给前端(8080)即可
- 缺点:不能配置多个代理,不能灵活地控制请求是否走代理。
- 工作方式:若按照上述配置代理,当请求了前段不存在的资源时,name该请求会转发给服务器(优先匹配前端资源)
5.8.2 方式二
<template>
<div><button @click="getStudent">获取学生信息</button><button @click="getCars">获取汽车信息</button>
</div>
</template><script>
import axiox from 'axios'
export default {name: 'root',methods:{getStudent(){axiox.get('http://localhost:8080/atBaiLuo/students').then(response=>{console.log("获取学生信息成功",response.data)},error=>{console.log("获取学生信息失败",error.message )})},getCars(){axiox.get('http://localhost:8080/demo/cars').then(response=>{console.log("获取学生信息成功",response.data)},error=>{console.log("获取学生信息失败",error.message )})}}
}
</script>
在Vue.config.js 里修改Vue配置
//配置代理方式二devServer:{proxy:{'/atBaiLuo':{target:'http://localhost:5000',//重新网址 找到匹配 atBaiLuo 将它替换成空字符串pathRewrite:{'^/atBaiLuo':''},wx:true,//用于支持websocketchangeOrigin:true,//用于控制请求头中的host的值},'/demo':{target:'http://localhost:5000',//重新网址 找到匹配 atBaiLuo 将它替换成空字符串pathRewrite:{'^/demo':''},wx:true,//用于支持websocketchangeOrigin:true,//用于控制请求头中的host的值}}}
- 优点:可以配置多个代理,且可以灵活地控制请求是否走代理。
- 缺点:配置略微繁琐,请求资源时必须加前缀
5.9 插槽
5.9.1 默认插槽
Category.vue 组件
<template>
<div class="category"><h3>{{title}}分类</h3>
<slot></slot></div>
</template><script>
export default {name: "Category",props:['listData','title']
}
</script><style scoped>
.category{background-color: #48daec;width: 200px;height: 300px;
}
h3{text-align: center;background-color: orange;
}
img{width: 100%;
}
video{width: 100%;
}
</style>
App.vue 父组件
<template><div class="container"><category title="美食" :listData="foods"><img src="https://img.zcool.cn/community/01d80e5e09f781a801216518695d24.jpg@2o.jpg"></category><category title="游戏" :listData="games"><ul><li v-for="(g,index) in games" :key="index">{{g}}</li></ul></category><category title="电影" :listData="films"><video src="https://www.bilibili.com/video/BV1Hh411K7zk?t=7.8" controls></video></category></div>
</template><script>
import Category from "@/components/Category.vue";
export default {name: 'App',components: {Category},data(){return{foods:['火锅','烧烤','小龙虾','牛排'],games:['红色警戒','英雄联盟','穿越火线','逆战'],films:['《教父》','《你好,李焕英》','《拆弹专家》','《七大队》']}}
}
</script><style>
.container{display: flex;justify-content: space-around;
}</style>
5.9.2 具名卡槽
Category.vue 组件
<template>
<div class="category"><h3>{{title}}分类</h3>
<slot name="center"></slot>
<slot name="footer"></slot></div>
</template><script>
export default {name: "Category",props:['listData','title']
}
</script><style scoped>
.category{background-color: #48daec;width: 200px;height: 300px;
}
h3{text-align: center;background-color: orange;
}
img{width: 100%;
}
video{width: 100%;
}
</style>
App.vue 父组件
<template><div class="container"><Category title="美食" :listData="foods"><img slot="center" src="https://img.zcool.cn/community/01d80e5e09f781a801216518695d24.jpg@2o.jpg"></Category><Category title="游戏" :listData="games"><ul slot="center"><li v-for="(g,index) in games" :key="index">{{g}}</li></ul><div class="foot" slot="footer"><a href="#">单机游戏</a><a href="#">网络游戏</a></div></Category><Category title="电影" :listData="films"><video slot="center" src="https://www.bilibili.com/video/BV1Hh411K7zk?t=7.8" controls></video><template slot="footer"><div class="foot" ><a href="#">经典</a><a href="#">热门</a><a href="#">推荐</a></div><h4>欢迎前来观影</h4></template></Category></div>
</template><script>
import Category from "@/components/Category.vue";
export default {name: 'App',components: {Category},data(){return{foods:['火锅','烧烤','小龙虾','牛排'],games:['红色警戒','英雄联盟','穿越火线','逆战'],films:['《教父》','《你好,李焕英》','《拆弹专家》','《七大队》']}},
}
</script><style>
.container,.foot{display: flex;justify-content: space-around;
}
h4{text-align: center;
}</style>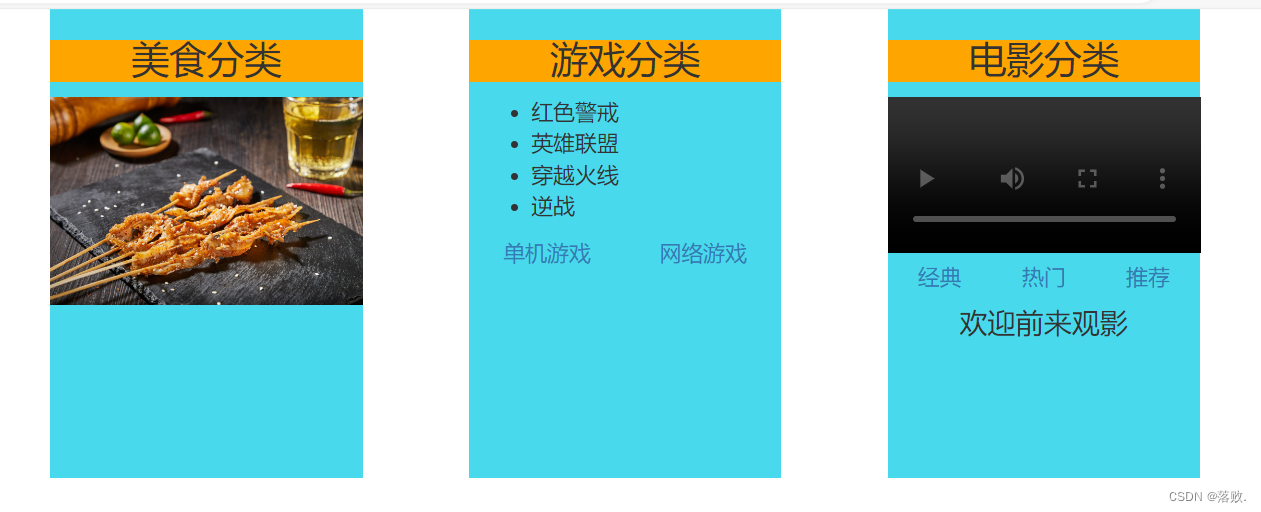
5.9.3 作用域卡槽
App.vue 父组件
<template><div class="container"><Category title="游戏"><template scope="atBaiLuo"><ul><li v-for="g in atBaiLuo.games">{{g}}</li></ul></template></Category><Category title="游戏"><template scope="{games}"><ol><li v-for="g in games">{{g}}</li></ol></template></Category><Category title="游戏"><template slot-scope="{games}"><h4 v-for="g in games">{{g}}</h4></template></Category></div>
</template><script>
import Category from "@/components/Category.vue";
export default {name: 'App',components: {Category},data(){return{games:['红色警戒','英雄联盟','穿越火线','逆战']}},
}
</script><style>
.container,.foot{display: flex;justify-content: space-around;
}
h4{text-align: center;
}</style>
Category.vue 组件
<template>
<div class="category"><h3>{{title}}分类</h3>
<slot :games="games"></slot></div>
</template><script>
export default {name: "Category",props:['listData','title'],data(){return{games:['红色警戒','英雄联盟','穿越火线','逆战']}}
}
</script><style scoped>
.category{background-color: #48daec;width: 200px;height: 300px;
}
h3{text-align: center;background-color: orange;
}
img{width: 100%;
}
video{width: 100%;
}
</style>
5.9.4 卡槽总结
- 作用:让父组件可以向子组件指定位置插入html结构,也是一种组件之间通信的一种方式,适用于 父组件==> 子组件。
- 分类:默认卡槽、具名卡槽、作用域卡槽。
使用方式
-
默认卡槽
父组件中:<Category title="美食" :listData="foods"><div>html结构</div></Category>子组件中:<template><div class="category"><h3>{{title}}分类</h3>定义卡槽<slot>卡槽默认内容</slot></div></template> -
具名卡槽
父组件: <Category title="电影" :listData="films"><template slot="center"><div>html结构1</div></template><template slot="footer"><div>html结构2</div></template></Category>子组件: <template><div class="category"><h3>{{title}}分类</h3><slot name="center">卡槽默认内容</slot><slot name="footer">卡槽默认内容</slot></div> </template> -
作用域卡槽
-
理解:数据在组件的自身,但根据数据生成的结构需要组件的使用者来决定。(games数据在Category组件中,但是使用数据所遍历出来的结构由App组件决定)
-
具体编码:
父组件:
<!--生成的时ul--><Category title="游戏"><template scope="atBaiLuo"><ul><li v-for="g in atBaiLuo.games">{{g}}</li></ul></template>
<!--生成的h4--></Category><Category title="游戏"><template slot-scope="{games}"><h4 v-for="g in games">{{g}}</h4></template></Category>子组件:
<template>
<div class="category"><h3>{{title}}分类</h3>
<slot :games="games"></slot></div>
</template><script>
export default {name: "Category",props:['listData','title'],data(){return{games:['红色警戒','英雄联盟','穿越火线','逆战']}}
}
</script>
-
相关文章:
五、使用脚手架
五、使用脚手架 5.1 简单的实现 创建一个 School 组件 <template> <div><h2>学校名称:{{name}}</h2><h2>学校地址:{{address}}</h2> </div> </template><script> export default {name: "S…...
抛弃chatgpt,使用微软的Cursor提升coding效率
Whats Cursor? Cursor编辑器是一个基于GPT-4的代码编辑器,它可以根据用户的自然语言指令或者正在编辑的代码上下文为用户提供代码建议,支持多种编程语言,如Python、Java、C/C#、go等。Cursor编辑器还可以帮助用户重构、理解和优化代码&…...
)
uniapp插件uViewplus的使用(涉及TS下的问题)
在技术选型后最后定了使用有团队维护的uview-plus3.0,官方文档 配置参考:https://juejin.cn/post/7169875753100640270 ts配置参考:https://blog.csdn.net/m0_70027114/article/details/132957426 引入 在项目文件的pages.json中的"easycom"…...
google浏览器chrome无法访问localhost等本地虚拟域名的解决方法
场景一: 谷歌浏览器访问出现:forbbiden 403 问题,或者直接跳转到正式域名(非本地虚拟域名) 访问本地的虚拟域名http://www.hd.com/phpinfo.php?p1发生了302 条状 火狐浏览器正常访问; 解决方法: 方法1:在谷歌浏览器…...
前端单元测试之Jest详解篇)
(2.2w字)前端单元测试之Jest详解篇
Jest Jest 概述 Jest是一个领先的JavaScript测试框架,特别适用于React和Node.js环境。由Facebook开发,它以简单的配置、高效的性能和易用性而闻名。Jest支持多种类型的测试,包括单元测试、集成测试和快照测试,后者用于捕获组件或…...

【C++私房菜】面向对象中的多态
文章目录 一、多态二、对象的静态类型和动态类型三、虚函数和纯虚函数1、虚函数2、虚析构函数3、抽象基类和纯虚函数4、多态的原理 四、重载、覆盖(重写)、隐藏(重定义)的对比 一、多态 OOP的核心思想是多态性(polymorphism)。多态性这个词源自希腊语,其含义是“多…...

(done) 什么是特征值和特征向量?如何求特征值的特征向量 ?如何判断一个矩阵能否相似对角化?
什么是齐次方程? https://blog.csdn.net/shimly123456/article/details/136198159 行列式和是否有解的关系? https://blog.csdn.net/shimly123456/article/details/136198215 特征值和特征向量 参考视频:https://www.bilibili.com/video/BV…...
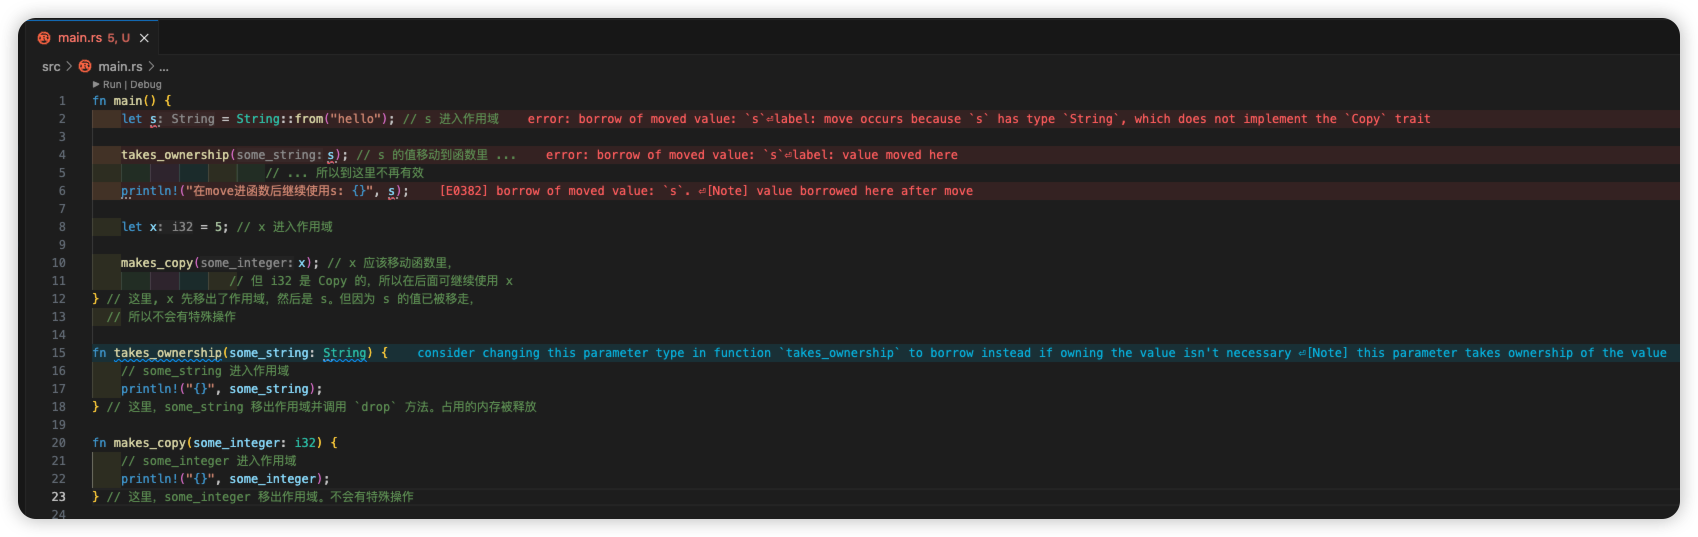
[rust] 11 所有权
文章目录 一 背景二 Stack 和 Heap2.1 Stack2.2 Heap2.3 性能区别2.4 所有权和堆栈 三 所有权原则3.1 变量作用域3.2 String 类型示例 四 变量绑定背后的数据交互4.1 所有权转移4.1.1 基本类型: 拷贝, 不转移所有权4.1.2 分配在 Heap 的类型: 转移所有权 4.2 Clone(深拷贝)4.3 …...

MySQL安装
文章目录 MYSQL安装一、下载二、解压三、配置1. 添加环境变量2. 初始化MySQL3. 注册MySQL服务4. 启动MySQL服务5. 修改默认账户密码 四、登录MySQL五、卸载MySQL MYSQL安装 一、下载 点开下面的链接:https://dev.mysql.com/downloads/mysql/ 点击Download 就可以下…...
AI时代显卡如何选择,B100、H200、L40S、A100、H100、V100 含架构技术和性能对比
AI时代显卡如何选择,B100、H200、L40S、A100、H100、V100 含架构技术和性能对比。 英伟达系列显卡大解析B100、H200、L40S、A100、A800、H100、H800、V100如何选择,含架构技术和性能对比带你解决疑惑。 近期,AIGC领域呈现出一片繁荣景象&a…...

R语言入门笔记2.5
数据预处理 R语言处理的数据多以数据框的形式出现。 预备操作 数据查看 > dim(x) [1] 16 3 #数据框有16行3列 > names(x) #查看数据框的变量名 [1] "X" "Z" "Y" > head(x,3) #查看前3行,若为-3则是查看后三行之…...

命令记录学习
1. 查看当前用户 cat /etc/passwd 添加test用户 useradd test -G root 查看test用户状态 id test 查看用户adaminstrator passwd -S adaminstrator 禁用用户adaminstrator passwd -l adaminstrator 密码策略设置文件地址 vi /etc/pam.d/system-auth 设…...

Python3 TCP 客户端
下面是一个简单的 Python TCP 客户端示例代码,用于与之前提到的 EchoServer 进行通信: import socketserver_address (localhost, 8888)# 创建 TCP 客户端套接字 client_socket socket.socket(socket.AF_INET, socket.SOCK_STREAM)try:# 连接到服务器…...
图论(算法竞赛、蓝桥杯)--拓扑排序
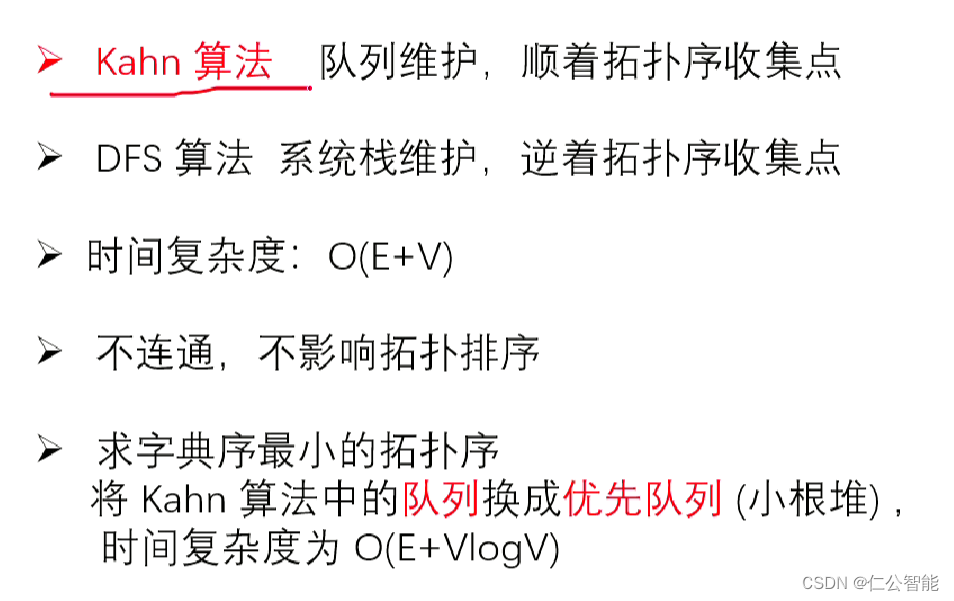
1、B站视频链接:D01 拓扑排序_哔哩哔哩_bilibili #include <bits/stdc.h> using namespace std; const int N100010; int n,m,a,b; vector<int> e[N],tp; int din[N]; bool topsort(){queue<int> q;for(int i1;i<n;i){if(din[i]0)q.push(i);}…...
)
内网穿透(docker部署frp)
文章目录 内网穿透实现内网穿透的常见方法 frpfrp的实现原理frps服务端应用部署配置文件部署参数配置 frpc客户端部署 内网穿透 内网穿透是指在内部网络(内网)中实现穿透外网(公网)的通信。内网通常是指公司、组织或家庭等内部网…...
Java设计模式 | 简介
设计模式的重要性: 软件工程中,设计模式(design pattern)是对软件设计中普遍存在(反复出现)的各种问题,所提出的解决方案。 这个术语由埃里希 伽玛(Erich Gamma)等人在1…...
微信小程序video 点击自动全屏播放
//因为这个地址可能是图片也可能是视频 点击 图片可以预览,点击视频可放大全屏自动播放。 代码如下 <view v-else :class{contentImg: x.picture.length0} style"margin-top: 10px;"v-for"(x1, y1) in x.picture" :key"y"><…...
)
MySQL基础面试问题(一)
MySQL面试问题的标准回答: 什么是数据库范式?MySQL中常见的范式有哪些? 标准回答:数据库范式是一组规则,用于设计关系型数据库的结构,以减少数据冗余和提高数据的一致性。常见的数据库范式包括第一范式&…...
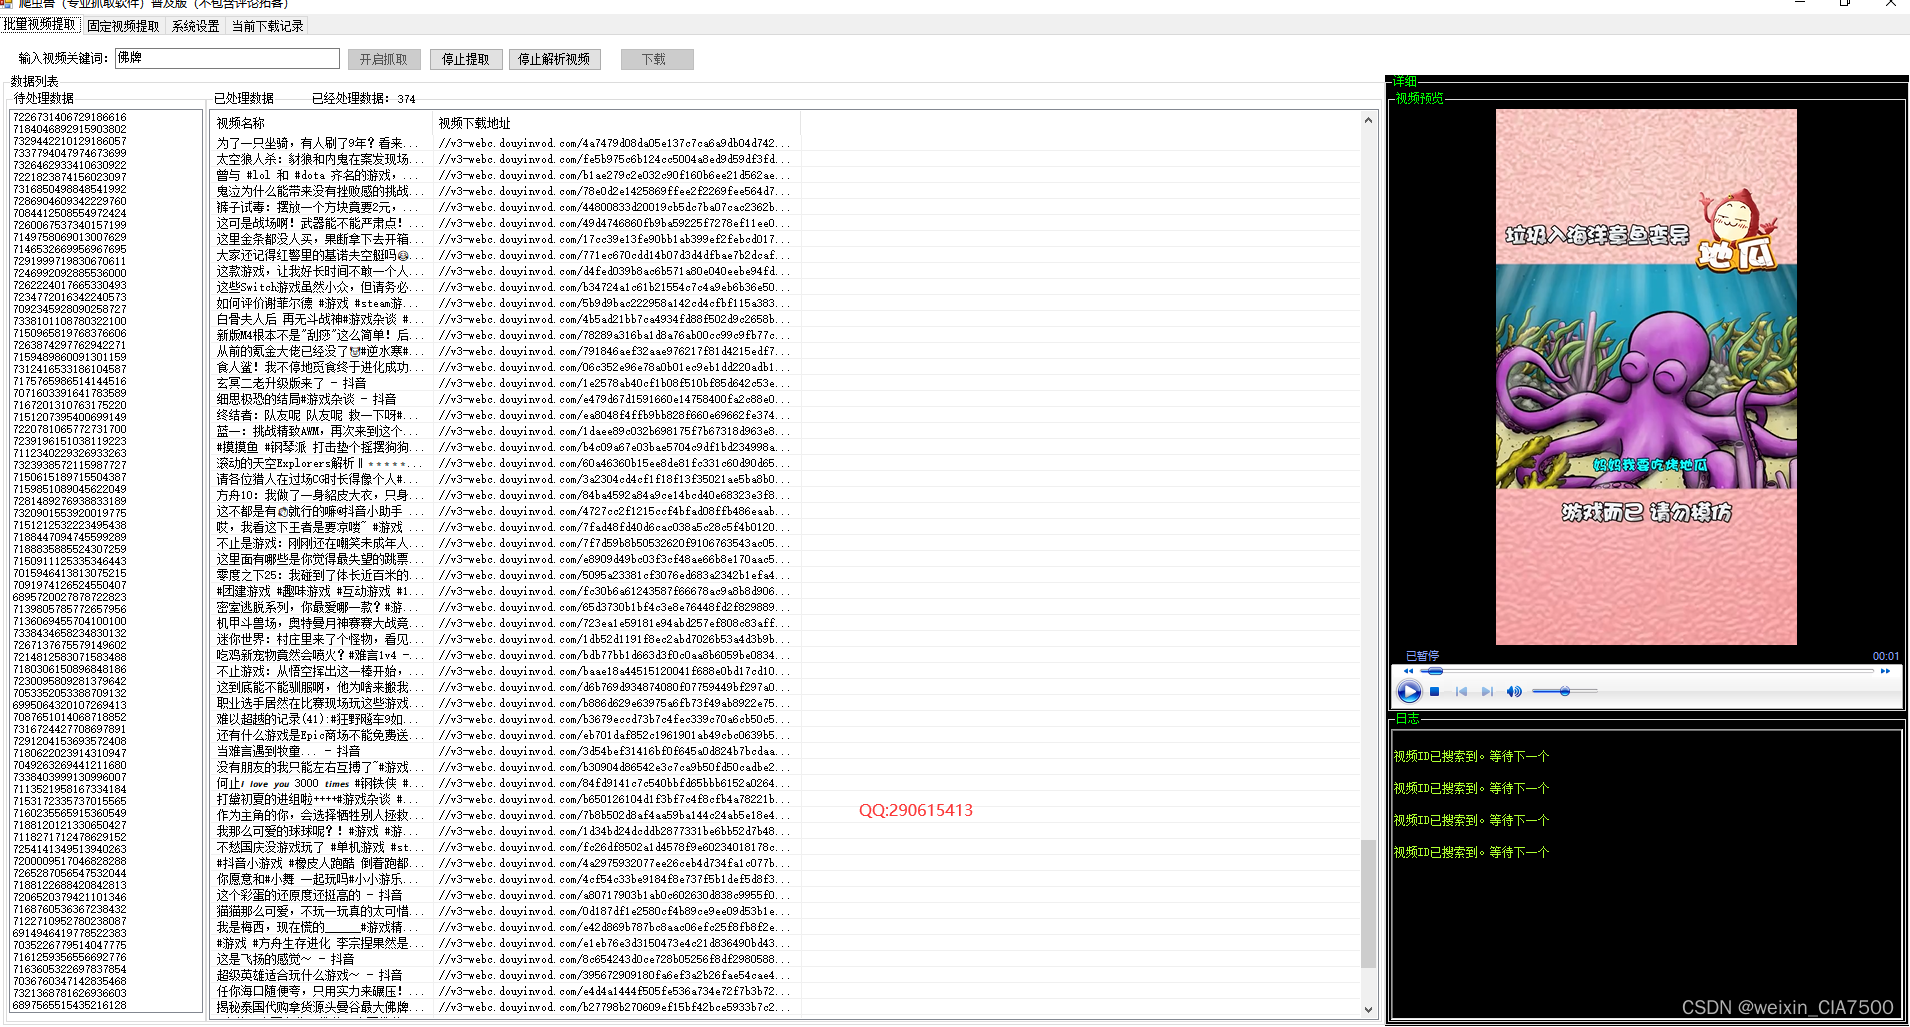
抖音爬虫批量视频提取功能介绍|抖音评论提取工具
抖音爬虫是指通过编程技术从抖音平台上获取视频数据的程序。在进行抖音爬虫时,需要注意遵守相关法律法规和平台规定,以确保数据的合法获取和使用。 一般来说,抖音爬虫可以实现以下功能之一:批量视频提取。这个功能可以用于自动化地…...
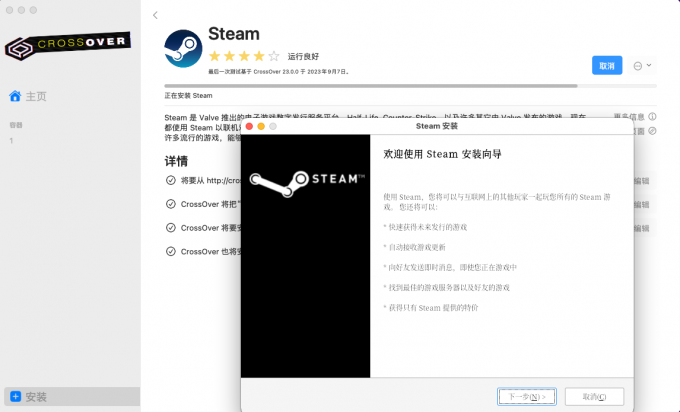
mac真的安装不了vmware吗 mac如何安装crossover crossover序列号从哪里买 购买正版渠道
有些用户可能想在mac上运行一些只能在windows上运行的软件,比如游戏、专业软件等。这时候,就需要用到虚拟机技术,也就是在mac上安装一个可以模拟其他操作系统的软件,比如vmware或者crossover。那么,mac真的安装不了vmw…...

VisualCppRedist AIO:终极Windows运行库一站式解决方案的5大核心技术解析
VisualCppRedist AIO:终极Windows运行库一站式解决方案的5大核心技术解析 【免费下载链接】vcredist AIO Repack for latest Microsoft Visual C Redistributable Runtimes 项目地址: https://gitcode.com/gh_mirrors/vc/vcredist VisualCppRedist AIO&#…...

BlenderKit插件Windows平台pwd模块缺失问题的深度技术解析与解决方案
BlenderKit插件Windows平台pwd模块缺失问题的深度技术解析与解决方案 【免费下载链接】BlenderKit Official BlenderKit add-on for Blender 3D. Documentation: https://github.com/BlenderKit/blenderkit/wiki 项目地址: https://gitcode.com/gh_mirrors/bl/BlenderKit …...

Zotero插件市场终极指南:一键安装管理所有插件的完整解决方案
Zotero插件市场终极指南:一键安装管理所有插件的完整解决方案 【免费下载链接】zotero-addons Zotero Add-on Market | Zotero插件市场 | Browsing, installing, and reviewing plugins within Zotero 项目地址: https://gitcode.com/gh_mirrors/zo/zotero-addons…...

如何一键同步网易云音乐到Discord?完整免费教程指南
如何一键同步网易云音乐到Discord?完整免费教程指南 【免费下载链接】NetEase-Cloud-Music-DiscordRPC 在Discord上显示网抑云/QQ音乐. Enables Discord Rich Presence For Netease Cloud Music/Tencent QQ Music. 项目地址: https://gitcode.com/gh_mirrors/ne/…...

百度网盘秒传脚本:告别文件链接失效,三步实现永久分享
百度网盘秒传脚本:告别文件链接失效,三步实现永久分享 【免费下载链接】rapid-upload-userscript-doc 秒传链接提取脚本 - 文档&教程 项目地址: https://gitcode.com/gh_mirrors/ra/rapid-upload-userscript-doc 你是否曾因百度网盘分享链接突…...

019、未来展望:IPFS、暗网与去中心化互联网的融合趋势
当内容寻址遇见匿名路由 IPFS的核心是内容寻址(CID),暗网(以Tor为例)的核心是匿名路由。二者在协议层本无直接关联,但在实际部署中却产生了有趣的互补。传统IPFS网络依赖公共DHT和引导节点,这些…...

Hypnos-i1-8B惊艳案例:用自然语言描述→自动生成LaTeX+Python可执行代码
Hypnos-i1-8B惊艳案例:用自然语言描述→自动生成LaTeXPython可执行代码 1. 模型能力概览 Hypnos-i1-8B是一款基于量子噪声注入训练的8B参数开源大模型,专为复杂逻辑推理和数学问题求解而设计。它能够理解自然语言描述,并直接生成可执行的La…...

5分钟快速上手:免费图像转字节数组工具轻松搞定Arduino显示难题
5分钟快速上手:免费图像转字节数组工具轻松搞定Arduino显示难题 【免费下载链接】image2cpp 项目地址: https://gitcode.com/gh_mirrors/im/image2cpp 还在为Arduino单色显示屏的图像处理而烦恼吗?image2cpp图像转换器是你的完美解决方案&#x…...

你的密码字典真的够强吗?用Hydra搭配Seclists定制专属攻击字典
密码字典的终极进化:从通用词库到精准爆破的艺术 在渗透测试的世界里,密码爆破就像一场精心策划的狩猎——而你的字典质量直接决定了是满载而归还是空手而回。太多安全从业者沉迷于工具的使用技巧,却忽视了最基础也最关键的环节:字…...

抖音内容采集全栈解决方案:从单视频到批量管理的技术实践
抖音内容采集全栈解决方案:从单视频到批量管理的技术实践 【免费下载链接】douyin-downloader A practical Douyin downloader for both single-item and profile batch downloads, with progress display, retries, SQLite deduplication, and browser fallback su…...