【数据结构入门】-链表之双向循环链表
个人主页:平行线也会相交
欢迎 点赞👍 收藏✨ 留言✉ 加关注💓本文由 平行线也会相交 原创
收录于专栏【数据结构初阶(C实现)】

文章目录
- 链表初始化
- 打印链表
- 尾插
- 尾删
- 新建一个节点
- 头插
- 头删
- 查找
- 在pos之前插入*
- 删除pos位置
- 销毁链表
- 总代码
- test.c
- List.h
- List.c
链表初始化
LTNode* ListInit(LTNode* phead)
{//哨兵位头节点phead = (LTNode*)malloc(sizeof(LTNode));phead->next = phead;phead->prev = phead;return phead;//利用返回值的方式
}
首先,我们需要一个哨兵头节点,该头节点的next和prev均指向该头节点本身,最后,返回这个头节点的地址。
打印链表
void ListPrint(LTNode* phead)
{assert(phead);LTNode* cur = phead->next;//从phead->开始遍历链表while (cur != phead)//为了防止死循环,所以终止条件为cur=phead{printf("%d ", cur->data);cur = cur->next;}printf("\n");
}
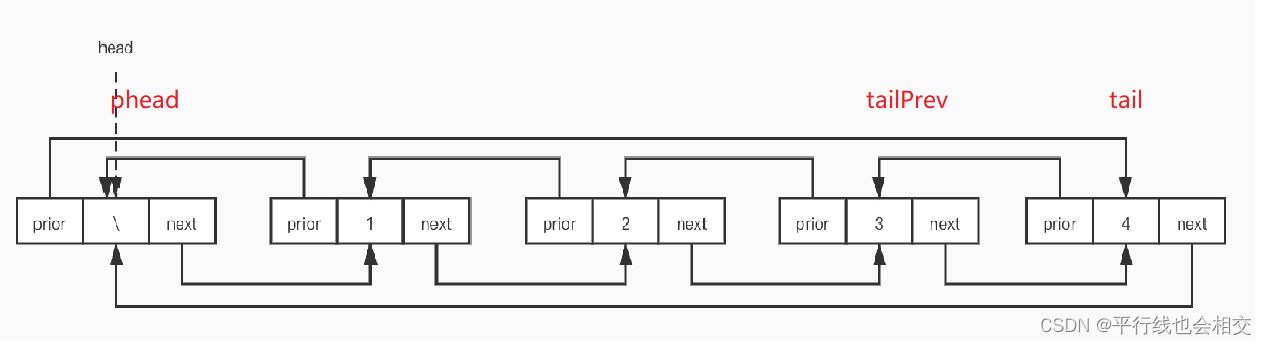
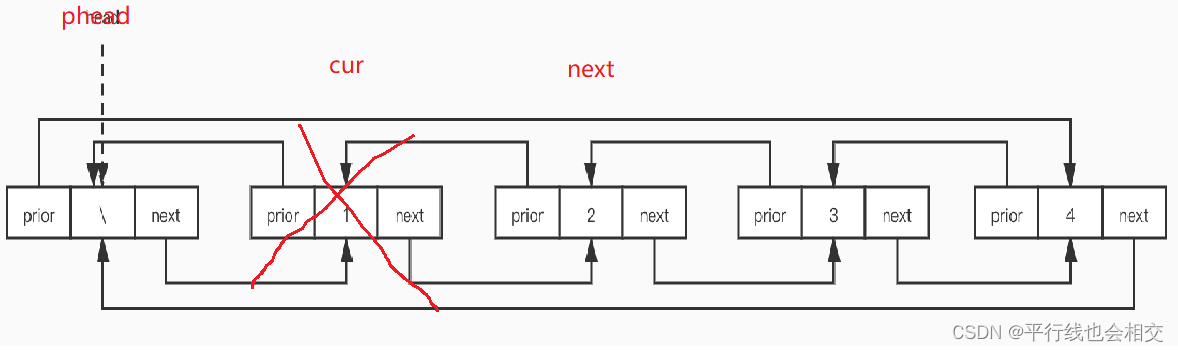
由于链表是双向循环链表,双向循环链表自身的结构很容易在打印时造成死循环,所以我们在打印链表时需要注意循环终止的条件,否则,程序就会陷入死循环。再次提醒,这是一个双向循环链表。当我们循环打印完链表的最后一个数据的时候,此时cur就是指向链表中最后一个节点的,而cur->next是指向链表的哨兵头节点的,所以,循环终止条件就是cur=phead。
尾插
void ListPushBack(LTNode* phead, LTDateType x)
{//链表为空时,依然可以处理assert(phead);LTNode* tail = phead->prev;//找到尾节点LTNode* newnode = (LTNode*)malloc(sizeof(LTNode));newnode->data = x;//pheadtail->next = newnode;newnode->prev = tail;newnode->next = phead;phead->prev = newnode;
}
尾删
//尾删
void ListPopBack(LTNode* phead)
{assert(phead);assert(phead->next != phead);//当链表为空时,就表示不能再删除了//找到尾LTNode* tail = phead->prev;phead->prev = tail->prev;tail->prev->next = phead;//最后释放空间free(tail);
}
既然是尾删,我们首先要先找到尾,即LTNode* tail = phead->prev;这样会方便很多,同时尾删的时候一定要注意**free()**的释放时机。
注意一种特殊情况:当phead->next==phead的时候,此时链表为空,就不能继续删除了。所以需要加上 assert(phead->next != phead);。

新建一个节点
LTNode* BuyListNode(LTDateType x)
{LTNode* newnode = (LTNode*)malloc(sizeof(LTNode));newnode->data = x;newnode->prev = NULL;newnode->next = NULL;return newnode;
}
该函数功能就是新建一个节点,把该节点的数据进行赋值(即newnode->data = x;),并把指针均变成空指针(newnode->prev = NULL; newnode->next = NULL;)。最后返回这个新节点的地址即可。
头插
void ListPushFront(LTNode* phead, LTDateType x)
{assert(phead);LTNode* newnode = BuyListNode(x);LTNode* next = phead->next;phead->next = newnode;newnode->prev = phead;newnode->next = next;next->prev = newnode;
}
还是看一下特殊情况,即如果链表是一个空链表,我们来简单分析一下:链表为空时phead->next就是phead本身。
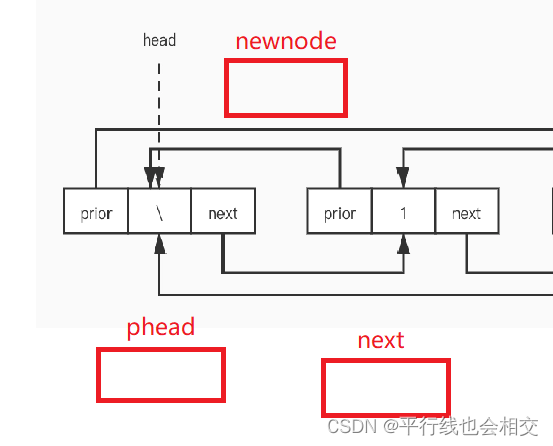
我们只需要处理phead、next、newnode三者之间的链接关系即可。最后发现,链表为空时依然可以进行处理。
头删
void ListPopFront(LTNode* phead)
{assert(phead);//链表为空就不需要头删了LTNode* next = phead->next;LTNode* nextNext = next->next;phead->next = nextNext;nextNext->prev = phead;free(next);
}
链表为空时就不要进行头删操作了,故加上assert(phead);我们最好还是提前定义好next和nextNext即LTNode* next = phead->next;
LTNode* nextNext = next->next;
这样后面会很方便,可以减少不必要的麻烦,接下来处理phead、next、nextNext三者之间的链接关系就好了。
查找
查找的实现与打印的实现差不太多,提前定义一个cur指向phead的next,即LTNode* next = phead->next;循环终止条件依然是cur = phead,其它按部就班即可。
LTNode* ListFind(LTNode* phead, LTDateType x)
{assert(phead);LTNode* cur = phead->next;while (cur != phead){if (cur->data == x){return cur;}cur = cur->next;}//没找到就返回NULLreturn NULL;
}
在pos之前插入*
void ListInsert(LTNode* pos, LTDateType x)
{assert(pos);LTNode* posPrev = pos->prev;LTNode* newnode = BuyListNode(x);//处理posPrev  newnode  pos三者之间的链接关系posPrev->next = newnode;newnode->prev = posPrev;newnode->next = pos;pos->prev = newnode;
}
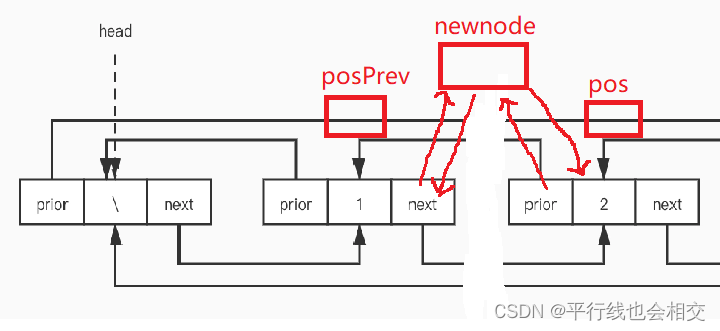
一定要提前定义一个posPrev即LTNode* posPrev = pos->prev;,然后进行newnode、pos、posPrev之间的链接就好。
在这里,我们还可以利用ListInsert这个函数来完成头插尾插的操作。
首先,我们先利用ListInsert来完成尾插的操作。
当pos是我们的哨兵位节点phead的时候,由于这个函数是在pos之前插入,所以此时就相当于尾插了(因为phead->prev就是尾)。
void ListPushBack(LTNode* phead, LTDateType x)
{//链表为空时,依然可以处理assert(phead);//LTNode* tail = phead->prev;//找到尾节点//LTNode* newnode = (LTNode*)malloc(sizeof(LTNode));//newnode->data = x;phead//tail->next = newnode;//newnode->prev = tail;//newnode->next = phead;//phead->prev = newnode;ListInsert(phead, x);
}
现在再来看头插:
当phead->next和pos相等时,此时就相当于头插。
void ListPushFront(LTNode* phead, LTDateType x)
{assert(phead);//LTNode* newnode = BuyListNode(x);//LTNode* next = phead->next;//phead->next = newnode;//newnode->prev = phead;//newnode->next = next;//next->prev = newnode;ListInsert(phead->next, x);
}
所以我们以后想要快速的写双向循环链表的时候,头插、尾插、或者任意位置的插入都可以利用ListInsert这个函数来快速的实现双向循环链表。把phead->prev传给pos就是尾插,把phead->next传给pos就变成了头删。所以双向链表只需要实现两个函数(ListInsert和ListErase)就都搞定了,这也是双向链表结构的一个优势。
删除pos位置
void ListErase(LTNode* pos)
{assert(pos);LTNode* posPrev = pos->prev;LTNode* posNext = pos->next;posPrev->next = posNext;posNext->prev = posPrev;free(pos);
}
一般来说,我们想要删除某个数据先是调用ListFind来返回一个地址,然后才调用ListErase继而把该数据删除,请看:
void TestList2()
{LTNode* plist = NULL;plist = ListInit(plist);ListPushFront(plist, 1);ListPushFront(plist, 2);ListPushFront(plist, 3);ListPushFront(plist, 4);ListPrint(plist);ListPushBack(plist, 1);ListPushBack(plist, 2);ListPushBack(plist, 3);ListPushBack(plist, 4);ListPrint(plist);LTNode* pos = ListFind(plist, 2);if (pos != NULL){ListErase(pos);}ListPrint(plist);
}
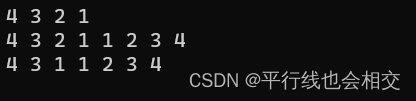
我们可以看到运行结果成功把第一个2删除了。
然而ListErase的功能不仅仅只有这些,我们还可以利用ListErase来完成头删尾删的操作。
请看:
//尾删
void ListPopBack(LTNode* phead)
{assert(phead);assert(phead->next != phead);//当链表为空时,就表示不能再删除了找到尾//LTNode* tail = phead->prev;//phead->prev = tail->prev;//tail->prev->next = phead;最后释放空间//free(tail);ListErase(phead->prev);
}
//头删
void ListPopFront(LTNode* phead)
{assert(phead);链表为空就不需要头删了//LTNode* next = phead->next;//LTNode* nextNext = next->next;//phead->next = nextNext;//nextNext->prev = phead;//free(next);ListErase(phead->next);
}
现在我们来测试一下:
void TestList2()
{LTNode* plist = NULL;plist = ListInit(plist);ListPushFront(plist, 1);ListPushFront(plist, 2);ListPushFront(plist, 3);ListPushFront(plist, 4);ListPrint(plist);ListPushBack(plist, 1);ListPushBack(plist, 2);ListPushBack(plist, 3);ListPushBack(plist, 4);ListPrint(plist);LTNode* pos = ListFind(plist, 2);if (pos != NULL){ListErase(pos);}ListPrint(plist);ListPopBack(plist);ListPopBack(plist);ListPopFront(plist);ListPopFront(plist);ListPrint(plist);
}

销毁链表
最后,我们再来实现一下销毁链表。
//销毁链表
void ListDestroy(LTNode* phead)
{assert(phead);LTNode* cur = phead->next;while (cur != phead){LTNode* next = cur->next;free(cur);cur = next;}free(phead);//想要把phead置为空,需要再函数外部进行置空,当然如果传二级指针也可以在函数内部把//phead置为空,不过因为我们这个双向链表都是传的一级指针,所以为了保持接口一致性,//我们在函数外部把phead置为空即可
}
以上就是双向循环链表所以接口函数的实现。
总代码
test.c
#include"List.h"void TestList1()
{LTNode* plist = NULL;//初始化plist = ListInit(plist);ListPushBack(plist, 1);ListPushBack(plist, 2);ListPushBack(plist, 3);ListPushBack(plist, 4);ListPrint(plist);ListPushFront(plist, 1);ListPushFront(plist, 2);ListPushFront(plist, 3);ListPushFront(plist, 4);ListPrint(plist);
}void TestList2()
{LTNode* plist = NULL;plist = ListInit(plist);ListPushFront(plist, 1);ListPushFront(plist, 2);ListPushFront(plist, 3);ListPushFront(plist, 4);ListPrint(plist);ListPushBack(plist, 1);ListPushBack(plist, 2);ListPushBack(plist, 3);ListPushBack(plist, 4);ListPrint(plist);LTNode* pos = ListFind(plist, 2);if (pos != NULL){ListErase(pos);}ListPrint(plist);ListPopBack(plist);ListPopBack(plist);ListPopFront(plist);ListPopFront(plist);ListPrint(plist);ListDestroy(plist);plist = NULL;
}int main()
{//TestList1();TestList2();return 0;
}
List.h
#pragma once#include<stdio.h>
#include<stdlib.h>
#include<assert.h>typedef int LTDateType;typedef struct ListNode
{LTDateType data;struct ListNode* next;struct ListNode* prev;
}LTNode;LTNode* ListInit(LTNode* phead);//初始化
void ListPrint(LTNode* phead);  //打印链表//尾插
void ListPushBack(LTNode* phead, LTDateType x);//尾删
void ListPopBack(LTNode* phead);//头插
void ListPushFront(LTNode* phead, LTDateType x);//头删
void ListPopFront(LTNode* phead);//创建新节点
LTNode* BuyListNode(LTDateType x);//查找
LTNode* ListFind(LTNode* phead, LTDateType x);//pos位置之前插入
void ListInsert(LTNode* pos, LTDateType x);//删除pos位置
void ListErase(LTNode* pos);//销毁聊表
void ListDestroy(LTNode* phead);
List.c
#include"List.h"//初始化
LTNode* ListInit(LTNode* phead)
{//哨兵位头节点phead = (LTNode*)malloc(sizeof(LTNode));phead->next = phead;phead->prev = phead;return phead;//利用返回值的方式
}void ListPushBack(LTNode* phead, LTDateType x)
{//链表为空时,依然可以处理assert(phead);//LTNode* tail = phead->prev;//找到尾节点//LTNode* newnode = (LTNode*)malloc(sizeof(LTNode));//newnode->data = x;phead//tail->next = newnode;//newnode->prev = tail;//newnode->next = phead;//phead->prev = newnode;ListInsert(phead, x);
}void ListPrint(LTNode* phead)
{assert(phead);LTNode* cur = phead->next;//从phead->开始遍历链表while (cur != phead)//为了防止死循环,所以终止条件为cur=phead{printf("%d ", cur->data);cur = cur->next;}printf("\n");
}//尾删
void ListPopBack(LTNode* phead)
{assert(phead);assert(phead->next != phead);//当链表为空时,就表示不能再删除了找到尾//LTNode* tail = phead->prev;//phead->prev = tail->prev;//tail->prev->next = phead;最后释放空间//free(tail);ListErase(phead->prev);
}LTNode* BuyListNode(LTDateType x)
{LTNode* newnode = (LTNode*)malloc(sizeof(LTNode));newnode->data = x;newnode->prev = NULL;newnode->next = NULL;return newnode;
}void ListPushFront(LTNode* phead, LTDateType x)
{assert(phead);//LTNode* newnode = BuyListNode(x);//LTNode* next = phead->next;//phead->next = newnode;//newnode->prev = phead;//newnode->next = next;//next->prev = newnode;ListInsert(phead->next, x);
}//头删
void ListPopFront(LTNode* phead)
{assert(phead);链表为空就不需要头删了//LTNode* next = phead->next;//LTNode* nextNext = next->next;//phead->next = nextNext;//nextNext->prev = phead;//free(next);ListErase(phead->next);
}//查找
LTNode* ListFind(LTNode* phead, LTDateType x)
{assert(phead);LTNode* cur = phead->next;while (cur != phead){if (cur->data == x){return cur;}cur = cur->next;}//没找到就返回NULLreturn NULL;
}//pos位置之前插入
void ListInsert(LTNode* pos, LTDateType x)
{assert(pos);LTNode* posPrev = pos->prev;LTNode* newnode = BuyListNode(x);//处理posPrev  newnode  pos三者之间的链接关系posPrev->next = newnode;newnode->prev = posPrev;newnode->next = pos;pos->prev = newnode;
}//删除pos位置
void ListErase(LTNode* pos)
{assert(pos);LTNode* posPrev = pos->prev;LTNode* posNext = pos->next;posPrev->next = posNext;posNext->prev = posPrev;free(pos);
}//销毁链表
void ListDestroy(LTNode* phead)
{assert(phead);LTNode* cur = phead->next;while (cur != phead){LTNode* next = cur->next;free(cur);cur = next;}free(phead);//想要把phead置为空,需要再函数外部进行置空,当然如果传二级指针也可以在函数内部把//phead置为空,不过因为我们这个双向链表都是传的一级指针,所以为了保持接口一致性,//我们在函数外部把phead置为空即可
}
好了,双向循环链表的实现就到这里了,其实在这里面最重要的两个接口函数就是ListErase和ListInser,这两个函数可以帮助我们快速的实现这个链表,剩余的就是一些边边角角的问题了。
这块的内容还是要多画图,来帮助我们更好的理解。
相关文章:
【数据结构入门】-链表之双向循环链表
个人主页:平行线也会相交 欢迎 点赞👍 收藏✨ 留言✉ 加关注💓本文由 平行线也会相交 原创 收录于专栏【数据结构初阶(C实现)】 文章目录链表初始化打印链表尾插尾删新建一个节点头插头删查找在pos之前插入*删除pos位…...
Jenkins自动化部署入门
Jenkins自动化部署入门 一、简介 Jenkins是一个开源软件项目,是基于Java开发的一种持续集成工具,用于监控持续重复的工作,旨在提供一个开放易用的软件平台,使软件的持续集成变成可能。 Jenkins自动化部署实现原理 二、Jenkins部…...

Springboot 读取模板excel信息内容并发送邮件, 并不是你想想中的那么简单
Springboot 读取模板excel信息内容并发送邮件 背景技术选型搭建过程数据加密隐藏问题暴露背景追溯解决背景 在我们日常开发中, 会遇到这样一种场景, 就是读取表格中的数据, 并将数据以附件的形式通过邮箱发送到表格中的每个人 即: excel 读取 excel 写入 发送邮件(携带附件), 例…...

蓝桥杯真题31日冲刺 |第一天
蓝桥杯真题31日冲刺 |第一天 一:完全平方数 题目:[链接](完全平方数 - 蓝桥云课 (lanqiao.cn)) 思路: 将 每个 完全平方数都 消掉,剩下的就是 不能构成平方的数 以12 为例: 所以 12 只要再 乘个三 即可满足 代…...

STM32开发(18)----CubeMX配置RTC
CubeMX配置RTC前言一、什么是RTC?RTC时钟源RTC备份域二、实验过程1.CubeMX配置2.代码实现3.实验结果总结前言 本章介绍使用STM32CubeMX对RTC进行配置的方法,RTC的原理、概念和特点,配置各个步骤的功能,并通过实验方式验证。 一、…...

Qt 单例模式第一次尝试
文章目录摘要单例模式如何使用Qt 的属性系统总结关键字: Qt、 单例、 的、 Q_GLOBAL_STATIC、 女神节摘要 世界上第一位电脑程序设计师是名女性:Ada Lovelace (1815-1852)是一位英国数学家兼作家,她是第一位主张计算机不只可以用来算数的人…...

C语言--一维数组
数组概念 数组:是一种构造数据类型,用以处理批量的同种类型的数据。 主要特点:数据量大 ,类型相同 一维数组的定义 语法: 类型说明符 数组名[整型常量表达式]; 注意: 方括号里面的内容用于指…...

DataGear 4.5.1 发布,数据可视化分析平台
DataGear 4.5.1 发布,严重 BUG 修复,具体更新内容如下: 修复:修复SQL数据集对于DB2、SQLite等数据源预览时会报错的BUG;修复:修复系统对于MySQL、MariaDB等数据源中无符号数值类型有时报错的BUG࿱…...

Springboot——@valid 做字段校验和自定义注解
文章目录前言注意实现测试环境验证自带的注解自定义valid注解自定义注解和处理类创建参数接收类,并增加字段注解接口中使用自测环节正常测试异常测试自定义全局异常监听扩展递归参数下valid不识别的坑前言 再项目开发中,针对前端传递的参数信息…...

c语言基础练习题详解
💞💞 1.C语言程序的基本单位是(C)。 A.程序行 B. 语句 C. 函数 D.字符 💞💞 2.已知各变量的类型说明如下: int m6,n,a,b; unsigned long w8;…...
C语言设计模式:实现简单工厂模式和工程创建
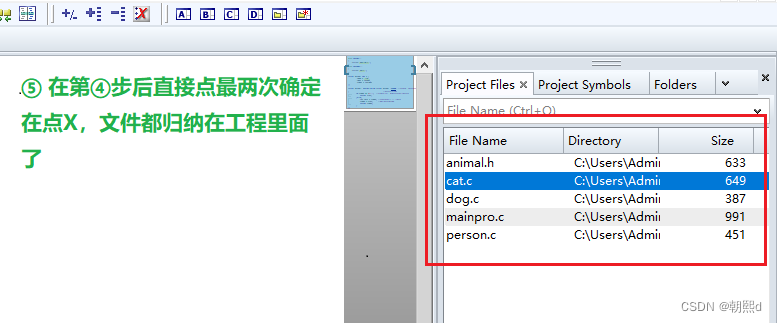
目录 一,设计模式概念引入 ① 什么是设计模式 ② 什么是类和对象 ③ 什么是工厂模式 二,C语言工厂模式的实现 ① 普通类和对象的代码实现 ② 工厂模式代码实现 ● cat.c ● dog.c ● person.c ● animal.h ● mainpro.c ● 完善mainpro.c …...

3.6日报
今天进行3.0信号整理工作 做官网后台技术文档 了解grpc gRPC是rpc框架中的一种,是rpc中的大哥 是一个高性能,开源和通用的RPC框架,基于Protobuf序列化协议开发,且支持众多开发语言。 面向服务端和协议端,基于http…...

中文代码88
PK 嘚釦 docProps/PK 嘚釦|,g z docProps/app.xml漅AN??駠(髂v诖m岼侸 魣,g踃$秂D廋Qvf漶x莗笳w?:瘜^?俍欶辇2}?睧汎 t#:?效7治XtA鏊?羄鈋嫿饄攗Tv契"D桷撵vJ鉂?闌 Jg??浱?樱沲gic鋹峡?sū窛葻?]迾?9卑{艏 rk\?洺萹啰N?W??2&quo…...
之 映射)
ElasticSearch 基础(五)之 映射
目录前言一、映射(Mapping)简介二、动态映射(Dynamic mapping)1、动态字段映射1.1、日期检测1.1.1、禁用日期检测1.1.2、自定义检测到的日期格式1.2、数值检测2、动态模板三、显示映射(Explicit mapping)1、…...
【C语言督学训练营 第二天】C语言中的数据类型及标准输入输出
文章目录一、前言二、数据类型1.基本数据类型①.整形②.浮点型③.字符型2.高级数据类型3.数据分类①.常量②.变量三、标准输入输出1.scanf2.printf四、进制转换1.进制转换简介2.十进制转其他进制3.其他进制转换五、OJ网站的使用一、前言 王道2024考研408C语言督学营第二天&…...

重资产模式和物流网络将推动京东第四季度利润率增长
来源:猛兽财经 作者:猛兽财经 强劲的2022年第三季度财务业绩 2022年11月18日,京东(JD)公布了2022年第三季度财务业绩,净收入为2435亿元人民币,增长了11.4%。净服务收入为465亿元人民币…...
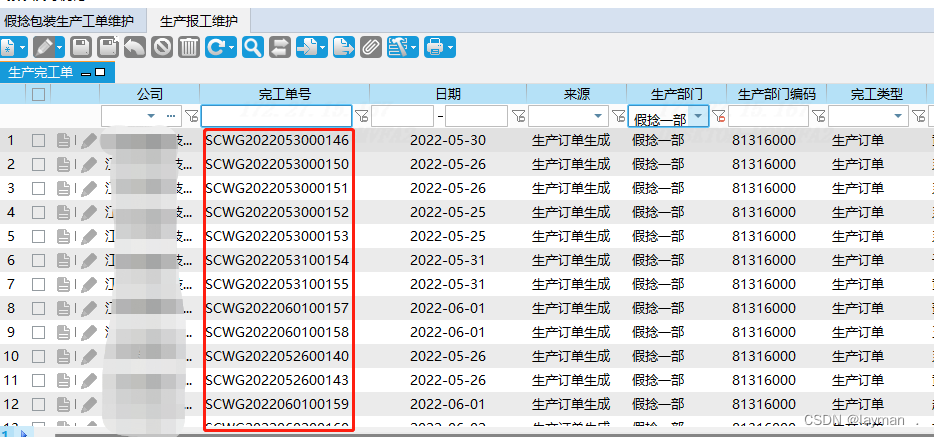
【新】EOS至MES的假捻报工数据导入-V2.0版本
假捻自动线的数据和MES没有进行对接,直接入库至EOS。 因此可信平台上缺少这部分的报工数据,需要把EOS的入库数据导出,整理成报工数据,导入到MES,然后通过定时任务集成到可信平台。 MES这边的报工数据整理,主要是添加订单明细ID,和完工单号。 订单明细ID(根据批次号和…...
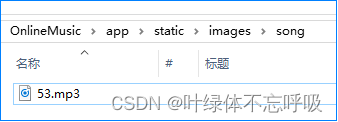
python甜橙歌曲音乐网站平台源码
wx供重浩:创享日记 对话框发送:python音乐 获取完整源码源文件说明文档配置教程等 在虚拟环境下输入命令“python manage.py runserver”启动项目,启动成功后,访问“http://127.0.0.1:5000”进入甜橙音乐网首页,如图1所…...

docker imageID计算
Image ID是在本地由Docker根据镜像的描述文件计算的,并用于imagedb的目录名称 docker镜像id都保存在/var/lib/docker/image/overlay2/imagedb/content/sha256下面,都是一些以sha256sum计算文件内容得出的哈希值的文件。 #ls /var/lib/docker/image/ove…...
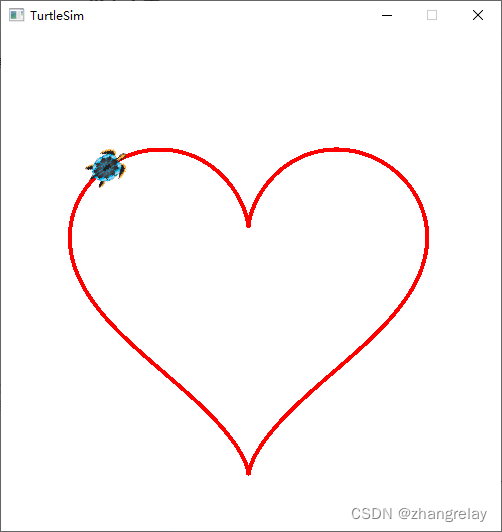
借助媛如意让ROS机器人turtlesim画出美丽的曲线-云课版本
首先安装并打开猿如意其次打开蓝桥云课ROS并加入课程在猿如意输入问题得到答案在蓝桥云课ROS验证如何通过turtlesim入门ROS机器人您可以通过以下步骤入门ROS机器人:安装ROS:您需要安装ROS,可以在ROS官网上找到安装指南。安装turtlesim&#x…...

java中间件无法连接数据库
文章目录环境症状问题原因解决方案环境 系统平台:N/A 版本:4.5.8 症状 java中间件连接瀚高数据库报如下错误: 连接失败 您必须改变数据库设置 com.highgo.jdbc.util.PSQLException: SCRAM authentication is not supported by this drive…...
)
DETR-segmentation实战:用PyTorch Hub快速搭建全景分割模型(附可视化代码)
DETR全景分割实战:5分钟快速部署PyTorch Hub预训练模型 计算机视觉领域近年来最令人兴奋的突破之一,就是Transformer架构在图像分割任务中的成功应用。不同于传统卷积神经网络,基于Transformer的DETR(Detection Transformer&#…...
)
基于springboot流浪宠物领养平台设计与开发(源码+精品论文+答辩PPT等资料)
博主介绍:CSDN毕设辅导第一人、靠谱第一人、全网粉丝50W,csdn特邀作者、博客专家、腾讯云社区合作讲师、CSDN新星计划导师、Java领域优质创作者,博客之星、掘金/华为云/阿里云/InfoQ等平台优质作者、专注于Java技术领域和学生毕业项目实战,高校老师/讲师/同行前辈交…...

构建企业级服务中台的几个关键设计思想
作为一名技术人员,我理解的“服务”,不仅仅是一个代码功能,更是一套复杂的业务流程和数据处理系统。在接触了“帮我吧”这样的企业级一体化智能服务管理平台后,我发现它背后蕴含的设计思想,非常值得我们技术人借鉴。 …...
)
鸿蒙Shape组件实战:5分钟搞定自定义几何图形绘制(附完整代码)
鸿蒙Shape组件实战:5分钟搞定自定义几何图形绘制(附完整代码) 在鸿蒙应用开发中,UI设计往往需要超越标准控件的限制,通过自定义图形来提升用户体验。Shape组件作为鸿蒙UI系统的核心绘图工具,能够帮助开发者…...
)
告别Vivado卡顿:Notepad++轻量化Verilog语法检查全攻略(含NppExec配置)
硬件工程师的效率革命:Notepad与Verilog语法检查的深度整合 每次打开Vivado都要忍受漫长的启动时间,只为检查几行Verilog代码的语法?作为FPGA开发者,我们经常需要快速验证代码片段,但传统EDA工具的笨重让我们在简单任务…...

阿里云渠道商:百炼模型选型指南 性能与成本全解析
引言:在 AI 大模型爆发式增长的今天,企业面临的核心挑战是如何在众多模型中选择最适合业务需求的解决方案。阿里云百炼作为一站式大模型服务平台,集成了国内外顶尖模型,但不同模型在性能、成本和应用场景上存在显著差异。本文将系…...

[Vulhub] PHP环境下XXE漏洞实战:从原理到防御
1. XXE漏洞:藏在XML里的隐形杀手 第一次听说XXE漏洞时,我正调试一个PHP项目。那天服务器突然开始疯狂读取系统文件,吓得我差点从椅子上摔下来。后来才发现,原来是一个看似无害的XML接口被恶意利用了。XXE(XML External…...

无线 DDC 如何神操作,助楼宇自控挣脱 “有线” 枷锁?
楼宇自控变革:从 “有线” 桎梏到 “无线” 自由在过去的二十年里,直接数字控制器(DDC)无疑是楼宇自动化领域当之无愧的 “大脑”。借助 BACnet/IP、Modbus 等有线协议,它将冷热源、空调以及照明等设备紧密相连&…...

降重压力小了!开源免费的降AI率神器 —— 千笔AI
在AI技术深度渗透学术写作的今天,越来越多的学生和研究者开始依赖AI工具提升论文撰写效率。然而,随着查重系统对AI生成内容的识别能力不断提升,如何有效降低AI率和重复率,已成为困扰众多学子的难题。面对市场上琳琅满目的降AI工具…...