OpenCV 4.9基本绘图
-
返回:OpenCV系列文章目录(持续更新中......)
上一篇:OpenCV使用通用内部函数对代码进行矢量化
下一篇:使用OpenCV4.9的随机生成器和文本

目标
在本教程中,您将学习如何:
- 使用 OpenCV 函数 line() 画一条线
- 使用 OpenCV 函数 ellipse()绘制椭圆
- 使用 OpenCV 函数 rectangle()绘制矩形
- 使用 OpenCV 函数 circle() 画一个圆
- 使用 OpenCV 函数 fillPoly()绘制填充多边形
点
它表示一个二维点,由其图像坐标 \(x\) 和 \(y\) 指定。我们可以将其定义为:
C++:
Point pt;
pt.x = 10;
pt.y = 8;
Java:
Point pt = new Point();
pt.x = 10;
pt.y = 8;
or
C++:
Point pt = Point(10, 8);Java:
Point pt = new Point(10, 8);标量
- 表示一个 4 元素向量。Scalar 类型在 OpenCV 中广泛用于传递像素值。
- 在本教程中,我们将广泛使用它来表示 BGR 颜色值(3 个参数)。如果不打算使用最后一个参数,则无需定义它。
- 让我们看一个例子,如果我们被要求一个颜色参数,我们给出:
-
我们将定义一个 BGR 颜色,例如:蓝色 = a、绿色 = b 和红色 = cScalar( a, b, c )
代码
此代码位于 OpenCV 示例文件夹中。否则你可以从这里下载
C++:
#include <opencv2/core.hpp>
#include <opencv2/imgproc.hpp>
#include <opencv2/highgui.hpp>#define w 400using namespace cv;void MyEllipse( Mat img, double angle );
void MyFilledCircle( Mat img, Point center );
void MyPolygon( Mat img );
void MyLine( Mat img, Point start, Point end );int main( void ){char atom_window[] = "Drawing 1: Atom";char rook_window[] = "Drawing 2: Rook";Mat atom_image = Mat::zeros( w, w, CV_8UC3 );Mat rook_image = Mat::zeros( w, w, CV_8UC3 );MyEllipse( atom_image, 90 );MyEllipse( atom_image, 0 );MyEllipse( atom_image, 45 );MyEllipse( atom_image, -45 );MyFilledCircle( atom_image, Point( w/2, w/2) );MyPolygon( rook_image );rectangle( rook_image,Point( 0, 7*w/8 ),Point( w, w),Scalar( 0, 255, 255 ),FILLED,LINE_8 );MyLine( rook_image, Point( 0, 15*w/16 ), Point( w, 15*w/16 ) );MyLine( rook_image, Point( w/4, 7*w/8 ), Point( w/4, w ) );MyLine( rook_image, Point( w/2, 7*w/8 ), Point( w/2, w ) );MyLine( rook_image, Point( 3*w/4, 7*w/8 ), Point( 3*w/4, w ) );imshow( atom_window, atom_image );moveWindow( atom_window, 0, 200 );imshow( rook_window, rook_image );moveWindow( rook_window, w, 200 );waitKey( 0 );return(0);
}void MyEllipse( Mat img, double angle )
{int thickness = 2;int lineType = 8;ellipse( img,Point( w/2, w/2 ),Size( w/4, w/16 ),angle,0,360,Scalar( 255, 0, 0 ),thickness,lineType );
}void MyFilledCircle( Mat img, Point center )
{circle( img,center,w/32,Scalar( 0, 0, 255 ),FILLED,LINE_8 );
}void MyPolygon( Mat img )
{int lineType = LINE_8;Point rook_points[1][20];rook_points[0][0] = Point( w/4, 7*w/8 );rook_points[0][1] = Point( 3*w/4, 7*w/8 );rook_points[0][2] = Point( 3*w/4, 13*w/16 );rook_points[0][3] = Point( 11*w/16, 13*w/16 );rook_points[0][4] = Point( 19*w/32, 3*w/8 );rook_points[0][5] = Point( 3*w/4, 3*w/8 );rook_points[0][6] = Point( 3*w/4, w/8 );rook_points[0][7] = Point( 26*w/40, w/8 );rook_points[0][8] = Point( 26*w/40, w/4 );rook_points[0][9] = Point( 22*w/40, w/4 );rook_points[0][10] = Point( 22*w/40, w/8 );rook_points[0][11] = Point( 18*w/40, w/8 );rook_points[0][12] = Point( 18*w/40, w/4 );rook_points[0][13] = Point( 14*w/40, w/4 );rook_points[0][14] = Point( 14*w/40, w/8 );rook_points[0][15] = Point( w/4, w/8 );rook_points[0][16] = Point( w/4, 3*w/8 );rook_points[0][17] = Point( 13*w/32, 3*w/8 );rook_points[0][18] = Point( 5*w/16, 13*w/16 );rook_points[0][19] = Point( w/4, 13*w/16 );const Point* ppt[1] = { rook_points[0] };int npt[] = { 20 };fillPoly( img,ppt,npt,1,Scalar( 255, 255, 255 ),lineType );
}void MyLine( Mat img, Point start, Point end )
{int thickness = 2;int lineType = LINE_8;line( img,start,end,Scalar( 0, 0, 0 ),thickness,lineType );
}
Java:
import org.opencv.core.*;
import org.opencv.core.Point;
import org.opencv.highgui.HighGui;
import org.opencv.imgproc.Imgproc;import java.util.*;
import java.util.List;class GeometricDrawingRun{private static final int W = 400;public void run(){String atom_window = "Drawing 1: Atom";String rook_window = "Drawing 2: Rook";Mat atom_image = Mat.zeros( W, W, CvType.CV_8UC3 );Mat rook_image = Mat.zeros( W, W, CvType.CV_8UC3 );MyEllipse( atom_image, 90.0 );MyEllipse( atom_image, 0.0 );MyEllipse( atom_image, 45.0 );MyEllipse( atom_image, -45.0 );MyFilledCircle( atom_image, new Point( W/2, W/2) );MyPolygon( rook_image );Imgproc.rectangle( rook_image,new Point( 0, 7*W/8 ),new Point( W, W),new Scalar( 0, 255, 255 ),-1,8,0 );MyLine( rook_image, new Point( 0, 15*W/16 ), new Point( W, 15*W/16 ) );MyLine( rook_image, new Point( W/4, 7*W/8 ), new Point( W/4, W ) );MyLine( rook_image, new Point( W/2, 7*W/8 ), new Point( W/2, W ) );MyLine( rook_image, new Point( 3*W/4, 7*W/8 ), new Point( 3*W/4, W ) );HighGui.imshow( atom_window, atom_image );HighGui.moveWindow( atom_window, 0, 200 );HighGui.imshow( rook_window, rook_image );HighGui.moveWindow( rook_window, W, 200 );HighGui.waitKey( 0 );System.exit(0);}private void MyEllipse( Mat img, double angle ) {int thickness = 2;int lineType = 8;int shift = 0;Imgproc.ellipse( img,new Point( W/2, W/2 ),new Size( W/4, W/16 ),angle,0.0,360.0,new Scalar( 255, 0, 0 ),thickness,lineType,shift );}private void MyFilledCircle( Mat img, Point center ) {int thickness = -1;int lineType = 8;int shift = 0;Imgproc.circle( img,center,W/32,new Scalar( 0, 0, 255 ),thickness,lineType,shift );}private void MyPolygon( Mat img ) {int lineType = 8;int shift = 0;Point[] rook_points = new Point[20];rook_points[0] = new Point( W/4, 7*W/8 );rook_points[1] = new Point( 3*W/4, 7*W/8 );rook_points[2] = new Point( 3*W/4, 13*W/16 );rook_points[3] = new Point( 11*W/16, 13*W/16 );rook_points[4] = new Point( 19*W/32, 3*W/8 );rook_points[5] = new Point( 3*W/4, 3*W/8 );rook_points[6] = new Point( 3*W/4, W/8 );rook_points[7] = new Point( 26*W/40, W/8 );rook_points[8] = new Point( 26*W/40, W/4 );rook_points[9] = new Point( 22*W/40, W/4 );rook_points[10] = new Point( 22*W/40, W/8 );rook_points[11] = new Point( 18*W/40, W/8 );rook_points[12] = new Point( 18*W/40, W/4 );rook_points[13] = new Point( 14*W/40, W/4 );rook_points[14] = new Point( 14*W/40, W/8 );rook_points[15] = new Point( W/4, W/8 );rook_points[16] = new Point( W/4, 3*W/8 );rook_points[17] = new Point( 13*W/32, 3*W/8 );rook_points[18] = new Point( 5*W/16, 13*W/16 );rook_points[19] = new Point( W/4, 13*W/16 );MatOfPoint matPt = new MatOfPoint();matPt.fromArray(rook_points);List<MatOfPoint> ppt = new ArrayList<MatOfPoint>();ppt.add(matPt);Imgproc.fillPoly(img,ppt,new Scalar( 255, 255, 255 ),lineType,shift,new Point(0,0) );}private void MyLine( Mat img, Point start, Point end ) {int thickness = 2;int lineType = 8;int shift = 0;Imgproc.line( img,start,end,new Scalar( 0, 0, 0 ),thickness,lineType,shift );}
}public class BasicGeometricDrawing {public static void main(String[] args) {// Load the native library.System.loadLibrary(Core.NATIVE_LIBRARY_NAME);new GeometricDrawingRun().run();}
}
Python :
import cv2 as cv
import numpy as npW = 400def my_ellipse(img, angle):thickness = 2line_type = 8cv.ellipse(img,(W // 2, W // 2),(W // 4, W // 16),angle,0,360,(255, 0, 0),thickness,line_type)def my_filled_circle(img, center):thickness = -1line_type = 8cv.circle(img,center,W // 32,(0, 0, 255),thickness,line_type)def my_polygon(img):line_type = 8# Create some pointsppt = np.array([[W / 4, 7 * W / 8], [3 * W / 4, 7 * W / 8],[3 * W / 4, 13 * W / 16], [11 * W / 16, 13 * W / 16],[19 * W / 32, 3 * W / 8], [3 * W / 4, 3 * W / 8],[3 * W / 4, W / 8], [26 * W / 40, W / 8],[26 * W / 40, W / 4], [22 * W / 40, W / 4],[22 * W / 40, W / 8], [18 * W / 40, W / 8],[18 * W / 40, W / 4], [14 * W / 40, W / 4],[14 * W / 40, W / 8], [W / 4, W / 8],[W / 4, 3 * W / 8], [13 * W / 32, 3 * W / 8],[5 * W / 16, 13 * W / 16], [W / 4, 13 * W / 16]], np.int32)ppt = ppt.reshape((-1, 1, 2))cv.fillPoly(img, [ppt], (255, 255, 255), line_type)# Only drawind the lines would be:# cv.polylines(img, [ppt], True, (255, 0, 255), line_type)def my_line(img, start, end):thickness = 2line_type = 8cv.line(img,start,end,(0, 0, 0),thickness,line_type)atom_window = "Drawing 1: Atom"
rook_window = "Drawing 2: Rook"# Create black empty images
size = W, W, 3
atom_image = np.zeros(size, dtype=np.uint8)
rook_image = np.zeros(size, dtype=np.uint8)# 1.a. Creating ellipses
my_ellipse(atom_image, 90)
my_ellipse(atom_image, 0)
my_ellipse(atom_image, 45)
my_ellipse(atom_image, -45)# 1.b. Creating circles
my_filled_circle(atom_image, (W // 2, W // 2))# 2. Draw a rook
# ------------------
# 2.a. Create a convex polygon
my_polygon(rook_image)cv.rectangle(rook_image,(0, 7 * W // 8),(W, W),(0, 255, 255),-1,8)# 2.c. Create a few lines
my_line(rook_image, (0, 15 * W // 16), (W, 15 * W // 16))
my_line(rook_image, (W // 4, 7 * W // 8), (W // 4, W))
my_line(rook_image, (W // 2, 7 * W // 8), (W // 2, W))
my_line(rook_image, (3 * W // 4, 7 * W // 8), (3 * W // 4, W))cv.imshow(atom_window, atom_image)
cv.moveWindow(atom_window, 0, 200)
cv.imshow(rook_window, rook_image)
cv.moveWindow(rook_window, W, 200)cv.waitKey(0)
cv.destroyAllWindows()
解释
由于我们计划绘制两个示例(一个原子和一个车),我们必须创建两个图像和两个窗口来显示它们。
C++:
char atom_window[] = "Drawing 1: Atom";char rook_window[] = "Drawing 2: Rook";Mat atom_image = Mat::zeros( w, w, CV_8UC3 );Mat rook_image = Mat::zeros( w, w, CV_8UC3 );Java:
String atom_window = "Drawing 1: Atom";String rook_window = "Drawing 2: Rook"; Mat atom_image = Mat.zeros( W, W, CvType.CV_8UC3 );Mat rook_image = Mat.zeros( W, W, CvType.CV_8UC3 );Python:
# Windows names
atom_window = "Drawing 1: Atom"
rook_window = "Drawing 2: Rook"# Create black empty images
size = W, W, 3
atom_image = np.zeros(size, dtype=np.uint8)
rook_image = np.zeros(size, dtype=np.uint8)
我们创建了函数来绘制不同的几何形状。例如,为了绘制原子,我们使用了 MyEllipse 和 MyFilledCircle:
MyEllipse( atom_image, 90 );MyEllipse( atom_image, 0 );MyEllipse( atom_image, 45 );MyEllipse( atom_image, -45 );MyFilledCircle( atom_image, Point( w/2, w/2) );Java:
MyEllipse( atom_image, 90.0 );MyEllipse( atom_image, 0.0 );MyEllipse( atom_image, 45.0 );MyEllipse( atom_image, -45.0 );MyFilledCircle( atom_image, new Point( W/2, W/2) );Python:
# 1. Draw a simple atom:
# -----------------------# 1.a. Creating ellipses
my_ellipse(atom_image, 90)
my_ellipse(atom_image, 0)
my_ellipse(atom_image, 45)
my_ellipse(atom_image, -45)# 1.b. Creating circles
my_filled_circle(atom_image, (W // 2, W // 2))
为了绘制车,我们使用了 MyLine、矩形和 MyPolygon:
MyPolygon( rook_image );rectangle( rook_image,Point( 0, 7*w/8 ),Point( w, w),Scalar( 0, 255, 255 ),FILLED,LINE_8 );MyLine( rook_image, Point( 0, 15*w/16 ), Point( w, 15*w/16 ) );MyLine( rook_image, Point( w/4, 7*w/8 ), Point( w/4, w ) );MyLine( rook_image, Point( w/2, 7*w/8 ), Point( w/2, w ) );MyLine( rook_image, Point( 3*w/4, 7*w/8 ), Point( 3*w/4, w ) );Java:
MyPolygon( rook_image );Imgproc.rectangle( rook_image,new Point( 0, 7*W/8 ),new Point( W, W),new Scalar( 0, 255, 255 ),-1,8,0 );MyLine( rook_image, new Point( 0, 15*W/16 ), new Point( W, 15*W/16 ) );MyLine( rook_image, new Point( W/4, 7*W/8 ), new Point( W/4, W ) );MyLine( rook_image, new Point( W/2, 7*W/8 ), new Point( W/2, W ) );MyLine( rook_image, new Point( 3*W/4, 7*W/8 ), new Point( 3*W/4, W ) );Python:
# 2. Draw a rook
# ------------------
# 2.a. Create a convex polygon
my_polygon(rook_image)cv.rectangle(rook_image,(0, 7 * W // 8),(W, W),(0, 255, 255),-1,8) # 2.c. Create a few lines
my_line(rook_image, (0, 15 * W // 16), (W, 15 * W // 16))
my_line(rook_image, (W // 4, 7 * W // 8), (W // 4, W))
my_line(rook_image, (W // 2, 7 * W // 8), (W // 2, W))
my_line(rook_image, (3 * W // 4, 7 * W // 8), (3 * W // 4, W))
让我们检查一下这些函数中的每一个都包含什么:
我的线条:
void MyLine( Mat img, Point start, Point end )
{int thickness = 2;int lineType = LINE_8;line( img,start,end,Scalar( 0, 0, 0 ),thickness,lineType );
}
Java:
private void MyLine( Mat img, Point start, Point end ) {int thickness = 2;int lineType = 8;int shift = 0;Imgproc.line( img,start,end,new Scalar( 0, 0, 0 ),thickness,lineType,shift );}
Python:
def my_line(img, start, end):thickness = 2line_type = 8cv.line(img,start,end,(0, 0, 0),thickness,line_type)- 正如我们所看到的,MyLine 只需调用函数 line() ,它执行以下操作:
- 从点起点到点终点画一条线
- 该线显示在图像 img 中
- 线条颜色由 ( 0, 0, 0 ) 定义,它是与黑色相对应的 RGB 值
- 线条粗细设置为粗细(在本例中为 2)
- 该线是 8 连接的线 (lineType = 8)
MyEllipse(椭圆)
void MyEllipse( Mat img, double angle )
{int thickness = 2;int lineType = 8;ellipse( img,Point( w/2, w/2 ),Size( w/4, w/16 ),angle,0,360,Scalar( 255, 0, 0 ),thickness,lineType );
}
Java:
private void MyEllipse( Mat img, double angle ) {int thickness = 2;int lineType = 8;int shift = 0;Imgproc.ellipse( img,new Point( W/2, W/2 ),new Size( W/4, W/16 ),angle,0.0,360.0,new Scalar( 255, 0, 0 ),thickness,lineType,shift );}Python:
def my_ellipse(img, angle):thickness = 2line_type = 8cv.ellipse(img,(W // 2, W // 2),(W // 4, W // 16),angle,0,360,(255, 0, 0),thickness,line_type)- 从上面的代码中,我们可以观察到函数 ellipse() 绘制一个椭圆,使得:
- 椭圆显示在图像 img 中
- 椭圆中心位于点 (w/2, w/2) 中,并封闭在大小为 (w/4, w/16) 的盒子中
- 椭圆是旋转角度度数
- 椭圆在 0 到 360 度之间延伸一条弧线
- 图形的颜色将是 ( 255, 0, 0 ),表示 BGR 值中的蓝色。
- 椭圆的厚度为 2。
MyFilledCircle(圆)
void MyFilledCircle( Mat img, Point center )
{circle( img,center,w/32,Scalar( 0, 0, 255 ),FILLED,LINE_8 );
}
Java:
private void MyFilledCircle( Mat img, Point center ) {int thickness = -1;int lineType = 8;int shift = 0;Imgproc.circle( img,center,W/32,new Scalar( 0, 0, 255 ),thickness,lineType,shift );}Python:
def my_filled_circle(img, center):thickness = -1line_type = 8cv.circle(img,center,W // 32,(0, 0, 255),thickness,line_type)- 与椭圆函数类似,我们可以观察到 circle 接收为参数:
- 将显示圆圈的图像(img)
- 圆的中心表示为点中心
- 圆的半径:w/32
- 圆圈的颜色:( 0, 0, 255 ) 在 BGR 中表示红色
- 由于厚度 = -1,因此圆将被绘制填充。
MyPolygon
void MyPolygon( Mat img )
{int lineType = LINE_8;Point rook_points[1][20];rook_points[0][0] = Point( w/4, 7*w/8 );rook_points[0][1] = Point( 3*w/4, 7*w/8 );rook_points[0][2] = Point( 3*w/4, 13*w/16 );rook_points[0][3] = Point( 11*w/16, 13*w/16 );rook_points[0][4] = Point( 19*w/32, 3*w/8 );rook_points[0][5] = Point( 3*w/4, 3*w/8 );rook_points[0][6] = Point( 3*w/4, w/8 );rook_points[0][7] = Point( 26*w/40, w/8 );rook_points[0][8] = Point( 26*w/40, w/4 );rook_points[0][9] = Point( 22*w/40, w/4 );rook_points[0][10] = Point( 22*w/40, w/8 );rook_points[0][11] = Point( 18*w/40, w/8 );rook_points[0][12] = Point( 18*w/40, w/4 );rook_points[0][13] = Point( 14*w/40, w/4 );rook_points[0][14] = Point( 14*w/40, w/8 );rook_points[0][15] = Point( w/4, w/8 );rook_points[0][16] = Point( w/4, 3*w/8 );rook_points[0][17] = Point( 13*w/32, 3*w/8 );rook_points[0][18] = Point( 5*w/16, 13*w/16 );rook_points[0][19] = Point( w/4, 13*w/16 );const Point* ppt[1] = { rook_points[0] };int npt[] = { 20 };fillPoly( img,ppt,npt,1,Scalar( 255, 255, 255 ),lineType );
}
Java:
private void MyPolygon( Mat img ) {int lineType = 8;int shift = 0;Point[] rook_points = new Point[20];rook_points[0] = new Point( W/4, 7*W/8 );rook_points[1] = new Point( 3*W/4, 7*W/8 );rook_points[2] = new Point( 3*W/4, 13*W/16 );rook_points[3] = new Point( 11*W/16, 13*W/16 );rook_points[4] = new Point( 19*W/32, 3*W/8 );rook_points[5] = new Point( 3*W/4, 3*W/8 );rook_points[6] = new Point( 3*W/4, W/8 );rook_points[7] = new Point( 26*W/40, W/8 );rook_points[8] = new Point( 26*W/40, W/4 );rook_points[9] = new Point( 22*W/40, W/4 );rook_points[10] = new Point( 22*W/40, W/8 );rook_points[11] = new Point( 18*W/40, W/8 );rook_points[12] = new Point( 18*W/40, W/4 );rook_points[13] = new Point( 14*W/40, W/4 );rook_points[14] = new Point( 14*W/40, W/8 );rook_points[15] = new Point( W/4, W/8 );rook_points[16] = new Point( W/4, 3*W/8 );rook_points[17] = new Point( 13*W/32, 3*W/8 );rook_points[18] = new Point( 5*W/16, 13*W/16 );rook_points[19] = new Point( W/4, 13*W/16 );MatOfPoint matPt = new MatOfPoint();matPt.fromArray(rook_points);List<MatOfPoint> ppt = new ArrayList<MatOfPoint>();ppt.add(matPt);Imgproc.fillPoly(img,ppt,new Scalar( 255, 255, 255 ),lineType,shift,new Point(0,0) );}Python:
def my_polygon(img):line_type = 8# Create some pointsppt = np.array([[W / 4, 7 * W / 8], [3 * W / 4, 7 * W / 8],[3 * W / 4, 13 * W / 16], [11 * W / 16, 13 * W / 16],[19 * W / 32, 3 * W / 8], [3 * W / 4, 3 * W / 8],[3 * W / 4, W / 8], [26 * W / 40, W / 8],[26 * W / 40, W / 4], [22 * W / 40, W / 4],[22 * W / 40, W / 8], [18 * W / 40, W / 8],[18 * W / 40, W / 4], [14 * W / 40, W / 4],[14 * W / 40, W / 8], [W / 4, W / 8],[W / 4, 3 * W / 8], [13 * W / 32, 3 * W / 8],[5 * W / 16, 13 * W / 16], [W / 4, 13 * W / 16]], np.int32)ppt = ppt.reshape((-1, 1, 2))cv.fillPoly(img, [ppt], (255, 255, 255), line_type)# Only drawind the lines would be:# cv.polylines(img, [ppt], True, (255, 0, 255), line_type)- 为了绘制一个填充的多边形,我们使用函数 fillPoly() 。我们注意到:
- 多边形将在 img 上绘制
- 多边形的顶点是 ppt 中的点集
- 多边形的颜色由 ( 255, 255, 255 ) 定义,这是白色的 BGR 值
矩形
rectangle( rook_image,Point( 0, 7*w/8 ),Point( w, w),Scalar( 0, 255, 255 ),FILLED,LINE_8 );Java:
Imgproc.rectangle( rook_image,new Point( 0, 7*W/8 ),new Point( W, W),new Scalar( 0, 255, 255 ),-1,8,0 );Python:
# 2.b. Creating rectangles
cv.rectangle(rook_image,(0, 7 * W // 8),(W, W),(0, 255, 255),-1,8)- 最后,我们有了cv::rectangle函数(我们没有为这个家伙创建一个特殊函数)。我们注意到:
- 矩形将绘制在rook_image
- 矩形的两个相对顶点由 ( 0, 7*w/8 ) 和 ( w, w ) 定义
- 矩形的颜色由 ( 0, 255, 255 ) 给出,它是黄色的 BGR 值
- 由于厚度值由 FILLED (-1) 给出,因此矩形将被填充。
结果
编译和运行程序应该会得到这样的结果:

相关文章:
OpenCV 4.9基本绘图
返回:OpenCV系列文章目录(持续更新中......) 上一篇:OpenCV使用通用内部函数对代码进行矢量化 下一篇:使用OpenCV4.9的随机生成器和文本 目标 在本教程中,您将学习如何: 使用 OpenCV 函数 line() 画一…...
显示器and拓展坞PD底层协商
简介: PD显示器或者PD拓展坞方案中,连接显示设备的Type-C端口主要运行在DRP模式,在此模式下可以兼容Source(显卡)、Sink(信号器)、DRP(手机、电脑)模式的显示设备。 Sou…...
如何利用Flutter将应用成功上架至iOS平台:详细指南
引言 🚀 Flutter作为一种跨平台的移动应用程序开发框架,为开发者提供了便利,使他们能够通过单一的代码库构建出高性能、高保真度的应用程序,同时支持Android和iOS两个平台。然而,完成Flutter应用程序的开发只是第一步…...
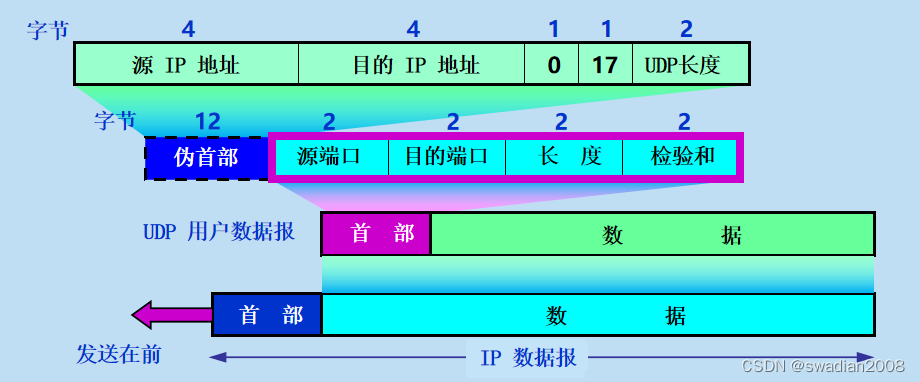
【运输层】网络数据报协议 UDP
目录 1、UDP 的特点 2、UDP 的首部格式 UDP 只在 IP 协议之上增加了很少的一些功能,比如复用、分用以及差错检测等。 1、UDP 的特点 UDP是无连接的,即发送数据之前不需要建立连接,因此减少了开销和发送数据之前的时延。 UDP使用尽最大努力…...
:顺序表实战通讯录)
数据结构(初阶):顺序表实战通讯录
前言 数据结构(初阶)第一节:数据结构概论-CSDN博客 数据结构(初阶)第二节:顺序表-CSDN博客 本文将以C语言和顺序表实现通讯录基础管理,实现功能包括增、删、改、查等,在实现相关功能…...
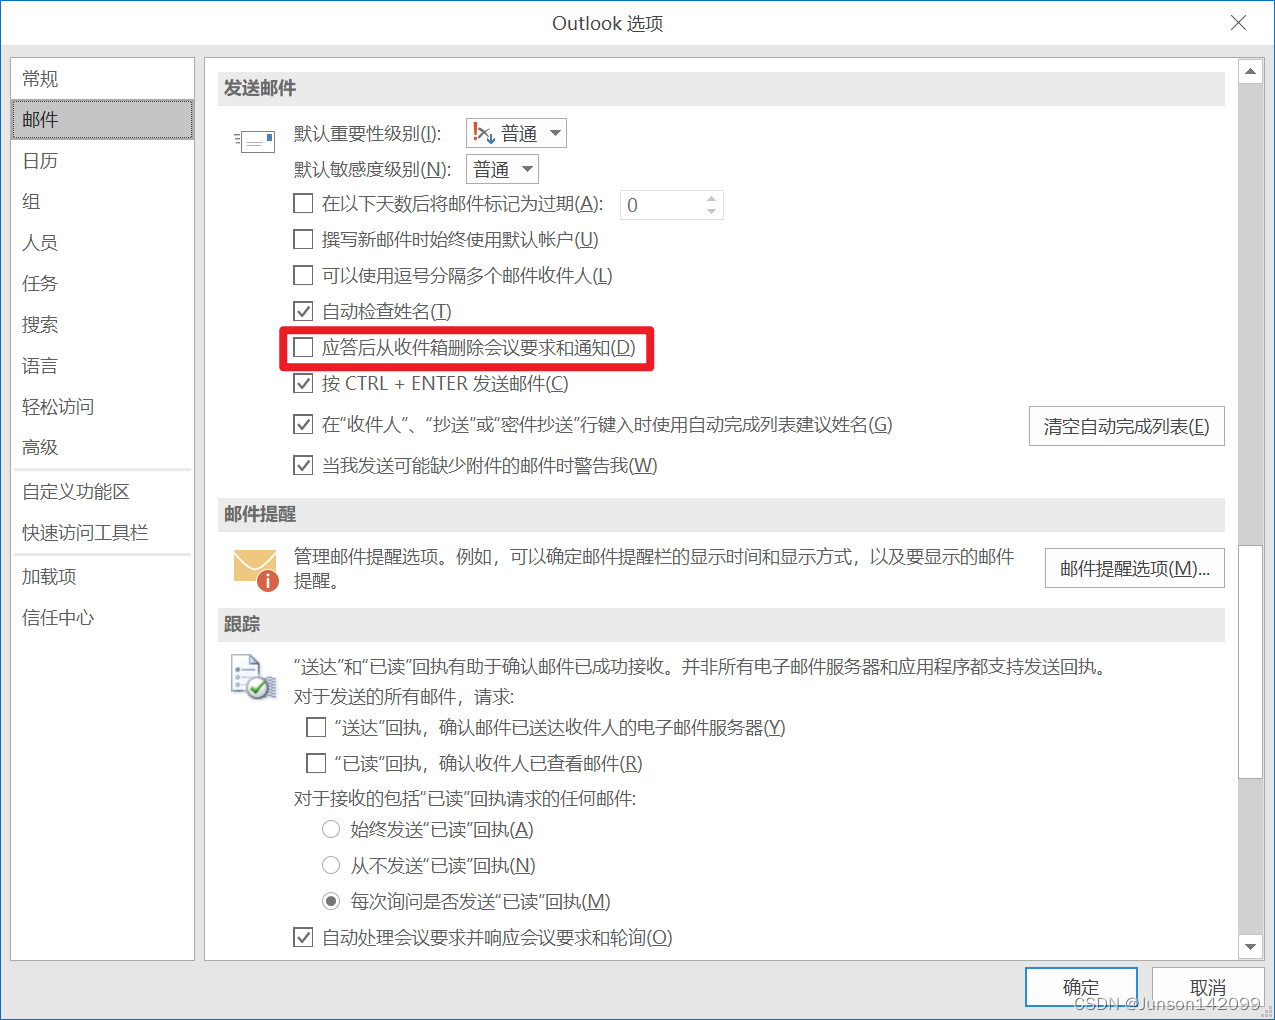
Outlook会议邀请邮件在答复后就不见了
时常会有同事找到我说,Outlook答复会议邀请邮件后收件箱就找不到会议邀请的邮件了。 这其实是Outlook的的一个机制,会把应答后的会议邀请邮件从收件箱自动删除,到已删除的邮件那里就能找到。如果不想要自动删除,改一个设置即可。…...
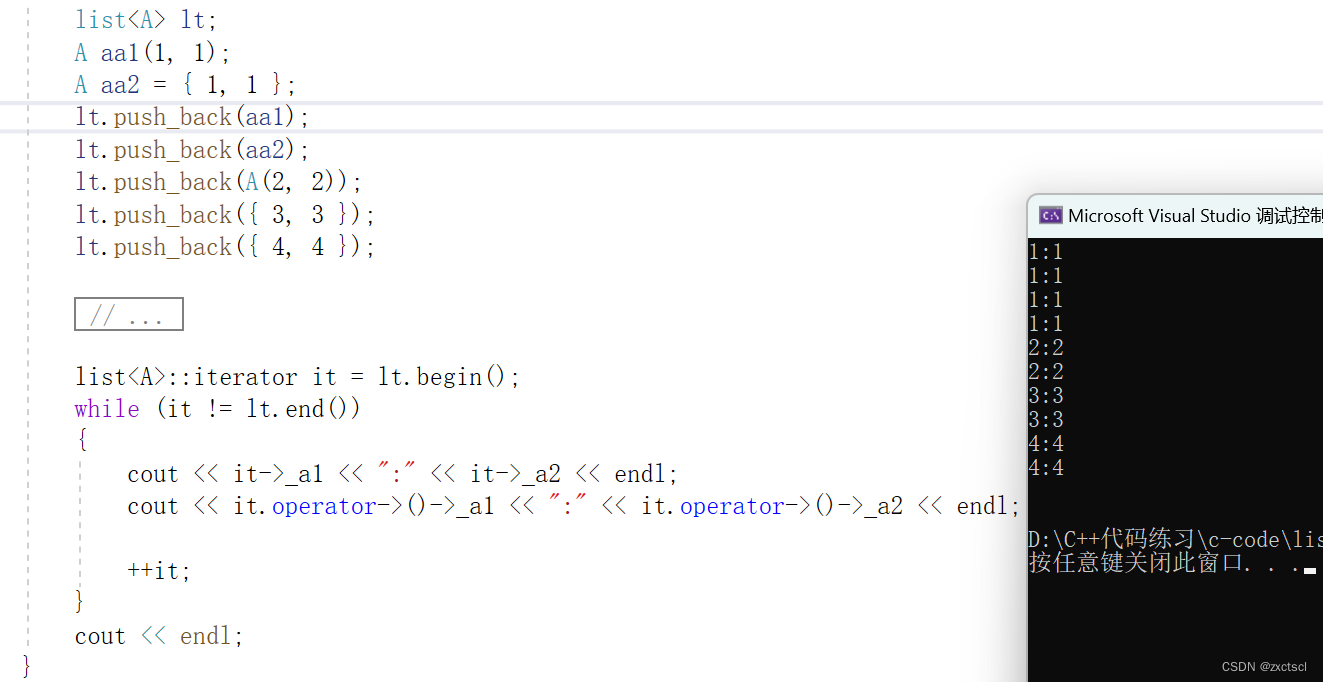
【C++】list模拟实现
个人主页 : zxctscl 如有转载请先通知 文章目录 1. 前言2. list源码3. 初始化3.1 构造3.2 拷贝构造3.3 赋值3.4 析构 4. 迭代器4.1 后置加加和前置加加4.2 后置减减和前置减减4.3 解引用4.4 !和4.5 begin 和 end4.6 const迭代器4.7 迭代器优化 5. Modifi…...

ETL工具-nifi干货系列 第八讲 处理器PutDatabaseRecord 写数据库(详细)
1、本节通过一个小例子来讲解下处理器PutDatabaseRecord,该处理器的作用是将数据写入数据库。 如下流程通过处理器GenerateFlowFile 生成数据,然后通过处理器JoltTransformJSON转换结构,最后通过处理器PutDatabaseRecord将数据写入数据库。如…...
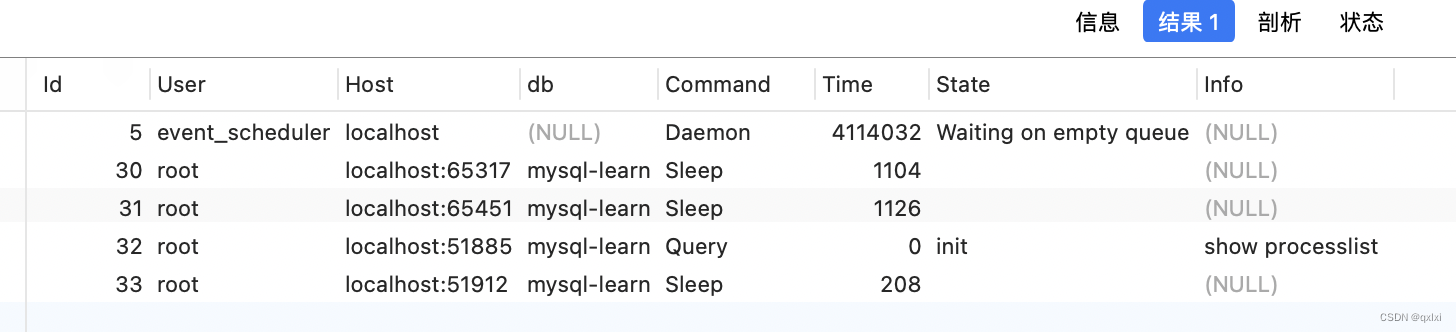
【MySQL】如何判断一个数据库是否出问题
在实际的应用中,其实大多数是主从结构。而采用主备,一般都需要一定的费用。 对于主备,如果主机故障,那么只需要直接将流量打到备机就可以,但是对于一主多从,还需要将从库连接到主库上。 对于切换的操作&a…...

SQLite数据库的性能问题并不是单纯地由数据量的大小决定的,而是受到多种因素的综合影响。以下是一些可能导致SQLite性能问题的因素
SQLite数据库的性能问题并不是单纯地由数据量的大小决定的,而是受到多种因素的综合影响。以下是一些可能导致SQLite性能问题的因素: 数据量:当SQLite数据库中的数据量增长到一定程度时,查询、插入和更新等操作可能会变得缓慢。这…...
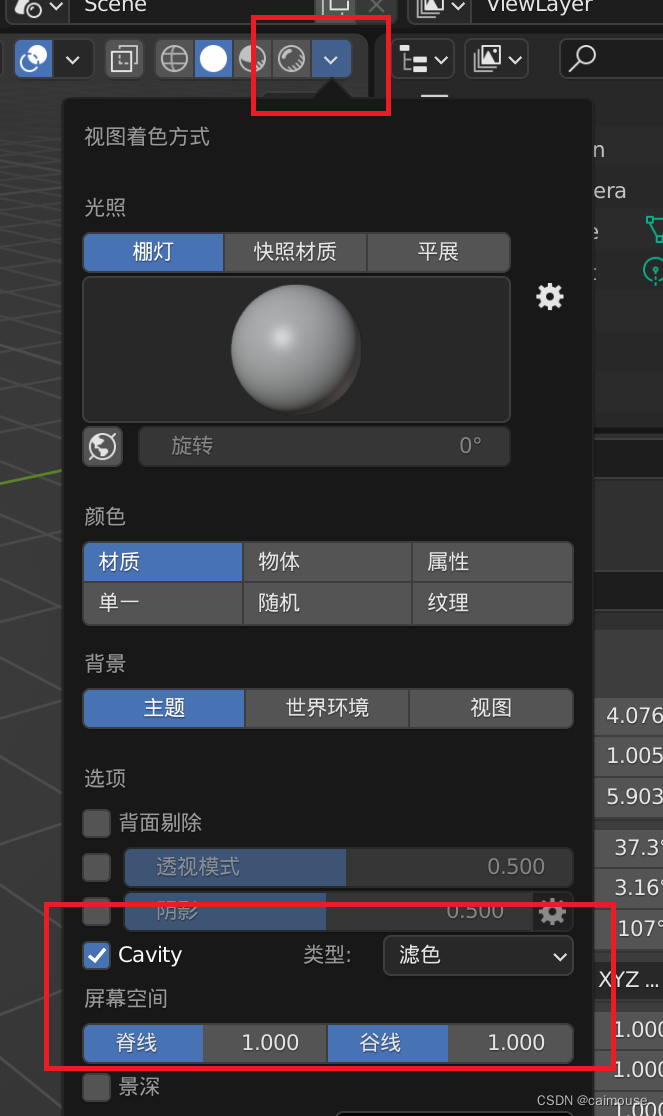
Blender怎么样启动默认移动和Cavity效果
在使用Blender的过程中,有一些特殊的技巧很重要。 比如默认地设置blender打开时,就是移动物体,这样怎么样设置的呢? 需要在界面里打开下面的菜单: 这样就找到默认设置的地方,把下面的移动勾选起来,这样点…...

Android 解决TextView多行滑动与NestedScrollView嵌套滑动冲突的问题
关键计算地方: 1.当前是上滑动还是下滑动(相对于屏幕) ,使用ev.getRawY()获得当前滑动位置在屏幕哪个地方 2. 计算文本客滑动到哪里即可停止, (行高*总文本行数)- (行高 * 最多显示行数) int sum getLineHeight() * getLineCount() - getLineHeight() * getMaxLines(); …...

Laravel 开发Api规范
一,修改时区 配置 config/app.php 文件 // 时区修改,感觉两者皆可,自己根据实际情况定义 timezone > PRC, // 大陆时间二,设置 Accept 头中间件 accept头即为客户端请求头,做成中间件来使用。Accept 决定了响应返…...

蓝色wordpress外贸建站模板
蓝色wordpress外贸建站模板 https://www.mymoban.com/wordpress/7.html...
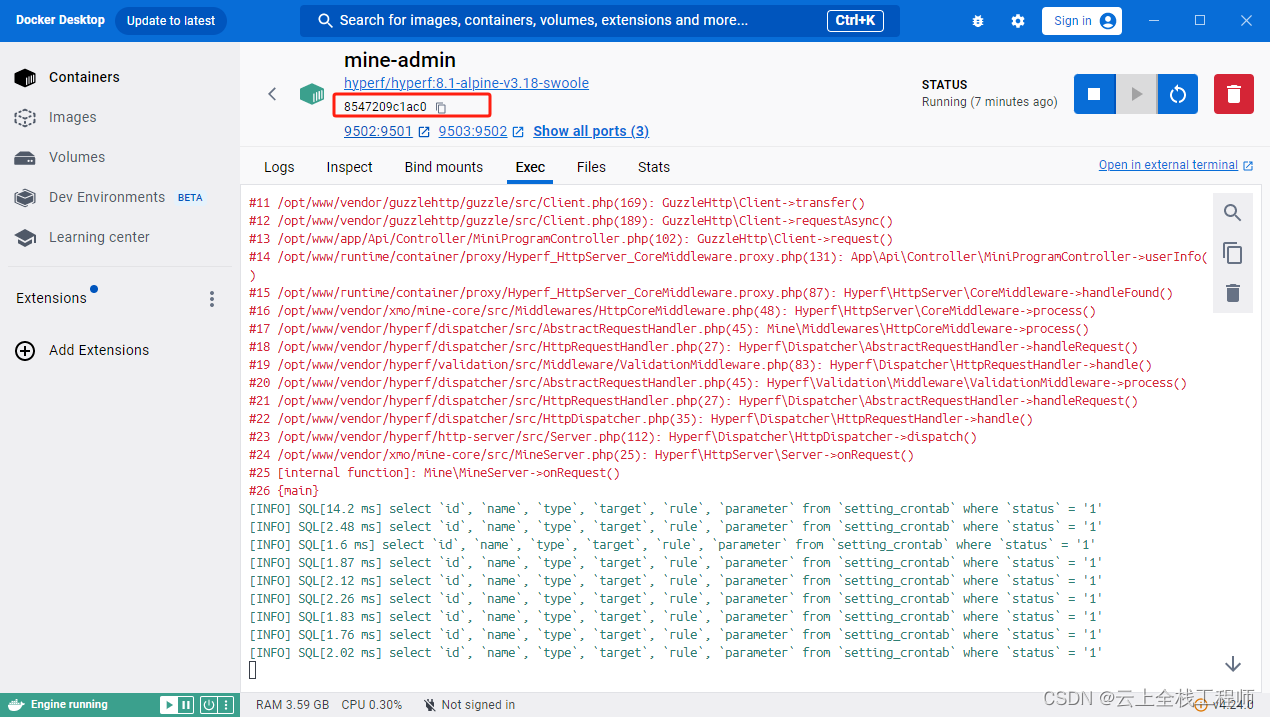
windos环境,使用docker容器运行项目的,新增外部访问地址配置
对于运行在 Docker 容器中的项目,你需要在容器内部编辑 resolv.conf 文件。以下是一种常见的方法: 进入正在运行的 Docker 容器:docker exec -it [container_id] bash其中 [container_id] 是你正在运行的 Docker 容器的 ID。 在容器内部使…...

设计模式:生活中的组合模式
想象一下,你正在组织一个大型的家庭聚会。在这个聚会中,你需要准备各种菜肴,每个菜肴又包含不同的食材。你的目标是能够以统一的方式处理整个聚会的准备工作,不论是处理单个食材还是一整道菜肴。 在这个场景中,我们可…...

WPF OnStartup
在Windows Presentation Foundation (WPF)框架中,OnStartup 是 System.Windows.Application 类的一个受保护的虚方法,它是应用程序启动过程中的一个重要环节。当一个 WPF 应用程序启动时,其入口点通常是 App.xaml 文件和对应的后台代码文件 A…...

docker-相关
打镜像 1、编写dockfile文件,请自行百度 2、docker build -t 镜像名称:版本号 dockerFile路径 3、docker save -o 镜像压缩包名称.tar 镜像名称:镜像版本号 部署镜像 1、将镜像tar包放到部署机器上 2、加载镜像:docker load -i 镜像tar包路径 3、dock…...

二十、Rust AOP 切面增强
用过 java spring 的同学,应该会对 AspectJ 的 前置、后置、环绕 增强 念念不忘,巧了 rust 也有类似能力,稍显不同的是,为了向 “零成本抽象” 靠齐,Rust 的 “增强” 是在编译期 完成的。 编译期生成,则离…...
)
掌握Go语言:Go语言精细错误,清晰、高效的错误处理实践(32)
错误处理是任何编程语言中都至关重要的一部分,Go 语言提供了一套简单而强大的错误处理机制,使得处理错误变得高效而清晰。 Go 错误类型 在 Go 中,错误是一个普通的接口类型,即 error 接口,其定义如下: t…...
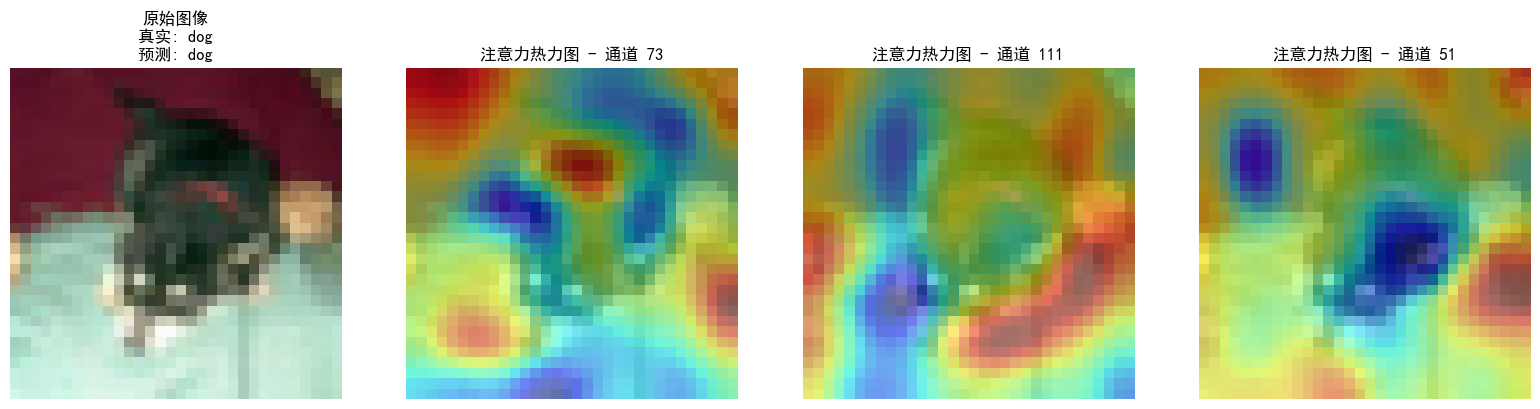
DAY 47
三、通道注意力 3.1 通道注意力的定义 # 新增:通道注意力模块(SE模块) class ChannelAttention(nn.Module):"""通道注意力模块(Squeeze-and-Excitation)"""def __init__(self, in_channels, reduction_rat…...

深入理解JavaScript设计模式之单例模式
目录 什么是单例模式为什么需要单例模式常见应用场景包括 单例模式实现透明单例模式实现不透明单例模式用代理实现单例模式javaScript中的单例模式使用命名空间使用闭包封装私有变量 惰性单例通用的惰性单例 结语 什么是单例模式 单例模式(Singleton Pattern&#…...

对WWDC 2025 Keynote 内容的预测
借助我们以往对苹果公司发展路径的深入研究经验,以及大语言模型的分析能力,我们系统梳理了多年来苹果 WWDC 主题演讲的规律。在 WWDC 2025 即将揭幕之际,我们让 ChatGPT 对今年的 Keynote 内容进行了一个初步预测,聊作存档。等到明…...

OkHttp 中实现断点续传 demo
在 OkHttp 中实现断点续传主要通过以下步骤完成,核心是利用 HTTP 协议的 Range 请求头指定下载范围: 实现原理 Range 请求头:向服务器请求文件的特定字节范围(如 Range: bytes1024-) 本地文件记录:保存已…...

HTML前端开发:JavaScript 常用事件详解
作为前端开发的核心,JavaScript 事件是用户与网页交互的基础。以下是常见事件的详细说明和用法示例: 1. onclick - 点击事件 当元素被单击时触发(左键点击) button.onclick function() {alert("按钮被点击了!&…...
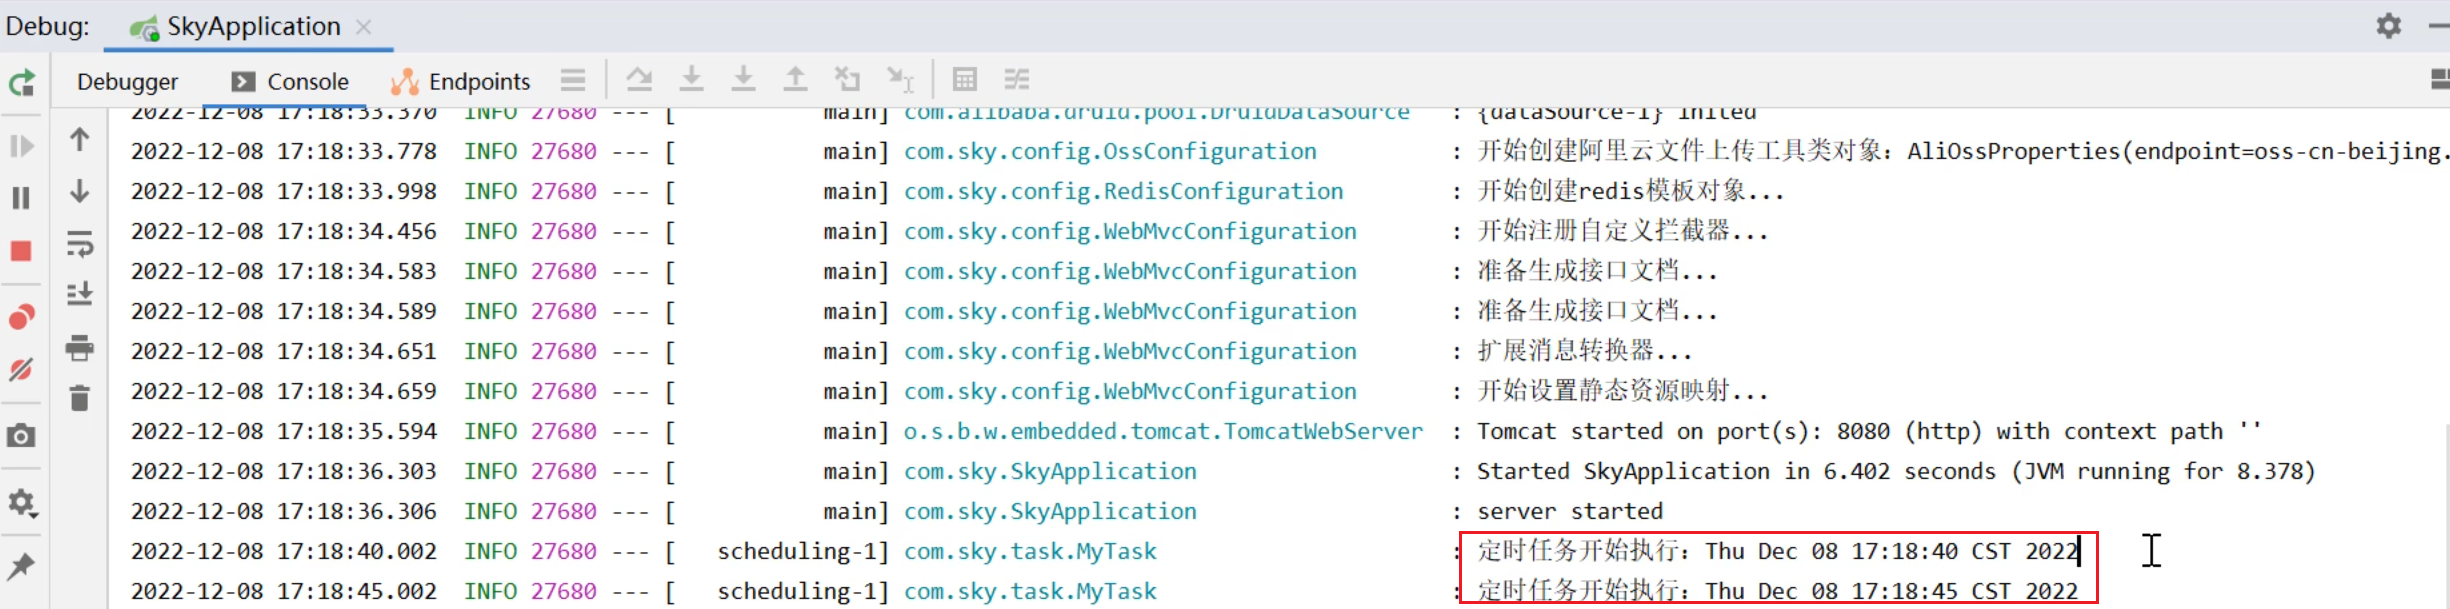
SpringTask-03.入门案例
一.入门案例 启动类: package com.sky;import lombok.extern.slf4j.Slf4j; import org.springframework.boot.SpringApplication; import org.springframework.boot.autoconfigure.SpringBootApplication; import org.springframework.cache.annotation.EnableCach…...
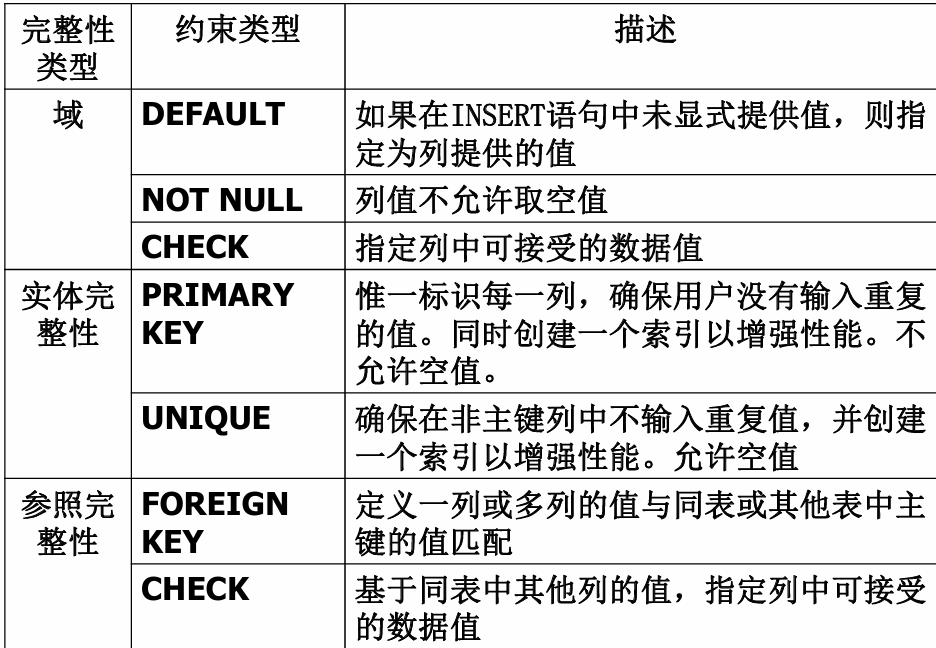
七、数据库的完整性
七、数据库的完整性 主要内容 7.1 数据库的完整性概述 7.2 实体完整性 7.3 参照完整性 7.4 用户定义的完整性 7.5 触发器 7.6 SQL Server中数据库完整性的实现 7.7 小结 7.1 数据库的完整性概述 数据库完整性的含义 正确性 指数据的合法性 有效性 指数据是否属于所定…...

Java数值运算常见陷阱与规避方法
整数除法中的舍入问题 问题现象 当开发者预期进行浮点除法却误用整数除法时,会出现小数部分被截断的情况。典型错误模式如下: void process(int value) {double half = value / 2; // 整数除法导致截断// 使用half变量 }此时...
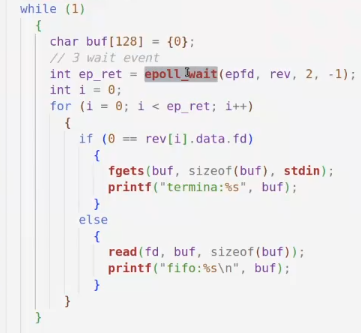
day36-多路IO复用
一、基本概念 (服务器多客户端模型) 定义:单线程或单进程同时监测若干个文件描述符是否可以执行IO操作的能力 作用:应用程序通常需要处理来自多条事件流中的事件,比如我现在用的电脑,需要同时处理键盘鼠标…...

WebRTC从入门到实践 - 零基础教程
WebRTC从入门到实践 - 零基础教程 目录 WebRTC简介 基础概念 工作原理 开发环境搭建 基础实践 三个实战案例 常见问题解答 1. WebRTC简介 1.1 什么是WebRTC? WebRTC(Web Real-Time Communication)是一个支持网页浏览器进行实时语音…...