使用 Prometheus 在 KubeSphere 上监控 KubeEdge 边缘节点(Jetson) CPU、GPU 状态
作者:朱亚光,之江实验室工程师,云原生/开源爱好者。
KubeSphere 边缘节点的可观测性
在边缘计算场景下,KubeSphere 基于 KubeEdge 实现应用与工作负载在云端与边缘节点的统一分发与管理,解决在海量边、端设备上完成应用交付、运维、管控的需求。
根据 KubeSphere 的支持矩阵,只有 1.23.x 版本的 K8s 支持边缘计算,而且 KubeSphere 界面也没有边缘节点资源使用率等监控信息的显示。

本文基于 KubeSphere 和 KubeEdge 构建云边一体化计算平台,通过 Prometheus 来监控 Nvidia Jetson 边缘设备状态,实现 KubeSphere 在边缘节点的可观测性。
| 组件 | 版本 |
|---|---|
| KubeSphere | 3.4.1 |
| containerd | 1.7.2 |
| K8s | 1.26.0 |
| KubeEdge | 1.15.1 |
| Jetson 型号 | NVIDIA Jetson Xavier NX (16GB ram) |
| Jtop | 4.2.7 |
| JetPack | 5.1.3-b29 |
| Docker | 24.0.5 |
部署 K8s 环境
参考 KubeSphere 部署文档。通过 KubeKey 可以快速部署一套 K8s 集群。
// all in one 方式部署一台 单 master 的 k8s 集群./kk create cluster --with-kubernetes v1.26.0 --with-kubesphere v3.4.1 --container-manager containerd部署 KubeEdge 环境
参考 在 KubeSphere 上部署最新版的 KubeEdge,部署 KubeEdge。
开启边缘节点日志查询功能
vim /etc/kubeedge/config/edgecore.yaml
enable=true

开启后,可以方便查询 pod 日志,定位问题。
修改 KubeSphere 配置
开启 KubeEdge 边缘节点插件
- 修改 configmap--ClusterConfiguration

- advertiseAddress 设置为 cloudhub 所在的物理机地址

KubeSphere 开启边缘节点文档链接:https://www.kubesphere.io/zh/docs/v3.3/pluggable-components/kubeedge/。
修改完发现可以显示边缘节点,但是没有 CPU 和 内存信息,发现边缘节点没有 node-exporter 这个 pod。

修改 node-exporter 亲和性
kubectl get ds -n kubesphere-monitoring-system 发现不会部署到边缘节点上。

修改为:
spec:affinity:nodeAffinity:requiredDuringSchedulingIgnoredDuringExecution:nodeSelectorTerms:- matchExpressions:- key: node-role.kubernetes.io/edgetest -- 修改这里,让亲和性失效operator: DoesNotExistnode-exporter 是部署在边缘节点上了,但是 pods 起不来。
通过kubectl edit 该失败的 pod,我们发现 node-exporter 这个pod 里面有两个容器,其中 kube-rbac-proxy 这个容器启动失败。看这个容器的日志,发现是 kube-rbac-proxy 想要获取 KUBERNETES_SERVICE_HOST 和 KUBERNETES_SERVICE_PORT 这两个环境变量,但是获取失败,所以容器启动失败。
在 K8s 的集群中,当创建 pod 时,会在 pod 中增加 KUBERNETES_SERVICE_HOST 和 KUBERNETES_SERVICE_PORT 这两个环境变量,用于 pod 内的进程对 kube-apiserver 的访问,但是在 KubeEdge 的 edge 节点上创建的 pod 中,这两个环境变量存在,但它是空的。
向 KubeEdge 的开发人员咨询,他们说会在 KubeEdge 1.17 版本上增加这两个环境变量的设置。参考如下: https://github.com/wackxu/kubeedge/blob/4a7c00783de9b11e56e56968b2cc950a7d32a403/docs/proposals/edge-pod-list-watch-natively.md。
另一方面,推荐安装 EdgeMesh,安装之后在 edge 的 pod 上就可以访问 kubernetes.default.svc.cluster.local:443 了。
EdgeMesh 部署
配置 cloudcore configmap
kubectl edit cm cloudcore -n kubeedge设置 dynamicController=true.修改完 重启 cloudcore
kubectl delete pod cloudcore-776ffcbbb9-s6ff8 -n kubeedge配置 edgecore 模块,配置 metaServer=true 和 clusterDNS
$ vim /etc/kubeedge/config/edgecore.yamlmodules:...metaManager:metaServer:enable: true   //配置这里
...modules:...edged:...tailoredKubeletConfig:...clusterDNS:     //配置这里- 169.254.96.16
...//重启edgecore
$ systemctl restart edgecore
修改完,验证是否修改成功。
$ curl 127.0.0.1:10550/api/v1/services{"apiVersion":"v1","items":[{"apiVersion":"v1","kind":"Service","metadata":{"creationTimestamp":"2021-04-14T06:30:05Z","labels":{"component":"apiserver","provider":"kubernetes"},"name":"kubernetes","namespace":"default","resourceVersion":"147","selfLink":"default/services/kubernetes","uid":"55eeebea-08cf-4d1a-8b04-e85f8ae112a9"},"spec":{"clusterIP":"10.96.0.1","ports":[{"name":"https","port":443,"protocol":"TCP","targetPort":6443}],"sessionAffinity":"None","type":"ClusterIP"},"status":{"loadBalancer":{}}},{"apiVersion":"v1","kind":"Service","metadata":{"annotations":{"prometheus.io/port":"9153","prometheus.io/scrape":"true"},"creationTimestamp":"2021-04-14T06:30:07Z","labels":{"k8s-app":"kube-dns","kubernetes.io/cluster-service":"true","kubernetes.io/name":"KubeDNS"},"name":"kube-dns","namespace":"kube-system","resourceVersion":"203","selfLink":"kube-system/services/kube-dns","uid":"c221ac20-cbfa-406b-812a-c44b9d82d6dc"},"spec":{"clusterIP":"10.96.0.10","ports":[{"name":"dns","port":53,"protocol":"UDP","targetPort":53},{"name":"dns-tcp","port":53,"protocol":"TCP","targetPort":53},{"name":"metrics","port":9153,"protocol":"TCP","targetPort":9153}],"selector":{"k8s-app":"kube-dns"},"sessionAffinity":"None","type":"ClusterIP"},"status":{"loadBalancer":{}}}],"kind":"ServiceList","metadata":{"resourceVersion":"377360","selfLink":"/api/v1/services"}}
安装 EdgeMesh
git clone https://github.com/kubeedge/edgemesh.git
cd edgemeshkubectl apply -f build/crds/istio/kubectl apply -f build/agent/resources/
dnsPolicy
EdgeMesh 部署完成后,edge 节点上的 node-exporter 中的两个境变量还是空的,也无法访问 kubernetes.default.svc.cluster.local:443,原因是该 pod 中 DNS 服务器配置错误,应该是 169.254.96.16 的,但是却是跟宿主机一样的 DNS 配置。
kubectl exec -it node-exporter-hcmfg -n kubesphere-monitoring-system -- sh
Defaulted container "node-exporter" out of: node-exporter, kube-rbac-proxy
$ cat /etc/resolv.conf
nameserver 127.0.0.53
将 dnsPolicy 修改为 ClusterFirstWithHostNet,之后重启 node-exporter,DNS 的配置正确。
kubectl edit ds node-exporter -n kubesphere-monitoring-system
dnsPolicy: ClusterFirstWithHostNethostNetwork: true添加环境变量
vim /etc/systemd/system/edgecore.service
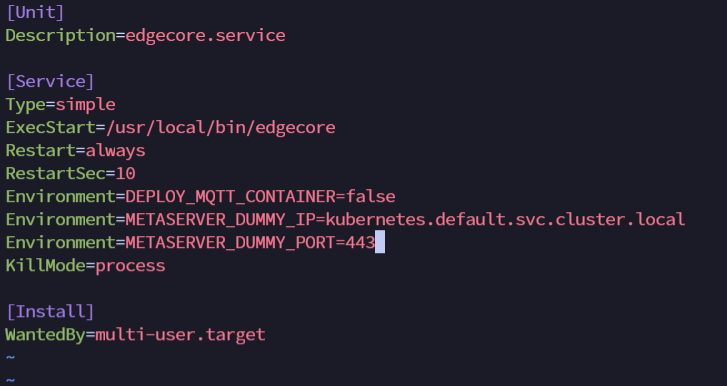
Environment=METASERVER_DUMMY_IP=kubernetes.default.svc.cluster.local
Environment=METASERVER_DUMMY_PORT=443
修改完重启 edgecore。
systemctl daemon-reload
systemctl restart edgecore
node-exporter 变成 running!!!!
在边缘节点 curl http://127.0.0.1:9100/metrics 可以发现采集到了边缘节点的数据。
最后我们可以将 KubeSphere 的 K8s 服务通过 NodePort 暴露出来。就可以在页面查看。
apiVersion: v1
kind: Service
metadata:labels:app.kubernetes.io/component: prometheusapp.kubernetes.io/instance: k8sapp.kubernetes.io/name: prometheusapp.kubernetes.io/part-of: kube-prometheusapp.kubernetes.io/version: 2.39.1name: prometheus-k8s-nodeportnamespace: kubesphere-monitoring-system
spec:ports:- port: 9090targetPort: 9090protocol: TCPnodePort: 32143selector:app.kubernetes.io/component: prometheusapp.kubernetes.io/instance: k8sapp.kubernetes.io/name: prometheusapp.kubernetes.io/part-of: kube-prometheussessionAffinity: ClientIPsessionAffinityConfig:clientIP:timeoutSeconds: 10800type: NodePort
通过访问 master IP + 32143 端口,就可以访问边缘节点 node-exporter 数据。

然后界面上也出现了 CPU 和内存的信息。

搞定了 CPU 和内存,接下来就是 GPU 了。
监控 Jetson GPU 状态
安装 Jtop
首先 Jetson 是一个 ARM 设备,所以无法运行 nvidia-smi ,需要安装 Jtop。
sudo apt-get install python3-pip python3-dev -y
sudo -H pip3 install jetson-stats
sudo systemctl restart jtop.service
安装 Jetson GPU Exporter
参考博客,制作 Jetson GPU Exporter 镜像,并且对应的 Grafana 仪表盘都有。

Dockerfile
FROM python:3-buster
RUN pip install --upgrade pip && pip install -U jetson-stats prometheus-client
RUN mkdir -p /root
COPY jetson_stats_prometheus_collector.py /root/jetson_stats_prometheus_collector.py
WORKDIR /root
USER root
RUN chmod +x /root/jetson_stats_prometheus_collector.py
ENTRYPOINT ["python3", "/root/jetson_stats_prometheus_collector.py"]
jetson_stats_prometheus_collector.py 代码
#!/usr/bin/python3
# -*- coding: utf-8 -*-import atexit
import os
from jtop import jtop, JtopException
from prometheus_client.core import InfoMetricFamily, GaugeMetricFamily, REGISTRY, CounterMetricFamily
from prometheus_client import make_wsgi_app
from wsgiref.simple_server import make_serverclass CustomCollector(object):def __init__(self):atexit.register(self.cleanup)self._jetson = jtop()self._jetson.start()def cleanup(self):print("Closing jetson-stats connection...")self._jetson.close()def collect(self):# spin传入true,表示不会等待下一次数据读取完成if self._jetson.ok(spin=True):## Board info#i = InfoMetricFamily('gpu_info_board', 'Board sys info', labels=['board_info'])i.add_metric(['info'], {'machine': self._jetson.board['info']['machine'] if 'machine' in self._jetson.board.get('info', {}) else self._jetson.board['hardware']['Module'],'jetpack': self._jetson.board['info']['jetpack'] if 'jetpack' in self._jetson.board.get('info', {}) else self._jetson.board['hardware']['Jetpack'],'l4t':  self._jetson.board['info']['L4T'] if 'L4T' in self._jetson.board.get('info', {}) else self._jetson.board['hardware']['L4T']})yield ii = InfoMetricFamily('gpu_info_hardware', 'Board hardware info', labels=['board_hw'])i.add_metric(['hardware'], {'codename': self._jetson.board['hardware'].get('Codename', self._jetson.board['hardware'].get('CODENAME', 'unknown')),'soc': self._jetson.board['hardware'].get('SoC', self._jetson.board['hardware'].get('SOC', 'unknown')),'module': self._jetson.board['hardware'].get('P-Number', self._jetson.board['hardware'].get('MODULE', 'unknown')),'board': self._jetson.board['hardware'].get('699-level Part Number', self._jetson.board['hardware'].get('BOARD', 'unknown')),'cuda_arch_bin': self._jetson.board['hardware'].get('CUDA Arch BIN', self._jetson.board['hardware'].get('CUDA_ARCH_BIN', 'unknown')),'serial_number': self._jetson.board['hardware'].get('Serial Number', self._jetson.board['hardware'].get('SERIAL_NUMBER', 'unknown')),})yield i## NV power mode#i = InfoMetricFamily('gpu_nvpmode', 'NV power mode', labels=['nvpmode'])i.add_metric(['mode'], {'mode': self._jetson.nvpmodel.name})yield i## System uptime#g = GaugeMetricFamily('gpu_uptime', 'System uptime', labels=['uptime'])days = self._jetson.uptime.daysseconds = self._jetson.uptime.secondshours = seconds//3600minutes = (seconds//60) % 60g.add_metric(['days'], days)g.add_metric(['hours'], hours)g.add_metric(['minutes'], minutes)yield g## CPU usage#g = GaugeMetricFamily('gpu_usage_cpu', 'CPU % schedutil', labels=['cpu'])g.add_metric(['cpu_1'], self._jetson.stats['CPU1'] if ('CPU1' in self._jetson.stats and isinstance(self._jetson.stats['CPU1'], int)) else 0)g.add_metric(['cpu_2'], self._jetson.stats['CPU2'] if ('CPU2' in self._jetson.stats and isinstance(self._jetson.stats['CPU2'], int)) else 0)g.add_metric(['cpu_3'], self._jetson.stats['CPU3'] if ('CPU3' in self._jetson.stats and isinstance(self._jetson.stats['CPU3'], int)) else 0)g.add_metric(['cpu_4'], self._jetson.stats['CPU4'] if ('CPU4' in self._jetson.stats and isinstance(self._jetson.stats['CPU4'], int)) else 0)g.add_metric(['cpu_5'], self._jetson.stats['CPU5'] if ('CPU5' in self._jetson.stats and isinstance(self._jetson.stats['CPU5'], int)) else 0)g.add_metric(['cpu_6'], self._jetson.stats['CPU6'] if ('CPU6' in self._jetson.stats and isinstance(self._jetson.stats['CPU6'], int)) else 0)g.add_metric(['cpu_7'], self._jetson.stats['CPU7'] if ('CPU7' in self._jetson.stats and isinstance(self._jetson.stats['CPU7'], int)) else 0)g.add_metric(['cpu_8'], self._jetson.stats['CPU8'] if ('CPU8' in self._jetson.stats and isinstance(self._jetson.stats['CPU8'], int)) else 0)yield g## GPU usage#g = GaugeMetricFamily('gpu_usage_gpu', 'GPU % schedutil', labels=['gpu'])g.add_metric(['val'], self._jetson.stats['GPU'])yield g## Fan usage#g = GaugeMetricFamily('gpu_usage_fan', 'Fan usage', labels=['fan'])g.add_metric(['speed'], self._jetson.fan.get('speed', self._jetson.fan.get('pwmfan', {'speed': [0] })['speed'][0]))yield g## Sensor temperatures#g = GaugeMetricFamily('gpu_temperatures', 'Sensor temperatures', labels=['temperature'])keys = ['AO', 'GPU', 'Tdiode', 'AUX', 'CPU', 'thermal', 'Tboard']for key in keys:if key in self._jetson.temperature:g.add_metric([key.lower()], self._jetson.temperature[key]['temp'] if isinstance(self._jetson.temperature[key], dict) else self._jetson.temperature.get(key, 0))yield g## Power#g = GaugeMetricFamily('gpu_usage_power', 'Power usage', labels=['power'])if isinstance(self._jetson.power, dict):g.add_metric(['cv'], self._jetson.power['rail']['VDD_CPU_CV']['avg'] if 'VDD_CPU_CV' in self._jetson.power['rail'] else self._jetson.power['rail'].get('CV', { 'avg': 0 }).get('avg'))g.add_metric(['gpu'], self._jetson.power['rail']['VDD_GPU_SOC']['avg'] if 'VDD_GPU_SOC' in self._jetson.power['rail'] else self._jetson.power['rail'].get('GPU', { 'avg': 0 }).get('avg'))g.add_metric(['sys5v'], self._jetson.power['rail']['VIN_SYS_5V0']['avg'] if 'VIN_SYS_5V0' in self._jetson.power['rail'] else self._jetson.power['rail'].get('SYS5V', { 'avg': 0 }).get('avg'))if isinstance(self._jetson.power, tuple):g.add_metric(['cv'], self._jetson.power[1]['CV']['cur'] if 'CV' in self._jetson.power[1] else 0)g.add_metric(['gpu'], self._jetson.power[1]['GPU']['cur'] if 'GPU' in self._jetson.power[1] else 0)g.add_metric(['sys5v'], self._jetson.power[1]['SYS5V']['cur'] if 'SYS5V' in self._jetson.power[1] else 0)yield g## Processes#try:processes = self._jetson.processes# key exists in dicti = InfoMetricFamily('gpu_processes', 'Process usage', labels=['process'])for index in range(len(processes)):i.add_metric(['info'], {'pid': str(processes[index][0]),'user': processes[index][1],'gpu': processes[index][2],'type': processes[index][3],'priority': str(processes[index][4]),'state': processes[index][5],'cpu': str(processes[index][6]),'memory': str(processes[index][7]),'gpu_memory': str(processes[index][8]),'name': processes[index][9],})yield iexcept AttributeError:# key doesn't exist in dicti = 0if __name__ == '__main__':port = os.environ.get('PORT', 9998)REGISTRY.register(CustomCollector())app = make_wsgi_app()httpd = make_server('', int(port), app)print('Serving on port: ', port)try:httpd.serve_forever()except KeyboardInterrupt:print('Goodbye!')
记得给 Jetson 的板子打标签,确保 GPU 的 Exporter 在 Jetson 上执行。否则在其他 node 上执行会因为采集不到数据而报错.
kubectl label node edge-wpx machine.type=jetson
新建 KubeSphere 资源
新建 ServiceAccount、DaemonSet、Service、servicemonitor,目的是将 jetson-exporter 采集到的数据提供给 KubeSphere 的 Prometheus。
apiVersion: v1
kind: ServiceAccount
metadata:labels:app.kubernetes.io/component: exporterapp.kubernetes.io/name: jetson-exporterapp.kubernetes.io/part-of: kube-prometheusapp.kubernetes.io/version: 1.0.0name: jetson-exporternamespace: kubesphere-monitoring-system
---
apiVersion: apps/v1
kind: DaemonSet
metadata:labels:app.kubernetes.io/component: exporterapp.kubernetes.io/name: jetson-exporterapp.kubernetes.io/part-of: kube-prometheusapp.kubernetes.io/version: 1.0.0name: jetson-exporternamespace: kubesphere-monitoring-system
spec:revisionHistoryLimit: 10selector:matchLabels:app.kubernetes.io/component: exporterapp.kubernetes.io/name: jetson-exporterapp.kubernetes.io/part-of: kube-prometheustemplate:metadata:labels:app.kubernetes.io/component: exporterapp.kubernetes.io/name: jetson-exporterapp.kubernetes.io/part-of: kube-prometheusapp.kubernetes.io/version: 1.0.0spec:affinity:nodeAffinity:requiredDuringSchedulingIgnoredDuringExecution:nodeSelectorTerms:- matchExpressions:- key: node-role.kubernetes.io/edgeoperator: Existscontainers:- image: jetson-status-exporter:v1imagePullPolicy: IfNotPresentname: jetson-exporterresources:limits:cpu: "1"memory: 500Mirequests:cpu: 102mmemory: 180Miports:- containerPort: 9998hostPort: 9998name: httpprotocol: TCPterminationMessagePath: /dev/termination-logterminationMessagePolicy: FilevolumeMounts:- mountPath: /run/jtop.sockname: jtop-sockreadOnly: truednsPolicy: ClusterFirstWithHostNethostNetwork: truehostPID: truenodeSelector:kubernetes.io/os: linuxmachine.type: jetsonrestartPolicy: AlwaysschedulerName: default-schedulerserviceAccount: jetson-exporterterminationGracePeriodSeconds: 30tolerations:- operator: Existsvolumes:- hostPath:path: /run/jtop.socktype: Socketname: jtop-sockupdateStrategy:rollingUpdate:maxSurge: 0maxUnavailable: 1type: RollingUpdate
---
apiVersion: v1
kind: Service
metadata:labels:app.kubernetes.io/component: exporterapp.kubernetes.io/name: jetson-exporterapp.kubernetes.io/part-of: kube-prometheusapp.kubernetes.io/version: 1.0.0name: jetson-exporternamespace: kubesphere-monitoring-system
spec:clusterIP: NoneclusterIPs:- NoneinternalTrafficPolicy: ClusteripFamilies:- IPv4ipFamilyPolicy: SingleStackports:- name: httpport: 9998protocol: TCPtargetPort: httpselector:app.kubernetes.io/component: exporterapp.kubernetes.io/name: jetson-exporterapp.kubernetes.io/part-of: kube-prometheussessionAffinity: Nonetype: ClusterIP
---
apiVersion: monitoring.coreos.com/v1
kind: ServiceMonitor
metadata:labels:app.kubernetes.io/component: exporterapp.kubernetes.io/name: jetson-exporterapp.kubernetes.io/part-of: kube-prometheusapp.kubernetes.io/vendor: kubesphereapp.kubernetes.io/version: 1.0.0name: jetson-exporternamespace: kubesphere-monitoring-system
spec:endpoints:- bearerTokenFile: /var/run/secrets/kubernetes.io/serviceaccount/tokeninterval: 1mport: httprelabelings:- action: replaceregex: (.*)replacement: $1sourceLabels:- __meta_kubernetes_pod_node_nametargetLabel: instance- action: labeldropregex: (service|endpoint|container)scheme: httptlsConfig:insecureSkipVerify: truejobLabel: app.kubernetes.io/nameselector:matchLabels:app.kubernetes.io/component: exporterapp.kubernetes.io/name: jetson-exporterapp.kubernetes.io/part-of: kube-prometheus
部署完成后,jetson-exporter pod running。

重启 Prometheus pod,重新加载配置后,可以在 Prometheus 界面看到新增加的 GPU exporter 的 target。
kubectl delete pod prometheus-k8s-0 -n kubesphere-monitoring-system
在 KubeSphere 前端,查看 GPU 监控数据
前端需要修改 KubeSphere 的 console 的代码,这里属于前端内容,这里就不详细说明了。
其次将 Prometheus 的 SVC 端口暴露出来,通过 nodeport 的方式将 Prometheus 的端口暴露出来,前端通过 http 接口来查询 GPU 的状态。
apiVersion: v1
kind: Service
metadata:labels:app.kubernetes.io/component: prometheusapp.kubernetes.io/instance: k8sapp.kubernetes.io/name: prometheusapp.kubernetes.io/part-of: kube-prometheusapp.kubernetes.io/version: 2.39.1name: prometheus-k8s-nodeportnamespace: kubesphere-monitoring-system
spec:ports:- port: 9090targetPort: 9090protocol: TCPnodePort: 32143selector:app.kubernetes.io/component: prometheusapp.kubernetes.io/instance: k8sapp.kubernetes.io/name: prometheusapp.kubernetes.io/part-of: kube-prometheussessionAffinity: ClientIPsessionAffinityConfig:clientIP:timeoutSeconds: 10800type: NodePort
http 接口
查询瞬时值:
get http://masterip:32143/api/v1/query?query=gpu_info_board_info&time=1711431293.686
get http://masterip:32143/api/v1/query?query=gpu_info_hardware_info&time=1711431590.574
get http://masterip:32143/api/v1/query?query=gpu_usage_gpu&time=1711431590.574
其中query为查询字段名,time是查询的时间查询某个时间段的采集值:
get http://10.11.140.87:32143/api/v1/query_range?query=gpu_usage_gpu&start=1711428221.998&end=1711431821.998&step=14
其中query为查询字段名,start和end是起始结束时间,step是间隔时间
这样就成功在 KubeSphere,监控 KubeEdge 边缘节点 Jetson 的 GPU 状态了。

总结
基于 KubeEdge,我们在 KubeSphere 的前端界面上实现了边缘设备的可观测性,包括 GPU 信息的可观测性。
对于边缘节点 CPU、内存状态的监控,首先修改亲和性,让 KubeSphere 自带的 node-exporter 能够采集边缘节点监控数据,接下来利用 KubeEdge 的 EdgeMesh 将采集的数据提供给 KubeSphere 的 Prometheus。这样就实现了 CPU、内存信息的监控。
对于边缘节点 GPU 状态的监控,安装 jtop 获取 GPU 使用率、温度等数据,然后开发 Jetson GPU Exporter,将 jtop 获取的信息发送给 KubeSphere 的 Prometheus,通过修改 KubeSphere 前端 ks-console 的代码,在界面上通过 http 接口获取 Prometheus 数据,这样就实现了 GPU 使用率等信息监控。
本文由博客一文多发平台 OpenWrite 发布!
相关文章:

使用 Prometheus 在 KubeSphere 上监控 KubeEdge 边缘节点(Jetson) CPU、GPU 状态
作者:朱亚光,之江实验室工程师,云原生/开源爱好者。 KubeSphere 边缘节点的可观测性 在边缘计算场景下,KubeSphere 基于 KubeEdge 实现应用与工作负载在云端与边缘节点的统一分发与管理,解决在海量边、端设备上完成应…...
OSI七层网络模型 —— 筑梦之路
在信息技术领域,OSI七层模型是一个经典的网络通信框架,它将网络通信分为七个层次,每一层都有其独特的功能和作用。为了帮助记忆这七个层次,有一个巧妙的方法:将每个层次的英文单词首字母组合起来,形成了一句…...

状态模式:管理对象状态转换的动态策略
在软件开发中,状态模式是一种行为型设计模式,它允许一个对象在其内部状态改变时改变它的行为。这种模式把与特定状态相关的行为局部化,并且将不同状态的行为分散到对应的状态类中,使得状态和行为可以独立变化。本文将详细介绍状态…...

【论文阅读】MCTformer: 弱监督语义分割的多类令牌转换器
【论文阅读】MCTformer: 弱监督语义分割的多类令牌转换器 文章目录 【论文阅读】MCTformer: 弱监督语义分割的多类令牌转换器一、介绍二、联系工作三、方法四、实验结果 Multi-class Token Transformer for Weakly Supervised Semantic Segmentation 本文提出了一种新的基于变换…...

FMix: Enhancing Mixed Sample Data Augmentation 论文阅读
1 Abstract 近年来,混合样本数据增强(Mixed Sample Data Augmentation,MSDA)受到了越来越多的关注,出现了许多成功的变体,例如MixUp和CutMix。通过研究VAE在原始数据和增强数据上学习到的函数之间的互信息…...
2024蓝桥A组A题
艺术与篮球(蓝桥) 问题描述格式输入格式输出评测用例规模与约定解析参考程序难度等级 问题描述 格式输入 无 格式输出 一个整数 评测用例规模与约定 无 解析 模拟就好从20000101-20240413每一天计算笔画数是否大于50然后天数; 记得判断平…...

Linux journalctl命令详解
文章目录 1.介紹2.概念设置system time基本的日志查阅方法按时过滤日志(by Time)显示本次启动以来的日志(Current Boot)按Past Boots按时间窗口按感兴趣的消息筛选按unit按进程、用户、Group ID按组件路径显示内核消息按消息优先级…...

恢复MySQL!是我的条件反射,PXB开源的力量...
📢📢📢📣📣📣 哈喽!大家好,我是【IT邦德】,江湖人称jeames007,10余年DBA及大数据工作经验 一位上进心十足的【大数据领域博主】!😜&am…...

Storm详细配置
一、认识Storm Apache Storm是个实时数据处理的“大能”,它可以实时接收、处理并转发大量数据流,就像一个高速运转的物流中心,确保数据及时、准确地到达目的地。我们要做的,就是把这个物流中心搭建起来,并且根据我们的…...

linux redis部署教程
单节点部署: 单节点部署 Redis 非常简单,只需要在一台服务器上安装 Redis 服务即可。以下是在 Linux 环境下的单节点部署步骤: 安装 Redis:打开终端,并执行以下命令来更新软件包列表并安装 Redis 服务器:…...
:如何解决餐厅等座的并发难题)
【Java】隐式锁(synchronized):如何解决餐厅等座的并发难题
当你走进一家熙熙攘攘的餐厅,准备享受一顿美味的晚餐时,你是否曾想过,这里正上演着一场场微观的线程战争?在这个场景中,每一张桌子都代表着珍贵的共享资源,而每一位顾客(线程)都在争…...
科技论文和会议录制高质量Presentation Video视频方法
一、背景 机器人领域,许多高质量的期刊和会议(如IEEE旗下的TRO,RAL,IROS,ICRA等)在你的论文收录后,需要上传一个Presentation Video材料,且对设备兼容性和视频质量有较高要求&#…...
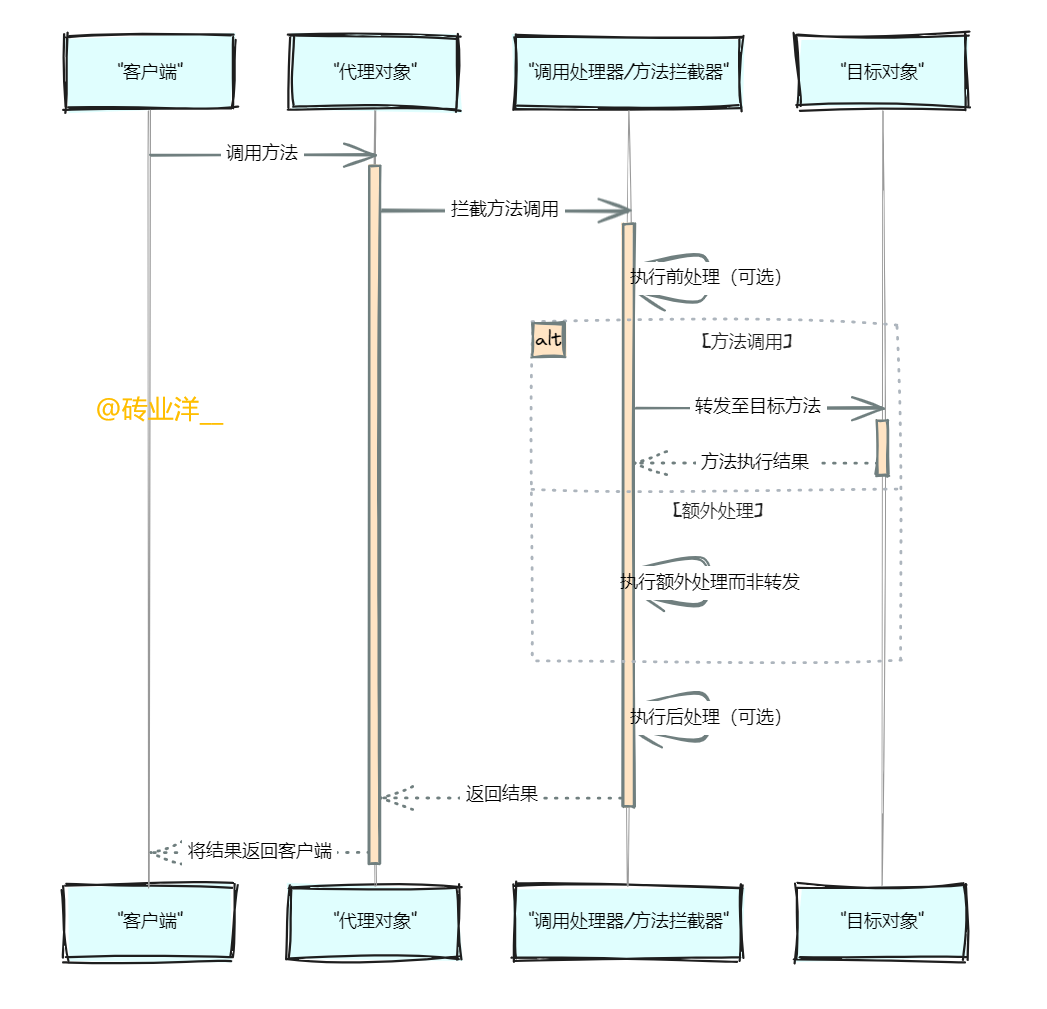
Spring高手之路17——动态代理的艺术与实践
文章目录 1. 背景2. JDK动态代理2.1 定义和演示2.2 不同方法分别代理2.3 熔断限流和日志监控 3. CGLIB动态代理3.1 定义和演示3.2 不同方法分别代理(对比JDK动态代理写法)3.3 熔断限流和日志监控(对比JDK动态代理写法) 4. 动态代理…...

如何在Unity中使用设计模式
在 Unity 环境中,设计模式是游戏开发人员遇到的常见问题的通用解决方案。将它们视为解决游戏开发中特定挑战的经过验证的模板或蓝图。以下是一些简单易懂的设计模式: 1. 单例=> 单例模式确保一个类只有一个实例,并提供对该实例的全局访问点。在 Unity 中,可以使用单例模…...
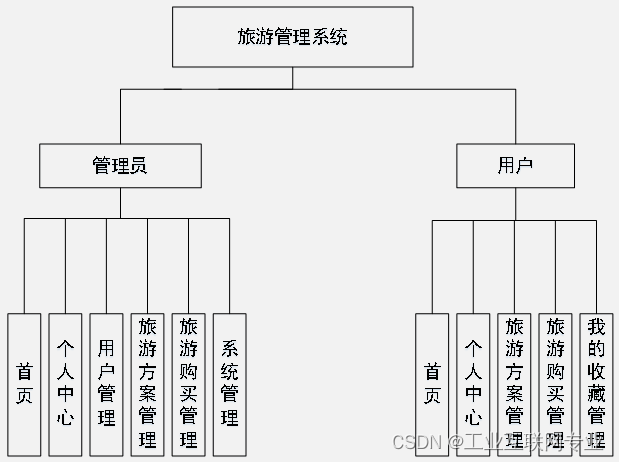
基于springboot+vue+Mysql的旅游管理系统
开发语言:Java框架:springbootJDK版本:JDK1.8服务器:tomcat7数据库:mysql 5.7(一定要5.7版本)数据库工具:Navicat11开发软件:eclipse/myeclipse/ideaMaven包:…...
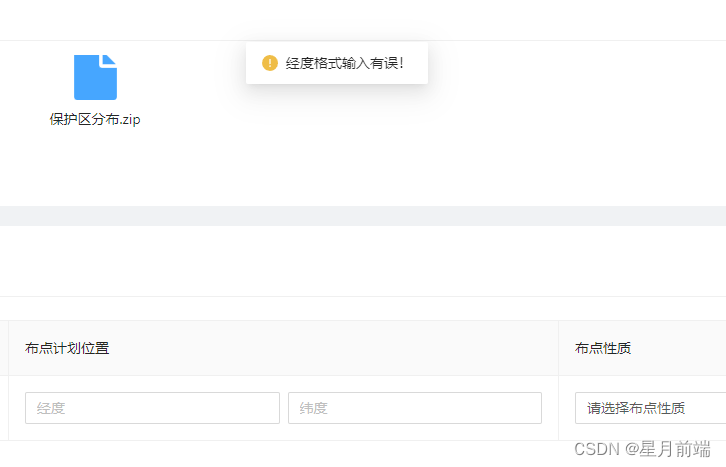
vue3+ts中判断输入的值是不是经纬度格式
vue3ts中判断输入的值是不是经纬度格式 vue代码: <template #bdjhwz"{ record }"><a-row :gutter"8" v-show"!record.editable"><a-col :span"12"><a-input placeholder"经度" v-model:v…...

python常用知识总结
文章目录 1. 常用内置函数1. ASCII码与字符相互转换 1. 常用内置函数 1. ASCII码与字符相互转换 # 用户输入字符 c input("请输入一个字符: ")# 用户输入ASCII码,并将输入的数字转为整型 a int(input("请输入一个ASCII码: "))print( c &qu…...

常用的启发式算法
A算法:在电子地图导航软件中,当你输入目的地时,软件就会利用A算法来计算从现在的位置到目的地的最佳路径。该算法兼顾了路径的优化以及计算速度,保证了结果的准确性以及反馈的实时性。 模拟退火算法:模拟退火算法常被…...

应该如何进行POC测试?—【DBA从入门到实践】第三期
在数据库选型过程中,为确保能够灵活应对数据规模的不断扩大和处理需求的日益复杂化,企业和技术人员会借助POC测试来评估不同数据库系统的性能。在测试过程中,性能、并发处理能力、存储成本以及高可用性等核心要素通常会成为大家关注的焦点&am…...

通过Clojure中的集合与序列谈谈抽象的重要
与君共勉:生命不息,学习不止,切忌浮躁,静下心来,每天进步一点点。 Clojure简介 Clojure是一门运行在JVM上面的Lisp方言,其它的Lisp方言还有Scheme、Common Lisp等。Lisp相关的著名书籍有《计算机程序的构…...
详解)
后进先出(LIFO)详解
LIFO 是 Last In, First Out 的缩写,中文译为后进先出。这是一种数据结构的工作原则,类似于一摞盘子或一叠书本: 最后放进去的元素最先出来 -想象往筒状容器里放盘子: (1)你放进的最后一个盘子(…...

在HarmonyOS ArkTS ArkUI-X 5.0及以上版本中,手势开发全攻略:
在 HarmonyOS 应用开发中,手势交互是连接用户与设备的核心纽带。ArkTS 框架提供了丰富的手势处理能力,既支持点击、长按、拖拽等基础单一手势的精细控制,也能通过多种绑定策略解决父子组件的手势竞争问题。本文将结合官方开发文档,…...
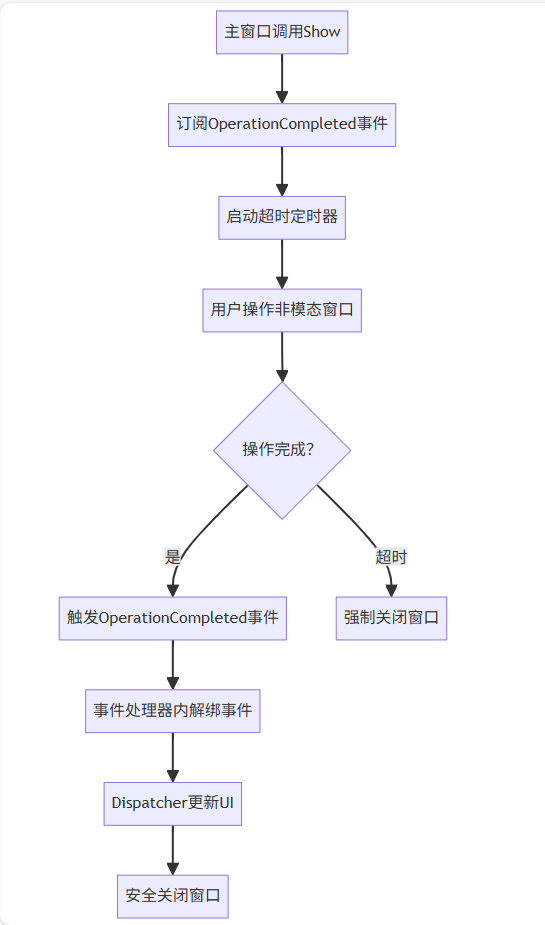
WPF八大法则:告别模态窗口卡顿
⚙️ 核心问题:阻塞式模态窗口的缺陷 原始代码中ShowDialog()会阻塞UI线程,导致后续逻辑无法执行: var result modalWindow.ShowDialog(); // 线程阻塞 ProcessResult(result); // 必须等待窗口关闭根本问题:…...
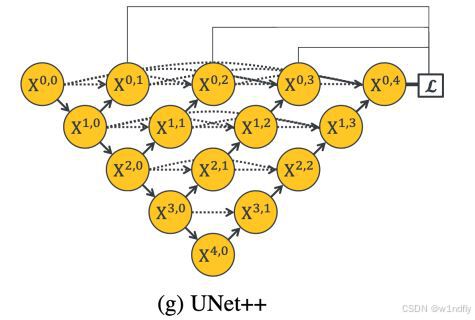
nnUNet V2修改网络——暴力替换网络为UNet++
更换前,要用nnUNet V2跑通所用数据集,证明nnUNet V2、数据集、运行环境等没有问题 阅读nnU-Net V2 的 U-Net结构,初步了解要修改的网络,知己知彼,修改起来才能游刃有余。 U-Net存在两个局限,一是网络的最佳深度因应用场景而异,这取决于任务的难度和可用于训练的标注数…...

Linux部署私有文件管理系统MinIO
最近需要用到一个文件管理服务,但是又不想花钱,所以就想着自己搭建一个,刚好我们用的一个开源框架已经集成了MinIO,所以就选了这个 我这边对文件服务性能要求不是太高,单机版就可以 安装非常简单,几个命令就…...

HTML前端开发:JavaScript 获取元素方法详解
作为前端开发者,高效获取 DOM 元素是必备技能。以下是 JS 中核心的获取元素方法,分为两大系列: 一、getElementBy... 系列 传统方法,直接通过 DOM 接口访问,返回动态集合(元素变化会实时更新)。…...

xmind转换为markdown
文章目录 解锁思维导图新姿势:将XMind转为结构化Markdown 一、认识Xmind结构二、核心转换流程详解1.解压XMind文件(ZIP处理)2.解析JSON数据结构3:递归转换树形结构4:Markdown层级生成逻辑 三、完整代码 解锁思维导图新…...
0609)
书籍“之“字形打印矩阵(8)0609
题目 给定一个矩阵matrix,按照"之"字形的方式打印这个矩阵,例如: 1 2 3 4 5 6 7 8 9 10 11 12 ”之“字形打印的结果为:1,…...

Python常用模块:time、os、shutil与flask初探
一、Flask初探 & PyCharm终端配置 目的: 快速搭建小型Web服务器以提供数据。 工具: 第三方Web框架 Flask (需 pip install flask 安装)。 安装 Flask: 建议: 使用 PyCharm 内置的 Terminal (模拟命令行) 进行安装,避免频繁切换。 PyCharm Terminal 配置建议: 打开 Py…...

TJCTF 2025
还以为是天津的。这个比较容易,虽然绕了点弯,可还是把CP AK了,不过我会的别人也会,还是没啥名次。记录一下吧。 Crypto bacon-bits with open(flag.txt) as f: flag f.read().strip() with open(text.txt) as t: text t.read…...
