Unity 中画线
前言:
在Unity项目中,调试和可视化是开发过程中不可或缺的部分。其中,绘制线条是一种常见的手段,可以用于在Scene场景和Game视图中进行调试和展示。本篇博客将为你介绍多种不同的绘制线条方法,帮助你轻松应对各种调试和可视化需求。
一、Debug.DrawLine
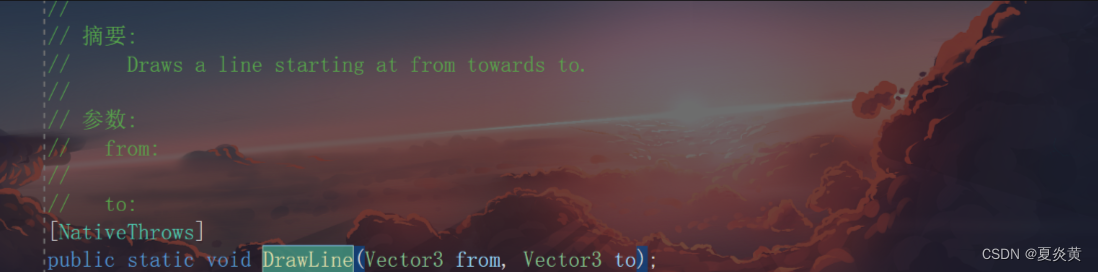
Debug.DrawLine 是 Unity 提供的一种用于在 Scene 视图中绘制调试线条的方法。

| start | 世界空间中线条起始点的位置。 |
| end | 在世界空间中指向线条的终点。 |
| color | 线条的颜色。 |
| duration | 线条的可见长度。 |
在 Update/FixedUpdate/LateUpdate 中调用:
这个方法通常用于游戏运行时进行更新,在这些方法中调用 Debug.DrawLine 来在不同帧更新时绘制线条。
只在 Scene 窗口里显示:
Debug.DrawLine 绘制的线条只能在 Scene 窗口中显示。这限制了在 Game 窗口中实时查看线条。
不能设置材质:
使用 Debug.DrawLine 绘制的线条无法更改或设置材质,因为它们主要用于调试和临时可视化,不提供材质设置的选项。
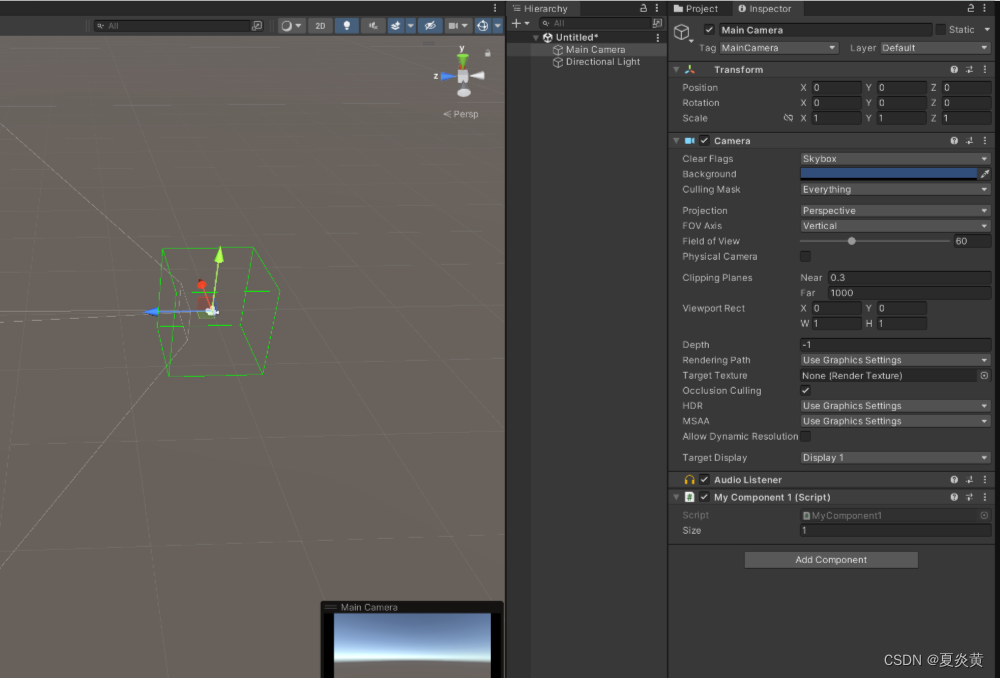
1、绘制正方体
[ExecuteInEditMode]
public class MyComponent1 : MonoBehaviour
{public float size = 1; // 正方体的大小private Vector3[] vertices = new Vector3[8]{new Vector3(-1, -1, -1),new Vector3(1, -1, -1),new Vector3(1, -1, 1),new Vector3(-1, -1, 1),new Vector3(-1, 1, -1),new Vector3(1, 1, -1),new Vector3(1, 1, 1),new Vector3(-1, 1, 1),};private void Update(){for (int i = 0; i < 4; i++){int next = (i < 3) ? (i + 1) : 0;// 底部边框线Debug.DrawLine(vertices[i] * size * 0.5f, vertices[next] * size * 0.5f, Color.green);// 顶部边框线Debug.DrawLine(vertices[i + 4] * size * 0.5f, vertices[next + 4] * size * 0.5f, Color.green);// 垂直边框线Debug.DrawLine(vertices[i] * size * 0.5f, vertices[i + 4] * size * 0.5f, Color.green); }}
}
要使用 Debug.DrawLine 绘制一个正方体,需要考虑其边界上的顶点和线条之间的关系。下面是一个示例代码,用于在场景中绘制一个简单的正方体:
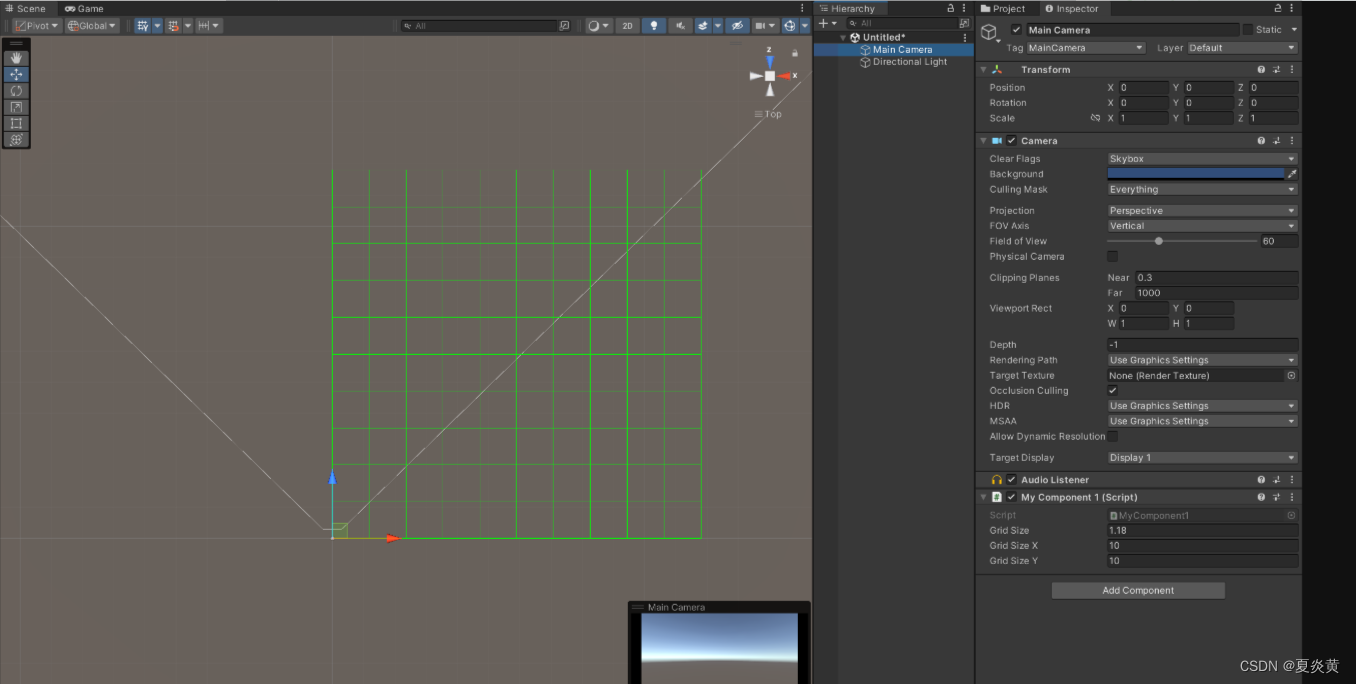
2、绘制网格
using UnityEngine;public class DrawGrid : MonoBehaviour
{public float gridSize = 1.0f; // 网格单元的大小public int gridSizeX = 10; // 网格的列数public int gridSizeY = 10; // 网格的行数void OnDrawGizmos(){// 绘制水平方向的线条for (int i = 0; i <= gridSizeX; i++){Vector3 start = Vector3.right * i * gridSize;Vector3 end = start + Vector3.forward * gridSize * gridSizeY;Debug.DrawLine(start, end, Color.white);}// 绘制垂直方向的线条for (int i = 0; i <= gridSizeY; i++){Vector3 start = Vector3.forward * i * gridSize;Vector3 end = start + Vector3.right * gridSize * gridSizeX;Debug.DrawLine(start, end, Color.white);}}
}
使用 Debug.DrawLine 绘制一个 10x10 的网格。将这个脚本附加到一个空 GameObject 上。gridSize 变量表示网格的单元大小,gridSizeX 和 gridSizeY 分别表示网格的列数和行数。在 Scene 视图中,可以看到一个由绿色线条组成的网格。这些线条只是用于调试和可视化,不会在游戏中显示。
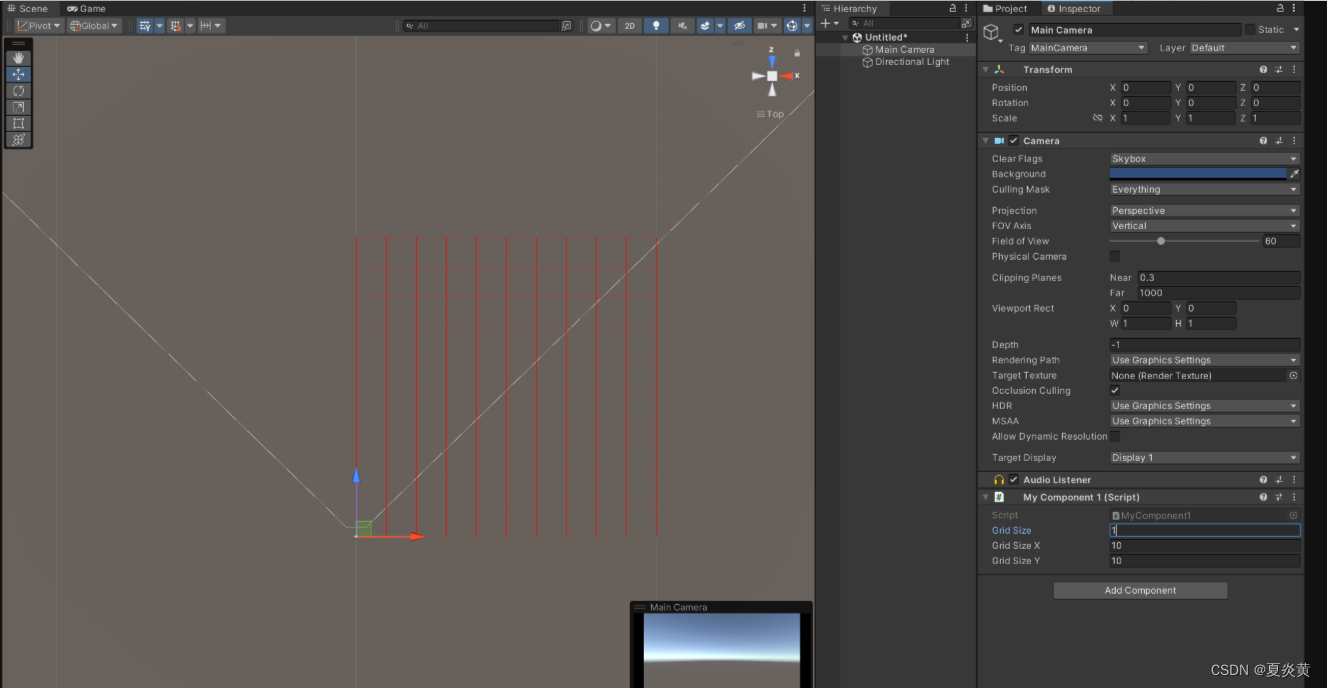
二、Gizmos.DrawLine
Gizmos.DrawLine 是 Unity 提供的一个用于在 Scene 窗口中绘制线条的函数。它可以在 OnDrawGizmos 和 OnDrawGizmosSelected 方法中使用。
| from | 世界空间中线条起始点的位置。 |
| to | 在世界空间中指向线条的终点。 |
调用方式:
适合在 OnDrawGizmos 和 OnDrawGizmosSelected 这两个 Unity 生命周期方法中调用。这些方法是专门用于在 Scene 窗口中绘制 Gizmo 的。
显示范围:
所绘制的线条只会在 Scene 窗口中显示,而不会出现在游戏运行中。这有助于在编辑器中进行调试和可视化,但不会影响游戏性能或最终的构建。
材质设置:
Gizmos 提供的绘制方法通常不能设置材质、颜色等属性。Gizmos.DrawLine 绘制的线条颜色和材质是固定的,无法调整其粗细、透明度或使用自定义材质。
1、绘制网格
using UnityEngine;public class DrawGrid : MonoBehaviour
{public float gridSize = 1.0f; // 网格单元的大小public int gridSizeX = 10; // 网格的列数public int gridSizeY = 10; // 网格的行数void OnDrawGizmos(){Gizmos.color = Color.red;// 绘制水平方向的线条for (int i = 0; i <= gridSizeX; i++){Vector3 start = Vector3.right * i * gridSize;Vector3 end = start + Vector3.forward * gridSize * gridSizeY;Gizmos.DrawLine(start, end);}// 绘制垂直方向的线条for (int i = 0; i <= gridSizeY; i++){Vector3 start = Vector3.forward * i * gridSize;Vector3 end = start + Vector3.right * gridSize * gridSizeX;Gizmos.DrawLine(start, end);}}
}
在 OnDrawGizmos 方法中使用 Gizmos.DrawLine 绘制一个 10x10 的网格。这些线条只在 Scene 窗口中显示,并且不能设置材质。要注意的是,Gizmos 类用于在 Scene 窗口中绘制 Gizmo,但不会在游戏运行时显示。
三、Mesh
在Unity中,Mesh(网格)是一种用于表示3D模型的数据结构。它定义了一个网格模型的顶点、三角形(或其他多边形)、UV(纹理坐标)、法线(法线方向)等数据。Mesh是用于构建3D模型的基本组成部分之一。
Mesh是Unity中许多3D对象(如MeshFilter、MeshRenderer等)的基础,通过MeshFilter组件将Mesh应用到GameObject上,并使用MeshRenderer来渲染对象。通常,开发者使用Mesh来创建静态或动态的3D模型,并在游戏场景中呈现出来。

| vertices | 表示网格的顶点数组。 |
| triangles | 表示定义三角形的索引数组。 |
| normals | 表示法线数组,用于指定网格每个顶点的法线方向。 |
| uv | 表示纹理坐标数组。 |
| colors | 表示网格的顶点颜色。 |
| SetIndices | SetIndices 是 Mesh 类中用于设置网格顶点索引的方法。它允许您指定用于连接顶点以形成三角形或其他多边形的索引数组。 |
| MarkDynamic | MarkDynamic 方法用于标记网格为动态网格。它是一个性能优化方法,用于告诉引擎此网格将频繁地更新。当您有一个需要在每帧或频繁时间间隔内更新的网格时,可以使用 MarkDynamic 方法。 |
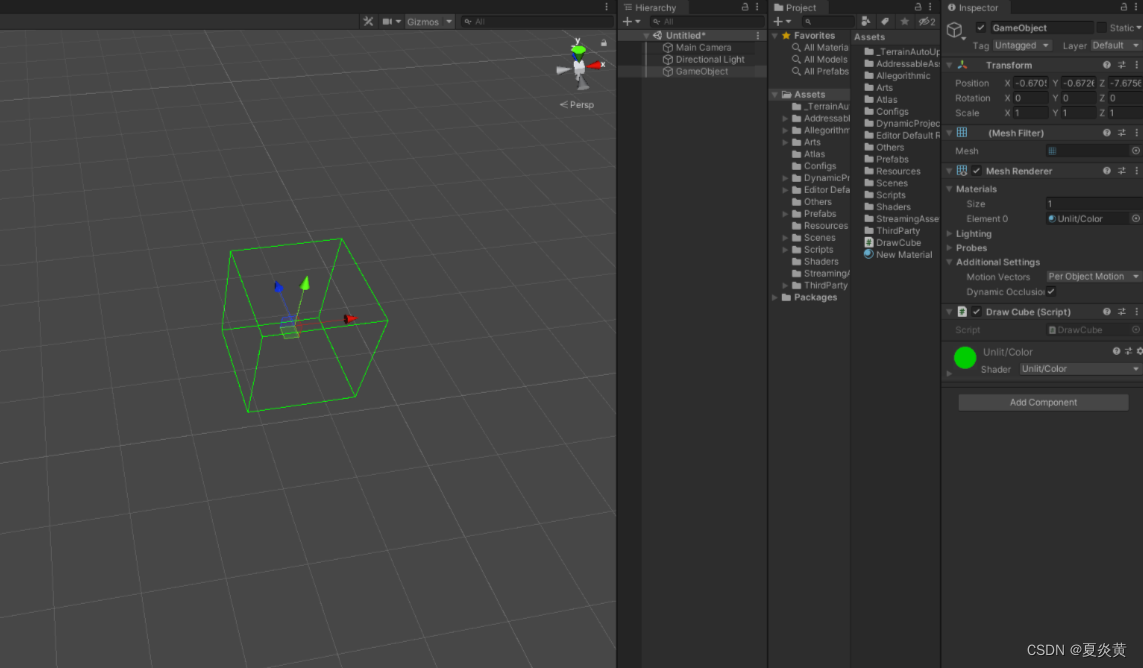
1、绘制正方体线框
using System.Collections;
using System.Collections.Generic;
using UnityEngine;
using UnityEngine.UI;[RequireComponent(typeof(MeshFilter))]
[RequireComponent(typeof(MeshRenderer))]
public class DrawCube : MonoBehaviour
{private Mesh mesh;private MeshFilter meshFilter;private MeshRenderer meshRenderer;// 创建一个立方体的 Meshprivate Mesh CreateCubeMesh(){Mesh mesh = new Mesh();mesh.vertices = new Vector3[]{new Vector3(-1, -1, -1), // 0new Vector3(1, -1, -1),  // 1new Vector3(1, 1, -1),   // 2new Vector3(-1, 1, -1),  // 3new Vector3(-1, -1, 1),  // 4new Vector3(1, -1, 1),   // 5new Vector3(1, 1, 1),    // 6new Vector3(-1, 1, 1)    // 7};mesh.SetIndices(new int[]{0, 1, 1, 2, 2, 3, 3, 0, // 前面四条边4, 5, 5, 6, 6, 7, 7, 4, // 后面四条边0, 4, 1, 5, 2, 6, 3, 7  // 连接前后两个面的四条边}, MeshTopology.Lines, 0);return mesh;}private void Start(){meshFilter = GetComponent<MeshFilter>();meshRenderer = GetComponent<MeshRenderer>();mesh = CreateCubeMesh();meshFilter.mesh = mesh;var material = new Material(Shader.Find("Unlit/Color"));material.color = Color.green;meshRenderer.material = material;}
}
这里是通过创建一个正方体的Mesh,然后通过MeshFilter组件将Mesh应用到GameObject上,并使用MeshRenderer来渲染该正方体线框。
四、GL
OpenGL(Open Graphics Library)是一个用于渲染 2D 和 3D 图形的跨平台图形库。它提供了一系列函数和指令,允许开发者通过编程来操作图形硬件,实现图形渲染和交互式图形应用程序的开发。
在Unity中,GL(Graphics Library)是一个底层的图形渲染接口,用于执行低级图形绘制操作。GL允许开发者以非常灵活的方式直接控制图形渲染,使开发者可以绘制各种形状、线条、文本和纹理,实现各种自定义的绘图需求。
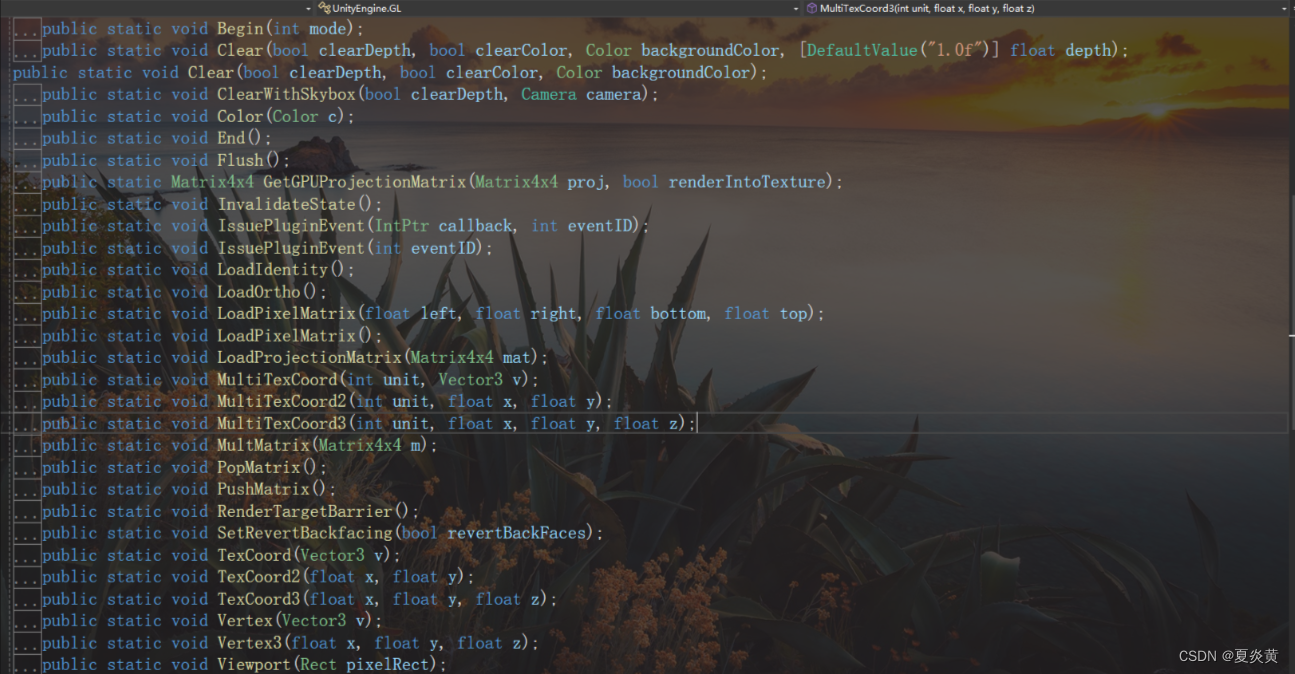
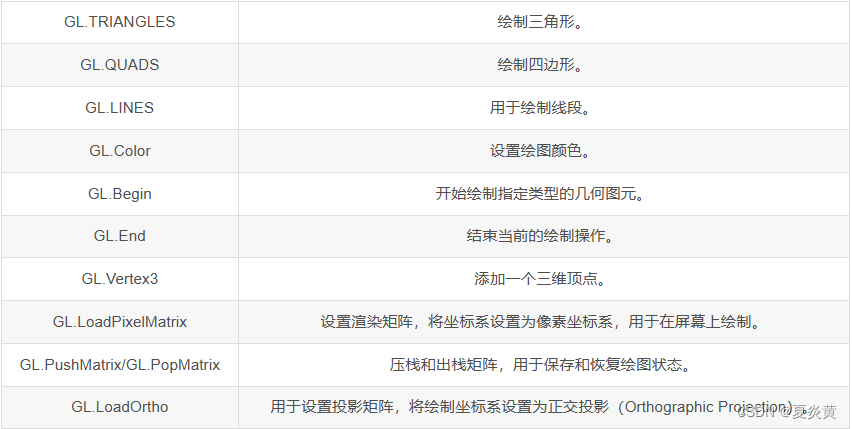
调用方式:
OnPostRender(): 用于在完成渲染场景之后立即调用,适合进行屏幕后处理或绘制Overlay UI。
OnRenderObject(): 在渲染对象时调用。允许手动渲染对象并覆盖其默认渲染。用于自定义渲染对象或其他特殊渲染需求。
显示范围:
LoadOrtho(): 用于设置绘制范围为屏幕坐标系,绘制在整个屏幕上。在OnPostRender()中调用,以便以屏幕为基础绘制2D图形。
材质设置:
GL允许使用材质,但与在Unity中常规渲染管道中的应用方式有所不同。
在GL中,使用材质时,需要在GL代码中直接调用SetPass()来设置所需的材质属性。这将设置着色器状态,让GL能够使用该材质来渲染几何图元。
若要控制颜色,需要使用GL.Color()方法设置颜色。
若要控制透明度,可以通过设置颜色的Alpha值来实现半透明效果。
1、绘制3D网格和屏幕网格
using UnityEngine;public class DrawGrid : MonoBehaviour
{public float gridSize = 1.0f; // 网格单元的大小public int gridSizeX = 10; // 网格的列数public int gridSizeY = 10; // 网格的行数private Material lineMaterial;void CreateLineMaterial(){if (!lineMaterial){// Unity has a built-in shader that is useful for drawing// simple colored things.Shader shader = Shader.Find("Hidden/Internal-Colored");lineMaterial = new Material(shader);lineMaterial.hideFlags = HideFlags.HideAndDontSave;// Turn on alpha blendinglineMaterial.SetInt("_SrcBlend", (int)UnityEngine.Rendering.BlendMode.SrcAlpha);lineMaterial.SetInt("_DstBlend", (int)UnityEngine.Rendering.BlendMode.OneMinusSrcAlpha);// Turn backface culling offlineMaterial.SetInt("_Cull", (int)UnityEngine.Rendering.CullMode.Off);// Turn off depth writeslineMaterial.SetInt("_ZWrite", 0);}}// Will be called after all regular rendering is donepublic void OnRenderObject(){CreateLineMaterial();lineMaterial.SetPass(0);                //刷新当前材质  //Draw3DGrid();DrawScreenGrid();}/// <summary>/// 在三维场景中绘制网格/// </summary>void Draw3DGrid(){GL.PushMatrix();GL.MultMatrix(transform.localToWorldMatrix);GL.Begin(GL.LINES);float startX = -(gridSize * gridSizeX) / 2;float startZ = -(gridSize * gridSizeY) / 2;// 绘制垂直方向的线条for (int i = 0; i <= gridSizeX; i++){GL.Color(Color.red);float xPos = startX + i * gridSize;GL.Vertex3(xPos, 0, startZ);GL.Vertex3(xPos, 0, -startZ);}// 绘制水平方向的线条for (int i = 0; i <= gridSizeY; i++){GL.Color(Color.green);float zPos = startZ + i * gridSize;GL.Vertex3(startX, 0, zPos);GL.Vertex3(-startX, 0, zPos);}GL.End();GL.PopMatrix();}/// <summary>/// 在屏幕上绘制网格/// </summary>void DrawScreenGrid(){GL.PushMatrix(); 			 			//保存当前Matirx  GL.LoadPixelMatrix();                   //设置pixelMatrix  GL.Begin(GL.LINES);// 绘制水平方向的线条for (int i = 0; i <= gridSizeX; i++){GL.Color(Color.green);float xPos = i * gridSize;GL.Vertex3(xPos, 0, 0);GL.Vertex3(xPos, gridSize * gridSizeY, 0);}// 绘制垂直方向的线条for (int i = 0; i <= gridSizeY; i++){GL.Color(Color.green);float zPos = i * gridSize;GL.Vertex3(0, zPos, 0);GL.Vertex3(gridSize * gridSizeX, zPos, 0);}GL.End();GL.PopMatrix();//读取之前的Matrix  }
}


2、实现屏幕框选
public class BoxSelection: MonoBehaviour
{public Material boxMaterial;public Material lineMaterial;private Vector3 startPoint;private bool isSelecting = false;private void Update(){if (Input.GetMouseButtonDown(0)){startPoint = Input.mousePosition;isSelecting = true;}else if (Input.GetMouseButtonUp(0)){isSelecting = false;SelectObjects();}}private void OnPostRender(){if (!boxMaterial || !lineMaterial){Debug.LogError("Please assign materials on the inspector!");return;}if (isSelecting){GL.PushMatrix();boxMaterial.SetPass(0);GL.LoadPixelMatrix();GL.Begin(GL.QUADS);boxMaterial.color = new Color(1f, 1f, 1f, 0.2f);Vector3 endPos = Input.mousePosition;GL.Vertex3(startPoint.x, startPoint.y, 0);GL.Vertex3(endPos.x, startPoint.y, 0);GL.Vertex3(endPos.x, endPos.y, 0);GL.Vertex3(startPoint.x, endPos.y, 0);GL.End();GL.PopMatrix();GL.PushMatrix();lineMaterial.SetPass(0);GL.LoadPixelMatrix();GL.Begin(GL.LINES);lineMaterial.color = Color.green;GL.Vertex3(startPoint.x, startPoint.y, 0);GL.Vertex3(endPos.x, startPoint.y, 0);GL.Vertex3(endPos.x, startPoint.y, 0);GL.Vertex3(endPos.x, endPos.y, 0);GL.Vertex3(endPos.x, endPos.y, 0);GL.Vertex3(startPoint.x, endPos.y, 0);GL.Vertex3(startPoint.x, endPos.y, 0);GL.Vertex3(startPoint.x, startPoint.y, 0);GL.End();GL.PopMatrix();}}private void SelectObjects(){Vector3 mouseStartPos = startPoint;Vector3 mouseEndPos = Input.mousePosition;Vector3 min = Vector3.Min(mouseStartPos, mouseEndPos);Vector3 max = Vector3.Max(mouseStartPos, mouseEndPos);Rect selectRect = new Rect(min.x, Screen.height - max.y, max.x - min.x, max.y - min.y);foreach (GameObject obj in FindObjectsOfType<GameObject>()){Vector3 screenPos = Camera.main.WorldToScreenPoint(obj.transform.position);if (selectRect.Contains(screenPos)){Debug.Log("Selected object: " + obj.name);// 在这里可以添加选中对象的操作逻辑}}}
}

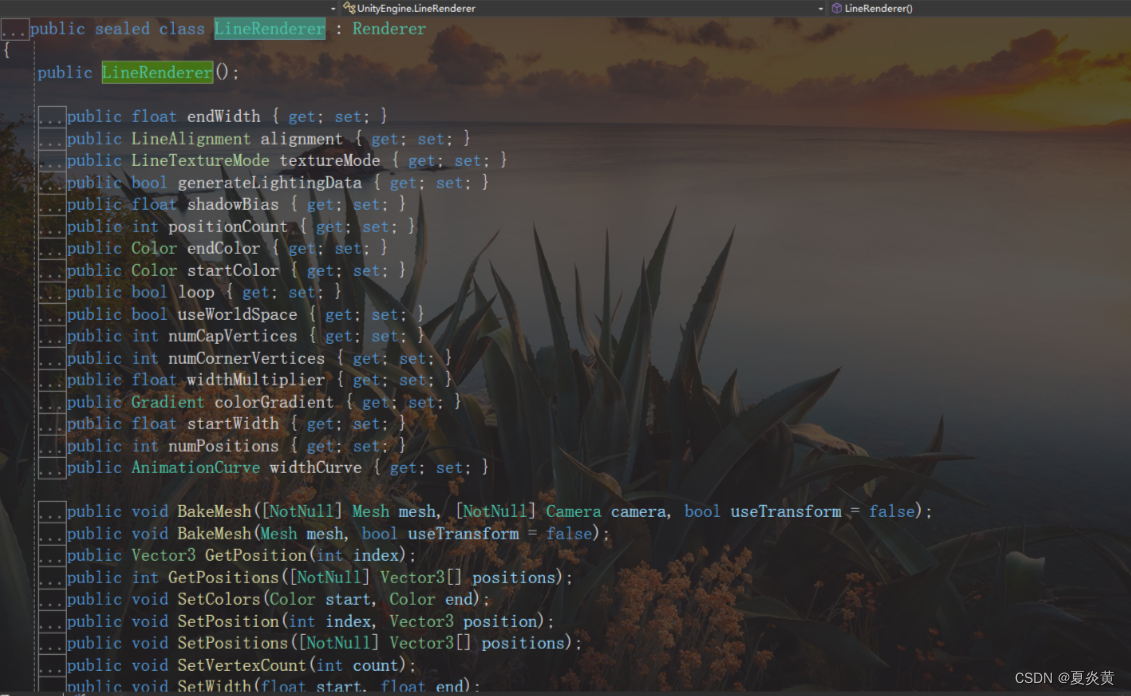
五、LineRenderer
LineRenderer 是 Unity 中用于在场景中绘制线条的组件之一。它可以用于创建简单的线段、路径、连线等效果。
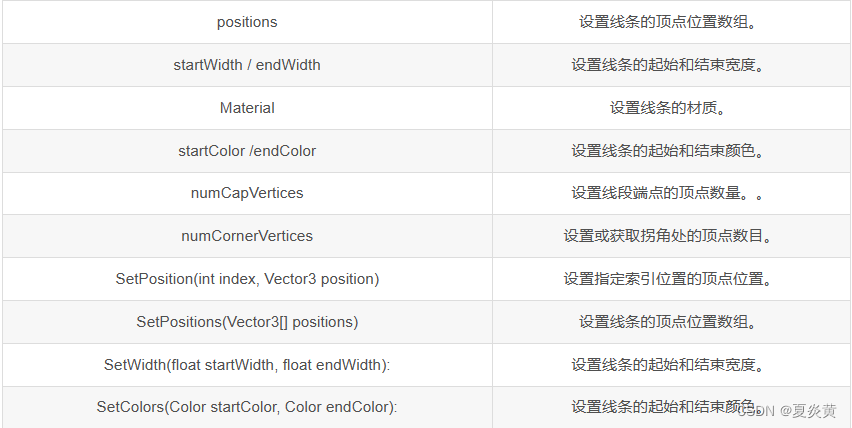
1、实现屏幕写字板
using System.Collections;
using System.Collections.Generic;
using UnityEngine;public class LineRendererDraw : MonoBehaviour
{private LineRenderer clone;public LineRenderer linePre;private int positionCount;private Material lineMaterial;private void Start(){lineMaterial = new Material(Shader.Find("Legacy Shaders/Particles/Additive"));linePre.material = lineMaterial;}/// <summary>/// 创建线条/// </summary>/// <returns></returns>private LineRenderer CreateLine(){//实例化对象LineRenderer line = Instantiate(linePre, linePre.transform.position, Quaternion.identity);//设置起始和结束的颜色line.startColor = Color.red;line.endColor = Color.blue;//设置起始和结束的宽度line.startWidth = 0.4f;line.endWidth = 0.35f;return line;}// Update is called once per framevoid Update(){if (Input.GetMouseButtonDown(0)){//实例化对象clone = CreateLine();//计数positionCount = 0;}if (Input.GetMouseButton(0)){//每一帧检测,按下鼠标的时间越长,计数越多positionCount++;//设置顶点数clone.positionCount = positionCount;//设置顶点位置(顶点的索引,将鼠标点击的屏幕坐标转换为世界坐标)clone.SetPosition(positionCount - 1, Camera.main.ScreenToWorldPoint(new Vector3(Input.mousePosition.x, Input.mousePosition.y, 15)));}}
}
六、UI画线
这里通过Unity的UGUI来进行画线,主要原理就是使用OnPopulateMesh方法来重构Mesh进行画线。
OnPopulateMesh函数:当一个UI元素生成顶点数据时会调用。
OnPopulateMesh(VertexHelper vh)函数,我们可以在这个函数中修改顶点的数据或者获取顶点的数据。
using System.Collections.Generic;
using UnityEngine;
using UnityEngine.UI;/// <summary>
/// 绘制的线段结构体
/// </summary>
public struct LineSegment
{public Vector3 startPoint;public Vector3 endPoint;public float lineWidth;public Vector3 Vector{get{return endPoint - startPoint;}}public Vector3 Normal{get{return Vector3.Cross(Vector.normalized, Vector3.forward).normalized;}}public Vector3 StartLeftPoint{get{return startPoint + Normal * lineWidth; }}public Vector3 StartRightPoint {get{return startPoint - Normal * lineWidth;}}public Vector3 EndLeftPoint{get{return endPoint + Normal * lineWidth; }}public Vector3 EndRightPoint{get{return endPoint - Normal * lineWidth;}}
}public class ImageLine : MaskableGraphic
{private List<List<UIVertex>> vertexQuadList = new List<List<UIVertex>>();private LineSegment lineSegment = new LineSegment();public float lineWidth = 4;protected override void OnPopulateMesh(VertexHelper vh){vh.Clear();for (int i = 0; i < vertexQuadList.Count; i++){vh.AddUIVertexQuad(vertexQuadList[i].ToArray());}}// Update is called once per framevoid Update(){if (Input.GetMouseButtonDown(0)){lineSegment.lineWidth = lineWidth;lineSegment.startPoint = ScreenPointToLocalPointInRectangle(Input.mousePosition);}else if (Input.GetMouseButton(0)){lineSegment.endPoint = ScreenPointToLocalPointInRectangle(Input.mousePosition);//当鼠标不动时不再绘制if (lineSegment.startPoint == lineSegment.endPoint) return;//线段过短不进行绘制if (lineSegment.Vector.magnitude < 5) return;AddVertexQuad(lineSegment);lineSegment.startPoint = lineSegment.endPoint;SetVerticesDirty();}if (Input.GetMouseButtonDown(1)){vertexQuadList.Clear();SetVerticesDirty();}}/// <summary>/// 将线段上顶点添加到UI四边形顶点/// </summary>/// <param name="lineSegment"></param>private void AddVertexQuad(LineSegment lineSegment){List<UIVertex> uIVertices = new List<UIVertex>();UIVertex uIVertex = new UIVertex();uIVertex.position = lineSegment.StartLeftPoint;uIVertex.color = color;uIVertices.Add(uIVertex);UIVertex uIVertex1 = new UIVertex();uIVertex1.position = lineSegment.StartRightPoint;uIVertex1.color = color;uIVertices.Add(uIVertex1);UIVertex uIVertex2 = new UIVertex();uIVertex2.position = lineSegment.EndRightPoint;uIVertex2.color = color;uIVertices.Add(uIVertex2);UIVertex uIVertex3 = new UIVertex();uIVertex3.position = lineSegment.EndLeftPoint;uIVertex3.color = color;uIVertices.Add(uIVertex3);vertexQuadList.Add(uIVertices);}/// <summary>/// 屏幕坐标转换为本地坐标/// </summary>/// <param name="screenPoint"></param>/// <returns></returns>private Vector2 ScreenPointToLocalPointInRectangle(Vector3 screenPoint){RectTransform rectTransform = GetComponent<RectTransform>();Vector2 localPoint = Vector2.zero;switch (canvas.renderMode){case RenderMode.ScreenSpaceOverlay:RectTransformUtility.ScreenPointToLocalPointInRectangle(rectTransform, screenPoint, null, out localPoint);break;case RenderMode.ScreenSpaceCamera:RectTransformUtility.ScreenPointToLocalPointInRectangle(rectTransform, screenPoint, canvas.worldCamera, out localPoint);break;case RenderMode.WorldSpace:RectTransformUtility.ScreenPointToLocalPointInRectangle(rectTransform, screenPoint, canvas.worldCamera, out localPoint);break;default:break;}return localPoint;}
}
相关文章:
Unity 中画线
前言: 在Unity项目中,调试和可视化是开发过程中不可或缺的部分。其中,绘制线条是一种常见的手段,可以用于在Scene场景和Game视图中进行调试和展示。本篇博客将为你介绍多种不同的绘制线条方法,帮助你轻松应对各种调试…...
【快捷部署】017_MongoDB(6.0.14)
📣【快捷部署系列】017期信息 编号选型版本操作系统部署形式部署模式复检时间017MongoDB6.0.14Ubuntu 20.04apt单机2024-04-11 一、快捷部署 #!/bin/bash ################################################################################# # 作者:…...

Android中的Zygote进程介绍
在Android系统中,Zygote是一个特殊的进程,主要负责孵化(fork)新的应用进程,从而加速应用的启动过程。Zygote进程是系统启动过程中创建的第一个进程,它会在系统启动时被初始化并一直运行在后台。 以下是Zyg…...
世界需要和平--中介者模式
1.1 世界需要和平 "你想呀,国与国之间的关系,就类似于不同的对象与对象之间的关系,这就要求对象之间需要知道其他所有对象,尽管将一个系统分割成许多对象通常可以增加其可复用性,但是对象间相互连接的激增又会降低…...

PHPStudy(小皮)切换PHP版本PDO拓展失效的问题
因为要看一个老项目,PHP版本在8.0以上会报错,只能切换到7.2,但又遇到了PDO没开启的问题。 PHPStudy上安装的PHP7.2是需要自己配置一下的,里面php.ini文件是空的,需要将php.ini-development改成php.ini,对于…...
Golang 基于共享变量的并发锁
一、互斥锁 先看一个并发情况,同时操作一个全局变量,如果没有锁会怎么样 假设有1000个goroutines并发进行银行余额的扣除,每次都扣除10元,起始的总余额是10000,理论上并发执行完应该是0对不对,但实际却不…...

探索分布式技术--------------注册中心zookeeper
目录 一、ZooKeeper是什么 二、ZooKeeper的工作机制 三、ZooKeeper特点 四、ZooKeeper数据结构 五、ZooKeeper应用场景 5.1统一命名服务 5.2统一配置管理 5.3统一集群管理 5.4服务器动态上下线 5.5软负载均衡 六、ZooKeeper的选举机制 6.1第一次启动选举机制 6.2非…...
剑指offer之牛客与力扣——前者分类题单中的题目在后者的链接
搜索 [4.12完成] JZ1 LCR 172. 统计目标成绩的出现次数 JZ3 153. 寻找旋转排序数组中的最小值 JZ4 LCR 014. 字符串的排列 JZ5 LCR 163. 找到第 k 位数字 400 动态规划 [4.15完成] JZ2 LCR 161. 连续天数的最高销售额 53 JZ3 LCR 127. 跳跃训练 70 JZ4 LCR 126. 斐波那契…...

C# WinForm —— 05 控件简介
简介 窗体中用于输入或操作的对象,有自己的属性、方法、事件 属性:外观方法:功能事件:行为控制特征 可视化,与用户进行交互,属性,方法,事件,可供开发人员使用࿰…...
JavaEE实验三:3.5学生信息查询系统(动态Sql)
题目要求: 使用动态SQL进行条件查询、更新以及复杂查询操作。本实验要求利用本章所学知识完成一个学生信息系统,该系统要求实现3个以下功能: 1、多条件查询: 当用户输入的学生姓名不为空,则根据学生姓名进行学生信息的查询; 当用户…...
【爬虫开发】爬虫从0到1全知识md笔记第5篇:Selenium课程概要,selenium的其它使用方法【附代码文档】
爬虫开发从0到1全知识教程完整教程(附代码资料)主要内容讲述:爬虫课程概要,爬虫基础爬虫概述,,http协议复习。requests模块,requests模块1. requests模块介绍,2. response响应对象,3. requests模块发送请求,4. request…...

【我的代码生成器】React的FrmUser类源码
FrmUser 类的源码中:FrmUser btnSaveClick 等命名方式都是参考VB.Net的写法。 import React, { forwardRef, useImperativeHandle, useState, useEffect, } from "react"; import { makeStyles, TextField, Grid, Paper, Button, ButtonGroup, } from &q…...

Flutter 单例模式的多种实现方法与使用场景分析
单例模式是一种常用的设计模式,用于确保一个类只有一个实例,并提供一个全局访问点。在Flutter应用程序中,单例模式可以有效地管理全局状态、资源共享和对象的生命周期。本文将介绍Flutter中实现单例模式的多种方法,并分析它们的使…...

C语言洛谷题目分享(9)奇怪的电梯
目录 1.前言 2.题目:奇怪的电梯 1.题目描述 2.输入格式 3.输出格式 4.输入输出样例 5.说明 6.题解 3.小结 1.前言 哈喽大家好啊,前一段时间小编去备战蓝桥杯所以博客的更新就暂停了几天,今天继续为大家带来题解分享,希望大…...
vue 中使 date/time/datetime 类型的 input 支持 placeholder 方法
一般在开发时,设置了 date/time/datetime 等类型的 input 属性 placeholder 提示文本时, 发现实际展示中却并不生效,如图: 处理后效果如图: 处理逻辑 判断表单项未设置值时,则设置其伪类样式,文…...
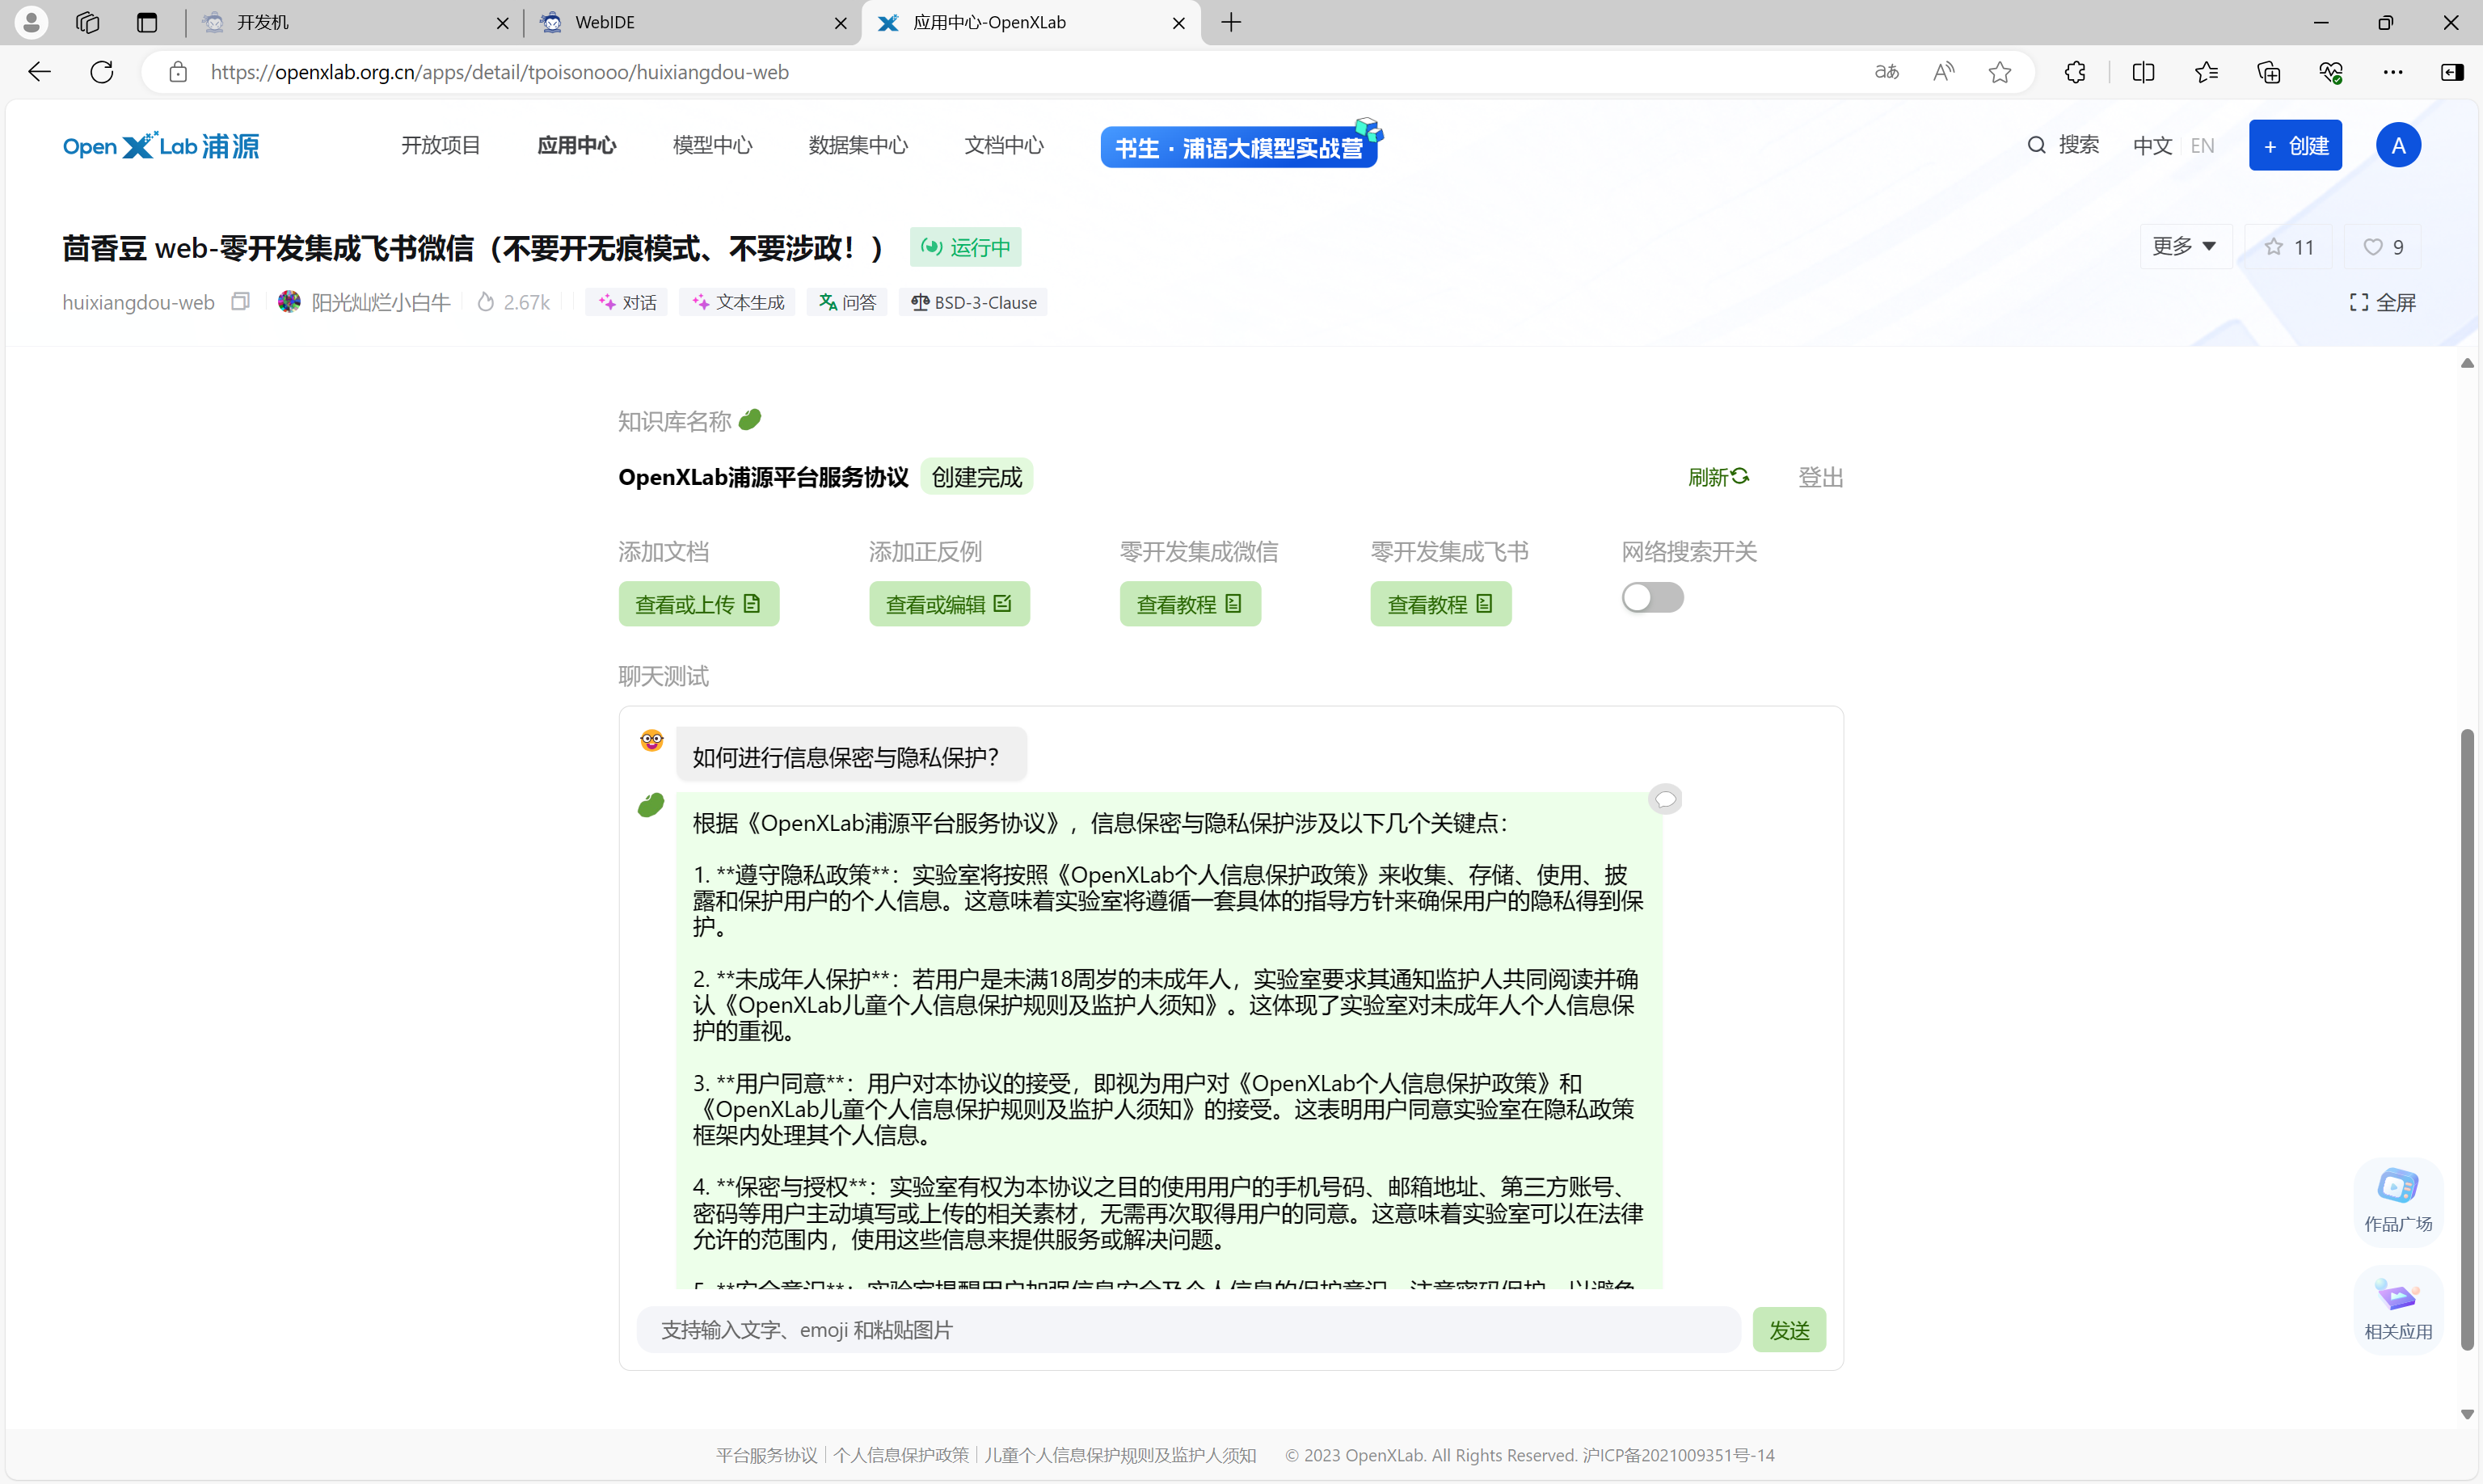
书生·浦语大模型全链路开源体系-第3课
书生浦语大模型全链路开源体系-第3课 书生浦语大模型全链路开源体系-第3课相关资源RAG 概述在 InternLM Studio 上部署茴香豆技术助手环境配置配置基础环境下载基础文件下载安装茴香豆 使用茴香豆搭建 RAG 助手修改配置文件 创建知识库运行茴香豆知识助手 在茴香豆 Web 版中创建…...
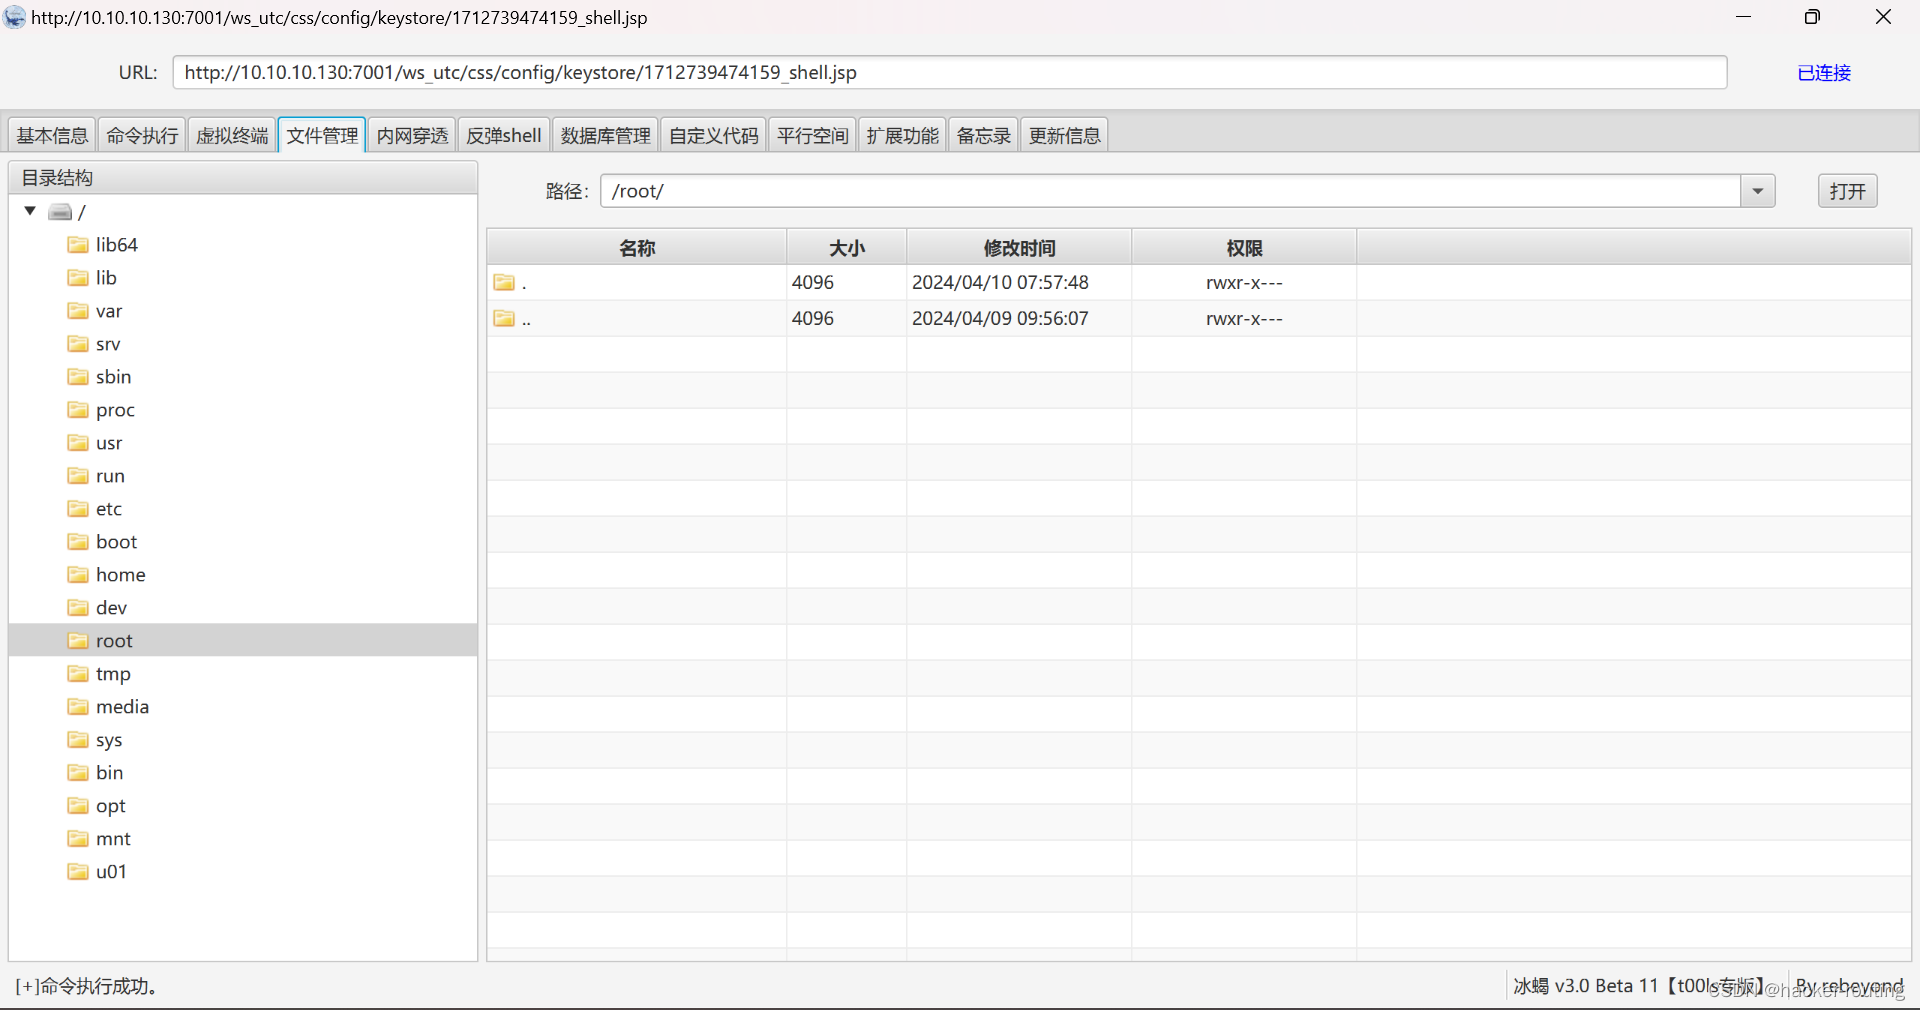
Weblogic任意文件上传漏洞(CVE-2018-2894)漏洞复现(基于vulhub)
🍬 博主介绍👨🎓 博主介绍:大家好,我是 hacker-routing ,很高兴认识大家~ ✨主攻领域:【渗透领域】【应急响应】 【Java、PHP】 【VulnHub靶场复现】【面试分析】 🎉点赞➕评论➕收…...
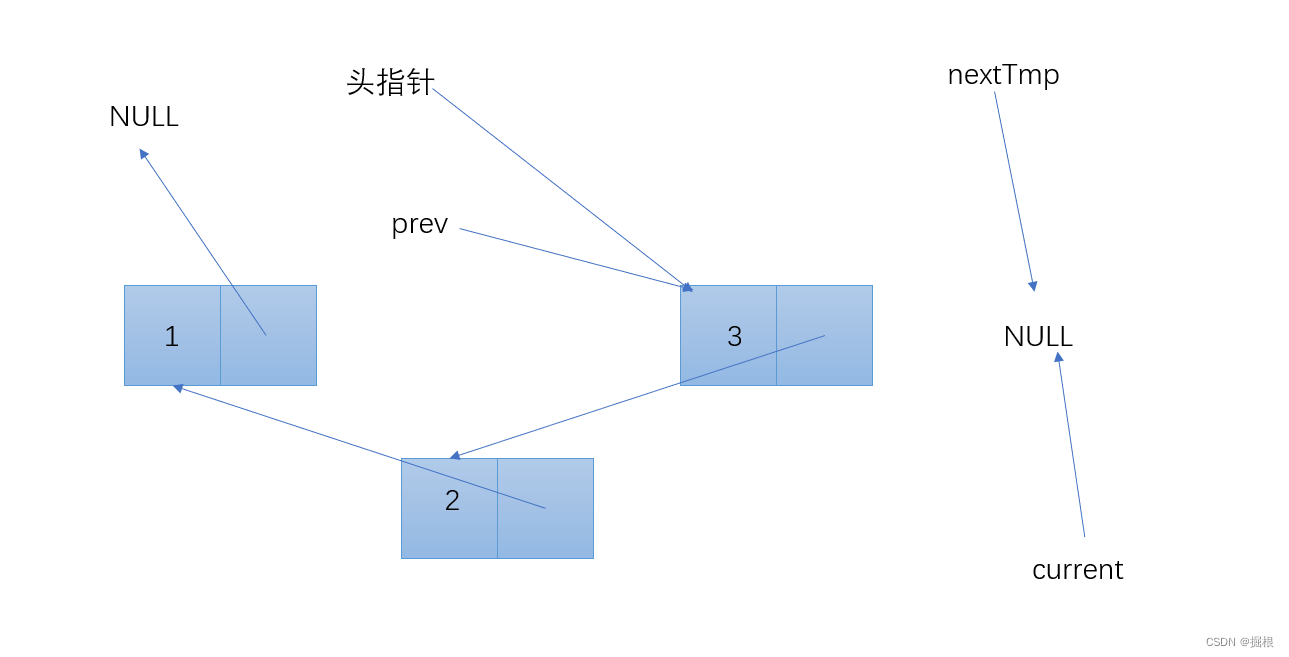
链表基础3——单链表的逆置
链表的定义 #include <stdio.h> #include <stdlib.h> typedef struct Node { int data; struct Node* next; } Node; Node* createNode(int data) { Node* newNode (Node*)malloc(sizeof(Node)); if (!newNode) { return NULL; } newNode->data …...

Fiddler:网络调试利器
目录 第1章:Fiddler简介和安装 1.1 Fiddler概述 1.2 Fiddler的安装步骤 步骤1:下载Fiddler 步骤2:运行安装程序 步骤3:启动Fiddler 1.3 配置Fiddler代理 配置操作系统代理 配置浏览器代理 Google Chrome Mozilla Firefox 第2章:Fiddler界面和基本操作 2.1 Fi…...
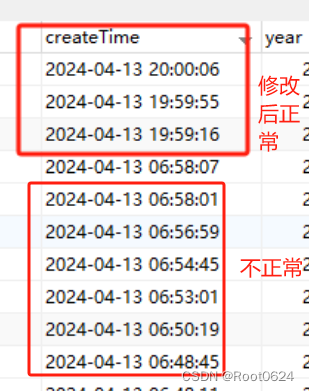
【笔记】mysql版本6以上时区问题
前言 最近在项目中发现数据库某个表的createTime字段的时间比中国时间少了13个小时,只是在数据库中查看显示时间不对,但是在页面,又是正常显示中国时区的时间。 排查 项目中数据库的驱动使用的是8.0.19,驱动类使用的是com.mysq…...
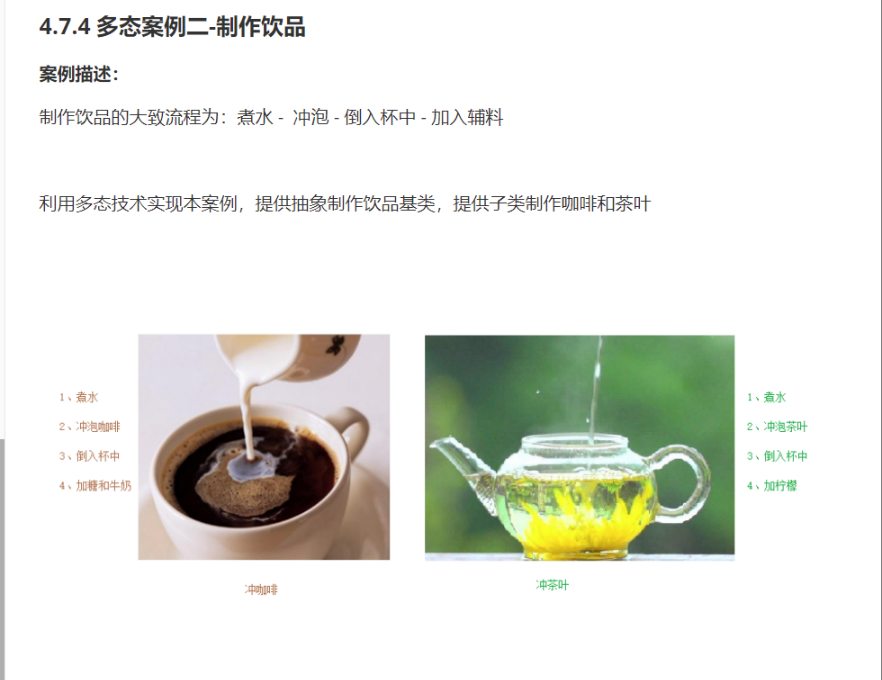
C++_核心编程_多态案例二-制作饮品
#include <iostream> #include <string> using namespace std;/*制作饮品的大致流程为:煮水 - 冲泡 - 倒入杯中 - 加入辅料 利用多态技术实现本案例,提供抽象制作饮品基类,提供子类制作咖啡和茶叶*//*基类*/ class AbstractDr…...

PHP和Node.js哪个更爽?
先说结论,rust完胜。 php:laravel,swoole,webman,最开始在苏宁的时候写了几年php,当时觉得php真的是世界上最好的语言,因为当初活在舒适圈里,不愿意跳出来,就好比当初活在…...

MySQL 隔离级别:脏读、幻读及不可重复读的原理与示例
一、MySQL 隔离级别 MySQL 提供了四种隔离级别,用于控制事务之间的并发访问以及数据的可见性,不同隔离级别对脏读、幻读、不可重复读这几种并发数据问题有着不同的处理方式,具体如下: 隔离级别脏读不可重复读幻读性能特点及锁机制读未提交(READ UNCOMMITTED)允许出现允许…...
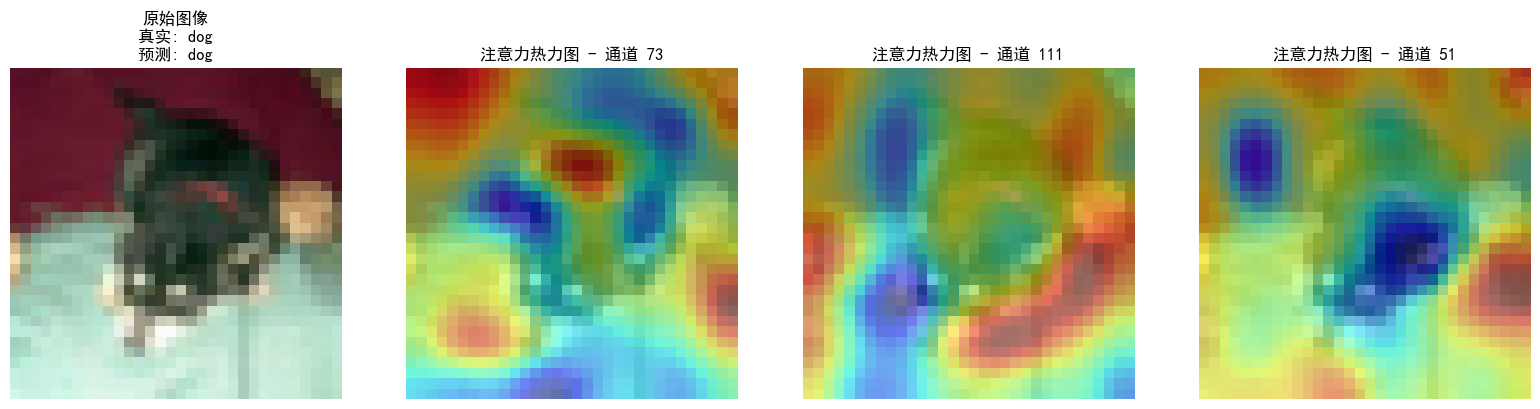
DAY 47
三、通道注意力 3.1 通道注意力的定义 # 新增:通道注意力模块(SE模块) class ChannelAttention(nn.Module):"""通道注意力模块(Squeeze-and-Excitation)"""def __init__(self, in_channels, reduction_rat…...
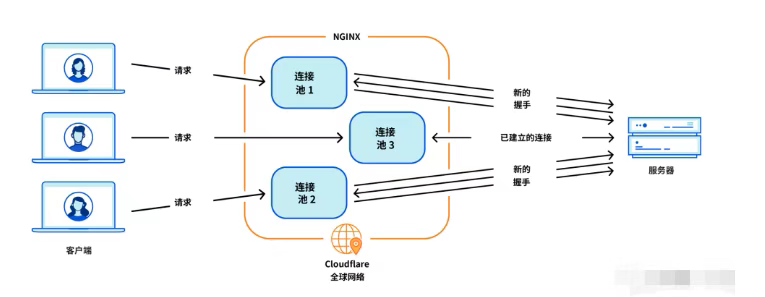
Cloudflare 从 Nginx 到 Pingora:性能、效率与安全的全面升级
在互联网的快速发展中,高性能、高效率和高安全性的网络服务成为了各大互联网基础设施提供商的核心追求。Cloudflare 作为全球领先的互联网安全和基础设施公司,近期做出了一个重大技术决策:弃用长期使用的 Nginx,转而采用其内部开发…...

三体问题详解
从物理学角度,三体问题之所以不稳定,是因为三个天体在万有引力作用下相互作用,形成一个非线性耦合系统。我们可以从牛顿经典力学出发,列出具体的运动方程,并说明为何这个系统本质上是混沌的,无法得到一般解…...

Git常用命令完全指南:从入门到精通
Git常用命令完全指南:从入门到精通 一、基础配置命令 1. 用户信息配置 # 设置全局用户名 git config --global user.name "你的名字"# 设置全局邮箱 git config --global user.email "你的邮箱example.com"# 查看所有配置 git config --list…...

为什么要创建 Vue 实例
核心原因:Vue 需要一个「控制中心」来驱动整个应用 你可以把 Vue 实例想象成你应用的**「大脑」或「引擎」。它负责协调模板、数据、逻辑和行为,将它们变成一个活的、可交互的应用**。没有这个实例,你的代码只是一堆静态的 HTML、JavaScript 变量和函数,无法「活」起来。 …...
Golang——7、包与接口详解
包与接口详解 1、Golang包详解1.1、Golang中包的定义和介绍1.2、Golang包管理工具go mod1.3、Golang中自定义包1.4、Golang中使用第三包1.5、init函数 2、接口详解2.1、接口的定义2.2、空接口2.3、类型断言2.4、结构体值接收者和指针接收者实现接口的区别2.5、一个结构体实现多…...

Spring AI Chat Memory 实战指南:Local 与 JDBC 存储集成
一个面向 Java 开发者的 Sring-Ai 示例工程项目,该项目是一个 Spring AI 快速入门的样例工程项目,旨在通过一些小的案例展示 Spring AI 框架的核心功能和使用方法。 项目采用模块化设计,每个模块都专注于特定的功能领域,便于学习和…...