MongoDB5副本集高可用集群部署
MongoDB5副本集高可用集群部署
1.MongoDB简介
MongoDB官方网站:https://www.mongodb.com
MongoDB最大的特点是表结构灵活可变,字段类型可以随时修改。MongoDB中的每一行数据只是简单的被转化成Json格式后存储,因此MongoDB中没有MySQL中表结构这样的概念,可以直接将任意结构的数据塞入同一个表中,不必考虑表结构,更不必像MySQL一样因为要修改数据表结构而大费周折。
MongoDB不需要定义表结构这个特点给表结构的修改带来了极大的方便,但是也给多表查询、复杂事务等高级操作带来了阻碍。因此,如果数据的逻辑结构非常复杂,经常需要进行复杂的多表查询或者事务操作,那显然还是MySQL这类关系型数据库更合适
- 面向集合存储,易存储对象类型的数据
- 支持查询,以及动态查询
- 支持RUBY,PYTHON,JAVA,C++,PHP,C#等多种语言
- 文件存储格式为BSON(一种JSON的扩展)
- 支持复制和故障恢复和分片
- 支持事务支持
- 索引 聚合 关联…
MongoDB结构对比
| RDBMS | MongoDB |
|---|---|
| 数据库 | 数据库 |
| 表 | 集合 |
| 行 | 文档 |
| 列 | 字段 |
在MongoDB中,集合就是table表的概念
2.安装部署
2-0.机器规划与准备
| 主机名 | IP | 角色Role |
|---|---|---|
| hdt-dmcp-ops05 | 172.20.12.179 | PRIMARY |
| hdt-dmcp-ops04 | 172.20.9.6 | SECONDARY |
| hdt-dmcp-ops03 | 172.20.14.243 | SECONDARY |
本次部署环境为CentOS 7.4 ,搭建部署MongoDB-5.0.15
[wangting@hdt-dmcp-ops05 software]$ cat /etc/redhat-release
CentOS Linux release 7.4.1708 (Core)
2-1.下载安装包(hdt-dmcp-ops05操作)
[wangting@hdt-dmcp-ops05 software]$ cd /opt/software
[wangting@hdt-dmcp-ops05 software]$ wget https://fastdl.mongodb.org/linux/mongodb-linux-x86_64-rhel70-5.0.15-rc2.tgz
2-2.创建MongoDB相关目录(hdt-dmcp-ops05操作)
[wangting@hdt-dmcp-ops05 software]$ cd /opt/module/
[wangting@hdt-dmcp-ops05 module]$ mkdir MongoDB
[wangting@hdt-dmcp-ops05 module]$ cd MongoDB/
[wangting@hdt-dmcp-ops05 MongoDB]$ mkdir data log pid
路径均可自定义配置
/opt/module/MongoDB为mongo项目路径
data目录为数据保存路径
log为日志保存路径
pid为服务启动后的进程信息存储路径
2-3.解压安装包(hdt-dmcp-ops05操作)
[wangting@hdt-dmcp-ops05 software]$ cd /opt/software
[wangting@hdt-dmcp-ops05 software]$ tar -zxvf mongodb-linux-x86_64-rhel70-5.0.15-rc2.tgz -C /opt/module/MongoDB/
[wangting@hdt-dmcp-ops05 software]$ cd /opt/module/MongoDB
[wangting@hdt-dmcp-ops05 MongoDB]$ mv mongodb-linux-x86_64-rhel70-5.0.15-rc2 mongodbServer
2-4.定义配置文件(hdt-dmcp-ops05操作)
[wangting@hdt-dmcp-ops05 MongoDB]$ vim mongodbServer/bin/mongod.conf
storage:journal:enabled: truedbPath: "/opt/module/MongoDB/data"directoryPerDB: truewiredTiger:engineConfig:cacheSizeGB: 1directoryForIndexes: truecollectionConfig:blockCompressor: zlibindexConfig:prefixCompression: truesystemLog:destination: filepath: "/opt/module/MongoDB/log/mongod.log"logAppend: truenet:port: 27017bindIpAll: truemaxIncomingConnections: 5000processManagement:fork: truepidFilePath: /opt/module/MongoDB/pid/mongod.pid#security:
#  keyFile: /opt/module/MongoDB/mongodbServer/bin/mongo.keyfile
# authorization: enabledreplication:oplogSizeMB: 4096replSetName: rs1
【注意】:
- security相关配置项为注释状态,第一次启动使用时,不加载security相关配置,需要机器配置完毕后再配置开启(因为具体的认证配置文件均未生成)
- PRIMARY和SECONDARY的配置文件没有特别配置不一样的参数,可以复用,角色的配置均在服务启动后访问server调整
2-5.分发安装目录(hdt-dmcp-ops05操作)
[wangting@hdt-dmcp-ops05 module]$ pwd
/opt/module
[wangting@hdt-dmcp-ops05 module]$ scp -r MongoDB hdt-dmcp-ops04:/opt/module/
[wangting@hdt-dmcp-ops05 module]$ scp -r MongoDB hdt-dmcp-ops03:/opt/module/
2-6.配置环境变量(所有节点机器操作)
# 增加mongo相关配置
[wangting@hdt-dmcp-ops05 MongoDB]$ sudo vim /etc/profile
# mongo
export MONGODB_HOME=/opt/module/MongoDB/mongodbServer
export PATH=$PATH:$MONGODB_HOME/bin# 引用环境变量
[wangting@hdt-dmcp-ops05 MongoDB]$ source /etc/profile
【注意】:
所有3个节点机器都需要配置环境变量
( 暂不操作,这里了解 )-单个实例启动服务方式:
mongod命令 --config 配置文件路径
[wangting@hdt-dmcp-ops05 MongoDB]$ mongod --config /opt/module/MongoDB/mongodbServer/bin/mongod.conf
about to fork child process, waiting until server is ready for connections.
forked process: 12601
child process started successfully, parent exiting
( 暂不操作,这里了解 )-单个实例关闭服务方式:
[wangting@hdt-dmcp-ops05 MongoDB]$ mongod --config /opt/module/MongoDB/mongodbServer/bin/mongod.conf --shutdown
2-7.编写集群启停脚本(hdt-dmcp-ops05操作)
[wangting@hdt-dmcp-ops05 bin]$ vim mymongo
#!/bin/bashstart() {
ssh hdt-dmcp-ops05 "/opt/module/MongoDB/mongodbServer/bin/mongod  --config /opt/module/MongoDB/mongodbServer/bin/mongod.conf >/dev/null 2>&1"
sleep 2
ssh hdt-dmcp-ops04 "/opt/module/MongoDB/mongodbServer/bin/mongod  --config /opt/module/MongoDB/mongodbServer/bin/mongod.conf >/dev/null 2>&1"
sleep 2
ssh hdt-dmcp-ops03 "/opt/module/MongoDB/mongodbServer/bin/mongod  --config /opt/module/MongoDB/mongodbServer/bin/mongod.conf >/dev/null 2>&1"
}stop() {
ssh hdt-dmcp-ops05 "/opt/module/MongoDB/mongodbServer/bin/mongod --config /opt/module/MongoDB/mongodbServer/bin/mongod.conf --shutdown >/dev/null 2>&1"
sleep 2
ssh hdt-dmcp-ops04 "/opt/module/MongoDB/mongodbServer/bin/mongod --config /opt/module/MongoDB/mongodbServer/bin/mongod.conf --shutdown >/dev/null 2>&1"
sleep 2
ssh hdt-dmcp-ops03 "/opt/module/MongoDB/mongodbServer/bin/mongod --config /opt/module/MongoDB/mongodbServer/bin/mongod.conf --shutdown >/dev/null 2>&1"
}
case "$1" instart)start;;stop)stop;;restart)stopstart;;*)echo
$"Usage: $0 {start|stop|restart}"exit 1
esac
[wangting@hdt-dmcp-ops05 bin]$ chmod +x mymongo
脚本可以使用for循环简化,这里为了操作方便,将操作集中到一个脚本中
2-8.启动停止服务(hdt-dmcp-ops05操作)
# 停止服务
[wangting@hdt-dmcp-ops05 bin]$ mymongo stop
killing process with pid: 12601
[wangting@hdt-dmcp-ops05 bin]$ netstat -tnlpu|grep 27017
[wangting@hdt-dmcp-ops05 bin]$# 启动服务
[wangting@hdt-dmcp-ops05 bin]$ mymongo start
about to fork child process, waiting until server is ready for connections.
forked process: 13747
child process started successfully, parent exiting
[wangting@hdt-dmcp-ops05 bin]$ netstat -tnlpu|grep 27017
(Not all processes could be identified, non-owned process infowill not be shown, you would have to be root to see it all.)
tcp        0      0 0.0.0.0:27017           0.0.0.0:*               LISTEN      13747/mongod
2-9.初次登录初始化副本集(任意一节点连接mongo)
使用mongo shell连接到其中任意一个节点即可,来执行初次登录初始化副本集
[wangting@hdt-dmcp-ops05 module]$ mongo shell
> use admin
> config = {_id : "rs1", members : [{_id:0, host:"172.20.12.179:27017"},{_id:1, host:"172.20.9.6:27017"},{_id:2, host:"172.20.14.243:27017"},]
}
【注意】:
需要更改对应环境的IP地址
2-10.对副本集进行初始化
> rs.initiate(config){ "ok" : 1 }
rs1:SECONDARY>
如果返回 { “ok” : 0 }, 则说明初始化失败
- 查看集群状态
rs1:PRIMARY> rs.status()
...
..."members" : [{"_id" : 0,"name" : "172.20.12.179:27017","health" : 1,"state" : 1,"stateStr" : "PRIMARY",{"_id" : 1,"name" : "172.20.9.6:27017","health" : 1,"state" : 2,"stateStr" : "SECONDARY","uptime" : 5382,{"_id" : 2,"name" : "172.20.14.243:27017","health" : 1,"state" : 2,"stateStr" : "SECONDARY","uptime" : 5382,
- 查看延时从库信息
rs1:PRIMARY> rs.printSlaveReplicationInfo()
WARNING: printSlaveReplicationInfo is deprecated and may be removed in the next major release. Please use printSecondaryReplicationInfo instead.
source: 172.20.9.6:27017syncedTo: Wed Mar 08 2023 16:27:45 GMT+0800 (CST)0 secs (0 hrs) behind the primary
source: 172.20.14.243:27017syncedTo: Wed Mar 08 2023 16:27:45 GMT+0800 (CST)0 secs (0 hrs) behind the primary
2-11.设置超级管理员账号和密码
> use admin
switched to db admin
> db.createUser({user: 'mongouser',pwd: '123456',roles:[{role: 'root',db: 'admin'}]
})Successfully added user: {"user" : "admin","roles" : [{"role" : "root","db" : "admin"}]
}
其它用户相关常用命令:
show users  //查看当前库下的用户
db.dropUser('testadmin')  // 删除用户
db.updateUser('admin', {pwd: 'newpasswd'})  // 修改用户密码
db.auth('admin', 'password')  // 密码认证
2-12.设置数据库读写用户方法
[wangting@hdt-dmcp-ops05 bin]$ mongo
> use bigdatadb
switched to db bigdatadb
> db.createUser({user: 'bigdata',pwd: 'bigdata123',roles:[{role: 'readWrite',db: 'bigdatadb'}]})Successfully added user: {"user" : "bigdata","roles" : [{"role" : "readWrite","db" : "bigdatadb"}]
}> exit
bye
MongoDB 数据库角色信息:
| 角色描述 | 角色标识 |
|---|---|
| 数据库用户角色 | read、readWrite |
| 数据库管理角色 | dbAdmin、dbOwner、userAdmin |
| 集群管理角色 | clusterAdmin、clusterManager、clusterMonitor、hostManager |
| 备份恢复角色 | backup、restore |
| 所有数据库角色 | readAnyDatabase、readWriteAnyDatabase、userAdminAnyDatabase、 dbAdminAnyDatabase |
| 超级用户角色 | root |
2-13.开启副本集认证
# 创建副本集认证的key文件
[wangting@hdt-dmcp-ops05 bin]$ pwd
/opt/module/MongoDB/mongodbServer/bin
[wangting@hdt-dmcp-ops05 bin]$ openssl rand -base64 90 -out /opt/module/MongoDB/mongodbServer/bin/mongo.keyfile
[wangting@hdt-dmcp-ops05 bin]$ ll
total 242228
-rwxr-xr-x 1 wangting wangting     15205 Feb 17 03:54 install_compass
-rwxr-xr-x 1 wangting wangting  60321720 Feb 17 04:43 mongo
-rwxr-xr-x 1 wangting wangting 110313632 Feb 17 04:46 mongod
-rw-rw-r-- 1 wangting wangting       629 Mar  8 14:19 mongod.conf
-rw-rw-r-- 1 wangting wangting       122 Mar  8 14:43 mongo.keyfile
-rwxr-xr-x 1 wangting wangting  77374072 Feb 17 04:43 mongos
# 分发mongo.keyfile
[wangting@hdt-dmcp-ops05 bin]$ scp mongo.keyfile hdt-dmcp-ops04:$PWD
[wangting@hdt-dmcp-ops05 bin]$ scp mongo.keyfile hdt-dmcp-ops03:$PWD# 将配置文件mongod.conf的配置注释打开(去掉注释)
# 【注意】:3个节点配置文件的security都要打开!
security:keyFile: /opt/module/MongoDB/mongodbServer/bin/mongo.keyfileauthorization: enabled
mongo.keyfile认证文件mongo集群必须要用同一份keyfile,一般都在一台机器上生成,然后分发到其他节点,且必须有读的权限,否则将来会报错
路径保持一致,否则mongod.conf中的keyFile路径就要根据不同节点配置不同路径,相对不好维护
- 重启服务生效
# 关闭服务
[wangting@hdt-dmcp-ops05 bin]$ mymongo stop
# 启动服务
[wangting@hdt-dmcp-ops05 bin]$ mymongo start
- 再次连接mongo
# 原方式:mongo admin --host 172.20.12.179 --port 27017 -u mongouser -p 123456
# 这里采用auther认证方式验证访问
[wangting@hdt-dmcp-ops05 module]$ mongo -u mongouser -p 123456 --host hdt-dmcp-ops05 --port 27017 -authenticationDatabase admin
MongoDB shell version v5.0.15-rc2
connecting to: mongodb://hdt-dmcp-ops05:27017/?authSource=admin&compressors=disabled&gssapiServiceName=mongodb
Implicit session: session { "id" : UUID("66c31018-e1a1-45e9-8742-4496e0266ba0") }
MongoDB server version: 5.0.15-rc2
rs1:PRIMARY>
3.验证调试及使用介绍
3-1.访问MongoDB
方式1(常用):
# 原始方式
[wangting@hdt-dmcp-ops05 ~]$ mongo admin --host 172.20.12.179 --port 27017 -u mongouser -p 123456
方式2(常用)
# 使用用户名、免密、认证库登录MongoDB副本集主节点
[wangting@hdt-dmcp-ops05 module]$ mongo -u mongouser -p 123456 --host hdt-dmcp-ops05 --port 27017 -authenticationDatabase admin
方式3:
# 机器上直接使用mongo访问
[wangting@hdt-dmcp-ops05 bin]$ mongo
> use admin
switched to db admin
> db.auth('admin', 'admin123')
1
> db
admin
普通用户访问方式相同:
[wangting@hdt-dmcp-ops05 ~]$ mongo bigdatadb --host 172.20.12.179 --port 27017 -u bigdata -p bigdata123
> db
bigdatadb
> exit
bye
3-2.MongoDB远程连接控制
[wangting@hdt-dmcp-ops05 ~]$ cd /opt/module/MongoDB/mongodbServer/bin/
[wangting@hdt-dmcp-ops05 bin]$ vim mongod.conf
#####
net:port: 27017bindIpAll: true
####
bindIp: 0.0.0.0 或者 bindIpAll: true 即允许所有的IPv4和IPv6地址访问
net.bindIp和net.bindIpAll是互斥的。可以指定其中一个,但不能同时指定两个配置
如需要指定个别IP或者某个网段访问可以配置bindIp
例如:
bindIp:192.168.3.11,192.168.3.12,192.168.3.13
bindIp: localhost
3-3.MongoDB使用介绍
- 登录
[wangting@hdt-dmcp-ops05 ~]$ mongo admin --host 172.20.12.179 --port 27017 -u mongouser -p 123456
rs1:PRIMARY> show dbs
admin   0.000GB
config  0.000GB
local   0.000GB
- 切换数据库
rs1:PRIMARY> use bigdata
switched to db bigdata
注意: use 代表创建并使用,当库中没有数据时默认不显示这个库
- 删除数据库
db.dropDatabase()
> use test111
switched to db test111
> db.dropDatabase()
{ "ok" : 1 }
> show dbs
admin    0.000GB
bigdata  0.000GB
config   0.000GB
local    0.000GB
>
- 查看表清单
> show tables
# 或者
> show collections
- 表创建
db.createCollection('集合名称', [options])
> db.createCollection("table1")
{ "ok" : 1 }
> show tables
table1
[options]可选参数:
| 字段 | 类型 | 描述 |
|---|---|---|
| capped | 布尔 | (可选)如果为 true,则创建固定集合。固定集合是指有着固定大小的集合,当达到最大值时,它会自动覆盖最早的文档。 当该值为 true 时,必须指定 size 参数 |
| size | 数值 | (可选)为固定集合指定一个最大值,即字节数。 如果 capped 为 true,也需要指定该字段 |
| max | 数值 | (可选)指定固定集合中包含文档的最大数量 |
注意:当集合(表)不存在时,向集合中插入文档也会自动创建该集合
- 表中插入数据
db.【表名】.insert("【JSON格式的数据】")
> db.table1.insert({"id":"1","name":"wangting111"})
WriteResult({ "nInserted" : 1 })
> db.table1.insert({"id":"2","name":"wangting222"})
WriteResult({ "nInserted" : 1 })
> db.table1.insert({"id":"3","name":"wangting333"})
WriteResult({ "nInserted" : 1 })
>
- 查看表中数据
> db.table1.find()
{ "_id" : ObjectId("63f5a21faa98d270a51a7968"), "id" : "1", "name" : "wangting111" }
{ "_id" : ObjectId("63f5a228aa98d270a51a7969"), "id" : "2", "name" : "wangting222" }
{ "_id" : ObjectId("63f5a22faa98d270a51a796a"), "id" : "3", "name" : "wangting333" }
>
- 删除集合(表)
> show tables;
table1
> db.table1.drop()
true
> show tables;
>
- 文档操作
# 单条文档
> db.table1.insert({"name":"wang111","age":18,"bir":"1989-09-07"});
WriteResult({ "nInserted" : 1 })
> db.table1.find()
{ "_id" : ObjectId("63f5a96c86e1dd7e4acc842f"), "name" : "wang111", "age" : 18, "bir" : "1989-09-07" }# 多条文档
db.table1.insert([{"name":"wang222","age":18,"bir":"1989-09-08"},{"name":"wang333","age":18,"bir":"1989-09-09"},{"name":"wang444","age":20,"bir":"1989-09-10"},{"name":"wang555","age":19,"bir":"1989-09-11"}
]);BulkWriteResult({"writeErrors" : [ ],"writeConcernErrors" : [ ],"nInserted" : 4,"nUpserted" : 0,"nMatched" : 0,"nModified" : 0,"nRemoved" : 0,"upserted" : [ ]
})
> db.table1.find()
{ "_id" : ObjectId("63f5a96c86e1dd7e4acc842f"), "name" : "wang111", "age" : 18, "bir" : "1989-09-07" }
{ "_id" : ObjectId("63f5aac286e1dd7e4acc8430"), "name" : "wang222", "age" : 18, "bir" : "1989-09-08" }
{ "_id" : ObjectId("63f5aac286e1dd7e4acc8431"), "name" : "wang333", "age" : 18, "bir" : "1989-09-09" }
{ "_id" : ObjectId("63f5aac286e1dd7e4acc8432"), "name" : "wang444", "age" : 20, "bir" : "1989-09-10" }
{ "_id" : ObjectId("63f5aac286e1dd7e4acc8433"), "name" : "wang555", "age" : 19, "bir" : "1989-09-11" }
>
# 支持利用代码循环批量插入
> for(let i=0;i<10;i++){db.table1.insert({"_id":i,"name":"wang"+i,"age" : 18+i,"bir" : "1989-09-07"})
}
WriteResult({ "nInserted" : 1 })> db.table1.find()
{ "_id" : ObjectId("63f5a96c86e1dd7e4acc842f"), "name" : "wang111", "age" : 18, "bir" : "1989-09-07" }
{ "_id" : ObjectId("63f5aac286e1dd7e4acc8430"), "name" : "wang222", "age" : 18, "bir" : "1989-09-08" }
{ "_id" : ObjectId("63f5aac286e1dd7e4acc8431"), "name" : "wang333", "age" : 18, "bir" : "1989-09-09" }
{ "_id" : ObjectId("63f5aac286e1dd7e4acc8432"), "name" : "wang444", "age" : 20, "bir" : "1989-09-10" }
{ "_id" : ObjectId("63f5aac286e1dd7e4acc8433"), "name" : "wang555", "age" : 19, "bir" : "1989-09-11" }
{ "_id" : 0, "name" : "wang0", "age" : 18, "bir" : "1989-09-07" }
{ "_id" : 1, "name" : "wang1", "age" : 19, "bir" : "1989-09-07" }
{ "_id" : 2, "name" : "wang2", "age" : 20, "bir" : "1989-09-07" }
{ "_id" : 3, "name" : "wang3", "age" : 21, "bir" : "1989-09-07" }
{ "_id" : 4, "name" : "wang4", "age" : 22, "bir" : "1989-09-07" }
{ "_id" : 5, "name" : "wang5", "age" : 23, "bir" : "1989-09-07" }
{ "_id" : 6, "name" : "wang6", "age" : 24, "bir" : "1989-09-07" }
{ "_id" : 7, "name" : "wang7", "age" : 25, "bir" : "1989-09-07" }
{ "_id" : 8, "name" : "wang8", "age" : 26, "bir" : "1989-09-07" }
{ "_id" : 9, "name" : "wang9", "age" : 27, "bir" : "1989-09-07" }
>
相关文章:

MongoDB5副本集高可用集群部署
MongoDB5副本集高可用集群部署 1.MongoDB简介 MongoDB官方网站:https://www.mongodb.com MongoDB最大的特点是表结构灵活可变,字段类型可以随时修改。MongoDB中的每一行数据只是简单的被转化成Json格式后存储,因此MongoDB中没有MySQL中表…...

【Java】最新版本SpringCloudStream整合RocketMQ实现单项目中事件的发布与监听
文章目录前言依赖配置代码参考前言 SpringCloud项目中整合RocketMQ是为了削峰填谷。 这里我使用RocketMQ的作用用于接收项目中产生的消息,然后异步的发送邮件给客户,这是这个项目的产生的背景。 依赖配置 <dependencies><dependency><…...
abp.net 5.0 部署IIS10
今天遇到了abp.net 5.0部署iis10被卡住的问题,网上找了一些资料,都不是我要的,最后我总结一下我用的是 5.0的版本,所以我需要给服务器安装 iis5.0的相关运行环境 1:https://dotnet.microsoft.com/zh-cn/download/dotne…...
Windows安装Qt与VS2019添加QT插件
一、通过Qt安装包方式http://download.qt.io/archive/qt/5.12/5.12.3/.安装可以就选中这个MSVC 2017 64-bit,其他就暂时不用了二、通过vs2019安装Qt插件方式方法1下面这种方式本人安装不起来,一直卡住下不下来。拓展->管理拓展->联机->搜索Qt&a…...

自学大数据第5天~hadoop集群搭建(二)
配置集群/分布式环境 1,修改文件workers 需要把所有节点数据节点的主机名写入该文件,每行一个,默认localhost(即把本机(namenode也作为数据节点),所以我们在伪分布式是没有配置该文件; 在进行分布式时需要删掉localhost(又可能文件中没有该配置,没有那就不用删了,配置一下数据…...

MySQL (六)------MySQL的常用函数、 事务(TCL)、DCL用户操作语句、常见环境、编码问题
第一章 MySQL的常用函数 1.1 字符串函数 1.1.1 字符串函数列表概览 函数用法CONCAT(S1,S2,......,Sn)连接S1,S2,......,Sn为一个字符串CONCAT_WS(separator, S1,S2,......,Sn)连接S1一直到Sn,并且中间以separator作为分隔符CHAR_LENGTH(s)返回字符串s的字符数LENGTH…...
【3.8】操作系统内存管理、Redis数据结构、哈希表
内存满了,会发生什么? 当应用程序读写了这块虚拟内存,CPU 就会去访问这个虚拟内存, 这时会发现这个虚拟内存没有映射到物理内存, CPU 就会产生缺页中断,进程会从用户态切换到内核态,并将缺页中…...
Shell编程:轻松掌握入门级Shell脚本,成为Shell高手
文章目录前言一. 实验环境二. shell基础入门精讲2.1 什么是shell脚本?2.2 shell的种类2.3 脚本案例2.3.1 打印 hello-word案例2.3.2 统计指定目录下的文件数和目录数2.4 shell脚本编写规范总结前言 🏠个人主页:我是沐风晓月 🧑个人…...
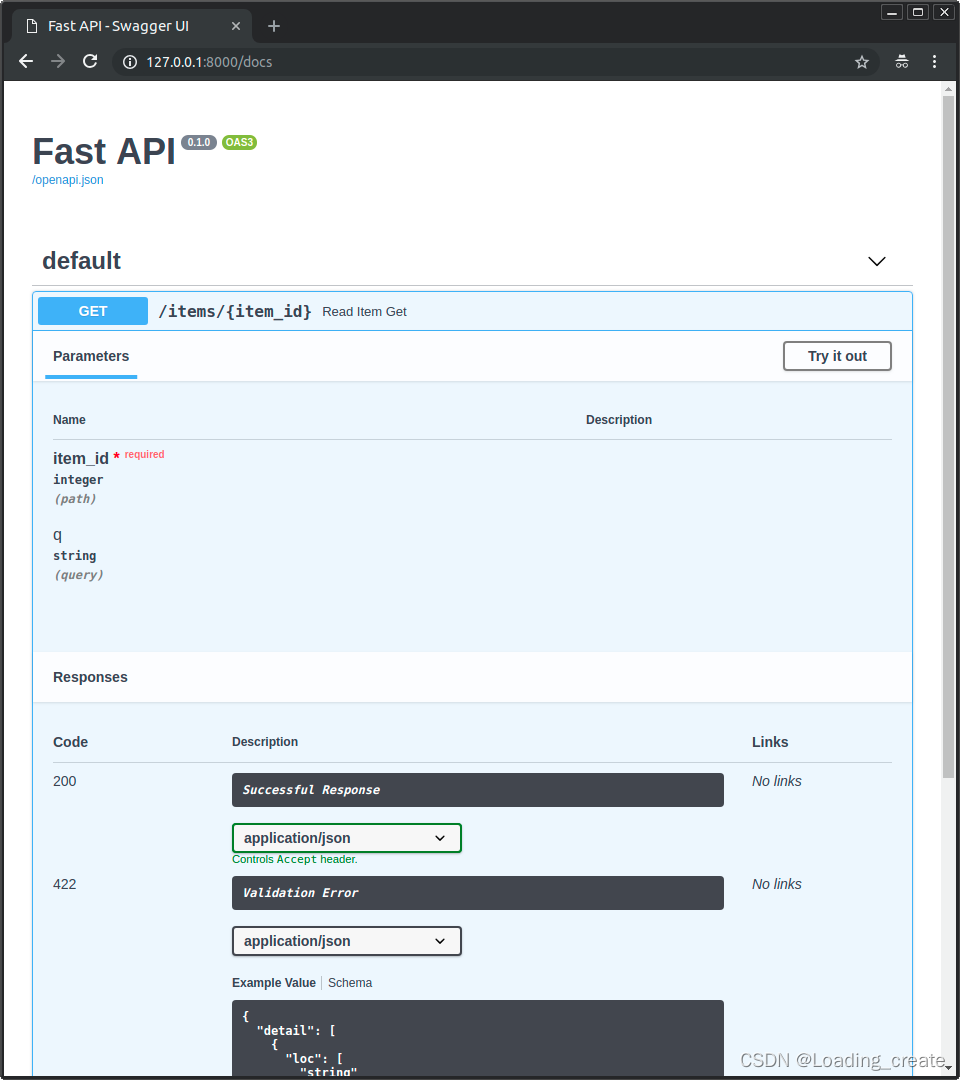
FastApi的搭建与测试
一、fastapi的安装 1-1、使用pip安装 安装fastapi的语句 pip install fastapi -i https://mirrors.aliyun.com/pypi/simple因为fastapi启动依赖于uvicorn,所以我们还需要安装uvicorn。 pip install uvicorn -i https://mirrors.aliyun.com/pypi/simple下面我们来…...

C++基础——C++面向对象之重载与多态基础总结(函数重载、运算符重载、多态的使用)
【系列专栏】:博主结合工作实践输出的,解决实际问题的专栏,朋友们看过来! 《QT开发实战》 《嵌入式通用开发实战》 《从0到1学习嵌入式Linux开发》 《Android开发实战》 《实用硬件方案设计》 长期持续带来更多案例与技术文章分享…...
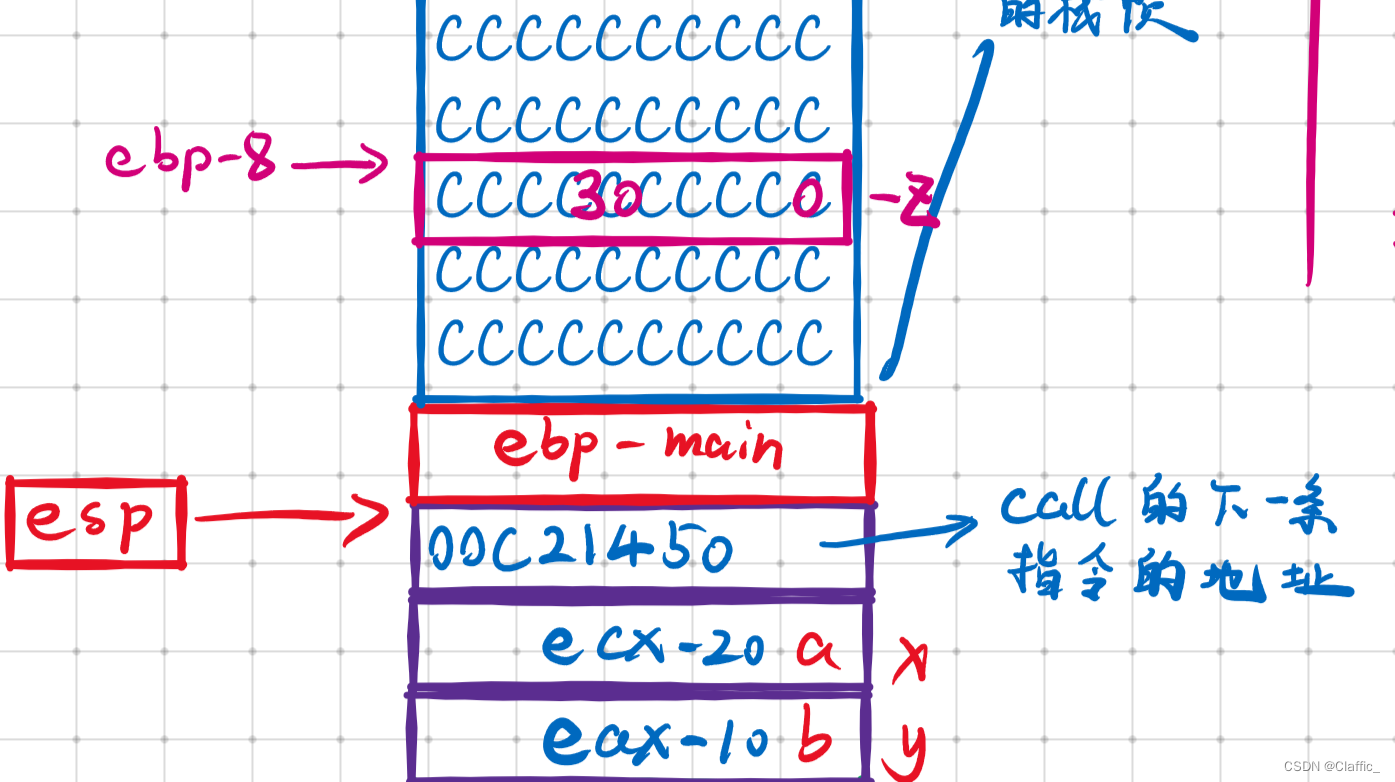
调用一个函数时发生了什么?
欢迎来到 Claffic 的博客 💞💞💞 前言: 用C语言写代码,如果一个工程相对复杂时,我们往往会采取封装函数的方式。在主函数中调用函数 这一看似简单的过程,实际上有很多不宜观察的细节࿰…...

MindAR的网页端WebAR图片识别功能的图片目标编译器中文离线版本功能(含源码)
前言 之前制作了基于MindAR实现的网页端WebAR图片识别叠加动作模型追踪功能的demo,使用了在线的图像目标编译器对识别图进行了编译,并实现了自制的WebAR效果,大致效果如下: 但是在线的编译器在操作中也不是很方便,我…...

测试经理:“你做了三年测试,连服务端的接口测试都不会?”
服务端的接口测试我们一般从功能开始进行测试,比如请求参数和响应参数的校验,业务逻辑或业务规则的校验,数据库操作的校验。 功能正常后会根据需要进行安全相关的检查、性能测试以及系列扩展测试,比如与历史版本的兼容性测试、接…...

4G AFR到5G应用场景介绍
前面文章介绍过AFR的机制及流程 AFR机制及流程介绍 (qq.com) GSM AFR到LTE流程...
)
正电源子 IMX6ULL 自学笔记(驱动开发)
一、字符设备驱动开发 1.1 字符设备驱动简介 字符设备是 Linux 驱动中最基本的一类设备驱动,字符设备就是一个一个字节,按照字节流进行读写操作的设备,读写数据是分先后顺序的。比如我们最常见的点灯、按键、IIC、SPI,LCD 等等都…...

AM5728(AM5708)开发实战之移植OpenCV-3.4.11
一 概述 OpenCV是一个开源的跨平台计算机视觉库,可以运行在Linux、Windows、Mac OS等操作系统上,它为图像处理、模式识别、三维重建、物体跟踪、机器学习提供了丰富的算法。 由于OpenCV依赖包特别多,尽量不要使用交叉编译,即在什…...

Notepad++ 下载与安装教程
文章目录Notepad 下载与安装教程Notepad 简介一,Notepad 下载二,Notepad 安装Notepad 下载与安装教程 Notepad 简介 Notepad是程序员必备的文本编辑器,Notepad中文版小巧高效,支持27种编程语言,通吃C,C ,Java ,C#, XM…...

005+limou+HTML——(5)HTML图片和HTML超链接
1、图片标签<img> (1)图片标签属性 [src]:用于指定这个图片所在的路径,常使用相对路径,比较少使用绝对路劲。如果图片路径有错误的话,就会发生图片显示错误[alt]:用于指定图片的提示文字…...

ES6 Generator
Generator Generator是es6引入的,主要用于异步编程。 最大特点是可以交出函数的执行权(即暂停执行)。 它和普通的函数写法有点不同 function关键字与函数名之间有一个*号,以与普通函数进行区别。 它不同于普通函数,是可以暂停执行的。 Gen…...
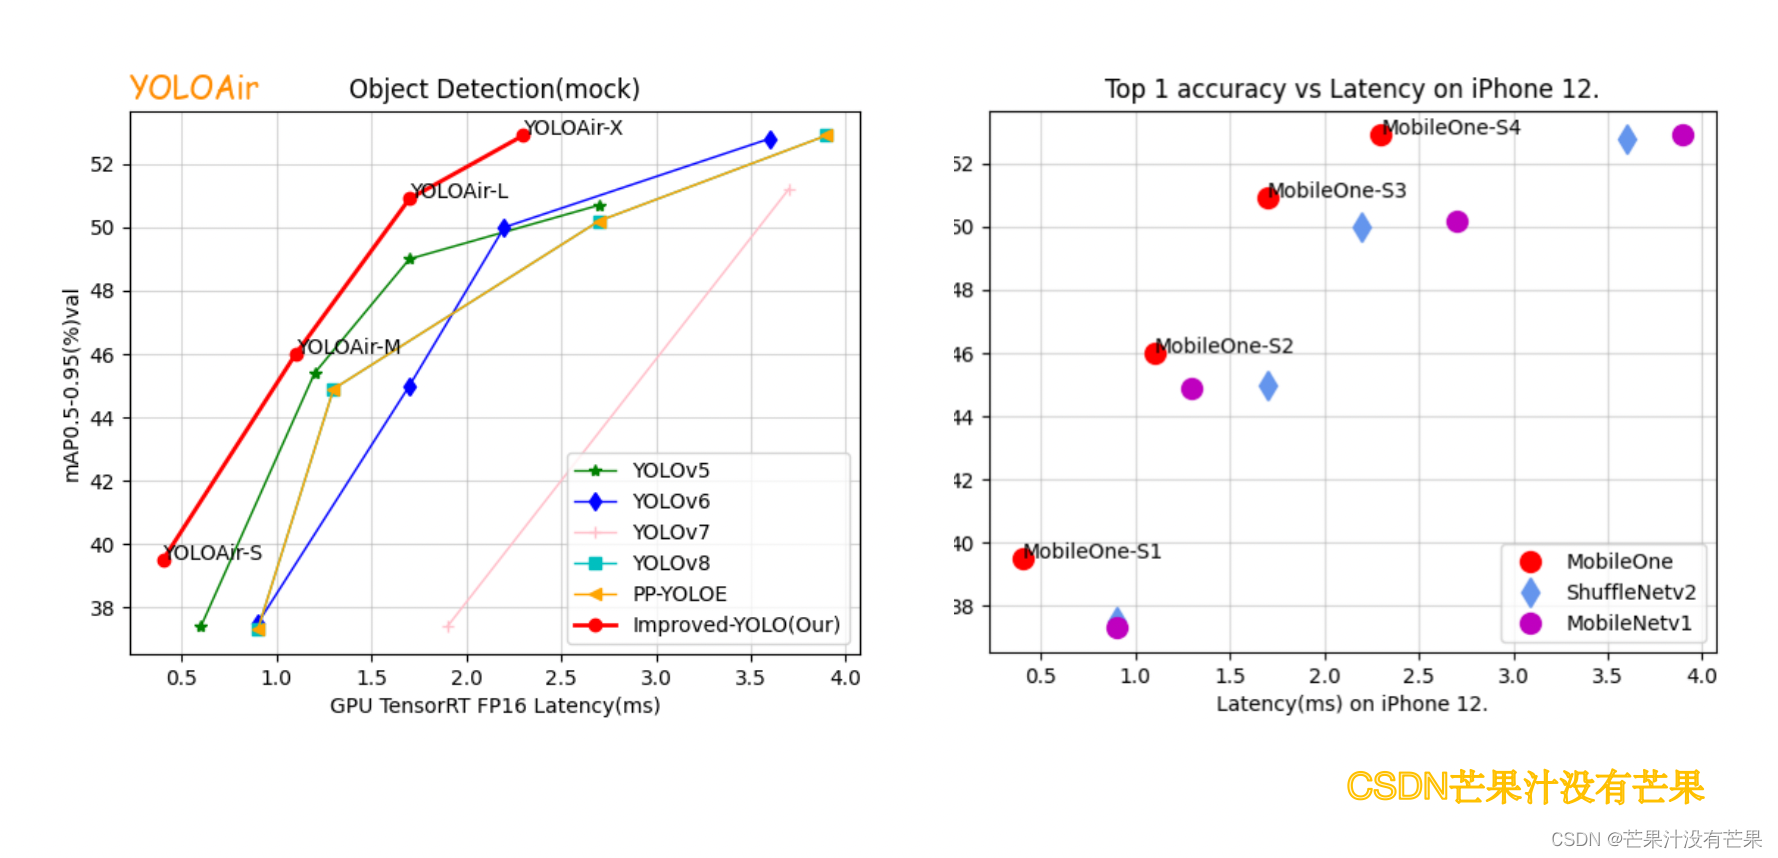
SCI期刊写作必备(二):代码|手把手绘制目标检测领域YOLO论文常见的性能对比折线图,一键生成YOLOv7等主流论文同款图表,包含多种不同功能风格对比图表
绘制一个原创属于自己的YOLO模型性能对比图表 具体绘制操作参考:(附Python代码,直接一键生成,精度对比图表代码 ) 只需要改动为自己的mAP、Params、FPS、GFlops等数值即可,一键生成 多种图表风格📈,可以按需挑选 文章目录 绘制一个原创属于自己的YOLO模型性能对比图…...

synchronized 学习
学习源: https://www.bilibili.com/video/BV1aJ411V763?spm_id_from333.788.videopod.episodes&vd_source32e1c41a9370911ab06d12fbc36c4ebc 1.应用场景 不超卖,也要考虑性能问题(场景) 2.常见面试问题: sync出…...

【OSG学习笔记】Day 18: 碰撞检测与物理交互
物理引擎(Physics Engine) 物理引擎 是一种通过计算机模拟物理规律(如力学、碰撞、重力、流体动力学等)的软件工具或库。 它的核心目标是在虚拟环境中逼真地模拟物体的运动和交互,广泛应用于 游戏开发、动画制作、虚…...

【OSG学习笔记】Day 16: 骨骼动画与蒙皮(osgAnimation)
骨骼动画基础 骨骼动画是 3D 计算机图形中常用的技术,它通过以下两个主要组件实现角色动画。 骨骼系统 (Skeleton):由层级结构的骨头组成,类似于人体骨骼蒙皮 (Mesh Skinning):将模型网格顶点绑定到骨骼上,使骨骼移动…...
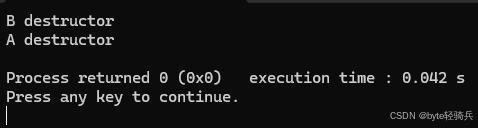
【C++特殊工具与技术】优化内存分配(一):C++中的内存分配
目录 一、C 内存的基本概念 1.1 内存的物理与逻辑结构 1.2 C 程序的内存区域划分 二、栈内存分配 2.1 栈内存的特点 2.2 栈内存分配示例 三、堆内存分配 3.1 new和delete操作符 4.2 内存泄漏与悬空指针问题 4.3 new和delete的重载 四、智能指针…...

Redis:现代应用开发的高效内存数据存储利器
一、Redis的起源与发展 Redis最初由意大利程序员Salvatore Sanfilippo在2009年开发,其初衷是为了满足他自己的一个项目需求,即需要一个高性能的键值存储系统来解决传统数据库在高并发场景下的性能瓶颈。随着项目的开源,Redis凭借其简单易用、…...

解读《网络安全法》最新修订,把握网络安全新趋势
《网络安全法》自2017年施行以来,在维护网络空间安全方面发挥了重要作用。但随着网络环境的日益复杂,网络攻击、数据泄露等事件频发,现行法律已难以完全适应新的风险挑战。 2025年3月28日,国家网信办会同相关部门起草了《网络安全…...

【Android】Android 开发 ADB 常用指令
查看当前连接的设备 adb devices 连接设备 adb connect 设备IP 断开已连接的设备 adb disconnect 设备IP 安装应用 adb install 安装包的路径 卸载应用 adb uninstall 应用包名 查看已安装的应用包名 adb shell pm list packages 查看已安装的第三方应用包名 adb shell pm list…...
打手机检测算法AI智能分析网关V4守护公共/工业/医疗等多场景安全应用
一、方案背景 在现代生产与生活场景中,如工厂高危作业区、医院手术室、公共场景等,人员违规打手机的行为潜藏着巨大风险。传统依靠人工巡查的监管方式,存在效率低、覆盖面不足、判断主观性强等问题,难以满足对人员打手机行为精…...

数据库正常,但后端收不到数据原因及解决
从代码和日志来看,后端SQL查询确实返回了数据,但最终user对象却为null。这表明查询结果没有正确映射到User对象上。 在前后端分离,并且ai辅助开发的时候,很容易出现前后端变量名不一致情况,还不报错,只是单…...

深入解析 ReentrantLock:原理、公平锁与非公平锁的较量
ReentrantLock 是 Java 中 java.util.concurrent.locks 包下的一个重要类,用于实现线程同步,支持可重入性,并且可以选择公平锁或非公平锁的实现方式。下面将详细介绍 ReentrantLock 的实现原理以及公平锁和非公平锁的区别。 ReentrantLock 实现原理 基本架构 ReentrantLo…...