基于linux5.15.5的IMX 参考手册 ---21
基于linux5.15.5的IMX 参考手册 — 21
10.5.2高清多媒体接口(HDMI)和显示端口(DP)概述
10.5.2.1测试名称
•mxc_cec_test.out
10.5.2.1.1位置
/unit_tests/HDMI/
10.5.2.1.2功能
验证HDMI CEC功能并向HDMI接收器发送断电命令。
10.5.2.1.3配置
对于mxc_cec_test.out 在目标板defconfig文件中添加以下行:
CONFIG_MXC_HDMI_CEC=y
硬件应支持HDMI,电视应支持HDMI CEC
10.5.2.1.4用例和预期输出
./mxc_cec_test.out
10.5.3视频处理单元(VPU)
10.5.3.1 i.MX 6测试
• autorun-vpu.sh
• mxc_vpu_test.out
10.5.3.1.1位置
/unit_test/VPU/
10.5.3.1.2功能
VPU测试在视频处理单元(VPU)上执行以下选项:
•解码一个流,并显示在LCD上。
•解码流并保存到文件。
•使用配置文件解码流。
•编码一个YUV流并保存到一个文件。
•从相机编码图像和解码它显示在LCD上。
•同时解码不同格式的多个流。
•解码和编码同时进行。
•输出到电视输出。
•用VDI(通过IPU的HW去交错)测试VPU。
10.5.3.1.3配置
此测试需要在/usr/lib/和LCD display下面libvpu.so。这个测试需要i.MX 6QuadPlus/Quad/Dual SoC。
10.5.3.1.4用例和预期输出
To test MPEG-4 decode and save to file:
./mxc_vpu_test.out -D "-i /usr/vectors/file.m4v -f 0 -o out.yuv"
To test H.263 decode and save to file:
./mxc_vpu_test.out -D "-i /usr/vectors/file.263 -f 1 -o out.yuv"
To test H.264 decode and save to file:
./mxc_vpu_test.out -D "-i /usr/vectors/file.264 -f 2 -o out.yuv"
Decode a stream using a config file.
Change options in config file, e.g, config_dec. Input correct input filename, output filename, format,
./mxc_vpu_test.out -C config_dec
Encode a YUV stream and save to a file.
To test MPEG-4 encode and save to a file:
./mxc_vpu_test.out -E "-i file.yuv -w 240 -h 320 -f 0 -o file.mpeg4"
To test H.263 encode and save to a file:
./mxc_vpu_test.out -E "-i file.yuv -w 240 -h 320 -f 1 -o file.263"
To test H.264 encode and save to a file:
./mxc_vpu_test.out -E "-i file.yuv -w 240 -h 320 -f 2 -o file.264"
Encode an image from the camera and decode it to display on the LCD.
To encode an MPEG4 image from the camera and display on the LCD: that
./mxc_vpu_test.out -L "-f 0 -w 1280 -h 720"
To encode an H263 image from the camera and display on the LCD:
./mxc_vpu_test.out -L "-f 1 -w 1280 -h 720"
To encode an H264 image from the camera and display on the LCD:
./mxc_vpu_test.out -L "-f 2 -w 1280 -h 720"
Decode multiple streams with different formats simultaneously.
Decoder one H264 and one MPEG4 streams.
./mxc_vpu_test.out -D "-i/vectors/file.264 -f 2" -D "-i ./akiyo.mp4 -f 0 -o akiyo.yuv"
Decode and encode simultaneously.
Encode one MPEG-4 stream and decode one H.264 stream simultaneously.
./mxc_vpu_test.out -E "-w 176 -h 144 -f 0 -o enc.m4v" -D "-i/vectors/file.264 -f
Test VPU with TV out.
Decoder one stream as normal VPU test. For example, H264 video stream:
./mxc_vpu_test.out -D "-i filename -f 2"
Test VPU with VDI (HW deinterlace via IPU).
Select one stream with top and bottom fields are interlaced.
av_stress2_dsmcc4m_1_C1_V11_A6.mp4_track1.h264
To decode the stream and display on LCD:
./mxc_vpu_test.out -D "-i av_stress2_dsmcc4m_1_C1_V11_A6.mp4_track1.h264 -f2"
To decode the stream and display on LCD using high motion stream video De Interlacing algorithm:
./mxc_vpu_test.out -D "-i av_stress2_dsmcc4m_1_C1_V11_A6.mp4_track1.h264 -v h -f2"
To decode the stream and display on LCD using low motion stream video De Interlacing algorithm:
./mxc_vpu_test.out -D "-i av_stress2_dsmcc4m_1_C1_V11_A6.mp4_track1.h264 -v l -f2"
To decode the stream and display on LCD having input in NV12 pixel format:
./mxc_vpu_test.out -D "-i av_stress2_dsmcc4m_1_C1_V11_A6.mp4_track1.h264 -v
10.5.3.2 i.MX 8M Quad测试
10.5.3.2.1位置
/ unit_test VPU/hantro
10.5.3.2.2功能
VPU测试在VPU上执行以下选项:
•解码流并保存到文件。
10.5.3.2.3用例和预期输出
解码不同编解码器示例:
./autorun-vpu.sh
Decode one stream and display on the LCD.
To test MPEG-4 decode and display to screen:
./mxc_vpu_test.out -D "-i /usr/vectors/file.m4v -f 0"
To test H.263 decode and display to screen:
./mxc_vpu_test.out -D "-i /usr/vectors/file.263 -f 1"
To test H.264 decode and display to screen:
./mxc_vpu_test.out -D "-i /usr/vectors/file.264 -f 2"
You can get the mp4 test file from the imx-test.git server.
It is located under test/mxc_vpu_test/configs/akiyo.mp4.
Decode a stream and save to a file.
/unit_tests/VPU/hantro/g2dec -P -b -ibs -Oout.yuv test.hevc
/unit_tests/VPU/hantro/g2dec -P -b -iivf -Oout.yuv test.vp9
/unit_tests/VPU/hantro/hx170dec -P -Oout.yuv test.h264
/unit_tests/VPU/hantro/mx170dec -P -Oout.yuv test.mpeg4
/unit_tests/VPU/hantro/m2x170dec -P -Oout.yuv test.mpeg2
/unit_tests/VPU/hantro/vx170dec -P -Oout.yuv test.vc1
/unit_tests/VPU/hantro/vp8x170dec -P -Oout.yuv test.vp8
/unit_tests/VPU/hantro/vp6dec -P -Oout.yuv test.vp6
/unit_tests/VPU/hantro/rvx170dec -P -Oout.yuv test.rv
/unit_tests/VPU/hantro/jx170dec -P -Oout.yuv test.jpg
/unit_tests/VPU/hantro/ax170dec -P -Oout.yuv test.avs
10.5.3.3 i.m mx 8M Mini的测试
10.5.3.3.1位置
/ unit_test VPU / hantro
10.5.3.3.2功能
VPU测试在VPU上执行以下选项:
•解码流并保存到文件。
•编码一个YUV流并保存到一个文件。
10.5.3.3.3用例和预期输出
解码器示例:
/unit_tests/VPU/hantro/g2dec -P -b -ibs -Oout.yuv test.hevc
/unit_tests/VPU/hantro/g2dec -P -b -iivf -Oout.yuv test.vp9
/unit_tests/VPU/hantro/hx170dec -P -Oout.yuv test.h264
/unit_tests/VPU/hantro/vp8x170dec -P -Oout.yuv test.vp8
编码器示例:
/unit_tests/VPU/hantro/h264_testenc -w176 -h144 -o temp.h264 -i test.yuv
/unit_tests/VPU/hantro/vp8_testenc -w176 -h144 -o temp.h264 -i test.yuv
10.5.3.4 i.m ax 8QuadXPlus和8QuadMax测试
10.5.3.4.1位置
/unit_test/V4L2_VPU/
10.5.3.4.2功能
VPU测试在VPU上执行以下选项:
•解码流并保存到文件。
•编码一个YUV流并保存到一个文件。
10.5.3.4.3用例和预期输出
解码器的示例,它有助于列出不同编解码器的’ifmt’值:
/unit_tests/V4L2_VPU/mxc_v4l2_vpu_dec.out ifile test.hevc ifmt 13 ofmt 1 ofile out.yuv
/unit_tests/V4L2_VPU/mxc_v4l2_vpu_dec.out ifile test.h264 ifmt 1 ofmt 1 ofile out.yuv
编码器示例(仅H.264):
/unit_tests/V4L2_VPU/mxc_v4l2_vpu_enc.out ifile --key 0 --name input_720p.nv12 --fmt nv12 --size 1280
720 --loop 1 encoder --key 1 --source 0 --size 1280
720 --framerate 30 --bitrate 3000000 --lowlatency 1 ofile --key 2 --source 1 --name test.h264
10.5.4 JPEG编解码器
10.5.4.1测试名称
•encoder_test
•decoder_test
10.5.4.1.1位置
/ unit_test / JPEG
10.5.4.1.2功能
encoder_test接收一个支持格式之一的原始文件作为输入,并生成一个JPEG文件作为输出,其分辨率和像素格式与输入相同。应用程序在一个V4L2输出缓冲区中填充原始文件,将其放入驱动程序中,并期望在一个捕获缓冲区中对JPEG图像出队列。
decoder_test接收一个支持格式之一的JPEG文件作为输入,并生成一个原始文件作为输出,其分辨率和像素格式与输入相同。应用程序在一个V4L2输出缓冲区中填充jpeg文件,将其放入驱动程序中,并期望在一个捕获缓冲区中对原始图像进行出队列。
10.5.4.1.3配置
无特殊配置。
10.5.4.1.4用例和预期输出
运行应用程序来获取使用情况:
./decoder_test.out
用法:
./decoder_test.out -d </dev/videoX> -f <INPUT_FILENAME> -w <width> -h <height> -p <pixel_format>
支持格式:
yuv420: 2-planes, Y and UV-interleaved, same as NV12
yuv422: packed YUYV
rgb24: packed RGB
yuv444: packed YUV
gray: Y8 or Y12 or Single Component
argb: packed ARGB
输入文件必须是与指定的宽度、高度和像素格式相匹配的JPEG文件。输出是当前文件夹中名为“outfile”的原始文件,具有与输入相同的宽度、高度和像素格式。
./encoder_test.out
用法:
./encoder_test.out -d </dev/videoX> -f <INPUT_FILENAME> -w <width> -h <height> -p <pixel_format>
支持格式:
yuv420: 2-planes, Y and UV-interleaved, same as NV12
yuv422: packed YUYV
rgb24: packed RGB
yuv444: packed YUV
gray: Y8 or Y12 or Single Component
argb: packed ARGB
输入文件必须是符合指定宽度、高度和像素格式的原始文件。输出是当前文件夹中名为“outfile.jpeg”的JPEG文件,具有与输入相同的宽度、高度和像素格式。
10.6音频
10.6.1 高级Linux声音架构(ALSA)片上系统(ASoC)声音
10.6.1.1测试名称
•mxc_tuner_test.out
10.6.1.1.1位置
/ unit_test / ALSA /
10.6.1.1.2功能
使用ALSA测试音频功能。
10.6.1.1.3配置
ALSA支持在所有i.MX的测试播放,录音和扬声器测试。要使用此调谐器测试,它需要调谐器硬件只在i.MX 6自动参考板上可用
10.6.1.1.4用例和预期输出
10.6.2异步采样速率转换器(ASRC)
10.6.2.1测试名称
•mxc_asrc_test.out
10.6.2.1.1位置
/unit_tests/ASRC
10.6.2.1.2功能
将WAV转换为不同的采样率。
10.6.2.1.3配置
没有
10.6.2.1.4用例和预期输出
#/unit_tests/ASRC/mxc_asrc_test.out -to 48000 /unit_tests/ASRC/audio8k16S.wav
audio48k16S.wav
---- Running < /unit_tests/ASRC/mxc_asrc_test.out > test ----
Pair A requested
All tests passed with success
mxc_asrc_test.out的更多用法。可以通过以下命令获取:
#/unit_tests/ASRC/mxc_asrc_test.out -h
---- Running < /unit_tests/ASRC/mxc_asrc_test.out > test ----
**************************************************
* Test aplication for ASRC
* Options :
-to <output sample rate> <origin.wav$gt; <converted.wav>
<input clock source> <output clock source>
input clock source types are:
0 -- INCLK_NONE
1 -- INCLK_ESAI_RX
2 -- INCLK_SSI1_RX
3 -- INCLK_SSI2_RX
4 -- INCLK_SPDIF_RX
5 -- INCLK_MLB_CLK
6 -- INCLK_ESAI_TX
7 -- INCLK_SSI1_TX
8 -- INCLK_SSI2_TX
9 -- INCLK_SPDIF_TX
10 -- INCLK_ASRCK1_CLK
default option for output clock source is 0
output clock source types are:
0 -- OUTCLK_NONE
1 -- OUTCLK_ESAI_TX
2 -- OUTCLK_SSI1_TX
3 -- OUTCLK_SSI2_TX
4 -- OUTCLK_SPDIF_TX
5 -- OUTCLK_MLB_CLK
6 -- OUTCLK_ESAI_RX
7 -- OUTCLK_SSI1_RX
8 -- OUTCLK_SSI2_RX
9 -- OUTCLK_SPDIF_RX
10 -- OUTCLK_ASRCK1_CLK
default option for output clock source is 10
**************************************************
10.7安全
10.7.1显示内容完整性检查器(DCIC)
10.7.1.1测试名称
•mxc_dcic_test.out
10.7.1.1.1位置
/ unit_test / DCIC /
10.7.1.1.2功能
DCIC的目标是验证发送到显示器的安全关键信息是否被损坏。
10.7.1.1.3配置
没有
10.7.1.1.4用例和预期输出
# ./mxc_dcic_test.out -bw 18 -dev 1
mxc_dcic_test.out的预期输出:
More usages for mxc_asrc_test.out can be obtained by the following command:
Opened fb0
open /dev/dcic1
bpp=16, bus_width=18
Config ROI=1
Config ROI=3
Config ROI=5
ROI=0,crcRS=0x0, crcCS=0x0
ROI=1,crcRS=0x6cd6b18d, crcCS=0x6cd6b18d
ROI=2,crcRS=0x0, crcCS=0x0
ROI=3,crcRS=0xc9da7ae6, crcCS=0xc9da7ae6
ROI=4,crcRS=0x0, crcCS=0x0
ROI=5,crcRS=0xb5ba1453, crcCS=0xb5ba1453
ROI=6,crcRS=0x0, crcCS=0x0
ROI=7,crcRS=0x0, crcCS=0x0
ROI=8,crcRS=0x0, crcCS=0x0
ROI=9,crcRS=0x0, crcCS=0x0
ROI=10,crcRS=0x0, crcCS=0x0
ROI=11,crcRS=0x0, crcCS=0x0
ROI=12,crcRS=0x0, crcCS=0x0
ROI=13,crcRS=0x0, crcCS=0x0
ROI=14,crcRS=0x0, crcCS=0x0
ROI=15,crcRS=0x0, crcCS=0x0
All ROI CRC check success!
10.7.2 SIM
10.7.2.1测试名称
•mxc_sim_test.out
10.7.2.1.1位置
/unit_test/SIM/
10.7.2.1.2功能
SIM卡接口基本测试。
10.7.2.1.3配置
没有
10.7.2.1.4用例和预期输出
/unit_tests/mxc_sim_test.out
Expected output
atr[0]= 0x3b atr[1]= 0x68 atr[2]= 0x0 atr[3]= 0x0 atr[4]= 0x0 atr[5]= 0x73 atr[6]=
0xc8
atr[7]= 0x40 atr[8]= 0x0 atr[9]= 0x0 atr[10]= 0x90 atr[11]= 0x0
rx[0] = 0x6e rx[1] = 0x0
rx[0] = 0x6d rx[1] = 0x0
rx[0] = 0x6e rx[1] = 0x0
10.7.3 SNVS实时时钟(SRTC)
10.7.3.1测试名称
•autorun-rtc.sh
•rtctest.out
•rtcwakeup.out
10.7.3.1.1位置
/ unit_test / SRTC /
10.7.3.1.2功能
这些测试检查Real Time Clock (RTC)模块,该模块用于保存时间和日期。它提供了一个认证的时间
用户,可以在检测到篡改计数器时发出警报。
10.7.3.1.3配置
为了autorun-rtc.sh, rtctest.out 和rtcwakeup.out能正常工作。在目标板defconfig文件中添加以下行:
CONFIG_RTC_DRV_SNVS = y
10.7.3.1.4用例和预期输出
/autorun-rtc.sh
or
./rtctest.out $lt;arg>
--full run all tests
--no-periodic don't run periodic interrupt tests
or
./rtcwakeup.out -d rtc0 -m mem -s 10
Expected output
autorun-rtc.sh: Exit with PASS results.
rtctest.out: The program ends with "Test complete" status.
rtcwakeup.out: System is wakeup after 10s.
i.MX 7D Sabre SD的预期输出
•autorun-rtc.sh
autorun-rtc.sh
i.MX7D
Checking for devnode: /dev/rtc0
autorun-rtc.sh: PASS devnode found: /dev/rtc0
Running test case: ./rtctest.out --no-periodic
RTC Driver Test Example.
Counting 5 update (1/sec) interrupts from reading /dev/rtc0: 1 2 3 4 5
Again, from using select(2) on /dev/rtc0: 1 2 3 4 5
Current RTC date/time is 21-2-2017, 23:13:07.
Alarm time now set to 23:13:12.
Waiting 5 seconds for alarm... okay. Alarm rang.
*** Test complete ***
Typing "cat /proc/interrupts" will show 1 more events on IRQ rtc.
autorun-rtc.sh: PASS test case: ./rtctest.out --no-periodic
rtc irqs before running unit test: 303
rtc irqs after running unit test: 314
so rtc irqs during test was:
11
checking rtc interrupts PASS
autorun-rtc.sh: Exiting PASS
• rtctest.out --full./rtctest.out --full
RTC Driver Test Example.
Counting 5 update (1/sec) interrupts from reading /dev/rtc0: 1 2 3 4 5
Again, from using select(2) on /dev/rtc0: 1 2 3 4 5
Current RTC date/time is 21-2-2017, 23:14:48.
Alarm time now set to 23:14:53.
Waiting 5 seconds for alarm... okay. Alarm rang.
Periodic IRQ rate was 1Hz.
Counting 20 interrupts at:
2Hz: 1 2 3 4 5 6 7 8 9 10 11 12 13 14 15 16 17 18 19 20
4Hz: 1 2 3 4 5 6 7 8 9 10 11 12 13 14 15 16 17 18 19 20
8Hz: 1 2 3 4 5 6 7 8 9 10 11 12 13 14 15 16 17 18 19 20
16Hz: 1 2 3 4 5 6 7 8 9 10 11 12 13 14 15 16 17 18 19 20
32Hz: 1 2 3 4 5 6 7 8 9 10 11 12 13 14 15 16 17 18 19 20
64Hz: 1 2 3 4 5 6 7 8 9 10 11 12 13 14 15 16 17 18 19 20
*** Test complete ***
Typing "cat /proc/interrupts" will show 131 more events on IRQ rtc.
• rtctest.out --no-periodic
•
/rtctest.out --no-periodic
RTC Driver Test Example.
Counting 5 update (1/sec) interrupts from reading /dev/rtc0: 1 2 3 4 5
Again, from using select(2) on /dev/rtc0: 1 2 3 4 5
Current RTC date/time is 21-2-2017, 23:16:24.
Alarm time now set to 23:16:29.
Waiting 5 seconds for alarm... okay. Alarm rang.
*** Test complete ***
Typing "cat /proc/interrupts" will show 1 more events on IRQ rtc.
• rtcwakeup.out -d rtc0 -m mem -s 10
•
./rtcwakeup.out -d rtc0 -m mem -s 10
rtcwakeup.out: wakeup from "mem" using rtc0 at Wed Feb 22 23:17:29 2017
PM: Syncing filesystems ... done.
Freezing user space processes ... (elapsed 0.001 seconds) done.
Freezing remaining freezable tasks ... (elapsed 0.001 seconds) done.
Suspending console(s) (use no_console_suspend to debug)
PM: suspend of devices complete after 639.100 msecs
PM: suspend devices took 0.640 seconds
PM: late suspend of devices complete after 1.236 msecs
PM: noirq suspend of devices complete after 1.202 msecs
Disabling non-boot CPUs ...
CPU1: shutdown
Turn off Mega/Fast mix in DSM
Enabling non-boot CPUs ...
CPU1 is up
PM: noirq resume of devices complete after 0.756 msecs
imx-sdma 30bd0000.sdma: loaded firmware 4.2
PM: early resume of devices complete after 0.972 msecs
PM: resume of devices complete after 483.302 msecs
PM: resume devices took 0.480 seconds
Restarting tasks ... done.
相关文章:

基于linux5.15.5的IMX 参考手册 ---21
基于linux5.15.5的IMX 参考手册 — 21 10.5.2高清多媒体接口(HDMI)和显示端口(DP)概述 10.5.2.1测试名称 •mxc_cec_test.out 10.5.2.1.1位置 /unit_tests/HDMI/ 10.5.2.1.2功能 验证HDMI CEC功能并向HDMI接收器发送断电命令。 1…...
Android Dalvik虚拟机 堆初始化流程
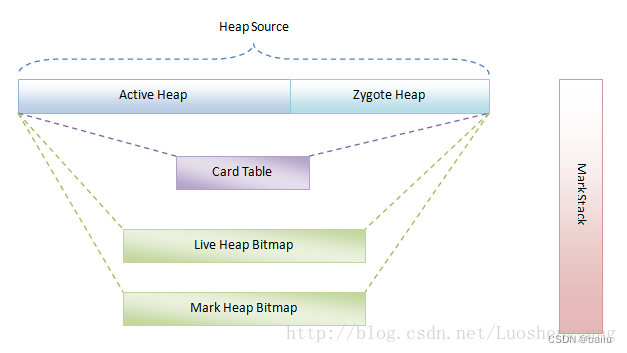
前言 上篇文章介绍了dalvik虚拟机启动流程,在dalvik虚拟机启动时调用了dvmGcStartup来启动堆。 本文介绍我们在日常开发使用Java时的堆创建流程。 Dalvik堆介绍 Dalvik虚拟机中,堆是由heap[0] Active堆和heap[1] Zygote堆两部分组成的。其中ÿ…...
——开发前必备基本常识)
0讲(补)——开发前必备基本常识
前言 专栏内容持续补充更新,目前正在进行优惠活动 目录 前言 一、函数的声明和定义 二、预编译 三、串口打印中的printf函数的使用...

JS学习笔记
1.WebAPIs简介导读Web APIs 和JS 基础关联性JS 基础阶段以及 Web APIs 阶段JS基础学习 ECMAScript 基础语法为后面作铺垫,Web APIs 是JS 的应用,大量使用JS基础语法做交互效果①JS 基础阶段我们学习的是ECMAScript 标准规定的基本语法要求同学们掌握JS 基…...

linux005之用户、组管理
linux用户管理简介: 任何使用linux系统的用户,都必须使用一个合法的账号和密码,账号和密码一般都是超级管理员创建,当然普通用户也可以创建用户,前提是必须拥有创建用户权限。 root是linux系统中默认创建的超级用户 创…...
列线图工具_Nomogram
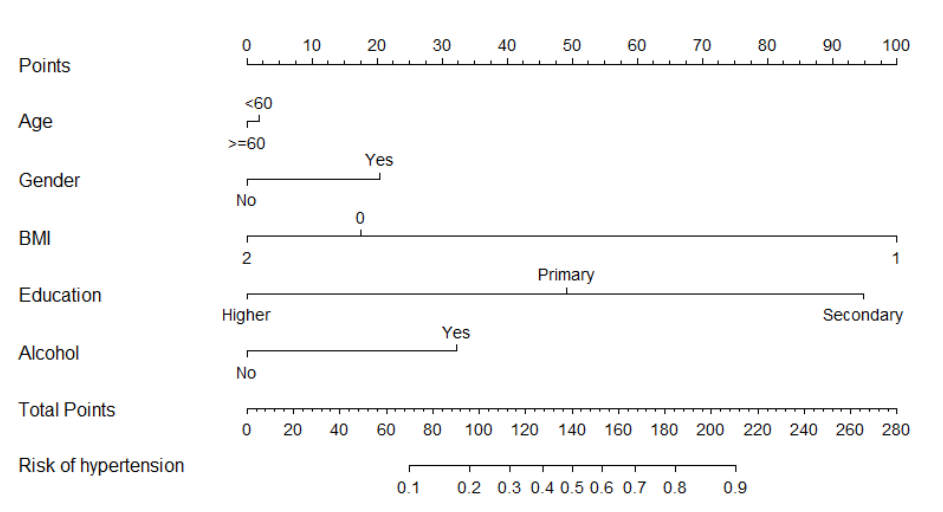
定义 列线图是一种相对传统的分析方法,用于展示自变量和因变量的线性关系,及其特征的重要程度。 现在用SHAP,和机器学习库中的 Feature importance 工具可以实现类似甚至更好效果。不过很多传统的研究领域比较认这种方法。 列线图工具建立在…...
【C++】类和对象(一)
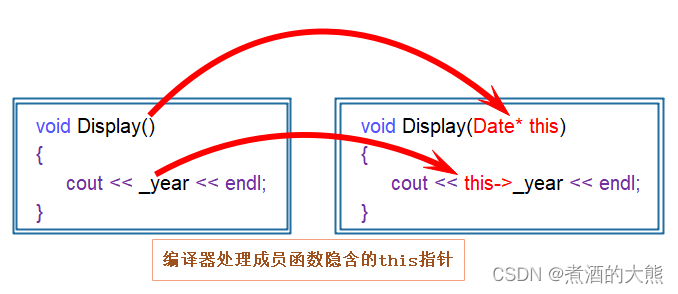
目录一、面向过程和面向对象初步认识二、类的引入三、类的定义四、类的访问限定符及封装4.1、访问限定符4.2、封装五、类的作用域六、类的实例化七、类对象的大小八、this指针8.1、this指针的引出8.2、this指针的特性8.3、C语言和C实现Stack的对比一、面向过程和面向对象初步认…...
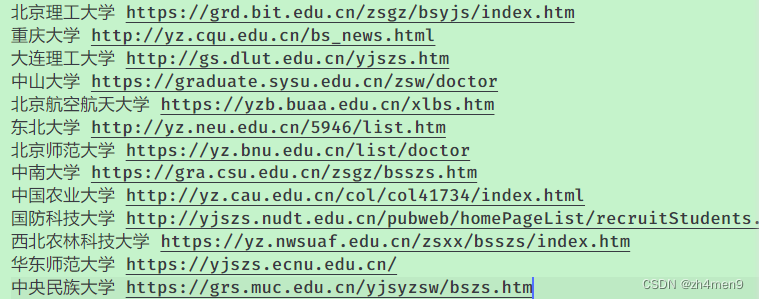
Python获取搜索引擎结果
前言 想快速获取各个高校的博士招生网站,于是通过python先获取出有可能包含高校博士招生网站的URL,然后通过人为筛选得到了想要的招生网站(注意,并非直接爬取,是间接获取的)。 整理了一份网站名单&#x…...
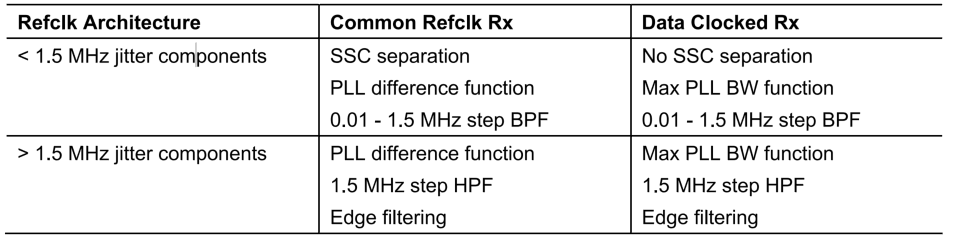
2.4.8 PCIe——物理逻辑层——REFCLK
一、概述 pcie的参考时钟由板级输入,提供给IP内PHY层的PLL使用,由PLL产生core_clk和pipe_clk。 二、REFCLK产生方式 Serdes 所用时钟由 PHY 模块内的PLL生成,PLL的参考时钟可以由common clock(外部背板提供)、separ…...

树莓派4B arm64 搭建 docker+drone+gitea
树莓派4B arm64 搭建 dockerdronegitea 记录时间: 2023年02月10日 树莓派烧录 如何用树莓派搭建一台永久运行的个人服务器? https://mp.weixin.qq.com/s?__bizMzI5NjA0ODkwNA&mid2651847658&idx1&sn267a1257b43d4a76f2a081ed157b77f9&chksmf7b11…...

Java的JDBC编程
目录 1. 打开IDEA,新建Project 2. 引入依赖 (1)下载驱动包 (2)将驱动包导入Project 3. 编写代码 (1)创建数据源 (2)让代码和数据库服务器建立联系 (3&…...
)
CSS:块格式化上下文(BFC)
块格式化上下文是块级盒子的布局过程发生的区域,也是浮动元素与其他元素交互的区域。 块格式化上下文(BFC)的创建 满足以下条件将创建块格式化上下文: 根元素()浮动元素(float 值不为 none)绝对定位元素…...

paddle表情识别部署
表情识别模块1.环境部署1.1同样采用fastDeploy库1.2相关模型2.封装成静态库2.1参考[百度Paddle中PP-Mattingv2的部署并将之封装并调用一个C静态库](https://blog.csdn.net/weixin_43564060/article/details/128882099)2.2项目依赖添加2.3生成成功3.test3.1创建emotion_test项目…...
Python-第五天 Python函数
Python-第五天 Python函数一、函数介绍1. 什么事函数二、函数的定义1.函数的定义:2.案例三、函数的参数1.函数的传入参数2.案例升级四、函数的返回值1.什么是返回值2.返回值的语法3.None类型4.None类型的应用场景五、函数说明文档1.函数的说明文档2.在PyCharm中查看…...

【Python学习笔记】28.Python3 错误和异常
前言 作为 Python 初学者,在刚学习 Python 编程时,经常会看到一些报错信息,在前面我们没有提及,这章节我们会专门介绍。 Python3 错误和异常 Python 有两种错误很容易辨认:语法错误和异常。 Python assert…...

SQLServer 迁移到 MySQL 工具对比
我之所以会写这篇对比文章,是因为公司新产品研发真实经历过这个痛苦过程(传统基于 SQL Server开发的C/S 产品转为 MySQL云产品)。首次需要数据转换是测试环节,当时为了快速验证新研发云产品性能与结果准确性(算法类&am…...
)
分析finebi5.x仪表板组件获取数据过程(数据是数据集或者sql的)
首先仪表板的公共连接类似:http://localhost:37799/webroot/decision/link/Bo6B 当我们访问这个连接时,会来到FineLinkAction的getShareReport方法。 public String getShareReport(HttpServletRequest req, HttpServletResponse res, @FinePathVariable("linkId"…...

设计模式--适配器模式 Adapter Pattern
设计模式--适配器模式 Adapter Pattern适配器模式 Adapter Pattern1.1 基本介绍1.2 工作原理类适配器模式对象适配器模式接口适配器模式小结适配器模式 Adapter Pattern 1.1 基本介绍 (1)适配器模式将某个类的接口转换成为客户端期望的另一个接口表示&…...

PVE虚拟机篇-rest api
rest api官方介绍 Proxmox VE API rest api文档 rest api文档 rest api token 调用pve rest api ,有两种认证方式 Ticket Cookie Ticket Cookie的方式是最为推荐的,获取的方式为,通过post请求,发送用户名和密码到pve的server端获取tok…...

2022-2025学年面向中小学生的白名单全国性竞赛活动清单及官网地址链接
**资料来源:爬虫爬取。** 教育部办公厅 工业和信息化部办公厅关于公布 首批特色化示范性软件学院名单的通知 教育部办公厅 工业和信息化部办公厅关于公布首批特色化示范性软件学院名单的通知 - 中华人民共和国教育部政府门户网站 教育部办公厅关于2022-2025学年面向中小学生…...
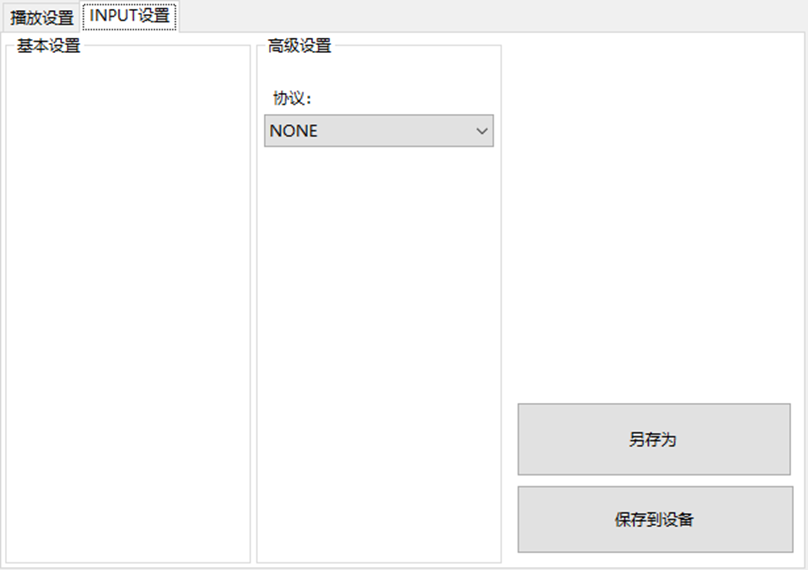
LBE-LEX系列工业语音播放器|预警播报器|喇叭蜂鸣器的上位机配置操作说明
LBE-LEX系列工业语音播放器|预警播报器|喇叭蜂鸣器专为工业环境精心打造,完美适配AGV和无人叉车。同时,集成以太网与语音合成技术,为各类高级系统(如MES、调度系统、库位管理、立库等)提供高效便捷的语音交互体验。 L…...

Cursor实现用excel数据填充word模版的方法
cursor主页:https://www.cursor.com/ 任务目标:把excel格式的数据里的单元格,按照某一个固定模版填充到word中 文章目录 注意事项逐步生成程序1. 确定格式2. 调试程序 注意事项 直接给一个excel文件和最终呈现的word文件的示例,…...
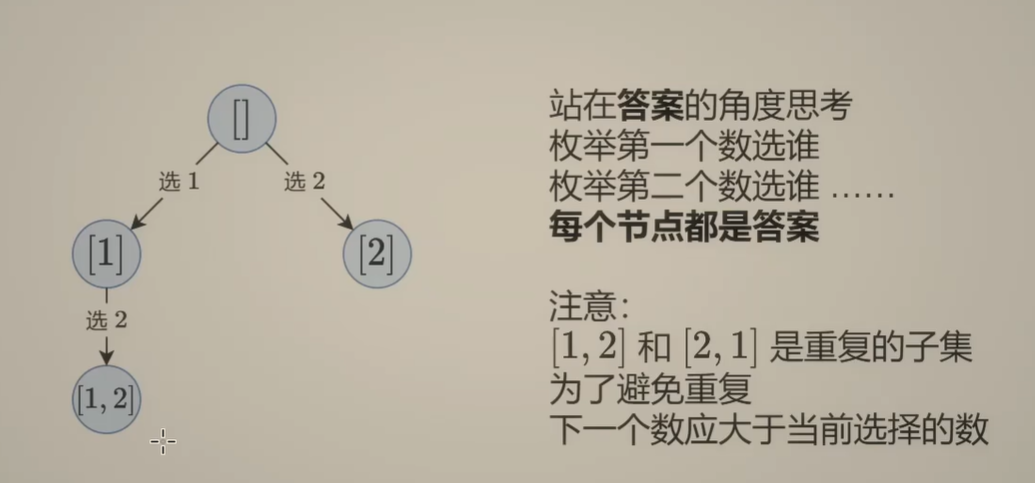
Day131 | 灵神 | 回溯算法 | 子集型 子集
Day131 | 灵神 | 回溯算法 | 子集型 子集 78.子集 78. 子集 - 力扣(LeetCode) 思路: 笔者写过很多次这道题了,不想写题解了,大家看灵神讲解吧 回溯算法套路①子集型回溯【基础算法精讲 14】_哔哩哔哩_bilibili 完…...

涂鸦T5AI手搓语音、emoji、otto机器人从入门到实战
“🤖手搓TuyaAI语音指令 😍秒变表情包大师,让萌系Otto机器人🔥玩出智能新花样!开整!” 🤖 Otto机器人 → 直接点明主体 手搓TuyaAI语音 → 强调 自主编程/自定义 语音控制(TuyaAI…...

CMake控制VS2022项目文件分组
我们可以通过 CMake 控制源文件的组织结构,使它们在 VS 解决方案资源管理器中以“组”(Filter)的形式进行分类展示。 🎯 目标 通过 CMake 脚本将 .cpp、.h 等源文件分组显示在 Visual Studio 2022 的解决方案资源管理器中。 ✅ 支持的方法汇总(共4种) 方法描述是否推荐…...

push [特殊字符] present
push 🆚 present 前言present和dismiss特点代码演示 push和pop特点代码演示 前言 在 iOS 开发中,push 和 present 是两种不同的视图控制器切换方式,它们有着显著的区别。 present和dismiss 特点 在当前控制器上方新建视图层级需要手动调用…...

JavaScript 数据类型详解
JavaScript 数据类型详解 JavaScript 数据类型分为 原始类型(Primitive) 和 对象类型(Object) 两大类,共 8 种(ES11): 一、原始类型(7种) 1. undefined 定…...
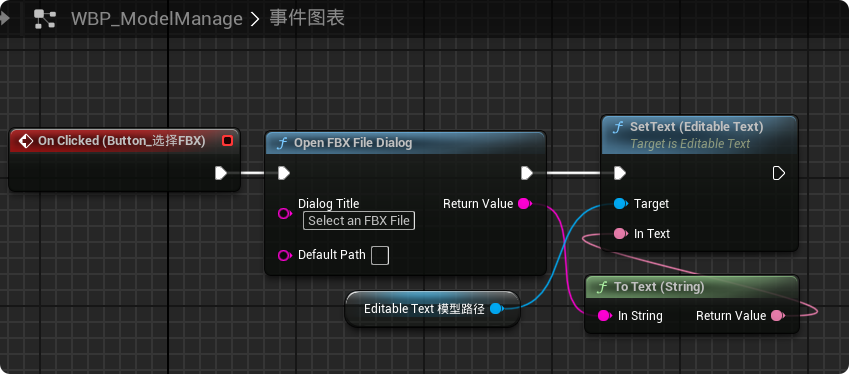
【UE5 C++】通过文件对话框获取选择文件的路径
目录 效果 步骤 源码 效果 步骤 1. 在“xxx.Build.cs”中添加需要使用的模块 ,这里主要使用“DesktopPlatform”模块 2. 添加后闭UE编辑器,右键点击 .uproject 文件,选择 "Generate Visual Studio project files",重…...

[特殊字符] 手撸 Redis 互斥锁那些坑
📖 手撸 Redis 互斥锁那些坑 最近搞业务遇到高并发下同一个 key 的互斥操作,想实现分布式环境下的互斥锁。于是私下顺手手撸了个基于 Redis 的简单互斥锁,也顺便跟 Redisson 的 RLock 机制对比了下,记录一波,别踩我踩过…...

嵌入式面试常问问题
以下内容面向嵌入式/系统方向的初学者与面试备考者,全面梳理了以下几大板块,并在每个板块末尾列出常见的面试问答思路,帮助你既能夯实基础,又能应对面试挑战。 一、TCP/IP 协议 1.1 TCP/IP 五层模型概述 链路层(Link Layer) 包括网卡驱动、以太网、Wi‑Fi、PPP 等。负责…...