list的简单模拟实现

文章目录
目录
文章目录
前言
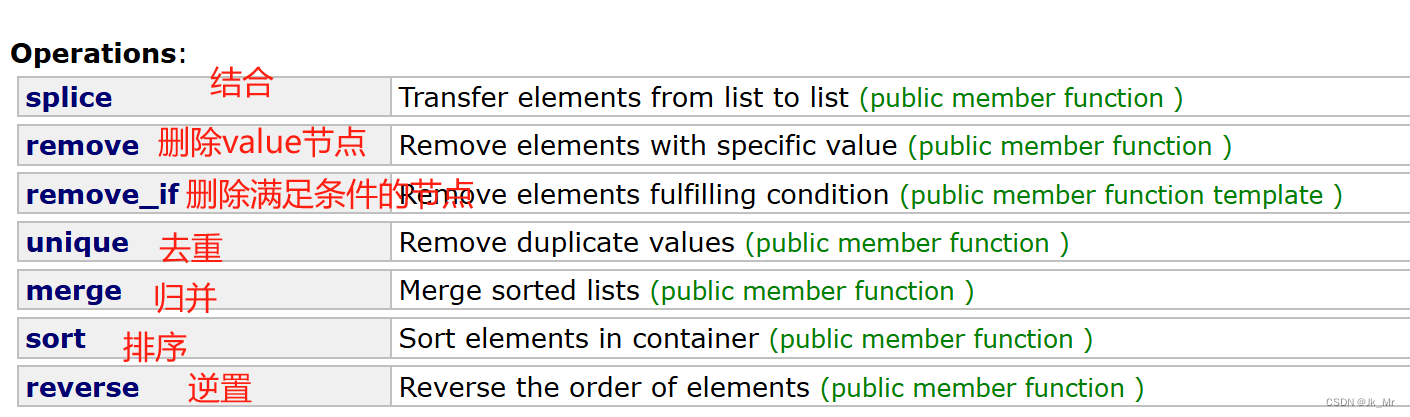
一、使用list时的注意事项
1.list不支持std库中的sort排序
2.去重操作
3.splice拼接
二、list的接口实现
1.源码中的节点
2.源码中的构造函数
3.哨兵位头节点
4.尾插和头插
5.迭代器*
5.1 迭代器中的operator++和--
5.2其他迭代器中的接口
5.3迭代器类的使用
5.4 前置后置--
5.5 list不支持重载+和-
5.6 operator->
6.const迭代器
6.1写俩个类实现const迭代器
6.2更简洁的const 迭代器
7.insert插入
8.erase删除节点
9.insert和erase的复用
9.1尾插
9.2尾删
9.3头插
9.4头删
10.析构函数
11.拷贝构造
12.operator=赋值操作
13.initializer_list构造
14.反向迭代器
前言
list是带头双向循环链表。是序列容器,允许在序列中的任何位置进行常数时间的插入和删除操作,并且可以在两个方向上进行迭代。list被实现为双向链表;双向链表可以将其包含的每个元素存储在不同且不相关的存储位置中。通过将每个元素与其前面的元素和后面的元素的链接关联起来,可以在内部保持排序。
一、使用list时的注意事项
1.list不支持std库中的sort排序
由于std库中sort内部是快排操作,涉及三数取中操作,需要迭代器可以相减。而由于list不支持迭代器相减操作 ,所以,不能使用std库中的sort排序。因为效率和空间问题,链表的空间不是连续的,实现迭代器相减操作非常影响效率。
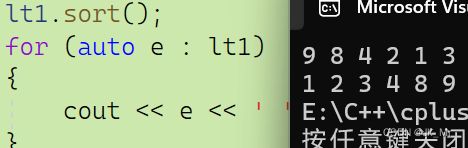
list想要进行排序就要使用它专门提供的操作:
默认升序:
#include <iostream>
using namespace std;
#include <list>
int main()
{list<int> lt1 = { 9,8,4,2,1,3 };for (auto e : lt1){cout << e << ' ';}cout << endl;lt1.sort();for (auto e : lt1){cout << e << ' ';}return 0;
}
降序:
使用greater<int>进行排序。也可以直接使用匿名对象(lt1.sort(greater<int>());)。
#include <iostream>
using namespace std;
#include <list>
int main()
{list<int> lt1 = { 9,8,4,2,1,3 };//lt1.sort(greater<int>());greater<int> gt;lt1.sort(gt);for (auto e : lt1){cout << e << ' ';}return 0;
}list中的排序是归并排序。在使用如果使用list排序,它的效率较vector的排序效率较低。所以大量数据时不建议使用list 的排序。
2.去重操作
操作中的去重是去掉重复的元素,但是前提是要进行排序:
void test_list02()
{list<int> lt1 = { 9,8,4,2,1,3 ,2,1,3};for (auto e : lt1){cout << e << ' ';}cout << endl;//直接调用去重lt1.unique();for (auto e : lt1){cout << e << ' ';}
}
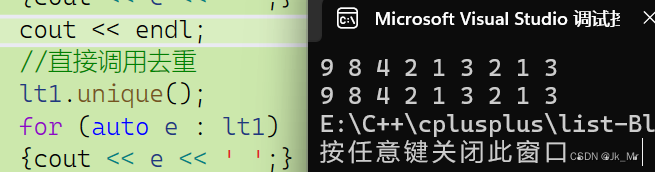
没有进行去重操作无法使得相同元素在一起。调用排序sort: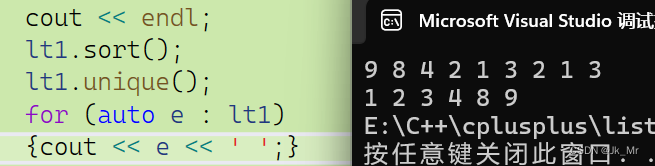
3.splice拼接
实际上就是转移另一个链表中的元素到目标链表的某个位置之前,可以转移一个或者整个链表。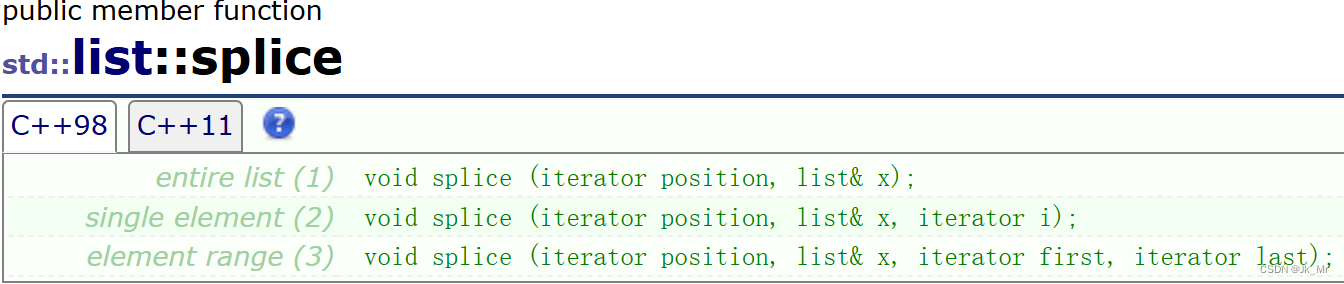
注意是将另一个链表中的节点直接拿过来,所以另一个链表中的元素在转移之后要去掉。
也可以将自己的元素转移到自己的某个位置 。
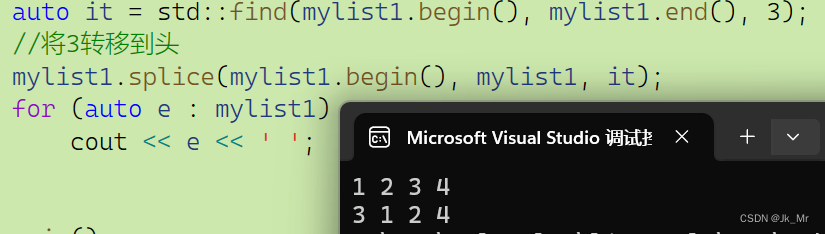
void test_list01()
{list<int> mylist1;for (int i = 1; i <= 4; i++){mylist1.push_back(i);  // 1 2 3 4}for (auto e : mylist1)cout << e << ' ';cout << endl;auto it = std::find(mylist1.begin(), mylist1.end(), 3);//将3转移到头mylist1.splice(mylist1.begin(), mylist1, it);for (auto e : mylist1)cout << e << ' ';
}
二、list的接口实现
1.源码中的节点
list一般是带头双向循环链表,所以节点的结构是俩个指针:
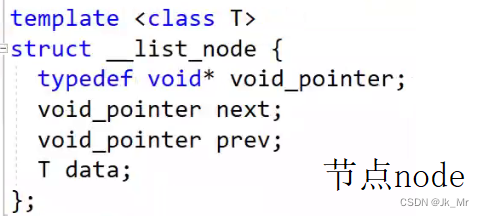 源码中用void*指针,在后面使用时都要进行强转成节点类型的指针。
![]()
我们在实现过程中不必这样,直接使用模板定下指针的类型:
// List的节点类template<class T>struct ListNode{ListNode<T>* _prev;ListNode<T>* _next;T _val;};再看整个list框架,迭代器刚开始看不懂,往下翻发现有个节点的指针:
link_type是什么?可以通过vs中ctrl+F功能进行查找,往上翻:
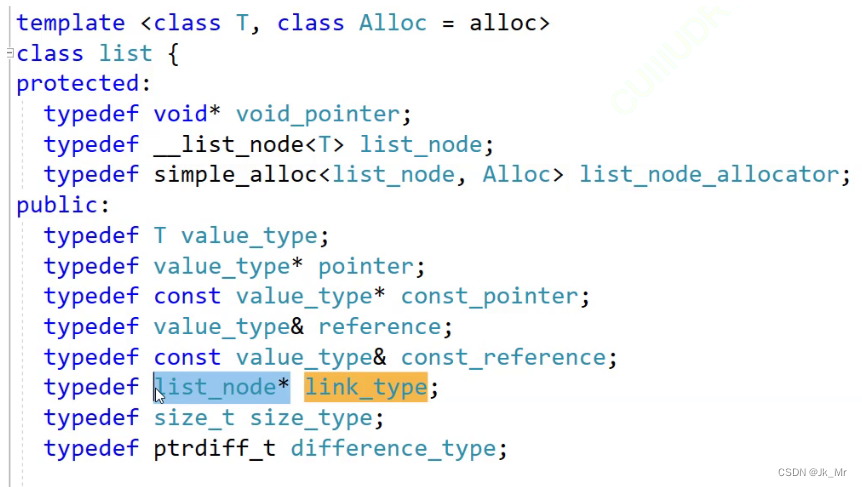
link_type实际上就是节点的指针。
#pragma once
#include <iostream>
using namespace std;namespace mylist
{template<class T>struct ListNode{ListNode<T>* _prev;ListNode<T>* _next;T val;};template<class T>class list{typedef ListNode<T> Node;private:Node* _head;};
}为什么节点不使用class?原因是因为节点的成员变量和成员函数需要频繁访问,使用public和友元也可以,但是这样实际上和struct一样,并且使用public和友元实际上破坏了封装。
2.源码中的构造函数
empty_initialize()从字面意思上理解就是空节点初始化。
观察:
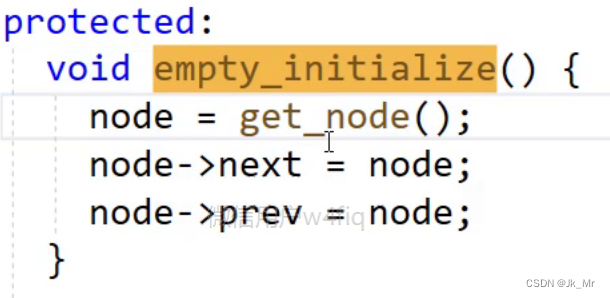
这个函数就是给出哨兵位。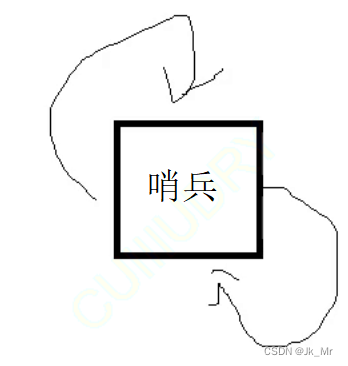
get_node()函数就是获取节点,观察:
C++获取节点时,都是从内存池上获取的,内存池就是我们使用空间配置中自己管理的空间。
使用内存池的好处就是可以更灵活的利用空间,使得代码空间获取效率提高。由于我们初步接触list,所以我们使用new开辟的就好。
由于内存池的空间是我们自己管理,所以对于自定义类型不能自动的调用构造函数,所以在源码中还有一个creat_node()函数:

consruct函数调用的是构造函数。对开辟好的内存池进行初始化,也就是定位new的功能。
这里不是本章重点,仅仅了解一下。
代码实现很简单:
void empty_init(){_head = new Node;_head->_next = _head;_head->_prev = _head;}list(){empty_init();}3.哨兵位头节点
创建节点时,哨兵为的prev和next都应该指向自己:
template<class T>class list{public:typedef ListNode<T> Node;public:void empty_init(){_head = new Node;_head->_next = _head;_head->_prev = _head;}list(){empty_init();}private:Node* _head;};写到这时我们实例化一个对象观察是否有错误:
void test_mylist01()
{mylist::list<int> lt1;
}
结果:
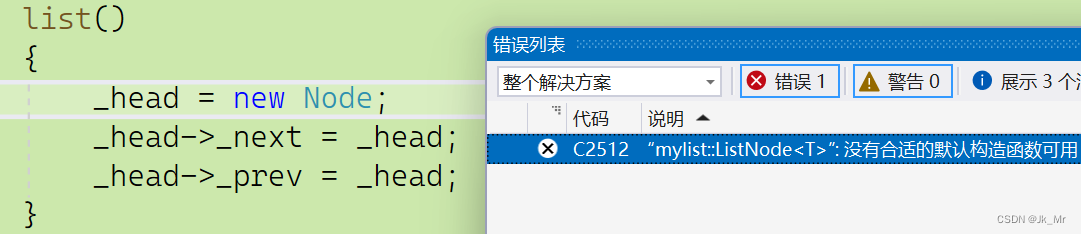
由于节点是一个自定义类型,new在对自定义类型开空间时,需要调用相应的默认构造函数.
而Node中没有构造函数,所以我们加上默认构造:
template<class T>struct ListNode{ListNode<T>* _prev;ListNode<T>* _next;T val;ListNode(const T& data = T()):_prev(nullptr), _next(nullptr), val(data) {}};
4.尾插和头插
尾插和头插操作源码中调用的是insert():

观察insert:
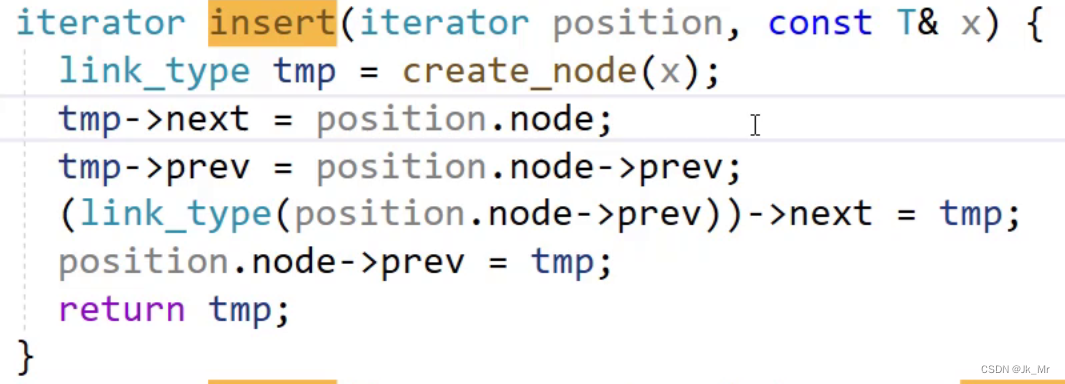
在迭代器position位置插入x。
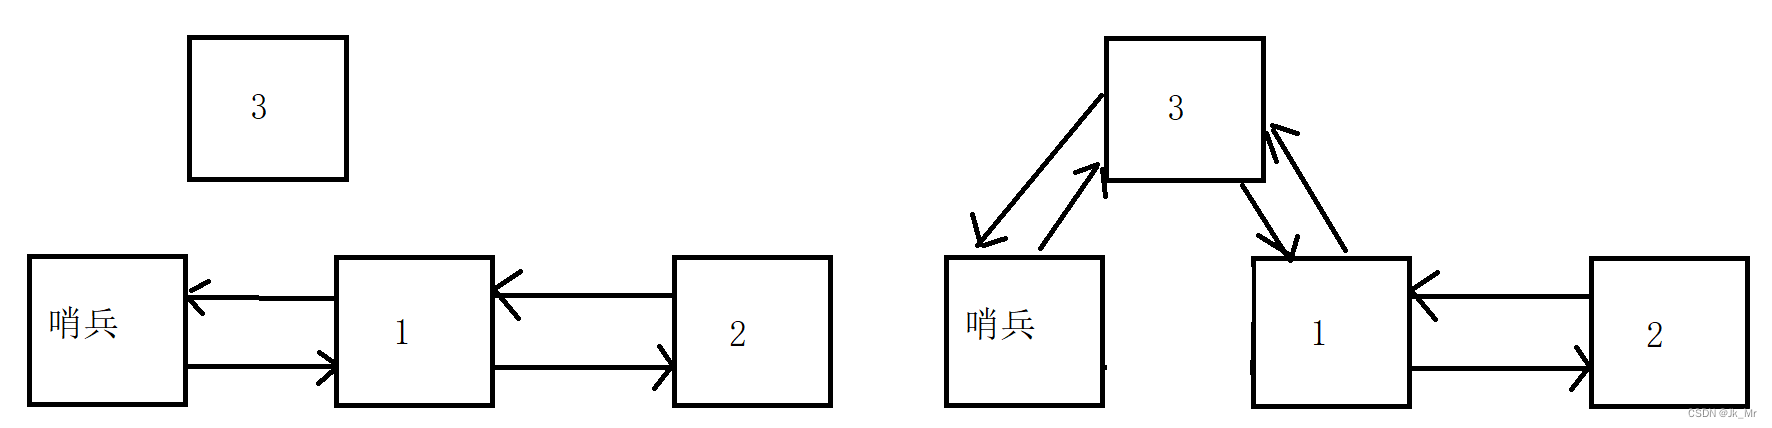
先写一个简单的尾插:
找尾: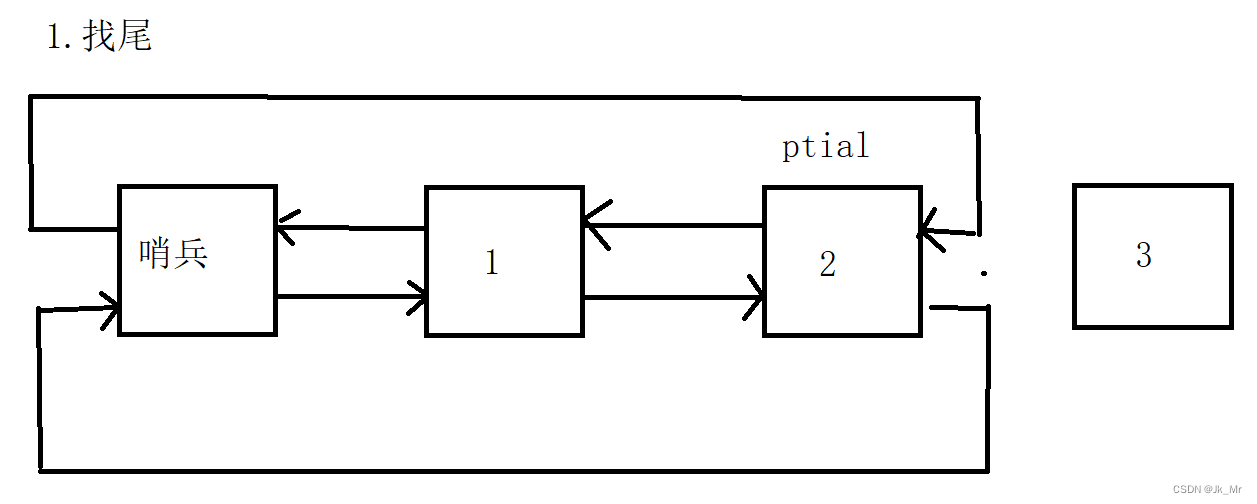
修改指向: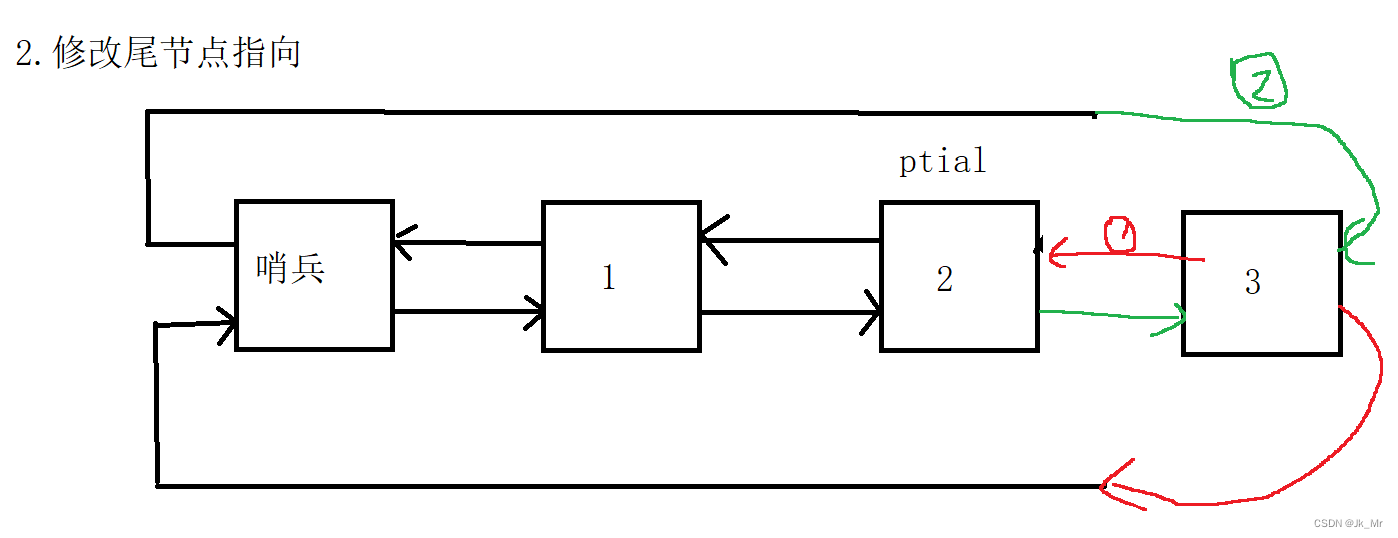
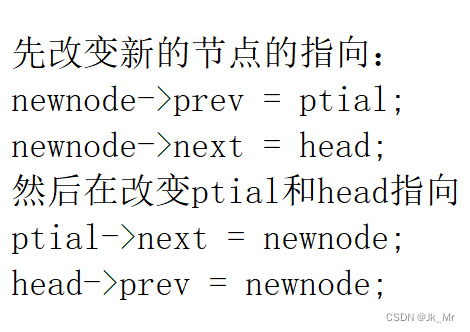
代码:
void push_back(const T& x)
{//创建新节点然后初始化Node* newnode = new Node(x);//找尾Node* ptail = head->prev;//改变新节点指向newnode->_next = head;newnode->_prev = ptail;//改变head和ptail指向ptail->_next = newnode;head->prev = newnode;
}
测试代码:
void test_mylist01()
{mylist::list<int> lt1;lt1.push_back(1);lt1.push_back(2);lt1.push_back(3);
}
结果:

已经插入了3个节点然后遍历节点?
遍历节点有很多种方式,最常用的是使用迭代器遍历。接下来我们进入重点。
5.迭代器*
链表的迭代器实现与vector和string不同,考虑到没有operator[],并且不像vector那样空间连续,使用+=比较麻烦,空间不连续。有没有更好的方法?
迭代器模拟的是指针的行为。
实际上链表要遍历很简单,因为链表中已经有后继节点和前驱节点了。
这里不能像vector那样直接typedef一个指针成为迭代器。空间不连续。如何实现一个迭代器,可以实现++到下一个节点、--到前一个节点、解引用*访问节点?
typedef Node* iterator;无法满足我们的行为。
我们一般会想到函数重载和重载运算符,那么如何将这些函数封装成一个迭代器?答案是--类。而++和--等运算符对内置类型可以直接使用,但是对于自定义类型我们需要重载,而重载的条件之一就是必须有一个参数是自定义类型,所以迭代器用类封装再好不过了。
有了类就可以定义迭代器的行为。
template<class T>
class ListIterator
{typedef ListNode<T> Node;Node* _node;
};
由于迭代器实际上是对节点的指针进行操作,所以我们需要指针的成员变量:
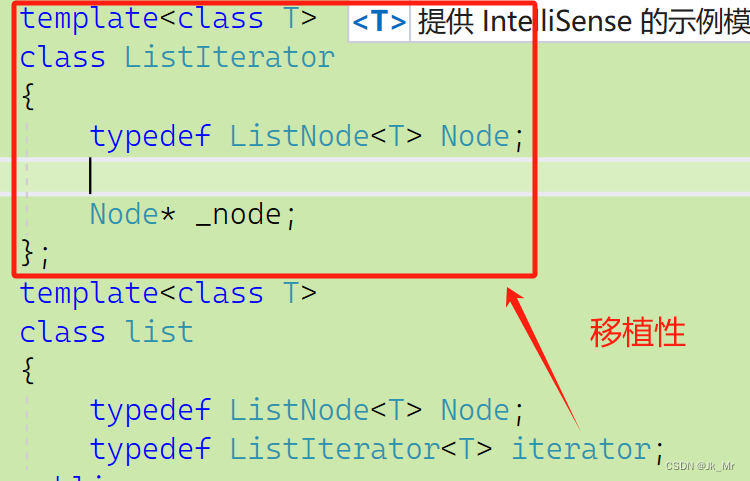
迭代器用节点的指针构造。所以在迭代器中还需要构造函数:
template<class T>class ListIterator{typedef ListNode<T> Node;typedef ListIterator<T> Self;//指向迭代器本身的类型重命名public:Node* _node;public:ListIterator(Node* node):_node(node){}};//用迭代器时,要获取指针:iterator(节点的指针);5.1 迭代器中的operator++和--
由于++和--的返回值是迭代器,所以在迭代器中还需要一个指向自己的typedef。
typedef ListNode<T> Node;typedef ListIterator<T> Self;public:Node* _node;public:ListIterator(Node* node):_node(node){}Self& operator++(){_node = _node->_next;return *this;}Self operator++(int){Self tmp(*this);_node = _node->_next;return tmp;}5.2其他迭代器中的接口
接下来我们先写出接口,然后进行分析;注意迭代器中构造函数和其他函数应该是公有的。
template<class T>
class ListIterator
{typedef ListNode<T> Node;typedef ListIterator<T> Self;
public:Node* _node;
public:ListIterator(Node* node):_node(node){}Self& operator++()//前置++{_node = _node->_next;return *this;}Self operator++(int)//后置++{Self tmp(*this);_node = _node->_next;return tmp;}T& operator*()//访问数据{return _node->val;}bool operator!=(const Self& it)//比较节点地址{return _node != it._node;}
};
5.3迭代器类的使用
我们可以通过迭代器进行修改数据(operator*),也可以进行比较。
实现迭代器begin()和end()(迭代器的实例化):
	template<class T>class list{public:typedef ListNode<T> Node;typedef ListIterator<T> iterator;public:iterator begin(){return iterator(_head->_next);//匿名对象}iterator end(){return iterator(_head);//末尾就是哨兵位}
//代码....
使用迭代器遍历链表测试接口:
void test_mylist02()
{mylist::list<int> lt1;lt1.push_back(1);lt1.push_back(2);lt1.push_back(3);lt1.push_back(4);mylist::list<int>::iterator it = lt1.begin();while (it != lt1.end()){cout << *it << ' ';++it;}
}
代码结果: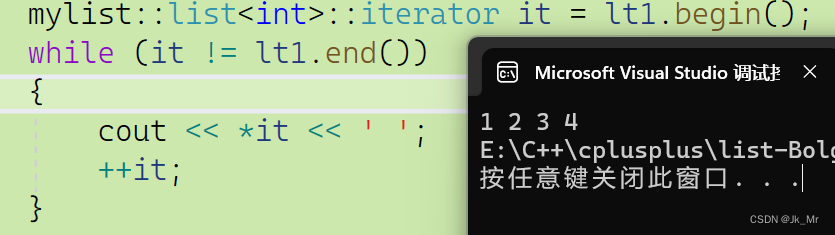
测试前置后置++:
void test_mylist02()
{mylist::list<int> lt1;lt1.push_back(1);lt1.push_back(2);lt1.push_back(3);lt1.push_back(4);//测试前置++mylist::list<int>::iterator it1 = lt1.begin();cout << *(++it1) << endl;cout << *it1 << endl;cout << endl;//测试后置++mylist::list<int>::iterator it2 = lt1.begin();cout << *(it2++) << endl;cout << *it2 << endl;
}
结果: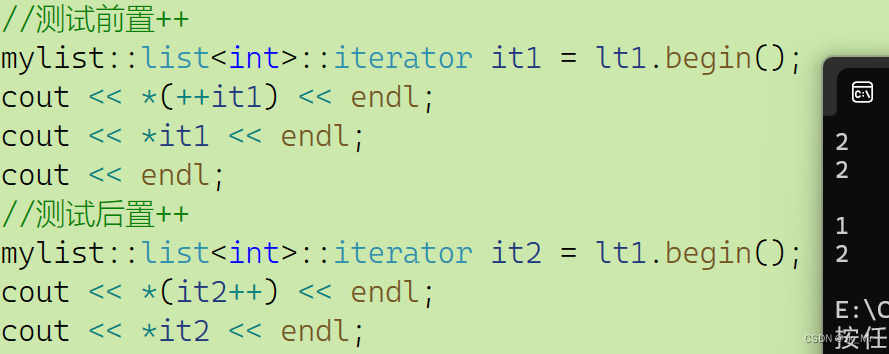
5.4 前置后置--
和++类似找到前一个节点:
Self& operator--()
{_node = _node->_prev;return *this;
}
Self operator--(int)
{Self tmp(*this);_node = _node->_prev;return tmp;
}
5.5 list不支持重载+和-
由于链表的空间地址不连续,重载+和-就需要遍历到n次节点,所以效率不高,标准库中未支持+、-。
迭代器不需要写析构函数,不需要对节点进行释放。节点的释放应该由list来做。
5.6 operator->
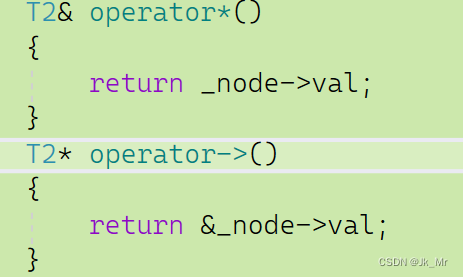
标准库中的list不仅仅重载了operator*并且重载了operator->:
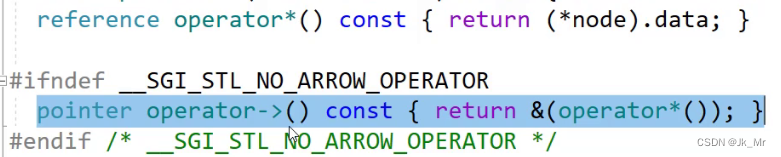
图中operator*的返回值是引用(被typedef了),而operator->的返回值是T*的指针即数据的指针。
T& operator*()
{return _node->val;
}
T* operator->()
{return &_node->val;
}
为什么要重载->?观察下面代码:
假设我们需要存储坐标:
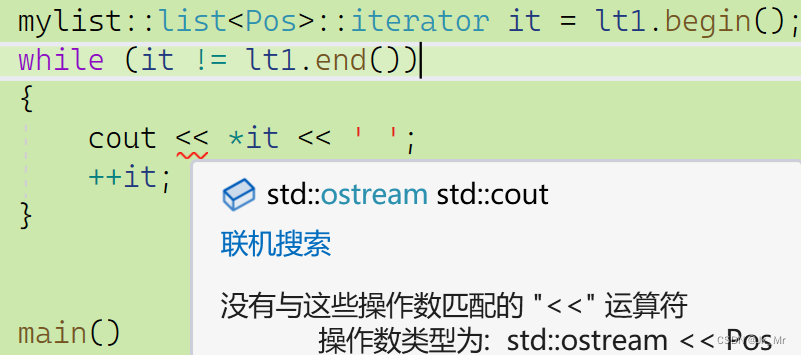
void test_mylist03()
{struct Pos{int _row;int _col;Pos(int row = 0, int col = 0)//需要默认构造,节点需要对象的默认构造:_row(row),_col(col){}};mylist::list<Pos> lt1;lt1.push_back(Pos(1, 2));lt1.push_back(Pos(3, 4));lt1.push_back(Pos(5, 6));//迭代器遍历数据mylist::list<Pos>::iterator it = lt1.begin();while (it != lt1.end()){cout << *it << ' ';//这样是编译不过的++it;}
}
我们需要访问成员:
//迭代器遍历数据mylist::list<Pos>::iterator it = lt1.begin();while (it != lt1.end()){cout << (*it)._row << ':' << (*it)._col << endl;++it;}结果: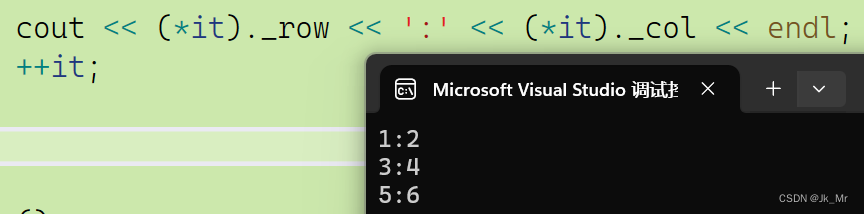
那有不有更便捷的方式?如果是Pos*的数据该怎么访问?
所以我们重载了operator->:
T* operator->()
{return &_node->val;
}//迭代器遍历数据mylist::list<Pos>::iterator it = lt1.begin();while (it != lt1.end()){//cout << (*it)._row << ':' << (*it)._col << endl;cout << it->_row << ':' << it->_col << endl;++it;}
结果:

这里就会有疑惑,这个->为什么可以调用成功?在平常使用时不应该需要一个结构体指针才用到 ->吗?
实际上这就是一个结构体指针调用,由于重载的特性,使用->会直接执行迭代器中我们所写的重载函数operator->().
在代码中调用了operator->函数,实际上是俩个对头,为了可读性将第二个->省略了:

6.const迭代器
6.1写俩个类实现const迭代器
在访问const链表的时,需要const迭代器,如果使用非const迭代器则会报错: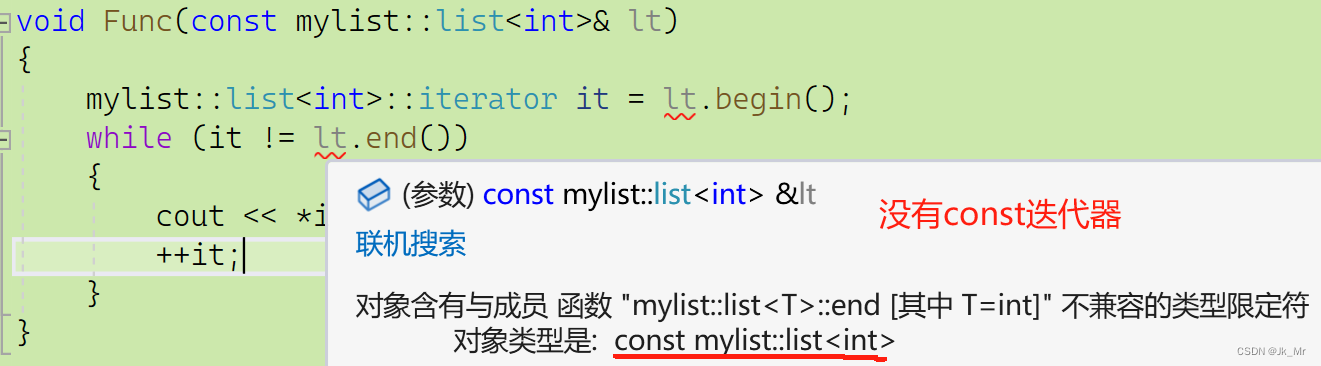
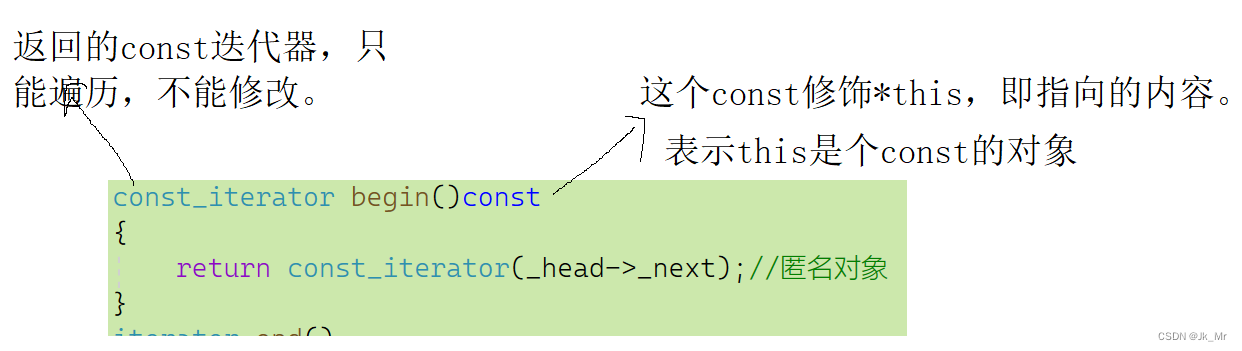
const迭代器的作用时可以访问,不可修改。
不能在我们实现的迭代器前加const修饰: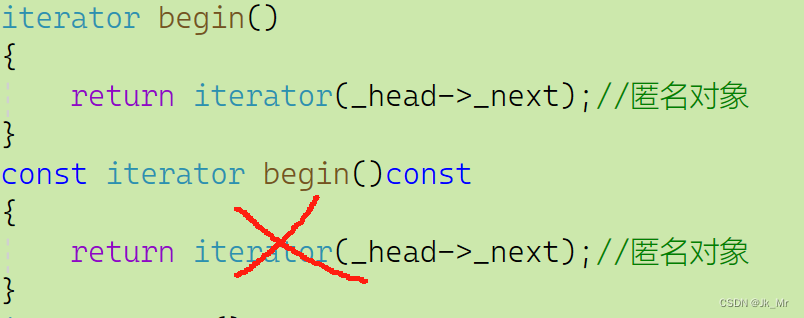


所以我们需要自己写一个const迭代器类,如何做到可以遍历,但是不能修改?
只需要将访问的函数和可以修改的值的函数用const修饰,将迭代器指向的内容修饰即可。
即将operator*和operator->进行修饰:
list类中:
typedef ListIterator<T> iterator;typedef ConstListIterator<T> const_iterator;定义新的const迭代器类模板:
template<class T>class ConstListIterator{typedef ListNode<T> Node;typedef ConstListIterator<T> Self;public:Node* _node;ConstListIterator(Node* node):_node(node){}Self& operator++(){_node = _node->_next;return *this;}Self operator++(int){Self tmp(*this);_node = _node->_next;return tmp;}Self& operator--(){_node = _node->_prev;return *this;}Self operator--(int){Self tmp(*this);_node = _node->_prev;return tmp;}const T& operator*(){return _node->val;}const T* operator->(){return &_node->val;}bool operator!=(const Self& it){return _node != it._node;}};list类模板中定义新的迭代器:
typedef ListNode<T> Node;
typedef ListIterator<T> iterator;
typedef ConstListIterator<T> const_iterator;
iterator begin()
{return iterator(_head->_next);//匿名对象
}
const_iterator begin()const
{return const_iterator(_head->_next);//匿名对象
}
iterator end()
{return iterator(_head);//末尾就是哨兵位
}
const_iterator end() const
{return const_iterator(_head);//末尾就是哨兵位
}
const迭代器:
观察测试:
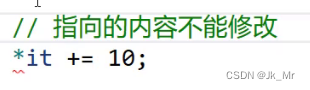
*it不能修改,it可以修改。

写到这里肯定会觉得写俩个类是不是很重复。能不能像下面这样:

这样是不行的,因为,迭代器中的所有T类型变为了const T类型,除了operator*和operator->符合我们的预期其他的函数,参数全部改变,那么const对象的迭代器就不能匹配上const迭代器中的其他函数,进而报错。
如list<int>时,const迭代器中的节点都是const int。
迭代器中: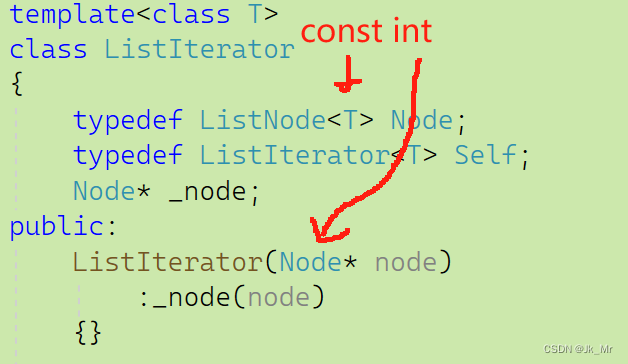
链表中: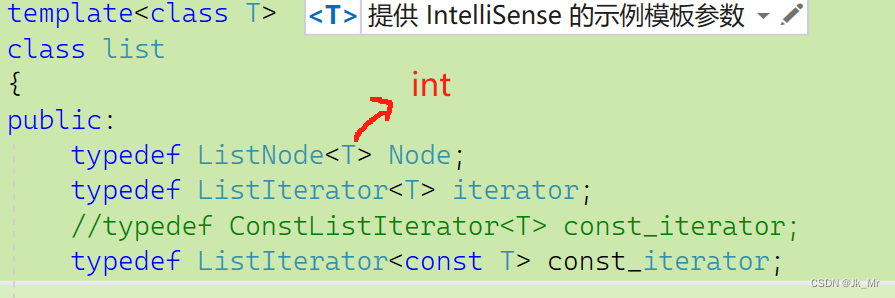
节点的类型都不匹配了。
6.2更简洁的const 迭代器
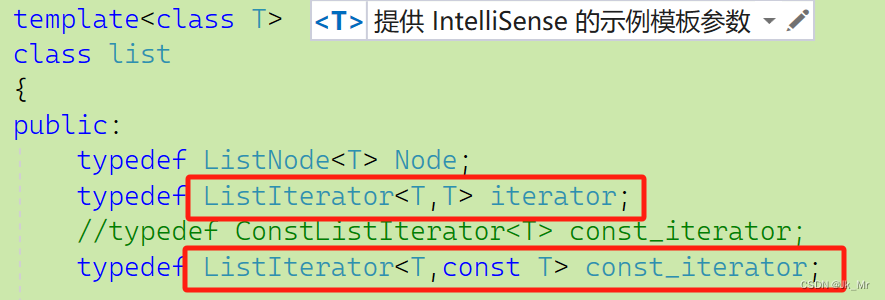
增加俩个模板参数,改变opeartor*和operator->:
同一个类模板给不同参数,就是不同类型:
class Ref表示引用,Ptr表示指针。
template<class T,class Ref, class Ptr>
class ListIterator
{typedef ListNode<T> Node;typedef ListIterator<T,Ref,Ptr> Self;
public:Node* _node;ListIterator(Node* node):_node(node){}Self& operator++(){_node = _node->_next;return *this;}Self operator++(int){Self tmp(*this);_node = _node->_next;return tmp;}Self& operator--(){_node = _node->_prev;return *this;}Self operator--(int){Self tmp(*this);_node = _node->_prev;return tmp;}Ref operator*(){return _node->val;}Ptr operator->(){return &_node->val;}bool operator!=(const Self& it){return _node != it._node;}
};
list中定义:
template<class T>class list{public:typedef ListNode<T> Node;typedef ListIterator<T,T&,T*> iterator;//typedef ConstListIterator<T> const_iterator;typedef ListIterator<T,const T&, const T*> const_iterator;其实就是写了俩个类,交给编译器完成,让编译器打工。
俩种写法实际上没有区别,但是,减少了我们的代码量。
测试:
void Func(const mylist::list<int>& lt)
{mylist::list<int>::const_iterator it = lt.begin();while (it != lt.end()){cout << *it << ' ';++it;}
}
void test_mylist04()
{mylist::list<int> lt1;lt1.push_back(1);lt1.push_back(2);lt1.push_back(3);lt1.push_back(4);Func(lt1);
}
结果: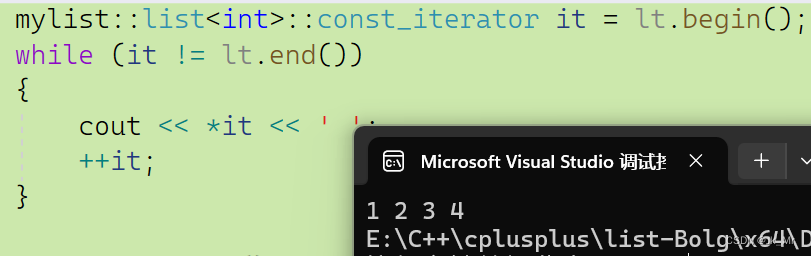
也可以传递俩个模板参数:
7.insert插入
源码插入:
我们实现一个简单的插入;
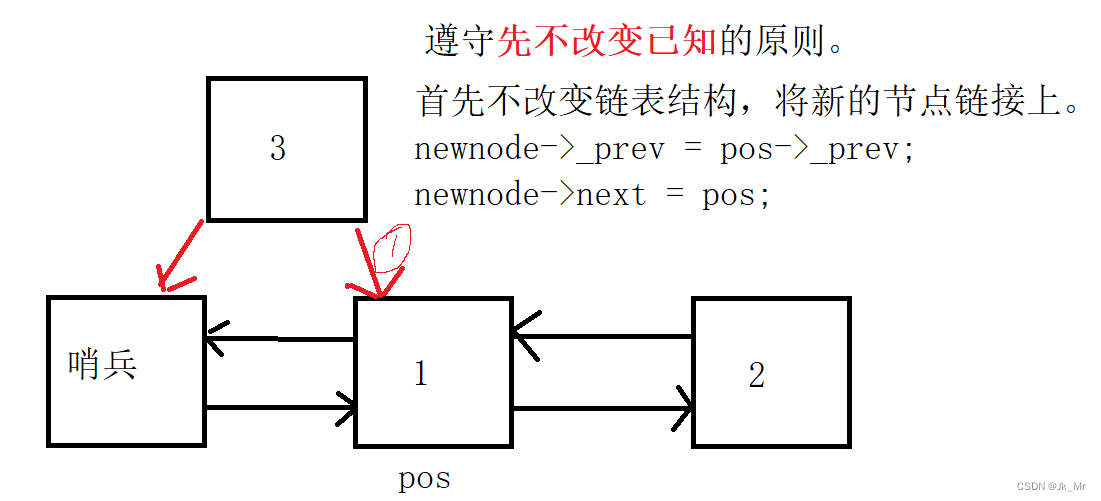
void insert(iterator pos, const T& x){//创建新的节点Node* newnode = new Node(x);//新节点Node* cur = pos._node; //pos节点Node* prev = cur->_prev;//前驱节点newnode->_next = cur;newnode->_prev = cur->_prev;//改变前驱节点的指向//prev newnode curprev->_next = newnode;cur->_prev = newnode;}思考:list中的迭代器有无迭代器失效?
链表中的迭代器不会失效,因为它的空间不连续。没有扩容这一说法。但是为了和库保持一致,我们和vector一样,给insert一个返回值:
iterator insert(iterator pos, const T& x){//代码....return iterator(newnode);}测试代码:
void test_mylist05()
{mylist::list<int> lt1;lt1.push_back(1);lt1.push_back(2);lt1.push_back(3);lt1.push_back(4);for (auto e : lt1){cout << e << ' ';}lt1.insert(lt1.begin(), 5);lt1.insert(lt1.end(),6);cout << endl;for (auto e : lt1){cout << e << ' ';}
}
结果:
8.erase删除节点
改变前继节点和后继节点的指向。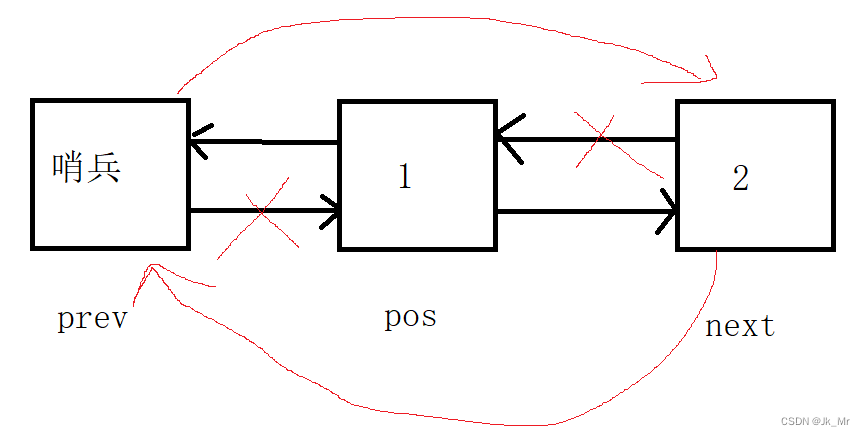
#include <assert.h>iterator erase(iterator pos){//不能删除哨兵位assert( pos != end());Node* cur = pos._node;Node* prev = cur->_prev;Node* next = cur->_next;//prev cur nextprev->_next = next;next->_prev = prev;delete cur;//删除后迭代器失效,因为pos指向的节点已经被释放//需要返回值来获取下一个节点的元素。return iterator(next);}由于delete释放了pos位置的节点,所以删除有迭代器失效。我们需要迭代器返回。
测试:
void test_mylist06()
{mylist::list<int> lt1;lt1.push_back(1);lt1.push_back(2);lt1.push_back(3);lt1.push_back(4);for (auto e : lt1){cout << e << ' ';}lt1.erase(lt1.begin());cout << endl;for (auto e : lt1){cout << e << ' ';}
}
结果:

9.insert和erase的复用
9.1尾插
void push_back(const T& x){创建新节点然后初始化//Node* newnode = new Node(x);找尾//Node* ptail = _head->_prev;改变新节点指向//newnode->_next = _head;//newnode->_prev = ptail;改变head和ptail指向//ptail->_next = newnode;//_head->_prev = newnode;insert(end(), x);}9.2尾删
void pop_back()
{insert(--end());
}
9.3头插
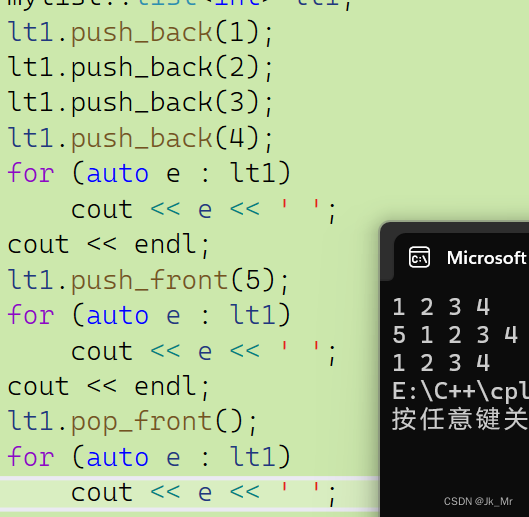
void push_front(const T& x){insert(begin(), x);}9.4头删
void pop_front(){erase(begin());}测试:
实际上迭代器我们经常要访问它的成员变量和成员函数,所以迭代器也可以写出strcut 的类。
虽然它公有但是,我们接触的是list而不是迭代器的类模板。
10.析构函数
链表的析构需要一个一个节点释放,在观察list等容器的代码会发现,一般的容器都会有一个clear的函数。
clear函数专门用于清除有效数据的空间,而不清理哨兵位。
void clear()
{auto it = begin();while (it != end()){it = erase(it);}
}
析构函数在这个函数基础上进行空间释放:
~list()
{clear();delete _head;_head = nullptr;
}
11.拷贝构造
不写拷贝构造编译器会生成一个,该默认生成的拷贝构造是值拷贝即浅拷贝。使用浅拷贝构造的链表,和原链表指向的是一块空间。
void test_mylist08()
{mylist::list<int> lt1;lt1.push_back(1);lt1.push_back(2);lt1.push_back(3);lt1.push_back(4);Func(lt1);mylist::list<int> lt2(lt1);lt1.push_back(5);Func(lt2);
}
俩个链表指向同一块空间。浅拷贝会有俩个问题:
1.修改lt1,lt2也会跟着改变。2.析构时会对同一块空间进行释放俩次。
所以我们需要自己写一份深拷贝:
使用empty_init创建一个新的哨兵位,不指向旧空间。
//lt1(lt2)
list(const list<T>& lt)
{empty_init();for (const auto& e : lt){push_back(e);}
}
测试代码:
void Func(const mylist::list<int>& lt)
{mylist::list<int>::const_iterator it = lt.begin();while (it != lt.end()){cout << *it << ' ';++it;}cout << endl;
}
void test_mylist08()
{mylist::list<int> lt1;lt1.push_back(1);lt1.push_back(2);lt1.push_back(3);lt1.push_back(4);Func(lt1);mylist::list<int> lt2(lt1);lt1.push_back(5);Func(lt1);Func(lt2);
}
结果: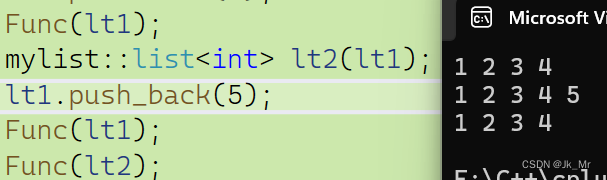
12.operator=赋值操作
赋值操作也需要深拷贝,有了拷贝构造,赋值操作就可以使用现代写法:
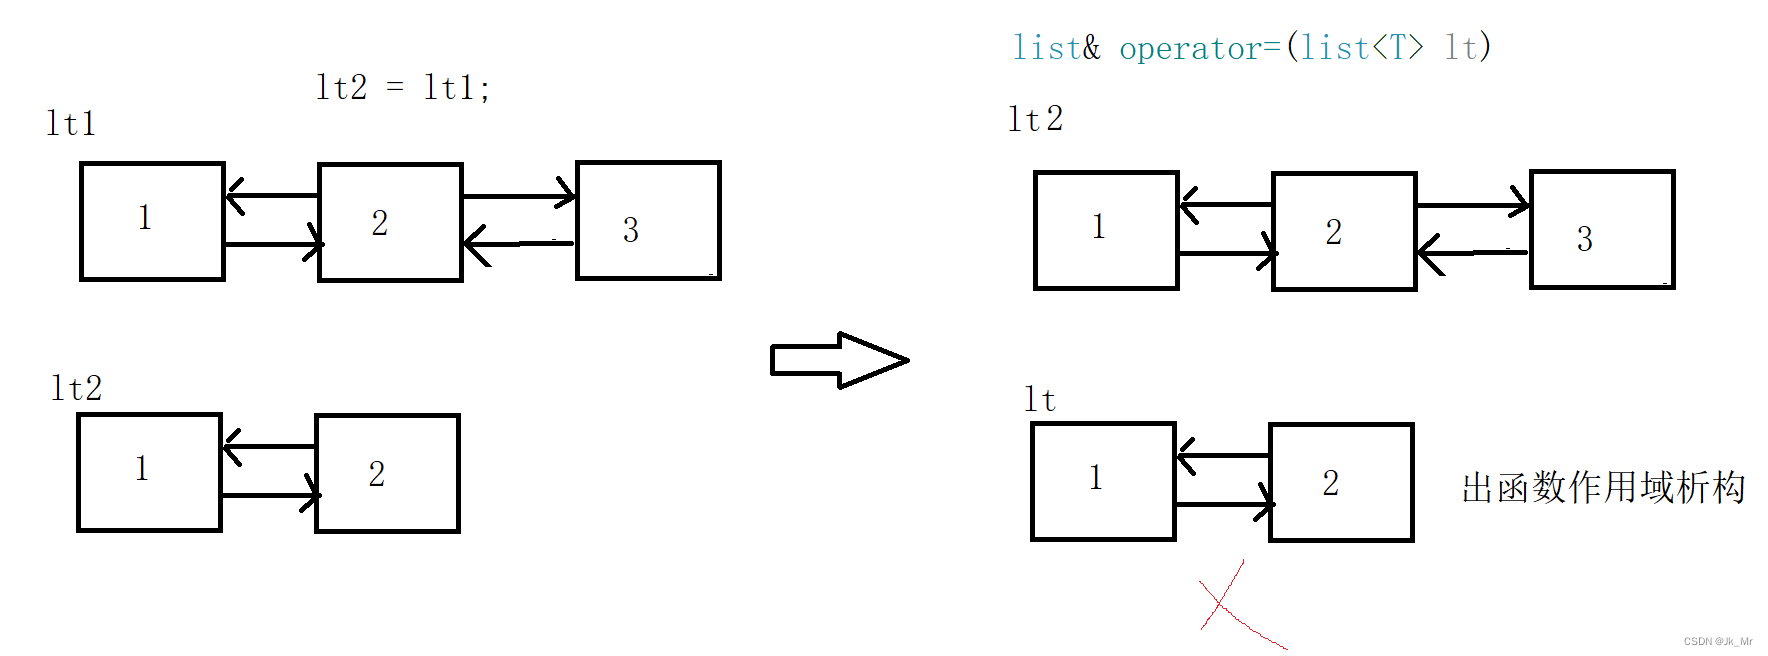
函数的参数lt是lt1的一份拷贝,然后将拷贝的空间和lt2进行交换,lt2指向的空间就是lt的空间,最后出函数作用域对lt空间进行释放。
list<T>& operator=(list<T> lt){std::swap(_head, lt._head);return *this;}测试代码:
void test_mylist09()
{mylist::list<int> lt1;lt1.push_back(1);lt1.push_back(2);lt1.push_back(3);Func(lt1);mylist::list<int> lt2;lt2.push_back(1);lt2.push_back(2);Func(lt2);lt2 = lt1;Func(lt2);
}
测试结果: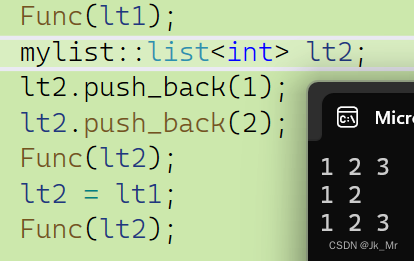
13.initializer_list构造
该构造就是支持{}括号构造:
list(initializer_list<T> il)
{empty_init();for (const auto& e : il){push_back(e);}
}
测试代码:
void test_mylist10()
{mylist::list<int> lt1 = { 1,2,3,4,5 };Func(lt1);
}
14.反向迭代器
反向迭代器我们需要学会复用iterator:
template <T>
class list
{
public://反向迭代器typedef Reverse_iterator<iterator, T&, T*> reverse_iterator;typedef Reverse_iterator<const_iterator, const T&, const T*> const_reverse_iterator;reverse_iterator rbegin(){return reverse_iterator(end());}const_reverse_iterator rbegin() const{return const_reverse_iterator(end());}reverse_iterator rend(){return reverse_iterator(begin());}const_reverse_iterator rend() const{return const_reverse_iterator(begin());}};反向迭代器就是从后开始往前遍历,那么使用普通迭代器。从最后一个元素到哨兵位。

// 适配器 -- 复用template<class Iterator, class Ref, class Ptr>struct Reverse_iterator{typedef Reverse_iterator< Iterator, Ref, Ptr> Self;Iterator _it;Reverse_iterator(const Iterator& it):_it(it){}//Self& operator++(){--_it;return *this;}Self operator++(int){Self tmp(*this);_it--;return tmp;}Self& operator--(){++_it;return *this;}Self operator--(int){Self tmp(*this);_it++;return tmp;}Ref operator*(){Iterator tmp(_it);//反向迭代器的rbegin()是正向迭代器end()的--;//有效元素//反向迭代器的rend()是正向迭代器begin()的--;//表示哨兵位位置return *(--tmp);}Ptr operator->(){return &(operator*());//是访问的地址}bool operator!=(const Self& it){return _it != it._it;//自定义类型比较所以参数需要成员函数}};测试代码:
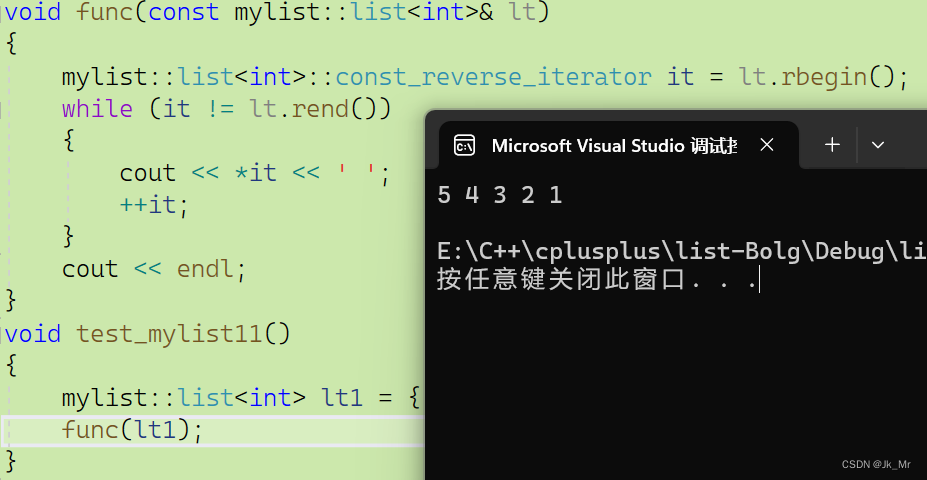
void func(const mylist::list<int>& lt)
{mylist::list<int>::const_reverse_iterator it = lt.rbegin();while (it != lt.rend()){cout << *it << ' ';++it;}cout << endl;
}
void test_mylist11()
{mylist::list<int> lt1 = { 1,2,3,4,5 };func(lt1);
}
结果:
三、所有代码:
#pragma once
#include <iostream>
using namespace std;
#include <list>
#include <algorithm>
#include <assert.h>
namespace mylist
{template<class T>struct ListNode{ListNode<T>* _prev;ListNode<T>* _next;T val;ListNode(const T& data = T()):_prev(nullptr), _next(nullptr), val(data) {}};template<class T,class Ref, class Ptr>struct ListIterator{typedef ListNode<T> Node;typedef ListIterator<T,Ref,Ptr> Self;Node* _node;ListIterator(Node* node):_node(node){}Self& operator++(){_node = _node->_next;return *this;}Self operator++(int){Self tmp(*this);_node = _node->_next;return tmp;}Self& operator--(){_node = _node->_prev;return *this;}Self operator--(int){Self tmp(*this);_node = _node->_prev;return tmp;}Ref operator*(){return _node->val;}Ptr operator->(){return &_node->val;}bool operator!=(const Self& it){return _node != it._node;//内置类型比较}};//template<class T>//class ConstListIterator//{//	typedef ListNode<T> Node;//	typedef ConstListIterator<T> Self;//	Node* _node;//public://	ConstListIterator(Node* node)//		:_node(node)//	{}//	Self& operator++()//	{//		_node = _node->_next;//		return *this;//	}//	Self operator++(int)//	{//		Self tmp(*this);//		_node = _node->_next;//		return tmp;//	}//	Self& operator--()//	{//		_node = _node->_prev;//		return *this;//	}//	Self operator--(int)//	{//		Self tmp(*this);//		_node = _node->_prev;//		return tmp;//	}//	const T& operator*()//	{//		return _node->val;//	}//	const T* operator->()//	{//		return &_node->val;//	}//	bool operator!=(const Self& it)//	{//		return _node != it._node;//	}//};// 适配器 -- 复用template<class Iterator, class Ref, class Ptr>struct Reverse_iterator{typedef Reverse_iterator< Iterator, Ref, Ptr> Self;Iterator _it;Reverse_iterator(const Iterator& it):_it(it){}//Self& operator++(){--_it;return *this;}Self operator++(int){Self tmp(*this);_it--;return tmp;}Self& operator--(){++_it;return *this;}Self operator--(int){Self tmp(*this);_it++;return tmp;}Ref operator*(){Iterator tmp(_it);//反向迭代器的rbegin()是正向迭代器end()的--;//有效元素//反向迭代器的rend()是正向迭代器begin()的--;//表示哨兵位位置return *(--tmp);}Ptr operator->(){return  &(operator*());//是访问的地址}bool operator!=(const Self& it){return _it != it._it;//自定义类型比较所以参数需要成员函数}};// vector和list反向迭代器实现template<class T>class list{public:typedef ListNode<T> Node;//普通迭代器typedef ListIterator<T,T&,T*> iterator;//typedef ConstListIterator<T> const_iterator;typedef ListIterator<T,const T&, const T*> const_iterator;iterator begin(){return iterator(_head->_next);//匿名对象}const_iterator begin()const{return const_iterator(_head->_next);//匿名对象}iterator end(){return iterator(_head);//末尾就是哨兵位}const_iterator end() const{return const_iterator(_head);//末尾就是哨兵位}//反向迭代器typedef Reverse_iterator<iterator, T&, T*> reverse_iterator;typedef Reverse_iterator<const_iterator, const T&, const T*> const_reverse_iterator;reverse_iterator rbegin(){return reverse_iterator(end());}const_reverse_iterator rbegin() const{return const_reverse_iterator(end());}reverse_iterator rend(){return reverse_iterator(begin());}const_reverse_iterator rend() const{return const_reverse_iterator(begin());}public:void empty_init(){_head = new Node;_head->_next = _head;_head->_prev = _head;}list(){ empty_init();}list(const list<T>& lt){empty_init();for (const auto& e : lt){push_back(e);}}list<T>& operator=(list<T> lt){std::swap(_head, lt._head);return *this;}list(initializer_list<T> il){empty_init();for (const auto& e : il){push_back(e);}}~list(){clear();delete _head;_head = nullptr;}void clear(){auto it = begin();while (it != end()){it = erase(it);}}void push_back(const T& x){创建新节点然后初始化//Node* newnode = new Node(x);找尾//Node* ptail = _head->_prev;改变新节点指向//newnode->_next = _head;//newnode->_prev = ptail;改变head和ptail指向//ptail->_next = newnode;//_head->_prev = newnode;insert(end(), x);}void pop_back(){insert(--end());}void push_front(const T& x){insert(begin(), x);}void pop_front(){erase(begin());}iterator insert(iterator pos, const T& x){//创建新的节点Node* newnode = new Node(x);Node* cur = pos._node;Node* prev = cur->_prev;newnode->_next = cur;newnode->_prev = cur->_prev;//改变前驱节点的指向//prev newnode curprev->_next = newnode;cur->_prev = newnode;return iterator(newnode);}iterator erase(iterator pos){assert(pos != end());Node* cur = pos._node;Node* prev = cur->_prev;Node* next = cur->_next;//prev cur nextprev->_next = next;next->_prev = prev;delete cur;//删除后迭代器失效,因为pos指向的节点已经被释放//需要返回值来获取下一个节点的元素。return iterator(next);}private:Node* _head;};
}如果你有所收获,可以留下你的点赞和关注。谢谢你的观看!!!
相关文章:
list的简单模拟实现
文章目录 目录 文章目录 前言 一、使用list时的注意事项 1.list不支持std库中的sort排序 2.去重操作 3.splice拼接 二、list的接口实现 1.源码中的节点 2.源码中的构造函数 3.哨兵位头节点 4.尾插和头插 5.迭代器* 5.1 迭代器中的operator和-- 5.2其他迭代器中的接口 5.3迭代器…...

深入解析Java HashMap的putVal方法
Java中的HashMap是我们在开发中经常使用的集合之一,它提供了基于哈希表的数据存储方式,使得对数据的插入、删除和查找操作都具有较高的效率。在本文中,我们将深入解析HashMap中的putVal方法,揭示其内部工作原理。通过对代码的逐行…...
使用智谱 GLM-4-9B 和 SiliconCloud 云服务快速构建一个编码类智能体应用
本篇文章我将介绍使用智谱 AI 最新开源的 GLM-4-9B 模型和 GenAI 云服务 SiliconCloud 快速构建一个 RAG 应用,首先我会详细介绍下 GLM-4-9B 模型的能力情况和开源限制,以及 SiliconCloud 的使用介绍,最后构建一个编码类智能体应用作为测试。…...
关于vue2 antd 碰到的问题总结下
1.关于vue2 antd 视图更新问题 1.一种强制更新 Vue2是通过用Object…defineProperty来设置数据的getter和setter实现对数据和以及视图改变的监听的。对于数组和对象这种引用类型来说,getter和setter无法检测到它们内部的变化。用这种 this.$set(this.form, "…...

常见的api:Runtime Object
一.Runtiem的成员方法 1.getRuntime() 当前系统的运行环境 2.exit 停止虚拟机 3.avaliableProcessors 获取Cpu线程的参数 4.maxMemory JVM能从系统中获取总内存大小(单位byte) 5.totalMemory JVM已经从系统中获取总内大小(单位byte) 6.freeMemory JVM剩余内存大小(…...

Linux守护进程揭秘-无声无息运行在后台
在Linux系统中,有一些特殊的进程悄无声息地运行在后台,如同坚实的基石支撑着整个系统的运转。它们就是众所周知的守护进程(Daemon)。本文将为你揭开守护进程的神秘面纱,探讨它们的本质特征、创建过程,以及如何重定向它们的输入输出…...
模型基础笔记0.1.096)
python-Bert(谷歌非官方产品)模型基础笔记0.1.096
python-bert模型基础笔记0.1.015 TODOLIST官网中的微调样例代码Bert模型的微调限制Bert的适合的场景Bert多语言和中文模型Bert模型两大类官方建议模型Bert模型中名字的含义Bert模型包含的文件Bert系列模型参数介绍微调与迁移学习区别Bert微调的方式Pre-training和Fine-tuning区…...

Linux的命令补全脚本
一 linux命令补全脚本 Linux的命令补全脚本是一个强大且高效的工具,它能够极大地提高用户在命令行界面的工作效率。这种脚本通过自动完成部分输入的命令或参数,帮助用户减少敲击键盘的次数并降低出错率。接下来将深入探讨其工作原理、安装方式以及如何自…...
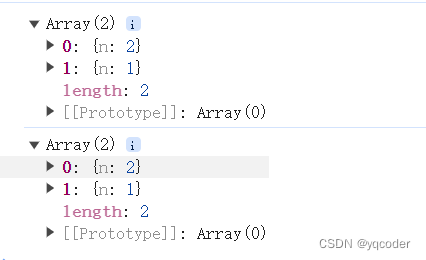
前端 JS 经典:打印对象的 bug
1. 问题 相信这个 console 打印语句的 bug,其实小伙伴们是遇到过的,就是你有一个对象,通过 console,打印一次,然后经过一些处理,再通过 console 打印,发现两次打印的结果是一样的,第…...

大型语言模型简介
大型语言模型简介 大型语言模型 (LLM) 是一种深度学习算法,可以使用非常大的数据集识别、总结、翻译、预测和生成内容。 文章目录 大型语言模型简介什么是大型语言模型?为什么大型语言模型很重要?什么是大型语言模型示例?大型语…...
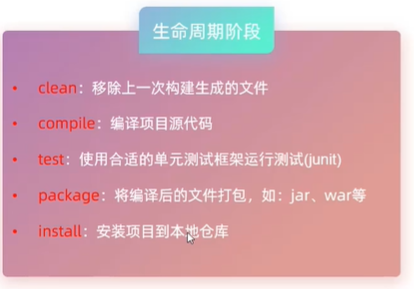
javaWeb4 Maven
Maven-管理和构建java项目的工具 基于POM的概念 1.依赖管理:管理项目依赖的jar包 ,避免版本冲突 2.统一项目结构:比如统一eclipse IDEA等开发工具 3.项目构建:标准跨平台的自动化项目构建方式。有标准构建流程,能快速…...

eclipse连接后端mysql数据库并且查询
教学视频:https://www.bilibili.com/video/BV1mK4y157kE/?spm_id_from333.337.search-card.all.click&vd_source26e80390f500a7ceea611e29c7bcea38本人eclipse和up主不同的地方如下,右键项目名称->build path->configure build path->Libr…...
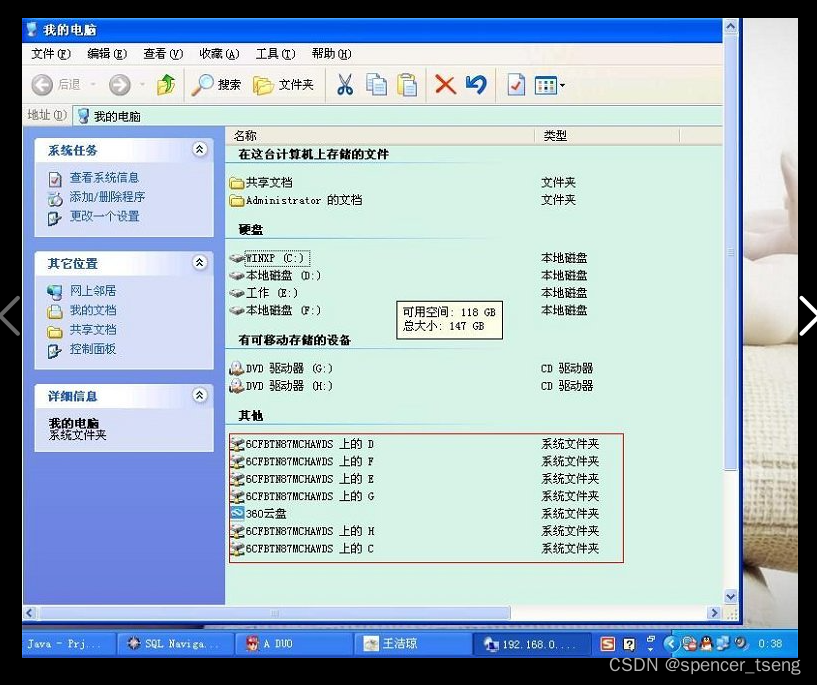
Windows mstsc
windows mstsc 局域网远程计算机192.168.0.113为例,远程控制命令mstsc...

百度/迅雷/夸克,网盘免费加速,已破!
哈喽,各位小伙伴们好,我是给大家带来各类黑科技与前沿资讯的小武。 之前给大家安利了百度网盘及迅雷的加速方法,详细方法及获取参考之前文章: 刚刚!度盘、某雷已破!速度50M/s! 本次主要介绍夸…...
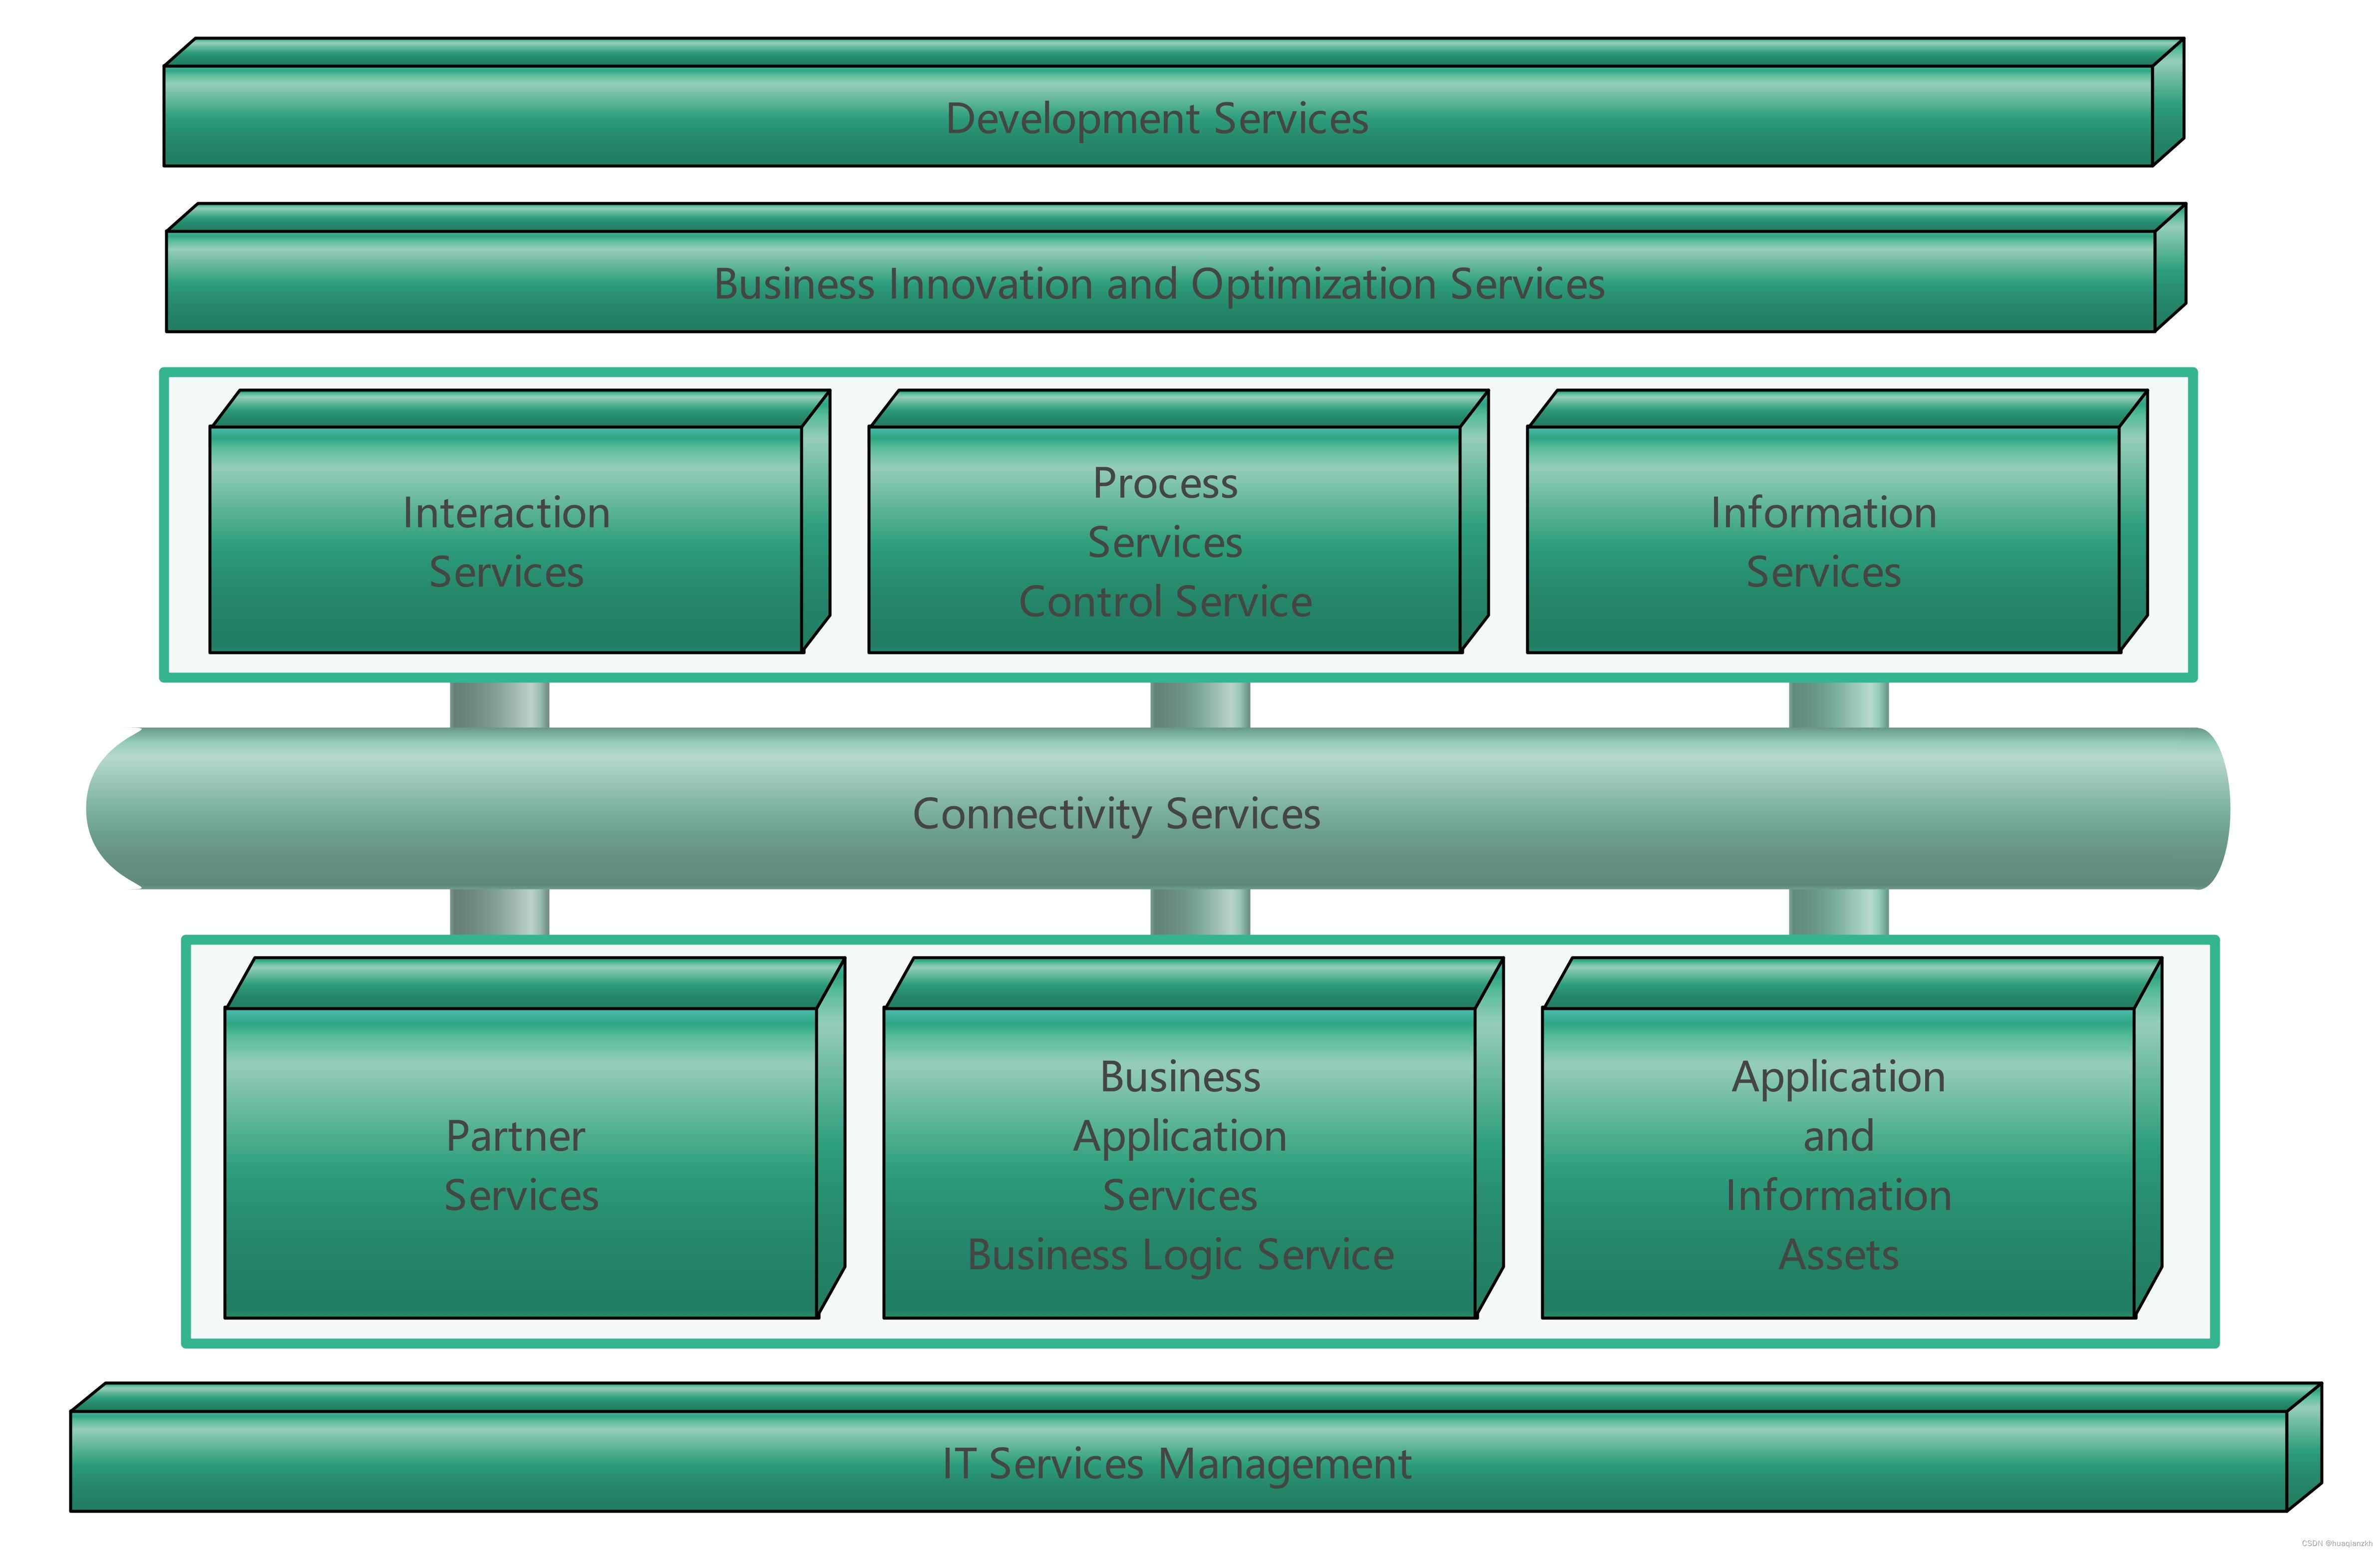
SOA的参考架构
1. 以服务为中心的企业集成架构 IBM的Websphere业务集成参考架构(如图1所示,以下称参考架构)是典型的以服务为中心的企业集成架构。 图1 IBM WebSphere业务集成参考架构 以服务为中心的企业集成采用“关注点分离(Separation of Co…...

前端开发-表单和表格的区别
在前端开发中,表单(Form)和表格(Table)同样具有不同的用途和结构: 前端表单(Form): 数据收集:表单用于收集用户输入的数据,如文本输入、选择选项等。用户交…...

Data Management Controls
Data Browsing and Analysis Data Grid 以标准表格或其他视图格式(例如,带状网格、卡片、瓷砖)显示数据。Vertical Grid 以表格形式显示数据,数据字段显示为行,记录显示为列。Pivot Grid 模拟微软Excel的枢轴表功…...

NextJs 数据篇 - 数据获取 | 缓存 | Server Actions
NextJs 数据篇 - 数据获取 | 缓存 | Server Actions 前言一. 数据获取 fetch1.1 缓存 caching① 服务端组件使用fetch② 路由处理器 GET 请求使用fetch 1.2 重新验证 revalidating① 基于时间的重新验证② 按需重新验证revalidatePathrevalidateTag 1.3 缓存的退出方式 二. Ser…...

腾讯开源人像照片生成视频模型V-Express
网址 https://github.com/tencent-ailab/V-Express 下面是github里的翻译: 在人像视频生成领域,使用单张图像生成人像视频变得越来越普遍。一种常见的方法是利用生成模型来增强受控发电的适配器。 但是,控制信号的强度可能会有所不同&…...
)
pytorch使用DataParallel并行化保存和加载模型(单卡、多卡各种情况讲解)
话不多说,直接进入正题。 !!!不过要注意一点,本文保存模型采用的都是只保存模型参数的情况,而不是保存整个模型的情况。一定要看清楚再用啊! 1 单卡训练,单卡加载 #保存模型 torc…...

DeepSeek-OCR开源镜像多场景实践:跨境电商多语言产品说明书自动本地化预处理
DeepSeek-OCR开源镜像多场景实践:跨境电商多语言产品说明书自动本地化预处理 1. 项目背景与价值 跨境电商企业在全球化运营中面临着一个共同挑战:产品说明书的多语言本地化。传统方式需要人工翻译、重新排版设计,整个过程耗时耗力且成本高昂…...
与细胞治疗生产工具解析:Sexton产品应用综述【曼博生物官方代理Sexton】)
人血小板裂解液(hPL)与细胞治疗生产工具解析:Sexton产品应用综述【曼博生物官方代理Sexton】
摘要:人血小板裂解液(hPL)作为无动物源培养补充剂,正在逐步替代FBS应用于细胞与基因治疗(CGT)领域。本文结合相关产品体系,对hPL及细胞冻存与灌装系统进行系统梳理。 关键词:人血小板…...

5个高效实用的英雄联盟工具集使用指南
5个高效实用的英雄联盟工具集使用指南 【免费下载链接】League-Toolkit 兴趣使然的、简单易用的英雄联盟工具集。支持战绩查询、自动秒选等功能。基于 LCU API。 项目地址: https://gitcode.com/gh_mirrors/le/League-Toolkit League-Toolkit是一款基于LCU API开发的开源…...

节水灌溉物联网监控管理系统方案
对于部分水资源匮乏的地区,节水灌溉系统的应用对农业发展具有重要意义。该系统通过实时监测农田土壤湿度和气象条件,结合预设的灌溉计划和作物生长需求,精准控制灌溉设备的开启或关闭,有效避免了水资源浪费,显著提高了…...

Python将Parquet文件转换为JSONL格式文件
prompt:如何使用 Python 将 Parquet 文件转换为 JSONL 格式文件? 请提供完整的代码示例,包括使用 pandas 或 pyarrow 读取 Parquet 文件, 并将每行数据以 JSON 格式逐行写入 JSONL 文件的实现方式。 假设 Parquet 文件包含结构化数据…...

[260326] x-cmd v0.8.10:跨 Shell 统一配置命令短名;自动装好依赖运行 WhisperLiveKit 实时语音转写
[260326] x-cmd v0.8.10:跨 Shell 统一配置命令短名;自动装好依赖运行 WhisperLiveKit 实时语音转写 开放 shortcut 内部模块,配置命令短名,支持跨 Shell 统一使用whisper 模块新增 livekit 命令,自动装好依赖&#x…...
)
从 0 开始讲透 C++ Lambda(对标 Java)
在写 C 多线程或 STL 时,经常会看到这样的代码:std::thread t([]{ std::cout << "Hello C Thread\n"; });很多人第一反应:这 [] 是什么?为什么和 Java 不一样?一、先给结论(先建立整体认知…...

Nacos集群启动时,那个神秘的cluster.conf文件到底是怎么被找到和监控的?
Nacos集群启动时cluster.conf文件的寻址与监控机制深度解析 从一次集群配置失效事件说起 上周深夜,我们的分布式系统监控平台突然发出警报——Nacos集群中的三个节点相继失联。紧急排查时发现,明明已经更新了cluster.conf文件新增了两个节点,…...

Phi-4-Reasoning-Vision开源模型:Phi-4-reasoning-vision-15B双卡推理镜像详解
Phi-4-Reasoning-Vision开源模型:Phi-4-reasoning-vision-15B双卡推理镜像详解 1. 项目概述 Phi-4-Reasoning-Vision是基于微软Phi-4-reasoning-vision-15B多模态大模型开发的高性能推理工具,专为双卡RTX 4090环境优化设计。这个工具严格遵循官方SYSTE…...

面向对象高级三:内部类 枚举 泛型 java.lang包下常用API
一.内部类1.内部类概述 2.成员内部类(实例内部类)(1)成员内部类可以定义类的一切成员(2)当创建对象时不能直接给内部类创建对象而要先创建外部类的对象 然后new成员内部类的对象(3)在…...