使用Kube-Bench对Kubernetes进行安全检测
使用Kube-Bench对Kubernetes进行安全检测
1. 工具介绍
Kube-Bench是一个开源的Go语言工具,用于自动化检查Kubernetes集群是否符合CIS Kubernetes基准。这些基准包括一系列关于Kubernetes配置和部署安全性的建议和最佳实践。
Kube-Bench执行了一系列针对Kubernetes组件(如kube-apiserver、etcd、kube-scheduler、kube-controller-manager等)的测试,来检查它们是否按照CIS基准的推荐进行了配置。测试结果会被分类为PASS、FAIL或WARN,以清晰明了地显示哪些地方需要改进。
Kube-Bench是在运行时检查Kubernetes环境的工具,它并不会修改系统。你可以定期运行kube-bench来审计你的Kubernetes环境,确保其保持在最佳的安全状态。
官方仓库:https://github.com/aquasecurity/kube-bench
2. CIS Kubernetes Benchmark支持
在Kubernetes环境中,CIS Kubernetes基准就是一套针对Kubernetes的安全配置最佳实践。例如,CIS Kubernetes基准会涵盖如何配置kubelet,如何限制API服务器上的权限等内容。
进入CIS(Center for Internet Security)官网可以下载Kubernetes Benchmark文件。
Kubernetes Benchmark、kube-bench config和Kubernetes配套关系如下:
| Source | Kubernetes Benchmark | kube-bench config | Kubernetes versions |
|---|---|---|---|
| CIS | 1.5.1 | cis-1.5 | 1.15 |
| CIS | 1.6.0 | cis-1.6 | 1.16-1.18 |
| CIS | 1.20 | cis-1.20 | 1.19-1.21 |
| CIS | 1.23 | cis-1.23 | 1.22-1.23 |
| CIS | 1.24 | cis-1.24 | 1.24 |
| CIS | 1.7 | cis-1.7 | 1.25 |
| CIS | 1.8 | cis-1.8 | 1.26 |
| CIS | GKE 1.0.0 | gke-1.0 | GKE |
| CIS | GKE 1.2.0 | gke-1.2.0 | GKE |
| CIS | EKS 1.0.1 | eks-1.0.1 | EKS |
| CIS | EKS 1.1.0 | eks-1.1.0 | EKS |
| CIS | EKS 1.2.0 | eks-1.2.0 | EKS |
| CIS | ACK 1.0.0 | ack-1.0 | ACK |
| CIS | AKS 1.0.0 | aks-1.0 | AKS |
| RHEL | RedHat OpenShift hardening guide | rh-0.7 | OCP 3.10-3.11 |
| CIS | OCP4 1.1.0 | rh-1.0 | OCP 4.1- |
| CIS | 1.6.0-k3s | cis-1.6-k3s | k3s v1.16-v1.24 |
| DISA | Kubernetes Ver 1, Rel 6 | eks-stig-kubernetes-v1r6 | EKS |
| CIS | TKGI 1.2.53 | tkgi-1.2.53 | vmware |
| CIS | 1.7.0-rke | rke-cis-1.7 | rke v1.25-v1.27 |
| CIS | 1.7.0-rke2 | rke2-cis-1.6 | rke2 v1.25-v1.27 |
| CIS | 1.7.0-k3s | k3s-cis-1.7 | k3s v1.25-v1.27 |
最新信息请访问 CIS Kubernetes Benchmark support 查看。
默认配置下,Kube-Bench将根据目标设备上运行的Kubernete版本来确定要运行的测试集。
3. 工具安装
3.1 二进制安装
下载地址:https://github.com/aquasecurity/kube-bench/releases
[root@master1 ~]# wget https://github.com/aquasecurity/kube-bench/releases/download/v0.7.3/kube-bench_0.7.3_linux_amd64.tar.gz
[root@master1 ~]# mkdir /opt/kube-bench
# 将二进制文件解压到创建的目录
[root@master1 ~]# tar xf kube-bench_0.7.3_linux_amd64.tar.gz -C /opt/kube-bench/# 查看文件内容
[root@master1 ~]# cd /opt/kube-bench/
[root@master1  kube-bench]# ls
cfg  kube-bench
[root@master1  kube-bench]# ls cfg/
ack-1.0   cis-1.24           cis-1.6-k3s  eks-1.0.1                 gke-1.0       k3s-cis-1.7    rke2-cis-1.24  rke-cis-1.7
aks-1.0   cis-1.24-microk8s  cis-1.7      eks-1.1.0                 gke-1.2.0     rh-0.7         rke2-cis-1.7   tkgi-1.2.53
cis-1.20  cis-1.5            cis-1.8      eks-1.2.0                 k3s-cis-1.23  rh-1.0         rke-cis-1.23
cis-1.23  cis-1.6            config.yaml  eks-stig-kubernetes-v1r6  k3s-cis-1.24  rke2-cis-1.23  rke-cis-1.24
[root@master1 cfg]# cd cis-1.8/
# 各个组件yaml文件记录了需要检测的详细信息
[root@master1 cis-1.8]# ls
config.yaml  controlplane.yaml  etcd.yaml  master.yaml  node.yaml  policies.yaml
cfg/config.yaml包含了相关测试组件配置、配置文件路径、K8S版本和CIS标准映射等。如果k8s的某些配置文件自定义到了非默认的目录,修改config.yaml里的相应目录就行。
[root@master1 kube-bench]# cat cfg/config.yaml
---
## Controls Files.
# These are YAML files that hold all the details for running checks.
#
## Uncomment to use different control file paths.
# masterControls: ./cfg/master.yaml
# nodeControls: ./cfg/node.yamlmaster:components:- apiserver- scheduler- controllermanager- etcd- flanneld# kubernetes is a component to cover the config file /etc/kubernetes/config that is referred to in the benchmark- kubernetes- kubeletkubernetes:defaultconf: /etc/kubernetes/configapiserver:bins:- "kube-apiserver"- "hyperkube apiserver"- "hyperkube kube-apiserver"- "apiserver"- "openshift start master api"- "hypershift openshift-kube-apiserver"confs:- /etc/kubernetes/manifests/kube-apiserver.yaml- /etc/kubernetes/manifests/kube-apiserver.yml- /etc/kubernetes/manifests/kube-apiserver.manifest- /var/snap/kube-apiserver/current/args- /var/snap/microk8s/current/args/kube-apiserver- /etc/origin/master/master-config.yaml- /etc/kubernetes/manifests/talos-kube-apiserver.yaml- /var/lib/rancher/rke2/agent/pod-manifests/kube-apiserver.yamldefaultconf: /etc/kubernetes/manifests/kube-apiserver.yamlscheduler:bins:- "kube-scheduler"...
node:components:- kubelet- proxy# kubernetes is a component to cover the config file /etc/kubernetes/config that is referred to in the benchmark- kuberneteskubernetes:defaultconf: "/etc/kubernetes/config"kubelet:cafile:- "/etc/kubernetes/pki/ca.crt"- "/etc/kubernetes/certs/ca.crt"- "/etc/kubernetes/cert/ca.pem"- "/var/snap/microk8s/current/certs/ca.crt"- "/var/lib/rancher/rke2/agent/server.crt"- "/var/lib/rancher/rke2/agent/client-ca.crt"- "/var/lib/rancher/k3s/agent/client-ca.crt"
...etcd:components:- etcdetcd:bins:- "etcd"datadirs:- /var/lib/etcd/default.etcd- /var/lib/etcd/data.etcdconfs:- /etc/kubernetes/manifests/etcd.yaml- /etc/kubernetes/manifests/etcd.yml
...controlplane:components:- apiserverapiserver:bins:- "kube-apiserver"- "hyperkube apiserver"- "hyperkube kube-apiserver"- "apiserver"policies:components: []managedservices:components: []version_mapping:"1.15": "cis-1.5""1.16": "cis-1.6"
...target_mapping:"cis-1.5":- "master"- "node"- "controlplane"- "etcd"- "policies"
...
3.2 源码安装
工具使用go语言开发,执行如下步骤进行源码安装:
# 安装go
yum install go
# 配置go国内镜像源
go env -w GO111MODULE=on
go env -w GOPROXY=https://goproxy.cn,directgo install github.com/aquasecurity/kube-bench@latest
#安装成功后位于当前用户的go目录下
/root/go/bin./kube-bench --help# Run all checks./kube-bench
4. 运行kube-bench检测
kube-bench支持etcd组件、master节点、node节点等检测。命令运行语法:
./kube-bench --config-dir <配置目录> --config <配置文件> run --targets=<需要检测的组件>
本文测试的K8S环境如下:
# CPU架构
[root@master1 ~]# lscpu | grep 架构
架构:                           x86_64# K8S集群信息,master节点同时也承担worker节点的角色
[root@master1 ~]# kubectl get nodes
NAME        STATUS   ROLES                  AGE   VERSION
master1   Ready    control-plane,master   44d   v1.27.6
master2   Ready    control-plane,master   44d   v1.27.6
master3   Ready    control-plane,master   44d   v1.27.6
# K8S版本为1.27.6
[root@master1 ~]# kubectl version
WARNING: This version information is deprecated and will be replaced with the output from kubectl version --short.  Use --output=yaml|json to get the full version.
Client Version: version.Info{Major:"1", Minor:"27", GitVersion:"v1.27.6", GitCommit:"741c8db18a52787d734cbe4795f0b4ad860906d6", GitTreeState:"clean", BuildDate:"2023-09-13T09:21:34Z", GoVersion:"go1.20.8", Compiler:"gc", Platform:"linux/amd64"}
Kustomize Version: v5.0.1
Server Version: version.Info{Major:"1", Minor:"27", GitVersion:"v1.27.6", GitCommit:"741c8db18a52787d734cbe4795f0b4ad860906d6", GitTreeState:"clean", BuildDate:"2023-09-13T09:14:09Z", GoVersion:"go1.20.8", Compiler:"gc", Platform:"linux/amd64"}# 操作系统为openEuler
[root@master1 ~]# cat /etc/openEuler-latest
openeulerversion=openEuler-22.03-LTS
compiletime=2022-03-30-16-23-56
gccversion=10.3.1-10.oe2203
kernelversion=5.10.0-60.18.0.50.oe2203
openjdkversion=1.8.0.312.b07-11.oe2203
4.1 kube-bench检测etcd组件
[root@master1 kube-bench]# ./kube-bench --config-dir ./cfg/ --config ./cfg/config.yaml run --targets=etcd
[INFO] 2 Etcd Node Configuration
[INFO] 2 Etcd Node Configuration
[FAIL] 2.1 Ensure that the --cert-file and --key-file arguments are set as appropriate (Automated)
[FAIL] 2.2 Ensure that the --client-cert-auth argument is set to true (Automated)
[PASS] 2.3 Ensure that the --auto-tls argument is not set to true (Automated)
[FAIL] 2.4 Ensure that the --peer-cert-file and --peer-key-file arguments are set as appropriate (Automated)
[FAIL] 2.5 Ensure that the --peer-client-cert-auth argument is set to true (Automated)
[PASS] 2.6 Ensure that the --peer-auto-tls argument is not set to true (Automated)
[WARN] 2.7 Ensure that a unique Certificate Authority is used for etcd (Manual)== Remediations etcd ==
2.1 Follow the etcd service documentation and configure TLS encryption.
Then, edit the etcd pod specification file /etc/kubernetes/manifests/etcd.yaml
on the master node and set the below parameters.
--cert-file=</path/to/ca-file>
--key-file=</path/to/key-file>2.2 Edit the etcd pod specification file /etc/kubernetes/manifests/etcd.yaml on the master
node and set the below parameter.
--client-cert-auth="true"2.4 Follow the etcd service documentation and configure peer TLS encryption as appropriate
for your etcd cluster.
Then, edit the etcd pod specification file /etc/kubernetes/manifests/etcd.yaml on the
master node and set the below parameters.
--peer-client-file=</path/to/peer-cert-file>
--peer-key-file=</path/to/peer-key-file>2.5 Edit the etcd pod specification file /etc/kubernetes/manifests/etcd.yaml on the master
node and set the below parameter.
--peer-client-cert-auth=true2.7 [Manual test]
Follow the etcd documentation and create a dedicated certificate authority setup for the
etcd service.
Then, edit the etcd pod specification file /etc/kubernetes/manifests/etcd.yaml on the
master node and set the below parameter.
--trusted-ca-file=</path/to/ca-file>== Summary etcd ==
2 checks PASS
4 checks FAIL
1 checks WARN
0 checks INFO== Summary total ==
2 checks PASS
4 checks FAIL
1 checks WARN
0 checks INFO
根据汇总结果,检测出4个Fail,1个Warn,打印结果给出了相应的详细问题说明和解决方法。
4.2 kube-bench检测master节点
[root@master1 kube-bench]# ./kube-bench --config-dir ./cfg/ --config ./cfg/config.yaml run --targets=master
[INFO] 1 Control Plane Security Configuration
[INFO] 1.1 Control Plane Node Configuration Files
[PASS] 1.1.1 Ensure that the API server pod specification file permissions are set to 600 or more restrictive (Automated)
[PASS] 1.1.2 Ensure that the API server pod specification file ownership is set to root:root (Automated)
[PASS] 1.1.3 Ensure that the controller manager pod specification file permissions are set to 600 or more restrictive (Automated)
[PASS] 1.1.4 Ensure that the controller manager pod specification file ownership is set to root:root (Automated)
[PASS] 1.1.5 Ensure that the scheduler pod specification file permissions are set to 600 or more restrictive (Automated)
[PASS] 1.1.6 Ensure that the scheduler pod specification file ownership is set to root:root (Automated)
[FAIL] 1.1.7 Ensure that the etcd pod specification file permissions are set to 600 or more restrictive (Automated)
[FAIL] 1.1.8 Ensure that the etcd pod specification file ownership is set to root:root (Automated)
[WARN] 1.1.9 Ensure that the Container Network Interface file permissions are set to 600 or more restrictive (Manual)
[WARN] 1.1.10 Ensure that the Container Network Interface file ownership is set to root:root (Manual)
[PASS] 1.1.11 Ensure that the etcd data directory permissions are set to 700 or more restrictive (Automated)
[FAIL] 1.1.12 Ensure that the etcd data directory ownership is set to etcd:etcd (Automated)
[FAIL] 1.1.13 Ensure that the admin.conf file permissions are set to 600 or more restrictive (Automated)
[PASS] 1.1.14 Ensure that the admin.conf file ownership is set to root:root (Automated)
[FAIL] 1.1.15 Ensure that the scheduler.conf file permissions are set to 600 or more restrictive (Automated)
[PASS] 1.1.16 Ensure that the scheduler.conf file ownership is set to root:root (Automated)
[FAIL] 1.1.17 Ensure that the controller-manager.conf file permissions are set to 600 or more restrictive (Automated)
[PASS] 1.1.18 Ensure that the controller-manager.conf file ownership is set to root:root (Automated)
[PASS] 1.1.19 Ensure that the Kubernetes PKI directory and file ownership is set to root:root (Automated)
[WARN] 1.1.20 Ensure that the Kubernetes PKI certificate file permissions are set to 600 or more restrictive (Manual)
[WARN] 1.1.21 Ensure that the Kubernetes PKI key file permissions are set to 600 (Manual)
[INFO] 1.2 API Server
[WARN] 1.2.1 Ensure that the --anonymous-auth argument is set to false (Manual)
[PASS] 1.2.2 Ensure that the --token-auth-file parameter is not set (Automated)
[WARN] 1.2.3 Ensure that the --DenyServiceExternalIPs is set (Manual)
[PASS] 1.2.4 Ensure that the --kubelet-client-certificate and --kubelet-client-key arguments are set as appropriate (Automated)
[FAIL] 1.2.5 Ensure that the --kubelet-certificate-authority argument is set as appropriate (Automated)
[PASS] 1.2.6 Ensure that the --authorization-mode argument is not set to AlwaysAllow (Automated)
[PASS] 1.2.7 Ensure that the --authorization-mode argument includes Node (Automated)
[PASS] 1.2.8 Ensure that the --authorization-mode argument includes RBAC (Automated)
[WARN] 1.2.9 Ensure that the admission control plugin EventRateLimit is set (Manual)
[PASS] 1.2.10 Ensure that the admission control plugin AlwaysAdmit is not set (Automated)
[WARN] 1.2.11 Ensure that the admission control plugin AlwaysPullImages is set (Manual)
[WARN] 1.2.12 Ensure that the admission control plugin SecurityContextDeny is set if PodSecurityPolicy is not used (Manual)
[PASS] 1.2.13 Ensure that the admission control plugin ServiceAccount is set (Automated)
[PASS] 1.2.14 Ensure that the admission control plugin NamespaceLifecycle is set (Automated)
[PASS] 1.2.15 Ensure that the admission control plugin NodeRestriction is set (Automated)
[FAIL] 1.2.16 Ensure that the --profiling argument is set to false (Automated)
[FAIL] 1.2.17 Ensure that the --audit-log-path argument is set (Automated)
[FAIL] 1.2.18 Ensure that the --audit-log-maxage argument is set to 30 or as appropriate (Automated)
[FAIL] 1.2.19 Ensure that the --audit-log-maxbackup argument is set to 10 or as appropriate (Automated)
[FAIL] 1.2.20 Ensure that the --audit-log-maxsize argument is set to 100 or as appropriate (Automated)
[WARN] 1.2.21 Ensure that the --request-timeout argument is set as appropriate (Manual)
[PASS] 1.2.22 Ensure that the --service-account-lookup argument is set to true (Automated)
[PASS] 1.2.23 Ensure that the --service-account-key-file argument is set as appropriate (Automated)
[PASS] 1.2.24 Ensure that the --etcd-certfile and --etcd-keyfile arguments are set as appropriate (Automated)
[PASS] 1.2.25 Ensure that the --tls-cert-file and --tls-private-key-file arguments are set as appropriate (Automated)
[PASS] 1.2.26 Ensure that the --client-ca-file argument is set as appropriate (Automated)
[PASS] 1.2.27 Ensure that the --etcd-cafile argument is set as appropriate (Automated)
[WARN] 1.2.28 Ensure that the --encryption-provider-config argument is set as appropriate (Manual)
[WARN] 1.2.29 Ensure that encryption providers are appropriately configured (Manual)
[PASS] 1.2.30 Ensure that the API Server only makes use of Strong Cryptographic Ciphers (Manual)
[INFO] 1.3 Controller Manager
[WARN] 1.3.1 Ensure that the --terminated-pod-gc-threshold argument is set as appropriate (Manual)
[FAIL] 1.3.2 Ensure that the --profiling argument is set to false (Automated)
[PASS] 1.3.3 Ensure that the --use-service-account-credentials argument is set to true (Automated)
[PASS] 1.3.4 Ensure that the --service-account-private-key-file argument is set as appropriate (Automated)
[PASS] 1.3.5 Ensure that the --root-ca-file argument is set as appropriate (Automated)
[PASS] 1.3.6 Ensure that the RotateKubeletServerCertificate argument is set to true (Automated)
[PASS] 1.3.7 Ensure that the --bind-address argument is set to 127.0.0.1 (Automated)
[INFO] 1.4 Scheduler
[FAIL] 1.4.1 Ensure that the --profiling argument is set to false (Automated)
[PASS] 1.4.2 Ensure that the --bind-address argument is set to 127.0.0.1 (Automated)== Remediations master ==
1.1.7 Run the below command (based on the file location on your system) on the control plane node.
For example,
chmod 600 /etc/kubernetes/manifests/etcd.yaml1.1.8 Run the below command (based on the file location on your system) on the control plane node.
For example,
chown root:root /etc/kubernetes/manifests/etcd.yaml1.1.9 Run the below command (based on the file location on your system) on the control plane node.
For example, chmod 600 <path/to/cni/files>1.1.10 Run the below command (based on the file location on your system) on the control plane node.
For example,
chown root:root <path/to/cni/files>1.1.12 On the etcd server node, get the etcd data directory, passed as an argument --data-dir,
from the command 'ps -ef | grep etcd'.
Run the below command (based on the etcd data directory found above).
For example, chown etcd:etcd /var/lib/etcd1.1.13 Run the below command (based on the file location on your system) on the control plane node.
For example, chmod 600 /etc/kubernetes/admin.conf1.1.15 Run the below command (based on the file location on your system) on the control plane node.
For example,
chmod 600 /etc/kubernetes/scheduler.conf1.1.17 Run the below command (based on the file location on your system) on the control plane node.
For example,
chmod 600 /etc/kubernetes/controller-manager.conf1.1.20 Run the below command (based on the file location on your system) on the control plane node.
For example,
chmod -R 600 /etc/kubernetes/pki/*.crt1.1.21 Run the below command (based on the file location on your system) on the control plane node.
For example,
chmod -R 600 /etc/kubernetes/pki/*.key1.2.1 Edit the API server pod specification file /etc/kubernetes/manifests/kube-apiserver.yaml
on the control plane node and set the below parameter.
--anonymous-auth=false1.2.3 Edit the API server pod specification file /etc/kubernetes/manifests/kube-apiserver.yaml
on the control plane node and remove the `DenyServiceExternalIPs`
from enabled admission plugins.1.2.5 Follow the Kubernetes documentation and setup the TLS connection between
the apiserver and kubelets. Then, edit the API server pod specification file
/etc/kubernetes/manifests/kube-apiserver.yaml on the control plane node and set the
--kubelet-certificate-authority parameter to the path to the cert file for the certificate authority.
--kubelet-certificate-authority=<ca-string>1.2.9 Follow the Kubernetes documentation and set the desired limits in a configuration file.
Then, edit the API server pod specification file /etc/kubernetes/manifests/kube-apiserver.yaml
and set the below parameters.
--enable-admission-plugins=...,EventRateLimit,...
--admission-control-config-file=<path/to/configuration/file>1.2.11 Edit the API server pod specification file /etc/kubernetes/manifests/kube-apiserver.yaml
on the control plane node and set the --enable-admission-plugins parameter to include
AlwaysPullImages.
--enable-admission-plugins=...,AlwaysPullImages,...1.2.12 Edit the API server pod specification file /etc/kubernetes/manifests/kube-apiserver.yaml
on the control plane node and set the --enable-admission-plugins parameter to include
SecurityContextDeny, unless PodSecurityPolicy is already in place.
--enable-admission-plugins=...,SecurityContextDeny,...1.2.16 Edit the API server pod specification file /etc/kubernetes/manifests/kube-apiserver.yaml
on the control plane node and set the below parameter.
--profiling=false1.2.17 Edit the API server pod specification file /etc/kubernetes/manifests/kube-apiserver.yaml
on the control plane node and set the --audit-log-path parameter to a suitable path and
file where you would like audit logs to be written, for example,
--audit-log-path=/var/log/apiserver/audit.log1.2.18 Edit the API server pod specification file /etc/kubernetes/manifests/kube-apiserver.yaml
on the control plane node and set the --audit-log-maxage parameter to 30
or as an appropriate number of days, for example,
--audit-log-maxage=301.2.19 Edit the API server pod specification file /etc/kubernetes/manifests/kube-apiserver.yaml
on the control plane node and set the --audit-log-maxbackup parameter to 10 or to an appropriate
value. For example,
--audit-log-maxbackup=101.2.20 Edit the API server pod specification file /etc/kubernetes/manifests/kube-apiserver.yaml
on the control plane node and set the --audit-log-maxsize parameter to an appropriate size in MB.
For example, to set it as 100 MB, --audit-log-maxsize=1001.2.21 Edit the API server pod specification file /etc/kubernetes/manifests/kube-apiserver.yaml
and set the below parameter as appropriate and if needed.
For example, --request-timeout=300s1.2.28 Follow the Kubernetes documentation and configure a EncryptionConfig file.
Then, edit the API server pod specification file /etc/kubernetes/manifests/kube-apiserver.yaml
on the control plane node and set the --encryption-provider-config parameter to the path of that file.
For example, --encryption-provider-config=</path/to/EncryptionConfig/File>1.2.29 Follow the Kubernetes documentation and configure a EncryptionConfig file.
In this file, choose aescbc, kms or secretbox as the encryption provider.1.3.1 Edit the Controller Manager pod specification file /etc/kubernetes/manifests/kube-controller-manager.yaml
on the control plane node and set the --terminated-pod-gc-threshold to an appropriate threshold,
for example, --terminated-pod-gc-threshold=101.3.2 Edit the Controller Manager pod specification file /etc/kubernetes/manifests/kube-controller-manager.yaml
on the control plane node and set the below parameter.
--profiling=false1.4.1 Edit the Scheduler pod specification file /etc/kubernetes/manifests/kube-scheduler.yaml file
on the control plane node and set the below parameter.
--profiling=false== Summary master ==
33 checks PASS
14 checks FAIL
13 checks WARN
0 checks INFO== Summary total ==
33 checks PASS
14 checks FAIL
13 checks WARN
0 checks INFO
检测到14个Fail,可以根据给出的修补方案进行修改。
4.3 kube-bench检测worker节点
[root@master1 kube-bench]# ./kube-bench --config-dir ./cfg/ --config ./cfg/config.yaml run --targets=node
[INFO] 4 Worker Node Security Configuration
[INFO] 4.1 Worker Node Configuration Files
[FAIL] 4.1.1 Ensure that the kubelet service file permissions are set to 600 or more restrictive (Automated)
[PASS] 4.1.2 Ensure that the kubelet service file ownership is set to root:root (Automated)
[WARN] 4.1.3 If proxy kubeconfig file exists ensure permissions are set to 600 or more restrictive (Manual)
[WARN] 4.1.4 If proxy kubeconfig file exists ensure ownership is set to root:root (Manual)
[PASS] 4.1.5 Ensure that the --kubeconfig kubelet.conf file permissions are set to 600 or more restrictive (Automated)
[PASS] 4.1.6 Ensure that the --kubeconfig kubelet.conf file ownership is set to root:root (Automated)
[WARN] 4.1.7 Ensure that the certificate authorities file permissions are set to 600 or more restrictive (Manual)
[PASS] 4.1.8 Ensure that the client certificate authorities file ownership is set to root:root (Manual)
[FAIL] 4.1.9 If the kubelet config.yaml configuration file is being used validate permissions set to 600 or more restrictive (Automated)
[PASS] 4.1.10 If the kubelet config.yaml configuration file is being used validate file ownership is set to root:root (Automated)
[INFO] 4.2 Kubelet
[PASS] 4.2.1 Ensure that the --anonymous-auth argument is set to false (Automated)
[PASS] 4.2.2 Ensure that the --authorization-mode argument is not set to AlwaysAllow (Automated)
[PASS] 4.2.3 Ensure that the --client-ca-file argument is set as appropriate (Automated)
[PASS] 4.2.4 Verify that the --read-only-port argument is set to 0 (Manual)
[PASS] 4.2.5 Ensure that the --streaming-connection-idle-timeout argument is not set to 0 (Manual)
[PASS] 4.2.6 Ensure that the --make-iptables-util-chains argument is set to true (Automated)
[PASS] 4.2.7 Ensure that the --hostname-override argument is not set (Manual)
[PASS] 4.2.8 Ensure that the eventRecordQPS argument is set to a level which ensures appropriate event capture (Manual)
[WARN] 4.2.9 Ensure that the --tls-cert-file and --tls-private-key-file arguments are set as appropriate (Manual)
[PASS] 4.2.10 Ensure that the --rotate-certificates argument is not set to false (Automated)
[PASS] 4.2.11 Verify that the RotateKubeletServerCertificate argument is set to true (Manual)
[WARN] 4.2.12 Ensure that the Kubelet only makes use of Strong Cryptographic Ciphers (Manual)
[WARN] 4.2.13 Ensure that a limit is set on pod PIDs (Manual)== Remediations node ==
4.1.1 Run the below command (based on the file location on your system) on the each worker node.
For example, chmod 600 /etc/systemd/system/kubelet.service.d/10-kubeadm.conf4.1.3 Run the below command (based on the file location on your system) on the each worker node.
For example,
chmod 600 /etc/kubernetes/proxy.conf4.1.4 Run the below command (based on the file location on your system) on the each worker node.
For example, chown root:root /etc/kubernetes/proxy.conf4.1.7 Run the following command to modify the file permissions of the
--client-ca-file chmod 600 <filename>4.1.9 Run the following command (using the config file location identified in the Audit step)
chmod 600 /var/lib/kubelet/config.yaml4.2.9 If using a Kubelet config file, edit the file to set `tlsCertFile` to the location
of the certificate file to use to identify this Kubelet, and `tlsPrivateKeyFile`
to the location of the corresponding private key file.
If using command line arguments, edit the kubelet service file
/etc/systemd/system/kubelet.service.d/10-kubeadm.conf on each worker node and
set the below parameters in KUBELET_CERTIFICATE_ARGS variable.
--tls-cert-file=<path/to/tls-certificate-file>
--tls-private-key-file=<path/to/tls-key-file>
Based on your system, restart the kubelet service. For example,
systemctl daemon-reload
systemctl restart kubelet.service4.2.12 If using a Kubelet config file, edit the file to set `TLSCipherSuites` to
TLS_ECDHE_ECDSA_WITH_AES_128_GCM_SHA256,TLS_ECDHE_RSA_WITH_AES_128_GCM_SHA256,TLS_ECDHE_ECDSA_WITH_CHACHA20_POLY1305,TLS_ECDHE_RSA_WITH_AES_256_GCM_SHA384,TLS_ECDHE_RSA_WITH_CHACHA20_POLY1305,TLS_ECDHE_ECDSA_WITH_AES_256_GCM_SHA384,TLS_RSA_WITH_AES_256_GCM_SHA384,TLS_RSA_WITH_AES_128_GCM_SHA256
or to a subset of these values.
If using executable arguments, edit the kubelet service file
/etc/systemd/system/kubelet.service.d/10-kubeadm.conf on each worker node and
set the --tls-cipher-suites parameter as follows, or to a subset of these values.
--tls-cipher-suites=TLS_ECDHE_ECDSA_WITH_AES_128_GCM_SHA256,TLS_ECDHE_RSA_WITH_AES_128_GCM_SHA256,TLS_ECDHE_ECDSA_WITH_CHACHA20_POLY1305,TLS_ECDHE_RSA_WITH_AES_256_GCM_SHA384,TLS_ECDHE_RSA_WITH_CHACHA20_POLY1305,TLS_ECDHE_ECDSA_WITH_AES_256_GCM_SHA384,TLS_RSA_WITH_AES_256_GCM_SHA384,TLS_RSA_WITH_AES_128_GCM_SHA256
Based on your system, restart the kubelet service. For example:
systemctl daemon-reload
systemctl restart kubelet.service4.2.13 Decide on an appropriate level for this parameter and set it,
either via the --pod-max-pids command line parameter or the PodPidsLimit configuration file setting.== Summary node ==
15 checks PASS
2 checks FAIL
6 checks WARN
0 checks INFO== Summary total ==
15 checks PASS
2 checks FAIL
6 checks WARN
0 checks INFO
检测到2个Fail,可以根据给出的修补方案进行修改。
4.4 执行全部检测
# 不加targets执行全部检测
[root@master1 kube-bench]# ./kube-bench --config-dir ./cfg/ --config ./cfg/config.yaml run
4.5 手动设置不安全的参数进行检测
可以手动构造不安全的设置,使用工具进行检测:
-
构造etcd不安全设置,将
/etc/kubernetes/manifests/etcd.yaml文件里的client-cert-auth=true改为client-cert-auth=false。 -
构造
kube-apiserver不安全设置,将/etc/kubernetes/manifests/kube-apiserver.yaml文件里的authorization-mode授权模式改为AlwaysAllow。
修改后重启kubelet使配置生效,然后使用kube-bench检测是否能检测到,详细操作查看文末的参考资料。
5. 总结
kube-bench是一款强大的工具,它可以帮助我们发现哪些Kubernetes配置没有遵循CIS的最佳实践,从而改正这些问题,增强我们的Kubernetes集群的安全性。虽然kube-bench不能捕获所有可能的安全问题,但它至少可以帮助我们消除最常见的一些安全漏洞。
6. 问题记录
- Centos7.9 K8S 环境下面运行kube-bench遇到glibc配套问题,需要更新系统的glibc版本到2.32,由于更新glibc可能造成系统不稳定,改换了系统进行测试。
[root@k8s-master kube-bench]# ./kube-bench --config-dir `pwd`/cfg --config `pwd`/cfg/config.yaml run --targets=etcd
./kube-bench: /lib64/libc.so.6: version `GLIBC_2.32' not found (required by ./kube-bench)
./kube-bench: /lib64/libc.so.6: version `GLIBC_2.34' not found (required by ./kube-bench)
7. 参考资料
https://www.cnblogs.com/renshengdezheli/p/17640119.html
相关文章:

使用Kube-Bench对Kubernetes进行安全检测
使用Kube-Bench对Kubernetes进行安全检测 1. 工具介绍 Kube-Bench是一个开源的Go语言工具,用于自动化检查Kubernetes集群是否符合CIS Kubernetes基准。这些基准包括一系列关于Kubernetes配置和部署安全性的建议和最佳实践。 Kube-Bench执行了一系列针对Kubernete…...
STM32开发过程中碰到的问题总结 - 1
文章目录 前言1. 怎么生成keil下可以使用的文件和gcc下编译使用的makefile2. STM32的时钟树3.怎么查看keil5下的编译工具链用的是哪个4. Arm编译工具链和GCC编译工具链有什么区别吗?5. 怎么查看Linux虚拟机是x86的还是aarch646. 怎么下载gcc-arm的编译工具链7.怎么修…...

hiberfil.sys文件在Windows系统作用
hiberfil.sys文件在Windows系统中起着关键的作用,主要涉及到计算机的休眠功能。以下是关于hiberfil.sys的详细解释: 定义与功能: hiberfil.sys是Windows休眠功能(Windows Hibernation)将内存数据与会话保存至硬盘所需…...
智能制造前沿:ARMxy工控机在机器人控制中
机器人控制系统正逐步成为现代制造业的核心引擎。在这个过程中,ARMxy工业计算机以其独特的优势,成为了驱动这一变革的关键力量。本文将以自动化装配线机器人为例,探讨ARMxy如何通过其低功耗、高性能特性,以及高度灵活性的设计&…...
【CS.AI】AI引领编程新时代:深度探索GitHub Copilot
文章目录 引言0. TOP TAKEAWAYS 重要要点1. Copilot的基本功能2. 技术原理3. 优势与局限优势局限 4. 使用体验4.1 初次使用4.2 在 JetBrains 全家桶中使用 GitHub Copilot1. 安装插件2. 配置插件3. 使用 GitHub Copilot 4.3 日常开发4.4 体验与反馈 5. 对开发者生态系统的影响5…...
Java:爬虫htmlunit抓取a标签
如果对htmlunit还不了解的话可以参考Java:爬虫htmlunit-CSDN博客 了解了htmlunit之后,我们再来学习如何在页面中抓取我们想要的数据,我们在学习初期可以找一些结构比较清晰的网站来做测试爬取,首先我们随意找个网站如下ÿ…...
电池包断路单元DBU的预充电电阻应用案例
当电池组接触器闭合到电机和逆变器上时,逆变器电容器中会有电流涌入。这种非常高的电流至少可能会使接触器老化,并可能永久损坏接触器。 因此,当我们关闭电池组上的接触器时,我们分三个步骤执行此操作: 1.关闭主负极…...
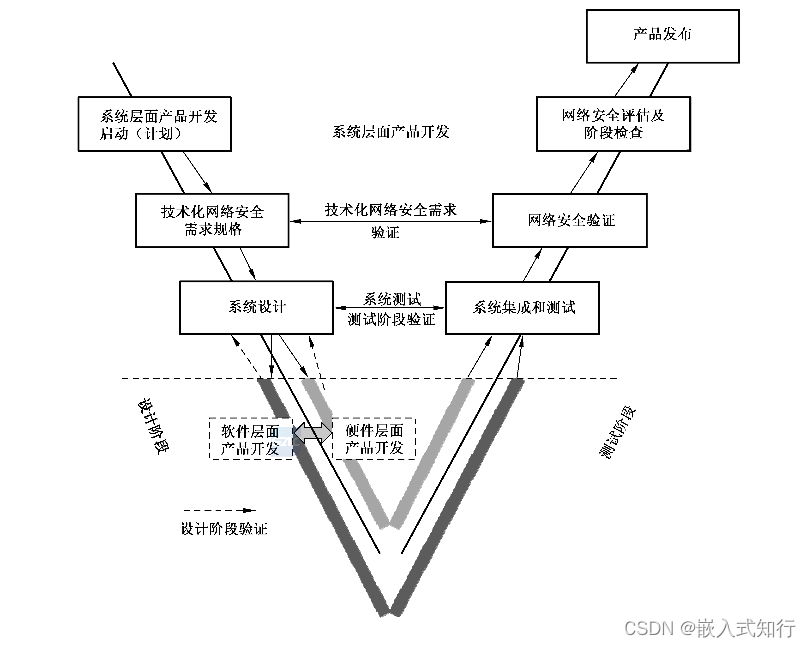
车载网络安全指南 系统层面开发阶段(六)
返回总目录->返回总目录<- 目录 前言 一、统层面产品开发启动 二、系统层面漏洞分析 三、网络安全策略具体化 四、确定网络安全技术需求 五、系统设计 六、系统集成与测试 七、网络安全验证 八、系统层面网络安全评估 九、系统层面产品开发阶段检查 十、产品发…...

Julia 文件读写
Julia 文件读写 Julia 是一种高性能的动态编程语言,特别适合于数值计算和科学计算。在数据处理和科学研究中,文件读写是一项基本且重要的技能。Julia 提供了一套丰富的函数和库来处理文件读写操作,使得文件操作变得简单而高效。 基本文件操作 打开和关闭文件 在 Julia 中…...

为何总是会失败
总是失败可能涉及多种因素,但这里有一些常见原因和对应的建议,或许可以帮助你找到问题所在并加以改进。 1. 目标不明确 原因 目标不清晰或设定过高会导致失望和挫折感。如果目标不明确,行动就会缺乏方向,导致效率低下和失败。 …...
【PB案例学习笔记】-21小大写金额转换
写在前面 这是PB案例学习笔记系列文章的第21篇,该系列文章适合具有一定PB基础的读者。 通过一个个由浅入深的编程实战案例学习,提高编程技巧,以保证小伙伴们能应付公司的各种开发需求。 文章中设计到的源码,小凡都上传到了gite…...
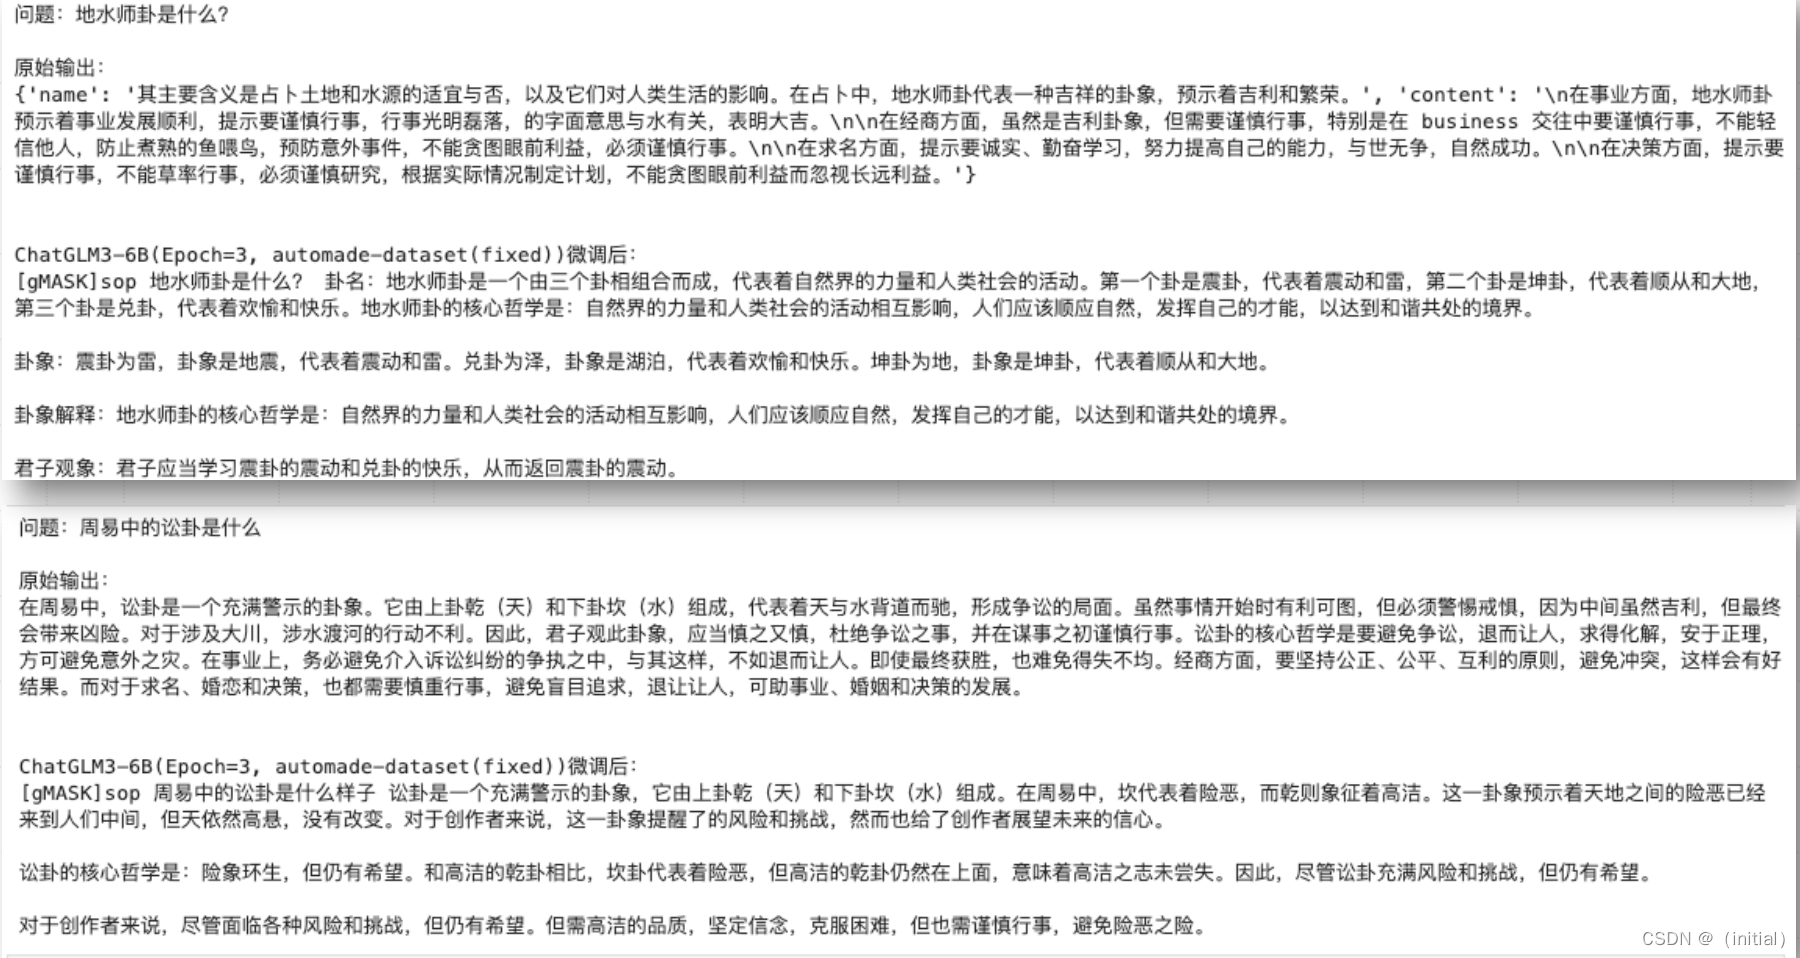
12.实战私有数据微调ChatGLM3
实战私有数据微调ChatGLM3 实战私有数据微调ChatGLM3实战构造私有的微调数据集基于 ChatGPT 设计生成训练数据的 Prompt使用 LangChain GPT-3.5-Turbo 生成训练数据样例训练数据解析、数据增强和持久化存储自动化批量生成训练数据集流水线提示工程(Prompt Engineer…...

PHP地方门户分类信息网站源码讯客分类信息系统源码(含手机版)
源码介绍 1.上传程序到网站根目录,访问http://域名/install/index.php 进行安装,不要直接打开网址,先直接安装; 2.安装完成后 后台恢复数据即可 默认帐号密码都是admin http://域名/admin/ 3.不要删除任何文件,因为删除文件或者修改代码可能造成错误 运…...
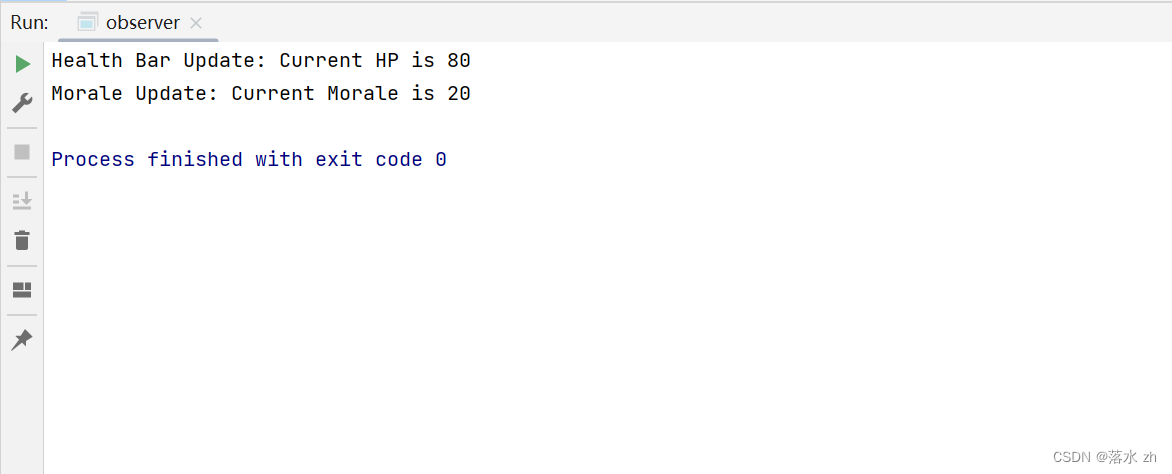
设计模式 —— 观察者模式
设计模式 —— 观察者模式 什么是观察者模式观察者模式定义观察者模式的角色观察者模式的使用场景观察者模式的实现 被观察者(Subject)观察者(Observer)通知(notify)更新显示(update)…...
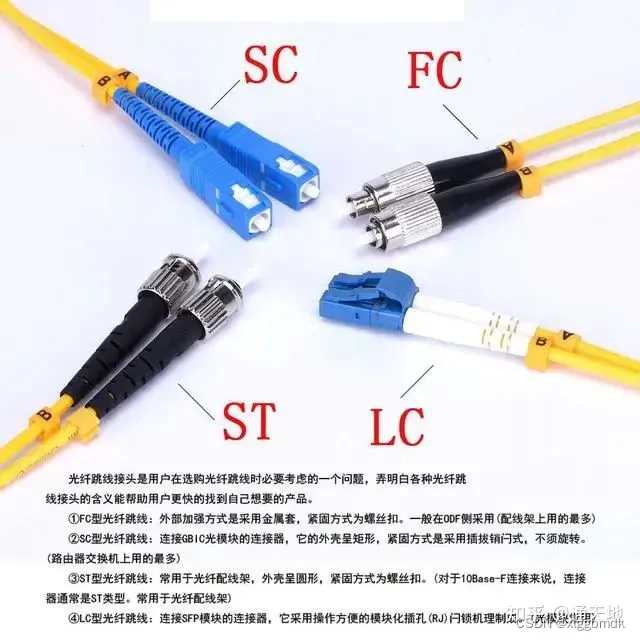
光纤跳线(又称光纤连接器)的种类
光纤跳线(又称光纤连接器),也就是接入光模块的光纤接头,也有好多种,且相互之间不可以互用。SFP模块接LC光纤连接器,而GBIC接的是SC光纤连接器。下面对网络工程中几种常用的光纤连接器进行详细的说明&#x…...

探索Ubuntu:从入门到精通
目录 一、什么是Ubuntu? 1.1 Ubuntu的定义和背景 1.2 Ubuntu的特点 二、安装Ubuntu 2.1 下载Ubuntu安装镜像 2.2 制作启动盘 2.3 安装Ubuntu 三、初步设置和基本操作 3.1 系统更新 3.2 安装必要软件 3.3 设置和管理用户账户 四、文件和目录管理 4.1 文件管理器 …...
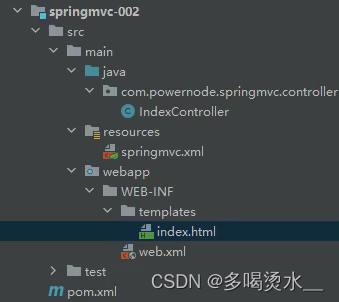
SpringMVC-基础架构
一、什么是MVC 二、什么是SpringMVC 三、SpringMVC的特点 四、配置SpringMVC 简单流程: 总体框架 1.创建pom.xml依赖 <!--打包方式--><packaging>war</packaging><!--依赖--><dependencies><dependency><groupId>org.s…...

《Windows API每日一练》4.1 GDI绘图
本节必须掌握的知识点: GDI原理 GDI函数调用 GDI基本图形 4.1.1 GDI原理 GDI,全称是Graphics Device Interface(图形设备接口),是微软Windows操作系统中提供的一套用于渲染图形和格式化文本的API(应用程序…...
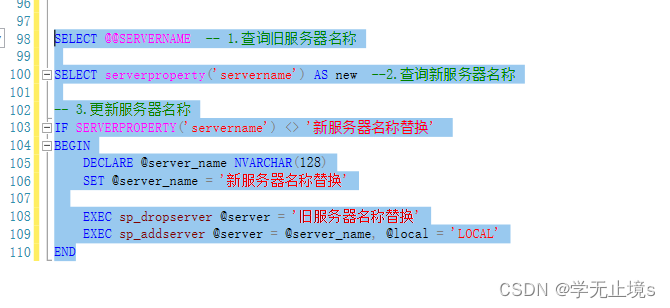
SQL Server 安装后,服务器再改名,造成名称不一致,查询并修改数据库服务器真实名称
SELECT SERVERNAME -- 1.查询旧服务器名称 SELECT serverproperty(servername) AS new --2.查询新服务器名称 -- 3.更新服务器名称 IF SERVERPROPERTY(servername) <> 新服务器名称替换 BEGIN DECLARE server_name NVARCHAR(128) SET server_name 新服务器…...

单例模式、工厂模式 c++关键字 static
static 关键字的作用: 主要作用在于 控制变量或函数的作用域、生命周期以及它们如何被不同部分的程序访问,从而帮助程序员管理内存、避免命名冲突,并实现特定的设计模式(如单例模式)。 1. 静态局部变量:当…...

Android音视频开发实战:如何用ExoPlayer+FFmpeg解决冷门格式播放难题
Android音视频开发实战:ExoPlayer与FFmpeg的深度整合方案 在移动应用开发领域,音视频播放功能已成为教育、社交、娱乐等各类应用的标配需求。然而当用户上传的媒体文件格式超出常规范围时,开发者往往会陷入兼容性困境。我曾在一个在线教育项目…...

Install pyrealsense2 on the jetson thor
Content1. 安装依赖2. 安装 librealsense 库3. 安装 Python 模块4. 测试安装在 Jetson Thor 上安装 pyrealsense2(Intel RealSense Python 绑定)需要注意 Jetson ARM 架构和 CUDA 驱动兼容性,下面是详细步骤(中文说明)…...

亚洲美女-造相Z-Turbo创意落地:结合LoRA微调实现汉服/职场/校园等细分风格
亚洲美女-造相Z-Turbo创意落地:结合LoRA微调实现汉服/职场/校园等细分风格 1. 引言:当AI绘画遇见亚洲美学 你有没有想过,让AI帮你画一个穿着汉服的古典美人,或者一个在写字楼里干练的职场女性,又或者一个充满青春活力…...

Qwen3-TTS快速体验:一键部署,输入文字即可生成10种语言语音
Qwen3-TTS快速体验:一键部署,输入文字即可生成10种语言语音 1. 从文字到语音,只需要几分钟 你有没有想过,把自己写的文字变成不同国家语言的语音,而且还能指定说话人的风格?比如让一个温柔的成年女性用中…...

芯片可靠性标准解析:从商规到车规的实战指南
1. 芯片可靠性标准入门:为什么商规、工规、车规差异这么大? 刚入行时,我总纳闷为什么同样功能的芯片,车规级价格能比商规贵5倍。直到有次亲眼目睹某新能源汽车因一颗电源管理芯片失效导致整车趴窝,才明白可靠性标准背后…...

Time-MoE:如何通过混合专家架构重塑时间序列预测的边界
1. 当时间序列预测遇上混合专家架构 记得我第一次接触时间序列预测时,还在用ARIMA模型手动调参。那时为了预测下周的销售额,光是确定差分阶数就折腾了一整天。现在回头看,传统方法就像用算盘处理大数据——不是说算盘不好,但当数据…...
)
迷你世界UGC3.0脚本触发器事件管理(特效)
迷你世界UGC3.0脚本WikiMenuOn this pageSidebar Navigation快速入门欢迎MOD、组件介绍什么是Lua编程组件介绍组件说明组件互相操作组件函数组件属性事件触发器事件管理组件事件管理函数库服务模块世界模块管理接口 World对象…...
)
Potplayer画质调校全攻略:从偏黄修复到HDR效果优化(附最新插件推荐)
Potplayer画质调校全攻略:从偏黄修复到HDR效果优化 每次打开心仪的电影,却发现画面泛黄得像老照片?或是HDR视频灰蒙蒙一片?作为影视发烧友,这些问题简直让人抓狂。今天我们就来彻底解决这些痛点,让你的Potp…...

NDT vs ICP:在KITTI数据集上,为什么NDT更适合SLAM前端?
NDT vs ICP:KITTI数据集下SLAM前端算法的深度解析 当我们在KITTI数据集上构建SLAM系统时,前端里程计的选择往往决定了整个系统的稳定性和精度。NDT(Normal Distributions Transform)和ICP(Iterative Closest Point&…...

Invest模型年产水量计算:从数据获取到结果导出的全流程实战
1. Invest模型年产水量计算入门指南 刚接触Invest模型的朋友们可能对这个强大的生态系统服务评估工具既好奇又困惑。作为一款由斯坦福大学自然资本项目组开发的免费开源工具,Invest模型能够帮助我们量化生态系统的各项服务价值,其中年产水量计算是最基础…...