使用seq2seq架构实现英译法

seq2seq介绍
模型架构:
Seq2Seq(Sequence-to-Sequence)模型是一种在自然语言处理(NLP)中广泛应用的架构,其核心思想是将一个序列作为输入,并输出另一个序列。这种模型特别适用于机器翻译、聊天机器人、自动文摘等场景,其中输入和输出的长度都是可变的。
- embedding层在seq2seq模型中起着将离散单词转换为连续向量表示的关键作用,为后续的自然语言处理任务提供了有效的特征输入。
数据集
下载: https://download.pytorch.org/tutorial/data.zip
🍸️步骤:
基于GRU的seq2seq模型架构实现翻译的过程:
- 导入必备的工具包.
- 对文件中数据进行处理,满足模型训练要求.
- 构建基于GRU的编码器和解码
- 构建模型训练函数,并进行训练
- 构建模型评估函数,并进行测试以及Attention效果分析

# 从io工具包导入open方法
from io import open
# 用于字符规范化
import unicodedata
# 用于正则表达式
import re
# 用于随机生成数据
import random
# 用于构建网络结构和函数的torch工具包
import torch
import torch.nn as nn
import torch.nn.functional as F
# torch中预定义的优化方法工具包
from torch import optim
# 设备选择, 我们可以选择在cuda或者cpu上运行你的代码
device = torch.device("cuda" if torch.cuda.is_available() else "cpu")
数据预处理

将指定语言中的词汇映射成数值💫
# 起始标志
SOS_token = 0
# 结束标志
EOS_token = 1class Lang:def __init__(self, name):self.name = nameself.word2index = {}self.index2word = {0: "SOS", 1: "EOS"}self.n_words = 2 def addSentence(self, sentence):for word in sentence.split(' '):self.addWord(word)def addWord(self, word):if word not in self.word2index:self.word2index[word] = self.n_wordsself.index2word[self.n_words] = wordsself.n_words += 1- 测试:实例化参数:
name = "eng"
sentence = "hello I am Jay"engl = Lang(name)
engl.addSentence(sentence)
print("word2index:", engl.word2index)
print("index2word:", engl.index2word)
print("n_words:", engl.n_words)# 输出
word2index: {'hello': 2, 'I': 3, 'am': 4, 'Jay': 5}
index2word: {0: 'SOS', 1: 'EOS', 2: 'hello', 3: 'I', 4: 'am', 5: 'Jay'}
n_words: 6
字符规范化💫
def unicodeToAscii(s):return ''.join(c for c in unicodedata.normalize('NFD', s)if unicodedata.category(c) != 'Mn')def normalizeString(s):s = unicodeToAscii(s.lower().strip())s = re.sub(r"([.!?])", r" \1", s)s = re.sub(r"[^a-zA-Z.!?]+", r" ", s)return s将文件中的数据加载到内存,实例化类Lang💫
data_path = 'eng-fra.txt'def readLangs(lang1, lang2):"""读取语言函数, 参数lang1是源语言的名字, 参数lang2是目标语言的名字返回对应的class Lang对象, 以及语言对列表"""# 从文件中读取语言对并以/n划分存到列表lines中lines = open(data_path, encoding='utf-8').read().strip().split('\n')# 对lines列表中的句子进行标准化处理,并以\t进行再次划分, 形成子列表, 也就是语言对pairs = [[normalizeString(s) for s in l.split('\t')] for l in lines] # 然后分别将语言名字传入Lang类中, 获得对应的语言对象, 返回结果input_lang = Lang(lang1)output_lang = Lang(lang2)return input_lang, output_lang, pairs- 测试:输入参数:
lang1 = "eng"
lang2 = "fra"input_lang, output_lang, pairs = readLangs(lang1, lang2)
print("pairs中的前五个:", pairs[:5])# 输出
pairs中的前五个: [['go .', 'va !'], ['run !', 'cours !'], ['run !', 'courez !'], ['wow !', 'ca alors !'], ['fire !', 'au feu !']]
过滤出符合我们要求的语言对💫
# 设置组成句子中单词或标点的最多个数
MAX_LENGTH = 10eng_prefixes = ("i am ", "i m ","he is", "he s ","she is", "she s ","you are", "you re ","we are", "we re ","they are", "they re "
)def filterPair(p):return len(p[0].split(' ')) < MAX_LENGTH and \p[0].startswith(eng_prefixes) and \len(p[1].split(' ')) < MAX_LENGTH def filterPairs(pairs):return [pair for pair in pairs if filterPair(pair)]
对以上数据准备函数进行整合💫
def prepareData(lang1, lang2):input_lang, output_lang, pairs = readLangs(lang1, lang2)pairs = filterPairs(pairs)for pair in pairs:input_lang.addSentence(pair[0])output_lang.addSentence(pair[1])return input_lang, output_lang, pairs将语言对转化为模型输入需要的张量💫
def tensorFromSentence(lang, sentence):indexes = [lang.word2index[word] for word in sentence.split(' ')]indexes.append(EOS_token)return torch.tensor(indexes, dtype=torch.long, device=device).view(-1, 1)def tensorsFromPair(pair):input_tensor = tensorFromSentence(input_lang, pair[0])target_tensor = tensorFromSentence(output_lang, pair[1])return (input_tensor, target_tensor)- 测试输入:
# 取pairs的第一条
pair = pairs[0]
pair_tensor = tensorsFromPair(pair)
print(pair_tensor)# 输出
(tensor([[2],[3],[4],[1]]), tensor([[2],[3],[4],[5],[1]]))
构建编码器和解码器

构建基于GRU的编码器
- “embedding”指的是一个将离散变量(如单词、符号等)转换为连续向量表示的过程或技术
- “embedded”是embedding过程的输出,即已经通过嵌入矩阵转换后的连续向量。在神经网络中,这些向量将作为后续层的输入。
class EncoderRNN(nn.Module):def __init__(self, input_size, hidden_size):super(EncoderRNN, self).__init__()self.hidden_size = hidden_sizeself.embedding = nn.Embedding(input_size, hidden_size)self.gru = nn.GRU(hidden_size, hidden_size)def forward(self, input, hidden):output = self.embedding(input).view(1, 1, -1)output, hidden = self.gru(output, hidden)return output, hiddendef initHidden(self):return torch.zeros(1, 1, self.hidden_size, device=device)- 测试:参数:
hidden_size = 25
input_size = 20# pair_tensor[0]代表源语言即英文的句子,pair_tensor[0][0]代表句子中
的第一个词
input = pair_tensor[0][0]
# 初始化第一个隐层张量,1x1xhidden_size的0张量
hidden = torch.zeros(1, 1, hidden_size)encoder = EncoderRNN(input_size, hidden_size)
encoder_output, hidden = encoder(input, hidden)
print(encoder_output)# 输出
tensor([[[ 1.9149e-01, -2.0070e-01, -8.3882e-02, -3.3037e-02, -1.3491e-01,-8.8831e-02, -1.6626e-01, -1.9346e-01, -4.3996e-01,  1.8020e-02,2.8854e-02,  2.2310e-01,  3.5153e-01,  2.9635e-01,  1.5030e-01,-8.5266e-02, -1.4909e-01,  2.4336e-04, -2.3522e-01,  1.1359e-01,1.6439e-01,  1.4872e-01, -6.1619e-02, -1.0807e-02,  1.1216e-02]]],grad_fn=<StackBackward>)
构建基于GRU的解码器
class DecoderRNN(nn.Module):def __init__(self, hidden_size, output_size):super(DecoderRNN, self).__init__()self.hidden_size = hidden_sizeself.embedding = nn.Embedding(output_size, hidden_size)self.gru = nn.GRU(hidden_size, hidden_size)self.out = nn.Linear(hidden_size, output_size)self.softmax = nn.LogSoftmax(dim=1)def forward(self, input, hidden):output = self.embedding(input).view(1, 1, -1)output = F.relu(output)output, hidden = self.gru(output, hidden)output = self.softmax(self.out(output[0]))return output, hiddendef initHidden(self):return torch.zeros(1, 1, self.hidden_size, device=device)构建基于GRU和Attention的解码器💥
💥三个输入:
- prev_hidden:指上一个时间步解码器的隐藏状态
- input:
input是当前时间步解码器的输入。在解码的开始阶段,它可能是一个特殊的起始符号。在随后的解码步骤中,input通常是上一个时间步解码器输出的词(或对应的词向量)。 encoder_outputs:是编码器处理输入序列后生成的一系列输出向量,在基于Attention的解码器中,这些输出向量将作为注意力机制的候选记忆单元,用于计算当前解码步与输入序列中不同位置的相关性。
class AttnDecoderRNN(nn.Module):def __init__(self, hidden_size, output_size, dropout_p=0.1, max_length=MAX_LENGTH):super(AttnDecoderRNN, self).__init__()self.hidden_size = hidden_sizeself.output_size = output_sizeself.dropout_p = dropout_pself.max_length = max_lengthself.embedding = nn.Embedding(self.output_size, self.hidden_size)self.attn = nn.Linear(self.hidden_size * 2, self.max_length)self.attn_combine = nn.Linear(self.hidden_size * 2, self.hidden_size)self.dropout = nn.Dropout(self.dropout_p)self.gru = nn.GRU(self.hidden_size, self.hidden_size)self.out = nn.Linear(self.hidden_size, self.output_size)def forward(self, input, hidden, encoder_outputs):embedded = self.embedding(input).view(1, 1, -1)embedded = self.dropout(embedded)attn_weights = F.softmax(self.attn(torch.cat((embedded[0], hidden[0]), 1)), dim=1)attn_applied = torch.bmm(attn_weights.unsqueeze(0),encoder_outputs.unsqueeze(0))output = torch.cat((embedded[0], attn_applied[0]), 1)output = self.attn_combine(output).unsqueeze(0)output = F.relu(output)output, hidden = self.gru(output, hidden)output = F.log_softmax(self.out(output[0]), dim=1)return output, hidden, attn_weightsdef initHidden(self):return torch.zeros(1, 1, self.hidden_size, device=device)构建模型训练函数

teacher_forcing介绍
Teacher Forcing是一种在训练序列生成模型,特别是循环神经网络(RNN)和序列到序列(seq2seq)模型时常用的技术。在seq2seq架构中,根据循环神经网络理论,解码器每次应该使用上一步的结果作为输入的一部分, 但是训练过程中,一旦上一步的结果是错误的,就会导致这种错误被累积,无法达到训练效果,我们需要一种机制改变上一步出错的情况,因为训练时我们是已知正确的输出应该是什么,因此可以强制将上一步结果设置成正确的输出, 这种方式就叫做teacher_forcing。
teacher_forcing的作用
- 加速模型收敛与稳定训练:通过使用真实的历史数据作为解码器的输入,Teacher Forcing技术可以加速模型的收敛速度,并使得训练过程更加稳定,因为它避免了因模型早期预测错误而导致的累积误差。
- 矫正预测并避免误差放大:Teacher Forcing在训练时能够矫正模型的预测,防止在序列生成过程中误差的进一步放大,从而提高了模型的预测准确性。
# 设置teacher_forcing比率为0.5
teacher_forcing_ratio = 0.5def train(input_tensor, target_tensor, encoder, decoder, encoder_optimizer, decoder_optimizer, criterion, max_length=MAX_LENGTH):encoder_hidden = encoder.initHidden()encoder_optimizer.zero_grad()decoder_optimizer.zero_grad()input_length = input_tensor.size(0)target_length = target_tensor.size(0)encoder_outputs = torch.zeros(max_length, encoder.hidden_size, device=device)loss = 0for ei in range(input_length):encoder_output, encoder_hidden = encoder(input_tensor[ei], encoder_hidden)encoder_outputs[ei] = encoder_output[0, 0]decoder_input = torch.tensor([[SOS_token]], device=device)decoder_hidden = encoder_hiddenuse_teacher_forcing = True if random.random() < teacher_forcing_ratio else Falseif use_teacher_forcing:for di in range(target_length):decoder_output, decoder_hidden, decoder_attention = decoder(decoder_input, decoder_hidden, encoder_outputs)loss += criterion(decoder_output, target_tensor[di])decoder_input = target_tensor[di]  else:for di in range(target_length):decoder_output, decoder_hidden, decoder_attention = decoder(decoder_input, decoder_hidden, encoder_outputs)topv, topi = decoder_output.topk(1)loss += criterion(decoder_output, target_tensor[di])if topi.squeeze().item() == EOS_token:breakdecoder_input = topi.squeeze().detach()# 误差进行反向传播loss.backward()# 编码器和解码器进行优化即参数更新encoder_optimizer.step()decoder_optimizer.step()# 返回平均损失return loss.item() / target_length
构建时间计算函数
import time
import mathdef timeSince(since):now = time.time()# 获得时间差s = now - since# 将秒转化为分钟m = math.floor(s / 60)s -= m * 60return '%dm %ds' % (m, s)
调用训练函数并打印日志和制图
import matplotlib.pyplot as pltdef trainIters(encoder, decoder, n_iters, print_every=1000, plot_every=100, learning_rate=0.01):start = time.time()plot_losses = []print_loss_total = 0 plot_loss_total = 0 encoder_optimizer = optim.SGD(encoder.parameters(), lr=learning_rate)decoder_optimizer = optim.SGD(decoder.parameters(), lr=learning_rate)criterion = nn.NLLLoss()for iter in range(1, n_iters + 1):training_pair = tensorsFromPair(random.choice(pairs))input_tensor = training_pair[0]target_tensor = training_pair[1]loss = train(input_tensor, target_tensor, encoder,decoder, encoder_optimizer, decoder_optimizer, criterion)print_loss_total += lossplot_loss_total += lossif iter % print_every == 0:print_loss_avg = print_loss_total / print_everyprint_loss_total = 0print('%s (%d %d%%) %.4f' % (timeSince(start),iter, iter / n_iters * 100, print_loss_avg))if iter % plot_every == 0:plot_loss_avg = plot_loss_total / plot_everyplot_losses.append(plot_loss_avg)plot_loss_total = 0plt.figure() plt.plot(plot_losses)plt.savefig("loss.png")💥训练模型:
# 设置隐层大小为256 ,也是词嵌入维度
hidden_size = 256
# 通过input_lang.n_words获取输入词汇总数,与hidden_size一同传入EncoderRNN类中
# 得到编码器对象encoder1
encoder1 = EncoderRNN(input_lang.n_words, hidden_size).to(device)# 通过output_lang.n_words获取目标词汇总数,与hidden_size和dropout_p一同传入AttnDecoderRNN类中
# 得到解码器对象attn_decoder1
attn_decoder1 = AttnDecoderRNN(hidden_size, output_lang.n_words, dropout_p=0.1).to(device)# 设置迭代步数
n_iters = 80000
# 设置日志打印间隔
print_every = 5000 trainIters(encoder1, attn_decoder1, n_iters, print_every=print_every)
模型会不断打印loss损失值并且绘制图像

- 一直下降的损失曲线, 说明模型正在收敛
构建模型评估函数

def evaluate(encoder, decoder, sentence, max_length=MAX_LENGTH):with torch.no_grad():# 对输入的句子进行张量表示input_tensor = tensorFromSentence(input_lang, sentence)# 获得输入的句子长度input_length = input_tensor.size()[0]encoder_hidden = encoder.initHidden()encoder_outputs = torch.zeros(max_length, encoder.hidden_size, device=device)for ei in range(input_length):encoder_output, encoder_hidden = encoder(input_tensor[ei],encoder_hidden)encoder_outputs[ei] += encoder_output[0, 0]decoder_input = torch.tensor([[SOS_token]], device=device) decoder_hidden = encoder_hiddendecoded_words = []# 初始化attention张量decoder_attentions = torch.zeros(max_length, max_length)# 开始循环解码for di in range(max_length):decoder_output, decoder_hidden, decoder_attention = decoder(decoder_input, decoder_hidden, encoder_outputs)decoder_attentions[di] = decoder_attention.datatopv, topi = decoder_output.data.topk(1)if topi.item() == EOS_token:decoded_words.append('<EOS>') breakelse:decoded_words.append(output_lang.index2word[topi.item()])decoder_input = topi.squeeze().detach()return decoded_words, decoder_attentions[:di + 1]随机选择指定数量的数据进行评估
def evaluateRandomly(encoder, decoder, n=6):for i in range(n):pair = random.choice(pairs)# > 代表输入print('>', pair[0])# = 代表正确的输出print('=', pair[1])# 调用evaluate进行预测output_words, attentions = evaluate(encoder, decoder, pair[0])# 将结果连成句子output_sentence = ' '.join(output_words)# < 代表模型的输出print('<', output_sentence)print('')evaluateRandomly(encoder1, attn_decoder1)效果:
> i m impressed with your french .
= je suis impressionne par votre francais .
< je suis impressionnee par votre francais . <EOS>> i m more than a friend .
= je suis plus qu une amie .
< je suis plus qu une amie . <EOS>> she is beautiful like her mother .
= elle est belle comme sa mere .
< elle est sa sa mere . <EOS>> you re winning aren t you ?
= vous gagnez n est ce pas ?
< tu restez n est ce pas ? <EOS>> he is angry with you .
= il est en colere apres toi .
< il est en colere apres toi . <EOS>> you re very timid .
= vous etes tres craintifs .
< tu es tres craintive . <EOS>
Attention张量制图
sentence = "we re both teachers ."
# 调用评估函数
output_words, attentions = evaluate(
encoder1, attn_decoder1, sentence)
print(output_words)
# 将attention张量转化成numpy, 使用matshow绘制
plt.matshow(attentions.numpy())
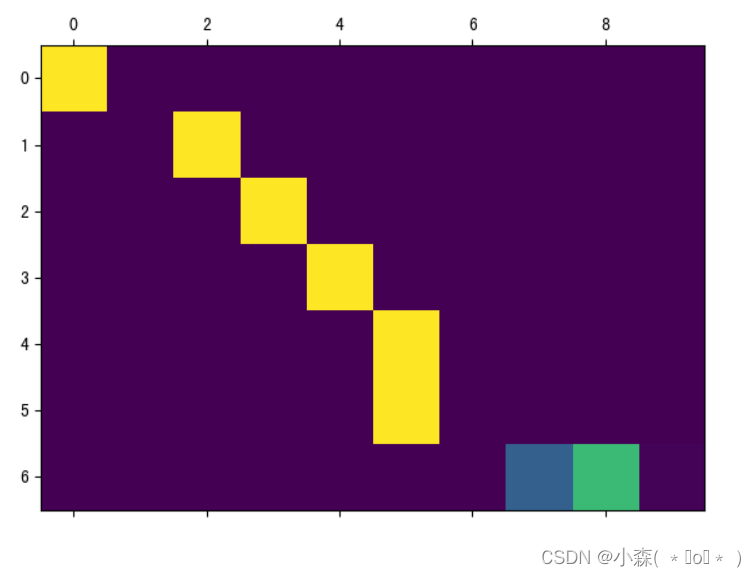
plt.savefig("attn.png")如果迭代次数过少,训练不充分,那么注意力就不会很好:
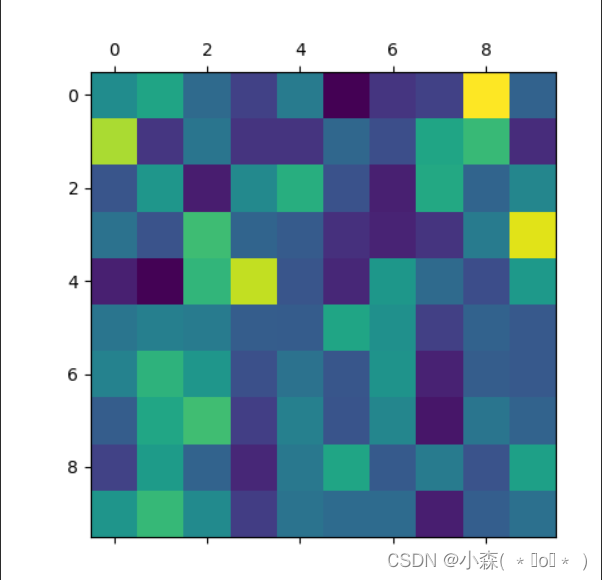
💯迭代次数变大:
相关文章:
使用seq2seq架构实现英译法
seq2seq介绍 模型架构: Seq2Seq(Sequence-to-Sequence)模型是一种在自然语言处理(NLP)中广泛应用的架构,其核心思想是将一个序列作为输入,并输出另一个序列。这种模型特别适用于机器翻译、聊天…...

攻防演练“轻装上阵” | 亚信安全信舱ForCloud 打造全栈防护新策略
网络世界攻防实战中,攻击风险已经从代码到云横跨全栈技术点,你准备好了吗 云服务器,攻击众矢之的 2022年超过38万个Kubernetes API服务器暴露公网,成为攻击者目标。云服务器,尤其是开源设施,一直以来不仅是…...

在Android Studio中将某个文件移出Git版本管理
最新在整理代码时发现,local.properties文件开头有这么一段注释: ## This file must *NOT* be checked into Version Control Systems, # as it contains information specific to your local configuration. 大意是这个文件不要加入到版本管理中。 之…...

Vue46-render函数
一、非单文件和单文件的main.js对比 1-1、非单文件的main.js 1-2、 单文件的main.js 将单文件的main.js中的render函数变成非单文件的main.js中的template形式,报如下错误: 解决方式: 二、解决方式 2-1、引入完成版的vue.js 精简版的vue&a…...

@RequestParam 和 @PathVariable @Param注解的区别和作用
在Spring MVC中,RequestParam、PathVariable和 RequestBody 是用于处理不同类型的请求参数的注解。每个注解都有其特定的用途和用法。让我们分别看一下它们的区别和作用。 RequestParam RequestParam用于从请求参数中获取数据,通常是处理表单数据或URL…...

复习一下。
名词解释 数字图像:数字图像是通过数字技术捕获存储和处理的图像。它由一个矩阵或二维数组的像素组成,每个像素包含图像在该位置上的颜色或亮度信息。 像素:像素是构成数字图像的最小单位。每个像素代表图像中某个位置的颜色或亮度值。 分辨…...
ripro主题如何使用memcached来加速
ripro主题是个很不错的资源付费下载主题。主题自带了缓存加速开关,只要开启了缓存加速功能,正常情况下能让网站访问的速度提升很大。 但好多人这么做了却发现没啥加速效果,原因就在于wordpress里缺少了memcache文件。只需要把object-cache.ph…...

《珊瑚岛》是一款什么类型的游戏 苹果电脑如何玩到《珊瑚岛》
在众多电子游戏中,有些游戏因其独特的游戏体验和丰富的内容而脱颖而出,《珊瑚岛》便是其中之一。在游戏中你将离开宝京前往珊瑚岛,种植农作物、饲养动物、和岛民成为朋友。您不仅可以振兴该岛小镇,还可以保护和修复周围的珊瑚礁。…...
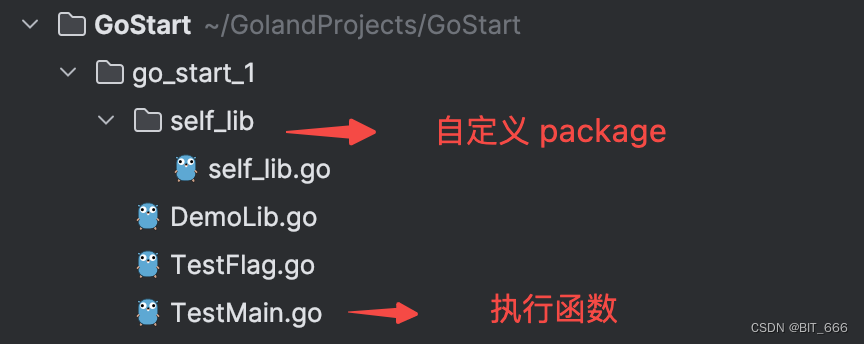
Go - 3.库源码文件
目录 一.引言 二.库源码文件 1.定义 2.生成库源码文件 3.直接调用库源码文件 三.总结 一.引言 前面我们学习了 命令源码文件,并成功运行了 go 的 hello world 代码,下面我们介绍 go 里面另一个概念: 库源码文件。 二.库源码文件 1.定义 库源码文…...
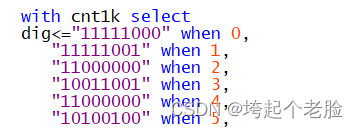
FPGA的基础仿真项目--七段数码管设计显示学号
一、设计实验目的 1. 了解数码管显示模块的工作原理。 2. 熟悉VHDL 硬件描述语言及自顶向下的设计思想。 3. 掌握利用FPGA设计6位数码管扫描显示驱动电路的方法。 二、实验设备 1. PC机 2.Cyclone IV FPGA开发板 三、扫描原理 下图所…...
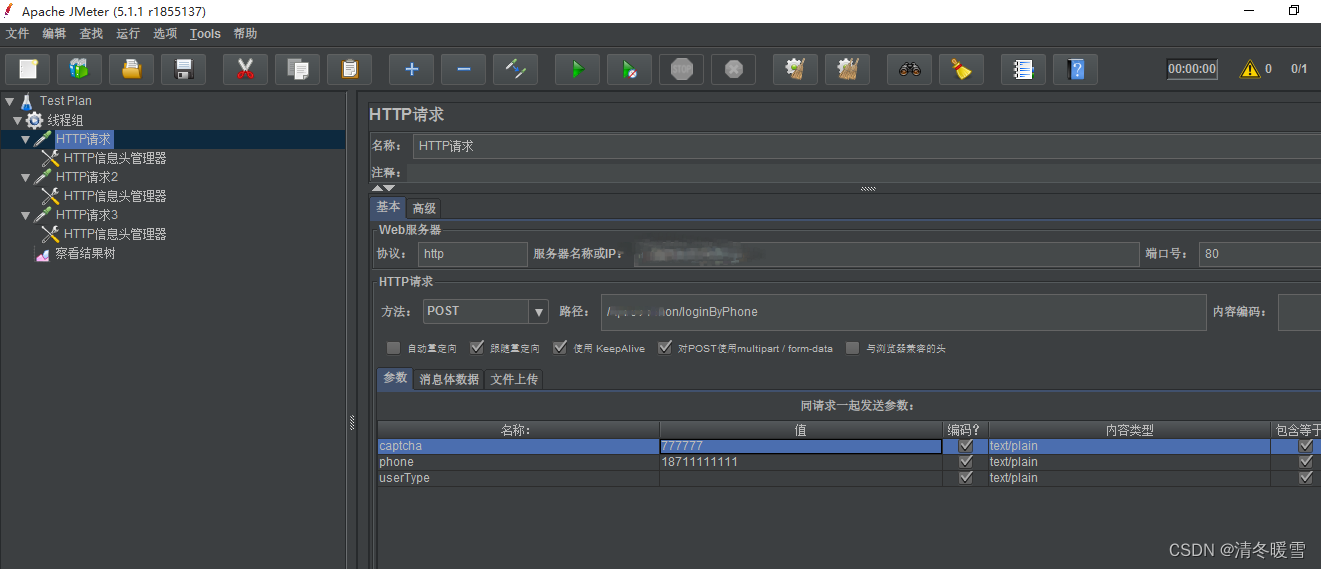
Jmeter接口请求之 :multipart/form-data 参数请求
参考教程 Jmeter压测之:multipart/form-data_jmeter form-data-CSDN博客 1、通过fiddler对接口进行抓取,接口信息如下图所示 2、获取到接口后 在fiddler右侧点击Inspectors-Raw中可以看到如下图所示信息,上半部分为默认请求头信息内容&#…...

Type-C诱骗芯片LDR6500
随着科技的飞速发展,电子设备的智能化和便携化已成为趋势。在这个过程中,Type-C接口因其高速传输、正反可插以及强大的扩展能力,逐渐成为主流接口标准。然而,Type-C接口的广泛应用也带来了一系列挑战,其中之一便是如何…...

统一异常处理
问题 当系统出现异常时,除了要在控制台、日志等后台进行输出之外,还需要在前端提示用户。 为了提示给用户,错误信息需要做一些约定: 错误信息统一用json格式返回给前端以HTTP状态码判断是否出现异常,非200即为异常 …...

Nginx网络服务
1 Nginx服务基础 Nginx( 发音为[engine x] ) 专为性能优化而开发,其最知名的优点是它的稳定性和低系 统资源消耗, 以及对HTTP 并发连接的高处理能力(单台物理服务器可支持30000~50000 个并发请求) 。正因为…...

ifconfig eth0 hw ether
ifconfig hw ether 是一个用于在 Linux 系统中设置或更改网络接口的硬件地址(即 MAC 地址)的命令。具体操作步骤如下: 首先,您需要确定要更改 MAC 地址的网络接口名称,通常是 eth0, eth1 等,取决于您的系统…...

微信小程序录音机源代码
<!-- <button bind:tap"startTab">开始录音</button> <button bind:tap"stopTab">结束录音</button> <button bind:tap"playTab">播放录音</button> <view style"margin: 0 auto;">{{ti…...

基于c语言的简单的数据库
简单的数据库 - 飞书云文档 (feishu.cn) mydatabase: 实现一个简单的数据库,基于B树 (gitee.com)...

Docker 容器内运行的 Neo4j 实例 安装apoc插件
插件 本页描述了如何将插件安装到在 Docker 容器内运行的 Neo4j 实例中。有关插件的一般说明,请参见配置 → 插件。 安装插件 安装插件,包括用户定义的程序,将包含插件 JAR 的文件夹或卷挂载到 /plugins ,例如: docker…...

PostgreSQL源码分析——审计插件pgaudit
PostgreSQL审计插件pgaudit 在PostgreSQL中,提供了开源的审计插件pgaudit,但是其功能并不完善,只提供了基本的审计功能,对此,很多基于PG开发的商业数据库大多提供了丰富的审计功能。比如人大金仓,openGaus…...

ijkplayer编译 android版本
ijkplayer源码下载地址如下:https://github.com/bilibili/ijkplayer 下载代码,直接执行如下命令即可: $cd /data/project/ijkplayer/ $git clone https://github.com/bilibili/ijkplayer.git $git checkout -B latest k0.8.8 1 环境安装 …...
)
rknn优化教程(二)
文章目录 1. 前述2. 三方库的封装2.1 xrepo中的库2.2 xrepo之外的库2.2.1 opencv2.2.2 rknnrt2.2.3 spdlog 3. rknn_engine库 1. 前述 OK,开始写第二篇的内容了。这篇博客主要能写一下: 如何给一些三方库按照xmake方式进行封装,供调用如何按…...

C++ Visual Studio 2017厂商给的源码没有.sln文件 易兆微芯片下载工具加开机动画下载。
1.先用Visual Studio 2017打开Yichip YC31xx loader.vcxproj,再用Visual Studio 2022打开。再保侟就有.sln文件了。 易兆微芯片下载工具加开机动画下载 ExtraDownloadFile1Info.\logo.bin|0|0|10D2000|0 MFC应用兼容CMD 在BOOL CYichipYC31xxloaderDlg::OnIni…...

DeepSeek 技术赋能无人农场协同作业:用 AI 重构农田管理 “神经网”
目录 一、引言二、DeepSeek 技术大揭秘2.1 核心架构解析2.2 关键技术剖析 三、智能农业无人农场协同作业现状3.1 发展现状概述3.2 协同作业模式介绍 四、DeepSeek 的 “农场奇妙游”4.1 数据处理与分析4.2 作物生长监测与预测4.3 病虫害防治4.4 农机协同作业调度 五、实际案例大…...
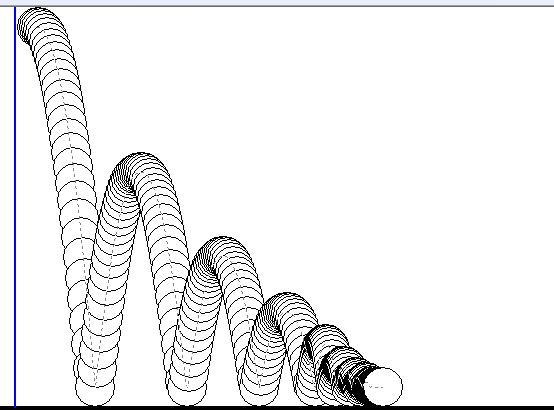
MFC 抛体运动模拟:常见问题解决与界面美化
在 MFC 中开发抛体运动模拟程序时,我们常遇到 轨迹残留、无效刷新、视觉单调、物理逻辑瑕疵 等问题。本文将针对这些痛点,详细解析原因并提供解决方案,同时兼顾界面美化,让模拟效果更专业、更高效。 问题一:历史轨迹与小球残影残留 现象 小球运动后,历史位置的 “残影”…...

RabbitMQ入门4.1.0版本(基于java、SpringBoot操作)
RabbitMQ 一、RabbitMQ概述 RabbitMQ RabbitMQ最初由LShift和CohesiveFT于2007年开发,后来由Pivotal Software Inc.(现为VMware子公司)接管。RabbitMQ 是一个开源的消息代理和队列服务器,用 Erlang 语言编写。广泛应用于各种分布…...

【Android】Android 开发 ADB 常用指令
查看当前连接的设备 adb devices 连接设备 adb connect 设备IP 断开已连接的设备 adb disconnect 设备IP 安装应用 adb install 安装包的路径 卸载应用 adb uninstall 应用包名 查看已安装的应用包名 adb shell pm list packages 查看已安装的第三方应用包名 adb shell pm list…...

苹果AI眼镜:从“工具”到“社交姿态”的范式革命——重新定义AI交互入口的未来机会
在2025年的AI硬件浪潮中,苹果AI眼镜(Apple Glasses)正在引发一场关于“人机交互形态”的深度思考。它并非简单地替代AirPods或Apple Watch,而是开辟了一个全新的、日常可接受的AI入口。其核心价值不在于功能的堆叠,而在于如何通过形态设计打破社交壁垒,成为用户“全天佩戴…...

前端中slice和splic的区别
1. slice slice 用于从数组中提取一部分元素,返回一个新的数组。 特点: 不修改原数组:slice 不会改变原数组,而是返回一个新的数组。提取数组的部分:slice 会根据指定的开始索引和结束索引提取数组的一部分。不包含…...
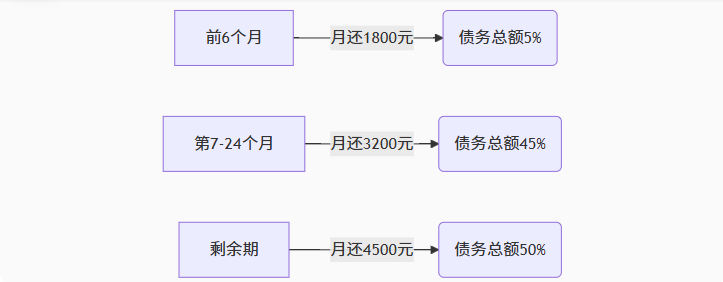
【无标题】湖北理元理律师事务所:债务优化中的生活保障与法律平衡之道
文/法律实务观察组 在债务重组领域,专业机构的核心价值不仅在于减轻债务数字,更在于帮助债务人在履行义务的同时维持基本生活尊严。湖北理元理律师事务所的服务实践表明,合法债务优化需同步实现三重平衡: 法律刚性(债…...

如何在Windows本机安装Python并确保与Python.NET兼容
✅作者简介:2022年博客新星 第八。热爱国学的Java后端开发者,修心和技术同步精进。 🍎个人主页:Java Fans的博客 🍊个人信条:不迁怒,不贰过。小知识,大智慧。 💞当前专栏…...