全面分析一下前端框架Angular的来龙去脉,分析angular的技术要点和难点,以及详细的语法和使用规则,底层原理-小白进阶之路
Angular 前端框架全面分析
Angular 是一个由 Google 维护的开源前端框架。它最早在 2010 年发布,最初版本称为 AngularJS。2016 年,团队发布了一个完全重写的版本,称为 Angular 2,之后的版本(如 Angular 4、Angular 5 等)都统称为 Angular。
一、历史背景
1. AngularJS(Angular 1.x)
- 发布年份:2010
- 特点:基于 MVC(Model-View-Controller)架构,使用双向数据绑定和依赖注入。
- 限制:性能瓶颈、可维护性差、学习曲线陡峭。
2. Angular 2+
- 发布年份:2016
- 特点:完全重写,采用基于组件的架构,使用 TypeScript 开发,提升了性能和可维护性。
- 发展:从 Angular 2 开始,Angular 团队每半年发布一个大版本,当前最新版本为 Angular 15。
二、技术要点
1. TypeScript
Angular 使用 TypeScript 编写,提供了静态类型检查、现代 JavaScript 特性等优点,有助于提高代码质量和开发效率。
2. 组件化
采用组件式开发,将应用程序分割成独立的、可复用的组件,每个组件包含自己的模板、样式和逻辑。
3. 模块化
使用 NgModule 来组织代码,一个 NgModule 可以包含组件、指令、管道和服务等,提供了良好的模块化支持。
4. 依赖注入
Angular 提供了强大的依赖注入机制,简化了服务的创建和管理,提高了代码的可测试性和可维护性。
5. 模板语法
Angular 使用直观的模板语法来定义组件的视图,支持数据绑定、指令和事件绑定等。
6. 路由
Angular 内置强大的路由模块,可以轻松地定义应用程序的导航和页面切换。
7. 表单处理
提供了两种表单处理方式:模板驱动表单和响应式表单,满足不同需求。
8. RxJS
Angular 大量使用 RxJS(Reactive Extensions for JavaScript)来处理异步数据流,非常适合复杂的数据交互场景。
三、技术难点
1. 学习曲线
由于 Angular 涉及的概念较多(如依赖注入、RxJS、TypeScript 等),学习曲线相对较陡。
2. 性能优化
理解和应用 Angular 的变更检测机制和 Zone.js 是性能优化的关键,需要一定的深入学习。
3. 复杂项目管理
随着项目规模的扩大,如何有效地管理模块、组件、服务等也是一个挑战。
四、详细语法和使用规则
1. 组件
import { Component } from '@angular/core';@Component({selector: 'app-root',templateUrl: './app.component.html',styleUrls: ['./app.component.css']
})
export class AppComponent {title = 'my-angular-app';
}
2. 模块
import { NgModule } from '@angular/core';
import { BrowserModule } from '@angular/platform-browser';import { AppComponent } from './app.component';@NgModule({declarations: [AppComponent],imports: [BrowserModule],providers: [],bootstrap: [AppComponent]
})
export class AppModule { }
3. 数据绑定
- 插值绑定:
{{ expression }} - 属性绑定:
[property]="expression" - 事件绑定:
(event)="handler" - 双向绑定:
[(ngModel)]="property"
4. 指令
- 结构型指令:
*ngIf,*ngFor - 属性型指令:
[ngClass],[ngStyle]
5. 服务和依赖注入
import { Injectable } from '@angular/core';@Injectable({providedIn: 'root',
})
export class DataService {getData() {return ['data1', 'data2', 'data3'];}
}
6. 路由
import { NgModule } from '@angular/core';
import { RouterModule, Routes } from '@angular/router';
import { HomeComponent } from './home/home.component';
import { AboutComponent }```typescript
import { AboutComponent } from './about/about.component';const routes: Routes = [{ path: '', component: HomeComponent },{ path: 'about', component: AboutComponent }
];@NgModule({imports: [RouterModule.forRoot(routes)],exports: [RouterModule]
})
export class AppRoutingModule { }
7. 模板驱动表单
<form #form="ngForm" (ngSubmit)="onSubmit(form)"><input type="text" name="username" ngModel required><button type="submit">Submit</button>
</form>
8. 响应式表单
import { Component, OnInit } from '@angular/core';
import { FormBuilder, FormGroup, Validators } from '@angular/forms';@Component({selector: 'app-form',templateUrl: './form.component.html'
})
export class FormComponent implements OnInit {form: FormGroup;constructor(private fb: FormBuilder) { }ngOnInit() {this.form = this.fb.group({username: ['', Validators.required]});}onSubmit() {console.log(this.form.value);}
}
<form [formGroup]="form" (ngSubmit)="onSubmit()"><input formControlName="username"><button type="submit">Submit</button>
</form>
五、底层原理
1. 变更检测机制
Angular 使用 Zone.js 来捕获异步操作,然后触发变更检测机制来更新视图。变更检测机制的核心是脏值检测策略,Angular 会对比数据的当前值和之前的值,决定是否重新渲染视图。
2. 依赖注入机制
Angular 的依赖注入机制基于提供者(Provider)和注入器(Injector)。每个服务、组件等都可以声明依赖项,Angular 会根据依赖关系图自动注入所需的依赖。
3. 编译过程
Angular 的编译过程分为 AOT(Ahead-of-Time)和 JIT(Just-in-Time)两种模式:
- AOT 编译:在构建时进行编译,生成优化后的 JavaScript 代码,减少应用运行时的开销,提高性能。
- JIT 编译:在浏览器中运行时进行编译,适合开发阶段使用。
4. 渲染机制
Angular 使用虚拟 DOM 进行渲染优化,类似于 React。通过虚拟 DOM,Angular 可以高效地计算出需要更新的部分,减少直接操作真实 DOM 的次数,从而提高性能。
5. 模块化
Angular 的模块系统通过 NgModule 实现。每个 NgModule 都有自己的执行环境,可以包含组件、指令、管道和服务等。模块化设计有助于代码分离和按需加载,提高了应用的可维护性和性能。
六、模块化
Angular 是一个功能强大且全面的前端框架,适用于大规模、复杂的 Web 应用开发。它采用 TypeScript 进行开发,提供了丰富的工具和功能(如依赖注入、变更检测、模块化、路由等),尽管学习曲线较陡,但在大型项目中表现出色。掌握 Angular 的核心概念和原理,能够帮助开发者构建高性能、高可维护性的 Web 应用。
当然,下面是关于 Angular 的更多详细信息,包括一些高级特性、最佳实践以及常见的开发模式。
七、高级特性
1. 懒加载(Lazy Loading)
懒加载是 Angular 中提高性能的重要特性。通过懒加载,可以按需加载模块而不是在应用启动时加载所有模块。
const routes: Routes = [{ path: 'home', component: HomeComponent },{ path: 'about', loadChildren: () => import('./about/about.module').then(m => m.AboutModule) }
];
2. Angular CLI
Angular CLI 是一个强大的命令行工具,用于初始化、开发、构建和维护 Angular 应用程序。
# 安装 Angular CLI
npm install -g @angular/cli# 创建新项目
ng new my-angular-app# 启动开发服务器
ng serve# 生成组件、服务等
ng generate component my-component
3. 国际化(i18n)
Angular 提供了内置的国际化支持,可以轻松地将应用程序本地化到多种语言。
import { registerLocaleData } from '@angular/common';
import localeFr from '@angular/common/locales/fr';registerLocaleData(localeFr, 'fr');
4. 动态组件加载
在运行时动态加载和渲染组件是 Angular 的一个高级特性,适用于需要根据用户交互动态生成内容的场景。
import { Component, ComponentFactoryResolver, ViewChild, ViewContainerRef } from '@angular/core';@Component({selector: 'app-dynamic-loader',template: `<ng-container #container></ng-container>`
})
export class DynamicLoaderComponent {@ViewChild('container', { read: ViewContainerRef, static: true }) container: ViewContainerRef;constructor(private resolver: ComponentFactoryResolver) { }loadComponent(component: any) {const factory = this.resolver.resolveComponentFactory(component);this.container.clear();this.container.createComponent(factory);}
}
5. 服务端渲染(SSR)
使用 Angular Universal 可以实现服务端渲染,从而提高应用的 SEO 和首屏加载速度。
# 安装 Angular Universal
ng add @nguniversal/express-engine# 构建和运行 SSR 应用
npm run build:ssr
npm run serve:ssr
八、最佳实践
1. 代码组织
- 模块化设计:将应用分为多个功能模块,每个模块负责特定功能。
- 组件化设计:尽量将界面划分为独立的组件,提升可复用性。
- 服务层:将业务逻辑和数据访问层抽象为服务,组件只负责视图逻辑。
2. 性能优化
- 使用懒加载:按需加载模块,减少首屏加载时间。
- 避免不必要的变更检测:使用
OnPush变更检测策略,减少不必要的视图更新。 - 异步操作:尽量使用异步操作,如
async管道、Promise和Observable。
3. 代码规范
- 使用 TypeScript:充分利用 TypeScript 的静态类型检查,提升代码质量。
- 遵循 Angular 风格指南:遵循官方提供的风格指南,保持代码一致性和可维护性。
- 单元测试和端到端测试:编写单元测试和端到端测试,确保代码的正确性和稳定性。
九、常见开发模式
1. 智能组件和哑组件
- 智能组件:负责处理业务逻辑和与服务的交互。
- 哑组件:只负责展示数据和处理简单的用户交互。
// 智能组件
@Component({selector: 'app-smart',template: `<app-dumb [data]="data" (event)="handleEvent($event)"></app-dumb>`
})
export class SmartComponent {data = this.dataService.getData();constructor(private dataService: DataService) { }handleEvent(event: any) { /* 处理事件 */ }
}// 哑组件
@Component({selector: 'app-dumb',template: `<div *ngFor="let item of data">{{ item }}</div>`
})
export class DumbComponent {@Input() data: any[];@Output() event = new EventEmitter<any>();
}
2. 状态管理
对于复杂的应用,可以采用状态管理库(如 NgRx)来管理应用状态当然,接下来我会详细介绍 Angular 的状态管理、单元测试、与其他技术的集成,以及一些高级调试技巧。
十、状态管理
1. NgRx
NgRx 是 Angular 中常用的状态管理库,基于 Redux 架构,提供了单一状态树、不可变状态、纯函数 reducer 等特点。
安装 NgRx
ng add @ngrx/store
ng add @ngrx/effects
状态定义
定义状态接口和初始状态:
// state.ts
export interface AppState {count: number;
}export const initialState: AppState = {count: 0,
};
Actions
定义 actions:
// actions.ts
import { createAction, props } from '@ngrx/store';export const increment = createAction('[Counter] Increment');
export const decrement = createAction('[Counter] Decrement');
export const reset = createAction('[Counter] Reset', props<{ count: number }>());
Reducer
定义 reducer:
// reducer.ts
import { createReducer, on } from '@ngrx/store';
import { increment, decrement, reset } from './actions';
import { AppState, initialState } from './state';const _counterReducer = createReducer(initialState,on(increment, state => ({ ...state, count: state.count + 1 })),on(decrement, state => ({ ...state, count: state.count - 1 })),on(reset, (state, { count }) => ({ ...state, count }))
);export function counterReducer(state: AppState | undefined, action: Action) {return _counterReducer(state, action);
}
Store Module
在应用模块中引入 Store 模块:
import { StoreModule } from '@ngrx/store';
import { counterReducer } from './reducer';@NgModule({imports: [StoreModule.forRoot({ count: counterReducer }),],
})
export class AppModule { }
使用 Store
在组件中使用 Store:
import { Component } from '@angular/core';
import { Store } from '@ngrx/store';
import { AppState } from './state';
import { increment, decrement, reset } from './actions';@Component({selector: 'app-counter',template: `<div>Count: {{ count$ | async }}</div><button (click)="increment()">Increment</button><button (click)="decrement()">Decrement</button><button (click)="reset(0)">Reset</button>`
})
export class CounterComponent {count$ = this.store.select(state => state.count);constructor(private store: Store<AppState>) {}increment() {this.store.dispatch(increment());}decrement() {this.store.dispatch(decrement());}reset(value: number) {this.store.dispatch(reset({ count: value }));}
}
2. Akita
Akita 是另一种用于 Angular 的状态管理库,提供了灵活的状态管理方式,适合大型应用。
安装 Akita
ng add @datorama/akita
定义 Store
import { Store, StoreConfig } from '@datorama/akita';export interface AppState {count: number;
}export function createInitialState(): AppState {return {count: 0,};
}@StoreConfig({ name: 'app' })
export class AppStore extends Store<AppState> {constructor() {super(createInitialState());}
}
使用 Store
import { Component } from '@angular/core';
import { AppStore } from './app.store';@Component({selector: 'app-counter',template: `<div>Count: {{ count$ | async }}</div><button (click)="increment()">Increment</button><button (click)="decrement()">Decrement</button><button (click)="reset()">Reset</button>`
})
export class CounterComponent {count$ = this.appStore.select(state => state.count);constructor(private appStore: AppStore) {}increment() {this.appStore.update(state => ({ count: state.count + 1 }));}decrement() {this.appStore.update(state => ({ count: state.count - 1 }));}reset() {this.appStore.reset();}
}
十一、单元测试
Angular 提供了强大的单元测试支持,使用 Karma 和 Jasmine 进行测试。
1. 设置测试环境
Angular CLI 自动生成的项目已经配置好了 Karma 和 Jasmine,无需额外配置。
2. 编写测试当然,我将继续深入探讨 Angular 的单元测试、与其他技术的集成、以及一些高级调试技巧。
十一、单元测试(继续)
2. 编写测试
组件测试
使用 TestBed 创建组件并进行测试:
import { ComponentFixture, TestBed } from '@angular/core/testing';
import { CounterComponent } from './counter.component';describe('CounterComponent', () => {let component: CounterComponent;let fixture: ComponentFixture<CounterComponent>;beforeEach(async () => {await TestBed.configureTestingModule({declarations: [ CounterComponent ]}).compileComponents();});beforeEach(() => {fixture = TestBed.createComponent(CounterComponent);component = fixture.componentInstance;fixture.detectChanges();});it('should create', () => {expect(component).toBeTruthy();});it('should increment count', () => {component.increment();expect(component.count).toBe(1);});it('should decrement count', () => {component.decrement();expect(component.count).toBe(-1);});it('should reset count', () => {component.reset(0);expect(component.count).toBe(0);});
});
服务测试
测试服务时,使用 TestBed 配置提供者:
import { TestBed } from '@angular/core/testing';
import { DataService } from './data.service';describe('DataService', () => {let service: DataService;beforeEach(() => {TestBed.configureTestingModule({});service = TestBed.inject(DataService);});it('should be created', () => {expect(service).toBeTruthy();});it('should get data', () => {const data = service.getData();expect(data).toEqual(['item1', 'item2']);});
});
3. 运行测试
使用 Angular CLI 运行测试:
ng test
十二、与其他技术的集成
1. 与后端 API 的集成
使用 Angular 的 HttpClient 模块来与后端 API 进行通信。
安装 HttpClient 模块
import { HttpClientModule } from '@angular/common/http';@NgModule({imports: [ HttpClientModule ],
})
export class AppModule { }
创建服务
import { Injectable } from '@angular/core';
import { HttpClient } from '@angular/common/http';
import { Observable } from 'rxjs';@Injectable({providedIn: 'root',
})
export class ApiService {constructor(private http: HttpClient) {}getData(): Observable<any> {return this.http.get('https://api.example.com/data');}postData(data: any): Observable<any> {return this.http.post('https://api.example.com/data', data);}
}
使用服务
import { Component, OnInit } from '@angular/core';
import { ApiService } from './api.service';@Component({selector: 'app-data',template: `<div *ngFor="let item of data">{{ item }}</div>`,
})
export class DataComponent implements OnInit {data: any;constructor(private apiService: ApiService) {}ngOnInit() {this.apiService.getData().subscribe(data => this.data = data);}
}
2. 与第三方库的集成
Angular 可以轻松集成第三方库,如 RxJS、Lodash 等。
使用 RxJS
import { of } from 'rxjs';
import { map } from 'rxjs/operators';const observable = of(1, 2, 3).pipe(map(x => x * 2)
);observable.subscribe(value => console.log(value)); // 输出 2, 4, 6
使用 Lodash
import * as _ from 'lodash';const array = [1, 2, 3, 4];
const doubled = _.map(array, x => x * 2);
console.log(doubled); // 输出 [2, 4, 6, 8]
当然,我将继续介绍更多关于 Angular 的内容,包括高级调试技巧、动画、表单处理、以及一些常见的开发工具和资源。
十三、高级调试技巧(继续)
2. 使用 Debug 模式
启用 Debug 模式
在开发过程中,可以启用 Angular 的 Debug 模式,以便在控制台中查看详细的调试信息。
import { enableProdMode } from '@angular/core';if (environment.production) {enableProdMode();
} else {// 开发模式下启用调试信息import('zone.js/plugins/zone-error');  // Included with Angular CLI.
}
3. Angular 调试工具
使用 ng.probe
在浏览器控制台中,可以使用 ng.probe 方法来访问组件实例和调试信息。
// 获取组件实例
const component = ng.probe(document.querySelector('app-root')).componentInstance;
console.log(component);
使用 Augury
Augury 是一个用于调试 Angular 应用的 Chrome 扩展,提供组件树、依赖注入、路由等信息的可视化展示。
安装 Augury
- 在 Chrome 浏览器中,访问 Augury 页面并安装扩展。
使用 Augury
- 打开 Chrome 开发者工具,切换到 Augury 标签,可以查看组件树、依赖关系等信息。
十四、动画
Angular 提供了强大的动画支持,通过 Angular Animations 模块可以实现复杂的动画效果。
1. 安装 Angular Animations
import { BrowserAnimationsModule } from '@angular/platform-browser/animations';@NgModule({imports: [BrowserAnimationsModule],
})
export class AppModule {}
2. 定义动画
使用 trigger、state、style、transition 和 animate 来定义动画。
import { trigger, state, style, transition, animate } from '@angular/animations';@Component({selector: 'app-animated',template: `<div [@fadeInOut]="'in'">Fade In Out Animation</div><button (click)="toggleState()">Toggle State</button>`,animations: [trigger('fadeInOut', [state('in', style({ opacity: 1 })),transition(':enter', [style({ opacity: 0 }),animate(600)]),transition(':leave', [animate(600, style({ opacity: 0 }))])])]
})
export class AnimatedComponent {state = 'in';toggleState() {this.state = this.state === 'in' ? 'out' : 'in';}
}
十五、表单处理
Angular 提供了两种表单处理方式:模板驱动表单和响应式表单。
1. 模板驱动表单
模板驱动表单使用 Angular 的指令和模板语法来处理表单。
import { FormsModule } from '@angular/forms';@NgModule({imports: [FormsModule],
})
export class AppModule {}
<!-- template-driven-form.component.html -->
<form #form="ngForm" (ngSubmit)="onSubmit(form)"><label for="name">Name:</label><input type="text" id="name" name="name" ngModel><button type="submit">Submit</button>
</form>
// template-driven-form.component.ts
import { Component } from '@angular/core';@Component({selector: 'app-template-driven-form',templateUrl: './template-driven-form.component.html'
})
export class TemplateDrivenFormComponent {onSubmit(form: any) {console.log('Form Data:', form.value);}
}
2. 响应式表单
响应式表单使用 FormBuilder 和 FormGroup 来处理表单。
import { ReactiveFormsModule, FormBuilder, FormGroup } from '@angular/forms';@NgModule({imports: [ReactiveFormsModule],
})
export class AppModule {}
<!-- reactive-form.component.html -->
<form [formGroup]="form" (ngSubmit)="onSubmit()"><label for="name">Name:</label><input type="text" id="name" formControlName="name"><button type="submit">Submit</button>
</form>
// reactive-form.component.ts
import { Component, OnInit } from '@angular/core';
import { FormBuilder, FormGroup } from '@angular/forms';@Component({selector: 'app-reactive-form',templateUrl: './react### 2. **响应式表单**响应式表单使用 `FormBuilder` 和 `FormGroup` 来处理表单。#### 创建表单```typescript
import { Component, OnInit } from '@angular/core';
import { FormBuilder, FormGroup, Validators } from '@angular/forms';@Component({selector: 'app-reactive-form',templateUrl: './reactive-form.component.html'
})
export class ReactiveFormComponent implements OnInit {form: FormGroup;constructor(private fb: FormBuilder) {}ngOnInit() {this.form = this.fb.group({name: ['', Validators.required],email: ['', [Validators.required, Validators.email]],password: ['', [Validators.required, Validators.minLength(6)]]});}onSubmit() {if (this.form.valid) {console.log('Form Data:', this.form.value);} else {console.log('Form is invalid');}}
}
表单模板
<form [formGroup]="form" (ngSubmit)="onSubmit()"><div><label for="name">Name:</label><input type="text" id="name" formControlName="name"><div *ngIf="form.get('name').invalid && form.get('name').touched">Name is required</div></div><div><label for="email">Email:</label><input type="email" id="email" formControlName="email"><div *ngIf="form.get('email').invalid && form.get('email').touched">Enter a valid email</div></div><div><label for="password">Password:</label><input type="password" id="password" formControlName="password"><div *ngIf="form.get('password').invalid && form.get('password').touched">Password must be at least 6 characters long</div></div><button type="submit">Submit</button>
</form>
十六、路由
Angular 的路由模块允许你在应用中定义导航路径。
1. 设置路由
配置路由
import { NgModule } from '@angular/core';
import { RouterModule, Routes } from '@angular/router';
import { HomeComponent } from './home/home.component';
import { AboutComponent } from './about/about.component';const routes: Routes = [{ path: '', component: HomeComponent },{ path: 'about', component: AboutComponent }
];@NgModule({imports: [RouterModule.forRoot(routes)],exports: [RouterModule]
})
export class AppRoutingModule { }
导航链接
<nav><a routerLink="/">Home</a><a routerLink="/about">About</a>
</nav>
<router-outlet></router-outlet>
2. 路由守卫
路由守卫用于保护路由,确保用户具有访问权限。
import { Injectable } from '@angular/core';
import { CanActivate, ActivatedRouteSnapshot, RouterStateSnapshot, Router } from '@angular/router';
import { AuthService } from './auth.service';@Injectable({providedIn: 'root'
})
export class AuthGuard implements CanActivate {constructor(private authService: AuthService, private router: Router) {}canActivate(next: ActivatedRouteSnapshot,state: RouterStateSnapshot): boolean {if (this.authService.isLoggedIn()) {return true;} else {this.router.navigate(['/login']);return false;}}
}
使用路由守卫
const routes: Routes = [{ path: '', component: HomeComponent },{ path: 'about', component: AboutComponent, canActivate: [AuthGuard] }
];
十七、国际化
Angular 提供了内置的国际化支持,用于多语言应用程序。
1. 准备翻译文件
创建翻译文件 messages.xlf:
<?xml version="1.0" encoding="UTF-8" ?>
<xliff version="1.2"><file source-language="en" datatype="plaintext" original="ng2.template"><body><trans-unit id="homeTitle" datatype="html"><source>Home</source><target>Accueil</target></当然,我将继续介绍更多关于 Angular 的内容,包括国际化的详细步骤、服务端渲染、以及一些常用的开发工具和资源。## 十七、国际化(继续)### 1. **准备翻译文件**创建翻译文件 `messages.xlf`:```xml
<?xml version="1.0" encoding="UTF-8" ?>
<xliff version="1.2"><file source-language="en" datatype="plaintext" original="ng2.template"><body><trans-unit id="homeTitle" datatype="html"><source>Home</source><target>Accueil</target></trans-unit><trans-unit id="aboutTitle" datatype="html"><source>About</source><target>À propos</target></trans-unit></body></file>
</xliff>
2. 配置 Angular
在 angular.json 中添加国际化配置:
{"$schema": "./node_modules/@angular/cli/lib/config/schema.json","projects": {"your-project-name": {"i18n": {"sourceLocale": "en","locales": {"fr": "src/locale/messages.fr.xlf"}},...}}
}
3. 标记可翻译文本
使用 Angular 内置的 i18n 属性标记可翻译的文本:
<h1 i18n="homeTitle">Home</h1>
<p i18n="aboutTitle">About</p>
4. 构建多语言版本
使用 Angular CLI 构建多语言版本:
ng build --localize
十八、服务端渲染(SSR)
Angular Universal 是一个用于实现 Angular 应用服务端渲染的库。
1. 安装 Angular Universal
ng add @nguniversal/express-engine
2. 更新应用模块
更新 app.server.module.ts 以适配服务端渲染:
import { NgModule } from '@angular/core';
import { ServerModule } from '@angular/platform-server';
import { AppModule } from './app.module';
import { AppComponent } from './app.component';@NgModule({imports: [AppModule,ServerModule],bootstrap: [AppComponent]
})
export class AppServerModule {}
3. 更新服务器文件
配置 server.ts 文件以启动 Express 服务器:
import 'zone.js/node';
import { ngExpressEngine } from '@nguniversal/express-engine';
import * as express from 'express';
import { join } from 'path';
import { APP_BASE_HREF } from '@angular/common';
import { existsSync } from 'fs';import { AppServerModule } from './src/main.server';// The Express app is exported so that it can be used by serverless Functions.
export function app(): express.Express {const server = express();const distFolder = join(process.cwd(), 'dist/your-project-name/browser');const indexHtml = existsSync(join(distFolder, 'index.original.html')) ? 'index.original.html' : 'index';server.engine('html', ngExpressEngine({bootstrap: AppServerModule,}));server.set('view engine', 'html');server.set('views', distFolder);// Serve static files from /browserserver.get('*.*', express.static(distFolder, {maxAge: '1y'}));// All regular routes use the Universal engineserver.get('*', (req, res) => {res.render(indexHtml, { req, providers: [{ provide: APP_BASE_HREF, useValue: req.baseUrl }] });});return server;
}function run(): void {const port = process.env.PORT || 4000;// Start up the Node serverconst server = app();server.listen(port, () => {console.log(`Node Express server listening on http://localhost:${port}`);});
}// Webpack will replace 'require' with '__webpack_require__'
// '__non_webpack_require__' is a proxy to Node 'require'
declare const __non_webpack_require__: NodeRequire;const mainModule = __non_webpack_require__.main;
const moduleFilename = mainModule && mainModule.filename || '';
if (moduleFilename === __filename || moduleFilename.includes('iisnode')) {run();
}export * from './src/main.server';
4. 运行 SSR
使用 Angular CLI 构建和运行 SSR 应用:
npm run build:ssr
npm run serve:ssr
相关文章:

全面分析一下前端框架Angular的来龙去脉,分析angular的技术要点和难点,以及详细的语法和使用规则,底层原理-小白进阶之路
Angular 前端框架全面分析 Angular 是一个由 Google 维护的开源前端框架。它最早在 2010 年发布,最初版本称为 AngularJS。2016 年,团队发布了一个完全重写的版本,称为 Angular 2,之后的版本(如 Angular 4、Angular 5…...

VACUUM 剖析
VACUUM 剖析 为什么需要 Vacuum MVCC MVCC:Multi-Version Concurrency Control,即多版本并发控制。 PostgreSQL 使用多版本并发控制(MVCC)来支持高并发的事务处理,同时保持数据的一致性和隔离性。MVCC 是一种用于管…...

基于LangChain框架搭建知识库
基于LangChain框架搭建知识库 说明流程1.数据加载2.数据清洗3.数据切分4.获取向量5.向量库保存到本地6.向量搜索7.汇总调用 说明 本文使用openai提供的embedding模型作为框架基础模型,知识库的搭建目的就是为了让大模型减少幻觉出现,实现起来也很简单&a…...

LeetCode 1789, 6, 138
目录 1789. 员工的直属部门题目链接表要求知识点思路代码 6. Z 字形变换题目链接标签思路代码 138. 随机链表的复制题目链接标签思路代码 1789. 员工的直属部门 题目链接 1789. 员工的直属部门 表 表Employee的字段为employee_id,department_id和primary_flag。…...

Redis部署模式全解析:单点、主从、哨兵与集群
Redis是一个高性能的键值存储系统,以其丰富的数据结构和优异的读写性能而闻名。在实际应用中,根据业务需求的不同,Redis可以部署在多种模式下。本文将详细介绍Redis的四种主要部署模式:单点模式、主从复制模式、哨兵模式以及集群模…...

python-docx顺序读取word内容
来源How to use Python iteration to read paragraphs, tables and pictures in word? Issue #650 python-openxml/python-docx (github.com) from docx import Document from docx.oxml.ns import qndef iter_block_items(parent):"""生成 paren…...
)
kafka 集群原理设计和实现概述(一)
kafka 集群原理设计和实现概述(一) Kafka 集群的设计原理是为了实现高可用性、高吞吐量、容错性和可扩展性。以下是 Kafka 集群的设计原 理及其实现方法: 1. 分布式架构设计 Kafka 采用分布式架构,集群中的多个 Broker 共同工作,负责接收、存储和传递消息。通过将数据分布…...

three.js 第十一节 - uv坐标
// ts-nocheck // 引入three.js import * as THREE from three // 导入轨道控制器 import { OrbitControls } from three/examples/jsm/controls/OrbitControls // 导入lil.gui import { GUI } from three/examples/jsm/libs/lil-gui.module.min.js // 导入tween import * as T…...

git从master分支创建分支
1. 切换到主分支或你想从哪里创建新分支 git checkout master 2. 创建并切换到新的本地分支 develop git checkout -b develop 3. 将新分支推送到远程存储库 git push origin develop 4. 设置本地 develop 分支跟踪远程 develop 分支 git branch --set-upstream-toorigi…...
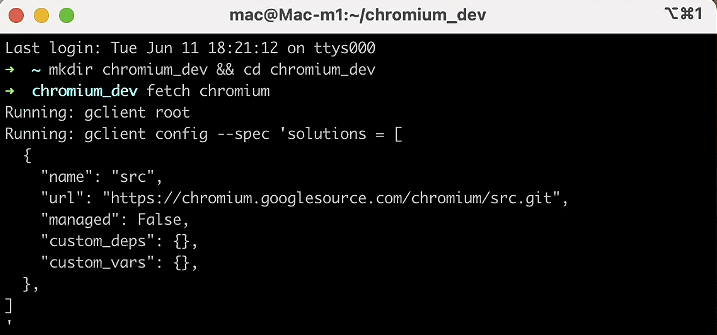
Chromium 调试指南2024 Mac篇 - 准备工作 (一)
1.引言 Chromium是一个由Google主导开发的开源浏览器项目,它为Google Chrome浏览器提供了基础框架。Chromium不仅是研究和开发现代浏览器技术的重要平台,还为众多其他基于Chromium的浏览器(如Microsoft Edge、Brave等)提供了基础…...
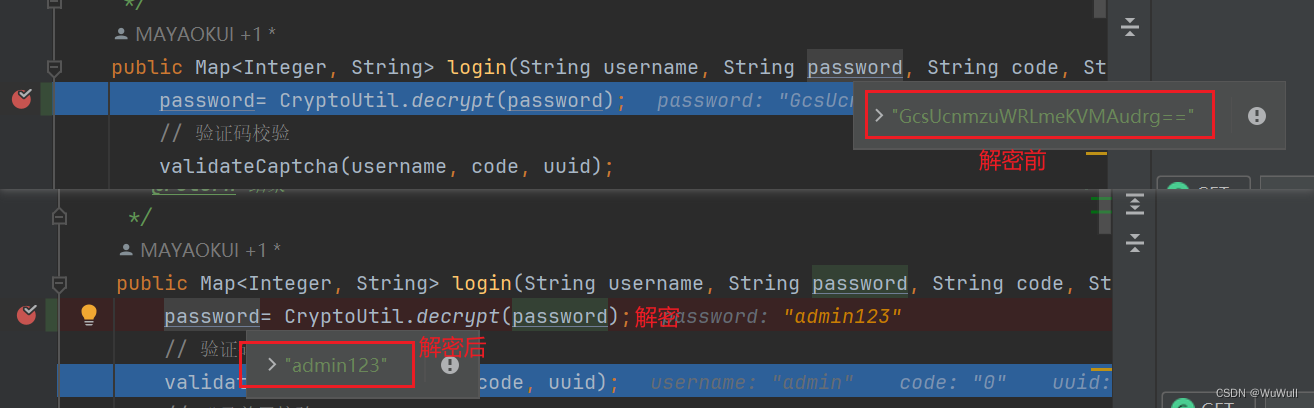
vue登陆密码加密,java后端解密
前端 安装crypto-js npm install crypto-js加密 //引入crypto-js import CryptoJS from crypto-js;/** ---密码加密 start--- */ const SECRET_KEY CryptoJS.enc.Utf8.parse("a15q8f6s5s1a2v3s"); const SECRET_IV CryptoJS.enc.Utf8.parse("a3c6g5h4v9sss…...
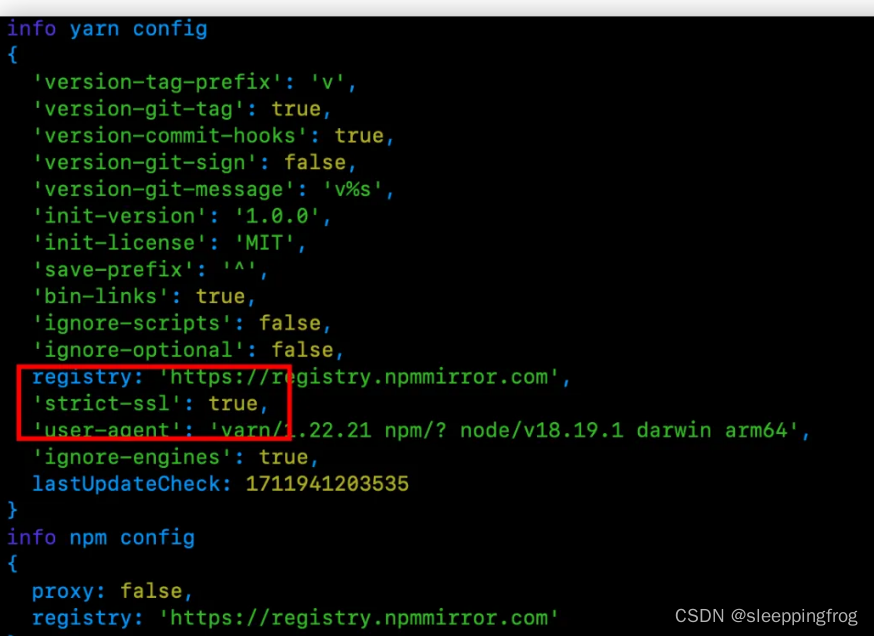
npm 安装踩坑
1 网络正常,但是以前的老项目安装依赖一直卡住无法安装?哪怕切换成淘宝镜像 解决办法:切换成yarn (1) npm i yarn -g(2) yarn init(3) yarn install在安装的过程中发现: [2/4] Fetching packages... error marked11.1.0:…...

内容安全复习 6 - 白帽子安全漏洞挖掘披露的法律风险
文章目录 安全漏洞的法律概念界定安全漏洞特征白帽子安全漏洞挖掘面临的法律风险“白帽子”安全漏洞挖掘的风险根源“白帽子”的主体边界授权行为边界关键结论 安全漏洞的法律概念界定 可以被利用来破坏所在系统的网络或信息安全的缺陷或错误;被利用的网络缺陷、错…...

dp经典问题:爬楼梯
dp经典问题:爬楼梯 爬楼梯 三步问题。有个小孩正在上楼梯,楼梯有n阶台阶,小孩一次可以上1阶、2阶或3阶。实现一种方法,计算小孩有多少种上楼梯的方式。结果可能很大,你需要对结果模1000000007。 Step1: 识别问题 这…...
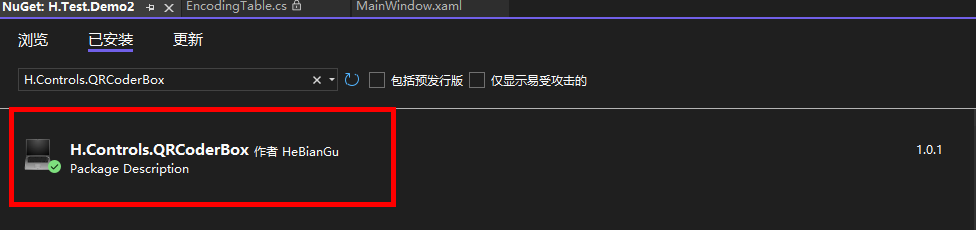
示例:推荐一个基于第三方QRCoder.Xaml封装的二维码显示控件
一、目的:基于第三方QRCoder.Xaml封装的二维码控件,为了方便WPF调用 二、效果如下 功能包括:背景色,前景色,中心图片设置和修改大小,二维码设置等 三、环境 VS2022 四、使用方式 1、安装nuget包…...

阿里云服务器618没想到这么便宜,买早了!
2年前,我买了个服务器,租用服务器(ECS5)和网络宽带(1M),可以说是非常非常低的配置了。 当时5年的折扣力度最大,但是打完折后,价格依然要近3000多元。 最近看到阿里云618活…...

提升Python技能的七个函数式编程技巧
文章目录 📖 介绍 📖🏡 演示环境 🏡📒 文章内容 📒📝 递归📝 结构化模式匹配📝 不变性📝 纯函数📝 高阶函数📝 函数组合📝 惰性求值⚓️ 相关链接 ⚓️📖 介绍 📖 在现代编程中,虽然Python并不是一门纯粹的函数式编程语言,但函数式编程(Funct…...
微型操作系统内核源码详解系列五(五):cm3下Pendsv切换任务上篇
系列一:微型操作系统内核源码详解系列一:rtos内核源码概论篇(以freertos为例)-CSDN博客 系列二:微型操作系统内核源码详解系列二:数据结构和对象篇(以freertos为例)-CSDN博客 系列…...

Django测试平台搭建学习笔记1
一安装 pip离线安装requests2.32.0所需要的依赖: : charset-normalizer<4,>2 (3.0.0b1) : idna<4,>2.5 (3.7) : urllib3<3,>1.21.1 (2.2.0) : certifi>2017.4.17 (2024.6.2) pip离线安装pytest8.2.0所需要的依赖: : iniconfig (2…...
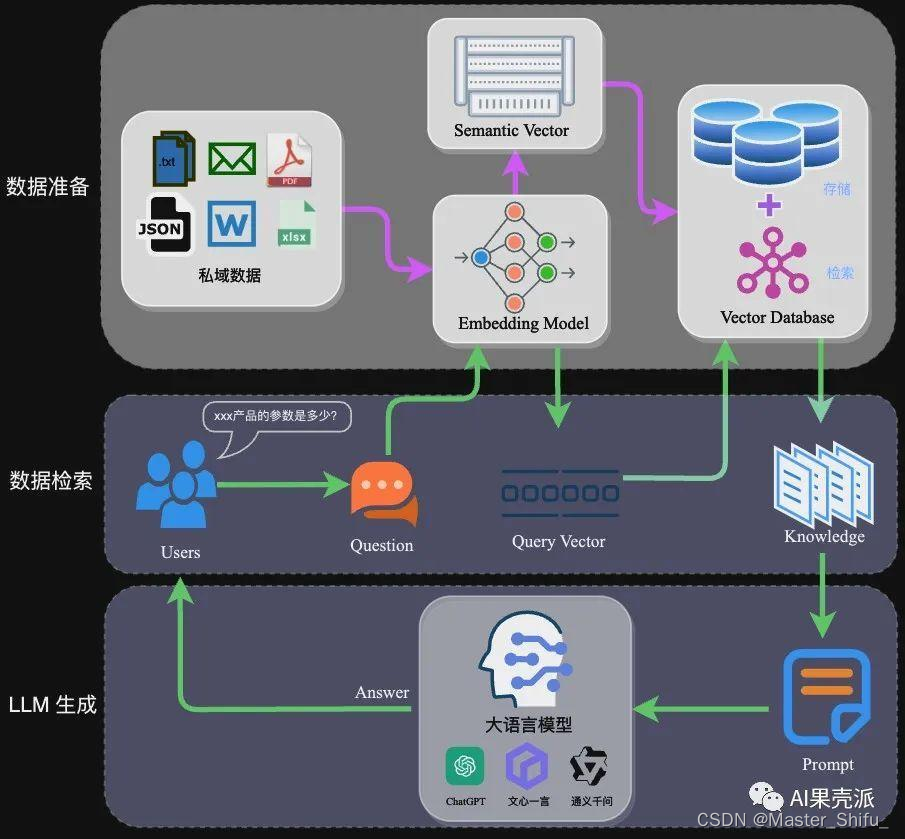
本地离线模型搭建指南-RAG架构实现
搭建一个本地中文大语言模型(LLM)涉及多个关键步骤,从选择模型底座,到运行机器和框架,再到具体的架构实现和训练方式。以下是一个详细的指南,帮助你从零开始构建和运行一个中文大语言模型。 本地离线模型搭…...
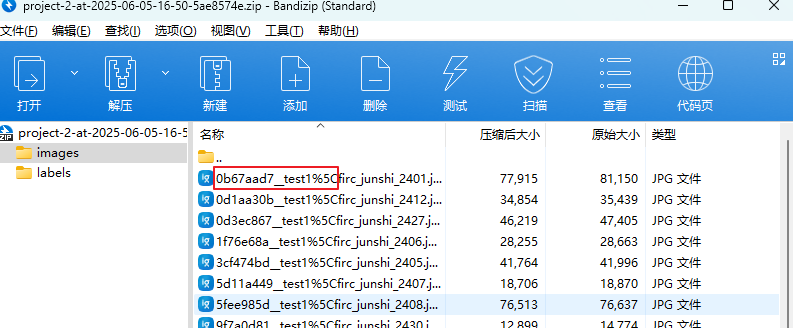
label-studio的使用教程(导入本地路径)
文章目录 1. 准备环境2. 脚本启动2.1 Windows2.2 Linux 3. 安装label-studio机器学习后端3.1 pip安装(推荐)3.2 GitHub仓库安装 4. 后端配置4.1 yolo环境4.2 引入后端模型4.3 修改脚本4.4 启动后端 5. 标注工程5.1 创建工程5.2 配置图片路径5.3 配置工程类型标签5.4 配置模型5.…...

C++ 基础特性深度解析
目录 引言 一、命名空间(namespace) C 中的命名空间 与 C 语言的对比 二、缺省参数 C 中的缺省参数 与 C 语言的对比 三、引用(reference) C 中的引用 与 C 语言的对比 四、inline(内联函数…...

Psychopy音频的使用
Psychopy音频的使用 本文主要解决以下问题: 指定音频引擎与设备;播放音频文件 本文所使用的环境: Python3.10 numpy2.2.6 psychopy2025.1.1 psychtoolbox3.0.19.14 一、音频配置 Psychopy文档链接为Sound - for audio playback — Psy…...

laravel8+vue3.0+element-plus搭建方法
创建 laravel8 项目 composer create-project --prefer-dist laravel/laravel laravel8 8.* 安装 laravel/ui composer require laravel/ui 修改 package.json 文件 "devDependencies": {"vue/compiler-sfc": "^3.0.7","axios": …...

Java求职者面试指南:Spring、Spring Boot、MyBatis框架与计算机基础问题解析
Java求职者面试指南:Spring、Spring Boot、MyBatis框架与计算机基础问题解析 一、第一轮提问(基础概念问题) 1. 请解释Spring框架的核心容器是什么?它在Spring中起到什么作用? Spring框架的核心容器是IoC容器&#…...

【Go语言基础【12】】指针:声明、取地址、解引用
文章目录 零、概述:指针 vs. 引用(类比其他语言)一、指针基础概念二、指针声明与初始化三、指针操作符1. &:取地址(拿到内存地址)2. *:解引用(拿到值) 四、空指针&am…...
集成 Mybatis-Plus 和 Mybatis-Plus-Join)
纯 Java 项目(非 SpringBoot)集成 Mybatis-Plus 和 Mybatis-Plus-Join
纯 Java 项目(非 SpringBoot)集成 Mybatis-Plus 和 Mybatis-Plus-Join 1、依赖1.1、依赖版本1.2、pom.xml 2、代码2.1、SqlSession 构造器2.2、MybatisPlus代码生成器2.3、获取 config.yml 配置2.3.1、config.yml2.3.2、项目配置类 2.4、ftl 模板2.4.1、…...

虚拟电厂发展三大趋势:市场化、技术主导、车网互联
市场化:从政策驱动到多元盈利 政策全面赋能 2025年4月,国家发改委、能源局发布《关于加快推进虚拟电厂发展的指导意见》,首次明确虚拟电厂为“独立市场主体”,提出硬性目标:2027年全国调节能力≥2000万千瓦࿰…...

CRMEB 中 PHP 短信扩展开发:涵盖一号通、阿里云、腾讯云、创蓝
目前已有一号通短信、阿里云短信、腾讯云短信扩展 扩展入口文件 文件目录 crmeb\services\sms\Sms.php 默认驱动类型为:一号通 namespace crmeb\services\sms;use crmeb\basic\BaseManager; use crmeb\services\AccessTokenServeService; use crmeb\services\sms\…...

CVPR2025重磅突破:AnomalyAny框架实现单样本生成逼真异常数据,破解视觉检测瓶颈!
本文介绍了一种名为AnomalyAny的创新框架,该方法利用Stable Diffusion的强大生成能力,仅需单个正常样本和文本描述,即可生成逼真且多样化的异常样本,有效解决了视觉异常检测中异常样本稀缺的难题,为工业质检、医疗影像…...