Mysql部署MHA高可用
部署前准备:
mysql-8.0.27下载地址:https://cdn.mysql.com//Downloads/MySQL-8.0/mysql-8.0.27-1.el7.x86_64.rpm-bundle.tar
mha-manager下载地址:https://github.com/yoshinorim/mha4mysql-manager/releases/download/v0.58/mha4mysql-manager-0.58-0.el7.centos.noarch.rpm
mha-node下载地址:https://github.com/yoshinorim/mha4mysql-node/releases/download/v0.58/mha4mysql-node-0.58-0.el7.centos.noarch.rpm
部署架构:
基本配置
4个节点逐台配置hostname和/etc/hosts文件

安装mysql8
4个节点均创建/data目录,将mysql-8.0.27-1.el7.x86_64.rpm-bundle.tar上传到/data目录下,进行解压安装
我这里使用操作系统镜像制作了本地yum源,用来解决依赖问题,命令见下图

看到如下内容,代表安装完成
配置Mysql异步复制集群
启动hdp2、hdp3、hdp4上的mysql服务,并配置开机自启
| 1 |
|
连接3个节点的mysql数据库,数据库默认root密码通过查看日志获取
| 1 2 |
|
3个节点数据库修改root用户密码,命令及sql如下
| 1 2 3 4 5 6 7 8 9 10 11 12 13 14 15 16 17 18 19 20 21 22 |
|
3个节点配置数据库server_id,以root用户登录mysql进行临时配置,然后将server_id配置在/etc/my.cnf中,防止重启后失效
| 1 2 3 4 5 6 7 8 9 10 11 12 |
|
查看主库hdp2的二进制日志信息
| 1 2 3 4 5 6 7 8 9 10 11 12 13 14 15 16 17 18 19 20 21 22 23 |
|
在主库hdp2上建立复制专用用户,并授权
| 1 2 3 4 5 6 7 |
|
在从库hdp3和hdp4上创建主库信息
| 1 2 3 4 5 6 7 8 9 10 |
|
在从库启动复制并查看从库状态
| 1 2 3 4 5 6 7 8 9 10 11 12 13 14 15 16 17 18 19 20 21 22 23 24 25 26 27 28 29 30 31 32 33 34 35 36 37 38 39 40 41 42 43 44 45 46 47 48 49 50 51 52 53 54 55 56 57 58 59 60 61 62 63 64 65 66 67 68 |
|
配置Mysql半同步复制
在主库加载插件semisync_master.so,从库加载插件semisync_slave.so
| 1 2 3 4 5 6 7 8 9 |
|
启用半同步复制
| 1 2 3 4 5 6 7 8 9 |
|
将半同步插件配置持久化到配置文件中
| 1 2 3 4 5 6 |
|
重启从库上的IO线程,否则仍然为异步复制模式,查询状态及重启命令如下
| 1 2 3 4 5 6 7 8 9 10 11 12 13 14 15 16 17 18 19 20 21 22 23 24 25 26 27 28 29 30 31 32 33 34 35 36 37 38 39 40 41 42 43 44 45 46 47 48 49 |
|
查询主库的半同步复制是否在运行
| 1 2 3 4 5 6 7 8 9 10 |
|
部署MHA相关组件
环境说明

组件:
mha-manager:部署在hdp1
mha-node:部署在hdp2、hdp3、hdp4
4个节点安装perl相关依赖
下载epel源
| 1 |
|
安装perl-DBD-MySQL、perl-Log-DIspatch、perl-Parallel-ForkManager、perl-Time-HiRes
| 1 |
|
安装perl-Config-Tiny,下载地址:http://mirror.centos.org/altarch/7/os/aarch64/Packages/perl-Config-Tiny-2.14-7.el7.noarch.rpm
| 1 2 3 4 5 6 7 8 9 10 11 12 13 14 15 16 17 18 19 20 21 22 23 24 25 26 27 28 29 30 31 32 33 34 35 36 |
|
4个节点互相配置免密登录
| 1 2 3 4 5 6 7 8 9 10 11 12 13 14 15 16 17 18 19 20 21 22 23 24 25 26 27 28 29 30 31 32 33 34 35 36 37 38 39 40 41 42 43 44 45 46 47 48 49 50 51 52 53 54 55 56 57 58 59 60 61 62 63 64 65 66 67 68 69 70 71 72 73 74 75 76 77 78 79 80 81 |
|
hdp2、hdp3、hdp4安装mha-node
| 1 2 3 4 |
|
hdp1安装mha-manager和mha-node
| 1 2 3 4 5 6 7 8 9 10 11 12 13 14 15 16 17 18 19 20 21 22 23 24 25 26 27 28 29 30 31 32 33 34 35 36 37 38 39 40 41 42 |
|
配置MHA
在hdp1上创建配置文件目录并创建配置app1.cnf
| 1 2 3 4 5 6 7 8 9 10 11 12 13 14 15 16 17 18 19 20 21 22 23 24 25 26 27 28 29 30 31 32 |
|
在hdp3、hdp4设置从库relay_log_purge参数
MHA在发生主从切换的过程中,从库的恢复过程依赖于relay log,所以这里要将relay log的自动清除设置为OFF,即采用手动清除relay log的方式。
在默认情况下,从服务器上的中继日志会在SQL线程执行完毕后被自动删除。
但是在MHA环境中,这些中继日志在恢复其他从服务器时可能会被用到,因此需要禁用中继日志的自动删除功能。
| 1 2 3 4 5 6 7 8 9 10 11 12 13 14 15 16 17 18 |
|
在hdp1上创建自动故障转移脚本
| 1 2 3 4 5 6 7 8 9 10 11 12 13 14 15 16 17 18 19 20 21 22 23 24 25 26 27 28 29 30 31 32 33 34 35 36 37 38 39 40 41 42 43 44 45 46 47 48 49 50 51 52 53 54 55 56 57 58 59 60 61 62 63 64 65 66 67 68 69 70 71 72 73 74 75 76 77 78 79 80 81 82 83 84 85 86 87 88 89 90 91 |
|
给自动故障转移脚本授权
| 1 |
|
hdp1上检查MHA
1、检查SSH
| 1 2 3 4 5 6 7 8 9 10 11 12 |
|
2、 检查整个复制环境状况
在hdp2执行root的登录授权,以及普通用户repl的登录授权
| 1 2 3 4 5 6 7 8 9 10 11 12 13 14 15 16 17 18 |
|
进行复制环境检查
| 1 2 3 4 5 6 7 8 9 10 11 12 13 14 15 16 17 18 19 20 21 22 23 24 25 26 27 28 29 30 31 32 33 34 35 36 37 38 39 40 41 42 43 44 45 46 47 48 49 50 51 52 53 54 55 56 57 58 59 60 61 62 63 64 65 66 67 68 69 70 71 72 73 74 75 76 77 78 79 80 81 82 83 84 85 |
|
3、检查MHA Manager的状态
| 1 2 |
|
启动MHA Manager
| 1 2 3 4 5 |
|
4、查看启动日志:tailf /var/log/masterha/app1/manager.log
功能测试
在 hdp2上初始绑定VIP
| 1 2 3 4 5 6 7 8 9 10 11 12 13 14 15 16 |
|
模拟主从延时,关闭hd3的slave IO线程
| 1 2 |
|
在hdp2上生成数据,这里使用sysbench
hdp2安装sysbench
| 1 |
|
在hdp2上生成数据
| 1 2 |
|
| 1 2 3 4 5 6 7 8 9 10 11 12 13 14 15 16 17 18 19 20 21 22 23 24 25 26 27 28 29 30 31 32 33 |
|
停止主服务器hdp2的MySQL服务
| 1 |
|
验证VIP漂移
在hdp3上查看ip
| 1 2 3 4 5 6 7 8 9 10 11 12 13 14 15 |
|
可以看到VIP已经从hdp2(master)漂移到了hdp3(slave1)
通过VIP连接数据库,查看表数据
| 1 2 3 4 5 6 7 8 9 10 11 12 13 14 15 16 17 18 19 20 21 22 23 24 25 26 27 28 29 30 31 32 33 34 35 36 37 38 39 40 41 42 43 |
|
至此,MHA基本搭建完毕!!
相关文章:
Mysql部署MHA高可用
部署前准备: mysql-8.0.27下载地址:https://cdn.mysql.com//Downloads/MySQL-8.0/mysql-8.0.27-1.el7.x86_64.rpm-bundle.tar mha-manager下载地址:https://github.com/yoshinorim/mha4mysql-manager/releases/download/v0.58/mha4mysql-mana…...
【算法学习】射线法判断点在多边形内外(C#)以及确定内外两点连线与边界的交点
1.前言: 在GIS开发中,经常会遇到确定一个坐标点是否在一块区域的内部这一问题。 如果这个问题不是一个单纯的数学问题,例如:在判断DEM、二维图像像素点、3D点云点等含有自身特征信息的这些点是否在一个区域范围内部的时候&#x…...
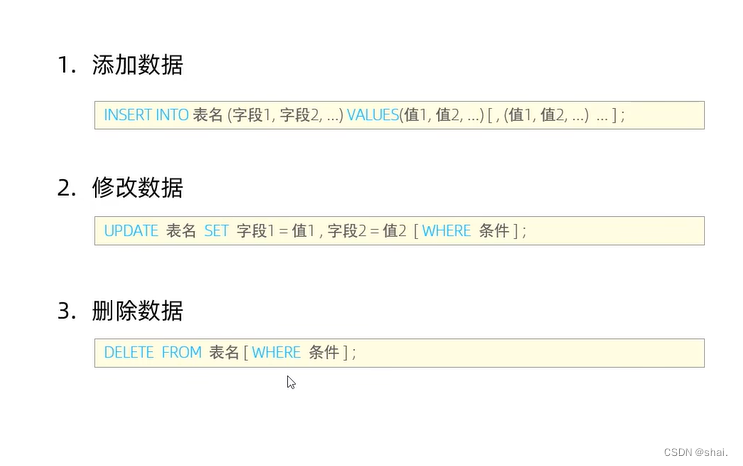
SQL语句(DML)
DML英文全称是Data Manipulation Language(数据操作语言),用来对数据库中表的数据记录进行增删改等操作 DML-添加数据 insert into employee(id, workno, name, gender, age, idcard) values (1,1,Itcast,男,10,123456789012345678);select *…...

uniapp小程序打开地图导航
uniapp uni.getLocation({type: gcj02, //返回可以用于uni.openLocation的经纬度success: function (res) {const latitude res.latitude;const longitude res.longitude;uni.openLocation({latitude: latitude,longitude: longitude,success: function () {console.log(suc…...
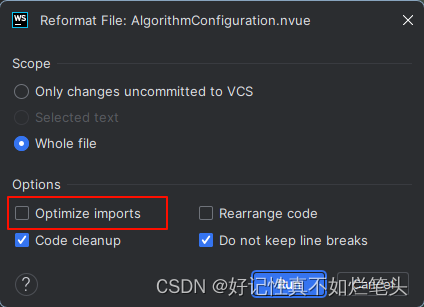
webstorm格式化或保存时 vue3引入的组件被删除了
解决办法 保存时设置 格式化设置...

Java时间转换
一、线程不安全 Date date new Date(); SimpleDateFormat dateFormat new SimpleDateFormat("yyyy-MM-dd HH:mm:ss"); String prefix dateFormat.format(date);二、线程安全,建议使用 String t1 LocalDateTime.now().format(DateTimeFormatter.ofPattern("y…...

Spring Boot与WebFlux的实战案例
Spring Boot与WebFlux的实战案例 大家好,我是免费搭建查券返利机器人省钱赚佣金就用微赚淘客系统3.0的小编,也是冬天不穿秋裤,天冷也要风度的程序猿!今天,我们将探讨如何利用Spring Boot和WebFlux构建响应式应用的实战…...

vue3引入本地静态资源图片
一、单张图片引入 import imgXX from /assets/images/xx.png二、多张图片引入 说明:import.meta.url 是一个 ESM 的原生功能,会暴露当前模块的 URL。将它与原生的 URL 构造器 组合使用 注意:填写自己项目图片存放的路径 /** vite的特殊性…...
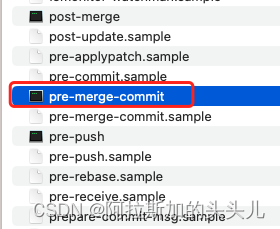
git 禁止dev合并到任何其他分支
创建 pre-merge-commit 钩子 导航到 Git 仓库的钩子目录: cd /path/to/your/repo/.git/hooks创建或编辑 pre-merge-commit 钩子: 也可以通过指令创建 nano pre-merge-commit在钩子文件中添加以下代码: #!/bin/sh# 获取当前分支名称 curr…...
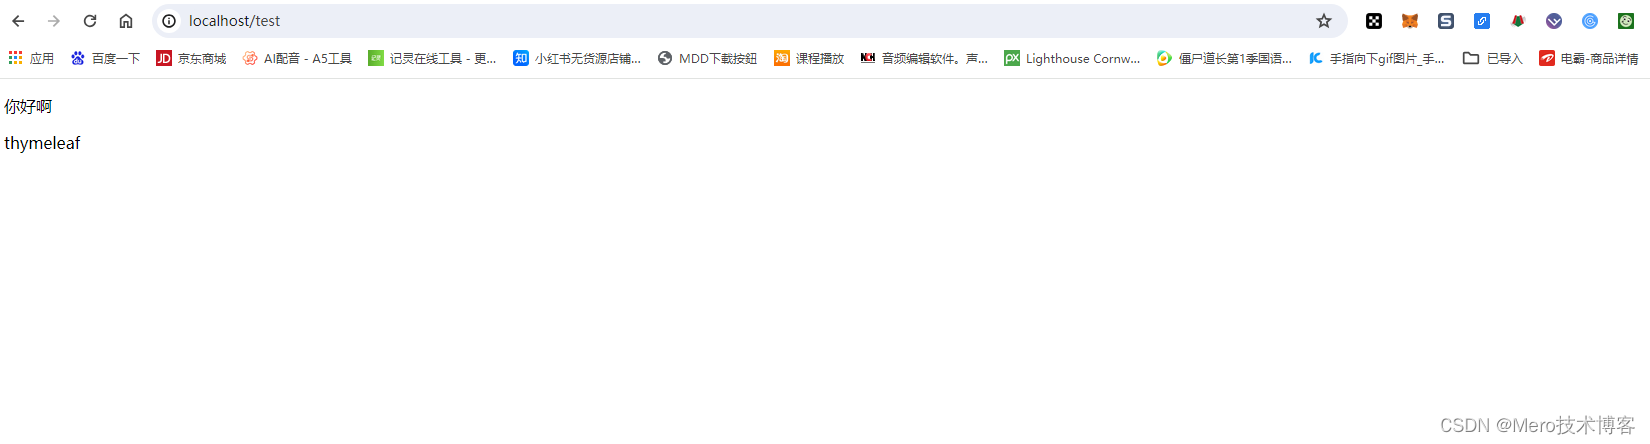
第二节:如何使用thymeleaf渲染html(自学Spring boot 3.x的第一天)
大家好,我是网创有方,今天来学习如何使用thymeleaf渲染html。该模板运用不广泛,所以本节内容了解既可。 第一步:创建html文件。 在模板templates目录下创建一个html文件。 编写代码如下: <!DOCTYPE html> <…...
)
计算机相关术语科普之什么叫网关(Gateway)
网关(Gateway)是一个在计算机网络中起到关键作用的设备或系统,它扮演着网络间连接器或协议转换器的角色。 一、定义与功能 1)定义: 网关是在不同网络之间实现互连的复杂设备,仅用于两个高层协议不同的网…...

B站网页部分API
https://www.bilibili.com/ 数据结构 mid: 用户id name: 用户名 face: 用户头像url noface.jpg为默认头像 sign: 签名level: b站等级 coins: b站硬币粉丝 https://api.bilibili.com/x/relation/fans?vmid{mid}&pn{pn}&ps{limit}&orderdesc&…...

使用Spring Boot和Spring Security保护你的应用
使用Spring Boot和Spring Security保护你的应用 大家好,我是免费搭建查券返利机器人省钱赚佣金就用微赚淘客系统3.0的小编,也是冬天不穿秋裤,天冷也要风度的程序猿!今天我们将深入探讨如何利用Spring Boot和Spring Security来保护…...
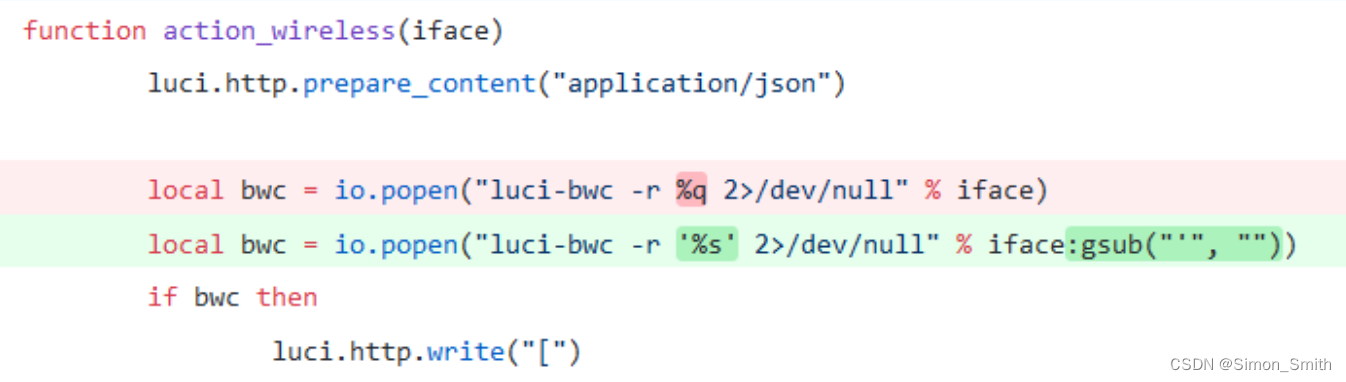
CVE-2019-12272 Openwrt可视页面LuCi命令注入漏洞复现(完结)
声明 本文所使用的一些源代码等内容已经上传至github,具体地址如下 Vulnerability_POC-EXP/OpenWrt/CVE-2019-12272 at main a2148001284/Vulnerability_POC-EXP GitHub 漏洞简介 参考内容: CVE-2019-12272 OpenWrt图形化管理界面LuCI命令注入分析 |…...

【多线程开发 4】从源码学习LockSupport
从源码学习LockSupport 2024年6月30日 大家好啊,好久没写博客了,今天打算写一下,讲一下JUC里面LockSupport这个类。 这个是一个工具类,实际上也是为了线程通信开发的。它的源码比较短,也只引用了Unsafe一个类。所以…...

gameui C++的代码
gameui C的代码 #include <graphics.h> #include "gameboard.h" const int WIDTH 560; const int HEIGHT 780; const int GRID_SIZE 120; class GameUi { private: public:GameUi(GameBoard& gb) {// 初始化图形窗口initgraph(WIDTH, HEIGHT);// 设置…...

1.什么是js?特点是什么?组成部分?
Js是一种直译式脚本语言,一种动态类型,弱类型,基于原型的高级语言。 直译式:js程序运行过程中直接编译成机器语言。 脚本语言:在程序运行过程中逐行进行解释说明,不需要预编译。 动态类型:js…...
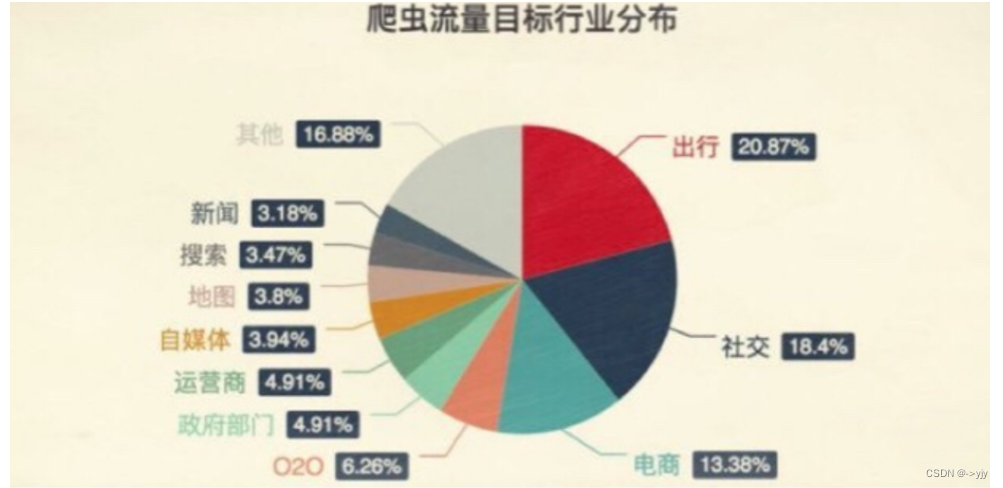
爬虫是什么?
目录 1.什么是互联网爬虫? 2.爬虫核心? 3.爬虫的用途? 4.爬虫分类? 5.反爬手段? 1.什么是互联网爬虫? 如果我们把互联网比作一张大的蜘蛛网,那一台计算机上的数据便是蜘蛛网上的一个猎物,而爬虫程序…...

深入理解Presto分页查询:方法与最佳实践
目录 引言为什么需要分页查询Presto简介分页查询的基本概念Presto分页查询的实现方法 使用LIMIT和OFFSET使用游标分页结合外部工具和框架 分页查询的性能优化 索引优化查询计划优化数据分区 实际案例分析最佳实践与常见问题 大数据集分页复杂查询分页实时性要求高的场景 总结 …...

如何使用Go语言中的并发函数实现网络爬虫的分布式部署?
如何使用go语言中的并发函数实现网络爬虫的分布式部署? 在当今的互联网时代,大量的信息蕴藏在各个网站中,爬虫成为了一种重要的工具。而对于大规模的数据爬取任务,采用分布式部署能够更有效地提升爬取速度和效率。Go语言的并发机…...

在MATLAB中调用与可视化Lingbot-Depth-Pretrain-ViTL-14的深度估计结果
在MATLAB中调用与可视化Lingbot-Depth-Pretrain-ViTL-14的深度估计结果 对于很多从事计算机视觉、机器人或者测绘相关研究的工程师和学者来说,深度估计是一个基础又关键的任务。它能从一张普通的二维图片中,推测出每个像素点距离相机的远近,…...

League-Toolkit:重新定义英雄联盟游戏体验的智能助手
League-Toolkit:重新定义英雄联盟游戏体验的智能助手 【免费下载链接】League-Toolkit 兴趣使然的、简单易用的英雄联盟工具集。支持战绩查询、自动秒选等功能。基于 LCU API。 项目地址: https://gitcode.com/gh_mirrors/le/League-Toolkit League-Toolkit …...

比特币钱包密码与助记词恢复工具:从入门到精通
比特币钱包密码与助记词恢复工具:从入门到精通 【免费下载链接】btcrecover An open source Bitcoin wallet password and seed recovery tool designed for the case where you already know most of your password/seed, but need assistance in trying different…...

CodeMaker:让编码效率提升3倍的智能代码生成工具
CodeMaker:让编码效率提升3倍的智能代码生成工具 【免费下载链接】CodeMaker A idea-plugin for Java/Scala, support custom code template. 项目地址: https://gitcode.com/gh_mirrors/co/CodeMaker 一、核心价值:重新定义开发效率 你是否也曾…...

像素风AI工具体验:像素史诗智识终端,让研究变得有趣又高效
像素风AI工具体验:像素史诗智识终端,让研究变得有趣又高效 1. 引言:当科研遇上像素冒险 想象一下:你是一位勇者,站在像素风格的城堡前,准备开始一场史诗般的冒险。但这次,你的武器不是剑与盾&…...

如何通过手机号快速查询QQ号:3分钟解决账号遗忘难题
如何通过手机号快速查询QQ号:3分钟解决账号遗忘难题 【免费下载链接】phone2qq 项目地址: https://gitcode.com/gh_mirrors/ph/phone2qq 在数字时代,QQ账号作为重要的社交和工作工具,其安全性与可访问性至关重要。然而,更…...

163MusicLyrics:开源高效歌词获取与管理解决方案
163MusicLyrics:开源高效歌词获取与管理解决方案 【免费下载链接】163MusicLyrics Windows 云音乐歌词获取【网易云、QQ音乐】 项目地址: https://gitcode.com/GitHub_Trending/16/163MusicLyrics 在数字音乐时代,歌词已成为音乐体验不可或缺的一…...

Qwen3-ASR-1.7B快速上手:3分钟完成CSDN GPU实例Web界面识别体验
Qwen3-ASR-1.7B快速上手:3分钟完成CSDN GPU实例Web界面识别体验 想体验语音转文字的神奇效果?Qwen3-ASR-1.7B让你在3分钟内就能通过网页界面完成高质量语音识别,无需任何技术背景。 1. 什么是Qwen3-ASR-1.7B? Qwen3-ASR-1.7B是阿…...

Java函数计算部署被低估的致命风险:类加载冲突、内存泄漏、上下文丢失——3个真实P0故障复盘
第一章:Java函数计算部署被低估的致命风险:类加载冲突、内存泄漏、上下文丢失——3个真实P0故障复盘在Serverless架构下,Java函数计算因其启动慢、内存占用高而常被“降级使用”,但更隐蔽的风险来自运行时环境的不可见性。我们复盘…...

@rc-component/slider拖拽轨道功能解析:提升用户体验的5个技巧
rc-component/slider拖拽轨道功能解析:提升用户体验的5个技巧 【免费下载链接】slider React Slider 项目地址: https://gitcode.com/gh_mirrors/sl/slider rc-component/slider是一款功能强大的React滑块组件,其拖拽轨道功能为用户提供了直观便捷…...