nx上darknet的使用-目标检测-在python中的使用
1 内置的代码
在darknet中已经内置了两个py文件

darknet_video.py与darknet_images.py用法类似,都是改一改给的参数就行了,我们说一下几个关键的参数

- input 要预测哪张图像
- weights 要使用哪个权重
- config_file 要使用哪个cfg文件
- data_file 要使用哪个data文件
- thresh 置信度给多少
改完上面这些参数就可以直接运行了

用鼠标点一下图片然后按q可以关闭图片
调用视频有时可以正常用,有时不可以,会报下面的错,可能是opencv的版本问题

这两个代码都很好,想的很周道,但是看起来太麻烦,我通常用下面两个简化版的
2 opencv使用模型
优点:只要有python,有opencv-python,有numpy就能用(不需要编译darknet,只要有names、cfg、weights就行)
缺点:只能搞CPU版,用摄像头搞效果较差
2.1 识别图像
你需要一张预测图像,训练时的classes.names yolov4-tiny-cfg yolov4-tiny_final.weights

yolo_opencv.py的内容如下
import cv2
import numpy as npLABELS = open("classes.names").read().strip().split("\n")
net = cv2.dnn.readNetFromDarknet('yolov4-tiny.cfg', 'yolov4-tiny_final.weights')
layer = net.getUnconnectedOutLayersNames()frame = cv2.imread('000003.jpg')
(H, W) = frame.shape[:2]
blob = cv2.dnn.blobFromImage(frame, 1 / 255.0, (416, 416),swapRB=True, crop=False)
net.setInput(blob)
layerOutputs = net.forward(layer)
boxes = []
confidences = []
classIDs = []for output in layerOutputs:for detection in output:scores = detection[5:]classID = np.argmax(scores)confidence = scores[classID]box = detection[0:4] * np.array([W, H, W, H])(centerX, centerY, width, height) = box.astype("int")x = int(centerX - (width / 2))y = int(centerY - (height / 2))boxes.append([x, y, int(width), int(height)])confidences.append(float(confidence))classIDs.append(classID)idxs = cv2.dnn.NMSBoxes(boxes, confidences, 0.5, 0.3)
if len(idxs) > 0:for i in idxs.flatten():(x, y) = (boxes[i][0], boxes[i][1])(w, h) = (boxes[i][2], boxes[i][3])cv2.rectangle(frame, (x, y), (x + w, y + h), (0,255,0), 1, lineType=cv2.LINE_AA)text = "{}: {:.4f}".format(LABELS[classIDs[i]], confidences[i])cv2.putText(frame, text, (x, y - 5), cv2.FONT_HERSHEY_SIMPLEX,0.5, (255,0,0), 1, lineType=cv2.LINE_AA)cv2.imshow('frame',frame)
cv2.waitKey(0)
cv2.destroyAllWindows()
运行后可以显示预测结果

2.2 flask起服务
我们可以搞一个接口来处理识别的功能
服务端
import numpy as np
import cv2
from flask import Flask,request
import base64LABELS = open("classes.names").read().strip().split("\n")
net = cv2.dnn.readNetFromDarknet('yolov4-tiny.cfg', 'yolov4-tiny_final.weights')
layer = net.getUnconnectedOutLayersNames()app = Flask(__name__)
@app.route('/predict',methods=["POST"])
def predict():if request.method == 'POST':image_base64 = request.json['img_b64']img = base64.b64decode(image_base64)img = np.fromstring(img,np.uint8)frame = cv2.imdecode(img,cv2.IMREAD_COLOR)(H, W) = frame.shape[:2]blob = cv2.dnn.blobFromImage(frame, 1 / 255.0, (416, 416),swapRB=True, crop=False)net.setInput(blob)layerOutputs = net.forward(layer)boxes = []confidences = []classIDs = []for output in layerOutputs:for detection in output:scores = detection[5:]classID = np.argmax(scores)confidence = scores[classID]box = detection[0:4] * np.array([W, H, W, H])(centerX, centerY, width, height) = box.astype("int")x = int(centerX - (width / 2))y = int(centerY - (height / 2))boxes.append([x, y, int(width), int(height)])confidences.append(float(confidence))classIDs.append(classID)idxs = cv2.dnn.NMSBoxes(boxes, confidences, 0.5, 0.3)result = []if len(idxs) > 0:for i in idxs.flatten():(x, y) = (boxes[i][0], boxes[i][1])(w, h) = (boxes[i][2], boxes[i][3])result_obj = {}result_obj['x'] = xresult_obj['y'] = yresult_obj['w'] = wresult_obj['h'] = hresult_obj['name'] = LABELS[classIDs[i]]result_obj['confidence'] = confidences[i]result.append(result_obj)return {'result':result}if __name__ == '__main__':app.run(host='192.168.0.105')
客户端
import cv2
import requests
import base64def get_result(url,frame):retval, buffer = cv2.imencode('.jpg', frame)image = str(base64.b64encode(buffer), 'utf-8')json_data = {'img_b64': image}response = eval(requests.post(url, json=json_data).text).get('result')return response
if __name__ == '__main__':url = 'http://192.168.0.105:5000/predict'frame = cv2.imread('000003.jpg')response = get_result(url,frame)for result in response:confidence = result.get('confidence')x = int(result.get('x'))y = int(result.get('y'))w = int(result.get('w'))h = int(result.get('h'))name = result.get('name')frame = cv2.rectangle(frame, (x, y), (x + w, y + h), (255, 0, 0), 2)frame = cv2.putText(frame, name, (x, y), cv2.FONT_HERSHEY_SIMPLEX, 1, (0, 255, 0), 2)cv2.imshow('img',frame)cv2.waitKey(0)cv2.destroyAllWindows()
请求结果

2.3 摄像头识别
原理是图像识别+多线程
import cv2
import numpy as np
import queue
import threading
import timeLABELS = open("classes.names").read().strip().split("\n")
net = cv2.dnn.readNetFromDarknet('yolov4-tiny.cfg', 'yolov4-tiny_final.weights')
layer = net.getUnconnectedOutLayersNames()cap = cv2.VideoCapture(0)frame_queue = queue.Queue()
detection_result_queue = queue.Queue(maxsize=1)def video_capture():while cap.isOpened():ret, frame = cap.read()if ret:frame_queue.put(frame)cap.release()def predict():while cap.isOpened():start_time = time.time()predict_frame = frame_queue.get()(H, W) = predict_frame.shape[:2]blob = cv2.dnn.blobFromImage(predict_frame, 1 / 255.0, (416, 416), swapRB=True, crop=False)net.setInput(blob)layerOutputs = net.forward(layer)boxes = []confidences = []classIDs = []for output in layerOutputs:for detection in output:scores = detection[5:]classID = np.argmax(scores)confidence = scores[classID]box = detection[0:4] * np.array([W, H, W, H])(centerX, centerY, width, height) = box.astype("int")x = int(centerX - (width / 2))y = int(centerY - (height / 2))boxes.append([x, y, int(width), int(height)])confidences.append(float(confidence))classIDs.append(classID)idxs = cv2.dnn.NMSBoxes(boxes, confidences, 0.5, 0.3)if len(idxs) > 0:result_list = []for i in idxs.flatten():result_dic = {}(x, y) = (boxes[i][0], boxes[i][1])(w, h) = (boxes[i][2], boxes[i][3])label = LABELS[classIDs[i]]confidence = confidences[i]result_dic.__setitem__('x',x)result_dic.__setitem__('y',y)result_dic.__setitem__('w',w)result_dic.__setitem__('h',h)result_dic.__setitem__('label',label)result_dic.__setitem__('confidence',confidence)result_list.append(result_dic)detection_result_queue.put(result_list)print(time.time()-start_time)cap.release()def draw():while cap.isOpened():draw_frame = frame_queue.get()try:predict_results = detection_result_queue.get(block=False)for predict_result in predict_results:x = predict_result.get('x')y = predict_result.get('y')w = predict_result.get('w')h = predict_result.get('h')label = predict_result.get('label')confidence = predict_result.get('confidence')cv2.rectangle(draw_frame, (x, y), (x + w, y + h), (0,255,0), 1, lineType=cv2.LINE_AA)text = "{}: {:.4f}".format(label, confidence)cv2.putText(draw_frame, text, (x, y - 5), cv2.FONT_HERSHEY_SIMPLEX,0.5, (255,0,0), 1, lineType=cv2.LINE_AA)except:passcv2.imshow('draw_frame',draw_frame)cv2.waitKey(1)cap.release()threading.Thread(target=video_capture).start()
threading.Thread(target=predict).start()
threading.Thread(target=draw).start()
由于是CPU运行,效果根据CPU的性能会有差异,我是用NX上的6核CPU运行yolov4-tiny,大约0.5s一张。这个速度如果在摄像头上的连续识别就非常慢了,至少要1秒30帧才能有流畅的感觉,也就是0.03秒需要预测一张
- 0.5/0.03 = 16.6 或许搞个17线程能够达成流畅的效果,没尝试过
3 darknet使用模型
优点:可以使用GPU
缺点:需要编译darknet才能使用
下面在代码中import darknet指的是import下面这个文件。下面这个py文件依赖了darknet文件夹下的其他文件,所以建议把下面的代码放在darknet的根目录下使用

3.1 识别图像
在模型读取的时候是通过data文件找names文件,而不是直接找names文件
import cv2
import darknet
import timenetwork, class_names, class_colors = darknet.load_network('/home/suyu/darknet/yolo_opencv/yolov7-tiny.cfg','/home/suyu/darknet/custom_training/custom_training.data','/home/suyu/darknet/yolo_opencv/yolov7-tiny_final_origin.weights',batch_size=1
)width = darknet.network_width(network)
height = darknet.network_height(network)
darknet_image = darknet.make_image(width, height, 3)image = cv2.imread('/home/suyu/darknet/yolo_opencv/280.jpg')
image_rgb = cv2.cvtColor(image, cv2.COLOR_BGR2RGB)
image_resized = cv2.resize(image_rgb, (width, height),interpolation=cv2.INTER_LINEAR)
darknet.copy_image_from_bytes(darknet_image, image_resized.tobytes())
start_time = time.time()
detections = darknet.detect_image(network, class_names, darknet_image, thresh=0.8)
print(time.time()-start_time)darknet.free_image(darknet_image)
image = darknet.draw_boxes(detections, image_resized, class_colors)
image = cv2.cvtColor(image, cv2.COLOR_BGR2RGB)cv2.imshow('image',image)
cv2.waitKey(0)
cv2.destroyAllWindows()
在终端上可以看到对模型进行了读取

画框的颜色每次都是随机的

在预测中,如果出现了下面这种情况,我们就需要减少预测的结果,可以通过标签后面的置信度减少,但是我们可以看到有两个框的置信度都在0.99以上,这个时候我们就需要用到其他减少框的办法

darknet.detect_image()这个方法,除了通过置信度减少预测结果,还可以通过非最大值抑制消除冗余,也就是最后一个的nms
- hier_thresh也是消除冗余的一个参数,叫控制层次性阈值(与nms类似),没用过,如果nms不行的化再尝试使用它

nms数值越小,消除冗余的效果就越好,我这里直接改成了0.05
![]()
改完之后可以得到还不错的效果

3.2 摄像头识别
原理是识别图像+多线程,我用yolov7-tiny大概能到0.03秒预测一张,这个预测速度不加多线程应该也可以
import cv2
import numpy as np
import queue
import threading
import time
import darknetnetwork, class_names, class_colors = darknet.load_network('/home/suyu/darknet/yolo_opencv/yolov7-tiny.cfg','/home/suyu/darknet/custom_training/custom_training.data','/home/suyu/darknet/yolo_opencv/yolov7-tiny_final_origin.weights',batch_size=1
)width = darknet.network_width(network)
height = darknet.network_height(network)
darknet_image = darknet.make_image(width, height, 3)cap = cv2.VideoCapture(0)frame_queue = queue.Queue()
detection_result_queue = queue.Queue(maxsize=1)def video_capture():while cap.isOpened():ret, frame = cap.read()if ret:image_rgb = cv2.cvtColor(frame, cv2.COLOR_BGR2RGB)image_resized = cv2.resize(image_rgb, (width, height), interpolation=cv2.INTER_LINEAR)frame_queue.put(image_resized)cap.release()def predict():while cap.isOpened():start_time = time.time()image_resized = frame_queue.get()darknet.copy_image_from_bytes(darknet_image, image_resized.tobytes())detections = darknet.detect_image(network, class_names, darknet_image, thresh=0.8)# darknet.free_image(darknet_image)print(time.time()-start_time)detection_result_queue.put(detections)cap.release()def draw():while cap.isOpened():draw_frame = frame_queue.get()# print(draw_frame)try:detections = detection_result_queue.get(block=False)draw_frame = darknet.draw_boxes(detections, draw_frame, class_colors)except:passdraw_frame = cv2.cvtColor(draw_frame, cv2.COLOR_BGR2RGB)cv2.imshow('draw_frame',draw_frame)cv2.waitKey(1)cap.release()threading.Thread(target=video_capture).start()
threading.Thread(target=predict).start()
threading.Thread(target=draw).start()
如果你想对预测的结果进行别的操作你可以用到detection_result_queue中的detections,打印出来是这样的
![]()
列表套元组,元组的第一个值是label,第二个值是置信
操作的时候建议多开一个线程,然后将detection_result_queue置为2或者更高,避免两个线程抢数据的情况
4 onnx使用模型
onnx(Open Neural Network eXchange) 开放式神经网络交换,好多模型都可以转换为onnx类型的模型,相当于是人工智能模型界的docker了。以高适配性而著名。在性能上并没有优于其他模型。
4.1 用到的库
onnx,这个是将其他类型的模型转换为onnx类型的库,在arm端上安装可能会有些麻烦,但在amd上直接用pip就可以安装了

onnxruntime是跑onnx模型用的,onnxruntime在arm端可以直接用pip安装

4.2 darknet的weight转onnx
参考 https://zhuanlan.zhihu.com/p/543345367
源码 GitHub - Tianxiaomo/pytorch-YOLOv4: PyTorch ,ONNX and TensorRT implementation of YOLOv4
安装完onnx与onnxruntime后运行demo_darknet2onnx.py,第一个参数是cfg,第二个参数是names,第三个参数是weights,第四个参数是图,第五个参数是batch_size,直接写1就行了
python demo_darknet2onnx.py /home/suyu/darknet/cfg/yolov4.cfg /home/suyu/darknet/data/coco.names /home/suyu/darknet/yolov4.weights /home/suyu/darknet/data/dog.jpg 1
如果opencv版本过高会爆出下面两个问题,是cv2.rectangele()与cv2.putText()的参数需为int


我们需要更改 /pytorch-YOLOv4-master/tool/utils.py
把画红线的地方改成int

成功使用会显示下面这些东西

在文件夹中可以找到通过onnx预测成功的图像和onnx模型

4.3 识别图像
识别的代码是用的上面提供的源码中的东西,有的代码直接从utils中复制过来了,用的时候不需要引入其他py文件了,只需要.onnx文件与.names文件
import sys
import onnx
import os
import argparse
import numpy as np
import cv2
import onnxruntime
import time
import mathdef load_class_names(namesfile):class_names = []with open(namesfile, 'r') as fp:lines = fp.readlines()for line in lines:line = line.rstrip()class_names.append(line)return class_namesdef nms_cpu(boxes, confs, nms_thresh=0.5, min_mode=False):# print(boxes.shape)x1 = boxes[:, 0]y1 = boxes[:, 1]x2 = boxes[:, 2]y2 = boxes[:, 3]areas = (x2 - x1) * (y2 - y1)order = confs.argsort()[::-1]keep = []while order.size > 0:idx_self = order[0]idx_other = order[1:]keep.append(idx_self)xx1 = np.maximum(x1[idx_self], x1[idx_other])yy1 = np.maximum(y1[idx_self], y1[idx_other])xx2 = np.minimum(x2[idx_self], x2[idx_other])yy2 = np.minimum(y2[idx_self], y2[idx_other])w = np.maximum(0.0, xx2 - xx1)h = np.maximum(0.0, yy2 - yy1)inter = w * hif min_mode:over = inter / np.minimum(areas[order[0]], areas[order[1:]])else:over = inter / (areas[order[0]] + areas[order[1:]] - inter)inds = np.where(over <= nms_thresh)[0]order = order[inds + 1]return np.array(keep)def post_processing(img, conf_thresh, nms_thresh, output):# anchors = [12, 16, 19, 36, 40, 28, 36, 75, 76, 55, 72, 146, 142, 110, 192, 243, 459, 401]# num_anchors = 9# anchor_masks = [[0, 1, 2], [3, 4, 5], [6, 7, 8]]# strides = [8, 16, 32]# anchor_step = len(anchors) // num_anchors# [batch, num, 1, 4]box_array = output[0]# [batch, num, num_classes]confs = output[1]t1 = time.time()if type(box_array).__name__ != 'ndarray':box_array = box_array.cpu().detach().numpy()confs = confs.cpu().detach().numpy()num_classes = confs.shape[2]# [batch, num, 4]box_array = box_array[:, :, 0]# [batch, num, num_classes] --> [batch, num]max_conf = np.max(confs, axis=2)max_id = np.argmax(confs, axis=2)t2 = time.time()bboxes_batch = []for i in range(box_array.shape[0]):argwhere = max_conf[i] > conf_threshl_box_array = box_array[i, argwhere, :]l_max_conf = max_conf[i, argwhere]l_max_id = max_id[i, argwhere]bboxes = []# nms for each classfor j in range(num_classes):cls_argwhere = l_max_id == jll_box_array = l_box_array[cls_argwhere, :]ll_max_conf = l_max_conf[cls_argwhere]ll_max_id = l_max_id[cls_argwhere]keep = nms_cpu(ll_box_array, ll_max_conf, nms_thresh)if (keep.size > 0):ll_box_array = ll_box_array[keep, :]ll_max_conf = ll_max_conf[keep]ll_max_id = ll_max_id[keep]for k in range(ll_box_array.shape[0]):bboxes.append([ll_box_array[k, 0], ll_box_array[k, 1], ll_box_array[k, 2], ll_box_array[k, 3], ll_max_conf[k], ll_max_conf[k], ll_max_id[k]])bboxes_batch.append(bboxes)t3 = time.time()print('-----------------------------------')print('       max and argmax : %f' % (t2 - t1))print('                  nms : %f' % (t3 - t2))print('Post processing total : %f' % (t3 - t1))print('-----------------------------------')return bboxes_batchdef plot_boxes_cv2(img, boxes, savename=None, class_names=None, color=None):import cv2img = np.copy(img)colors = np.array([[1, 0, 1], [0, 0, 1], [0, 1, 1], [0, 1, 0], [1, 1, 0], [1, 0, 0]], dtype=np.float32)def get_color(c, x, max_val):ratio = float(x) / max_val * 5i = int(math.floor(ratio))j = int(math.ceil(ratio))ratio = ratio - ir = (1 - ratio) * colors[i][c] + ratio * colors[j][c]return int(r * 255)width = img.shape[1]height = img.shape[0]for i in range(len(boxes)):box = boxes[i]x1 = int(box[0] * width)y1 = int(box[1] * height)x2 = int(box[2] * width)y2 = int(box[3] * height)bbox_thick = int(0.6 * (height + width) / 600)if color:rgb = colorelse:rgb = (255, 0, 0)if len(box) >= 7 and class_names:cls_conf = box[5]cls_id = box[6]print('%s: %f' % (class_names[cls_id], cls_conf))classes = len(class_names)offset = cls_id * 123457 % classesred = get_color(2, offset, classes)green = get_color(1, offset, classes)blue = get_color(0, offset, classes)if color is None:rgb = (red, green, blue)msg = str(class_names[cls_id])+" "+str(round(cls_conf,3))t_size = cv2.getTextSize(msg, 0, 0.7, thickness=bbox_thick // 2)[0]c1, c2 = (x1,y1), (x2, y2)c3 = (c1[0] + t_size[0], c1[1] - t_size[1] - 3)cv2.rectangle(img, (int(x1),int(y1)), (int(np.float32(c3[0])), int(np.float32(c3[1]))), rgb, -1)img = cv2.putText(img, msg, (int(c1[0]), int(np.float32(c1[1] - 2))), cv2.FONT_HERSHEY_SIMPLEX,0.7, (0,0,0), bbox_thick//2,lineType=cv2.LINE_AA)img = cv2.rectangle(img, (int(x1), int(y1)), (int(x2), int(y2)), rgb, bbox_thick)if savename:print("save plot results to %s" % savename)cv2.imwrite(savename, img)return imgdef detect(session, image_src, namesfile):IN_IMAGE_H = session.get_inputs()[0].shape[2]IN_IMAGE_W = session.get_inputs()[0].shape[3]# Inputresized = cv2.resize(image_src, (IN_IMAGE_W, IN_IMAGE_H), interpolation=cv2.INTER_LINEAR)img_in = cv2.cvtColor(resized, cv2.COLOR_BGR2RGB)img_in = np.transpose(img_in, (2, 0, 1)).astype(np.float32)img_in = np.expand_dims(img_in, axis=0)img_in /= 255.0#print("Shape of the network input: ", img_in.shape)# Computeinput_name = session.get_inputs()[0].nameoutputs = session.run(None, {input_name: img_in})boxes = post_processing(img_in, 0.4, 0.6, outputs)class_names = load_class_names(namesfile)return plot_boxes_cv2(image_src, boxes[0], class_names=class_names)if __name__ == '__main__':session = onnxruntime.InferenceSession('yolov4_1_3_640_640_static.onnx')namesfile = 'classes.names'image_src = cv2.imread('3.png')detected_img = detect(session, image_src, namesfile)cv2.imshow('detected_img',detected_img)cv2.waitKey(0)cv2.destroyAllWindows()
4.4 摄像头识别
用的采集、预测、画 三线程。模型输入width与height都为320,两分类,在树莓派4B中大概是0.5s一张,大概是1秒2个识别帧
import cv2
import numpy as np
import queue
import threading
import timeimport sys
import onnx
import os
import argparse
import onnxruntime
import mathdef load_class_names(namesfile):class_names = []with open(namesfile, 'r') as fp:lines = fp.readlines()for line in lines:line = line.rstrip()class_names.append(line)return class_namesdef nms_cpu(boxes, confs, nms_thresh=0.5, min_mode=False):x1 = boxes[:, 0]y1 = boxes[:, 1]x2 = boxes[:, 2]y2 = boxes[:, 3]areas = (x2 - x1) * (y2 - y1)order = confs.argsort()[::-1]keep = []while order.size > 0:idx_self = order[0]idx_other = order[1:]keep.append(idx_self)xx1 = np.maximum(x1[idx_self], x1[idx_other])yy1 = np.maximum(y1[idx_self], y1[idx_other])xx2 = np.minimum(x2[idx_self], x2[idx_other])yy2 = np.minimum(y2[idx_self], y2[idx_other])w = np.maximum(0.0, xx2 - xx1)h = np.maximum(0.0, yy2 - yy1)inter = w * hif min_mode:over = inter / np.minimum(areas[order[0]], areas[order[1:]])else:over = inter / (areas[order[0]] + areas[order[1:]] - inter)inds = np.where(over <= nms_thresh)[0]order = order[inds + 1]return np.array(keep)def post_processing(img, conf_thresh, nms_thresh, output):box_array = output[0]confs = output[1]if type(box_array).__name__ != 'ndarray':box_array = box_array.cpu().detach().numpy()confs = confs.cpu().detach().numpy()num_classes = confs.shape[2]box_array = box_array[:, :, 0]max_conf = np.max(confs, axis=2)max_id = np.argmax(confs, axis=2)bboxes_batch = []for i in range(box_array.shape[0]):argwhere = max_conf[i] > conf_threshl_box_array = box_array[i, argwhere, :]l_max_conf = max_conf[i, argwhere]l_max_id = max_id[i, argwhere]bboxes = []for j in range(num_classes):cls_argwhere = l_max_id == jll_box_array = l_box_array[cls_argwhere, :]ll_max_conf = l_max_conf[cls_argwhere]ll_max_id = l_max_id[cls_argwhere]keep = nms_cpu(ll_box_array, ll_max_conf, nms_thresh)if (keep.size > 0):ll_box_array = ll_box_array[keep, :]ll_max_conf = ll_max_conf[keep]ll_max_id = ll_max_id[keep]for k in range(ll_box_array.shape[0]):bboxes.append([ll_box_array[k, 0], ll_box_array[k, 1], ll_box_array[k, 2], ll_box_array[k, 3], ll_max_conf[k], ll_max_conf[k], ll_max_id[k]])bboxes_batch.append(bboxes)return bboxes_batchdef get_color(c, x, max_val):colors = np.array([[1, 0, 1], [0, 0, 1], [0, 1, 1], [0, 1, 0], [1, 1, 0], [1, 0, 0]], dtype=np.float32)ratio = float(x) / max_val * 5i = int(math.floor(ratio))j = int(math.ceil(ratio))ratio = ratio - ir = (1 - ratio) * colors[i][c] + ratio * colors[j][c]return int(r * 255)def detect(session, image_src, namesfile):IN_IMAGE_H = session.get_inputs()[0].shape[2]IN_IMAGE_W = session.get_inputs()[0].shape[3]# Inputresized = cv2.resize(image_src, (IN_IMAGE_W, IN_IMAGE_H), interpolation=cv2.INTER_LINEAR)img_in = cv2.cvtColor(resized, cv2.COLOR_BGR2RGB)img_in = np.transpose(img_in, (2, 0, 1)).astype(np.float32)img_in = np.expand_dims(img_in, axis=0)img_in /= 255.0# Computeinput_name = session.get_inputs()[0].nameoutputs = session.run(None, {input_name: img_in})boxes = post_processing(img_in, 0.4, 0.6, outputs)return boxes[0]session = onnxruntime.InferenceSession('yolov4_1_3_640_640_static.onnx')
namesfile = 'classes.names'
class_names = load_class_names(namesfile)cap = cv2.VideoCapture(0)frame_queue = queue.Queue()
detection_result_queue = queue.Queue(maxsize=1)def video_capture():while cap.isOpened():ret, frame = cap.read()if ret:frame_queue.put(frame)cap.release()def predict():while cap.isOpened():start_time = time.time()predict_frame = frame_queue.get()result_list = detect(session, predict_frame, namesfile)detection_result_queue.put(result_list)print(time.time()-start_time)cap.release()def draw():while cap.isOpened():draw_frame = frame_queue.get()try:boxes = detection_result_queue.get(block=False)img = draw_framewidth = img.shape[1]height = img.shape[0]for i in range(len(boxes)):box = boxes[i]x1 = int(box[0] * width)y1 = int(box[1] * height)x2 = int(box[2] * width)y2 = int(box[3] * height)bbox_thick = int(0.6 * (height + width) / 600)rgb = (255, 0, 0)if len(box) >= 7 and class_names:cls_conf = box[5]cls_id = box[6]print('%s: %f' % (class_names[cls_id], cls_conf))classes = len(class_names)offset = cls_id * 123457 % classesred = get_color(2, offset, classes)green = get_color(1, offset, classes)blue = get_color(0, offset, classes)rgb = (red, green, blue)msg = str(class_names[cls_id])+" "+str(round(cls_conf,3))t_size = cv2.getTextSize(msg, 0, 0.7, thickness=bbox_thick // 2)[0]c1, c2 = (x1,y1), (x2, y2)c3 = (c1[0] + t_size[0], c1[1] - t_size[1] - 3)cv2.rectangle(img, (int(x1),int(y1)), (int(np.float32(c3[0])), int(np.float32(c3[1]))), rgb, -1)img = cv2.putText(img, msg, (int(c1[0]), int(np.float32(c1[1] - 2))), cv2.FONT_HERSHEY_SIMPLEX,0.7, (0,0,0), bbox_thick//2,lineType=cv2.LINE_AA)img = cv2.rectangle(img, (int(x1), int(y1)), (int(x2), int(y2)), rgb, bbox_thick)draw_frame = img#except Exception as e:#print(e)except:passcv2.imshow('draw_frame',draw_frame)cv2.waitKey(1)cap.release()threading.Thread(target=video_capture).start()
threading.Thread(target=predict).start()
threading.Thread(target=draw).start()
在树莓派4B上是下面这个效果

相关文章:
nx上darknet的使用-目标检测-在python中的使用
1 内置的代码 在darknet中已经内置了两个py文件 darknet_video.py与darknet_images.py用法类似,都是改一改给的参数就行了,我们说一下几个关键的参数 input 要预测哪张图像weights 要使用哪个权重config_file 要使用哪个cfg文件data_file 要使用哪个da…...
_内存管理)
Python高级(四)_内存管理
Python高级-内存管理 第四章 内存管理 1、对象池 小整数池 系统默认创建好的,等着你使用 概述:整数在程序中的使用非常广泛,Python为了优化速度,使用了小整数对象池,避免为整数频繁申请和销毁内存空间。Python 对小整数的定义是 [-5, 256] ,这些整数对象是提前建立好的…...

关键路径-matlab
路径上边的数目称为路径长度 图的基本知识 求最短路径(Dijkstra算法) 2. 待继续尝试 ①Dijkstra ②floyd_all.m 一 二 ③ LeetCode [329. 矩阵中的最长递增路径]...

JavaDS —— 单链表 与 LinkedList
顺序表和链表区别 ArrayList : 底层使用连续的空间,可以随机访问某下标的元素,时间复杂度为O(1) 但是在插入和删除操作的时候,需要将该位置的后序元素整体往前或者向后移动,时间复杂度为O&…...

LangChain —— Message —— how to filter messages
文章目录 一、概述二、基本使用三、连成链 一、概述 在更复杂的链和代理中,我们可能会使用消息列表跟踪状态。此列表可以开始累积来自多个不同模型、说话者、子链等的消息,我们可能只想将此完整消息列表的子集传递给链/代理中的每个模型调用。 filter_me…...

conda install问题记录
最近想用代码处理sar数据,解放双手。 看重了isce这个处理平台,在安装包的时候遇到了一些问题。 这一步持续了非常久,然后我就果断ctrlc了 后面再次进行尝试,出现一大串报错,不知道是不是依赖项的问题 后面看到说mam…...

【python】IPython的使用技巧
IPython使用技巧 一、魔法命令 %timeit 用途:用于测量一段代码的执行时间,这对于评估代码的性能非常有帮助,尤其适用于需要进行性能优化和比较不同实现方式效率的场景。示例:%timeit [x**2 for x in range(1000)]扩展…...

常用知识点问答
kafka如何部署? 先说明kafka的版本如果是 2.X 版本,则要先部署 3或5 个服务器的zookeeper集群,然后在每个zookeeper服务器上部署kafka应用。如果是 3.X 版本,kafka不再依赖zookeeper,所以可以直接在java17的环境上部署…...

paddlenlp cpu windows 下测试gpt
paddlenlp 安装python3.11版本 conda create -n python311 python3.11 激活python conda activate python311 安装paddlepaddle conda install paddlepaddle3.0.0b0 -c paddle pip install paddlenlp3.0.0b0 -U -i https://pypi.tuna.tsinghua.edu.cn/simple windows下…...

uboot的功能
uboot裸机程序,uboot的核心功能是启动内核 uboot启动流程 XIP设备: 1、硬件初始化 2、读flash上面的内核,拷贝进内存 3、启动内核 非XIP设备 1、BROM程序拷贝uboot到RAM 2、执行uboot 3、硬件初始化 4、读flash上面的内核,拷贝进…...

java导出word实现
参考:Poi-tl Documentation...

Flink 提交作业的方式
首先我进行了flink单机部署,个人建议不管是学习还是开发尽量不使用 然后开始了flink自带集群部署,部署在三台服务器上,资源管理由flink集群自己管理,然后为了解决集群的单点故障问题,使用zookeeper监听事件࿰…...

JVM系列 | 垃圾收集算法
JVM系列 | 垃圾收集算法 文章目录 前言如何判断对象已"死"?引用计数法可达性分析算法可达性分析2.0版 | 引用的增强对象的消亡过程回收方法区主要回收目标:回收操作 垃圾收集算法分代收集理论 与 跨代引用假说分代收集理论跨带引用假说 垃圾收…...

深入理解Spring Boot中的事件驱动架构
深入理解Spring Boot中的事件驱动架构 大家好,我是微赚淘客系统3.0的小编,也是冬天不穿秋裤,天冷也要风度的程序猿! 1. 引言 事件驱动架构在现代软件开发中越来越受欢迎,它能够提高系统的松耦合性和可扩展性。Sprin…...

Moldflow安装包下载:附网盘地址+详细教程步骤
如大家所了解的,Autodesk Moldflow仿真软件具有注塑成型仿真工具,能够帮助您验证和优化塑料零件、注塑模具和注塑成型流程。目前常用的版本有Moldflow 2019和Moldflow2023。 还没有获取Moldflow软件安装包资源的小伙伴,可以用百度云盘保存或下…...

2024辽宁省数学建模B题【钢铁产品质量优化】思路详解
2024 辽宁省大学数学建模竞赛试题 B 题 钢铁产品质量优化 由于连续退火工序中各阶段的工艺参数之间存在耦合性(加热炉的温度设定会影响后续均热与冷却温度的设定,以及带钢穿行速度),导致难以建立该工序的机理模型,从而…...

C++基础入门(上)
个人主页:C忠实粉丝 欢迎 点赞👍 收藏✨ 留言✉ 加关注💓本文由 C忠实粉丝 原创 C基础入门(上) 收录于专栏【C语法基础】 本专栏旨在分享学习C的一点学习笔记,欢迎大家在评论区交流讨论💌 目录 1. C发展历史 2. C版本…...

基于深度学习的情感分析
基于深度学习的情感分析是一种利用深度学习技术从文本数据中提取情感信息,判断文本的情感倾向(如正面、负面或中性)的方法。这项技术在市场营销、客户服务、社交媒体分析、产品评价和政治分析等领域有广泛应用。以下是对这一领域的系统介绍&a…...

mybatis 延迟加载
MyBatis的延迟加载(Lazy Loading)是一种优化技术,用于在需要时才加载关联对象或集合,从而提高性能和效率。以下是对MyBatis延迟加载的详细介绍: 延迟加载的基本概念 延迟加载是指在第一次访问对象的属性时才加载该对象…...

使用QT5.14.2开发族谱管理软件过程记录
目标缘由:出生在农村、学习了电脑技术,总有一个想法就是将老家传承下来的族谱录入电脑中,方便快速查询和长期保存。开始入手时候发现还挺有难度。 难点如下: 过去族谱纸质版书籍是民国时候印刷的、很多字都是繁体字、还有好些字…...

反向工程与模型迁移:打造未来商品详情API的可持续创新体系
在电商行业蓬勃发展的当下,商品详情API作为连接电商平台与开发者、商家及用户的关键纽带,其重要性日益凸显。传统商品详情API主要聚焦于商品基本信息(如名称、价格、库存等)的获取与展示,已难以满足市场对个性化、智能…...

电脑插入多块移动硬盘后经常出现卡顿和蓝屏
当电脑在插入多块移动硬盘后频繁出现卡顿和蓝屏问题时,可能涉及硬件资源冲突、驱动兼容性、供电不足或系统设置等多方面原因。以下是逐步排查和解决方案: 1. 检查电源供电问题 问题原因:多块移动硬盘同时运行可能导致USB接口供电不足&#x…...

OkHttp 中实现断点续传 demo
在 OkHttp 中实现断点续传主要通过以下步骤完成,核心是利用 HTTP 协议的 Range 请求头指定下载范围: 实现原理 Range 请求头:向服务器请求文件的特定字节范围(如 Range: bytes1024-) 本地文件记录:保存已…...

涂鸦T5AI手搓语音、emoji、otto机器人从入门到实战
“🤖手搓TuyaAI语音指令 😍秒变表情包大师,让萌系Otto机器人🔥玩出智能新花样!开整!” 🤖 Otto机器人 → 直接点明主体 手搓TuyaAI语音 → 强调 自主编程/自定义 语音控制(TuyaAI…...

Android15默认授权浮窗权限
我们经常有那种需求,客户需要定制的apk集成在ROM中,并且默认授予其【显示在其他应用的上层】权限,也就是我们常说的浮窗权限,那么我们就可以通过以下方法在wms、ams等系统服务的systemReady()方法中调用即可实现预置应用默认授权浮…...
SpringCloudGateway 自定义局部过滤器
场景: 将所有请求转化为同一路径请求(方便穿网配置)在请求头内标识原来路径,然后在将请求分发给不同服务 AllToOneGatewayFilterFactory import lombok.Getter; import lombok.Setter; import lombok.extern.slf4j.Slf4j; impor…...

蓝桥杯3498 01串的熵
问题描述 对于一个长度为 23333333的 01 串, 如果其信息熵为 11625907.5798, 且 0 出现次数比 1 少, 那么这个 01 串中 0 出现了多少次? #include<iostream> #include<cmath> using namespace std;int n 23333333;int main() {//枚举 0 出现的次数//因…...
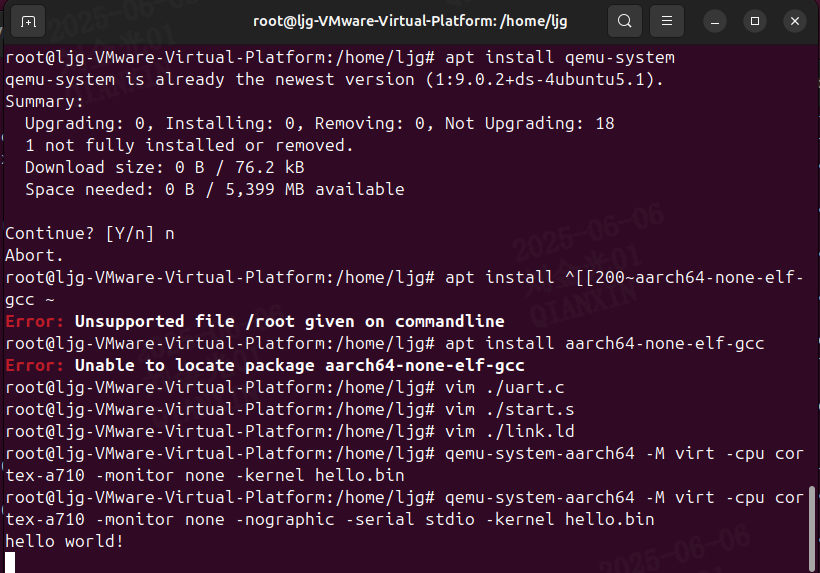
Qemu arm操作系统开发环境
使用qemu虚拟arm硬件比较合适。 步骤如下: 安装qemu apt install qemu-system安装aarch64-none-elf-gcc 需要手动下载,下载地址:https://developer.arm.com/-/media/Files/downloads/gnu/13.2.rel1/binrel/arm-gnu-toolchain-13.2.rel1-x…...

Web后端基础(基础知识)
BS架构:Browser/Server,浏览器/服务器架构模式。客户端只需要浏览器,应用程序的逻辑和数据都存储在服务端。 优点:维护方便缺点:体验一般 CS架构:Client/Server,客户端/服务器架构模式。需要单独…...
mac:大模型系列测试
0 MAC 前几天经过学生优惠以及国补17K入手了mac studio,然后这两天亲自测试其模型行运用能力如何,是否支持微调、推理速度等能力。下面进入正文。 1 mac 与 unsloth 按照下面的进行安装以及测试,是可以跑通文章里面的代码。训练速度也是很快的。 注意…...