【Android】常用基础布局
布局是一种可用于放置很多控件的容器,它可以按照一定的规律调整内部控件的位置,从而编写出精美的界面,布局内不单单可以放控件,也可以嵌套布局,这样可以完成一些复杂的界面,下面就来认识一些常用的布局吧。
线性布局
-
名称:LinearLayout,这个布局会将它所包含的控件在线性方向上依次排列
-
属性:
android:orientation这个属性就规定了是在竖直方向上还是水平方向上,当为vertical时,规定的排列方向就为竖直方向;当为horizontal时,控件就会在水平方向上排列 -
设置一个主活动,并修改其xml中的代码,在这个活动里面加入三个按钮控件,此时设置为竖直方向:
<LinearLayout xmlns:android="http://schemas.android.com/apk/res/android"xmlns:app="http://schemas.android.com/apk/res-auto"xmlns:tools="http://schemas.android.com/tools"android:id="@+id/main"android:layout_width="match_parent"android:layout_height="match_parent"android:orientation="vertical"tools:context=".MainActivity"><Buttonandroid:layout_width="wrap_content"android:layout_height="wrap_content"android:id="@+id/Button_1"android:text="Button1"/><Buttonandroid:layout_width="wrap_content"android:layout_height="wrap_content"android:id="@+id/Button_2"android:text="Button2"/><Buttonandroid:layout_width="wrap_content"android:layout_height="wrap_content"android:id="@+id/Button_3"android:text="Button3"/></LinearLayout>
此时使用的是android:orientation="vertical"即竖直方向,因此运行结果为:

但如果改为android:orientation="horizontal"即为水平方向,即三个按钮水平排列在第一行
注意:如果排列方式为horizontal,内部控件绝不能将宽度设置为match_parent,同样的道理,如果排列方式为vertical,内部控件绝不能将高度设置为match_parent,当不指定orietation属性时,则默认为水平方向排列
重要属性:通过android:layout_gravity来设置控件与上级视图(即布局)的对齐方式,当这三个控件仍然会坚持以布局所规定的方向排列
<LinearLayout xmlns:android="http://schemas.android.com/apk/res/android"xmlns:app="http://schemas.android.com/apk/res-auto"xmlns:tools="http://schemas.android.com/tools"android:id="@+id/main"android:layout_width="match_parent"android:layout_height="match_parent"android:orientation="horizontal"tools:context=".MainActivity"><Buttonandroid:layout_width="wrap_content"android:layout_height="wrap_content"android:id="@+id/Button_1"android:layout_gravity="top"android:text="Button1"/><Buttonandroid:layout_width="wrap_content"android:layout_height="wrap_content"android:id="@+id/Button_2"android:layout_gravity="center_vertical"android:text="Button2"/><Buttonandroid:layout_width="wrap_content"android:layout_height="wrap_content"android:layout_gravity="bottom"android:id="@+id/Button_3"android:text="Button3"/></LinearLayout>
因此运行结果为:

重要属性:android:layout_weight:允许我们使用比例的方式指定控件的大小,即将控件的宽或者高其中一个设置为0dp,则会根据你所设置的数值计算所占的权重,从而规划大小:
<LinearLayout xmlns:android="http://schemas.android.com/apk/res/android"xmlns:app="http://schemas.android.com/apk/res-auto"xmlns:tools="http://schemas.android.com/tools"android:id="@+id/main"android:layout_width="match_parent"android:layout_height="match_parent"android:orientation="horizontal"tools:context=".MainActivity"><EditTextandroid:layout_width="0dp"android:layout_height="wrap_content"android:layout_weight="1"android:id="@+id/editText"android:hint="Type Something"/><Buttonandroid:layout_width="0dp"android:layout_height="wrap_content"android:id="@+id/Button_1"android:layout_gravity="top"android:layout_weight="1"android:text="Button1"/></LinearLayout>
此时,我们将一个两个控件的宽度都设置为0dp,权重设置为1,此时权重就管的是宽度,它们两个来分配,都占二分之一,运行程序:

相对布局
- 名称:RelativeLayout
- 作用:可以通过相对定位的方式让控件出现在布局的任何位置
- 对于父布局的定位示例:
<RelativeLayout xmlns:android="http://schemas.android.com/apk/res/android"xmlns:app="http://schemas.android.com/apk/res-auto"xmlns:tools="http://schemas.android.com/tools"android:id="@+id/main"android:layout_width="match_parent"android:layout_height="match_parent"tools:context=".MainActivity"><Buttonandroid:layout_width="wrap_content"android:layout_height="wrap_content"android:id="@+id/Button_1"android:layout_alignParentTop="true"android:layout_alignParentStart="true"android:text="Button1"/><Buttonandroid:layout_width="wrap_content"android:layout_height="wrap_content"android:id="@+id/Button_2"android:layout_alignParentTop="true"android:layout_alignParentEnd="true"android:text="Button2"/><Buttonandroid:layout_width="wrap_content"android:layout_height="wrap_content"android:id="@+id/Button_3"android:layout_centerInParent="true"android:text="Button3"/><Buttonandroid:layout_width="wrap_content"android:layout_height="wrap_content"android:id="@+id/Button_4"android:layout_alignParentBottom="true"android:layout_alignParentStart="true"android:text="Button4"/><Buttonandroid:layout_width="wrap_content"android:layout_height="wrap_content"android:id="@+id/Button_5"android:layout_alignParentBottom="true"android:layout_alignParentEnd="true"android:text="Button5"/></RelativeLayout>
运行结果:

以上是对于父布局进行定位,控件还可以以控件进行定位:
<RelativeLayout xmlns:android="http://schemas.android.com/apk/res/android"xmlns:app="http://schemas.android.com/apk/res-auto"xmlns:tools="http://schemas.android.com/tools"android:id="@+id/main"android:layout_width="match_parent"android:layout_height="match_parent"tools:context=".MainActivity"><Buttonandroid:layout_width="wrap_content"android:layout_height="wrap_content"android:id="@+id/Button_1"android:layout_above="@id/Button_3"android:layout_toStartOf="@id/Button_3"android:text="Button1"/><Buttonandroid:layout_width="wrap_content"android:layout_height="wrap_content"android:id="@+id/Button_2"android:layout_above="@id/Button_3"android:layout_toEndOf="@id/Button_3"android:text="Button2"/><Buttonandroid:layout_width="wrap_content"android:layout_height="wrap_content"android:id="@+id/Button_3"android:layout_centerInParent="true"android:text="Button3"/><Buttonandroid:layout_width="wrap_content"android:layout_height="wrap_content"android:id="@+id/Button_4"android:layout_below="@id/Button_3"android:layout_toStartOf="@id/Button_3"android:text="Button4"/><Buttonandroid:layout_width="wrap_content"android:layout_height="wrap_content"android:id="@+id/Button_5"android:layout_below="@id/Button_3"android:layout_toEndOf="@id/Button_3"android:text="Button5"/>
android:layout_above:可以让一个控件位于另一个控件的上方
android:layout_below:可以让一个控件位于另一个控件的下方
android:layout_toStartOf:可以让一个控件位于另一个控件的左侧
android:layout_toEndOf:可以让一个控件位于另一个控件的右侧
android:layout_alignBottom:一个控件和另一个控件的下边缘对齐
android:layout_alignTop:一个控件和另一个控件的上边缘对齐
android:layout_alignEnd:一个控件和另一个控件的右边缘对齐
android:layout_alignStart:一个控件和另一个控件的左边缘对齐
上面代码运行结果:

帧布局
-
名称:FrameLayout
-
作用:没有方便的定位方式,所有的控件都会默认放在布局的左上角,控件堆叠在一起,通常用于覆盖或弹出窗口。
-
示例:
<FrameLayout xmlns:android="http://schemas.android.com/apk/res/android"xmlns:app="http://schemas.android.com/apk/res-auto"xmlns:tools="http://schemas.android.com/tools"android:id="@+id/main"android:layout_width="match_parent"android:layout_height="match_parent"tools:context=".MainActivity"><TextViewandroid:layout_width="wrap_content"android:layout_height="wrap_content"android:text="This is TextView"/><ImageViewandroid:layout_width="wrap_content"android:layout_height="wrap_content"android:src="@mipmap/ic_launcher"/></FrameLayout>
由于都位于左上角,因此文本会被图片遮盖一部分,因此运行结果为:

除了默认的效果还可以通过android:layout_gravity来指定控件在布局里的对齐方式
网格布局
-
名称:GridLayout
-
支持多行多列的表格排列
-
网格布局默认从左向右、从上到下排列,它新增了两个属性:
- columnCount属性,它指定了网格的列数,即每行能放多少个视图
- rowCount属性:它指定了网格的行数,即每列能放多少个视图
-
示例:
<GridLayout xmlns:android="http://schemas.android.com/apk/res/android"xmlns:app="http://schemas.android.com/apk/res-auto"xmlns:tools="http://schemas.android.com/tools"android:id="@+id/main"android:layout_width="match_parent"android:layout_height="match_parent"android:columnCount="2"android:rowCount="2"tools:context=".MainActivity"><TextViewandroid:layout_width="0dp"android:layout_height="60dp"android:background="#ffcccc"android:gravity="center"android:layout_columnWeight="1"android:text="aa"/><TextViewandroid:layout_width="0dp"android:layout_height="60dp"android:background="#00ffff"android:gravity="center"android:layout_columnWeight="1"android:text="aa"/><TextViewandroid:layout_width="0dp"android:layout_height="60dp"android:background="#ff00cc"android:gravity="center"android:layout_columnWeight="1"android:text="aa"/><TextViewandroid:layout_width="0dp"android:layout_height="60dp"android:background="#ffcc00"android:gravity="center"android:layout_columnWeight="1"android:text="aa"/></GridLayout>
定义了一个2行2列的网格布局,并注意其中对于宽度进行了权重的赋值,有代码在网格布局当中权重的设置方式是与前面不一样的,运行界面:

约束布局
ConstraintLayout:是一种灵活的布局管理器,它允许开发者在Android应用中创建复杂的布局,同时保持性能和灵活性。
相对定位
| 属性 | 作用 |
|---|---|
| layout_constraintTop_toTopOf | 将控件的顶部与另一个控件的顶部对齐。 |
| layout_constraintTop_toBottomOf | 将控件的顶部与另一个控件的底部对齐。 |
| layout_constraintBottom_toBottomOf | 将控件的底部与另一个控件的底部对齐。 |
| layout_constraintBottom_toTopOf | 将控件的底部与另一个控件的顶部对齐。 |
| layout_constraintLeft_toLeftOf | 将控件的左边与另一个控件的左边对齐。 |
| layout_constraintLeft_toRightOf | 将控件的左边与另一个控件的右边对齐。 |
| layout_constraintRight_toRightOf | 将控件的右边与另一个控件的右边对齐。 |
| layout_constraintRight_toLeftOf | 将控件的右边与另一个控件的左边对齐。 |
| layout_constraintStart_toStartOf | 将控件的开始边与另一个控件的开始边对齐。 |
| layout_constraintStart_toEndOf | 将控件的开始边与另一个控件的结束边对齐。 |
| layout_constraintEnd_toEndOf: | 将控件的结束边与另一个控件的结束边对齐。 |
| layout_constraintEnd_toStartOf | 将控件的结束边与另一个控件的开始边对齐。 |
| layout_constraintBaseline_toBaselineOf | 将一个控件的基线(baseline)与另一个控件的基线对齐 |
注意:当出现顶部与底部之间的对齐时这意味着当你将这个属性应用到一个视图上时,它会将视图的顶部放置在另一个所要对其的底部,从而在垂直方向上将它们连接起来。
示例:
<androidx.constraintlayout.widget.ConstraintLayout xmlns:android="http://schemas.android.com/apk/res/android"xmlns:app="http://schemas.android.com/apk/res-auto"xmlns:tools="http://schemas.android.com/tools"android:id="@+id/main"android:layout_width="match_parent"android:layout_height="match_parent"tools:context=".MainActivity"><Buttonandroid:id="@+id/button1"android:layout_width="100dp"android:layout_height="100dp"android:background="#ff2200"android:text="button1"app:layout_constraintLeft_toLeftOf="parent"app:layout_constraintTop_toTopOf="@+id/button2" /><Buttonandroid:id="@+id/buttoncenter"android:layout_width="100dp"android:layout_height="100dp"android:background="@color/teal_200"android:text="button center"app:layout_constraintBottom_toBottomOf="parent"app:layout_constraintLeft_toLeftOf="parent"app:layout_constraintRight_toRightOf="parent"app:layout_constraintTop_toTopOf="parent" /><Buttonandroid:id="@+id/button2"android:layout_width="100dp"android:layout_height="100dp"android:layout_marginRight="4dp"android:background="#ff4400"android:text="button2"app:layout_constraintRight_toRightOf="parent"app:layout_constraintTop_toBottomOf="@+id/button1" /><Buttonandroid:id="@+id/button3"android:layout_width="100dp"android:layout_height="100dp"android:background="#ff8825"android:text="button3"app:layout_constraintBottom_toBottomOf="parent"app:layout_constraintLeft_toRightOf="@+id/button1" /><Buttonandroid:id="@+id/button4"android:layout_width="100dp"android:layout_height="100dp"android:background="#ff6677"android:text="button4"app:layout_constraintBottom_toBottomOf="parent"app:layout_constraintRight_toLeftOf="@id/button2" /></androidx.constraintlayout.widget.ConstraintLayout>
运行结果:

角度定位
| 属性 | 作用 |
|---|---|
| layout_constraintCircle | 指定控件相对于另一个控件的圆形路径进行定位。 |
| layout_constraintCircleAngle | 指定控件在圆形路径上的角度位置。 |
| layout_constraintCircleRadius | 指定控件相对于圆形路径的半径。 |
示例:
<androidx.constraintlayout.widget.ConstraintLayout xmlns:android="http://schemas.android.com/apk/res/android"xmlns:app="http://schemas.android.com/apk/res-auto"xmlns:tools="http://schemas.android.com/tools"android:id="@+id/main"android:layout_width="match_parent"android:layout_height="match_parent"tools:context=".MainActivity"><TextViewandroid:layout_width="100dp"android:layout_height="100dp"android:id="@+id/TextView1"android:background="#00ff00"android:text="TextView1"android:visibility="visible"app:layout_constraintLeft_toLeftOf="parent"app:layout_constraintTop_toTopOf="parent"/><TextViewandroid:layout_width="100dp"android:layout_height="100dp"android:id="@+id/TextView2"android:background="#ff0033"android:text="TextView2"android:visibility="visible"app:layout_constraintCircle="@id/TextView1"app:layout_constraintCircleAngle="120"app:layout_constraintCircleRadius="150dp"app:layout_constraintRight_toRightOf="parent"app:layout_goneMarginLeft="50dp"app:layout_constraintTop_toTopOf="parent"/></androidx.constraintlayout.widget.ConstraintLayout>
运行结果:

边距示例:
| 属性 | 作用 |
|---|---|
| android:layout_marginStart | 设置控件在其起始边(左边或右边,取决于布局方向)的外边距。 |
| android:layout_marginEnd | 设置控件在其结束边(右边或左边,取决于布局方向)的外边距。 |
| android:layout_marginLeft | 设置控件在其左边的外边距。 |
| android:layout_marginTop | 设置控件在其顶部的外边距。 |
| android:layout_marginRight | 设置控件在其右边的外边距。 |
| android:layout_marginBottom | 设置控件在其底部的外边距。 |
当给marginBottom前面加上gone时就代表控件在不可用时相对应位置的外边距
示例:
<androidx.constraintlayout.widget.ConstraintLayout xmlns:android="http://schemas.android.com/apk/res/android"xmlns:app="http://schemas.android.com/apk/res-auto"xmlns:tools="http://schemas.android.com/tools"android:id="@+id/main"android:layout_width="match_parent"android:layout_height="match_parent"tools:context=".MainActivity"><TextViewandroid:layout_width="100dp"android:layout_height="100dp"android:id="@+id/TextView1"android:background="#00ff00"android:text="TextView1"android:visibility="visible"app:layout_constraintLeft_toLeftOf="parent"app:layout_constraintTop_toTopOf="parent"/><TextViewandroid:layout_width="100dp"android:layout_height="100dp"android:id="@+id/TextView2"android:background="#ff0033"android:text="TextView2"android:visibility="visible"app:layout_constraintLeft_toRightOf="@id/TextView1"app:layout_goneMarginLeft="50dp"app:layout_constraintTop_toTopOf="parent"/></androidx.constraintlayout.widget.ConstraintLayout>
运行结果:

当我们将第一个控件的可见性属性进行改变:android:visibility="gone",由于设置,此时运行结果为:

居中和偏移:
居中:
<androidx.constraintlayout.widget.ConstraintLayout xmlns:android="http://schemas.android.com/apk/res/android"xmlns:app="http://schemas.android.com/apk/res-auto"xmlns:tools="http://schemas.android.com/tools"android:id="@+id/main"android:layout_width="match_parent"android:layout_height="match_parent"tools:context=".MainActivity"><TextViewandroid:layout_width="100dp"android:layout_height="100dp"android:id="@+id/TextView1"android:background="#00ff00"android:text="TextView1"android:visibility="visible"app:layout_constraintTop_toTopOf="parent"app:layout_constraintLeft_toLeftOf="parent"app:layout_constraintBottom_toBottomOf="parent"app:layout_constraintRight_toRightOf="parent"/></androidx.constraintlayout.widget.ConstraintLayout>
运行之后,此时就会有一个TextView位于屏幕的中间:

偏移:
| 属性 | 作用 |
|---|---|
| layout_constraintHorizontal_bias | 水平偏移 |
| layout_constraintVertical_bias | 垂直偏移 |
偏移量的设置范围为0~1,当设置偏移量为1时,当为水平偏移时就会位于最右端,当为垂直偏移时,就会位于最下端。当为0.5就会位于中间,以此类推。
尺寸约束
-
当我们使用wrap_content,即让控件自己确定大小,此时我们可以设立属性来规定它的最大最小宽度与高度:
android:minWidth 最小的宽度 android:minHeight 最小的高度 android:maxWidth 最大的宽度 android:maxHeight 最大的高度 -
使用0dp:
match_parent是一个布局参数,它可以使视图的尺寸与父容器的尺寸相匹配。然而,ConstraintLayout推荐使用MATCH_CONSTRAINT(在XML中表示为0dp)来代替match_parent,因为它提供了更多的灵活性和控制。使用
MATCH_CONSTRAINT时,可以通过设置视图的约束来控制其尺寸。例如,你可以让视图的宽度或高度匹配父容器,或者根据其他视图的尺寸来调整自己的尺寸。这样做的好处是,它允许视图在不同屏幕尺寸和方向下保持更好的适应性。
示例:
<TextViewandroid:layout_width="0dp"android:layout_height="wrap_content"android:id="@+id/TextView1"android:background="#00ff00"android:text="TextView1"android:visibility="visible"app:layout_constraintTop_toTopOf="parent"app:layout_constraintLeft_toLeftOf="parent"app:layout_constraintRight_toRightOf="parent" />
在一般情况下,当我们设置了android:layout_width="0dp"时,这个视图就看不到了,但在约束布局当中由于我们设立了左右要与父视图对齐,因此运行结果如下:

- 宽高比:当宽或高至少有一个尺寸被设置为0dp时,可以通过属性layout_constraintDimensionRatio设置宽高比
示例:
<androidx.constraintlayout.widget.ConstraintLayout xmlns:android="http://schemas.android.com/apk/res/android"xmlns:app="http://schemas.android.com/apk/res-auto"xmlns:tools="http://schemas.android.com/tools"android:id="@+id/main"android:layout_width="match_parent"android:layout_height="match_parent"tools:context=".MainActivity"><TextViewandroid:layout_width="0dp"android:layout_height="100dp"android:id="@+id/TextView1"android:background="#00ff00"android:text="TextView2"android:visibility="visible"app:layout_constraintDimensionRatio="1:1"app:layout_constraintTop_toTopOf="parent"app:layout_constraintLeft_toLeftOf="parent" /><TextViewandroid:layout_width="0dp"android:layout_height="100dp"android:id="@+id/TextView2"android:background="#00ff00"android:text="TextView2"android:visibility="visible"app:layout_constraintDimensionRatio="H,2:3"app:layout_constraintTop_toTopOf="parent"app:layout_constraintRight_toRightOf="parent" /><TextViewandroid:layout_width="0dp"android:layout_height="100dp"android:id="@+id/TextView3"android:background="#00ff00"android:text="TextView1"android:visibility="visible"app:layout_constraintDimensionRatio="W,2:3"app:layout_constraintBottom_toBottomOf="parent"app:layout_constraintLeft_toLeftOf="parent" /></androidx.constraintlayout.widget.ConstraintLayout>
运行结果:

一般没有特殊声明时,指的为高比宽,也可在前面加上比例的限制,例如上面的示例文本控件2与文本控件3就加了限制,当前面为H时代表的是高比宽,当前面为W时,代表的是宽比高。
链
在约束布局中,链(Chains)是一种用于定义一组相关控件之间关系的方法,可以控制它们的排列方式和行为。
| 属性 | 作用 |
|---|---|
| app:layout_constraintHorizontal_chainStyle | 定义水平链的样式,可以设置为 spread(均匀分布)、spread_inside(均匀分布,但不包括边缘控件)或 packed(靠拢排列)。 |
| app:layout_constraintVertical_chainStyle | 定义垂直链的样式,可以设置为 spread、spread_inside或 packed。 |
| app:layout_constraintHorizontal_bias | 设置水平链中每个控件的偏移量,取值范围为 0.0(左边)到 1.0(右边)。 |
| app:layout_constraintVertical_bias | 设置垂直链中每个控件的偏移量 |
| app:layout_constraintHorizontal_weight | 定义水平链中每个控件的权重,用于均匀分配额外空间。 |
| app:layout_constraintVertical_weight | 定义垂直链中每个控件的权重。 |
示例:
<androidx.constraintlayout.widget.ConstraintLayout xmlns:android="http://schemas.android.com/apk/res/android"xmlns:app="http://schemas.android.com/apk/res-auto"xmlns:tools="http://schemas.android.com/tools"android:id="@+id/main"android:layout_width="match_parent"android:layout_height="match_parent"tools:context=".MainActivity"><TextViewandroid:layout_width="50dp"android:layout_height="wrap_content"android:id="@+id/TextView1"android:background="#00ff00"android:text="TextView2"android:visibility="visible"app:layout_constraintHorizontal_chainStyle="spread_inside"app:layout_constraintTop_toTopOf="parent"app:layout_constraintLeft_toLeftOf="parent"app:layout_constraintRight_toLeftOf="@id/TextView2" /><TextViewandroid:layout_width="50dp"android:layout_height="wrap_content"android:id="@+id/TextView2"android:background="#ff0011"android:text="TextView2"android:visibility="visible"app:layout_constraintTop_toTopOf="parent"app:layout_constraintLeft_toRightOf="@id/TextView1"app:layout_constraintRight_toRightOf="parent"app:layout_constraintRight_toLeftOf="@id/TextView3" /><TextViewandroid:layout_width="50dp"android:layout_height="wrap_content"android:id="@+id/TextView3"android:background="#1100ff"android:text="TextView1"android:visibility="visible"app:layout_constraintTop_toTopOf="parent"app:layout_constraintRight_toRightOf="parent"app:layout_constraintLeft_toRightOf="@id/TextView2" /></androidx.constraintlayout.widget.ConstraintLayout>
运行程序,此时结果为:

当我们将第一个的属性改变:app:layout_constraintHorizontal_chainStyle="spread"

app:layout_constraintHorizontal_chainStyle="packed",此时三个TextView为挨在一起的
到这里就结束了!
相关文章:

【Android】常用基础布局
布局是一种可用于放置很多控件的容器,它可以按照一定的规律调整内部控件的位置,从而编写出精美的界面,布局内不单单可以放控件,也可以嵌套布局,这样可以完成一些复杂的界面,下面就来认识一些常用的布局吧。…...

服务攻防-中间件安全(漏洞复现)
一.中间件-IIS-短文件&解析&蓝屏 IIS现在用的也少了,漏洞也基本没啥用 1、短文件:信息收集 2、文件解析:还有点用 3、HTTP.SYS:蓝屏崩溃 没有和权限挂钩 4、CVE-2017-7269 条件过老 windows 2003上面的漏洞 二.中…...

【SD】深入理解Stable Diffusion与ComfyUI的使用
【SD】深入理解Stable Diffusion与ComfyUI的使用 1. Stable Diffusion(SD)原理概述2. 各部件详解3. SD的工作流程4. ComfyUI与SD的结合5. 总结 1. Stable Diffusion(SD)原理概述 整体结构:SD不是单一模型,…...

Linux 12:多线程2
1. 生产者消费者模型 生产者消费者模型有三种关系,两个角色,一个交易场所。 三种关系: 生产者之间是什么关系?竞争 - 互斥 消费者和消费者之间?竞争 - 互斥 消费者和消费者之间?互斥和同步 两个角色: 生产者和消费者 一个交…...

Android RSA 加解密
文章目录 一、RSA简介二、RSA 原理介绍三、RSA 秘钥对生成1. 密钥对生成2. 获取公钥3. 获取私钥 四、PublicKey 和PrivateKey 的保存1. 获取公钥十六进制字符串1. 获取私钥十六进制字符串 五、PublicKey 和 PrivateKey 加载1. 加载公钥2. 加载私钥 六、 RSA加解密1. RSA 支持三…...

类与对象-多态-案例3-电脑组装具体实现
#include<iostream> #include<string> using namespace std; //CPU class CPU { public:virtual void calculate() 0; }; //显卡 class GraCard { public:virtual void graphics() 0; }; //存储 class Memory { public:virtual void memory() 0; }; class Compu…...

try-with-resources 语句的用途和优点有哪些,它如何自动管理资源?
在Java编程中,资源管理是一个重要的议题,尤其是当你在代码中使用那些需要显式关闭的资源,比如文件流、数据库连接或者网络套接字等。 如果资源使用完毕后忘记关闭,不仅会导致资源泄露,还可能引起程序性能问题甚至系统…...

GraphRAG参数与使用步骤 | 基于GPT-4o-mini实现更便宜的知识图谱RAG
首先给兄弟朋友们展示一下结论,一个文本18万多字,txt文本大小185K,采用GraphRAG,GPT-4o-mini模型,索引耗时差不多5分钟,消耗API价格0.15美元 GraphRAG介绍 GraphRAG是微软最近开源的一款基于知识图谱技术的框架&#…...

/秋招突击——7/21——复习{堆——数组中的第K大元素}——新作{回溯——全排列、子集、电话号码的字母组合、组合总和、括号生成}
文章目录 引言复习数组中的第K大的最大元素复习实现参考实现 新作回溯模板46 全排列个人实现参考实现 子集个人实现参考实现 电话号码的字母组合复习实现 组合总和个人实现参考实现 括号生成复习实现 总结 引言 昨天的科大讯飞笔试做的稀烂,今天回来好好练习一下&a…...

matlab 异常值检测与处理——Robust Z-score法
目录 一、算法原理1、概述2、主要函数3、参考文献二、代码实现三、结果展示四、相关链接本文由CSDN点云侠翻译,原文链接。如果你不是在点云侠的博客中看到该文章,那么此处便是不要脸的爬虫。 一、算法原理 1、概述 Robust Z-score法也被称为中位数绝对偏差法。它类似于Z-sc…...

Ubuntu 20安装JDK17和MySQL8.0
一.jdk 安装JDK 第一步:更新软件包:sudo apt update 第二步:安装JDK:sudo apt install openjdk-17-jdk 第三步:检测JDK: java -version 卸载JDK: 第一步:移除JDK包:apt-get purg…...

DC-1靶场打靶第一次!!!!冲冲冲!
今天打了一下DC-1这个靶场,感觉收获比大,我就来记录一下。 我的思路是下面的这个 我们先把靶机导入,然后与我们的liunx(攻击机)在同一个网段中,这也大大的减低难度。 然后我们先对自己这个网段内存活的主机进行操作,我…...

【LeetCode】填充每个节点的下一个右侧节点指针 II
目录 一、题目二、解法完整代码 一、题目 给定一个二叉树: struct Node { int val; Node *left; Node *right; Node *next; } 填充它的每个 next 指针,让这个指针指向其下一个右侧节点。如果找不到下一个右侧节点,则将 next 指针设置为 NUL…...

mac无法清空废纸篓怎么办 mac废纸篓清空了如何找回 cleanmymac误删文件怎么恢复
废纸篓相当于“一颗后悔药”,用于临时存储用户删除的文件。我们从从Mac上删除的文件,一般会进入废纸篓中。如果我们后悔了,可以从废纸篓中找回来。然而,有时我们会发现mac无法清空废纸篓,这是怎么回事?本文将探讨一些…...

树上启发加点分治思想
题目链接 思路: 对于一条链可以组成回文串,意味着最多只有一个奇数字母,比起我们记录路径各个字母的个数和,我们可以发现回文串实际上不在意真正的个数,只在意个数的奇偶。又我们发现字母只有20来个,可以使…...

【iOS】类对象的结构分析
目录 对象的分类object_getClass和class方法isa流程和继承链分析isa流程实例验证类的继承链实例验证 类的结构cache_t结构bits分析实例验证属性properties方法methods协议protocolsro类方法 类结构流程图解 对象的分类 OC中的对象主要可以分为3种:实例对象…...

接口性能优化思路
前言 日常开发中设计接口,响应时间是衡量一个接口质量的重要指标。 接口响应时间这里粗糙地分为三种: 即时响应:毫秒级,小于500毫秒快速响应:秒级,大于500毫秒且小于2秒长时间操作:大于2秒&a…...

PyQt5 多线程编程详细教程
PyQt5 多线程编程详细教程 在 PyQt5 中,多线程编程是提高应用程序性能和响应性的重要手段。本教程将详细介绍如何在 PyQt5 中使用 QThread 进行多线程编程,学习如何避免界面冻结和线程安全问题,并通过丰富的案例来展示如何实现这些功能。 Q…...

uniapp小程序上传pdf文件
<template><view class"mainInnBox"><view class"formBox"><!-- 注意,如果需要兼容微信小程序,最好通过setRules方法设置rules规则 --><u-form :model"form" ref"uForm" :rules&quo…...

Python酷库之旅-第三方库Pandas(036)
目录 一、用法精讲 111、pandas.Series.item方法 111-1、语法 111-2、参数 111-3、功能 111-4、返回值 111-5、说明 111-6、用法 111-6-1、数据准备 111-6-2、代码示例 111-6-3、结果输出 112、pandas.Series.xs方法 112-1、语法 112-2、参数 112-3、功能 112-…...

在鸿蒙HarmonyOS 5中实现抖音风格的点赞功能
下面我将详细介绍如何使用HarmonyOS SDK在HarmonyOS 5中实现类似抖音的点赞功能,包括动画效果、数据同步和交互优化。 1. 基础点赞功能实现 1.1 创建数据模型 // VideoModel.ets export class VideoModel {id: string "";title: string ""…...
23-Oracle 23 ai 区块链表(Blockchain Table)
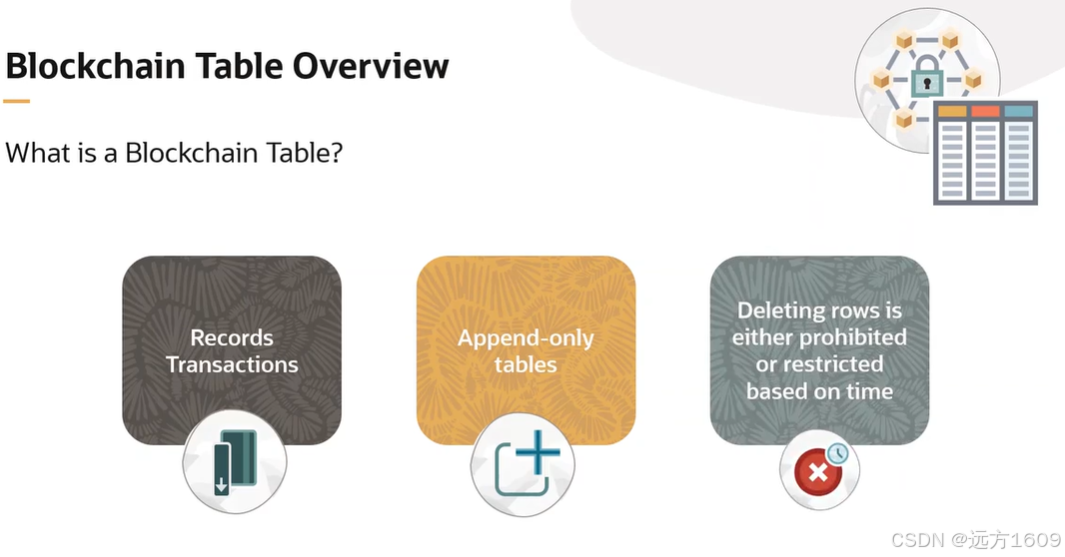
小伙伴有没有在金融强合规的领域中遇见,必须要保持数据不可变,管理员都无法修改和留痕的要求。比如医疗的电子病历中,影像检查检验结果不可篡改行的,药品追溯过程中数据只可插入无法删除的特性需求;登录日志、修改日志…...
使用分级同态加密防御梯度泄漏
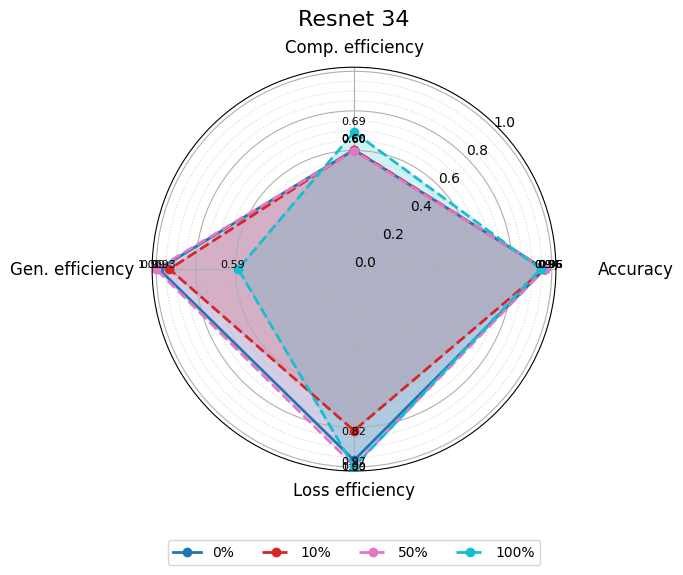
抽象 联邦学习 (FL) 支持跨分布式客户端进行协作模型训练,而无需共享原始数据,这使其成为在互联和自动驾驶汽车 (CAV) 等领域保护隐私的机器学习的一种很有前途的方法。然而,最近的研究表明&…...

基于服务器使用 apt 安装、配置 Nginx
🧾 一、查看可安装的 Nginx 版本 首先,你可以运行以下命令查看可用版本: apt-cache madison nginx-core输出示例: nginx-core | 1.18.0-6ubuntu14.6 | http://archive.ubuntu.com/ubuntu focal-updates/main amd64 Packages ng…...

linux 错误码总结
1,错误码的概念与作用 在Linux系统中,错误码是系统调用或库函数在执行失败时返回的特定数值,用于指示具体的错误类型。这些错误码通过全局变量errno来存储和传递,errno由操作系统维护,保存最近一次发生的错误信息。值得注意的是,errno的值在每次系统调用或函数调用失败时…...
Cloudflare 从 Nginx 到 Pingora:性能、效率与安全的全面升级
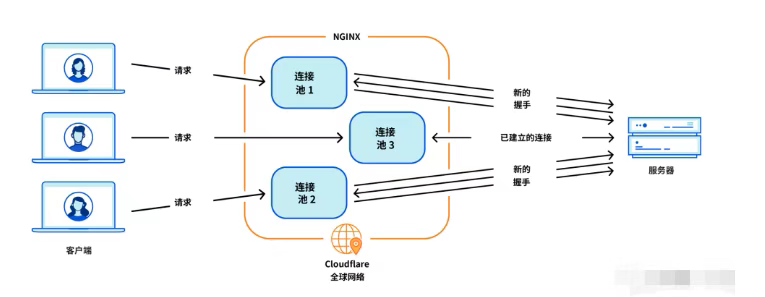
在互联网的快速发展中,高性能、高效率和高安全性的网络服务成为了各大互联网基础设施提供商的核心追求。Cloudflare 作为全球领先的互联网安全和基础设施公司,近期做出了一个重大技术决策:弃用长期使用的 Nginx,转而采用其内部开发…...
tree 树组件大数据卡顿问题优化
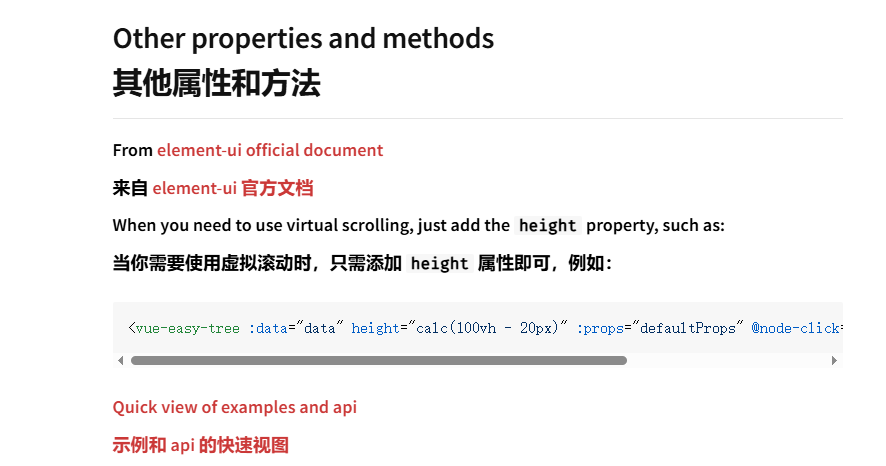
问题背景 项目中有用到树组件用来做文件目录,但是由于这个树组件的节点越来越多,导致页面在滚动这个树组件的时候浏览器就很容易卡死。这种问题基本上都是因为dom节点太多,导致的浏览器卡顿,这里很明显就需要用到虚拟列表的技术&…...

Linux --进程控制
本文从以下五个方面来初步认识进程控制: 目录 进程创建 进程终止 进程等待 进程替换 模拟实现一个微型shell 进程创建 在Linux系统中我们可以在一个进程使用系统调用fork()来创建子进程,创建出来的进程就是子进程,原来的进程为父进程。…...

return this;返回的是谁
一个审批系统的示例来演示责任链模式的实现。假设公司需要处理不同金额的采购申请,不同级别的经理有不同的审批权限: // 抽象处理者:审批者 abstract class Approver {protected Approver successor; // 下一个处理者// 设置下一个处理者pub…...
【Linux系统】Linux环境变量:系统配置的隐形指挥官
。# Linux系列 文章目录 前言一、环境变量的概念二、常见的环境变量三、环境变量特点及其相关指令3.1 环境变量的全局性3.2、环境变量的生命周期 四、环境变量的组织方式五、C语言对环境变量的操作5.1 设置环境变量:setenv5.2 删除环境变量:unsetenv5.3 遍历所有环境…...
