SpringBoot开启多端口探究(1)
文章目录
- 前情提要
- 发散探索
- 从management.port开始
- 确定否需要开启额外端口
- 额外端口是如何开启的
- ManagementContextFactory的故事
- 从哪儿来
- 创建过程
- management 相关API如何被注册
- 小结
前情提要
最近遇到一个需求,在单个服务进程上开启多网络端口,将API的访问通过端口强行隔离开。
发散探索
- SpringBoot自带的多端口配置,server.port和management.port,将常规的API与管理相关API通过端口拆分开;
- 1中的端口是基于HTTP/1.1通信的,如果需要基于HTTP/2.0(如gRPC)又会有些差别;
- 一般一个进程内SpringApplication对象只有1个,理论上搞多个自然就能开启多个端口,略显粗暴;
本着探索的态度,我会逐个探讨上述3个方向,本文先关注在方向1上。如果你有更NB的问题或者建议,欢迎评论区留言。
从management.port开始
配置生效依赖SpringBoot的AutoConfiguration机制,management相关配置体现在ManagementContextAutoConfiguration中,完成ManagementContext的配置;其中涉及的问题如下。
确定否需要开启额外端口
@ConditionalOnManagementPort决定了是否开启新端口,该注解声明如下
@Retention(RetentionPolicy.RUNTIME)
@Target({ ElementType.TYPE, ElementType.METHOD })
@Documented
@Conditional(OnManagementPortCondition.class)
public @interface ConditionalOnManagementPort {/*** The {@link ManagementPortType} to match.* @return the port type*/ManagementPortType value();}
其依赖的OnManagementPortCondition会在配置过程中被处理,处理概要过程如下:
- 基于当前的Environment决定实际的ManagementPortType;
- 获得当前注解中value对应的设定ManagementPortType;
- 基于1和2决定被其注解的bean是否初始化,ManagementPortType的定义如下
public enum ManagementPortType {/*** The management port has been disabled.*/DISABLED,/*** The management port is the same as the server port.*/SAME,/*** The management port and server port are different.*/DIFFERENT;/*** Look at the given environment to determine if the {@link ManagementPortType} is* {@link #DISABLED}, {@link #SAME} or {@link #DIFFERENT}.* @param environment the Spring environment* @return {@link #DISABLED} if {@code management.server.port} is set to a negative* value, {@link #SAME} if {@code management.server.port} is not specified or equal to* {@code server.port} and {@link #DIFFERENT} otherwise.* @since 2.1.4*/public static ManagementPortType get(Environment environment) {Integer managementPort = getPortProperty(environment, "management.server.");if (managementPort != null && managementPort < 0) {return DISABLED;}Integer serverPort = getPortProperty(environment, "server.");return ((managementPort == null || (serverPort == null && managementPort.equals(8080))|| (managementPort != 0 && managementPort.equals(serverPort))) ? SAME : DIFFERENT);}private static Integer getPortProperty(Environment environment, String prefix) {return environment.getProperty(prefix + "port", Integer.class);}}
额外端口是如何开启的
到这里,我们可以回到ManagementContextAutoConfiguration,针对性地关注@ConditionalOnManagementPort(ManagementPortType.DIFFERENT)相关类, 也就是下面这段
@Configuration(proxyBeanMethods = false)@ConditionalOnManagementPort(ManagementPortType.DIFFERENT)static class DifferentManagementContextConfiguration implements ApplicationListener<WebServerInitializedEvent> {private final ApplicationContext applicationContext;private final ManagementContextFactory managementContextFactory;DifferentManagementContextConfiguration(ApplicationContext applicationContext,ManagementContextFactory managementContextFactory) {this.applicationContext = applicationContext;this.managementContextFactory = managementContextFactory;}@Overridepublic void onApplicationEvent(WebServerInitializedEvent event) {if (event.getApplicationContext().equals(this.applicationContext)) {ConfigurableWebServerApplicationContext managementContext = this.managementContextFactory.createManagementContext(this.applicationContext,EnableChildManagementContextConfiguration.class,PropertyPlaceholderAutoConfiguration.class);if (isLazyInitialization()) {managementContext.addBeanFactoryPostProcessor(new LazyInitializationBeanFactoryPostProcessor());}managementContext.setServerNamespace("management");managementContext.setId(this.applicationContext.getId() + ":management");setClassLoaderIfPossible(managementContext);CloseManagementContextListener.addIfPossible(this.applicationContext, managementContext);managementContext.refresh();}}protected boolean isLazyInitialization() {AbstractApplicationContext context = (AbstractApplicationContext) this.applicationContext;List<BeanFactoryPostProcessor> postProcessors = context.getBeanFactoryPostProcessors();return postProcessors.stream().anyMatch(LazyInitializationBeanFactoryPostProcessor.class::isInstance);}private void setClassLoaderIfPossible(ConfigurableApplicationContext child) {if (child instanceof DefaultResourceLoader) {((DefaultResourceLoader) child).setClassLoader(this.applicationContext.getClassLoader());}}}
从中我们可以发现几个点:
- ManagementContext是在主WebApplicationContext发布事件WebServerInitializedEvent后开始初始化;
- ManagementContext全新的ConfigurableWebServerApplicationContext,这意味着最终启动后,内存中存在至少两个ApplicationContext;如果说开启两个SpringApplication对象是表象的话,那么创建两个WebApplicationContext应该说就是底层的本质了;
- 整个处理过程就是创建ConfigurableWebServerApplicationContext,后续做必要的配置,最后refresh。如果你分析过SpringApplication.run(),那想必你看到了熟悉的味道。
ManagementContextFactory的故事
从哪儿来
对应的子类有两个,ReactiveManagementContextFactory和ServletManagementContextFactory,具体初始化则由xxxManagementContextFactoryAutoConfiguration影响,更进一步的细节藏在
@ConditionalOnWebApplication(type=xxx)中。
创建过程
以ReactiveManagementContextFactory为例
@Overridepublic ConfigurableWebServerApplicationContext createManagementContext(ApplicationContext parent,Class<?>... configClasses) {// 复用EnvironmentEnvironment parentEnvironment = parent.getEnvironment();ConfigurableEnvironment childEnvironment = ApplicationContextFactory.DEFAULT.createEnvironment(WebApplicationType.REACTIVE);if (parentEnvironment instanceof ConfigurableEnvironment) {// 复用ConversionServicechildEnvironment.setConversionService(((ConfigurableEnvironment) parentEnvironment).getConversionService());}AnnotationConfigReactiveWebServerApplicationContext child = new AnnotationConfigReactiveWebServerApplicationContext();child.setEnvironment(childEnvironment);// 这里可以看到最终会是parent和child关系child.setParent(parent);/*
这里以编程的方式完成BeanDefinition注册, 这里的configClass =     {EnableChildManagementContextConfiguration.class,PropertyPlaceholderAutoConfiguration.class}		*/Class<?>[] combinedClasses = ObjectUtils.addObjectToArray(configClasses,ReactiveWebServerFactoryAutoConfiguration.class);child.register(combinedClasses);// 最后保持parent和child的WebFactory一致, 直接复用parent的BeanDefinitionregisterReactiveWebServerFactory(parent, child);return child;}
management 相关API如何被注册
经过前面一波分析,我们已经看到了创建ApplicationContext,注册必要的Class,而后refresh整个容器就要启动,但没有看到management相关API,其实就藏在EnableChildManagementContextConfiguration.class这里, 从这里出发最终找到配置文件ManagementContextConfiguration.imports,链路如下
EnableManagementContext -> ManagementContextConfigurationImportSelector -> META-INFO/spring/org.springframework.boot.actuate.autoconfigure.web.ManagementContextConfiguration.imports
ManagementContextConfiguration.imports的内容如下:
org.springframework.boot.actuate.autoconfigure.endpoint.web.ServletEndpointManagementContextConfiguration
org.springframework.boot.actuate.autoconfigure.endpoint.web.reactive.WebFluxEndpointManagementContextConfiguration
org.springframework.boot.actuate.autoconfigure.endpoint.web.servlet.WebMvcEndpointManagementContextConfiguration
org.springframework.boot.actuate.autoconfigure.endpoint.web.jersey.JerseyWebEndpointManagementContextConfiguration
org.springframework.boot.actuate.autoconfigure.security.servlet.SecurityRequestMatchersManagementContextConfiguration
org.springframework.boot.actuate.autoconfigure.web.jersey.JerseySameManagementContextConfiguration
org.springframework.boot.actuate.autoconfigure.web.jersey.JerseyChildManagementContextConfiguration
org.springframework.boot.actuate.autoconfigure.web.reactive.ReactiveManagementChildContextConfiguration
org.springframework.boot.actuate.autoconfigure.web.servlet.ServletManagementChildContextConfiguration
org.springframework.boot.actuate.autoconfigure.web.servlet.WebMvcEndpointChildContextConfiguration
这些Configuration最终受如下2个注解的解决决定是否初始化
@ManagementContextConfiguration(value = ManagementContextType.xxx, proxyBeanMethods = false)
@ConditionalOnWebApplication(type = Type.xxx)
最终不同的EndPoint由不同的EndPointDiscover对整个ApplicationContext中的类进行扫描并提取出来,组装为EndPointHandlerMapping。
到这里可以解释一个现象,就是在manage端口上,无法访问到应用端口上的API,因为两者各自关联了一个独立的HandlerMapping。虽然通常child context可以访问到parent context中的所有bean实例,但是各自可见的API被各自的RequestHandlerMapping限制而隔离。
小结
以上是针对mangement API开放独立端口的探究,从中有几个点值得借鉴:
- 独立的ApplicationContext可以作为资源隔离的一种方式,同时又不完全失去与parent的联系;
- 条件初始化在SpringBoot自动配置中的广泛应用;
- WebApplicationContext与ApplicationContext的区别在于WebServerFactory是否存在,以及RequestHandlerMapping+必要的注解识别,有了这点发现,做API隔离可用的方案也会更加丰富;
后续会对另外2种实现方式做探讨,感谢你的阅读。
相关文章:
)
SpringBoot开启多端口探究(1)
文章目录 前情提要发散探索从management.port开始确定否需要开启额外端口额外端口是如何开启的ManagementContextFactory的故事从哪儿来创建过程 management 相关API如何被注册 小结 前情提要 最近遇到一个需求,在单个服务进程上开启多网络端口,将API的…...

优化算法:2.粒子群算法(PSO)及Python实现
一、定义 粒子群算法(Particle Swarm Optimization,PSO)是一种模拟鸟群觅食行为的优化算法。想象一群鸟在寻找食物,每只鸟都在尝试找到食物最多的位置。它们通过互相交流信息,逐渐向食物最多的地方聚集。PSO就是基于这…...

ThreadLocal面试三道题
针对ThreadLocal的面试题,我将按照由简单到困难的顺序给出三道题目,并附上参考答案的概要。 1. 简单题:请简述ThreadLocal是什么,以及它的主要作用。 参考答案: ThreadLocal是Java中的一个类,用于提供线…...
)
Git操作指令(已完结)
Git操作指令 一、安装git 1、设置配置信息: # global全局配置 git config --global user.name "Your username" git config --global user.email "Your email"# 显示颜色 git config --global color.ui true# 配置别名,各种指令都…...

大数据采集工具——Flume简介安装配置使用教程
Flume简介&安装配置&使用教程 1、Flume简介 一:概要 Flume 是一个可配置、可靠、高可用的大数据采集工具,主要用于将大量的数据从各种数据源(如日志文件、数据库、本地磁盘等)采集到数据存储系统(主要为Had…...

C语言 #具有展开功能的排雷游戏
文章目录 前言 一、整个排雷游戏的思维梳理 二、整体代码分布布局 三、游戏主体逻辑实现--test.c 四、整个游戏头文件的引用以及函数的声明-- game.h 五、游戏功能的具体实现 -- game.c 六、老六版本 总结 前言 路漫漫其修远兮,吾将上下而求索。 一、整个排…...

npm publish出错,‘proxy‘ config is set properly. See: ‘npm help config‘
问题:使用 npm publish发布项目依赖失败,报错 proxy config is set properly. See: npm help config 1、先查找一下自己的代理 npm config get proxy npm config get https-proxy npm config get registry2、然后将代理和缓存置空 方式一: …...
Springboot 多数据源事务
起因 在一个service方法上使用的事务,其中有方法是调用的多数据源orderDB 但是多数据源没有生效,而是使用的primaryDB 原因 spring 事务实现的方式 以 Transactional 注解为例 (也可以看 TransactionTemplate, 这个流程更简单一点)。 入口:ProxyTransa…...

Python每日学习
我是从c转来学习Python的,总感觉和c相比Python的实操简单,但是由于写c的代码多了,感觉Python的语法好奇怪 就比如说c的开头要有库(就是类似于#include <bits/stdc.h>)而且它每一项的代码结束之后要有一个表示结…...

数据库 执行sql添加删除字段
添加字段: ALTER TABLE 表明 ADD COLUMN 字段名 类型 DEFAULT NULL COMMENT 注释 AFTER 哪个字段后面; 效果: 删除字段: ALTER TABLE 表明 DROP COLUMN 字段;...

前端开发:HTML与CSS
文章目录 前言1.1、CS架构和BS架构1.2、网页构成 HTML1.web开发1.1、最简单的web应用程序1.2、HTTP协议1.2.1 、简介1.2.2、 http协议特性1.3.3、http请求协议与响应协议 2.HTML概述3.HTML标准结构4.标签的语法5.基本标签6.超链接标签6.1、超链接基本使用6.2、锚点 7.img标签8.…...

ctfshow解题方法
171 172 爆库名->爆表名->爆字段名->爆字段值 -1 union select 1,database() ,3 -- //返回数据库名 -1 union select 1,2,group_concat(table_name) from information_schema.tables where table_schema库名 -- //获取数据库里的表名 -1 union select 1,group_concat(…...

探索 Blockly:自定义积木实例
3.实例 3.1.基础块 无输入 , 无输出 3.1.1.json var textOneJson {"type": "sql_test_text_one","message0": " one ","colour": 30,"tooltip": 无输入 , 无输出 };javascriptGenerator.forBlock[sql_test_te…...

MongoDB教程(二十三):关于MongoDB自增机制
💝💝💝首先,欢迎各位来到我的博客,很高兴能够在这里和您见面!希望您在这里不仅可以有所收获,同时也能感受到一份轻松欢乐的氛围,祝你生活愉快! 文章目录 引言一、MongoD…...

展馆导览系统架构解析,从需求分析到上线运维
在物质生活日益丰富的当下,人们对精神世界的追求愈发强烈,博物馆、展馆、纪念馆等场所成为人们丰富知识、滋养心灵的热门选择。与此同时,人们对展馆的导航体验也提出了更高要求,展馆导览系统作为一种基于室内外地图相结合的位置引…...

Servlet详解(超详细)
Servlet详解 文章目录 Servlet详解一、基本概念二、Servlet的使用1、创建Servlet类2、配置Servleta. 使用web.xml配置b. 使用注解配置 3、部署Web应用4、处理HTTP请求和生成响应5、处理表单数据HTML表单Servlet 6、管理会话 三、servlet生命周期1、加载和实例化2、初始化3、 请…...

Meta AI引入Imagine Me功能,上传图片输入提示词即可实现个性化照片
AITOP100平台获悉,Meta 公司在 AI 领域再次迈出了重要的步伐,其发布的 Llama 3.1 开源 AI 模型以及对 Meta AI 功能的更新扩充引发了广泛关注。 其中,新引入的“Imagine Me”功能尤为引人注目。在这一功能下,美国地区的用户只需上…...

常用自启设置
一、开机自启动 1、编辑 vi /lib/systemd/system/nginx.service 文件,没有创建一个 touch nginx.service 然后将如下内容根据具体情况进行修改后,添加到nginx.service文件中: [Unit] Descriptionnginx Afternetwork.target remote-fs.targ…...

模块与组件、模块化与组件化的理解
在React或其他现代JavaScript框架中,模块与组件、模块化与组件化是核心概念,它们对于提高代码的可维护性、复用性和开发效率具有重要意义。以下是对这些概念的理解: 模块与组件 模块(Module) 定义:模块是…...

Rust:cargo的常用命令
1.查看版本 $ cargo --version cargo 1.79.0 (ffa9cf99a 2024-06-03) 2.创建新的项目 $ cargo new hello 创建后的目录结构为 $ tree hello/ hello/ ├── Cargo.toml └── src └── main.rs 3.运行项目 $ cd hello $ cargo run Compiling hello v0.1.0 (/home/c…...

利用ngx_stream_return_module构建简易 TCP/UDP 响应网关
一、模块概述 ngx_stream_return_module 提供了一个极简的指令: return <value>;在收到客户端连接后,立即将 <value> 写回并关闭连接。<value> 支持内嵌文本和内置变量(如 $time_iso8601、$remote_addr 等)&a…...
Prompt Tuning、P-Tuning、Prefix Tuning的区别
一、Prompt Tuning、P-Tuning、Prefix Tuning的区别 1. Prompt Tuning(提示调优) 核心思想:固定预训练模型参数,仅学习额外的连续提示向量(通常是嵌入层的一部分)。实现方式:在输入文本前添加可训练的连续向量(软提示),模型只更新这些提示参数。优势:参数量少(仅提…...
使用rpicam-app通过网络流式传输视频)
树莓派超全系列教程文档--(62)使用rpicam-app通过网络流式传输视频
使用rpicam-app通过网络流式传输视频 使用 rpicam-app 通过网络流式传输视频UDPTCPRTSPlibavGStreamerRTPlibcamerasrc GStreamer 元素 文章来源: http://raspberry.dns8844.cn/documentation 原文网址 使用 rpicam-app 通过网络流式传输视频 本节介绍来自 rpica…...

Oracle查询表空间大小
1 查询数据库中所有的表空间以及表空间所占空间的大小 SELECTtablespace_name,sum( bytes ) / 1024 / 1024 FROMdba_data_files GROUP BYtablespace_name; 2 Oracle查询表空间大小及每个表所占空间的大小 SELECTtablespace_name,file_id,file_name,round( bytes / ( 1024 …...
ESP32 I2S音频总线学习笔记(四): INMP441采集音频并实时播放
简介 前面两期文章我们介绍了I2S的读取和写入,一个是通过INMP441麦克风模块采集音频,一个是通过PCM5102A模块播放音频,那如果我们将两者结合起来,将麦克风采集到的音频通过PCM5102A播放,是不是就可以做一个扩音器了呢…...
Nuxt.js 中的路由配置详解
Nuxt.js 通过其内置的路由系统简化了应用的路由配置,使得开发者可以轻松地管理页面导航和 URL 结构。路由配置主要涉及页面组件的组织、动态路由的设置以及路由元信息的配置。 自动路由生成 Nuxt.js 会根据 pages 目录下的文件结构自动生成路由配置。每个文件都会对…...
微信小程序云开发平台MySQL的连接方式
注:微信小程序云开发平台指的是腾讯云开发 先给结论:微信小程序云开发平台的MySQL,无法通过获取数据库连接信息的方式进行连接,连接只能通过云开发的SDK连接,具体要参考官方文档: 为什么? 因为…...
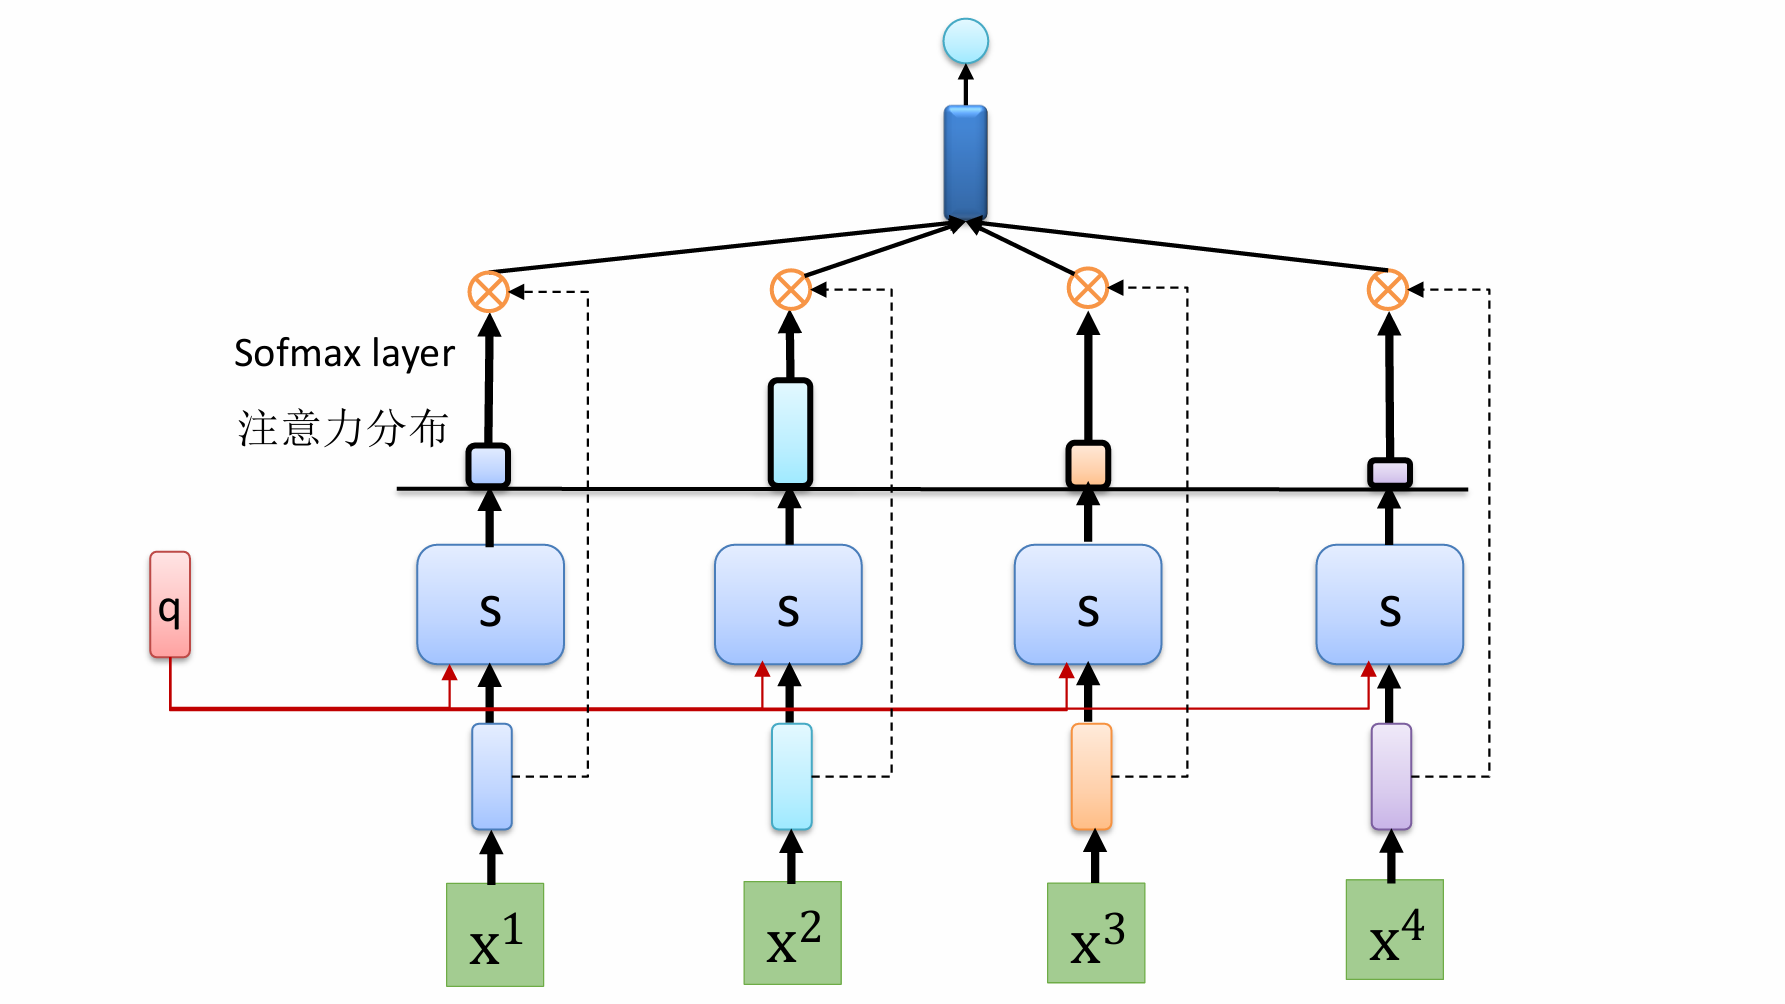
自然语言处理——循环神经网络
自然语言处理——循环神经网络 循环神经网络应用到基于机器学习的自然语言处理任务序列到类别同步的序列到序列模式异步的序列到序列模式 参数学习和长程依赖问题基于门控的循环神经网络门控循环单元(GRU)长短期记忆神经网络(LSTM)…...

ArcGIS Pro制作水平横向图例+多级标注
今天介绍下载ArcGIS Pro中如何设置水平横向图例。 之前我们介绍了ArcGIS的横向图例制作:ArcGIS横向、多列图例、顺序重排、符号居中、批量更改图例符号等等(ArcGIS出图图例8大技巧),那这次我们看看ArcGIS Pro如何更加快捷的操作。…...
Mobile ALOHA全身模仿学习
一、题目 Mobile ALOHA:通过低成本全身远程操作学习双手移动操作 传统模仿学习(Imitation Learning)缺点:聚焦与桌面操作,缺乏通用任务所需的移动性和灵活性 本论文优点:(1)在ALOHA…...