react.16+
1、函数式组件
在vite脚手架中执行:
app.jsx:
import { useState } from 'react'
import reactLogo from './assets/react.svg'
import viteLogo from '/vite.svg'
import './App.css'function App() {console.log(this)return <h2>我是函数式组件</h2>
}export default App
main.tsx:
import React from 'react'
import ReactDOM from 'react-dom/client'
import App from './App.tsx'
import './index.css'ReactDOM.createRoot(document.getElementById('root')!).render(<React.StrictMode><App /></React.StrictMode>,
)
注意:
1、这里没有this,因为babel编译后开启了模式
2、渲染的组件必须要大写开头(虚拟dom转为真实的dom)
2、类式组件
1、类式组件必须通过react的Component继承
2、组件必须在类中的render方法中返回
import { Component } from "react"
//使用类组件的时候必须要继承react中的Component
//类组件不写构造器,必须要render
//render放在组件的原型对象上
//this是指向组件实例对象,
class MyClassCom extends Component
{render(){return(<div><h1>This is Class Component</h1></div>)}
}
export {MyClassCom}
3、组件三大核心(都是在类组件中使用,props可以在函数组件中使用)
3.1、state
import { Component } from "react";
//使用类组件的时候必须要继承react中的Component
//类组件可以不写构造器,必须要render
//render放在组件的原型对象上
//this是指向组件实例对象,
class MyClassCom extends Component {//构造器调用一次constructor(props) {super(props);//初始化状态this.state = {name: "张三",isHot: false,};//绑定this,这里其实是重写的,可以用其他名字,但是下面调用也要改名字this.b = this.b.bind(this);}//调用1+n次,n次是响应式状态更新的次数render() {return (<div><h1>今天{this.state.isHot ? "炎热" : "凉快"}</h1><button onClick={this.a}>点击</button><button onClick={this.b}>点击</button></div>);}a = () => {//这里能拿到this,是因为箭头函数绑定了thisconsole.log(this);//修改状态,必须通过setState修改状态this.setState({isHot: !this.state.isHot,});};b() {//因为是直接调用的类方法,不是实例对象调用的,所以拿不到this//类中的方法默认开启了局部严格模式,所以this指向undefinedconsole.log(this);this.setState({isHot: !this.state.isHot,});}
}
export { MyClassCom };
简写方式:
import { Component } from "react";class MyClassCom extends Component {//类中可以直接定义属性state = {name: "张三",isHot: false,};render() {return (<div><h1>今天{this.state.isHot ? "炎热" : "凉快"}</h1><button onClick={this.a}>点击</button></div>);}//直接使用箭头函数(箭头函数可以修改this指向),避免了this指向修改,也就不用构造器了a = () => {this.setState({isHot: !this.state.isHot,});};
}
export { MyClassCom };
总结:
1、state是组件对象的重要属性,值是对象
2、组件被称为”状态机”,通过更新组件的state来更新对应页面显示(重新渲染页面-可以理解为响应式)
3、组件中的render方法中的this为组件实例对象
4、组件自定义方法中的this为undefined(通过强制绑定this,通过对象的build(),如果是类组件但是要使用构造器,也可以直接使用箭头函数(推荐直接使用箭头函数))
5、状态数据不能直接修改或者更新,要通过setState修改更新
3.2、props
3.2.1、基本使用
封装组件:
import { Component } from "react";
class Person extends Component<{ name: string,age:string,sex:string }> {render() {const {name, age , sex} = this.props;return (<ul><li>{name}</li><li>{age}</li><li>{sex}</li></ul>)}
}export { Person }
调用组件(通过props传值)
import { Person } from './components/propsReact'function App() {//return <h2>我是函数式组件<MyClassCom></MyClassCom></h2> return (<div><Person name="张三" age="18" sex="男"></Person><Person name="李四" age="19" sex="女"></Person></div>)
}export default App
其实这里就是一个父传子的操作,跟vue思想差不多
3.2.2、props限制
类型限制:
import { Component } from "react";
import PropTypes from "prop-types";//需要安装库
class Person extends Component<{ name: string,age:string,sex:string }> {render() {const {name, age , sex} = this.props;return (<ul><li>{name}</li><li>{age}</li><li>{sex}</li></ul>)}
}Person.propTypes = {name: PropTypes.string.isRequired,//isRequired是必填项age: PropTypes.string.isRequired,sex: PropTypes.string.isRequired,
};export { Person }
import { Person } from './components/propsReact'function App() {//return <h2>我是函数式组件<MyClassCom></MyClassCom></h2> return (<div><Person name="asd" age="18" sex="男"></Person><Person name="李四" age="19" sex="女"></Person></div>)
}export default App简写方式:
import { Component } from "react";
import PropTypes from "prop-types";
class Person extends Component<{ name: string; age: string; sex: string }> {static propTypes = {name: PropTypes.string.isRequired,age: PropTypes.string.isRequired,sex: PropTypes.string.isRequired,};static defaultProps = {name: "张三",age: "18",sex: "男",};render() {const { name, age, sex } = this.props;return (<ul><li>{name}</li><li>{age}</li><li>{sex}</li></ul>);}
}export { Person };
3.2.3、函数组件使用props
函数式组件只能使用props,其他两个属性没法用
import { Component } from "react";
import PropTypes from "prop-types";
class Person extends Component<{ name: string; age: string; sex: string }> {static propTypes = {name: PropTypes.string.isRequired,age: PropTypes.string.isRequired,sex: PropTypes.string.isRequired,};static defaultProps = {name: "张三",age: "18",sex: "男",};render() {const { name, age, sex } = this.props;return (<ul><li>{name}</li><li>{age}</li><li>{sex}</li></ul>);}
}function Person1(props: { name: string; age: string; sex: string }) {const { name, age, sex } = props;return (<ul><li>{name}</li><li>{age}</li><li>{sex}</li></ul>);
}
Person1.prototype = {name: PropTypes.string.isRequired,age: PropTypes.string.isRequired,sex: PropTypes.string.isRequired,
}
export { Person, Person1};
import { Person,Person1 } from './components/propsReact'function App() {//return <h2>我是函数式组件<MyClassCom></MyClassCom></h2> return (<div><Person name="张三" age="18" sex="男"></Person><Person name="李四" age="19" sex="女"></Person><Person></Person><Person1 name="张三" age="108" sex="男"></Person1></div>)
}export default App
总结:
1、每个组件都有props属性
2、组件所有的标签属性都会存在props中
3、组件内部不要修改props
4、通过标签属性从组件外部传递到内部的变化的数据
3.3、refs
3.3.1、字符串类型写法:
存在效率问题(不推荐使用)
import React from "react";
class RefsDemo extends React.Component{showData  = () => {console.log(this)const {input1} = this.refsalert(input1.value)}showData2 = () => {const {input2} = this.refsalert(input2.value)}render(): React.ReactNode {return (<div><input ref="input1" type="text" /><button onClick={this.showData}></button><input ref="input2" onBlur={this.showData2} type="text" /></div>)}
}export default RefsDemo
3.3.2、回调函数形式
import React from "react";
class RefsDemo extends React.Component{showData  = () => {console.log(this)const {input1} = thisalert(input1.value)}showData2 = () => {const {input2} = thisalert(input2.value)}render(): React.ReactNode {return (<div><input ref={c=>this.input1=c} type="text" /><button onClick={this.showData}></button><input ref={c=>this.input2=c} onBlur={this.showData2} type="text" /></div>)}
}export default RefsDemo
注意:
1、这样写会有 副作用
2、可以把方法抽出来放在render里面作为方法调用
3.3.3、React.createRef()钩子的使用
import React from "react";
class RefsDemo extends React.Component{/**每一个createRef都是单独的,用来获取组件中的元素 */myRef = React.createRef()myRef1 = React.createRef()showData = () => {console.log(this.myRef.current.value)}showData2 = () => {console.log(this.myRef1.current.value)}render(): React.ReactNode {return (<div><input ref={this.myRef} type="text" /><button onClick={this.showData}></button><input ref = {this.myRef1} onBlur={this.showData2}type="text" /></div>)}
}export default RefsDemo
总结ref:
1、尽可能避免字符串方法的使用
2、内联用的最多,第三个比较繁琐,要使用钩子
4、事件处理
4.1、非受控组件
import React from "react";
class Login extends React.Component {handleSubmit = (e) => {e.preventDefault()//阻止默认行为const { username, password } = thisconsole.log(username, password)alert(`用户名:${username.value} 密码:${password.value}`)}render(): React.ReactNode {return (<div><form action="https://www.baidu.com" onSubmit={this.handleSubmit}>用户名:<input ref={c=>this.username = c} type="text" name="username" />密码:<input ref = {c=>this.password = c} type="password" name="password" /><button type="submit">登录</button></form></div>)}
}export default Login;
4.2、受控组件
import React from "react";
class Login extends React.Component {state: Readonly<{}> = {username: "",password: ""}saveUsername = (e) =>{this.setState({username: e.target.value})}savePassword = (e) =>{this.setState({password: e.target.value})}handleSubmit = (e) => {e.preventDefault()//阻止默认行为const { username, password } = this.stateconsole.log(username, password)alert(`用户名:${username} 密码:${password}`)}render(): React.ReactNode {return (<div><form action="https://www.baidu.com" onSubmit={this.handleSubmit}>用户名:<input onChange={this.saveUsername} type="text" name="username" />密码:<input onChange={this.savePassword} type="password" name="password" /><button type="submit">登录</button></form></div>)}
}export default Login;
注意:
1、受控组件能够避免ref的使用
2、现用现取是非受控,维护状态的是受控组件
5、高阶函数+函数柯里化
高级函数:
1、若A函数,按接的参数是一个函数,那么A就是高阶函数
2、若A函数,调用的返回值依然是一个函数,那么A就可以称为高阶函数
常见的高阶函数:Promise、setTimeout、arr.map()等
函数的柯里化:通过函数调用继续返回函数的方式,实现多次接收参数最后统一处理的函数
eg:
import React from "react";
class Login extends React.Component {saveFromData = (typename) =>{return (event) => {this.setState({[typename]: event.target.value})}}render(): React.ReactNode {return (<div>用户名:<input onChange={this.saveFromData('username')} type="text" name="username" />密码:<input onChange={this.saveFromData('password')} type="password" name="password" /><button type="submit">登录</button></div>)}
}export default Login;
6、生命周期
组件挂载完毕和将要卸载的调用:
import React from "react";
class Login extends React.Component {// 组件挂载的时候调用componentDidMount(): void {this.timer =   setTimeout(() => {console.log(11111)}, 1000)}// 挂载的组件卸载前 的调用componentWillUnmount(): void {clearTimeout(this.timer)}render(): React.ReactNode {return (<div></div>)}
}export default Login;
6.1、组件挂载流程
6.1.1、生命周期(旧)
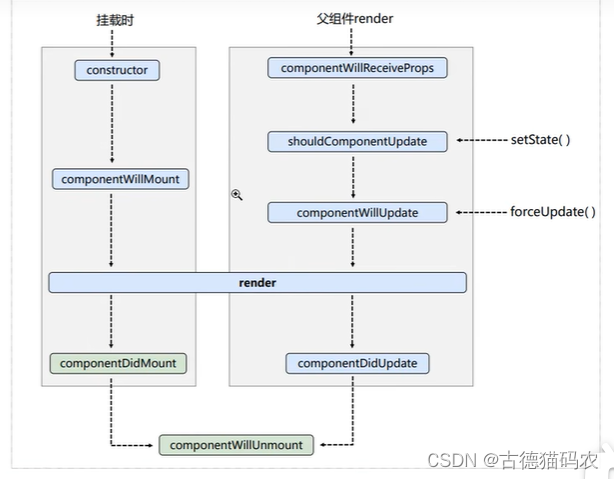
eg:
import { Component } from "react";
class Count extends Component {constructor(props) {super(props);this.state = {count: 0,};this.name = "count";console.log("count-constructor");}add = () => {this.setState({count: this.state.count + 1,});};foce = () => {this.forceUpdate();};//   组件将要挂载的钩子componentWillMount() {console.log("componentWillMount");}//   组件挂载完成的钩子componentDidMount() {console.log("componentDidMount");}// 组件将要卸载componentWillUnmount() {console.log("componentWillUnmount");}// 组件是否需要更新--阀门showldComponentUpdate() {console.log("showldComponentUpdate");return true;}// 组件将要更新componentWillUpdate() {console.log("componentWillUpdate");}// 组件更新完成componentDidUpdate() {console.log("componentDidUpdate");}render() {return (<div><h2>当前求和为:{this.state.count}</h2><button onClick={this.add}>点我+1</button><button onClick={this.foce}>强制更新组件</button><A name={this.name} content={this.state.count} /></div>);}
}
class A extends Component {//这个钩子比较奇特,只有操作更新的时候才会调用,第一次传的时候不调用,此处就是操作+1的时候才调用--将要废弃componentWillReceiveProps(props) {console.log("componentWillReceiveProps",props);}render() {return (<div>我是子组件{this.props.name}<p>{this.props.content}</p></div>);}
}export default Count;
总结:(标红的是常用的)
1.初始化阶段:由ReactDoM.render()触发---初次渲染
A、constructor()
B、componentWillMount() //将要废弃
C、render()
D、componentDidMount() ---常用于做初始化数据(一般用于网络请求、订阅消息、开启定时器)
2.更新阶段:由组件内部this.setsate()或父组件render触发
A、shouldComponentUpdate()
B、componentWillUpdate() //将要废弃
C、render()
D、componentDidUpdate()
3.卸线组件:由ReactD0M.unmountComponentAtNode()触发
A、componentWillUnmount() --常用于收尾(关闭定时器、取消订阅等)
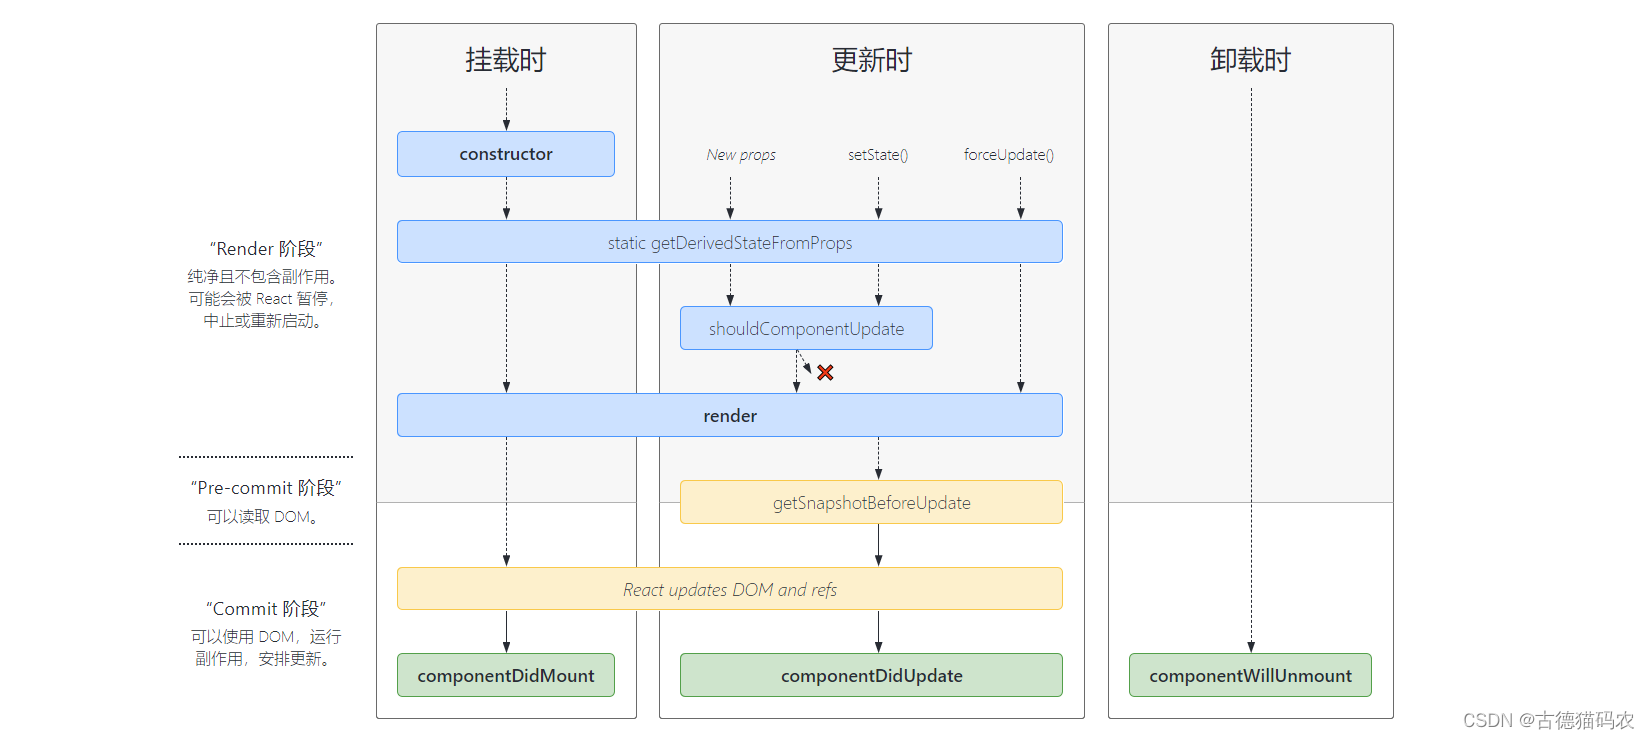
6.1.2、生命周期(新>=16.4)
官网的周期图:
eg:
import { Component, createRef } from "react";
class Count extends Component {constructor(props) {super(props);this.state = {count: 0,};this.name = "count";console.log("count-constructor");}add = () => {this.setState({count: this.state.count + 1,});};foce = () => {this.forceUpdate();};//若state的值在任何时候取决于props的值,则使用getDerivedStateFromProps ---使用场景及其罕见// static getDerivedStateFromProps(props,state) {//   console.log("getDeruvedStateFromProps");//   // return console.log(props,state);// }//   组件挂载完成的钩子componentDidMount() {console.log("componentDidMount");}// 组件将要卸载componentWillUnmount() {console.log("componentWillUnmount");}// 组件是否需要更新--阀门showldComponentUpdate() {console.log("showldComponentUpdate");return true;}// 组件更新前获取快照getSnapshotBeforeUpdate() {console.log("getSnapshotBeforeUpdate");return null}// 组件更新完成componentDidUpdate(preProps, preState,Shouwkong) {console.log("componentDidUpdate",preProps,preState,Shouwkong);}render() {return (<div><h2>当前求和为:{this.state.count}</h2><button onClick={this.add}>点我+1</button><DomList /></div>);}
}export default Count;/*** 列表滚动渲染案例*/
class DomList extends Component {constructor(props) {super(props);this.listRef = createRef();this.state = {newsArr: [],};}componentDidMount() {setInterval(() => {const { newsArr } = this.state;const news = '商品' + (newsArr.length + 1);this.setState({newsArr: [news, ...newsArr],});}, 1000);}getSnapshotBeforeUpdate(prevProps, prevState) {return this.listRef.current ? this.listRef.current.scrollHeight : null;}componentDidUpdate(prevProps, prevState, snapshot) {if (this.listRef.current) {this.listRef.current.scrollTop += this.listRef.current.scrollHeight - snapshot;}}render() {return (<div className="list" ref={this.listRef} style={{ height: '300px', overflow: 'auto' }}>{this.state.newsArr.map((item, index) => (<p key={index} className="news">{item}</p>))}</div>);}
}
总结:
(标红的是常用的)
1.初始化阶段:由ReactDoM.render()触发---初次渲染
A、constructor()
B、getDerivedStateFromProps
C、render()
D、componentDidMount() ---常用于做初始化数据(一般用于网络请求、订阅消息、开启定时器)
2.更新阶段:由组件内部this.setsate()或父组件render触发
A、getDerivedStateFromProps
B、showldComponentUpdate
C、render()
D、getSnapshotBeforeUpdate
E、componentDidUpdate
3.卸线组件:由ReactD0M.unmountComponentAtNode()触发
A、componentWillUnmount() --常用于收尾(关闭定时器、取消订阅等)
7、diffing算法


8、脚手架配置
8.1、代理配置
方法1:
在package.json追加如下配置:
"proxy":"http://localhost:5000"说明:
1、优点:配置简单,前端请求资源时可以不加任何前缀
2、缺点:不能配置多个代理
3、工作方式:当请求3000不存在的时候,资源请求转发给5000
方法2:
1、第一步:创建代理配置文件
在src下创建配置配置文件:src/setupProxy.js
2、编写setupProxy.js配置具体代理规则:
const proxy = require('http-proxy-middleware');
module.exports = function (app) {app.use(proxy('/api', { //api是需要转发的请求(所有带有/api标识的请求都会转发给后台-5000)target: 'http://localhost:3000' , //配置转发目标地址(能返回苏剧的服务器地址)changeOrigin: true,//控制服务器接收请求头中Host字段的值,/*** 重写请求路径* 例如:*  请求地址:http://localhost:3000/api/user/list*  重写之后:http://localhost:5000/user/list*/pathRewrite: {'^/api': ''//去除请求地址中的/api,保证能正常请求到接口},  }
));
};
说明:
1、优点:可以配置多个代理,可以灵活的控制请求是否走代理
2、配置繁琐,前端请求资源时必须加前缀
9、消息订阅-发布机制
1、工具库:PubSubJS
2、npm install pubsub-js
3、使用:
3.1、improt PubSub from 'pubsub-js'
3.2、PubSub.subscribe("del"mfunction(data){})//订阅
3.3、PubSub.publish(‘del’,data)//发布消息
eg:
父组件:
import React, { Component } from 'react'
import A from "../components/A"
import B from "../components/B"
export default class test extends Component {render() {return (<div><A/><B/></div>)}
}A子组件--发布
import React, { Component } from 'react'
import pubsub from 'pubsub-js'
export default class A extends Component {componentDidMount(){pubsub.publish('test', 'test')}render() {return (<div>A</div>)}
}B子组件--订阅
import React, { Component } from 'react'
import pubsub from 'pubsub-js'
export default class B extends Component {componentDidMount() {pubsub.subscribe('test',(msg,data)=>{console.log(msg,data)})}componentWillUnmount() {pubsub.unsubscribe('test')}render() {return (<div>B</div>)}
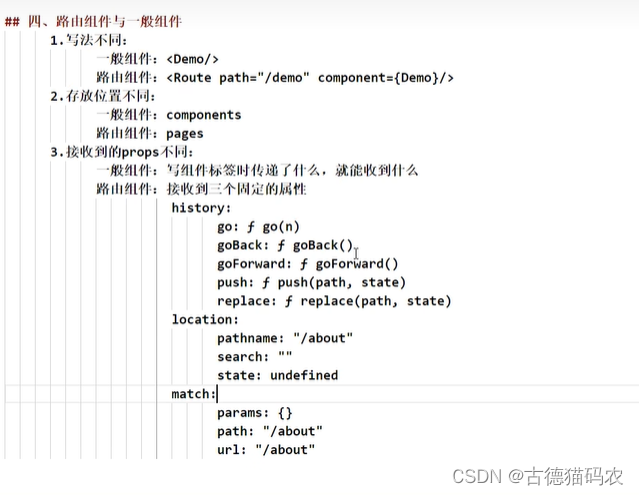
}10、路由(参考另外一个18+的教程)
参考链接:Home v6.24.0 | React Router
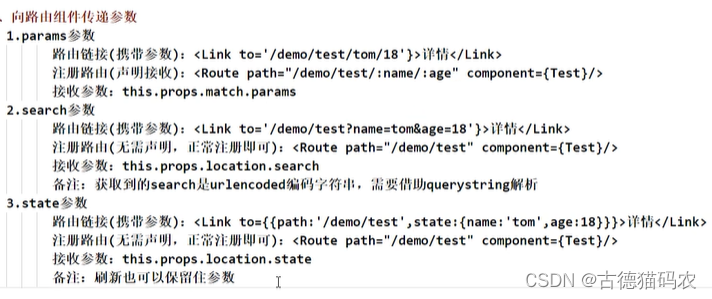
对比:

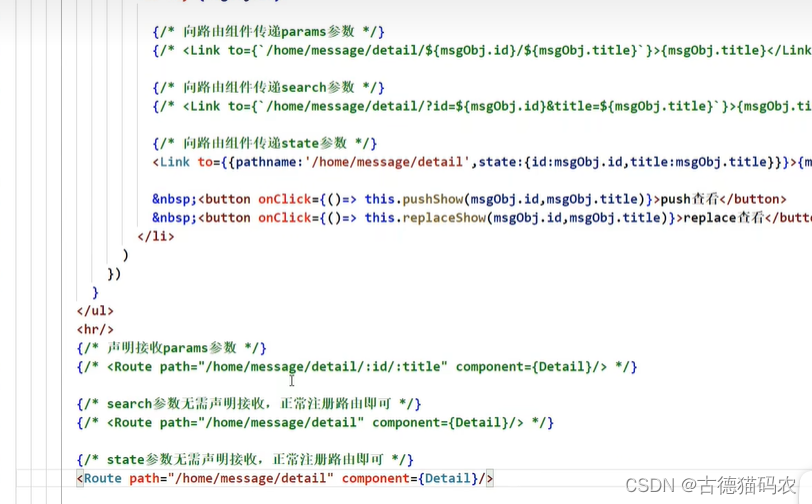
基本使用的三种方式:(16)
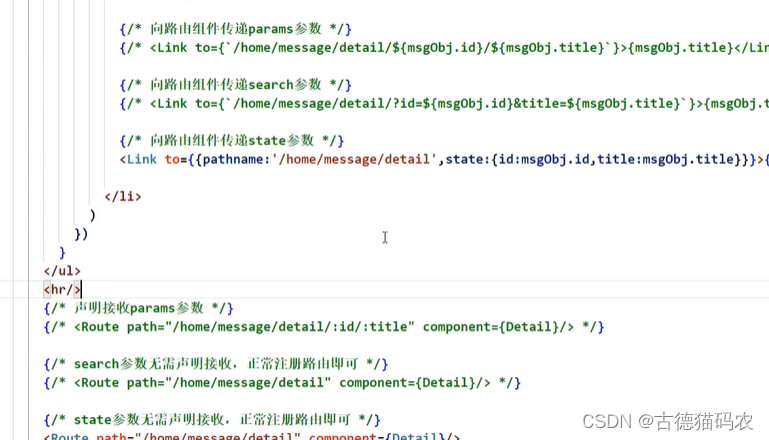
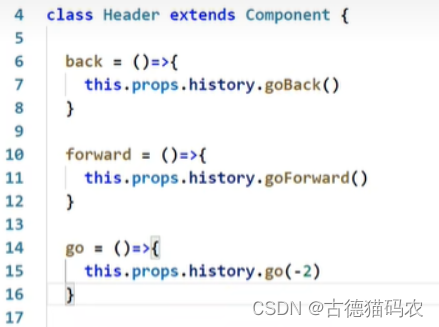
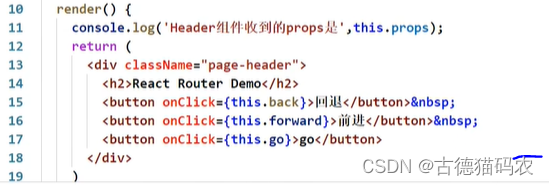
11、编程式导航
方法调用:

通过onclick调用:
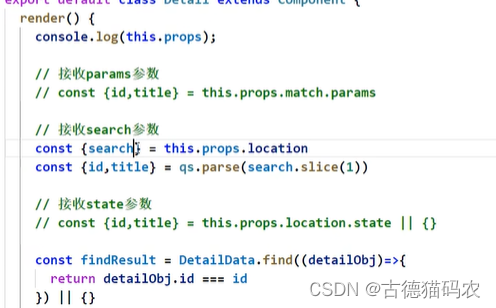
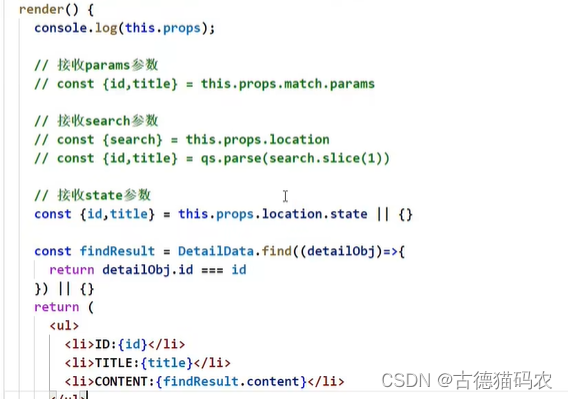
detail组件接收:
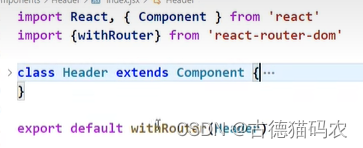
12、withRouter的使用

13、BrowserRouter与HashRouter区别

相关文章:
react.16+
1、函数式组件 在vite脚手架中执行: app.jsx: import { useState } from react import reactLogo from ./assets/react.svg import viteLogo from /vite.svg import ./App.cssfunction App() {console.log(this)return <h2>我是函数式组件</h2> }exp…...

如何实现MySQL对某一张表的binlog日志进行记录
在 MySQL 中,使用触发器(Triggers)来记录表的变更是一种常见的方法。下面是具体的配置和步骤: 1. 创建日志表 首先,需要创建一个日志表,用于存储变更记录。 CREATE TABLE my_table_log (id INT AUTO_INC…...

使用requests库进行网络爬虫:入门指南
在数据收集与分析的广阔领域中,网络爬虫是一项基础而强大的技能。requests库是Python中用于发送HTTP请求的第三方库,它简洁易用,非常适合初学者学习网络爬虫。本文将带你一步步了解如何使用requests库进行基本的网络爬虫操作。 一、安装requ…...

实验5-1 使用函数计算两点间的距离
本题要求实现一个函数,对给定平面任意两点坐标(x1,y1)和(x2,y2),求这两点之间的距离。 函数接口定义: double dist( double x1, double y1, double x2, double y2 );其中用户传入的参数为平面上两个点的坐标(x1, y1)和(x2, y2),函…...

免费!OpenAI发布最新模型GPT-4o mini,取代GPT-3.5,GPT-3.5退出历史舞台?
有个小伙伴问我,GPT-4O mini是什么,当时我还一脸懵逼,便做了一波猜测: 我猜测哈,这个可能是ChatGPT4o的前提下,只支持文本功能的版本,速度更快 结果,大错特错。 让我们一起看看Open…...
)
目标检测损失计算部分(YOLO)
ComputeLoss 标准化坐标的增益张量 标准化坐标的增益张量(gain tensor)用于将归一化的目标转换为特定特征层的网格尺度,以便进行匹配和计算。 在目标检测模型中,输入图像被划分为多个网格,每个网格负责预测多个锚框…...

Swift 方法
Swift 方法 Swift 是一种强大的编程语言,用于开发 iOS 和 macOS 应用程序。在 Swift 中,方法是一段代码,它定义了执行特定任务的步骤。方法可以提高代码的可重用性和可维护性。本文将介绍 Swift 方法的基本概念、语法和用法。 1. 基本概念 1.1 方法定义 方法是一段代码,…...

哪些牌子充电宝性价比比较高?目前公认比较好用充电宝都在这儿!
在这个科技飞速发展的时代,充电宝已经成为我们生活中不可或缺的一部分。然而,在享受充电宝带来的便利时,我们不能忽视一个至关重要的问题——安全性。随着无线充电宝的普及,大家对于“无线充电宝哪个牌子更好?”的疑问…...
计算机网络必会面经
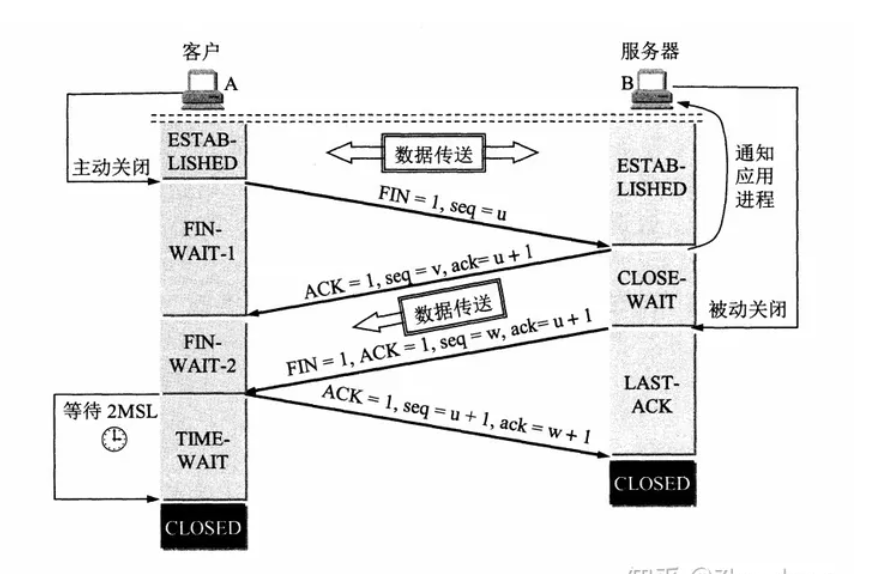
1.键入网址到网页显示,期间发生了什么 2.在TCP/IP网络模型中。TCP将数据进行分段后,为什么还需要IP层继续分片 3.详细说明tcp三次握手,为什么是三次,若每次握手丢了,解决办法是什么 4.详细说明tcp四次挥手ÿ…...
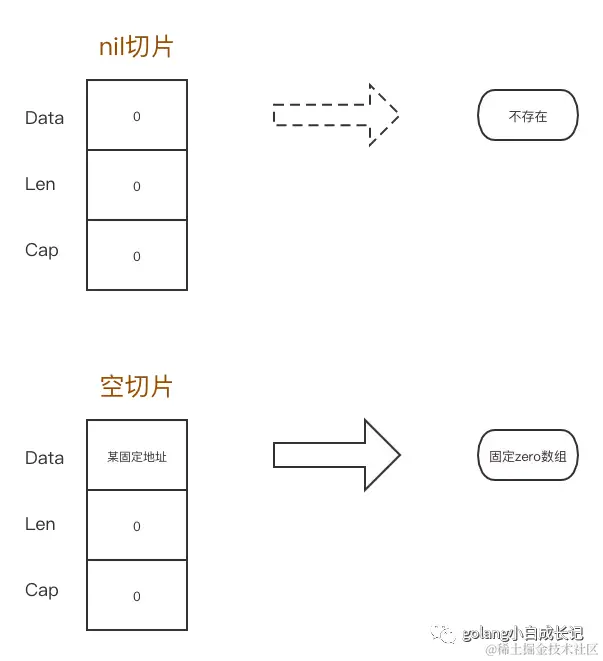
深入理解 Go 数组、切片、字符串
打个广告:欢迎关注我的微信公众号,在这里您将获取更全面、更新颖的文章! 原文链接:深入理解 Go 数组、切片、字符串 欢迎点赞关注 前言 为什么在一篇文章里同时介绍数组、切片、字符串,了解这三个数据类型底层数据结构…...

STM32下的HAL库U盘数据读写
最近在使用FreeRTOS操作U盘数据读取,与裸机开发区别不大,只要注意默认分配的栈大小就行 FATFS简介 FATFS 是一个完全免费开源的 FAT 文件系统模块,专门为小型的嵌入式系统而设计。它完全用标准 C 语言编写,所以具有良好的硬件平…...
——事件委托)
JavaScript(20)——事件委托
事件委托是利用事件流的特征解决一些开发需求的知识技巧 优点:减少注册次数,提高程序性能 原理:利用事件冒泡的特点。 给父元素注册事件,当我们触发子元素的时候,会冒泡到父元素上,从而触发父元素事件。…...

Linux系统安装opencv
在Linux系统上安装OpenCV时,使用pip install opencv-python-headless是一个常见的选择。以下是安装OpenCV的步骤总结: 安装步骤: 更新系统软件包(可选): sudo apt update sudo apt upgrade安装pip…...

nginx反向代理+nginx黑白名单+nginx负载均衡+平滑升级+配置jdk环境-7.30
一、反向代理 1.前端服务器配置 前端服务器:用于接收和响应客户端,代理另一台主机 Nginx 安装 (1).下载安装nginx [rootweb ~]# wget https://nginx.org/download/nginx-1.26.1.tar.gz (2).解压 [rootweb ~ ]# tar -zxvf nginx-1.26.1.tar.gz (3…...

C# Unity 面向对象补全计划 之 访问修饰符
本文仅作学习笔记与交流,不作任何商业用途,作者能力有限,如有不足还请斧正 本系列旨在通过补全学习之后,给出任意类图都能实现并做到逻辑上严丝合缝...

JAVA多线程设计模式 (多线程程序的衡量标准)
前言 如果你对一个程序的评价方式还停留在“这个程序写得不错”、“这个程序写得太差”的程度,这样很难看出你是否确实分析了程序的构造。不要只是“好不好”应该要有一个“好在哪里,不好在哪里”的评量标准。 一、下载地址 下载地址:JAVA…...

消息队列使用
消息队列在分布式系统中扮演着非常重要的角色,其主要用途包括但不限于以下几点: 解耦: 消息队列可以减少应用程序之间的直接依赖,使系统各部分更加独立。例如,在一个电子商务网站中,订单系统可以将订单信息发送到消息队列中,而不必直接调用库存系统。库存系统可以从队列…...

Windows 10+Visual Studio2019 Opencv-C++安装配置
前往官网下载需要的版本Releases - OpenCVhttps://opencv.org/releases/ 1.下载并解压OpenCV 我选择4.6.0,点击windows版本,进行下载 2.配置项目属性 打开你的Visual Studio 2019项目 -> 右击项目名,选择“属性” 注:整个配…...

百易云资产管理运营系统 comfileup.php 文件上传致RCE漏洞复现(XVE-2024-18154)
0x01 产品简介 百易云资产管理运营系统,是专门针对企业不动产资产管理和运营需求而设计的一套综合解决方案。该系统能够覆盖资产的全生命周期管理,包括资产的登记、盘点、评估、处置等多个环节,同时提供强大的运营分析功能,帮助企业优化资产配置,提升运营效率。 0x02 漏…...

【学习笔记】Redis学习笔记——第17章 集群
第17章 集群 17.1 节点 使用cluster meet命令将其他节点添加到当前节点集群中 17.1.1 启动节点 通过cluster-enabled设置来决定是否启用集群 17.1.2 集群数据结构 每个节点都保存了自己及其他节点的IP端口号等信息 17.1.3 cluster meet命令的实现 是收到命令的节点和新…...

Python爬虫实战:研究MechanicalSoup库相关技术
一、MechanicalSoup 库概述 1.1 库简介 MechanicalSoup 是一个 Python 库,专为自动化交互网站而设计。它结合了 requests 的 HTTP 请求能力和 BeautifulSoup 的 HTML 解析能力,提供了直观的 API,让我们可以像人类用户一样浏览网页、填写表单和提交请求。 1.2 主要功能特点…...
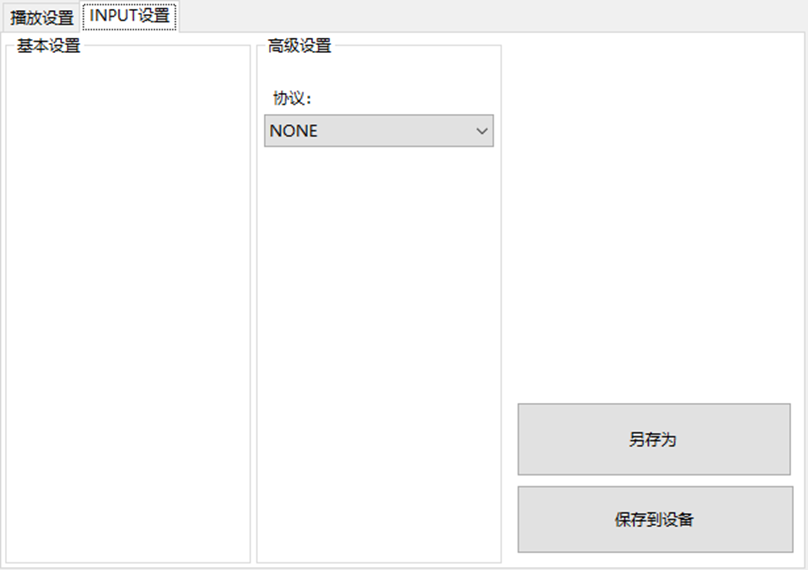
LBE-LEX系列工业语音播放器|预警播报器|喇叭蜂鸣器的上位机配置操作说明
LBE-LEX系列工业语音播放器|预警播报器|喇叭蜂鸣器专为工业环境精心打造,完美适配AGV和无人叉车。同时,集成以太网与语音合成技术,为各类高级系统(如MES、调度系统、库位管理、立库等)提供高效便捷的语音交互体验。 L…...

JavaScript 中的 ES|QL:利用 Apache Arrow 工具
作者:来自 Elastic Jeffrey Rengifo 学习如何将 ES|QL 与 JavaScript 的 Apache Arrow 客户端工具一起使用。 想获得 Elastic 认证吗?了解下一期 Elasticsearch Engineer 培训的时间吧! Elasticsearch 拥有众多新功能,助你为自己…...

在rocky linux 9.5上在线安装 docker
前面是指南,后面是日志 sudo dnf config-manager --add-repo https://download.docker.com/linux/centos/docker-ce.repo sudo dnf install docker-ce docker-ce-cli containerd.io -y docker version sudo systemctl start docker sudo systemctl status docker …...
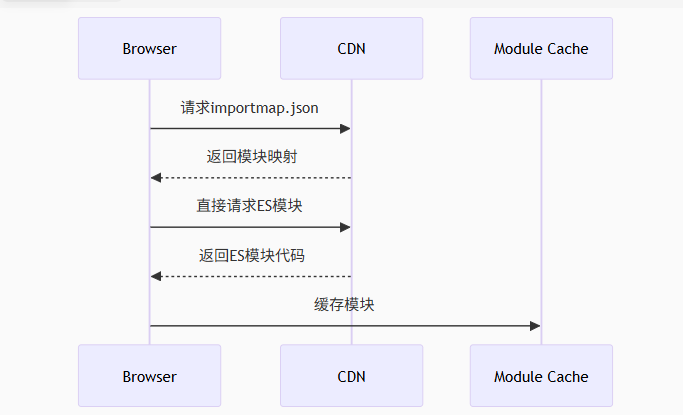
Module Federation 和 Native Federation 的比较
前言 Module Federation 是 Webpack 5 引入的微前端架构方案,允许不同独立构建的应用在运行时动态共享模块。 Native Federation 是 Angular 官方基于 Module Federation 理念实现的专为 Angular 优化的微前端方案。 概念解析 Module Federation (模块联邦) Modul…...
基础光照(Basic Lighting))
C++.OpenGL (10/64)基础光照(Basic Lighting)
基础光照(Basic Lighting) 冯氏光照模型(Phong Lighting Model) #mermaid-svg-GLdskXwWINxNGHso {font-family:"trebuchet ms",verdana,arial,sans-serif;font-size:16px;fill:#333;}#mermaid-svg-GLdskXwWINxNGHso .error-icon{fill:#552222;}#mermaid-svg-GLd…...

Rust 异步编程
Rust 异步编程 引言 Rust 是一种系统编程语言,以其高性能、安全性以及零成本抽象而著称。在多核处理器成为主流的今天,异步编程成为了一种提高应用性能、优化资源利用的有效手段。本文将深入探讨 Rust 异步编程的核心概念、常用库以及最佳实践。 异步编程基础 什么是异步…...
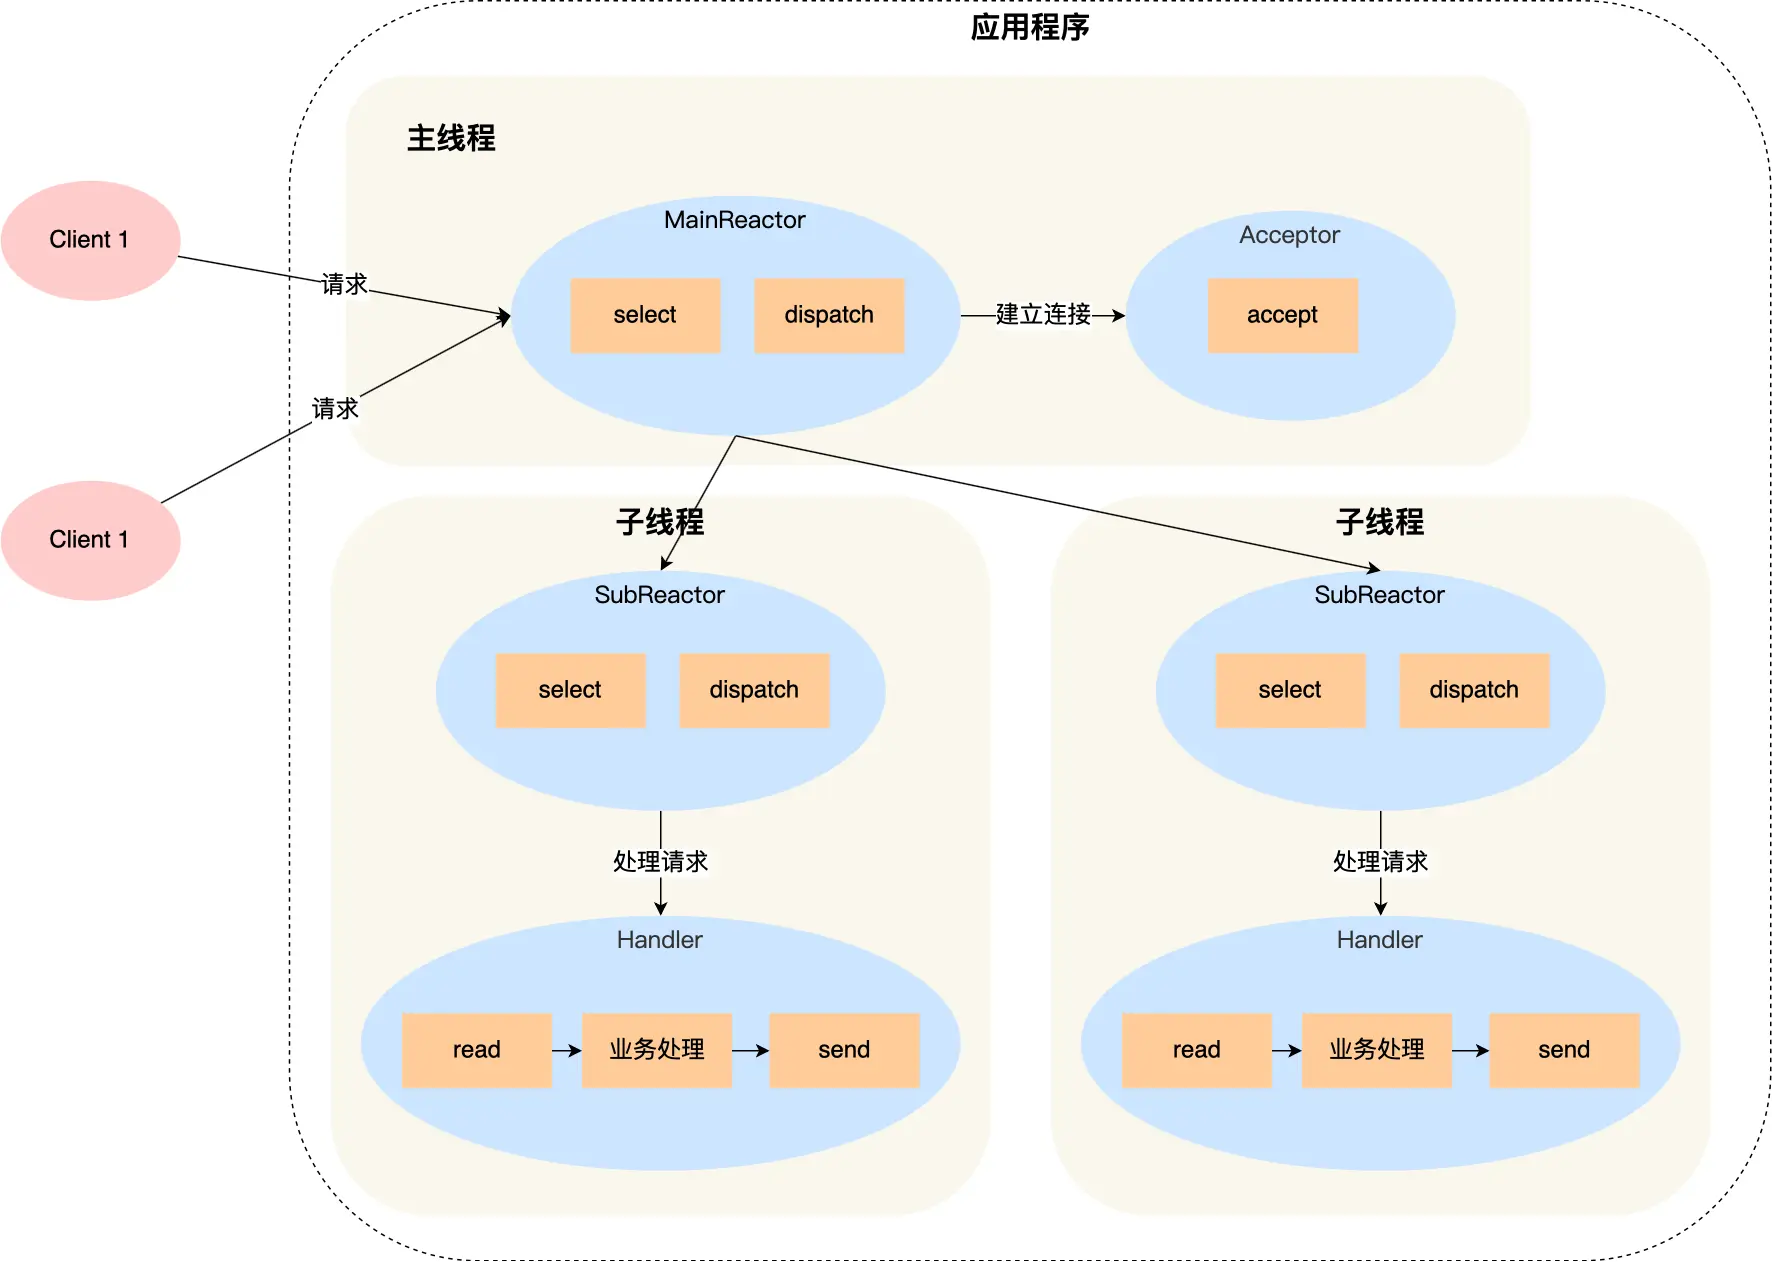
select、poll、epoll 与 Reactor 模式
在高并发网络编程领域,高效处理大量连接和 I/O 事件是系统性能的关键。select、poll、epoll 作为 I/O 多路复用技术的代表,以及基于它们实现的 Reactor 模式,为开发者提供了强大的工具。本文将深入探讨这些技术的底层原理、优缺点。 一、I…...
)
是否存在路径(FIFOBB算法)
题目描述 一个具有 n 个顶点e条边的无向图,该图顶点的编号依次为0到n-1且不存在顶点与自身相连的边。请使用FIFOBB算法编写程序,确定是否存在从顶点 source到顶点 destination的路径。 输入 第一行两个整数,分别表示n 和 e 的值(1…...

基于 TAPD 进行项目管理
起因 自己写了个小工具,仓库用的Github。之前在用markdown进行需求管理,现在随着功能的增加,感觉有点难以管理了,所以用TAPD这个工具进行需求、Bug管理。 操作流程 注册 TAPD,需要提供一个企业名新建一个项目&#…...