基于 Android studio 实现停车场管理系统--原创
目录
一、项目演示
二、开发环境
三、项目页面
四、项目详情
五、项目完整源码
一、项目演示
二、开发环境

三、项目详情
1.启动页

这段代码是一个简单的Android应用程序启动活动(Activity),具体功能如下:
1. **延迟进入登录页面:**
- 在 `onCreate()` 方法中,使用 `Handler` 和 `Runnable` 实现了一个延迟执行的功能,延迟时间为3秒。
- `runnable` 对象的 `run()` 方法调用了 `tomainActive()` 方法,在延迟结束后启动 `LoginRegisterActivity` 并关闭当前的 `StartActivity`。
2. **计时器功能:**
- 定义了一个内部类 `TimeCount`,继承自 `CountDownTimer`,用于执行一个四秒的倒计时操作,每隔一秒触发一次。
- `onFinish()` 方法中,倒计时结束后移除了 `handler` 中的 `runnable` 对象,确保不会在倒计时结束后再次跳转到登录页面。
3. **Activity 生命周期方法:**
- `onCreate()` 方法中,设置了布局文件 `activity_start.xml` 作为界面显示内容,并启动了延迟执行和计时器。
- `onDestroy()` 方法中未显示重写,但在 `toMainActive()` 方法中的 `finish()` 方法确保了在跳转完成后关闭当前 Activity。
总体来说,该代码实现了在应用启动后延迟3秒进入登录页面,并在倒计时4秒后取消延迟,确保用户在启动页面停留不超过指定时间后自动跳转到登录页面。
<?xml version="1.0" encoding="utf-8"?>
<androidx.constraintlayout.widget.ConstraintLayout xmlns:android="http://schemas.android.com/apk/res/android"xmlns:app="http://schemas.android.com/apk/res-auto"xmlns:tools="http://schemas.android.com/tools"android:layout_width="match_parent"android:layout_height="match_parent"android:background="#5492ea"tools:context=".Activity.StartActivity"><ImageViewandroid:id="@+id/imageView"android:layout_width="0dp"android:layout_height="0dp"android:layout_marginStart="32dp"android:layout_marginTop="32dp"android:layout_marginEnd="32dp"android:layout_marginBottom="32dp"android:background="#5492ea"app:layout_constraintBottom_toBottomOf="parent"app:layout_constraintEnd_toEndOf="parent"app:layout_constraintStart_toStartOf="parent"app:layout_constraintTop_toTopOf="parent"app:srcCompat="@drawable/logo" />
</androidx.constraintlayout.widget.ConstraintLayout>
2.登录注册


这段代码实现了一个包含登录和注册功能的活动(Activity),具体功能如下:
1. **界面初始化和控件绑定:**
- 在 `onCreate()` 方法中,通过 `setContentView()` 方法设置了布局文件 `activity_login_register.xml` 作为界面显示内容,并调用了 `initView()` 方法初始化了界面上的控件。
- `initView()` 方法中绑定了登录按钮(`llLogin`、`tvLogin`、`viewLogin`)、注册按钮(`llRegister`、`tvRegister`、`viewRegister`)以及用于显示 Fragment 的 `FrameLayout` (`fr`)。
2. **页面切换逻辑:**
- `Navigation()` 方法设置了登录 (`llLogin`) 和注册 (`llRegister`) 按钮的点击事件监听器。
- 点击登录按钮时,调用 `setFragment(0)` 方法,切换到登录页面(`LoginFragment`),并设置相关的文本颜色和视图状态。
- 点击注册按钮时,调用 `setFragment(1)` 方法,切换到注册页面(`RegisterFragment`),同样设置相关的文本颜色和视图状态。
3. **Fragment 切换方法:**
- `setFragment(int id)` 方法根据传入的 `id` 参数,使用 `FragmentManager` 将对应的 `Fragment` 替换到 `FrameLayout` (`fr`) 中。
- 当 `id` 为 `0` 时,创建并显示 `LoginFragment`;当 `id` 为 `1` 时,创建并显示 `RegisterFragment`。
4. **颜色和视图控制:**
- 在点击事件中,通过 `setTextColor()` 方法设置文本颜色,通过 `setVisibility()` 方法控制视图的显示和隐藏,以反映当前选择的是登录还是注册页面。
总体来说,该代码实现了一个简单的登录注册页面切换功能,使用了 `Fragment` 来分别展示登录和注册界面,并通过点击事件处理程序来实现页面切换和视图控制。
package com.example.parking.Activity;import android.graphics.Color;
import android.os.Bundle;
import android.view.View;
import android.widget.FrameLayout;
import android.widget.LinearLayout;
import android.widget.TextView;import androidx.appcompat.app.AppCompatActivity;
import androidx.fragment.app.Fragment;import com.example.parking.Fragment.LoginFragment;
import com.example.parking.Fragment.RegisterFragment;
import com.example.parking.R;public class LoginRegisterActivity extends AppCompatActivity {private LinearLayout llLogin;private TextView tvLogin;private View viewLogin;private LinearLayout llRegister;private TextView tvRegister;private View viewRegister;private FrameLayout fr;@Overrideprotected void onCreate(Bundle savedInstanceState) {super.onCreate(savedInstanceState);setContentView(R.layout.activity_login_register);initView();Navigation();llLogin.callOnClick();}// 点击控件进行页面转换private void Navigation() {// 设置llLogin点击事件监听器llLogin.setOnClickListener(new View.OnClickListener() {@Overridepublic void onClick(View v) {// 调用setFragment方法切换到指定页面setFragment(0);// 设置文本颜色和视图显示状态tvLogin.setTextColor(Color.parseColor("#5492ea"));viewLogin.setVisibility(View.VISIBLE);tvRegister.setTextColor(Color.parseColor("#000000"));viewRegister.setVisibility(View.GONE);}});// 设置llRegister点击事件监听器llRegister.setOnClickListener(new View.OnClickListener() {@Overridepublic void onClick(View v) {// 调用setFragment方法切换到指定页面setFragment(1);// 设置文本颜色和视图显示状态tvLogin.setTextColor(Color.parseColor("#000000"));viewLogin.setVisibility(View.GONE);tvRegister.setTextColor(Color.parseColor("#5492ea"));viewRegister.setVisibility(View.VISIBLE);}});}// 切换fg页面private void setFragment(int id) {Fragment fragment = null;switch (id) {case 0:// 创建LoginFragment实例fragment = new LoginFragment();break;case 1:// 创建RegisterFragment实例fragment = new RegisterFragment();break;}// 使用FragmentManager替换指定布局中的FragmentgetSupportFragmentManager().beginTransaction().replace(R.id.fr, fragment).commit();}private void initView() {llLogin = findViewById(R.id.ll_login);tvLogin = findViewById(R.id.tv_login);viewLogin = findViewById(R.id.view_login);llRegister = findViewById(R.id.ll_register);tvRegister = findViewById(R.id.tv_register);viewRegister = findViewById(R.id.view_register);fr = findViewById(R.id.fr);}
}
3.用户首页

这段代码实现了一个名为 `HomeFragment` 的片段(Fragment),用于显示用户的汽车信息和通知内容。让我们来逐步分析其功能和结构:
1. **布局初始化和视图绑定:**
- 在 `onCreateView()` 方法中,使用 `LayoutInflater` 加载了 `fragment_home.xml` 布局文件,并通过 `initView(v)` 方法初始化了界面上的控件。
- `initView(View v)` 方法中,绑定了通知内容的 `TextView` (`tvInform`) 和两个水平方向的 `RecyclerView` (`rvA` 和 `rvB`)。
2. **显示方法 (`show()` 方法):**
- **通知信息显示:**
- 通过 `InformHelper` 实例 (`informHelper`) 获取 ID 为 1 的通知信息 (`informById`),如果获取到则将其内容显示在 `tvInform` 中。
- **汽车信息显示:**
- **RecyclerViewA:** 显示前五辆汽车的信息。
- 设置了水平方向的 `LinearLayoutManager`。
- 从 `carHelper` 获取所有汽车信息列表 (`carList`),并取前五个数据显示。
- 创建 `CarAdapter` 实例 (`adapterA`),将其设置给 `rvA`。
- **RecyclerViewB:** 显示剩余汽车信息。
- 同样设置了水平方向的 `LinearLayoutManager`。
- 如果汽车总数超过五辆,则显示剩余的汽车数据。
- 创建 `CarAdapter` 实例 (`adapterB`),将其设置给 `rvB`。
3. **初始化方法 (`initView(View v)` 方法):**
- 在 `initView(View v)` 方法中,通过 `v.findViewById()` 方法绑定了布局中的各个控件,包括 `tvInform`、`rvA` 和 `rvB`。
- 初始化了 `carHelper` 和 `informHelper` 实例,用于获取汽车信息和通知信息。
4. **SharedPreferences 使用:**
- 使用了 `SharedPreferences` 获取存储在 "User" 中的手机号 (`phone`),用于后续可能的用户数据查询或其他操作。
总体来说,`HomeFragment` 主要实现了在用户主页显示通知信息和汽车信息的功能。它通过 `InformHelper` 和 `CarHelper` 来获取和展示数据,并通过两个 `RecyclerView` 分别显示前五个和剩余的汽车信息。
package com.example.parking.Fragment;import android.content.Context;
import android.content.SharedPreferences;
import android.os.Bundle;
import android.view.LayoutInflater;
import android.view.View;
import android.view.ViewGroup;
import android.widget.TextView;import androidx.fragment.app.Fragment;
import androidx.recyclerview.widget.LinearLayoutManager;
import androidx.recyclerview.widget.RecyclerView;import com.example.parking.Adapter.CarAdapter;
import com.example.parking.Bean.CarBean;
import com.example.parking.Bean.InformBean;
import com.example.parking.Helper.CarHelper;
import com.example.parking.Helper.InformHelper;
import com.example.parking.R;import java.util.List;public class HomeFragment extends Fragment {private TextView tvInform;private CarHelper carHelper;private String phone;private RecyclerView rvA, rvB;private InformHelper informHelper;@Overridepublic View onCreateView(LayoutInflater inflater, ViewGroup container,Bundle savedInstanceState) {View v = inflater.inflate(R.layout.fragment_home, container, false);initView(v);show();return v;}private void show() {// 通过ID获取通知信息InformBean informById = informHelper.getInformById(1);if (informById != null) {// 如果获取到通知信息,设置到TextView中显示tvInform.setText(informById.getContent());}// 设置RecyclerViewA的布局管理器为水平方向的LinearLayoutManagerLinearLayoutManager layoutManagerA = new LinearLayoutManager(getContext(), LinearLayoutManager.HORIZONTAL, false);rvA.setLayoutManager(layoutManagerA);// 设置RecyclerViewB的布局管理器为水平方向的LinearLayoutManagerLinearLayoutManager layoutManagerB = new LinearLayoutManager(getContext(), LinearLayoutManager.HORIZONTAL, false);rvB.setLayoutManager(layoutManagerB);// 获取所有汽车信息列表List<CarBean> carList = carHelper.getAllCars();int totalCarCount = carList.size();// 获取前五个汽车数据List<CarBean> firstFiveCars = carList.subList(0, Math.min(totalCarCount, 5));// 获取剩余的汽车数据int remainingCarCount = Math.max(totalCarCount - 5, 0);List<CarBean> remainingCars = carList.subList(5, totalCarCount);// 初始化适配器A,并设置给RecyclerViewACarAdapter adapterA = new CarAdapter(getContext(), firstFiveCars);rvA.setAdapter(adapterA);// 初始化适配器B,并设置给RecyclerViewBCarAdapter adapterB = new CarAdapter(getContext(), remainingCars);rvB.setAdapter(adapterB);}private void initView(View v) {tvInform = v.findViewById(R.id.tv_inform);carHelper = new CarHelper(getActivity());SharedPreferences sharedPreferences = getActivity().getSharedPreferences("User", Context.MODE_PRIVATE);phone = sharedPreferences.getString("phone", "");rvA = v.findViewById(R.id.rv_a);rvB = v.findViewById(R.id.rv_b);informHelper = new InformHelper(getActivity());}
}
4.用户我的

这段代码实现了一个名为 `MineFragment` 的片段(Fragment),用于展示用户的个人信息,包括用户名、电话号码、头像,并提供了跳转到信息管理、修改密码、车辆管理以及退出登录功能。让我们来逐步分析其功能和结构:
1. **布局初始化和视图绑定:**
- 在 `onCreateView()` 方法中,使用 `LayoutInflater` 加载了 `fragment_mine.xml` 布局文件,并通过 `initView(v)` 方法初始化了界面上的控件。
- `initView(View v)` 方法中,绑定了用户头像 (`imgAvatar`)、用户名 (`tvUsername`)、电话号码 (`tvPhone`),以及四个功能按钮 (`llInformation`、`llPassword`、`llCar`、`llQuit`)。
2. **数据显示方法 (`show()` 方法):**
- **获取用户信息:**
- 使用 `userHelper` 实例通过存储在 `SharedPreferences` 中的手机号 (`phone`),从数据库中获取用户信息 (`UserBean`)。
- 如果成功获取到用户信息 (`userByPhone`),则将用户的用户名、电话号码显示在界面上。
- **显示用户头像:**
- 如果用户有头像数据 (`avatar` 不为 null),则使用 Glide 库加载并显示头像。
- 使用了 `Base64.decode()` 解码用户头像数据,并使用 `CircleCrop` 实现圆形裁剪效果,加载到 `imgAvatar` 中。
- 如果用户没有头像数据,则显示默认的头像图片 (`avatar` 为空时显示 `R.drawable.avatar` 图片)。
3. **功能跳转 (`skip()` 方法):**
- **信息管理 (`llInformation`)、修改密码 (`llPassword`)、车辆管理 (`llCar`):**
- 设置了点击事件监听器,点击时分别跳转到 `InformationActivity`、`ModifyPassWordActivity` 和 `CarManagementActivity`。
- **退出登录 (`llQuit`):**
- 设置了点击事件监听器,点击时弹出确认退出登录的对话框 (`AlertDialog`)。
- 如果点击确认,则跳转到 `LoginRegisterActivity` 并结束当前活动 (`getActivity().finish()`),实现退出登录操作。
- 如果点击取消,则对话框消失,不执行任何操作。
4. **生命周期方法:**
- 使用了 `onResume()` 方法,在片段恢复时重新调用 `show()` 方法,以确保界面上的数据能够及时更新显示。
5. **使用到的技术和库:**
- 使用了 `SharedPreferences` 存储用户手机号,用于从数据库中获取用户信息。
- 使用了 Glide 库加载和显示用户头像,并应用了圆形裁剪的效果。
- 使用了 `AlertDialog.Builder` 创建对话框,实现用户退出登录的确认操作。
总体来说,`MineFragment` 实现了一个完整的个人信息展示和操作界面,包括用户信息的显示、头像的加载、功能按钮的点击跳转以及退出登录的确认对话框功能。
package com.example.parking.Fragment;import android.content.Context;
import android.content.DialogInterface;
import android.content.Intent;
import android.content.SharedPreferences;
import android.os.Bundle;
import android.util.Base64;
import android.view.LayoutInflater;
import android.view.View;
import android.view.ViewGroup;
import android.widget.ImageView;
import android.widget.LinearLayout;
import android.widget.TextView;import androidx.appcompat.app.AlertDialog;
import androidx.fragment.app.Fragment;import com.bumptech.glide.Glide;
import com.bumptech.glide.load.resource.bitmap.CircleCrop;
import com.bumptech.glide.request.RequestOptions;
import com.example.parking.Activity.CarManagementActivity;
import com.example.parking.Activity.InformationActivity;
import com.example.parking.Activity.LoginRegisterActivity;
import com.example.parking.Activity.ModifyPassWordActivity;
import com.example.parking.Bean.UserBean;
import com.example.parking.Helper.UserHelper;
import com.example.parking.R;public class MineFragment extends Fragment {private ImageView imgAvatar;private TextView tvUsername;private TextView tvPhone;private LinearLayout llInformation;private LinearLayout llPassword;private LinearLayout llCar;private LinearLayout llQuit;private String phone;private UserHelper userHelper;@Overridepublic void onResume() {super.onResume();show();}@Overridepublic View onCreateView(LayoutInflater inflater, ViewGroup container,Bundle savedInstanceState) {View v = inflater.inflate(R.layout.fragment_mine, container, false);initView(v);show();skip();return v;}private void skip() {// 设置 llInformation 的点击事件监听器llInformation.setOnClickListener(new View.OnClickListener() {@Overridepublic void onClick(View v) {// 点击时跳转至 InformationActivityIntent intent = new Intent(getActivity(), InformationActivity.class);startActivity(intent);}});// 设置 llPassword 的点击事件监听器llPassword.setOnClickListener(new View.OnClickListener() {@Overridepublic void onClick(View v) {// 点击时跳转至 ModifyPassWordActivityIntent intent = new Intent(getActivity(), ModifyPassWordActivity.class);startActivity(intent);}});// 设置 llCar 的点击事件监听器llCar.setOnClickListener(new View.OnClickListener() {@Overridepublic void onClick(View v) {// 点击时跳转至 CarManagementActivityIntent intent = new Intent(getActivity(), CarManagementActivity.class);startActivity(intent);}});// 设置 llQuit 的点击事件监听器llQuit.setOnClickListener(new View.OnClickListener() {@Overridepublic void onClick(View v) {// 弹出确认退出登录的对话框AlertDialog.Builder builder = new AlertDialog.Builder(getActivity());builder.setMessage("确定要退出登录吗?");// 点击确定时执行退出登录操作builder.setPositiveButton("确定", new DialogInterface.OnClickListener() {@Overridepublic void onClick(DialogInterface dialog, int which) {Intent intent = new Intent(getActivity(), LoginRegisterActivity.class);startActivity(intent);getActivity().finish();}});// 点击取消则不执行任何操作builder.setNegativeButton("取消", new DialogInterface.OnClickListener() {@Overridepublic void onClick(DialogInterface dialog, int which) {// 点击取消}});// 创建并显示对话框AlertDialog dialog = builder.create();dialog.show();}});}private void show() {// 通过手机号从数据库获取用户信息UserBean userByPhone = userHelper.getUserByPhone(phone);// 如果用户信息不为空,则展示用户信息if (userByPhone != null) {// 设置电话号码文本tvPhone.setText("电话:" + userByPhone.getPhone());String username = userByPhone.getUsername();// 设置用户名文本tvUsername.setText(username);// 如果用户有头像,则加载并显示头像if (userByPhone.getAvatar() != null) {// 使用 Glide 加载头像并显示Glide.with(getActivity()).load(Base64.decode(userByPhone.getAvatar(), Base64.DEFAULT)).apply(RequestOptions.bitmapTransform(new CircleCrop())).into(imgAvatar);} else {// 如果用户没有头像,则显示默认头像imgAvatar.setImageResource(R.drawable.avatar);}}}private void initView(View v) {imgAvatar = v.findViewById(R.id.img_avatar);tvUsername = v.findViewById(R.id.tv_username);tvPhone = v.findViewById(R.id.tv_phone);llInformation = v.findViewById(R.id.ll_information);llPassword = v.findViewById(R.id.ll_password);llCar = v.findViewById(R.id.ll_car);llQuit = v.findViewById(R.id.ll_quit);SharedPreferences sharedPreferences = getActivity().getSharedPreferences("User", Context.MODE_PRIVATE);phone = sharedPreferences.getString("phone", "");userHelper = new UserHelper(getActivity());}
}
5.用户个人信息

这段代码实现了一个名为 `InformationActivity` 的活动(Activity),用于展示和编辑用户的个人信息,包括用户名、手机号、头像、性别、生日和地址等。让我们来逐步分析其功能和结构:
1. **布局初始化和视图绑定:**
- 在 `onCreate()` 方法中,使用 `setContentView()` 方法加载了 `activity_information.xml` 布局文件,并通过 `initView()` 方法初始化了界面上的控件。
- `initView()` 方法中,绑定了返回按钮 (`imgBack`)、头像 (`imgAvatar`)、用户名 (`tvUsername`)、手机号 (`tvPhone`)、性别 (`tvSex`)、生日 (`tvBirthday`)、地址 (`tvAddress`) 的控件,以及保存按钮 (`btnSave`) 和各个信息项的布局 (`llAvatar`、`llUsername` 等)。
2. **显示用户信息 (`show()` 方法):**
- **从数据库获取用户信息:**
- 使用 `userHelper` 实例根据存储在 `SharedPreferences` 中的手机号 (`phone`),从数据库中获取用户信息 (`UserBean`)。
- 如果成功获取到用户信息 (`user`),则从用户对象中获取各个信息字段,并将它们显示在对应的 `TextView` 和 `ImageView` 中。
- 如果用户的头像字段 (`avatar`) 为 null,则显示默认的头像图片 (`R.drawable.avatar`)。
- 如果用户的性别、生日或地址字段为 null,则显示默认的提示文本 ("请输入性别"、"请输入生日"、"请输入地址")。
3. **编辑用户信息 (`dialog(TextView textView)` 方法):**
- **创建编辑对话框:**
- 使用 `AlertDialog.Builder` 创建对话框,加载自定义布局 `dialog_information.xml`。
- 对于每个信息项的布局 (`llUsername`、`llSex`、`llBirthday`、`llAddress`),设置点击事件监听器。
- 点击事件触发时,弹出对话框编辑对应的信息。用户可以输入新的信息,并在确定按钮点击后将新信息设置到对应的 `TextView` 中。
4. **保存用户信息 (`save()` 方法):**
- **保存按钮点击事件:**
- 设置保存按钮 (`btnSave`) 的点击事件监听器。
- 获取头像 (`imgAvatar`) 的图片并将其转换为 Base64 编码格式。
- 获取用户输入的用户名、性别、生日和地址信息,并调用 `userHelper` 的方法更新用户信息(除了手机号外的信息)。
- 根据更新结果显示相应的提示信息,成功则显示 "保存成功!",失败则显示 "保存失败!"。
5. **处理相册选择和图片裁剪 (`onActivityResult()` 方法):**
- **相册选择和图片裁剪结果处理:**
- 当用户点击头像布局 (`llAvatar`) 时,打开系统相册 (`Intent.ACTION_PICK`)。
- 在相册选择图片后,调用 `UCrop` 库进行图片裁剪,并设置裁剪的宽高比为 1:1。
- 在裁剪完成后 (`REQUEST_CROP_PICTURE` 请求码),加载裁剪后的图片并显示为圆形,使用 Glide 加载图片并显示到 `imgAvatar` 控件上。
6. **返回按钮点击事件 (`back()` 方法):**
- 返回按钮 (`imgBack`) 的点击事件监听器,点击时结束当前活动 (`finish()`),返回上一个界面。
7. **使用到的技术和库:**
- 使用了 `SharedPreferences` 存储用户手机号,用于从数据库中获取用户信息。
- 使用 Glide 库加载和显示用户头像,并应用了圆形裁剪的效果。
- 使用了 `UCrop` 库进行图片裁剪,实现用户头像的选择和编辑功能。
- 使用了 `AlertDialog.Builder` 创建对话框,实现用户信息的编辑和保存功能。
总体来说,`InformationActivity` 实现了一个完整的用户个人信息展示和编辑界面,用户可以查看和修改自己的个人信息,并可以选择头像进行编辑。
package com.example.parking.Activity;import android.content.Context;
import android.content.Intent;
import android.content.SharedPreferences;
import android.graphics.Bitmap;
import android.graphics.drawable.BitmapDrawable;
import android.net.Uri;
import android.os.Bundle;
import android.util.Base64;
import android.view.LayoutInflater;
import android.view.View;
import android.widget.Button;
import android.widget.EditText;
import android.widget.ImageView;
import android.widget.LinearLayout;
import android.widget.TextView;
import android.widget.Toast;import androidx.annotation.Nullable;
import androidx.appcompat.app.AlertDialog;
import androidx.appcompat.app.AppCompatActivity;import com.bumptech.glide.Glide;
import com.bumptech.glide.load.engine.DiskCacheStrategy;
import com.bumptech.glide.load.resource.bitmap.CircleCrop;
import com.bumptech.glide.request.RequestOptions;
import com.example.parking.Bean.UserBean;
import com.example.parking.Helper.UserHelper;
import com.example.parking.R;
import com.yalantis.ucrop.UCrop;import java.io.ByteArrayOutputStream;
import java.io.File;public class InformationActivity extends AppCompatActivity {@Overrideprotected void onCreate(Bundle savedInstanceState) {super.onCreate(savedInstanceState);setContentView(R.layout.activity_information);back();show();}// 设置各个信息项的点击事件监听器private void llClick() {llAvatar.setOnClickListener(new View.OnClickListener() {@Overridepublic void onClick(View v) {// 打开相册Intent intent = new Intent(Intent.ACTION_PICK);// 设置类型为图片intent.setType("image/*");startActivityForResult(intent, REQUEST_SELECT_PICTURE);}});llUsername.setOnClickListener(new View.OnClickListener() {@Overridepublic void onClick(View v) {// 弹出对话框编辑用户名dialog(tvUsername);}});llPhone.setOnClickListener(new View.OnClickListener() {@Overridepublic void onClick(View v) {// 提示手机号不支持修改Toast.makeText(InformationActivity.this, "手机号不支持修改!", Toast.LENGTH_SHORT).show();}});llSex.setOnClickListener(new View.OnClickListener() {@Overridepublic void onClick(View v) {// 弹出对话框编辑性别dialog(tvSex);}});llBirthday.setOnClickListener(new View.OnClickListener() {@Overridepublic void onClick(View v) {// 弹出对话框编辑生日dialog(tvBirthday);}});llAddress.setOnClickListener(new View.OnClickListener() {@Overridepublic void onClick(View v) {// 弹出对话框编辑地址dialog(tvAddress);}});}// 创建编辑对话框的方法private void dialog(final TextView textView) {// 创建AlertDialog构建器AlertDialog.Builder builder = new AlertDialog.Builder(this);// 获取自定义布局文件dialog_car.xml的视图View dialogView = LayoutInflater.from(this).inflate(R.layout.dialog_information, null);// 设置对话框的视图builder.setView(dialogView);// 获取对话框中的控件final EditText etInformation = dialogView.findViewById(R.id.et_information);Button btnOk = dialogView.findViewById(R.id.btn_ok);// 创建AlertDialog对象final AlertDialog dialog = builder.create();// 设置确定按钮的点击事件btnOk.setOnClickListener(new View.OnClickListener() {@Overridepublic void onClick(View v) {// 获取输入的信息String information = etInformation.getText().toString();if (information.isEmpty()) {// 提示输入信息不能为空Toast.makeText(InformationActivity.this, "请输入信息!", Toast.LENGTH_SHORT).show();return;}// 将信息设置到传入的textView上textView.setText(information);// 关闭对话框dialog.dismiss();}});// 显示对话框dialog.show();}// 处理从相册选择图片后的返回结果@Overrideprotected void onActivityResult(int requestCode, int resultCode, @Nullable Intent data) {super.onActivityResult(requestCode, resultCode, data);if (requestCode == REQUEST_SELECT_PICTURE && resultCode == RESULT_OK) {if (data != null) {Uri selectedImageUri = data.getData();// 调用UCrop进行图片裁剪UCrop.of(selectedImageUri, Uri.fromFile(new File(getCacheDir(), "cropped_image"))).withAspectRatio(1, 1).start(this, REQUEST_CROP_PICTURE);}} else if (requestCode == REQUEST_CROP_PICTURE && resultCode == RESULT_OK) {if (data != null) {Uri croppedImageUri = UCrop.getOutput(data);// 使用Glide加载裁剪后的图片并显示为圆形Glide.with(this).load(croppedImageUri).skipMemoryCache(true)  // 跳过内存缓存.diskCacheStrategy(DiskCacheStrategy.NONE)  // 不使用磁盘缓存.circleCrop().into(imgAvatar);}}}// 显示用户信息的方法private void show() {// 根据手机号获取用户信息UserBean user = userHelper.getUserByPhone(phone);if (user != null) {// 获取用户信息的各个字段String avatar = user.getAvatar();String username = user.getUsername();String phone = user.getPhone();String sex = user.getSex();String birthday = user.getBirthday();String address = user.getAddress();password = user.getPassword();// 如果用户头像为空,设置默认头像if (avatar == null) {imgAvatar.setImageResource(R.drawable.avatar);} else {// 加载用户头像Glide.with(this).load(Base64.decode(avatar, Base64.DEFAULT)).apply(RequestOptions.bitmapTransform(new CircleCrop())).into(imgAvatar);}// 设置用户名、手机号、性别、生日和地址信息到对应的TextView上tvUsername.setText(username);tvPhone.setText(phone);if (sex != null) {tvSex.setText(sex);} else {tvSex.setText("请输入性别");}if (birthday != null) {tvBirthday.setText(birthday);} else {tvBirthday.setText("请输入生日");}if (address != null) {tvAddress.setText(address);} else {tvAddress.setText("请输入地址");}}}// 返回按钮的点击事件private void back() {imgBack.setOnClickListener(new View.OnClickListener() {@Overridepublic void onClick(View v) {finish();}});}
}
6.修改密码

<?xml version="1.0" encoding="utf-8"?>
<androidx.constraintlayout.widget.ConstraintLayout xmlns:android="http://schemas.android.com/apk/res/android"xmlns:app="http://schemas.android.com/apk/res-auto"xmlns:tools="http://schemas.android.com/tools"android:layout_width="match_parent"android:layout_height="match_parent"android:background="#F6F6F6"tools:context=".Activity.ModifyPassWordActivity"><Viewandroid:id="@+id/view10"android:layout_width="0dp"android:layout_height="40dp"android:background="#fff"app:layout_constraintEnd_toEndOf="parent"app:layout_constraintStart_toStartOf="parent"app:layout_constraintTop_toTopOf="parent" /><ImageViewandroid:id="@+id/img_back"android:layout_width="15dp"android:layout_height="0dp"android:layout_marginStart="8dp"app:layout_constraintBottom_toBottomOf="@+id/view10"app:layout_constraintStart_toStartOf="parent"app:layout_constraintTop_toTopOf="@+id/view10"app:srcCompat="@drawable/back" /><TextViewandroid:id="@+id/textView7"android:layout_width="wrap_content"android:layout_height="wrap_content"android:text="修改密码"android:textColor="#000"android:textSize="16sp"android:textStyle="bold"app:layout_constraintBottom_toBottomOf="@+id/view10"app:layout_constraintEnd_toEndOf="parent"app:layout_constraintStart_toStartOf="parent"app:layout_constraintTop_toTopOf="@+id/view10" /><LinearLayoutandroid:layout_width="0dp"android:layout_height="0dp"android:layout_marginTop="4dp"android:background="#fff"android:orientation="vertical"android:padding="20dp"app:layout_constraintBottom_toBottomOf="parent"app:layout_constraintEnd_toEndOf="parent"app:layout_constraintStart_toStartOf="parent"app:layout_constraintTop_toBottomOf="@+id/view10"><TextViewandroid:id="@+id/textView8"android:layout_width="match_parent"android:layout_height="wrap_content"android:text="原始密码"android:textColor="#000"android:textSize="16sp"android:textStyle="bold" /><EditTextandroid:id="@+id/et_old"android:layout_width="match_parent"android:layout_height="40dp"android:layout_marginTop="10dp"android:background="#fff"android:ems="10"android:hint="请输入原始密码"android:inputType="textPersonName"android:textSize="16sp" /><Viewandroid:id="@+id/view11"android:layout_width="match_parent"android:layout_height="1dp"android:layout_marginTop="5dp"android:background="#ccc" /><TextViewandroid:id="@+id/textView9"android:layout_width="match_parent"android:layout_height="wrap_content"android:layout_marginTop="20dp"android:text="新密码"android:textColor="#000"android:textSize="16sp"android:textStyle="bold" /><EditTextandroid:id="@+id/et_new"android:layout_width="match_parent"android:layout_height="40dp"android:layout_marginTop="10dp"android:background="#fff"android:ems="10"android:hint="请输入新密码"android:inputType="textPersonName"android:textSize="16sp" /><Viewandroid:id="@+id/view12"android:layout_width="match_parent"android:layout_height="1dp"android:layout_marginTop="5dp"android:background="#ccc" /><Buttonandroid:id="@+id/btn_modify"android:layout_width="match_parent"android:layout_height="35dp"android:layout_marginTop="100dp"android:background="@drawable/button"android:text="立 即 修 改"android:textColor="#fff"android:textStyle="bold" /></LinearLayout>
</androidx.constraintlayout.widget.ConstraintLayout>
7.用户车辆管理

这段代码实现了一个名为 `CarManagementActivity` 的活动(Activity),用于展示和搜索用户的车辆信息。让我们来逐步分析其功能和结构:
1. **布局初始化和视图绑定:**
- 在 `onCreate()` 方法中,使用 `setContentView()` 方法加载了 `activity_car_management.xml` 布局文件,并通过 `initView()` 方法初始化了界面上的控件。
- `initView()` 方法中,绑定了返回按钮 (`imgBack`)、车牌号输入框 (`etNum`)、搜索按钮 (`imgSearch`) 和车辆信息列表 (`lv`) 的控件。
2. **显示车辆信息 (`show()` 方法):**
- **从数据库获取车辆信息列表:**
- 使用 `carHelper` 实例根据存储在 `SharedPreferences` 中的手机号 (`phone`),从数据库中获取用户的车辆信息列表 (`List<CarBean>`)。
- 如果成功获取到车辆信息列表 (`carsByPhone`),则创建一个 `CarManagementAdapter` 适配器对象,并将其设置到 `ListView` (`lv`) 中显示。
- 如果车辆信息列表为空,则显示短暂的提示信息 "暂无停车记录"。
3. **搜索车辆信息 (`search()` 方法):**
- **搜索按钮点击事件:**
- 设置搜索按钮 (`imgSearch`) 的点击事件监听器。
- 获取用户输入的车牌号 (`num`)。
- 如果车牌号为空,则显示短暂的提示信息 "请输入查询车牌号" 并调用 `show()` 方法重新显示全部车辆信息。
- 否则,根据手机号和车牌号查询数据库中的车辆信息列表 (`List<CarBean> carsByPhoneAndCarNum`)。
- 如果查询结果不为空且列表不为空,则创建一个新的 `CarManagementAdapter` 适配器对象,并将其设置到 `ListView` (`lv`) 中显示查询结果,并显示 "查询成功" 的提示信息。
- 如果查询结果为空,则清空 `ListView` (`lv`) 并显示 "未查询到该车辆信息" 的提示信息。
4. **返回按钮点击事件 (`back()` 方法):**
- **返回按钮 (`imgBack`) 的点击事件监听器,点击时结束当前活动 (`finish()`),返回上一个界面。
5. **使用到的技术和库:**
- 使用了 `SharedPreferences` 存储用户手机号,用于从数据库中获取用户的车辆信息。
- 使用了自定义的 `CarManagementAdapter` 适配器来填充和显示车辆信息列表。
- 实现了简单的搜索功能,根据车牌号查询用户的车辆信息,并反馈查询结果。
总体来说,`CarManagementActivity` 提供了一个基本的用户车辆信息管理界面,用户可以查看所有车辆信息或者根据车牌号进行搜索,并且支持返回上一个界面的功能。
package com.example.parking.Activity;import android.content.Context;
import android.content.SharedPreferences;
import android.os.Bundle;
import android.view.View;
import android.widget.EditText;
import android.widget.ImageView;
import android.widget.ListView;
import android.widget.Toast;import androidx.appcompat.app.AppCompatActivity;import com.example.parking.Adapter.CarManagementAdapter;
import com.example.parking.Bean.CarBean;
import com.example.parking.Helper.CarHelper;
import com.example.parking.R;import java.util.List;public class CarManagementActivity extends AppCompatActivity {private ImageView imgBack;private EditText etNum;private ImageView imgSearch;private ListView lv;private CarHelper carHelper;private String phone;@Overrideprotected void onCreate(Bundle savedInstanceState) {super.onCreate(savedInstanceState);setContentView(R.layout.activity_car_management);initView();back();show();search();}// 定义一个私有方法show()private void show() {// 调用carHelper的方法根据电话号码获取车辆信息列表List<CarBean> carsByPhone = carHelper.getCarsByPhone(phone);// 如果获取到的车辆信息列表不为空if (carsByPhone != null) {// 创建一个CarManagementAdapter适配器对象,并填充ListViewCarManagementAdapter adapter = new CarManagementAdapter(CarManagementActivity.this, carsByPhone);lv.setAdapter(adapter);} else {// 如果车辆信息列表为空,则显示"暂无停车记录"的提示信息Toast.makeText(this, "暂无停车记录!", Toast.LENGTH_SHORT).show();}}// 定义一个私有方法search()private void search() {// 设置imgSearch的点击事件监听器imgSearch.setOnClickListener(new View.OnClickListener() {@Overridepublic void onClick(View v) {// 获取输入的车牌号String num = etNum.getText().toString();// 如果车牌号为空if (num.isEmpty()) {// 显示"请输入查询车牌号"的提示信息Toast.makeText(CarManagementActivity.this, "请输入查询车牌号!", Toast.LENGTH_SHORT).show();// 调用show()方法show();return;}// 根据电话号码和车牌号查询车辆信息列表List<CarBean> carsByPhoneAndParkingType = carHelper.getCarsByPhoneAndCarNum(phone, num);// 如果查询到车辆信息列表不为空且不为空列表if (carsByPhoneAndParkingType != null && !carsByPhoneAndParkingType.isEmpty()) {// 创建一个CarManagementAdapter适配器对象,并填充ListViewCarManagementAdapter adapter = new CarManagementAdapter(CarManagementActivity.this, carsByPhoneAndParkingType);lv.setAdapter(adapter);// 显示"查询成功"的提示信息Toast.makeText(CarManagementActivity.this, "查询成功!", Toast.LENGTH_SHORT).show();} else {// 清空ListViewlv.setAdapter(null);// 显示"未查询到该车辆信息"的提示信息Toast.makeText(CarManagementActivity.this, "未查询到该车辆信息!", Toast.LENGTH_SHORT).show();}}});}// 定义一个私有方法back()private void back() {// 设置imgBack的点击事件监听器imgBack.setOnClickListener(new View.OnClickListener() {@Overridepublic void onClick(View v) {// 结束当前Activityfinish();}});}private void initView() {imgBack = findViewById(R.id.img_back);etNum = findViewById(R.id.et_num);imgSearch = findViewById(R.id.img_search);lv = findViewById(R.id.lv);carHelper = new CarHelper(this);SharedPreferences sharedPreferences = getSharedPreferences("User", Context.MODE_PRIVATE);phone = sharedPreferences.getString("phone", "");}
}
8.用户管理页面

这是一个 XML 布局文件,用于定义名为 `fragment_admin_user.xml` 的界面布局,主要用于管理员管理用户信息的功能。让我们来逐步分析其结构和布局:
1. **根布局:**
- 根布局采用 `ConstraintLayout`,用于灵活地管理内部视图的位置和大小。
- 设置了背景颜色为 `#F6F6F6`,使界面看起来更加舒适。
2. **顶部标题栏:**
- 使用 `View` 元素 (`view17`) 实现了一个蓝色的顶部条,作为标题栏。
- 在标题栏中,使用 `TextView` (`textView13`) 显示 "用户信息" 文字,文字颜色为白色,加粗,居中显示在标题栏中间。
- 右侧使用 `ImageView` (`img_quit`) 显示了退出图标 (`quit1`),用于退出管理员用户界面。
3. **搜索栏和列表视图:**
- 在标题栏下方是一个 `LinearLayout`,垂直排列,用于放置搜索栏和列表视图。
- **搜索栏 (`LinearLayout`):**
- 使用内部水平排列的 `LinearLayout`,背景为自定义的 `search_view`,用于实现搜索框的样式。
- 包含一个 `EditText` (`et_phone`),用于输入用户手机号进行查询,背景为白色,提示用户输入类型为电话号码。
- 右侧是一个 `ImageView` (`img_search`),显示搜索图标 (`search`),用于触发搜索操作。
- **列表视图 (`ListView`):**
- 位于搜索栏下方,占据剩余空间。
- 设置了左右边距为 `10dp`,顶部边距为 `10dp`,用于控制列表视图在布局中的位置。
- 用于显示用户信息列表,具体数据由后续的代码逻辑和适配器处理。
4. **布局属性和资源引用:**
- 使用了 `app:layout_constraint` 系列属性来设置各个视图元素在 `ConstraintLayout` 中的约束关系,以确保它们在界面中正确布局。
- 引用了各种资源,如颜色 (`#03A9F4`、`#fff`)、背景 (`@drawable/search_view`、`@drawable/quit1`) 和图片资源 (`@drawable/search`),用于美化界面和提供交互功能。
总体来说,这个布局文件定义了一个典型的管理员界面,包括顶部的标题栏、用户信息的搜索栏和列表视图,通过 `ConstraintLayout` 和嵌套的 `LinearLayout` 实现了界面元素的布局和排列。
<?xml version="1.0" encoding="utf-8"?>
<androidx.constraintlayout.widget.ConstraintLayout xmlns:android="http://schemas.android.com/apk/res/android"xmlns:app="http://schemas.android.com/apk/res-auto"xmlns:tools="http://schemas.android.com/tools"android:layout_width="match_parent"android:layout_height="match_parent"android:background="#F6F6F6"tools:context=".Admin.AdminUserFragment"><!-- TODO: Update blank fragment layout --><Viewandroid:id="@+id/view17"android:layout_width="0dp"android:layout_height="40dp"android:background="#03A9F4"app:layout_constraintEnd_toEndOf="parent"app:layout_constraintStart_toStartOf="parent"app:layout_constraintTop_toTopOf="parent" /><TextViewandroid:id="@+id/textView13"android:layout_width="wrap_content"android:layout_height="wrap_content"android:text="用户信息"android:textColor="#fff"android:textSize="18sp"android:textStyle="bold"app:layout_constraintBottom_toBottomOf="@+id/view17"app:layout_constraintEnd_toEndOf="@+id/view17"app:layout_constraintStart_toStartOf="@+id/view17"app:layout_constraintTop_toTopOf="@+id/view17" /><ImageViewandroid:id="@+id/img_quit"android:layout_width="20dp"android:layout_height="0dp"android:layout_marginEnd="16dp"android:src="@drawable/quit1"app:layout_constraintBottom_toBottomOf="@+id/view17"app:layout_constraintEnd_toEndOf="parent"app:layout_constraintTop_toTopOf="@+id/view17" /><LinearLayoutandroid:layout_width="0dp"android:layout_height="0dp"android:orientation="vertical"app:layout_constraintBottom_toBottomOf="parent"app:layout_constraintEnd_toEndOf="parent"app:layout_constraintStart_toStartOf="parent"app:layout_constraintTop_toBottomOf="@+id/view17"><LinearLayoutandroid:layout_width="match_parent"android:layout_height="35dp"android:layout_marginLeft="10dp"android:layout_marginTop="20dp"android:layout_marginRight="10dp"android:background="@drawable/search_view"android:orientation="horizontal"android:padding="6dp"><EditTextandroid:id="@+id/et_phone"android:layout_width="wrap_content"android:layout_height="match_parent"android:layout_marginLeft="4dp"android:layout_weight="1"android:background="#fff"android:ems="10"android:hint="请输入用户手机号进行查询"android:inputType="phone"android:textSize="16sp" /><ImageViewandroid:id="@+id/img_search"android:layout_width="20dp"android:layout_height="match_parent"app:srcCompat="@drawable/search" /></LinearLayout><ListViewandroid:id="@+id/lv"android:layout_width="match_parent"android:layout_height="match_parent"android:layout_marginLeft="10dp"android:layout_marginTop="10dp"android:layout_marginRight="10dp" /></LinearLayout></androidx.constraintlayout.widget.ConstraintLayout>
9.通知管理

这段代码实现了一个名为 `AdminInformFragment` 的片段(Fragment),用于管理员界面发布和修改公告通知内容。让我们来逐步分析其功能和结构:
1. **布局初始化和视图绑定:**
- 在 `onCreateView()` 方法中,使用 `LayoutInflater` 加载了 `fragment_admin_inform.xml` 布局文件,并通过 `initView(View v)` 方法初始化了片段上的控件。
- `initView(View v)` 方法中,绑定了公告通知内容输入框 (`etInform`)、确认发布按钮 (`btnOk`) 的控件,并初始化了 `InformHelper` 实例用于访问数据库。
2. **显示公告通知内容 (`show()` 方法):**
- **获取指定 id 的公告通知内容:**
- 使用 `informHelper` 实例从数据库中获取指定 id (`1`) 的公告通知内容 (`InformBean informById`)。
- 如果成功获取到公告通知内容 (`informById`),则将内容显示在公告通知内容输入框 (`etInform`) 中。
3. **修改公告通知内容 (`modify()` 方法):**
- **确认发布按钮点击事件监听器:**
- 设置确认发布按钮 (`btnOk`) 的点击事件监听器。
- 获取用户输入的公告通知内容 (`inform`)。
- 如果公告通知内容为空,则显示短暂的提示信息 "请输入公告通知内容"。
- 否则,调用 `informHelper` 实例的 `updateInform()` 方法更新数据库中 id 为 `1` 的公告通知内容。
- 如果更新成功 (`b` 为 `true`),显示 "发布成功" 的提示信息,并调用 `show()` 方法刷新显示最新的公告通知内容。
- 如果更新失败,则显示 "发布失败" 的提示信息。
4. **使用到的技术和库:**
- 使用了 `FragmentManager` 和 `FragmentTransaction` 将片段添加到管理员界面中。
- 使用了自定义的 `InformHelper` 类来处理与公告通知内容相关的数据库操作。
- 提供了简单的输入验证和数据库更新操作,以便管理员能够实时发布和修改公告通知。
总体来说,`AdminInformFragment` 提供了一个方便的管理员界面片段,用于发布和修改公告通知内容,通过输入框和按钮的交互,实现了简单的公告管理功能。
<?xml version="1.0" encoding="utf-8"?>
<androidx.constraintlayout.widget.ConstraintLayout xmlns:android="http://schemas.android.com/apk/res/android"xmlns:app="http://schemas.android.com/apk/res-auto"xmlns:tools="http://schemas.android.com/tools"android:layout_width="match_parent"android:layout_height="match_parent"android:background="#F6F6F6"tools:context=".Admin.AdminInformFragment"><!-- TODO: Update blank fragment layout --><Viewandroid:id="@+id/view18"android:layout_width="0dp"android:layout_height="40dp"android:background="#03A9F4"app:layout_constraintEnd_toEndOf="parent"app:layout_constraintStart_toStartOf="parent"app:layout_constraintTop_toTopOf="parent" /><TextViewandroid:id="@+id/textView17"android:layout_width="wrap_content"android:layout_height="wrap_content"android:text="公告通知"android:textColor="#fff"android:textSize="18sp"android:textStyle="bold"app:layout_constraintBottom_toBottomOf="@+id/view18"app:layout_constraintEnd_toEndOf="@+id/view18"app:layout_constraintStart_toStartOf="parent"app:layout_constraintTop_toTopOf="parent" /><LinearLayoutandroid:layout_width="0dp"android:layout_height="0dp"android:layout_marginTop="32dp"android:orientation="vertical"android:padding="20dp"app:layout_constraintBottom_toBottomOf="parent"app:layout_constraintEnd_toEndOf="parent"app:layout_constraintStart_toStartOf="parent"app:layout_constraintTop_toBottomOf="@+id/view18"><TextViewandroid:id="@+id/textView19"android:layout_width="match_parent"android:layout_height="wrap_content"android:text="公告信息:"android:textColor="#000"android:textSize="18sp"android:textStyle="bold" /><EditTextandroid:id="@+id/et_inform"android:layout_width="match_parent"android:layout_height="100dp"android:layout_marginTop="20dp"android:background="@drawable/admin_inform"android:ems="10"android:gravity="top|left"android:hint="请输入公告信息"android:inputType="textPersonName"android:padding="10dp" /><Buttonandroid:id="@+id/btn_ok"android:layout_width="match_parent"android:layout_height="35dp"android:layout_marginTop="40dp"android:background="@drawable/button"android:text="立 即 发 布"android:textColor="#fff"android:textSize="16sp" /></LinearLayout></androidx.constraintlayout.widget.ConstraintLayout>
10.车辆管理

这段代码实现了一个名为 `AdminCarFragment` 的片段(Fragment),用于管理员界面展示和搜索所有车辆信息。让我们来逐步分析其功能和结构:
1. **布局初始化和视图绑定:**
- 在 `onCreateView()` 方法中,使用 `LayoutInflater` 加载了 `fragment_admin_car.xml` 布局文件,并通过 `initView(View v)` 方法初始化了片段上的控件。
- `initView(View v)` 方法中,绑定了车辆类型输入框 (`etCarType`)、搜索按钮 (`imgSearch`) 和车辆信息列表 (`lv`) 的控件,并初始化了 `CarHelper` 实例用于访问数据库。
2. **显示车辆信息 (`show()` 方法):**
- **获取所有车辆信息:**
- 使用 `carHelper` 实例从数据库中获取所有车辆信息 (`List<CarBean> allCars`)。
- 如果成功获取到车辆信息列表 (`allCars`),则创建一个 `AdminCarManagementAdapter` 适配器对象,并将其设置到 `ListView` (`lv`) 中显示。
- 如果车辆信息列表为空,则显示短暂的提示信息 "暂无停车记录"。
3. **搜索车辆信息 (`search()` 方法):**
- **搜索按钮点击事件:**
- 设置搜索按钮 (`imgSearch`) 的点击事件监听器。
- 获取用户输入的车辆类型 (`type`)。
- 如果车辆类型为空,则显示短暂的提示信息 "请输入查询状态" 并调用 `show()` 方法重新显示所有车辆信息。
- 否则,根据车辆类型从数据库中查询符合条件的车辆信息列表 (`List<CarBean> carsByParkingType`)。
- 如果查询结果不为空且列表不为空,则创建一个新的 `AdminCarManagementAdapter` 适配器对象,并将其设置到 `ListView` (`lv`) 中显示查询结果,并显示 "查询成功" 的提示信息。
- 如果查询结果为空,则清空 `ListView` (`lv`) 并显示 "未查询到信息" 的提示信息。
4. **点击监听器实现 (`AdminCarManagementAdapter.OnCarItemClickListener`):**
- 实现了接口方法 `onCarItemClick()`,当车辆列表项被点击时,调用 `show()` 方法刷新 `ListView` 显示最新的车辆信息。
5. **使用到的技术和库:**
- 使用了 `FragmentManager` 和 `FragmentTransaction` 将片段添加到管理员界面中。
- 使用了自定义的 `AdminCarManagementAdapter` 适配器来填充和显示管理员界面中的车辆信息列表。
- 实现了简单的搜索功能,根据车辆类型查询所有符合条件的车辆信息,并提供了点击监听器来实时更新列表。
总体来说,`AdminCarFragment` 提供了一个便捷的管理员界面片段,用于管理和搜索所有车辆信息,通过列表展示和点击监听器提供了交互和实时更新的功能。
package com.example.parking.Admin;import android.os.Bundle;
import android.view.LayoutInflater;
import android.view.View;
import android.view.ViewGroup;
import android.widget.EditText;
import android.widget.ImageView;
import android.widget.ListView;
import android.widget.Toast;import androidx.fragment.app.Fragment;import com.example.parking.Activity.CarManagementActivity;
import com.example.parking.Adapter.AdminCarManagementAdapter;
import com.example.parking.Adapter.CarManagementAdapter;
import com.example.parking.Bean.CarBean;
import com.example.parking.Helper.CarHelper;
import com.example.parking.R;import java.util.List;public class AdminCarFragment extends Fragment implements AdminCarManagementAdapter.OnCarItemClickListener {private EditText etCarType;private ImageView imgSearch;private ListView lv;private CarHelper carHelper;@Overridepublic View onCreateView(LayoutInflater inflater, ViewGroup container,Bundle savedInstanceState) {View v = inflater.inflate(R.layout.fragment_admin_car, container, false);initView(v);show();search();return v;}private void search() {// 设置图片点击事件监听器imgSearch.setOnClickListener(new View.OnClickListener() {@Overridepublic void onClick(View v) {// 获取车辆类型输入框中的内容String type = etCarType.getText().toString();// 判断车辆类型是否为空if (type.isEmpty()) {// 如果为空,显示Toast提示用户输入查询状态,并调用show()方法展示所有车辆信息Toast.makeText(getActivity(), "请输入查询状态!", Toast.LENGTH_SHORT).show();show();return;}// 根据停车类型从数据库中查询车辆信息List<CarBean> carsByParkingType = carHelper.getCarsByParkingType(type);if (carsByParkingType != null && !carsByParkingType.isEmpty()) {// 如果查询到车辆信息,填充ListView并显示查询成功的Toast提示AdminCarManagementAdapter adapter = new AdminCarManagementAdapter(getActivity(), carsByParkingType);lv.setAdapter(adapter);Toast.makeText(getActivity(), "查询成功!", Toast.LENGTH_SHORT).show();} else {// 如果未查询到车辆信息,清空ListView并显示未查询到信息的Toast提示lv.setAdapter(null);Toast.makeText(getActivity(), "未查询到信息!", Toast.LENGTH_SHORT).show();}}});}private void show() {// 获取所有车辆信息List<CarBean> allCars = carHelper.getAllCars();if (allCars != null) {// 如果有车辆信息,填充ListView并设置点击监听器,显示所有车辆信息AdminCarManagementAdapter adapter = new AdminCarManagementAdapter(getActivity(), allCars);adapter.setOnCarItemClickListener(this); // 设置点击监听器lv.setAdapter(adapter);} else {// 如果没有车辆信息,显示暂无停车记录的Toast提示Toast.makeText(getActivity(), "暂无停车记录!", Toast.LENGTH_SHORT).show();}}@Overridepublic void onCarItemClick() {// 当车辆列表项被点击时,刷新ListView显示最新车辆信息show();}private void initView(View v) {etCarType = v.findViewById(R.id.et_carType);imgSearch = v.findViewById(R.id.img_search);lv = v.findViewById(R.id.lv);carHelper = new CarHelper(getActivity());}
}
四、项目完整源码
👇👇👇👇👇快捷获取方式👇👇👇👇👇
相关文章:
基于 Android studio 实现停车场管理系统--原创
目录 一、项目演示 二、开发环境 三、项目页面 四、项目详情 五、项目完整源码 一、项目演示 二、开发环境 三、项目详情 1.启动页 这段代码是一个简单的Android应用程序启动活动(Activity),具体功能如下: 1. **延迟进入登…...

8 个最佳 Java IDE 和文本编辑器
从 2024 年使用的最佳 Java IDE 和代码编辑器中进行选择,并提高您的 Java 生产力。 Java 是世界上最流行的编程语言之一,于 1995 年首次推出,它确实践行了“编写一个,随处运行”的座右铭。该语言用途广泛,可用于构建从…...
【2024最新版版】PyCharm安装教程
简介 由于Python语法简单容易入门,并且Python在办公自动化等领域的功能非常强大,所以现在越来越多非IT行业的人也开始学起了Python,要学习和使用一门编程语言,一个好用的IDE是必不可少的,而对于Python来说,…...

奥运科技观察:AI PC,如何成为当代体育精神的数字捍卫者?
作者 | 曾响铃 文 | 响铃说 数字孪生帮助体育馆建设、超高清直播……这届奥运会科技感拉满,几乎所有前沿技术都能在奥运的赛事运营中发现。 而AI大时代,AI如何帮助帮助奥运会顺利举办、如何帮助运动员拥有更好的表现,同样值得业界关注&…...

Java进阶篇之包的概念及其应用
引言 在前面的文章中,我们介绍了抽象类和抽象方法(Java进阶篇之抽象类和抽象方法),在Java编程中,包(Package)是管理类和接口的重要工具。包不仅提供了一种层次化的命名空间机制,还可…...

短剧出海,赚钱新途径,掌握海外短剧CPS分销的秘诀
国内短剧发展的如日中天,需要的资质也是越来越严格,不少人已经将目标瞄向海外短剧市场,海外短剧这块相对来说并没有那么严格,但很多人在海外推广的道路上举步维艰,推广异常困难,重点讲下目前海外短剧的推广…...

uniapp小程序openid和unionId
1. openid 1. 用户的openid在小程序中的固定不变的; 2. 用户在不同的小程序里的openid是不一样的; 3. 只要appid不变,openid就不变。 获取openid 1. 使用uni.login获取code 2. 使用code调接口换取 用户唯一标识 OpenID 、 用户在微信开放平台…...

前端工程化-04.Vue项目简介
一.Vue项目-创建 1.使用如图两种方式创建Vue项目 2.在此创建新项目 点击创建项目 创建成功! 二.Vue项目-目录结构 三.Vue项目-运行 启动后直接在下方找到连接端口 成功启动项目 这个项目即为Vue中的自带项目Vue.app。修改其中的Home为Vue Home。ctals保存发…...

10 Checkbutton 组件
10 Checkbutton 组件 Tkinter 是 Python 的标准 GUI 库,它提供了一系列的控件来创建图形用户界面。Checkbutton 是其中的一个组件,用于创建可以被选中或取消选中的按钮,通常用于实现布尔值的开关功能。 创建 Checkbutton 创建一个基本的 C…...
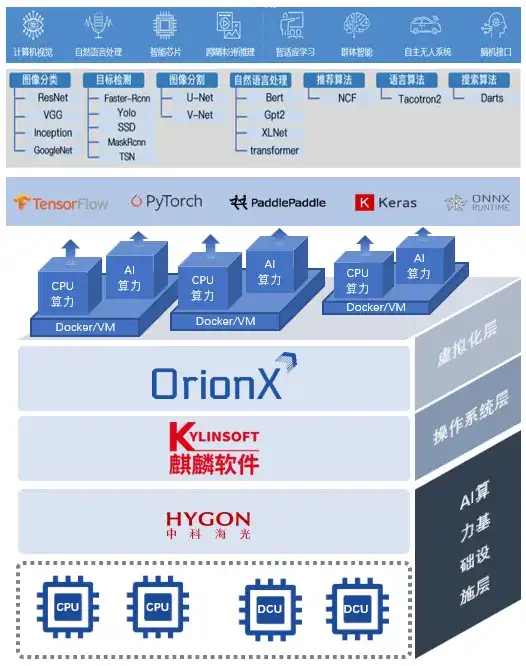
获奖方案|趋动科技:资源池化释放AI算力价值
“据统计,GPU的平均利用率不超过30%,会产生巨大的算力资源浪费。我们用软件定义的方式通常可以把用户GPU的利用率提升3-8倍,甚至可以到10倍。” 这是算力池化软件公司趋动科技援引行业报告数据并结合自身企业最佳实践经验给出的最新数据。通…...

Gin框架接入pyroscope完美替代pprof实现检测内存泄露
传统检测内存泄露可以看一下我这篇文章Gin框架接入Prometheus,grafana辅助pprof检测内存泄露-CSDN博客 pyroscope被Grafana收购,GPT来总结一下pyroscope的强大之处🐶 pyroscope github地址 pyroscope与grafana的安装 docker compose安装,这里我们其实…...

记录一个lombok和mybatisplus的问题,@Data注解失效
刚开始我这里一直爆红,Article实体类也加了Data注解 依赖也导入了lombok,后来觉得是版本的问题,换了几个版本也是不行 后来最后还是在各种资料下,找到了原因 首先使用lombok不是只要导入依赖就行的,还要有插件&#…...

React学习-初始化react项目
目标: reactv18:->1.核心的22中api2路由3.数据状态管理:redux项目: 1.b端业务闭环:登录方案、权限设计、用户管理方案、业务功能、系统架构设计、路由设计流程闭环:开发环境、生产环境、测试环境、代码规范、分支管理规范、项…...

ubuntu查看CPU、内存、硬盘
1、查看CPU cat /proc/cpuinfo 我这台机器CPU是2核,所以这里是2核 或者使用如下命令也可以查看 lscpu 查看CPU使用率 top 2、查看内存 查看内存信息: free -h 查看内存使用情况: vmstat 3、硬盘 查看硬盘使用情况: df -…...

第5章 使用Intent和IntentFilter通信
第5章 使用Intent和IntentFilter通信 本章要点 理解Intent对于Android应用的作用使用Intent启动系统组件Intent的Component属性的作用Intent的Action属性的作用Intent的Category属性的作用为指定Action、Category的Intent配置对应的intent-filterIntent的Data属性Intent的Typ…...

AI产品经理需要了解的算法知识
这篇文章给大家系统总结一下AI产品经理需要了解的算法知识。 1、自然语言生成(NLG) 自然语言生成(Natural Language Generation,简称NLG)是一种人工智能技术,它的目标是将计算机的数据、逻辑或算法产生的…...

OD C卷 - 结对编程
结对编程(200) 某部门计划通过结队编程来进行项目开发,部门有N名员工,每个员工有唯一的职级,三个员工为一组,结队分组规则如下:选出序号为i,j,k的员工,职级分别为level[i], level[j…...

AcWing 723. PUM
输入两个整数 NN 和 MM,构造一个 NN 行 MM 列的数字矩阵,矩阵中的数字从第一行到最后一行,按从左到右的顺序依次为 1,2,3,…,NM1,2,3,…,NM。 矩阵构造完成后,将每行的最后一个数字变为 PUM。 输出最终矩阵。 输入格式 共一行…...

编译安装php7.4.33正确开启opcache,不只是去掉opcache.enable=1前面的分号
编译安装php7.4.33正确开启opcache,不只是去掉opcache.enable1前面的分号 要成功开启 必须增加zend_extensionopcache.so 请看下面的样例: [opcache] zend_extensionopcache.so; Determines if Zend OPCache is enabled opcache.enable1; Determines …...

ComfyUI - 在服务器中部署 AIGC 绘画的 ComfyUI 工具 教程
欢迎关注我的CSDN:https://spike.blog.csdn.net/ 本文地址:https://spike.blog.csdn.net/article/details/141140498 免责声明:本文来源于个人知识与公开资料,仅用于学术交流,欢迎讨论,不支持转载。 ComfyU…...
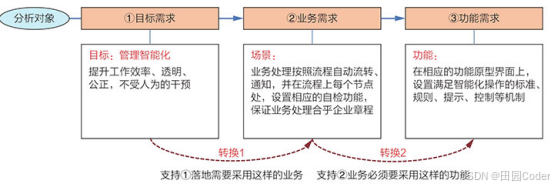
大话软工笔记—需求分析概述
需求分析,就是要对需求调研收集到的资料信息逐个地进行拆分、研究,从大量的不确定“需求”中确定出哪些需求最终要转换为确定的“功能需求”。 需求分析的作用非常重要,后续设计的依据主要来自于需求分析的成果,包括: 项目的目的…...

大数据零基础学习day1之环境准备和大数据初步理解
学习大数据会使用到多台Linux服务器。 一、环境准备 1、VMware 基于VMware构建Linux虚拟机 是大数据从业者或者IT从业者的必备技能之一也是成本低廉的方案 所以VMware虚拟机方案是必须要学习的。 (1)设置网关 打开VMware虚拟机,点击编辑…...
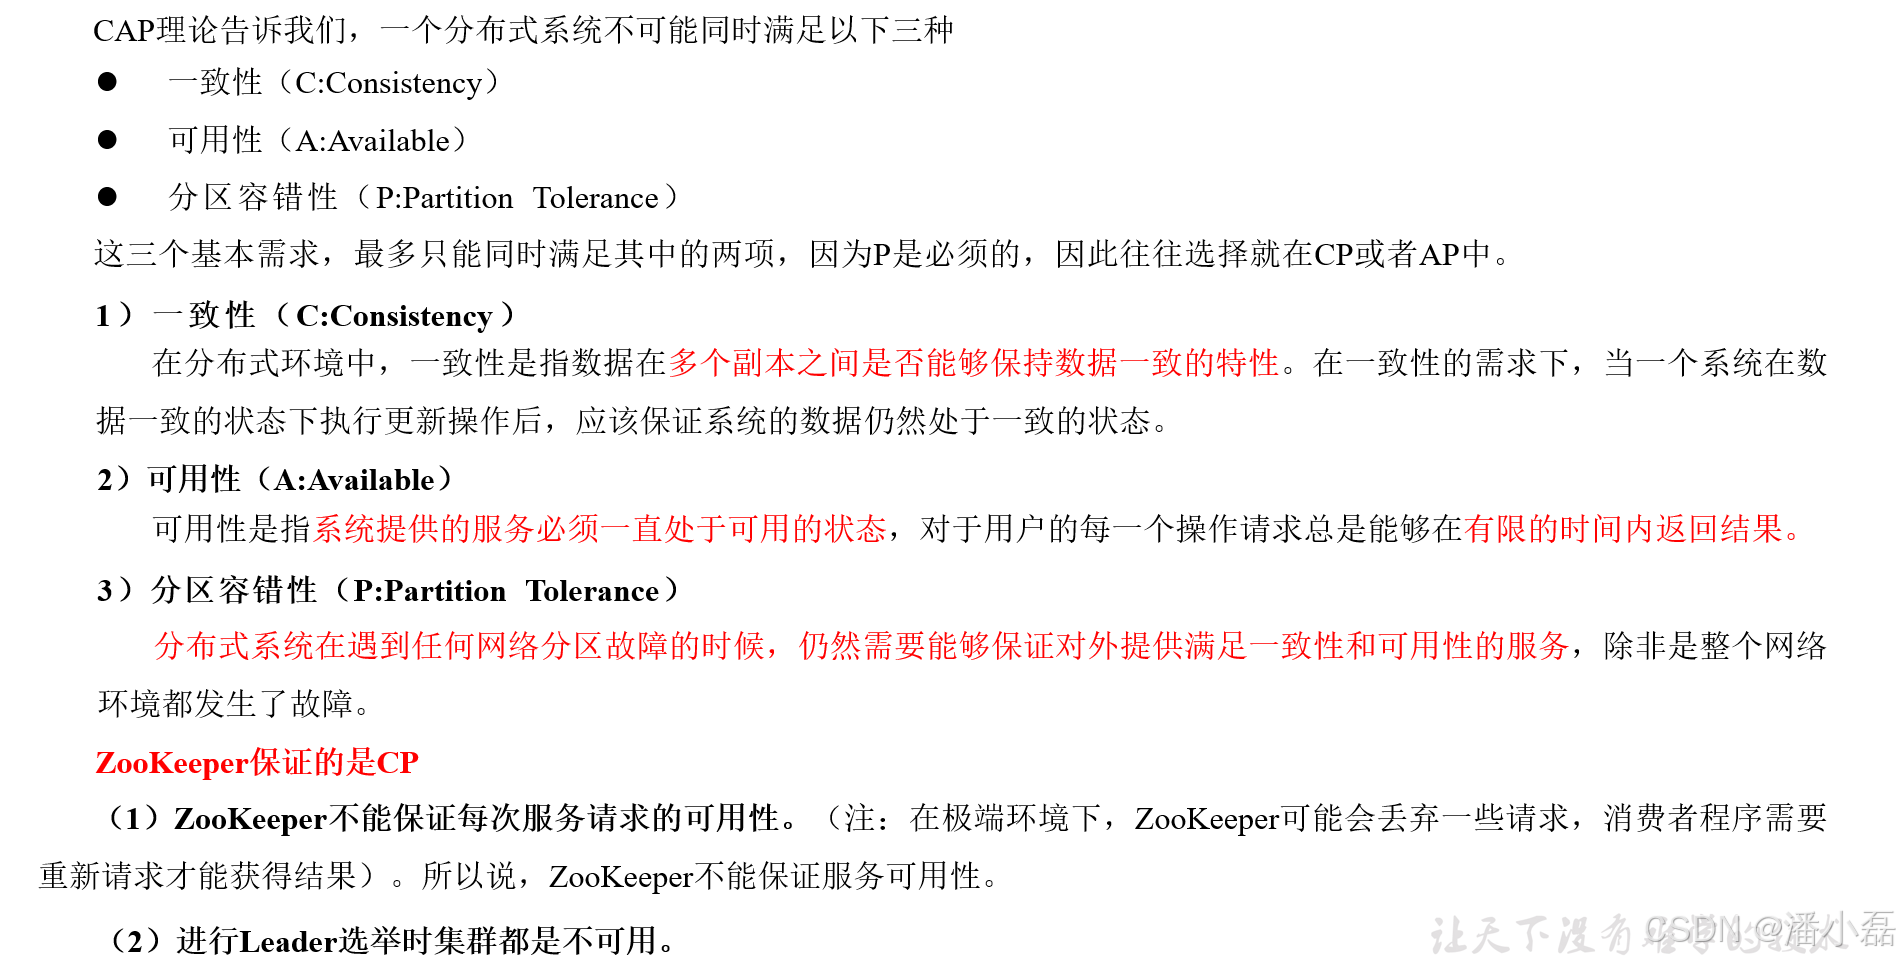
高频面试之3Zookeeper
高频面试之3Zookeeper 文章目录 高频面试之3Zookeeper3.1 常用命令3.2 选举机制3.3 Zookeeper符合法则中哪两个?3.4 Zookeeper脑裂3.5 Zookeeper用来干嘛了 3.1 常用命令 ls、get、create、delete、deleteall3.2 选举机制 半数机制(过半机制࿰…...
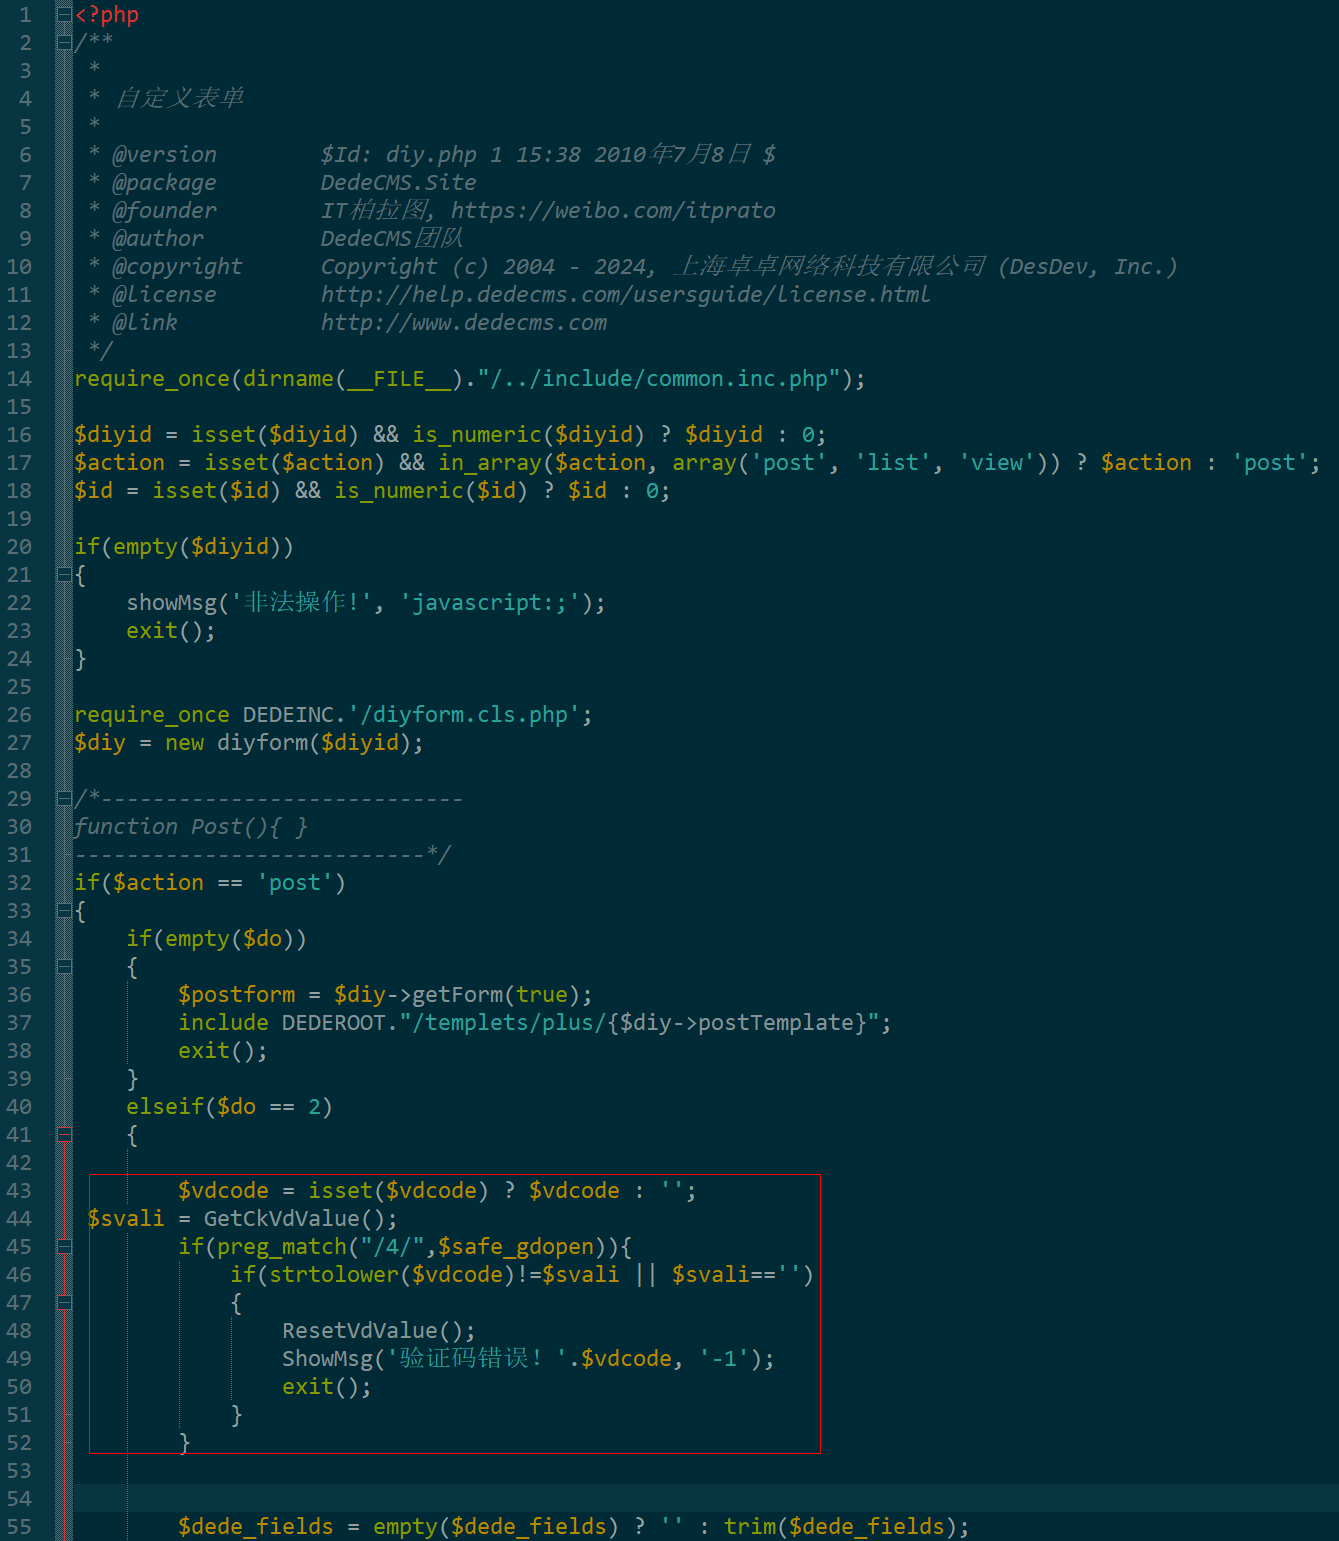
dedecms 织梦自定义表单留言增加ajax验证码功能
增加ajax功能模块,用户不点击提交按钮,只要输入框失去焦点,就会提前提示验证码是否正确。 一,模板上增加验证码 <input name"vdcode"id"vdcode" placeholder"请输入验证码" type"text&quo…...

工程地质软件市场:发展现状、趋势与策略建议
一、引言 在工程建设领域,准确把握地质条件是确保项目顺利推进和安全运营的关键。工程地质软件作为处理、分析、模拟和展示工程地质数据的重要工具,正发挥着日益重要的作用。它凭借强大的数据处理能力、三维建模功能、空间分析工具和可视化展示手段&…...
)
是否存在路径(FIFOBB算法)
题目描述 一个具有 n 个顶点e条边的无向图,该图顶点的编号依次为0到n-1且不存在顶点与自身相连的边。请使用FIFOBB算法编写程序,确定是否存在从顶点 source到顶点 destination的路径。 输入 第一行两个整数,分别表示n 和 e 的值(1…...
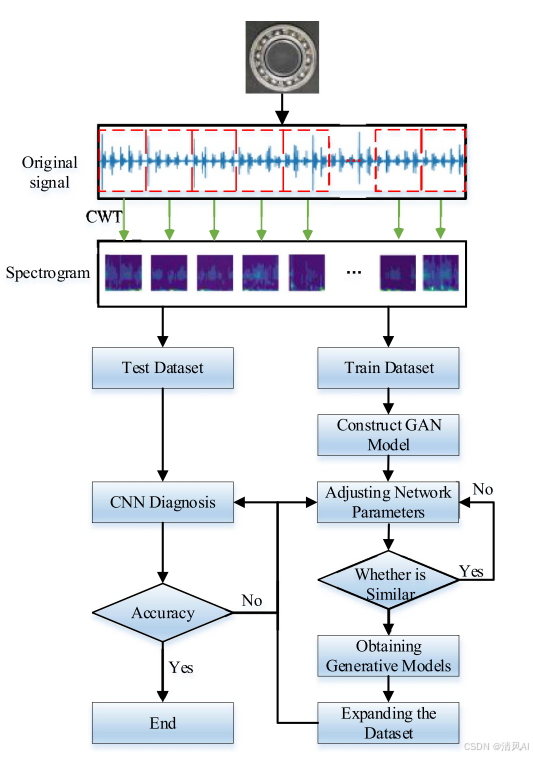
基于IDIG-GAN的小样本电机轴承故障诊断
目录 🔍 核心问题 一、IDIG-GAN模型原理 1. 整体架构 2. 核心创新点 (1) 梯度归一化(Gradient Normalization) (2) 判别器梯度间隙正则化(Discriminator Gradient Gap Regularization) (3) 自注意力机制(Self-Attention) 3. 完整损失函数 二…...
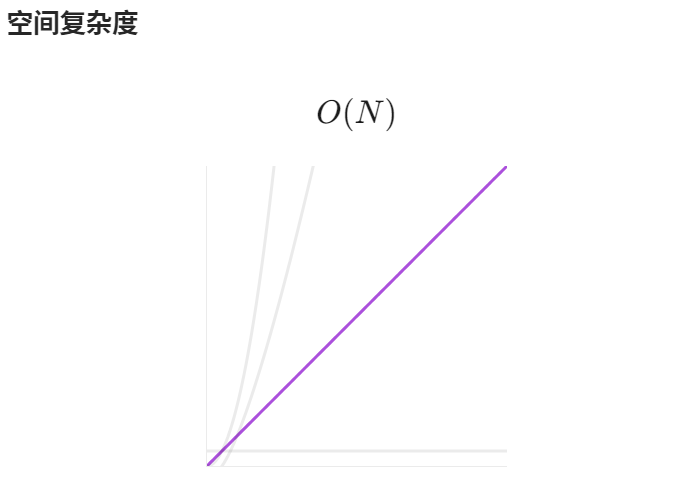
【LeetCode】算法详解#6 ---除自身以外数组的乘积
1.题目介绍 给定一个整数数组 nums,返回 数组 answer ,其中 answer[i] 等于 nums 中除 nums[i] 之外其余各元素的乘积 。 题目数据 保证 数组 nums之中任意元素的全部前缀元素和后缀的乘积都在 32 位 整数范围内。 请 不要使用除法,且在 O…...

c# 局部函数 定义、功能与示例
C# 局部函数:定义、功能与示例 1. 定义与功能 局部函数(Local Function)是嵌套在另一个方法内部的私有方法,仅在包含它的方法内可见。 • 作用:封装仅用于当前方法的逻辑,避免污染类作用域,提升…...
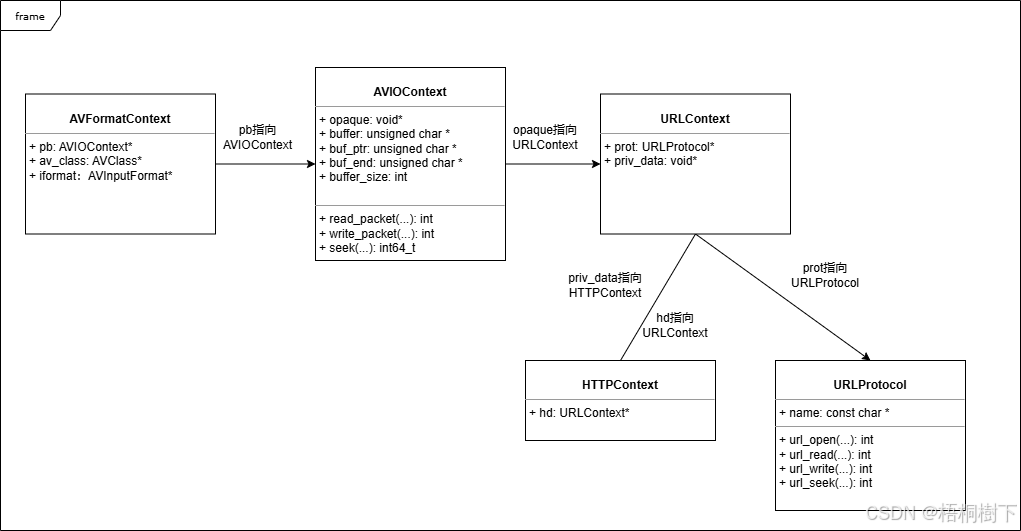
FFmpeg avformat_open_input函数分析
函数内部的总体流程如下: avformat_open_input 精简后的代码如下: int avformat_open_input(AVFormatContext **ps, const char *filename,ff_const59 AVInputFormat *fmt, AVDictionary **options) {AVFormatContext *s *ps;int i, ret 0;AVDictio…...