FFmpeg与OpenCV联合开发
本文讲述如何利用FFmpeg SDK与OpenCV 从RTSP流中获取图像(OpenCV MAT 对象格式)。
一,构造RTSP视频流
因为是在本机实验,所以我自己构造了一个RTSP流。如果你有现成的RTSP流也可以的。
实验用的源视频是黑神话·悟空的《云宫讯音》。

自己产生一个RTSP视频流得需要一个RTSP流媒体服务器。目前可以用的RTSP流媒体服务器有两个,分别是ZLMediaKit和MediaMTX两个。ZLMediaKit需要编译,我编译好了。MediaMTX下载即用。这里我选了MediaMTX,下载下来就可以用,比较轻量化。
1,启动流媒体服务器
在MediaMTX的安装目录下启动即可。

2,启动FFmpeg推流
ffmpeg -re -stream_loop -1 -i “wukong.mp4” -vcodec copy -acodec copy -f rtsp -rtsp_transport tcp rtsp://192.168.76.189:8554/live/test

这是流的相关信息:
Input #0, rtsp, from ‘rtsp://192.168.76.189:8554/live/test’:f=0/0
Metadata:
title : No Name
Duration: N/A, start: 0.000000, bitrate: N/A
Stream #0:0: Video: h264 (Main), yuv420p(tv, bt709, progressive), 1920x1080 [SAR 1:1 DAR 16:9], 30 fps, 30 tbr, 90k tbn
Stream #0:1: Audio: aac (LC), 44100 Hz, stereo, fltp
3,用FFplay播放一下

二,源代码
#include <stdio.h>
#include <thread>
#include <string>
//#include <io.h>
//#include <vector>//#define __STDC_CONSTANT_MACROS
#include <iostream>
using namespace std;
extern "C"
{
#include "libavformat/avformat.h"
#include "libavcodec/avcodec.h"
#include "libavutil/time.h"
//#include "libavutil/log.h"
//#include "libavutil/mathematics.h"
#include "libswscale/swscale.h"
//#include "libavutil/imgutils.h"
}#include <opencv2/opencv.hpp>using namespace cv;int main(int argc, char* argv[])
{Mat pCvMat;//const string sourceWindow = "test";//namedWindow(sourceWindow,1);//cout<<avcodec_version()<<endl;//cout<<FFMPEG_VERSION<<endl;unsigned codecVer = avcodec_version();int ver_major, ver_minor, ver_micro;ver_major = (codecVer >> 16) & 0xff;ver_minor = (codecVer >> 8) & 0xff;ver_micro = (codecVer) & 0xff;printf("Current ffmpeg version is:    ,avcodec version is: %d=%d.%d.%d\n",codecVer, ver_major, ver_minor, ver_micro);int startTime = 0;                           // 记录播放开始int currentFrame = 0;                           // 当前帧序号double fps = 0;                                 // 帧率double interval = 0;                            // 帧间隔const AVInputFormat* p_ifmt_v = NULL;// ffmpeg相关变量预先定义与分配AVFormatContext* pAVFormatContext = 0;          // ffmpeg的全局上下文,所有ffmpeg操作都需要AVStream* pAVStream = 0;                        // ffmpeg流信息AVCodecContext* pAVCodecContext = avcodec_alloc_context3(NULL);            // ffmpeg编码上下文const AVCodec* pAVCodec = 0;                          // ffmpeg编码器AVPacket* pAVPacket = 0;                        // ffmpag单帧数据包AVFrame* pAVFrame = 0;                          // ffmpeg单帧缓存//AVFrame *pAVFrameBGR24 = 0;                     // ffmpeg单帧缓存转换颜色空间后的缓存struct SwsContext* pSwsContext = 0;             // ffmpeg编码数据格式转换AVDictionary* pAVDictionary = 0;                // ffmpeg数据字典,用于配置一些编码器属性等//unsigned char * outBuffer = 0;                           // 解码后的数据存放缓存区//const char* url_v = "video.sdp";int ret = 0;                                    // 函数执行结果int videoIndex = -1;                            // 音频流所在的序号//int numBytes = 0;                               // 解码后的数据长度pAVFormatContext = avformat_alloc_context();    // 分配//pAVFormatContext->flags |= AVFMT_NOFILE;//添加白名单,这里很重要,如果不申请内存,在avformat_close_input中会宕//pAVFormatContext->protocol_whitelist = (char*)av_malloc(sizeof("file,udp,rtp"));//memcpy(pAVFormatContext->protocol_whitelist, "file,udp,rtp", sizeof("file,udp,rtp"));//pAVPacket = av_packet_alloc();                  // 分配pAVPacket = (AVPacket*)av_malloc(sizeof(AVPacket));pAVFrame = av_frame_alloc();                    // 分配//pAVFrameBGR24 = av_frame_alloc();               // 分配p_ifmt_v = av_find_input_format("rtsp");//if(!pAVFormatContext || !pAVPacket || !pAVFrame || !pAVFrameBGR24)if (!pAVFormatContext || !pAVPacket || !pAVFrame){cout << "Failed to alloc" << endl;system("pause");return -1;}// 步骤一:注册所有容器和编解码器(也可以只注册一类,如注册容器、注册编码器等)//av_register_all();avformat_network_init();// 步骤二:打开文件(ffmpeg成功则返回0)//std::string src = "rtsp://192.168.76.215/live/test";std::string src = argv[1];cout << "打开:" << src << endl;AVDictionary* format_opts = NULL;av_dict_set(&format_opts, "rtsp_transport", "tcp", 0); //设置推流的方式,默认udp。ret = avformat_open_input(&pAVFormatContext, src.c_str(), p_ifmt_v, &format_opts);//nullptr//ret = avformat_open_input(&pAVFormatContext, src.c_str(), p_ifmt_v, nullptr);if (ret){cout << "Failed" << endl;system("pause");return -1;}// 步骤三:探测流媒体信息ret = avformat_find_stream_info(pAVFormatContext, 0);if (ret < 0){cout << "Failed to avformat_find_stream_info(pAVFormatContext, 0)" << endl;system("pause");return -1;}printf("******************\n");av_dump_format(pAVFormatContext, 0, src.c_str(), 0);printf("******************\n");// 步骤四:提取流信息,提取视频信息for (int index = 0; index < pAVFormatContext->nb_streams; index++){if (pAVFormatContext->streams[index]->codecpar->codec_type == AVMEDIA_TYPE_VIDEO){cout << "流序号:" << index << "\n类型为:" << "AVMEDIA_TYPE_VIDEO" << endl;//pAVCodecContext = pAVFormatContext->streams[index]->codecpar->;avcodec_parameters_to_context(pAVCodecContext, pAVFormatContext->streams[index]->codecpar);pAVStream = pAVFormatContext->streams[index];videoIndex = index;break;}}if (videoIndex == -1 || !pAVCodecContext){cout << "Failed to find video stream" << endl;system("pause");return -1;}// 步骤五:对找到的视频流寻解码器pAVCodec = avcodec_find_decoder(pAVCodecContext->codec_id);if (!pAVCodec){cout << "Fialed to avcodec_find_decoder(pAVCodecContext->codec_id):"<< pAVCodecContext->codec_id << endl;system("pause");return -1;}// 步骤六:打开解码器// 设置缓存大小 1024000byteav_dict_set(&pAVDictionary, "buffer_size", "8192000", 0);// 设置超时时间 20sav_dict_set(&pAVDictionary, "stimeout", "20000000", 0);// 设置最大延时 3sav_dict_set(&pAVDictionary, "max_delay", "30000000", 0);// 设置打开方式 tcp/udpav_dict_set(&pAVDictionary, "rtsp_transport", "tcp", 0);//ret = avcodec_open2(pAVCodecContext, pAVCodec, &pAVDictionary);ret = avcodec_open2(pAVCodecContext, pAVCodec, &pAVDictionary);if (ret){cout << "Failed to avcodec_open2(pAVCodecContext, pAVCodec, pAVDictionary)" << endl;system("pause");return -1;}// 显示视频相关的参数信息(编码上下文)cout << "比特率:" << pAVCodecContext->bit_rate << endl;cout << "宽高:" << pAVCodecContext->width << "x" << pAVCodecContext->height << endl;cout << "格式:" << pAVCodecContext->pix_fmt << endl;  // AV_PIX_FMT_YUV420P 0cout << "帧率分母:" << pAVCodecContext->time_base.den << endl;cout << "帧率分子:" << pAVCodecContext->time_base.num << endl;cout << "帧率分母:" << pAVStream->avg_frame_rate.den << endl;cout << "帧率分子:" << pAVStream->avg_frame_rate.num << endl;cout << "总时长:" << pAVStream->duration / 10000.0 << "s" << endl;cout << "总帧数:" << pAVStream->nb_frames << endl;// 有总时长的时候计算帧率(较为准确)//    fps = pAVStream->nb_frames / (pAVStream->duration / 10000.0);//    interval = pAVStream->duration / 10.0 / pAVStream->nb_frames;// 没有总时长的时候,使用分子和分母计算fps = pAVStream->avg_frame_rate.num * 1.0f / pAVStream->avg_frame_rate.den;interval = 1 * 1000 / fps;cout << "平均帧率:" << fps << endl;cout << "帧间隔:" << interval << "ms" << endl;// 步骤七:对拿到的原始数据格式进行缩放转换为指定的格式高宽大小pAVCodecContext->pix_fmt = (AVPixelFormat)AV_PIX_FMT_YUV420P;pSwsContext = sws_getContext(pAVCodecContext->width,pAVCodecContext->height,pAVCodecContext->pix_fmt,pAVCodecContext->width,pAVCodecContext->height,AV_PIX_FMT_BGR24,SWS_FAST_BILINEAR,0,0,0);cout << "sws_getContext!" << endl;pCvMat = Mat(pAVCodecContext->height, pAVCodecContext->width, CV_8UC3);int cvLinesizes[1];cvLinesizes[0] = pCvMat.step1();// 步骤八:读取一帧数据的数据包//av_free_packet(pAVPacket);//av_packet_unref(pAVPacket);int frame_count = 0;//cout << "now av_read_frame!" << endl;//namedWindow("img", 0);while (av_read_frame(pAVFormatContext, pAVPacket) >= 0){if (pAVPacket->stream_index == videoIndex){//cout << "av_read_frame!" << endl;// 步骤八:对读取的数据包进行解码ret = avcodec_send_packet(pAVCodecContext, pAVPacket);//ret = avcodec_decode_video2(pAVCodecContext, pAVFrame, &got_picture, pAVPacket);if (ret){cout << "Failed to avcodec_send_packet(pAVCodecContext, pAVPacket) ,ret ="<< ret << endl;break;}//cout << "avcodec_send_packet!" << endl;av_frame_unref(pAVFrame);while (!avcodec_receive_frame(pAVCodecContext, pAVFrame)){//pCvMat.data=NULL;sws_scale(pSwsContext,(const uint8_t* const*)pAVFrame->data,pAVFrame->linesize,0,pAVCodecContext->height,&pCvMat.data,cvLinesizes);//cout << "avcodec_receive_frame!" << endl;frame_count++;if (frame_count % int(25) == 0) {//sprintf()//char * temp;//itoa(frame_count,temp,10);//string sss=temp;imwrite("./image/test_" + std::to_string(frame_count) + ".bmp", pCvMat);//imshow("img", pCvMat);cout << "SAVE: " << std::to_string(frame_count) << endl;}//threshold(pCvMat,pCvMat,128,255,THRESH_BINARY);//imshow(sourceWindow,pCvMat);//waitKey(1);av_frame_unref(pAVFrame);}// 下一帧currentFrame++;while (av_gettime() - startTime < currentFrame * interval){//Sleep(1);std::this_thread::sleep_for(std::chrono::milliseconds(1));}//cout << "current:" << currentFrame <<"," << time << av_gettime()- startTime <<endl;}//av_free_packet(pAVPacket);av_packet_unref(pAVPacket);}cout << "释放回收资源" << endl;if (pSwsContext){sws_freeContext(pSwsContext);pSwsContext = 0;cout << "sws_freeContext(pSwsContext)" << endl;}if (pAVFrame){av_frame_free(&pAVFrame);pAVFrame = 0;cout << "av_frame_free(pAVFrame)" << endl;}if (pAVPacket){//av_free_packet(pAVPacket);pAVPacket = 0;cout << "av_free_packet(pAVPacket)" << endl;}if (pAVCodecContext){avcodec_free_context(&pAVCodecContext);avcodec_close(pAVCodecContext);pAVCodecContext = 0;cout << "avcodec_close(pAVCodecContext);" << endl;}if (pAVFormatContext){avformat_close_input(&pAVFormatContext);avformat_free_context(pAVFormatContext);pAVFormatContext = 0;cout << "avformat_free_context(pAVFormatContext)" << endl;}pCvMat = NULL;system("pause");return 0;
}
三,运行一下
TestFFmpegOpencv_RTSP.exe rtsp://192.168.76.189:8554/live/test

四,结果
提取出的帧结果保存在image文件夹下:

相关文章:
FFmpeg与OpenCV联合开发
本文讲述如何利用FFmpeg SDK与OpenCV 从RTSP流中获取图像(OpenCV MAT 对象格式)。 一,构造RTSP视频流 因为是在本机实验,所以我自己构造了一个RTSP流。如果你有现成的RTSP流也可以的。 实验用的源视频是黑神话悟空的《云宫讯音》…...
Docker 部署 Redis (图文并茂超详细)
部署 Redis ( Docker ) [Step 1] : 拉取 Redis 镜像, 推荐使用 7 的 Redis 版本 docker pull redis:7.0.12[Step 2] : 创建 Redis 相关目录 ➡️ 启动 Redis 容器 ➡️ 拷贝文件 ➡️ 授权文件夹 ➡️ 删除容器 # 创建 Redis 相关目录 mkdir -p /data/redis/{conf,data,log…...

Docker基础-Docker Compose使用
文章目录 一、什么是Docker Compose?常用命令 Docker Compose安装前提条件Linux 上的安装macOS 上的安装Windows 上的安装注意事项启动 Docker Compose 服务 Docker Compose使用Docker Compose 文件基本结构关键概念示例:更复杂的配置注意事项 参考文献 一、什么是…...

GPT撰写开题报告教程——课题确定及文献调研
撰写开题报告是一项复杂而重要的任务,需要涵盖从主题选择到文献综述、研究方法等多个环节。借助AI,如ChatGPT,可以显著提高这一过程的效率以及内容的质量。本文将详细探讨如何一步步利用ChatGPT撰写开题报告。 一、开题报告内容 一个清晰的…...
SprinBoot+Vue高校就业管理系统的设计与实现
目录 1 项目介绍2 项目截图3 核心代码3.1 Controller3.2 Service3.3 Dao3.4 application.yml3.5 SpringbootApplication3.5 Vue 4 数据库表设计5 文档参考6 计算机毕设选题推荐7 源码获取 1 项目介绍 博主个人介绍:CSDN认证博客专家,CSDN平台Java领域优质…...

【人工智能】Transformers之Pipeline(十八):文本生成(text-generation)
目录 一、引言 二、文本生成(text-generation) 2.1 概述 2.2 家谱树谱——encoder or decoder is a problem 2.3 pipeline参数 2.3.1 pipeline对象实例化参数 2.3.2 pipeline对象使用参数 2.3.3 pipeline返回参数 …...

判断当前用户登录时常是否超过两个小时
有一个签到功能需要用户登录时间超过两个小时才可以签到 1. 存储登录时间戳 login() { // 假设这是登录后的操作 const currentTime new Date().getTime(); // 获取当前时间戳 localStorage.setItem(loginTimestamp, currentTime.toString()); // 存储登录时间戳 // 其他…...

nacos明明配置了远程连接地址却一直连接本地的详细配置解释
大家时间都很珍贵,我直接把方法放这 这个是yml文件,我们配置yml文件的时候,一定要把他的服务发现地址写了 这里是针对bootstrap做出的文件,注意名字,要和我们在yml文件里面的spring名字一样 yml discovery:是发现的意…...

Superset二次开发之源码 run-server.sh 分析
背景: 如果基于docker方式部署Superset项目,Dockerfile文件末尾指向了docker-ci.sh,而docker-ci.sh 脚本又指向了run-server.sh。因此我们重点分析一下run-server脚本 路径 docker\run-server.sh #!/usr/bin/env bashHYPHEN_SYMBOL-gunicorn…...

Java 之四种内部类详解
在 Java 中,除了传统的类定义方式之外,还有一种特殊的类定义方式——内部类。内部类定义在另一个类的内部,可以访问外部类的成员,这使得代码更加灵活和可读性更强。本文将详细讲解 Java 中四种内部类的类型:成员内部类…...

03:手动可变电阻
可变电阻 1、电位器2、变阻器/数字电位器2.1:变阻器2.2:数字电位器 3、电位器锥度4、寄生电感/电容 1、电位器 如上图所示:将可变的电阻作为分压器,那么这种可变的电阻就是电位器。例如:将L1连接负极,L3连接…...
)
嵌入式Linux电池管理(TODO)
(TODO) 在树莓派3B上使用电池供电需要考虑多个方面,包括电源管理、硬件连接和软件配置。以下是详细的步骤和建议: 1. 选择合适的电池 树莓派3B需要5V的电源供电,通常电流需求在2.5A左右。常见的电池选择包括࿱…...

Python 求亲和数
亲和数(Amicable Numbers)是指两个不同的正整数,它们的真因数(即除去本身的所有因数)之和与对方的数相等。 def sum_of_proper_divisors(n):"""计算一个数的真因子之和"""divisors_su…...

【C++】——vector模拟实现和迭代器失效问题
文章目录 模拟实现vector基本成员变量vector的构造与析构vector迭代器vector容量vector元素访问vector修改操作 vector迭代器失效问题什么是迭代器失效1.插入元素导致迭代器失效2.删除元素导致迭代器失效3.重新分配空间导致迭代器失效 如何解决迭代器失效问题 模拟实现 vector…...

USB 3.1 标准 A 型连接器及其引脚分配
USB 3.1 标准 A 型连接器 USB 3.1 标准 A 型连接器被定义为主机连接器。它具有与 USB 2.0 标准 A 型连接器相同的配合接口,但增加了另外两对差分信号和一个接地引脚。 USB 3.1 标准 A 型插座可以接受 USB 3.1 标准 A 型插头或 USB 2.0 标准 A 型插头。类似地&…...

机器学习文献|基于循环细胞因子特征,通过机器学习算法预测NSCLC免疫治疗结局
今天我们一起学习一篇最近发表在Journal for immunotherapy of cancer (IF 10.9)上的文章,Machine learning for prediction of immunotherapeutic outcome in non-small-cell lung cancer based on circulating cytokine signatures[基于循环…...

Qt 实现自定义截图工具
目录 Qt 实现自定义截图工具实现效果图PrintScreen 类介绍PrintScreen 类的主要特性 逐步实现第一步:类定义第二步:初始化截图窗口第三步:处理鼠标事件第四步:计算截图区域第五步:捕获和保存图像 完整代码PrintScreen.…...
第15-05章:获取运行时类的完整结构
我的后端学习大纲 我的Java学习大纲 6.1.第一组方法API: 1.API列表:java.lang.Class 类: 2.代码测试: public class ReflectionUtils{ puvblic static void main(String[] args){}// 第一组Testpublic void api_01{//上面截图的代码......…...

【Kubernetes】K8s 的鉴权管理(二):基于属性 / 节点 / Webhook 的访问控制
K8s 的鉴权管理(二):基于属性 / 节点 / Webhook 的访问控制 1.基于属性的访问控制(ABAC 鉴权)2.基于节点的访问控制(node 鉴权)2.1 读取操作2.2 写入操作 3.基于 Webhook 的访问控制3.1 基于 We…...
Java面试、技巧、问题、回复,资源面面观
入门 先了解一下面试流程 复习 Java 基础知识: 温习 Java 编程的核心概念,包括数据类型、变量、循环、数组和面向对象的编程原则。数据结构和算法: 加强您对 Java 编程中使用的基本数据结构和算法的理解。练习编码: 在各种平台上解…...
idea大量爆红问题解决
问题描述 在学习和工作中,idea是程序员不可缺少的一个工具,但是突然在有些时候就会出现大量爆红的问题,发现无法跳转,无论是关机重启或者是替换root都无法解决 就是如上所展示的问题,但是程序依然可以启动。 问题解决…...

深入剖析AI大模型:大模型时代的 Prompt 工程全解析
今天聊的内容,我认为是AI开发里面非常重要的内容。它在AI开发里无处不在,当你对 AI 助手说 "用李白的风格写一首关于人工智能的诗",或者让翻译模型 "将这段合同翻译成商务日语" 时,输入的这句话就是 Prompt。…...

【力扣数据库知识手册笔记】索引
索引 索引的优缺点 优点1. 通过创建唯一性索引,可以保证数据库表中每一行数据的唯一性。2. 可以加快数据的检索速度(创建索引的主要原因)。3. 可以加速表和表之间的连接,实现数据的参考完整性。4. 可以在查询过程中,…...

DockerHub与私有镜像仓库在容器化中的应用与管理
哈喽,大家好,我是左手python! Docker Hub的应用与管理 Docker Hub的基本概念与使用方法 Docker Hub是Docker官方提供的一个公共镜像仓库,用户可以在其中找到各种操作系统、软件和应用的镜像。开发者可以通过Docker Hub轻松获取所…...
Linux相关概念和易错知识点(42)(TCP的连接管理、可靠性、面临复杂网络的处理)
目录 1.TCP的连接管理机制(1)三次握手①握手过程②对握手过程的理解 (2)四次挥手(3)握手和挥手的触发(4)状态切换①挥手过程中状态的切换②握手过程中状态的切换 2.TCP的可靠性&…...
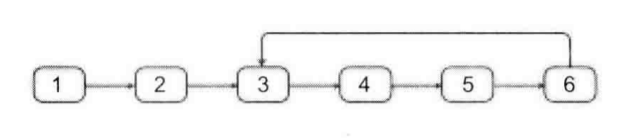
剑指offer20_链表中环的入口节点
链表中环的入口节点 给定一个链表,若其中包含环,则输出环的入口节点。 若其中不包含环,则输出null。 数据范围 节点 val 值取值范围 [ 1 , 1000 ] [1,1000] [1,1000]。 节点 val 值各不相同。 链表长度 [ 0 , 500 ] [0,500] [0,500]。 …...

python如何将word的doc另存为docx
将 DOCX 文件另存为 DOCX 格式(Python 实现) 在 Python 中,你可以使用 python-docx 库来操作 Word 文档。不过需要注意的是,.doc 是旧的 Word 格式,而 .docx 是新的基于 XML 的格式。python-docx 只能处理 .docx 格式…...

VTK如何让部分单位不可见
最近遇到一个需求,需要让一个vtkDataSet中的部分单元不可见,查阅了一些资料大概有以下几种方式 1.通过颜色映射表来进行,是最正规的做法 vtkNew<vtkLookupTable> lut; //值为0不显示,主要是最后一个参数,透明度…...
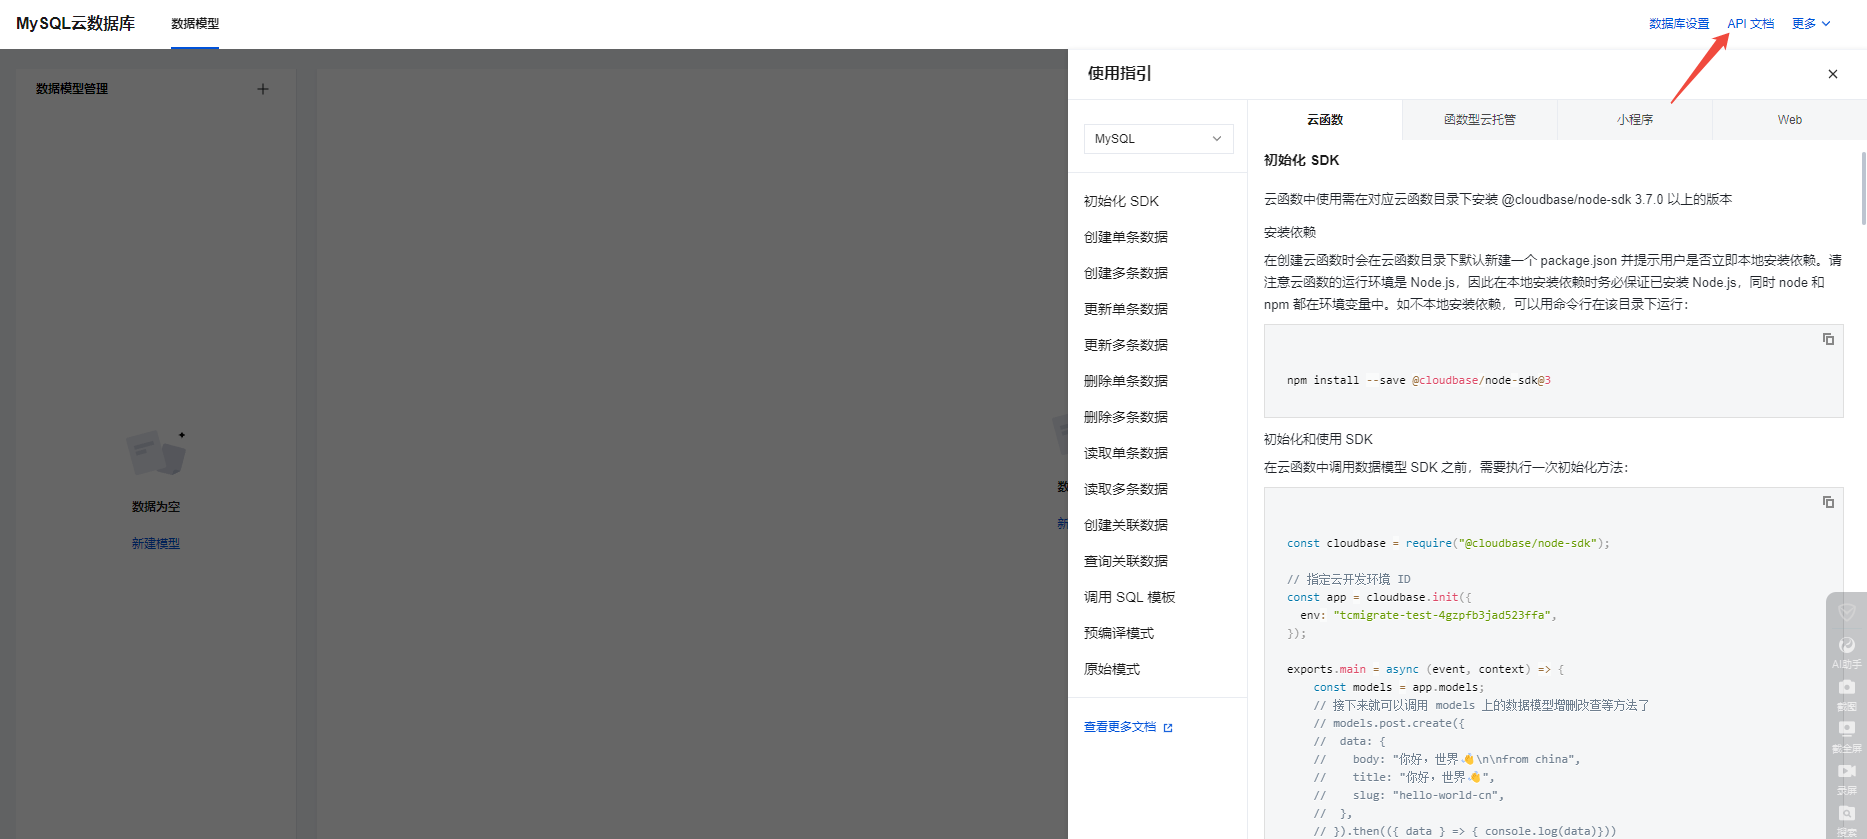
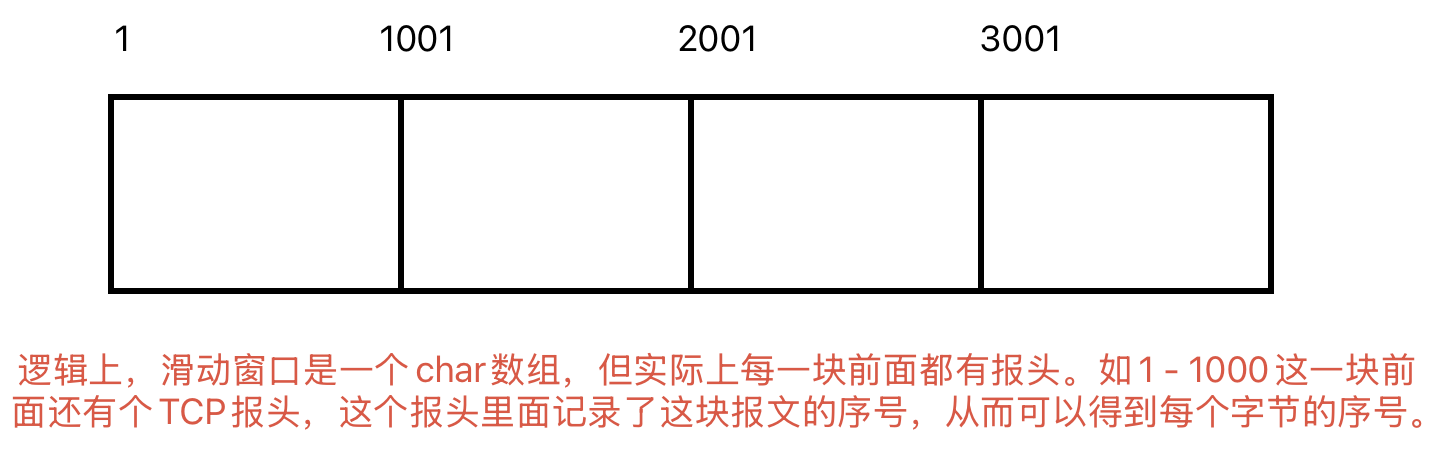
微信小程序云开发平台MySQL的连接方式
注:微信小程序云开发平台指的是腾讯云开发 先给结论:微信小程序云开发平台的MySQL,无法通过获取数据库连接信息的方式进行连接,连接只能通过云开发的SDK连接,具体要参考官方文档: 为什么? 因为…...

基于matlab策略迭代和值迭代法的动态规划
经典的基于策略迭代和值迭代法的动态规划matlab代码,实现机器人的最优运输 Dynamic-Programming-master/Environment.pdf , 104724 Dynamic-Programming-master/README.md , 506 Dynamic-Programming-master/generalizedPolicyIteration.m , 1970 Dynamic-Programm…...