WPF+MVVM案例实战(三)- 动态数字卡片效果实现
1、创建项目
打开 VS2022 ,新建项目 Wpf_Examples,创建各层级文件夹,安装 CommunityToolkit.Mvvm 和 Microsoft.Extensions.DependencyInjectio NuGet包,完成MVVM框架搭建。搭建完成后项目层次如下图所示:

这里如何实现 MVVM 框架可以参考本人 像 MvvmLight 一样使用 CommunityToolkit.Mvvm 工具包 的文章
2、整理项目
1、项目目录层级
在前面该案例前,已经发布了两个案例,为了后续不断推出的新案例,我们先将项目整理成一个整体,做成整套案例系统,后续所有的案例都在该项目上迭代更新。目前先做简单的归纳处理,我们把所有案例都单独放在一个窗体,主窗体做按钮菜单,每个案例通过弹窗方式呈现。基于以上整理后得到系统文件层级分布如下所示:

2、案例代码实现
1、主界面菜单实现
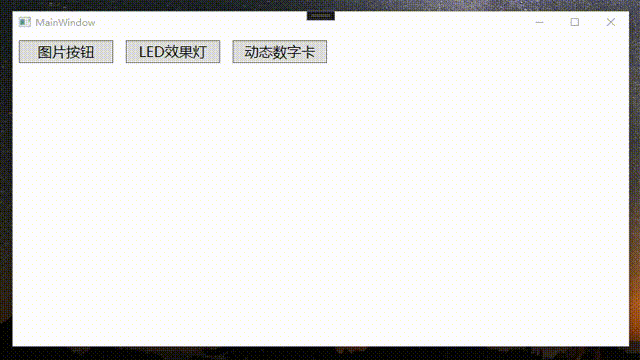
1、MainWindow.xaml 代码
<Window x:Class="Wpf_Examples.MainWindow"xmlns="http://schemas.microsoft.com/winfx/2006/xaml/presentation"xmlns:x="http://schemas.microsoft.com/winfx/2006/xaml"xmlns:d="http://schemas.microsoft.com/expression/blend/2008"xmlns:mc="http://schemas.openxmlformats.org/markup-compatibility/2006"xmlns:converter="clr-namespace:Wpf_Examples.Converters"xmlns:local="clr-namespace:Wpf_Examples"xmlns:cc="clr-namespace:CustomControlLib;assembly=CustomControlLib"DataContext="{Binding Source={StaticResource Locator},Path=Main}"mc:Ignorable="d"Title="MainWindow" Height="450" Width="800"><Grid><WrapPanel><Button Width="120" Height="30" FontSize="18" Content="图片按钮" Command="{Binding ButtonClickCmd}" CommandParameter="{Binding RelativeSource={RelativeSource Mode=Self},Path=Content}" Margin="8"/><Button Width="120" Height="30" FontSize="18" Content="LED效果灯" Command="{Binding ButtonClickCmd}" CommandParameter="{Binding RelativeSource={RelativeSource Mode=Self},Path=Content}" Margin="8"/><Button Width="120" Height="30" FontSize="18" Content="动态数字卡" Command="{Binding ButtonClickCmd}" CommandParameter="{Binding RelativeSource={RelativeSource Mode=Self},Path=Content}" Margin="8"/></WrapPanel></Grid>
</Window>
2、MainViewWindow. 代码
using CommunityToolkit.Mvvm.ComponentModel;
using CommunityToolkit.Mvvm.Input;
using System;
using System.Collections.Generic;
using System.Linq;
using System.Text;
using System.Threading.Tasks;
using System.Windows;
using System.Windows.Media.Imaging;
using System.Windows.Threading;
using Wpf_Examples.Views;namespace Wpf_Examples.ViewModels
{public class MainViewModel : ObservableObject{public RelayCommand<string> ButtonClickCmd { get; set; }public MainViewModel(){ButtonClickCmd = new RelayCommand<string>(FunMenu);}private void FunMenu(string obj){switch (obj){case "图片按钮":PopWindow(new ImageButtonWindow());break;case "LED效果灯":PopWindow(new LEDStatusWindow());break;case "动态数字卡":PopWindow(new DataCardWindow());break;}}private void PopWindow(Window window){var mainWindowInstance = App.Current.MainWindow; // 获取主窗口实例window.Owner = mainWindowInstance;window.WindowStartupLocation = WindowStartupLocation.CenterOwner;window.ShowDialog();}}
}
3、界面效果

2、案例一 图片按钮整理实现
1、ImageButtonWindow.xaml 代码
<Window x:Class="Wpf_Examples.Views.ImageButtonWindow"xmlns="http://schemas.microsoft.com/winfx/2006/xaml/presentation"xmlns:x="http://schemas.microsoft.com/winfx/2006/xaml"xmlns:d="http://schemas.microsoft.com/expression/blend/2008"xmlns:mc="http://schemas.openxmlformats.org/markup-compatibility/2006"xmlns:cc="clr-namespace:CustomControlLib;assembly=CustomControlLib"xmlns:converter="clr-namespace:Wpf_Examples.Converters"xmlns:local="clr-namespace:Wpf_Examples.Views"DataContext="{Binding Source={StaticResource Locator},Path=ImageButton}"mc:Ignorable="d"Title="ImageButtonWindow" Height="450" Width="800"><Window.Resources><converter:InverseBooleanConverter x:Key="InverseBooleanConverter"/></Window.Resources><Grid><Grid.RowDefinitions><RowDefinition/><RowDefinition/></Grid.RowDefinitions><StackPanel Orientation="Horizontal" VerticalAlignment="Center"  HorizontalAlignment="Right"><TextBlock Text="双按钮状态控制,边框同时虚线实线切换" FontSize="30" VerticalAlignment="Center" HorizontalAlignment="Center" Margin="0 0 80 0"/><cc:ImageTextButton Text="开始生产" ToolTip="开始生产"  IsDashedBorder="{Binding SystemStatus}" Command="{Binding ButtonClickCmd}" CommandParameter="{Binding RelativeSource={RelativeSource Mode=Self},Path=ToolTip}" Width="70" Height="70" Margin="0,0,5,0" ImageSource="pack://application:,,,/Wpf_Examples;component/Assets/Images/Start.png"/><cc:ImageTextButton Text="停止生产" ToolTip="停止生产"   IsDashedBorder="{Binding SystemStatus,Converter={StaticResource InverseBooleanConverter}}" Command="{Binding ButtonClickCmd}" CommandParameter="{Binding RelativeSource={RelativeSource Mode=Self},Path=ToolTip}" Width="70" Height="70" Margin="0,0,5,0" ImageSource="pack://application:,,,/Wpf_Examples;component/Assets/Images/Stop.png"/></StackPanel><StackPanel Orientation="Horizontal" VerticalAlignment="Center"  HorizontalAlignment="Right" Grid.Row="1"><TextBlock Text="单按钮状态控制,切换背景图片和文本" FontSize="30" VerticalAlignment="Center" HorizontalAlignment="Center" Margin="0 0 80 0"/><cc:ImageTextButton Text="{Binding ButtonName}" Command="{Binding SingleButtonClickCmd}" ImageSource="{Binding ImageSource}" CommandParameter="{Binding RelativeSource={RelativeSource Mode=Self},Path=Text}" Width="70" Height="70" Margin="0,0,5,0" /></StackPanel></Grid>
</Window>
2、ImageButtonViewModel.cs 代码
using CommunityToolkit.Mvvm.ComponentModel;
using CommunityToolkit.Mvvm.Input;
using System;
using System.Collections.Generic;
using System.Linq;
using System.Text;
using System.Threading.Tasks;
using System.Windows.Media.Imaging;namespace Wpf_Examples.ViewModels
{public class ImageButtonViewModel:ObservableObject{/// <summary>/// 生产状态按钮名称/// </summary>private string buttonName;public string ButtonName{get { return buttonName; }set { SetProperty(ref buttonName, value); }}/// <summary>/// 系统运行状态/// </summary>private bool systemStatus = false;public bool SystemStatus{get { return systemStatus; }set { SetProperty(ref systemStatus, value); }}/// <summary>/// 产线状态/// </summary>private bool productStatus = false;public bool ProductStatus{get { return productStatus; }set { SetProperty(ref productStatus, value); }}/// <summary>/// 生产状态背景图/// </summary>private BitmapImage imageSource;public BitmapImage ImageSource{get { return imageSource; }set { SetProperty(ref imageSource, value); }}public RelayCommand SingleButtonClickCmd { get; set; }public RelayCommand<string> ButtonClickCmd { get; set; }public ImageButtonViewModel(){SingleButtonClickCmd = new RelayCommand(StatusChange);ButtonClickCmd = new RelayCommand<string>(FunMenu);StatusChange();}private void FunMenu(string obj){switch (obj){case "开始生产":SystemStatus = true;break;case "停止生产":SystemStatus = false;break;}}private void StatusChange(){if (!ProductStatus){ButtonName = "开始生产";ImageSource = new BitmapImage(new Uri("pack://application:,,,/Wpf_Examples;component/Assets/Images/Start.png"));ProductStatus = true;}else{ButtonName = "停止生产";ImageSource = new BitmapImage(new Uri("pack://application:,,,/Wpf_Examples;component/Assets/Images/Stop.png"));ProductStatus = false;}}}
}
3、InverseBooleanConverter.cs 转换器代码
using System;
using System.Collections.Generic;
using System.Globalization;
using System.Linq;
using System.Text;
using System.Threading.Tasks;
using System.Windows.Data;namespace Wpf_Examples.Converters
{public class InverseBooleanConverter : IValueConverter{public object Convert(object value, Type targetType, object parameter, CultureInfo culture){return !(value is bool boolValue) || !boolValue;}public object ConvertBack(object value, Type targetType, object parameter, CultureInfo culture){return !(value is bool boolValue) || !boolValue;}}
}
3、案例二 LED灯整理实现
1、LEDStatusWindow.xaml 代码
<Window x:Class="Wpf_Examples.Views.LEDStatusWindow"xmlns="http://schemas.microsoft.com/winfx/2006/xaml/presentation"xmlns:x="http://schemas.microsoft.com/winfx/2006/xaml"xmlns:d="http://schemas.microsoft.com/expression/blend/2008"xmlns:mc="http://schemas.openxmlformats.org/markup-compatibility/2006"xmlns:converter="clr-namespace:Wpf_Examples.Converters"xmlns:local="clr-namespace:Wpf_Examples.Views"DataContext="{Binding Source={StaticResource Locator},Path=LedStatus}"mc:Ignorable="d"Title="LEDStatusWindow" Height="450" Width="800"><Window.Resources><converter:StatusToColorConverter x:Key="StatusToColorConverter"/></Window.Resources><Grid><Grid.ColumnDefinitions><ColumnDefinition/><ColumnDefinition/><ColumnDefinition/></Grid.ColumnDefinitions><StackPanel Orientation="Horizontal" VerticalAlignment="Center" HorizontalAlignment="Right" ><TextBlock Text="网络" FontSize="16" Foreground="DarkGray" Margin="0 0 20 0"/><Ellipse Width="20" Height="20" Fill="{Binding NetStatusValue, Converter={StaticResource StatusToColorConverter}}"/></StackPanel><StackPanel Grid.Column="1" Orientation="Horizontal" VerticalAlignment="Center" HorizontalAlignment="Center"><TextBlock Text="PLC" FontSize="16" Foreground="DarkGray" Margin="0 0 20 0"/><Ellipse Width="20" Height="20" Fill="{Binding PLCStatusValue, Converter={StaticResource StatusToColorConverter}}"/></StackPanel><StackPanel Grid.Column="2" Orientation="Horizontal" VerticalAlignment="Center" HorizontalAlignment="Left"><TextBlock Text="相机" FontSize="16" Foreground="DarkGray" Margin="0 0 20 0"/><Ellipse Width="20" Height="20" Fill="{Binding DevStatusValue, Converter={StaticResource StatusToColorConverter}}"/></StackPanel></Grid>
</Window>
2、LEDStatusViewModel.cs 代码
using CommunityToolkit.Mvvm.ComponentModel;
using CommunityToolkit.Mvvm.Input;
using System;
using System.Collections.Generic;
using System.Linq;
using System.Text;
using System.Threading.Tasks;
using System.Windows.Threading;namespace Wpf_Examples.ViewModels
{public class LEDStatusViewModel: ObservableObject{/// <summary>/// 网络状态按钮名称/// </summary>private int netStatusValue = 2;public int NetStatusValue{get { return netStatusValue; }set { SetProperty(ref netStatusValue, value); }}/// <summary>/// PLC状态按钮名称/// </summary>private int plcStatusValue = 1;public int PLCStatusValue{get { return plcStatusValue; }set { SetProperty(ref plcStatusValue, value); }}/// <summary>/// 设备状态/// </summary>private int devStatusValue = 0;public int DevStatusValue{get { return devStatusValue; }set { SetProperty(ref devStatusValue, value); }}/// <summary>/// 系统运行状态/// </summary>private bool systemStatus = false;public bool SystemStatus{get { return systemStatus; }set { SetProperty(ref systemStatus, value); }}public LEDStatusViewModel(){CreateTimer();}private void DispatcherTimer_Tick(object sender, EventArgs e){DevStatusValue = StatusChange(DevStatusValue);NetStatusValue = StatusChange(NetStatusValue);PLCStatusValue = StatusChange(PLCStatusValue);}private void CreateTimer(){#region 每秒定时器服务DispatcherTimer cpuTimer = new DispatcherTimer{Interval = new TimeSpan(0, 0, 0, 3, 0)};cpuTimer.Tick += DispatcherTimer_Tick;cpuTimer.Start();#endregion}private int StatusChange(int value){int outVal = 0;//状态变化if (value == 0){outVal = 1;}else if (value == 1){outVal = 2;}else{outVal = 0;}return outVal;}}
}
3、StatusToColorConverter.cs 转换器代码
using System;
using System.Collections.Generic;
using System.Linq;
using System.Text;
using System.Threading.Tasks;
using System.Windows.Data;
using System.Windows.Media;namespace Wpf_Examples.Converters
{public class StatusToColorConverter : IValueConverter{public object Convert(object value, Type targetType, object parameter, System.Globalization.CultureInfo culture){if (value is int statusValue){switch (statusValue){case 0:return Brushes.Red;case 1:return "#E5D21C";case 2:return Brushes.Green;default:return Brushes.Green; // 默认颜色}}return Brushes.Gray;}public object ConvertBack(object value, Type targetType, object parameter, System.Globalization.CultureInfo culture){throw new NotImplementedException();}}
}
4、动态数字卡实现
1、DataCardWindow.xaml 界面代码实现
<Window x:Class="Wpf_Examples.Views.DataCardWindow"xmlns="http://schemas.microsoft.com/winfx/2006/xaml/presentation"xmlns:x="http://schemas.microsoft.com/winfx/2006/xaml"xmlns:d="http://schemas.microsoft.com/expression/blend/2008"xmlns:mc="http://schemas.openxmlformats.org/markup-compatibility/2006"xmlns:local="clr-namespace:Wpf_Examples.Views"DataContext="{Binding Source={StaticResource Locator},Path=DataCard}"mc:Ignorable="d"Title="DataCardWindow" Height="450" Width="800" Background="#2B2B2B"><Grid><!--第二列--><StackPanel Orientation="Horizontal" VerticalAlignment="Center" HorizontalAlignment="Center"><StackPanel.Resources><DataTemplate x:Key="machineCount"><Border Width="15" Background="#99D40B0B" Margin="2,0"><TextBlock Text="{Binding}" VerticalAlignment="Center" HorizontalAlignment="Center" Foreground="White" FontSize="16"></TextBlock></Border></DataTemplate></StackPanel.Resources><TextBlock Text="机台 总数" Foreground="#99ffffff" Margin="10,0" VerticalAlignment="Center" FontSize="10"></TextBlock><ItemsControl ItemsSource="{Binding MachineCount}" ItemTemplate="{StaticResource machineCount}"><ItemsControl.ItemsPanel><ItemsPanelTemplate><StackPanel Orientation="Horizontal"></StackPanel></ItemsPanelTemplate></ItemsControl.ItemsPanel></ItemsControl><TextBlock Text="生产计数" Foreground="#99ffffff" VerticalAlignment="Center" FontSize="10" Margin="20,0"></TextBlock><ItemsControl ItemsSource="{Binding ProductCount}" ItemTemplate="{StaticResource machineCount}"><ItemsControl.ItemsPanel><ItemsPanelTemplate><StackPanel Orientation="Horizontal"></StackPanel></ItemsPanelTemplate></ItemsControl.ItemsPanel></ItemsControl><TextBlock Text="不良计数" Foreground="#99ffffff" Margin="20,0" VerticalAlignment="Center" FontSize="10"></TextBlock><ItemsControl ItemsSource="{Binding BadCount}" ItemTemplate="{StaticResource machineCount}"><ItemsControl.ItemsPanel><ItemsPanelTemplate><StackPanel Orientation="Horizontal"></StackPanel></ItemsPanelTemplate></ItemsControl.ItemsPanel></ItemsControl></StackPanel></Grid>
</Window>2、DataCardViewModel.cs 代码实现
using CommunityToolkit.Mvvm.ComponentModel;
using CommunityToolkit.Mvvm.Messaging.Messages;
using System;
using System.Collections.Generic;
using System.ComponentModel;
using System.Linq;
using System.Text;
using System.Threading.Tasks;
using System.Windows.Threading;namespace Wpf_Examples.ViewModels
{public class DataCardViewModel:ObservableObject{#region 计数/// <summary>/// 机台总数/// </summary>private string _MachineCount = "02981";/// <summary>/// 机台总数/// </summary>public string MachineCount{get { return _MachineCount; }set{SetProperty(ref _MachineCount, value);}}/// <summary>/// 生产计数/// </summary>private string _ProductCount = "16403";/// <summary>/// 生产计数/// </summary>public string ProductCount{get { return _ProductCount; }set{SetProperty(ref _ProductCount, value);}}/// <summary>/// 不良计数/// </summary>private string _BadCount = "0403";/// <summary>/// 不良计数/// </summary>public string BadCount{get { return _BadCount; }set{SetProperty(ref _BadCount, value);}}#endregionpublic DataCardViewModel(){CreateTimer();}private void CreateTimer(){#region 每秒定时器服务DispatcherTimer cpuTimer = new DispatcherTimer{Interval = new TimeSpan(0, 0, 0, 2, 0)};cpuTimer.Tick += DispatcherTimer_Tick;cpuTimer.Start();#endregion}private void DispatcherTimer_Tick(object sender, EventArgs e){ValueChanged();}private void ValueChanged(){Random random = new Random();ProductCount= random.Next(100, 9999).ToString();BadCount = random.Next(100, 999).ToString();}}
}
3、效果展示
4.源代码
CSDN下载链接:WPF+MVVM案例实战(三)- 动态数字卡片效果实现
相关文章:
WPF+MVVM案例实战(三)- 动态数字卡片效果实现
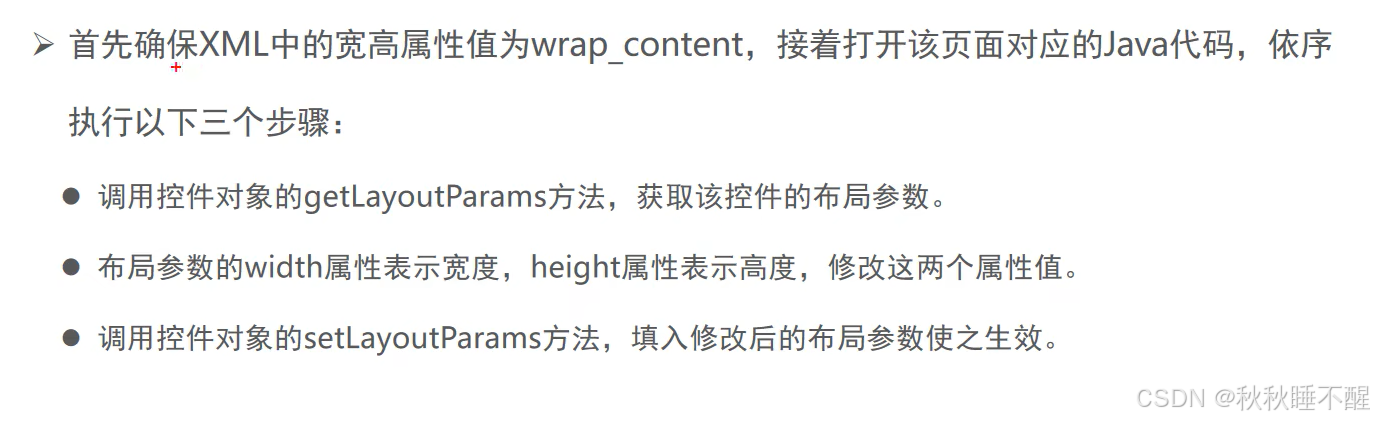
1、创建项目 打开 VS2022 ,新建项目 Wpf_Examples,创建各层级文件夹,安装 CommunityToolkit.Mvvm 和 Microsoft.Extensions.DependencyInjectio NuGet包,完成MVVM框架搭建。搭建完成后项目层次如下图所示: 这里如何实现 MVVM 框…...

#网络安全#渗透测试# 渗透测试应用
网络安全渗透测试是一种重要的安全评估方法,用于发现和评估网络系统中的安全漏洞。在进行渗透测试时,需要注意以下几个关键点: 法律和道德考量 获得授权:在进行渗透测试之前,必须获得目标系统的正式授权。未经授权的测…...
MicroServer Gen8再玩 OCP万兆光口+IT直通之二
这个接上一篇,来个简单测试。 一、测试环境 PC端:Win10,网卡:万兆光纤(做都做了,都给接上),硬盘使用N年的三星SSD 840 交换机:磊科GS10,带两个万兆口 Gen…...
【JAVA面试题】Java和C++主要区别有哪些?各有哪些优缺点?
文章目录 强烈推荐前言区别:1. 语法和编程风格2.内存管理3.平台独立性4.性能5.指针和引用6.多线程7.使用场景 Java 的优缺点优点:缺点: C 的优缺点优点:缺点: 总结专栏集锦 强烈推荐 前些天发现了一个巨牛的人工智能学…...
保姆级教程!!教你通过【Pycharm远程】连接服务器运行项目代码
小罗碎碎念 这篇文章主要解决一个问题——我有服务器,但是不知道怎么拿来写代码,跑深度学习项目。确实,玩深度学习的成本比较高,无论是前期的学习成本,还是你需要具备的硬件成本,都是拦路虎。小罗没有办法…...

JMeter详细介绍和相关概念
JMeter是一款开源的、强大的、用于进行性能测试和功能测试的Java应用程序。 本篇承接上一篇 JMeter快速入门示例 , 对该篇中出现的相关概念进行详细介绍。 JMeter测试计划 测试计划名称和注释:整个测试脚本保存的名称,以及对该测试计划的注…...
如何使用Git
简介 一.git简介 Git是一个分布式版本控制工具,通常用来对软件开发过程中的源代码文件进行管理.通过Git仓库来存储和管理这些文件,Git仓库分两种: 本地仓库:开发人员自己电脑上的Git仓库远程仓库:远程服务器上的Git仓库 commit:提交,将本地文件和版本信息保存到本地仓库 p…...

Redis 哨兵 问题
前言 相关系列 《Redis & 目录》(持续更新)《Redis & 哨兵 & 源码》(学习过程/多有漏误/仅作参考/不再更新)《Redis & 哨兵 & 总结》(学习总结/最新最准/持续更新)《Redis & 哨兵…...
安卓基础001
前言 也是好久没有更新博客了,最近实习也是需要学习一些知识哈哈哈哈哈哈为了更好的发展嘛,咱们从客户端开始,过程可能有点像写前端,不喜勿喷,希望在学习的过程中也可以给大家带来一些简单得帮助吧....... tips:这里跳过安卓studio安装,大家可自行寻找教程 写的不详细,只是为了…...

shodan2:绕过shodan高级会员限制+metasploit批量验证漏洞
shodan2 shodanmetasploit批量验证漏洞 shodan的这个指令语法是特别多的,那么我不可能说一个个全部讲完,因为有的参数可能你一辈子都用不上,主要就是把一些红队最常用的参数给你讲完,今天我们看看怎么去查一个cve-2019-0708的一…...
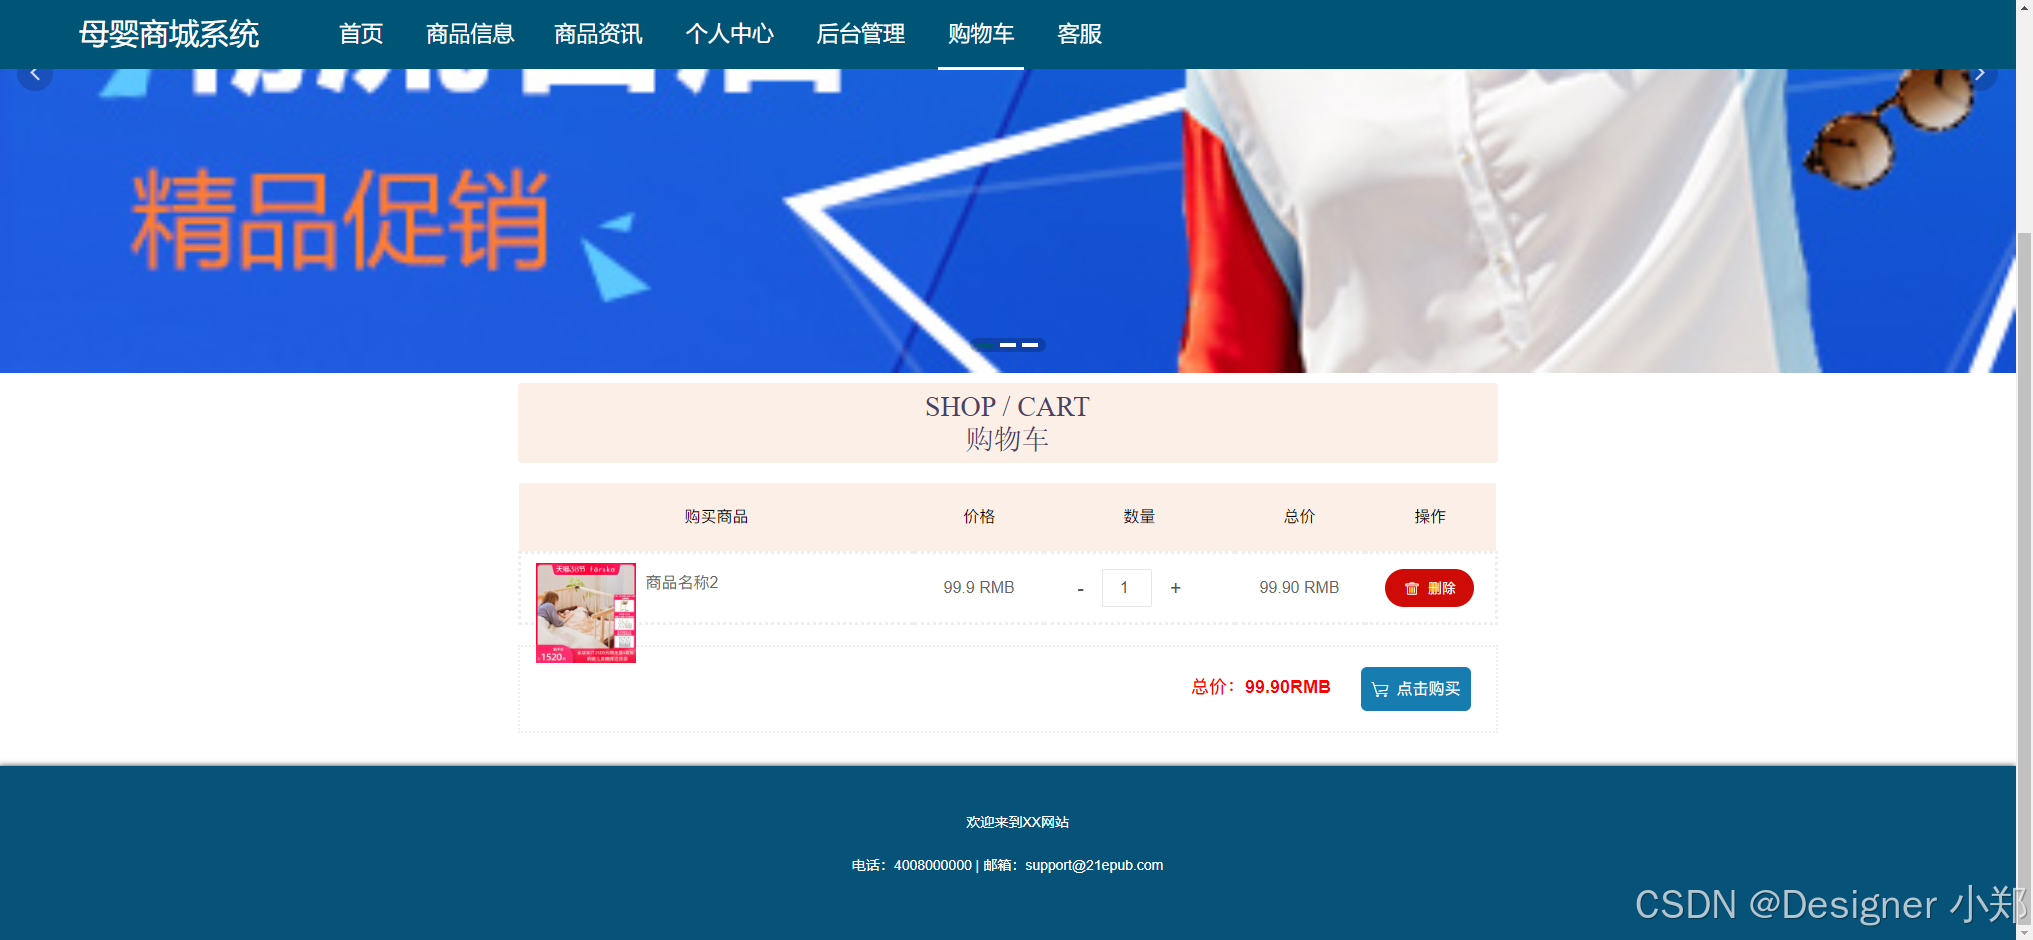
【JAVA毕业设计】基于Vue和SpringBoot的母婴商城系统
本文项目编号 T 030 ,文末自助获取源码 \color{red}{T030,文末自助获取源码} T030,文末自助获取源码 目录 一、系统介绍二、演示录屏三、启动教程四、功能截图五、文案资料5.1 选题背景5.2 国内外研究现状5.3 可行性分析 六、核心代码6.1 查…...

探索Python安全字符串处理的奥秘:MarkupSafe库揭秘
文章目录 探索Python安全字符串处理的奥秘:MarkupSafe库揭秘第一部分:背景介绍第二部分:MarkupSafe是什么?第三部分:如何安装MarkupSafe?第四部分:MarkupSafe的简单使用方法1. 使用escape函数2.…...

Xcode真机运行正常,打包报错
1.问题: 老项目Xcode真机运行没问题,但但打包的时候却报了以下错误: some files could not be transferred (code 23) at /AppleInternal/Library/BuildRoots/4ff29661-3588-11ef-9513-e2437461156c/Library/Caches/com.apple.xbs/Sources/r…...
)
Android Audio基础——音频混音线程介绍(十)
MixerThread 是 Android 音频输出的核心部分,主要负责将多个音频流混合成一个输出流,通常用于处理多个音频源(如音乐播放器、语音通话、系统提示音等)的混音操作,混音后的音频数据会被发送到音频硬件(如扬声器或耳机)进行最终输出。大多数 Android 的音频都需要经过 Mix…...

【Excel】函数各类公式总结
在 Excel 中,有许多常用的公式和函数用于各种类型的计算,包括基本的数学运算、统计运算、逻辑判断、查找与引用、文本处理,以及复数计算。下面列出了一些常用的 Excel 函数: 1、数学与三角函数 SUM求和函数,计算一组…...

【入门篇】2.9 系统滴答定时器 SysTick
目录 一,SysTick 系统滴答定时器 二,SysTick寄存器 2.1 SysTick 控制和状态寄存器(CTRL) 2.2 SysTick 重装载数值寄存器(LOAD) 2.3. SysTick 当前值寄存器(VAL) 2.4 SysTick 校准值寄存器(CALIB) 三,使用SysTick定时器 四,用法示例 一,SysTick 系统滴答定时…...
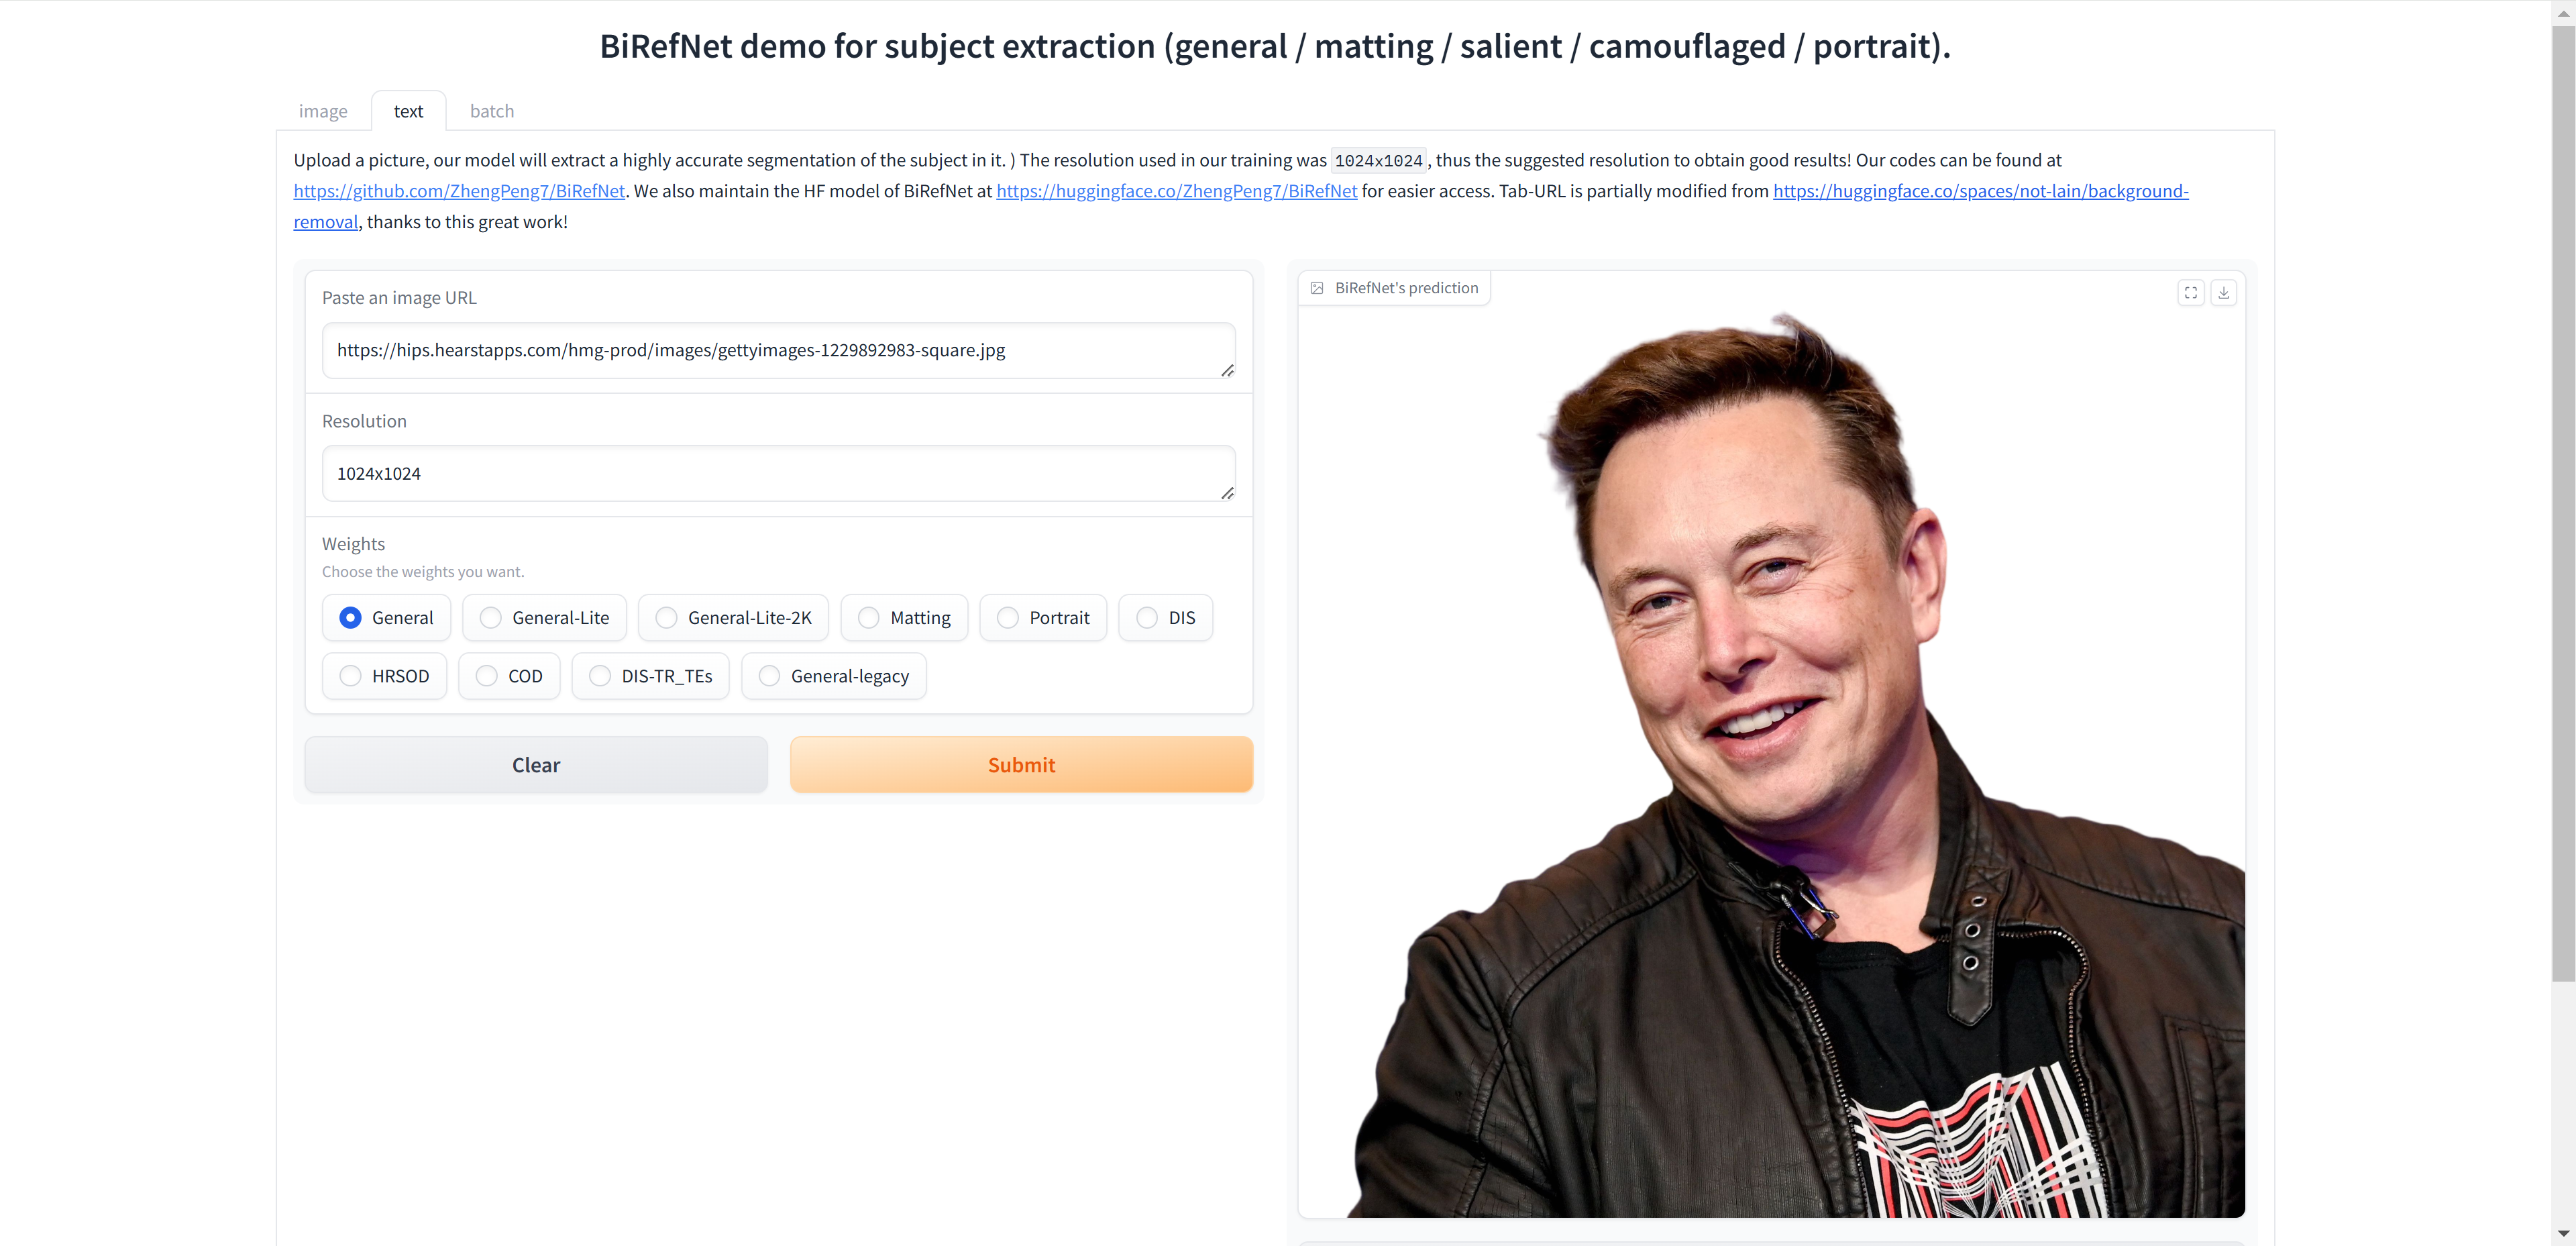
BiRefNet:颠覆图像分割,AI黑科技再升级
BiRefNet:颠覆图像分割,AI黑科技再升级 BiRefNet 是一款超强的图像分割 AI 模型,精准度惊人✨,适用于医疗、农业、工业等多个领域🌍,让图像处理变得简单高效!快来体验这款黑科技吧!…...
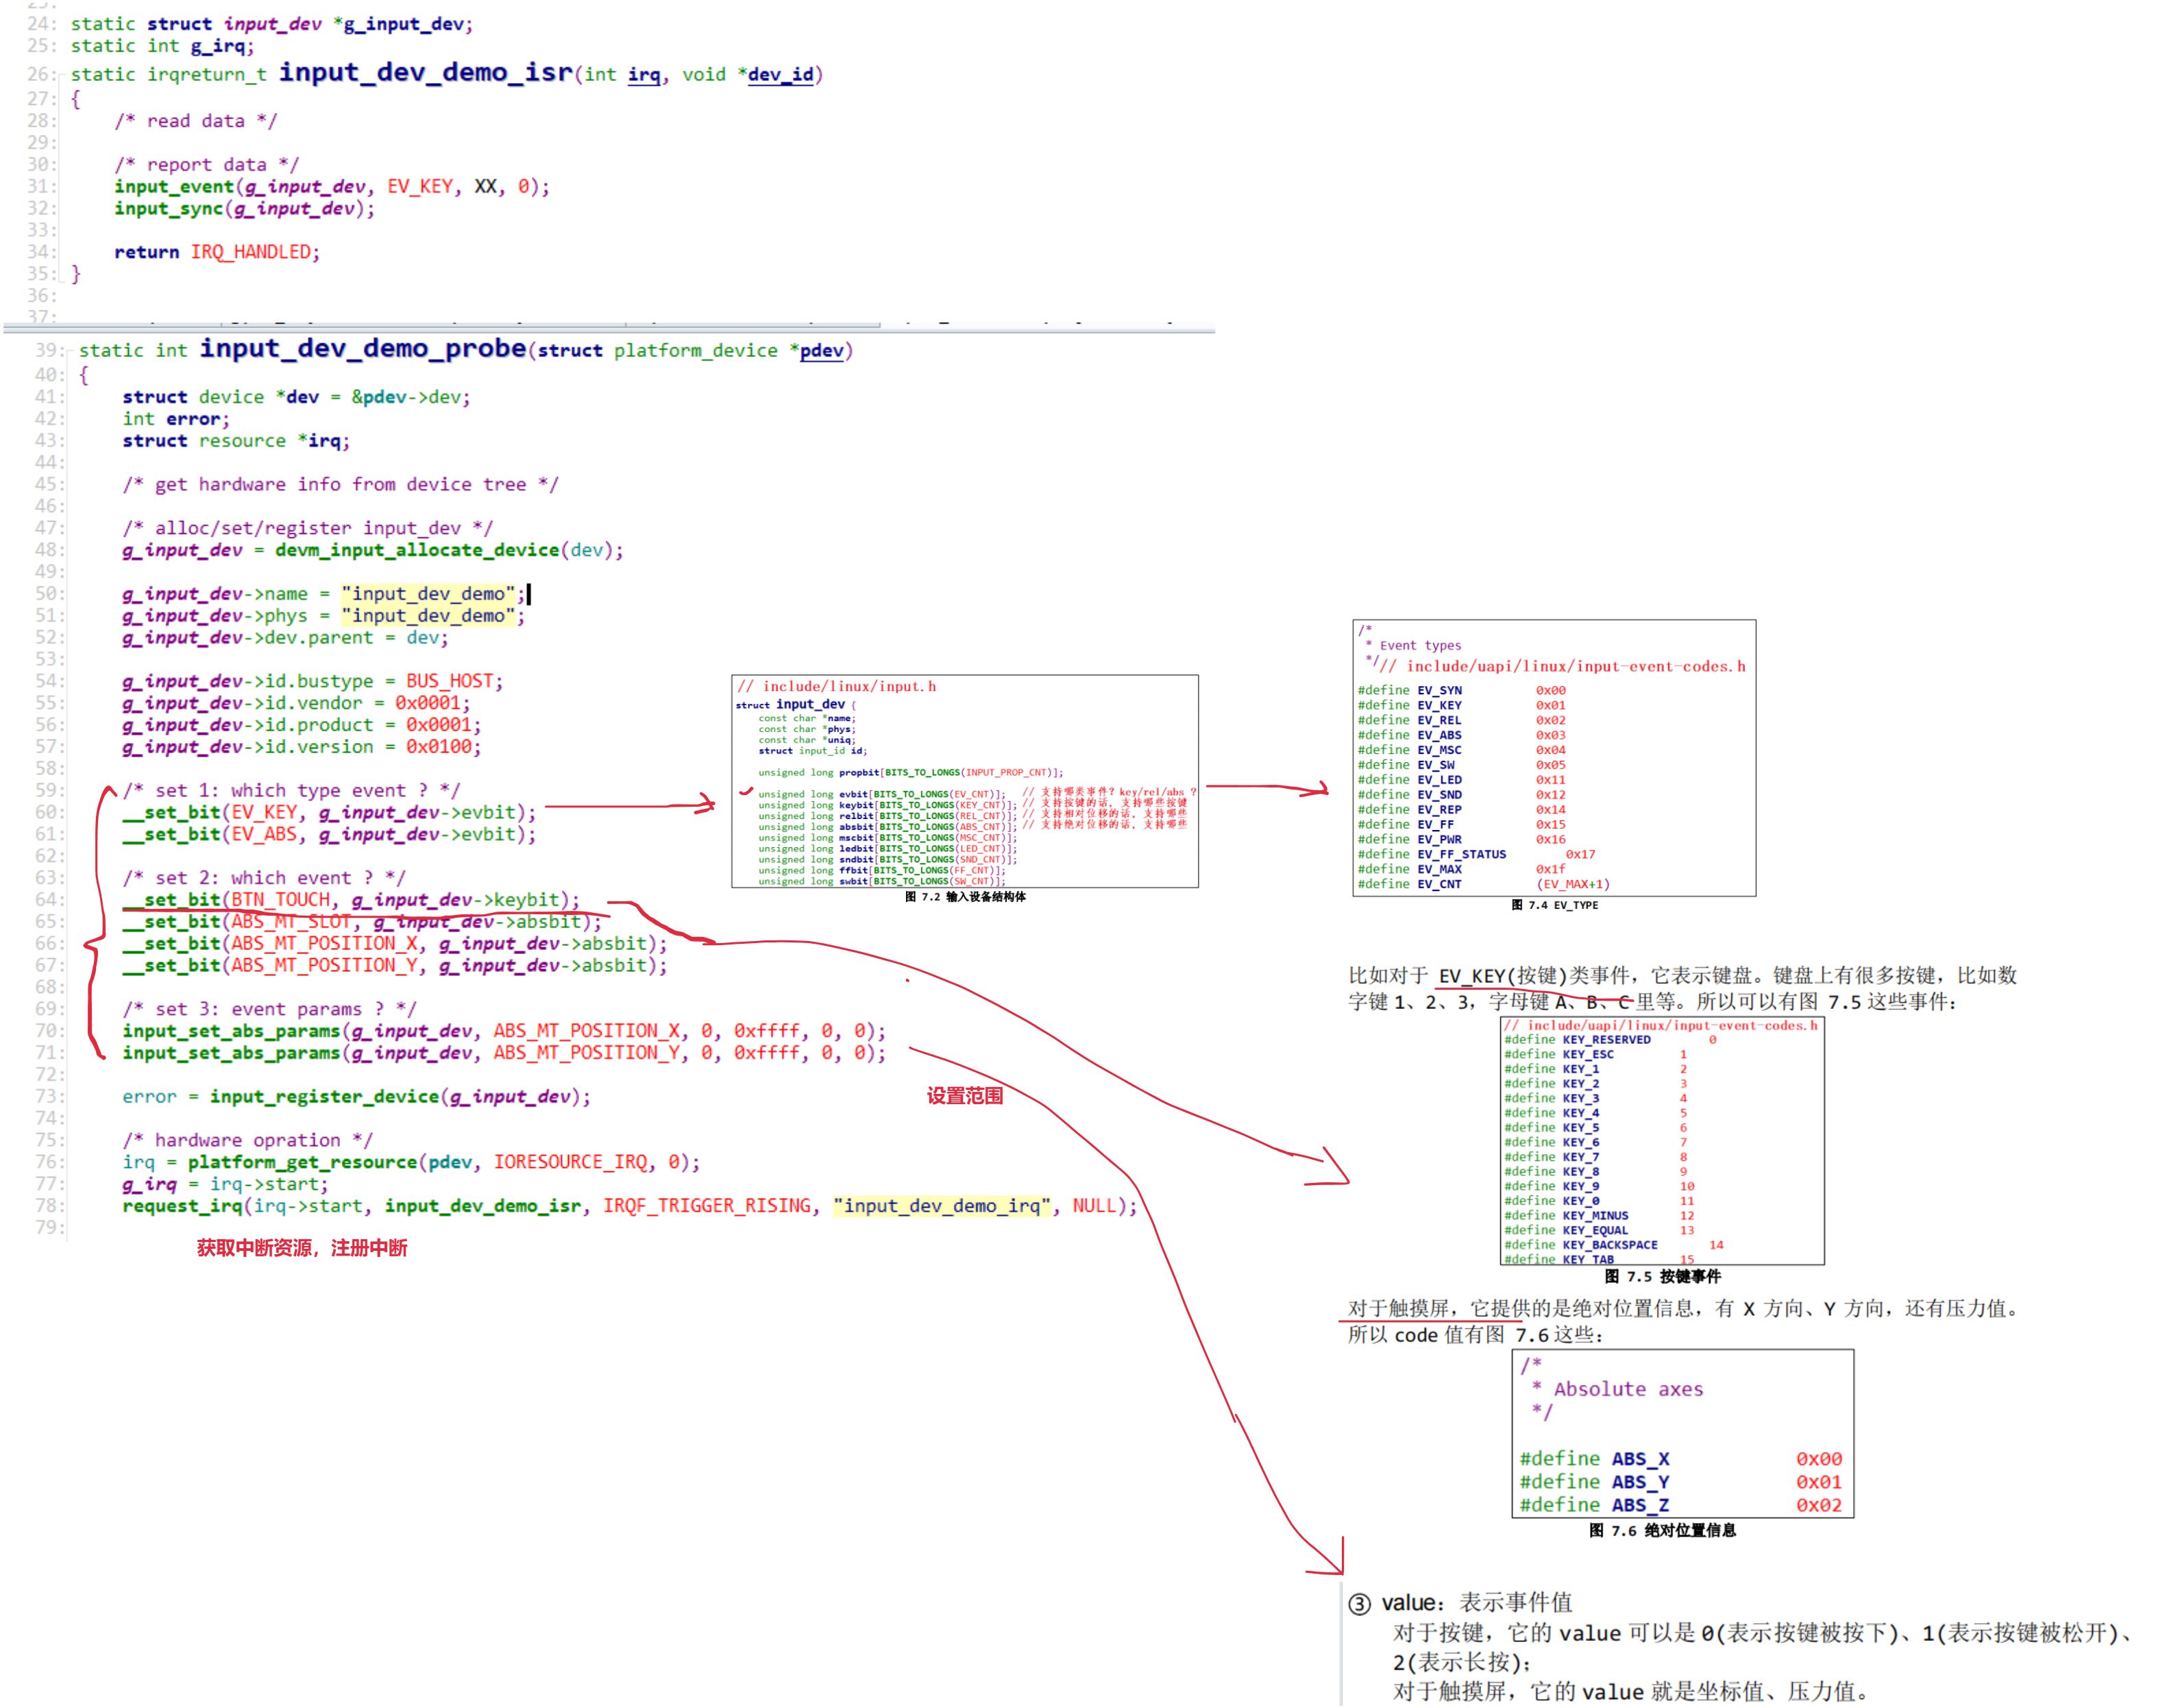
编写一个简单的Iinput_dev框架
往期内容 本专栏往期内容: input子系统的框架和重要数据结构详解-CSDN博客input device和input handler的注册以及匹配过程解析-CSDN博客input device和input handler的注册以及匹配过程解析-CSDN博客 I2C子系统专栏: 专栏地址:IIC子系统_憧憬…...
ctfshow的sql注入解题思路171-211
ctfshow-SQL注入 web171:爆库名->爆表名->爆字段名->爆字段值 -1 union select 1,database() ,3 -- //返回数据库名 -1 union select 1,2,group_concat(table_name) from information_schema.tables where table_schema库名 -- //获取数据库里的表名 -…...
深入理解C语言中的静态库与动态库 —— 原理与实践
引言 在 C 语言编程中,库是预编译的代码集合,用于实现特定功能,以供其他程序使用。库可以分为静态库和动态库两种主要类型。静态库在编译阶段被链接到目标程序中,而动态库则是在运行时被加载。本文旨在深入探讨这两种库的工作原理…...

深入剖析PHP 7.4.21开发服务器源码泄露漏洞及其复现过程
1. PHP开发服务器源码泄露漏洞初探 最近在测试PHP 7.4.21开发服务器时,我发现一个挺有意思的漏洞——源码可以直接被读取。这可不是闹着玩的,想象一下你的网站源代码像裸奔一样暴露在外,数据库配置、加密逻辑全都一览无余。这个漏洞影响所有P…...
)
用Python和ROS 2 Humble手把手教你写一个简易机械臂仿真器(附完整代码)
用Python和ROS 2 Humble构建2自由度机械臂仿真器:从零实现运动学与轨迹可视化 在机器人开发中,机械臂的运动控制一直是核心难点。传统实体设备的高成本和复杂调试流程让许多开发者望而却步。本文将带你用Python和ROS 2 Humble构建一个完整的2自由度机械臂…...

FDTD仿真中谐振腔Q值计算:从低Q到高Q的完整实践指南
1. 谐振腔Q值计算的核心概念 第一次接触谐振腔Q值计算时,我被各种公式和图表搞得晕头转向。直到在实验室熬了三个通宵后,才真正理解Q值就像是一个"能量储存能力"的评分卡——分数越高,能量泄漏越慢。在FDTD仿真中,我们…...

PyTorch Autograd动态计算图实战:从构建、可视化到高效调试
1. 动态计算图的构建原理 PyTorch的Autograd系统最迷人的特性就是它的动态计算图。我第一次接触这个概念时,感觉就像发现了一个魔法黑箱——它能在代码运行时自动记录所有操作,并在需要时反向计算梯度。这种动态特性让PyTorch在调试复杂模型时特别顺手&a…...

3大核心功能揭秘:CELLxGENE如何让单细胞数据分析变得如此简单
3大核心功能揭秘:CELLxGENE如何让单细胞数据分析变得如此简单 【免费下载链接】cellxgene An interactive explorer for single-cell transcriptomics data 项目地址: https://gitcode.com/gh_mirrors/ce/cellxgene 在单细胞转录组学研究中,数据分…...

CasaOS应用商店太单调?试试这几个社区维护的源,青龙面板、迅雷都能一键装
CasaOS社区应用源全攻略:解锁青龙面板、迅雷等本土化神器 如果你已经厌倦了CasaOS官方应用商店里那些千篇一律的容器镜像,正为找不到迅雷下载、青龙面板这类中国特色应用而发愁,那么这篇文章就是为你准备的。作为一个长期折腾家庭服务器的玩家…...
)
STM32新手避坑:用Keil5和SSD1306 OLED显示自定义汉字(解决中文乱码)
STM32实战指南:Keil5与SSD1306 OLED的汉字显示优化全解析 刚接触STM32开发的工程师们,在完成基础的点灯实验后,往往迫不及待想尝试更丰富的显示功能。SSD1306 OLED屏幕因其小巧的体积和清晰的显示效果,成为许多项目的首选。但当涉…...

3步精通Calibre电子书转换:从格式兼容到专业排版指南
3步精通Calibre电子书转换:从格式兼容到专业排版指南 【免费下载链接】calibre The official source code repository for the calibre ebook manager 项目地址: https://gitcode.com/GitHub_Trending/ca/calibre 在数字阅读时代,电子书格式碎片化…...
)
保姆级教程:小米AX3000T刷OpenWrt 24.10.0全流程(含救砖指南)
小米AX3000T路由器刷OpenWrt全流程实战指南 作为一名长期折腾家用路由器的技术爱好者,我最近刚完成了小米AX3000T刷OpenWrt的全过程。相比官方固件,OpenWrt提供了更强大的自定义功能和性能优化空间。本文将分享从准备工作到救砖方案的完整经验ÿ…...

OpenClaw与Qwen3-VL:30B:高效个人AI办公助手实战
OpenClaw与Qwen3-VL:30B:高效个人AI办公助手实战 1. 为什么选择OpenClawQwen3-VL组合 去年冬天,当我第5次因为会议记录整理到凌晨两点时,终于决定寻找自动化解决方案。在尝试了市面上各种RPA工具后,偶然发现了OpenClaw这个开源框…...