Spring完整知识点二
Spring注解开发
- Spring是轻代码而重配置的框架,配置比较繁重,影响开发效率,所以注解开发是一种趋势,它能够代替xml配置文件,可以简化配置,提高开发效率
- Spring注解根据出现时间分类
- Spring原始注解:主要代替
<bean>的配置 - Spring新注解:Spring配置文件中有些配置是Spring原始注解无法替代的,此时就需要新注解,比如:
- 非自定义的Bean的配置,比如Druid、Cp30的bean
- 加载properties配置文件的配置:
<context:property-placeholder location="classpath:jdbc.properties"/> - 组件扫描的配置:
<context:component-scan base-package="at.guigu"></context:component-scan> - 引入其它配置文件的配置:
<import resource="applicationContext-xxx.xml"/>
- Spring原始注解:主要代替
- 注意
- 使用注解开发时,需要在Spring配置文件中配置组件扫描
- 作用:指定哪个包及其子包下的bean需要进行扫描,以便可以识别使用注解配置的类、字段和方法
- 使用注解开发时,需要在Spring配置文件中配置组件扫描
Spring原始注解快速入门
-
不使用注解开发时的代码截图如下(以
setter方法注入为例)
-
使用注解开发的步骤
-
Step1: 在pom.xml文件中导入相应的坐标及插件:Spring坐标、Annotation坐标、Tomcat插件。pom.xml文件完整代码如下
<project xmlns="http://maven.apache.org/POM/4.0.0" xmlns:xsi="http://www.w3.org/2001/XMLSchema-instance"xsi:schemaLocation="http://maven.apache.org/POM/4.0.0 http://maven.apache.org/maven-v4_0_0.xsd"><modelVersion>4.0.0</modelVersion><parent><groupId>org.example</groupId><artifactId>SpringDemo</artifactId><version>1.0-SNAPSHOT</version></parent><artifactId>SpringAnno</artifactId><packaging>war</packaging><name>SpringAnno Maven Webapp</name><url>http://maven.apache.org</url><dependencies><dependency><groupId>junit</groupId><artifactId>junit</artifactId><version>3.8.1</version><scope>test</scope></dependency><!--spring坐标--><dependency><groupId>org.springframework</groupId><artifactId>spring-context</artifactId><version>6.1.6</version></dependency><!--Annotation坐标--><dependency><groupId>javax.annotation</groupId><artifactId>javax.annotation-api</artifactId><version>1.3.2</version></dependency></dependencies><build><finalName>SpringAnno</finalName><plugins><!-- Tomcat插件 --><plugin><groupId>org.apache.tomcat.maven</groupId><artifactId>tomcat7-maven-plugin</artifactId><version>2.2</version></plugin></plugins></build> </project> -
Step2: 给对应的类添加注解
-
UserDaoImpl类代码如下package at.guigu.dao.impl;import at.guigu.dao.UserDao; import org.springframework.stereotype.Repository;// <bean id="userDaoImpl" class="at.guigu.dao.impl.UserDaoImpl"></bean> // 等同于@Component("userDaoImpl") @Repository("userDaoImpl") public class UserDaoImpl implements UserDao {public void save() {System.out.println("UserDao save running...");} } -
BookServiceImpl类代码如下package at.guigu.service.impl; import at.guigu.dao.UserDao; import at.guigu.service.BookService; import org.springframework.beans.factory.annotation.Autowired; import org.springframework.beans.factory.annotation.Qualifier; import org.springframework.stereotype.Service;//<bean id="bookServiceImpl" class="at.guigu.service.impl.BookServiceImpl"></bean> // 等同于@Component("bookServiceImpl") @Service("bookServiceImpl") public class BookServiceImpl implements BookService {// <property name="userDao" ref="userDaoImpl"/>@Autowired@Qualifier("userDaoImpl")private UserDao userDao;/*public void setUserDao(UserDao userDao) {this.userDao = userDao;}*/@Overridepublic void save() {System.out.println("BookService save...");userDao.save();} }
-
-
Step3: 在Spring配置文件中配置注解的组件扫描,Spring配置文件代码如下
- 配置组件扫描需要在Spring配置文件中引入
context命名空间和context约束路径然后使用context命名空间加载 properties 文件。Spring配置文件代码如下- 命名空间:
xmlns:context="http://www.springframework.org/schema/context" - 约束路径:
http://www.springframework.org/schema/context、http://www.springframework.org/schema/context/spring-context.xsd
- 命名空间:
- 配置组件扫描代码:
<context:component-scan base-package="at.guigu"></context:component-scan>base-package:给定一个包,然后会自动扫描该包下的所有内容,以便可以识别使用注解配置的类、字段和方法
<?xml version="1.0" encoding="UTF-8"?> <beans xmlns="http://www.springframework.org/schema/beans"xmlns:xsi="http://www.w3.org/2001/XMLSchema-instance"xmlns:context="http://www.springframework.org/schema/context"xsi:schemaLocation="http://www.springframework.org/schema/beanshttp://www.springframework.org/schema/beans/spring-beans.xsdhttp://www.springframework.org/schema/contexthttp://www.springframework.org/schema/context/spring-context.xsd"><!--配置注解的组件扫描--><context:component-scan base-package="at.guigu"></context:component-scan> </beans> - 配置组件扫描需要在Spring配置文件中引入
-
Step4: 测试类TestOne代码如下
package at.guigu.web;import at.guigu.service.impl.BookServiceImpl;
import org.junit.Test;
import org.springframework.context.ApplicationContext;
import org.springframework.context.support.ClassPathXmlApplicationContext;public class TestOne {@Testpublic void test1() {//1 获取IOC容器ApplicationContext app = new ClassPathXmlApplicationContext("applicationContext.xml");//2 从IOC容器中获取bean对应的对象BookServiceImpl bookService = (BookServiceImpl) app.getBean("bookServiceImpl");bookService.save();}
}
-
-
使用注解开发的与使用配置文件进行依赖注入的对比图例如下

Spring原始注解
| 原始注解 | 解释 |
|---|---|
@Component | 使用在类上,用于实例化bean |
@Controller | 使用在Web层的类上,用于实例化bean |
@Service | 使用在Service层的类上,用于实例化bean |
@Repository | 使用在Dao/Mapper层的类上,用于实例化bean |
@Autowired | 使用在字段上,用于根据类型进行自动依赖注入 |
@Qualifier("beanId") | 必须与@Autowired一起使用,用于根据名称进行依赖注入,从而避免按类型自动装配时的歧义 |
@Resource(name = "beanId") | 相当于@Autowired+@Resource。它既可以按名称注入,也可以按类型注入。它的默认行为是按名称注入,如果找不到匹配的名称,再按类型注入。 |
@Value | 注入普通属性 |
@Scope | 使用在类上,标注bean的作用范围。默认为@Scope("singleton"):单例; @Scope("prototype"):多例 |
@PostConstruct | 使用在方法上,标注该方法是bean的初始化方法 |
@PreDestroy | 使用在方法上,标注该方法是bean的销毁方法 |
-
注意
-
@Repository、@Service、@Controller以上三个注解能用@Component来代替- 因为这三个注解本质上都是
@Component注解的扩展
- 因为这三个注解本质上都是
-
使用
@Autowired、@Qualifier("beanId")、@Resource("beanId")这三个注解进行依赖注入时,可以省略不写setter方法 -
@Value用于替代value,即只能用于基本数据类型与字符串类型 -
@Scope不在进行测试,可自行测试
-
-
@Autowired、@Qualifier注解详解@Autowired是按照数据类型从Spring容器中进行自动匹配的。它会自动匹配对应引用类型的实现类的bean@Qualifier注解必须与@Autowired一起配合使用。它是按照对应bean的id值从Spring容器中进行匹配的- 若只使用
@Autowired,而不与@Qualifier配合使用时:使用@Autowired注解的引用数据类型对应的bean在Spring容器中只能有一个;反之则必须与@Qualifier联合使用
-
@Resource注解详解@Resource相当于@Autowired+@Resource。@Resource(name = "beanId"):如果beanId属性被指定,首先按名称查找;如果没有指定beanId,则按字段或属性名进行查找;如果没有找到匹配的名称,再按类型查找。@Resource注解在代码中必须写为@Resource(name = "beanId")的形式,若不加上name=,则会报错
-
只使用
@Autowired的示例-
使用
@Autowired注解的属性只存在一个对应实现类的bean
-
使用
@Autowired注解的属性存在多个对应实现类的bean- 错误示例

- 正确示例:此时必须与
@Qualifier联合使用
@Autowired、@Qualifier("beanId")联合使用
@Resource代替@Autowired+@Resource
-
@Value注入普通属性
-
简单形式的代码示例图如下

-
与properties配置文件结合给属性赋值的步骤
-
Step1: 在pom.xml文件中导入Spring、Annotation、数据源(连接池)的坐标和数据库mysql驱动坐标。pom.xml文件完整代码如下
- 博主测试C3P0、Druid两个数据库连接池,所以它俩的坐标均会导入
<project xmlns="http://maven.apache.org/POM/4.0.0" xmlns:xsi="http://www.w3.org/2001/XMLSchema-instance"xsi:schemaLocation="http://maven.apache.org/POM/4.0.0 http://maven.apache.org/maven-v4_0_0.xsd"><modelVersion>4.0.0</modelVersion><parent><groupId>org.example</groupId><artifactId>SpringDemo</artifactId><version>1.0-SNAPSHOT</version></parent><artifactId>SpringAnno</artifactId><packaging>war</packaging><name>SpringAnno Maven Webapp</name><url>http://maven.apache.org</url><dependencies><dependency><groupId>junit</groupId><artifactId>junit</artifactId><version>3.8.1</version><scope>test</scope></dependency><!--mysql坐标--><dependency><groupId>mysql</groupId><artifactId>mysql-connector-java</artifactId><version>8.0.33</version></dependency><!--druid坐标--><dependency><groupId>com.alibaba</groupId><artifactId>druid</artifactId><version>1.2.18</version></dependency><!--c3p0坐标--><dependency><groupId>com.mchange</groupId><artifactId>c3p0</artifactId><version>0.9.5.5</version></dependency><!--spring坐标--><dependency><groupId>org.springframework</groupId><artifactId>spring-context</artifactId><version>6.1.6</version></dependency><!--Annotation坐标--><dependency><groupId>javax.annotation</groupId><artifactId>javax.annotation-api</artifactId><version>1.3.2</version></dependency><dependency><groupId>junit</groupId><artifactId>junit</artifactId><version>4.13.2</version><scope>test</scope></dependency></dependencies><build><finalName>SpringAnno</finalName><plugins><!-- Tomcat插件 --><plugin><groupId>org.apache.tomcat.maven</groupId><artifactId>tomcat7-maven-plugin</artifactId><version>2.2</version></plugin></plugins></build> </project> -
Step2: 右键源代码配置文件目录(即资源文件
resources)→New→File,创建properties配置文件,博主文件名为jdbc.properties,该配置文件代码如下- 注意: properties配置文件中配置的各个属性前必须添加个
id.(即id.属性,比如:属性url就设置为id.url,博主设置的为jdbc.url),以供Spring配置文件可以使用属性占位符${}语法引用这些属性
#driverClassName代表数据库驱动,后跟驱动全类名(在MySQL驱动jar包下的META-INF下的services文件夹下的java.sql.Driver文件内) jdbc.driverClassName=com.mysql.cj.jdbc.Driver # 数据库连接URL jdbc.url=jdbc:mysql://localhost:3306/test02?useUnicode=true&characterEncoding=utf-8&useSSL=false&serverTimezone=Asia/Shanghai # 数据库用户名 jdbc.username=root # 数据库密码 jdbc.password=123456 # 初始化连接数量---即容器中初始的数据库连接数量 jdbc.initialSize=5 # 最大活跃连接数量---容器中初始为5个,但若5个用完了,此时可以在申请5个数据库连接数量 #也就是说容器中最多存放10个数据库连接 jdbc.maxActive=10 # 获取连接时的最大等待时间,单位:毫秒。---与数据库进行连接时若超过3s仍未连接成功,则会报错 jdbc.maxWait=3000 #最小空闲连接数量---minIdle=5 # 配置检测连接是否有效的SQL,可以是一个查询语句,如果不指定则默认为"SELECT 1"---validationQuery=SELECT 1 # 是否开启自动提交事务---defaultAutoCommit=true - 注意: properties配置文件中配置的各个属性前必须添加个
-
Step3: 右键源代码配置文件目录(即资源文件
resources)→New→XML Configuration File→Spring Config,文件名为applicationContext.xml,然后在该Spring配置文件中引入context命名空间、context约束路径、配置注解的组件扫描,并引入properties配置文件后配置数据源(连接池)的bean。Spring配置文件完整代码如下<?xml version="1.0" encoding="UTF-8"?> <beans xmlns="http://www.springframework.org/schema/beans"xmlns:xsi="http://www.w3.org/2001/XMLSchema-instance"xmlns:context="http://www.springframework.org/schema/context"xsi:schemaLocation="http://www.springframework.org/schema/beanshttp://www.springframework.org/schema/beans/spring-beans.xsdhttp://www.springframework.org/schema/contexthttp://www.springframework.org/schema/context/spring-context.xsd"><!--配置注解的组件扫描--><context:component-scan base-package="at.guigu"></context:component-scan><!--使用`context`命名空间加载 `properties` 文件--><context:property-placeholder location="classpath:jdbc.properties"/><!--Cp30对应的bean--><bean id="dataSourceCp30" class="com.mchange.v2.c3p0.ComboPooledDataSource"><!--使用属性占位符`${}`语法引用properties文件中的属性--><property name="driverClass" value="${jdbc.driverClassName}"/><property name="jdbcUrl" value="${jdbc.url}"/><property name="user" value="${jdbc.username}"/><property name="password" value="${jdbc.password}"/></bean><!--Druid对应的bean--><bean id="dataSourceDruid" class="com.alibaba.druid.pool.DruidDataSource"><!--使用属性占位符`${}`语法引用properties文件中的属性--><property name="driverClassName" value="${jdbc.driverClassName}"/><property name="url" value="${jdbc.url}"/><property name="username" value="${jdbc.username}"/><property name="password" value="${jdbc.password}"/></bean> </beans> -
Step4:
BookServiceImpl类属性配置代码如下package at.guigu.service.impl; import at.guigu.dao.UserDao; import at.guigu.service.BookService; import org.springframework.beans.factory.annotation.Autowired; import org.springframework.beans.factory.annotation.Qualifier; import org.springframework.beans.factory.annotation.Value; import org.springframework.stereotype.Service;import javax.annotation.Resource;//<bean id="bookServiceImpl" class="at.guigu.service.impl.BookServiceImpl"></bean> @Service("bookServiceImpl") public class BookServiceImpl implements BookService {// <property name="userDao" ref="userDaoImpl"/>@Resource(name = "userDaoImpl")private UserDao userDao;@Value("${jdbc.driverClassName}")private String driverClass;@Value("${jdbc.username}")private String name;@Value("15")private int age;@Overridepublic void save() {System.out.println(driverClass);System.out.println(name + "===" + age);userDao.save();} } -
Step5: 测试代码如下
package at.guigu.web;import at.guigu.service.impl.BookServiceImpl; import org.junit.Test; import org.springframework.context.ApplicationContext; import org.springframework.context.support.ClassPathXmlApplicationContext;public class TestOne {@Testpublic void test1() {//1 获取IOC容器ApplicationContext app = new ClassPathXmlApplicationContext("applicationContext.xml");//2 从IOC容器中获取bean对应的对象BookServiceImpl bookService = (BookServiceImpl) app.getBean("bookServiceImpl");bookService.save();} }
-
@PostConstruct、@PreDestroy:初始、销毁方法
-
繁琐配置步骤均省略,可详见之前的步骤,此处只说明重点步骤
-
BookServiceImpl类代码如下
package at.guigu.service.impl; import at.guigu.dao.UserDao; import at.guigu.service.BookService; import org.springframework.beans.factory.annotation.Autowired; import org.springframework.beans.factory.annotation.Qualifier; import org.springframework.beans.factory.annotation.Value; import org.springframework.context.annotation.Scope; import org.springframework.stereotype.Service;import javax.annotation.PostConstruct; import javax.annotation.PreDestroy; import javax.annotation.Resource;//<bean id="bookServiceImpl" scope = "singleton" class="at.guigu.service.impl.BookServiceImpl"></bean> @Service("bookServiceImpl") @Scope("singleton") public class BookServiceImpl implements BookService {// <property name="userDao" ref="userDaoImpl"/>@Resource(name = "userDaoImpl")private UserDao userDao;@PostConstructpublic void init() {System.out.println("Service Init...");}@PreDestroypublic void destroy() {System.out.println("Service Destroy...");}@Overridepublic void save() {System.out.println("BookService running...");userDao.save();} } -
测试代码如下
package at.guigu.web;import at.guigu.service.impl.BookServiceImpl; import org.junit.Test; import org.springframework.context.ApplicationContext; import org.springframework.context.support.ClassPathXmlApplicationContext;public class TestOne {@Testpublic void test2() {//1 获取IOC容器ApplicationContext app = new ClassPathXmlApplicationContext("applicationContext.xml");//2 从IOC容器中获取bean对应的对象BookServiceImpl bookService = (BookServiceImpl) app.getBean("bookServiceImpl");bookService.save();} }
-
-
注意:在上述测试代码运行截图中并未运行销毁方法,原因及解决方式请详见本章中的Spring配置文件标签详解一中的初始销毁知识点
Spring新注解
-
作用:配合Spring原始注解完全代替Spring配置文件
-
可替代的配置如下
- 非自定义的Bean的配置,比如Druid、Cp30的bean
- 加载properties配置文件的配置:
<context:property-placeholder location="classpath:jdbc.properties"/> - 组件扫描的配置(若有多个包则中间用逗号或空格间隔):
<context:component-scan base-package="at.guigu"></context:component-scan><context:component-scan base-package="at.guigu.dao at.guigu.service"></context:component-scan><context:component-scan base-package="at.guigu.dao, at.guigu.service"></context:component-scan>
- 引入其它配置文件的配置:
<import resource="applicationContext-xxx.xml"/>
| 新注解 | 解释 |
|---|---|
@Configuration | 使用在类上,用于指定当前类是Spring的核心配置类。当创建容器时会从该类上加载注解 |
@ComponentScan | 用于指定Spring在初始化容器时要扫描的包。即相当于组件扫描的配置。若扫描一个包,则为:@ComponentScan("包1");若扫描多个包,则为:@ComponentScan({"包1", "包2", ...}) |
@Bean | 使用在方法上,标注将该方法的返回值存储到容器中 |
@PropertySource | 用于加载properties文件的配置 |
@Import | 用于导入其它文件的配置类。若只导入一个文件配置类,则为@Import(Aaa.class);若导入多个,则为@Import({Aaa.class, Bbb.class}) |
@ComponentScan注解可能用到的属性 | 解释 |
value/basePackages | 指定要扫描的包 |
includeFilters | 用于指定一个或多个包含过滤器,限制只有符合条件的类才会被扫描和注册为 Spring Bean。过滤条件可以是注解、正则表达式等。 |
excludeFilters | 用于指定一个或多个排除过滤器,排除掉不需要扫描的类。它和 includeFilters 是互斥的 |
@ComponentScan注解的内部注解 | 解释 |
@ComponentScan.Filter | 用于定义在组件扫描时的过滤规则。主要用于 includeFilters 和 excludeFilters 属性,用来实现扫描范围的精确控制。 |
@ComponentScan.Filter注解用到的属性 | 解释 |
type | 指定过滤的类型。共有四种即FilterType.ANNOTATION:根据注解类型过滤类;FilterType.REGEX:使用正则表达式过滤类的全限定名;FilterType.ASPECTJ:使用 AspectJ 表达式进行过滤;FilterType.ANY:匹配所有类,不常用。 |
value/classes | 根据过滤类型不同,指定具体的过滤条件。如果 type 是 FilterType.ANNOTATION,则 value 是要过滤的注解类型;如果 type 是 FilterType.ASPECTJ,则 value 是 AspectJ 表达式。 |
pattern | 根据过滤类型不同,指定具体的过滤条件。如果 type 是 FilterType.REGEX,则用pattern 要匹配的正则表达式 |
注意:
@ComponentScan注解中的属性及内部注解示例可详见SpringMVC注解形式的快速入门示例
Spring新注解代码实现
-
Spring新注解快速入门的
UserDaoImpl类、BookServiceImpl类代码省略,详见Spring原始注解快速入门 -
在Spring原始注解中,利用
@Value()注解注入普通属性时有一个与properties配置文件结合给属性赋值的步骤-
该步骤的Step3中的Spring配置文件代码如下
<?xml version="1.0" encoding="UTF-8"?>
<beans xmlns="http://www.springframework.org/schema/beans"xmlns:xsi="http://www.w3.org/2001/XMLSchema-instance"xmlns:context="http://www.springframework.org/schema/context"xsi:schemaLocation="http://www.springframework.org/schema/beanshttp://www.springframework.org/schema/beans/spring-beans.xsdhttp://www.springframework.org/schema/contexthttp://www.springframework.org/schema/context/spring-context.xsd"><!--配置注解的组件扫描--><context:component-scan base-package="at.guigu"></context:component-scan><!--使用`context`命名空间加载 `properties` 文件--><context:property-placeholder location="classpath:jdbc.properties"/><!--Cp30对应的bean--><bean id="dataSourceCp30" class="com.mchange.v2.c3p0.ComboPooledDataSource"><!--使用属性占位符`${}`语法引用properties文件中的属性--><property name="driverClass" value="${jdbc.driverClassName}"/><property name="jdbcUrl" value="${jdbc.url}"/><property name="user" value="${jdbc.username}"/><property name="password" value="${jdbc.password}"/></bean><!--Druid对应的bean--><bean id="dataSourceDruid" class="com.alibaba.druid.pool.DruidDataSource"><!--使用属性占位符`${}`语法引用properties文件中的属性--><property name="driverClassName" value="${jdbc.driverClassName}"/><property name="url" value="${jdbc.url}"/><property name="username" value="${jdbc.username}"/><property name="password" value="${jdbc.password}"/></bean>
</beans>
-
-
利用新注解进行配置的步骤如下
-
Step1: 在pom.xml文件中导入Spring、Annotation、数据源(连接池)的坐标和数据库mysql驱动坐标。pom.xml文件完整代码如下
- 博主测试C3P0、Druid两个数据库连接池,所以它俩的坐标均会导入
<project xmlns="http://maven.apache.org/POM/4.0.0" xmlns:xsi="http://www.w3.org/2001/XMLSchema-instance"xsi:schemaLocation="http://maven.apache.org/POM/4.0.0 http://maven.apache.org/maven-v4_0_0.xsd"><modelVersion>4.0.0</modelVersion><parent><groupId>org.example</groupId><artifactId>SpringDemo</artifactId><version>1.0-SNAPSHOT</version></parent><artifactId>SpringAnno</artifactId><packaging>war</packaging><name>SpringAnno Maven Webapp</name><url>http://maven.apache.org</url><dependencies><dependency><groupId>junit</groupId><artifactId>junit</artifactId><version>3.8.1</version><scope>test</scope></dependency><!--mysql坐标--><dependency><groupId>mysql</groupId><artifactId>mysql-connector-java</artifactId><version>8.0.33</version></dependency><!--druid坐标--><dependency><groupId>com.alibaba</groupId><artifactId>druid</artifactId><version>1.2.18</version></dependency><!--c3p0坐标--><dependency><groupId>com.mchange</groupId><artifactId>c3p0</artifactId><version>0.9.5.5</version></dependency><!--spring坐标--><dependency><groupId>org.springframework</groupId><artifactId>spring-context</artifactId><version>6.1.6</version></dependency><!--Annotation坐标--><dependency><groupId>javax.annotation</groupId><artifactId>javax.annotation-api</artifactId><version>1.3.2</version></dependency><dependency><groupId>junit</groupId><artifactId>junit</artifactId><version>4.13.2</version><scope>test</scope></dependency></dependencies><build><finalName>SpringAnno</finalName><plugins><!-- Tomcat插件 --><plugin><groupId>org.apache.tomcat.maven</groupId><artifactId>tomcat7-maven-plugin</artifactId><version>2.2</version></plugin></plugins></build> </project> -
Step2: 右键源代码配置文件目录(即资源文件
resources)→New→File,创建properties配置文件,博主文件名为jdbc.properties,该配置文件代码如下- 注意: properties配置文件中配置的各个属性前必须添加个
id.(即id.属性,比如:属性url就设置为id.url,博主设置的为jdbc.url),以供Spring配置文件可以使用属性占位符${}语法引用这些属性
#driverClassName代表数据库驱动,后跟驱动全类名(在MySQL驱动jar包下的META-INF下的services文件夹下的java.sql.Driver文件内) jdbc.driverClassName=com.mysql.cj.jdbc.Driver # 数据库连接URL jdbc.url=jdbc:mysql://localhost:3306/test02?useUnicode=true&characterEncoding=utf-8&useSSL=false&serverTimezone=Asia/Shanghai # 数据库用户名 jdbc.username=root # 数据库密码 jdbc.password=123456 # 初始化连接数量---即容器中初始的数据库连接数量 jdbc.initialSize=5 # 最大活跃连接数量---容器中初始为5个,但若5个用完了,此时可以在申请5个数据库连接数量 #也就是说容器中最多存放10个数据库连接 jdbc.maxActive=10 # 获取连接时的最大等待时间,单位:毫秒。---与数据库进行连接时若超过3s仍未连接成功,则会报错 jdbc.maxWait=3000 #最小空闲连接数量---minIdle=5 # 配置检测连接是否有效的SQL,可以是一个查询语句,如果不指定则默认为"SELECT 1"---validationQuery=SELECT 1 # 是否开启自动提交事务---defaultAutoCommit=true - 注意: properties配置文件中配置的各个属性前必须添加个
-
Step4: 在三层架构包下创建一个
config包,并在该包下创建一个**代替Spring配置文件的类**SpringConfiguration,完整代码如下package at.guigu.config;import com.alibaba.druid.pool.DruidDataSource; import com.mchange.v2.c3p0.ComboPooledDataSource; import org.springframework.beans.factory.annotation.Value; import org.springframework.context.annotation.Bean; import org.springframework.context.annotation.ComponentScan; import org.springframework.context.annotation.Configuration; import org.springframework.context.annotation.PropertySource;import javax.sql.DataSource;// 该注解代表该类是Spring的核心配置类 @Configuration // 配置注解的组件扫描<context:component-scan base-package="at.guigu"></context:component-scan> @ComponentScan("at.guigu") // 加载properties配置文件<context:property-placeholder location="classpath:jdbc.properties"/> @PropertySource("classpath:jdbc.properties") public class SpringConfiguration {@Value("${jdbc.driverClassName}")private String driverClassName;@Value("${jdbc.url}")private String url;@Value("${jdbc.username}")private String username;@Value("${jdbc.password}")private String password;/*** Cp30对应的bean* Spring会将当前方法的返回值以指定的id存储到Spring的IOC容器中* @return* @throws Exception*/@Bean("dataSourceCp30")public DataSource getCp30DataSource() throws Exception{// 创建数据源对象ComboPooledDataSource dataSource = new ComboPooledDataSource();// 设置数据源基本连接数据dataSource.setDriverClass(driverClassName);dataSource.setJdbcUrl(url);dataSource.setUser(username);dataSource.setPassword(password);return dataSource;}/*** Druid对应的bean* Spring会将当前方法的返回值以指定的id存储到Spring的IOC容器中* @return* @throws Exception*/@Bean("dataSourceDruid")public DataSource getDruidDataSource() throws Exception{// 创建数据源对象DruidDataSource dataSource = new DruidDataSource();// 设置数据源基本连接数据dataSource.setDriverClassName(driverClassName);dataSource.setUrl(url);dataSource.setUsername(username);dataSource.setPassword(password);return dataSource;} } -
测试代码如下
package at.guigu.web;import at.guigu.config.SpringConfiguration;
import at.guigu.service.impl.BookServiceImpl;
import com.mchange.v2.c3p0.ComboPooledDataSource;
import org.junit.Test;
import org.springframework.context.ApplicationContext;
import org.springframework.context.annotation.AnnotationConfigApplicationContext;
import org.springframework.context.support.ClassPathXmlApplicationContext;public class TestOne {@Testpublic void test3() {//1 获取IOC容器// 通过Spring配置文件获取:ApplicationContext app = new ClassPathXmlApplicationContext("applicationContext.xml");// 通过Spring类获取ApplicationContext app = new AnnotationConfigApplicationContext(SpringConfiguration.class);//2 从IOC容器中获取bean对应的对象BookServiceImpl bookService = (BookServiceImpl) app.getBean("bookServiceImpl");bookService.save();}@Testpublic void test4() {//1 获取IOC容器// 通过Spring配置文件获取:ApplicationContext app = new ClassPathXmlApplicationContext("applicationContext.xml");// 通过Spring类获取ApplicationContext app = new AnnotationConfigApplicationContext(SpringConfiguration.class);//2 从IOC容器中获取bean对应的对象ComboPooledDataSource dataSourceCp30 = (ComboPooledDataSource) app.getBean("dataSourceCp30");System.out.println(dataSourceCp30);}
}
-
-
在实际开发中代替Spring配置文件的
SpringConfiguration类中的代码会很多,我们可以将其根据不同种类拆分开,然后在主Spring配置文件对应的类中引入拆分后的类,代码如下-
Step1: 在
config包下创建拆分配置文件对应的拆分类DataSourceConfiguration,代码如下package at.guigu.config;import com.alibaba.druid.pool.DruidDataSource; import com.mchange.v2.c3p0.ComboPooledDataSource; import org.springframework.beans.factory.annotation.Value; import org.springframework.context.annotation.Bean; import org.springframework.context.annotation.PropertySource;import javax.sql.DataSource;// 分配置文件对应的类不用配置@Configuration以及@ComponentScan注解 // 加载properties配置文件<context:property-placeholder location="classpath:jdbc.properties"/> @PropertySource("classpath:jdbc.properties") public class DataSourceConfiguration {@Value("${jdbc.driverClassName}")private String driverClassName;@Value("${jdbc.url}")private String url;@Value("${jdbc.username}")private String username;@Value("${jdbc.password}")private String password;/*** Cp30对应的bean* Spring会将当前方法的返回值以指定的id存储到Spring的IOC容器中* @return* @throws Exception*/@Bean("dataSourceCp30")public DataSource getCp30DataSource() throws Exception{// 创建数据源对象ComboPooledDataSource dataSource = new ComboPooledDataSource();// 设置数据源基本连接数据dataSource.setDriverClass(driverClassName);dataSource.setJdbcUrl(url);dataSource.setUser(username);dataSource.setPassword(password);return dataSource;}/*** Druid对应的bean* Spring会将当前方法的返回值以指定的id存储到Spring的IOC容器中* @return* @throws Exception*/@Bean("dataSourceDruid")public DataSource getDruidDataSource() throws Exception{// 创建数据源对象DruidDataSource dataSource = new DruidDataSource();// 设置数据源基本连接数据dataSource.setDriverClassName(driverClassName);dataSource.setUrl(url);dataSource.setUsername(username);dataSource.setPassword(password);return dataSource;} } -
Step2: 在Spring主配置文件对应的主类
SpringConfiguration中利用@Import注解引入分配置文件对应的拆分类DataSourceConfiguration,代码如下:package at.guigu.config;import com.alibaba.druid.pool.DruidDataSource; import com.mchange.v2.c3p0.ComboPooledDataSource; import org.springframework.beans.factory.annotation.Value; import org.springframework.context.annotation.*;import javax.sql.DataSource;// 该注解代表该类是Spring的核心配置类 @Configuration // 配置注解的组件扫描<context:component-scan base-package="at.guigu"></context:component-scan> @ComponentScan("at.guigu") // 引入拆分配置文件<import resource="applicationContext-xxx.xml"/> @Import(DataSourceConfiguration.class) public class SpringConfiguration { }
-
为非自定义(即第三方)的bean注入资源
-
以数据源为例,假设现在容器中的数据源需要使用
UserDao实现类的对象(即引用类型),此时直接将其作为形式参数传递给数据源方法中即可,因为Spring在检测到该数据源bean为第三方bean时,会自动为其提供IOC容器中参数所对应引用类型的bean,代码如下package at.guigu.config;import com.alibaba.druid.pool.DruidDataSource; import com.mchange.v2.c3p0.ComboPooledDataSource; import org.springframework.beans.factory.annotation.Value; import org.springframework.context.annotation.Bean; import org.springframework.context.annotation.PropertySource;import javax.sql.DataSource;// 分配置文件对应的类不用配置@Configuration以及@ComponentScan注解 // 加载properties配置文件<context:property-placeholder location="classpath:jdbc.properties"/> @PropertySource("classpath:jdbc.properties") public class DataSourceConfiguration {@Value("${jdbc.driverClassName}")private String driverClassName;@Value("${jdbc.url}")private String url;@Value("${jdbc.username}")private String username;@Value("${jdbc.password}")private String password;/*** Cp30对应的bean* Spring会将当前方法的返回值以指定的id存储到Spring的IOC容器中* @return* @throws Exception*/@Bean("dataSourceCp30")public DataSource getCp30DataSource(BookService bookService) throws Exception{System.out.println(bookService);// 创建数据源对象ComboPooledDataSource dataSource = new ComboPooledDataSource();// 设置数据源基本连接数据dataSource.setDriverClass(driverClassName);dataSource.setJdbcUrl(url);dataSource.setUser(username);dataSource.setPassword(password);return dataSource;}/*** Druid对应的bean* Spring会将当前方法的返回值以指定的id存储到Spring的IOC容器中* @return* @throws Exception*/@Bean("dataSourceDruid")public DataSource getDruidDataSource(BookService bookService) throws Exception{System.out.println(bookService);// 创建数据源对象DruidDataSource dataSource = new DruidDataSource();// 设置数据源基本连接数据dataSource.setDriverClassName(driverClassName);dataSource.setUrl(url);dataSource.setUsername(username);dataSource.setPassword(password);return dataSource;} }此处不在进行运行示例
Spring集成Junit
-
原始Junit测试Spring的问题
-
在测试类中均需要以下两行代码,这两行代码若不写的话就会造成空指针异常
//1 获取IOC容器
// 通过Spring配置文件获取:ApplicationContext app = new ClassPathXmlApplicationContext("applicationContext.xml");
// 通过Spring类获取
ApplicationContext app = new AnnotationConfigApplicationContext(SpringConfiguration.class);
//2 从IOC容器中获取bean对应的对象
ComboPooledDataSource dataSourceCp30 = (ComboPooledDataSource) app.getBean("dataSourceCp30");
-
-
解决原始Junit测试Spring问题的方案
- 让SpringJunit负责创建Spring容器,但需要将配置文件或配置类告知,然后将需要进行测试的bean直接在测试类中进行注入
Spring集成Junit代码实现
-
Spring集成Junit步骤
-
导入相关坐标
- 导入Spring基础坐标:spring-context
- 导入Spring提供的监听器
ContextLoaderListener的相关坐标:spring-web - 导入Spring集成Web环境相关坐标:servlet、jsp
- 导入Spring注解相关坐标:Annotation
- 导入数据库相关坐标:mysql、数据源坐标(druid、cp30)
- 导入Spring集成JUnit相关坐标:junit、spring-test
- 导入Spring集成MyBatis相关坐标:mybatis、spring-jdbc、mybatis-spring
-
使用
@Runwith注解替换原来的运行器,并设置新的类运行器- 其属性为
SpringRunner.class或SpringJUnit4ClassRunner.class:用于集成 Spring 测试框架
- 其属性为
-
使用
@ContextConfiguration指定Spring配置文件或Spring配置类- 指定Spring配置文件:
@ContextConfiguration("classpath:applicationContext.xml") - 指定单个Spring配置类:
@ContextConfiguration(classes = SpringConfiguration.class) - 指定多个Spring配置类:
@ContextConfiguration(classes = {SpringConfiguration.class,...})
- 指定Spring配置文件:
-
在该类中使用
@Autowired注入需要测试的对象 -
在该类中创建对应测试方法测试对应方法
-
-
步骤如下
-
该步骤有两种形式
- Spring配置文件的形式:Spring配置文件及与之对应的
UserDaoImpl、BookServiceImpl代码均省略 - Spring配置类的形式:Spring配置类及与之对应的
UserDaoImpl、BookServiceImpl代码均省略,可详见Spring注解开发部分内容
- Spring配置文件的形式:Spring配置文件及与之对应的
-
Step1: 导入Spring集成Junit的坐标,即spring-test坐标
- 除了Junit坐标外还有spring、Annotation、数据源(连接池)的坐标和数据库mysql驱动坐标。pom.xml文件完整代码如下
<project xmlns="http://maven.apache.org/POM/4.0.0" xmlns:xsi="http://www.w3.org/2001/XMLSchema-instance"xsi:schemaLocation="http://maven.apache.org/POM/4.0.0 http://maven.apache.org/maven-v4_0_0.xsd"><modelVersion>4.0.0</modelVersion><parent><groupId>org.example</groupId><artifactId>SpringDemo</artifactId><version>1.0-SNAPSHOT</version></parent><artifactId>SpringAnno</artifactId><packaging>war</packaging><name>SpringAnno Maven Webapp</name><url>http://maven.apache.org</url><dependencies><dependency><groupId>junit</groupId><artifactId>junit</artifactId><version>3.8.1</version><scope>test</scope></dependency><!--mysql坐标--><dependency><groupId>mysql</groupId><artifactId>mysql-connector-java</artifactId><version>8.0.33</version></dependency><!--druid坐标--><dependency><groupId>com.alibaba</groupId><artifactId>druid</artifactId><version>1.2.18</version></dependency><!--c3p0坐标--><dependency><groupId>com.mchange</groupId><artifactId>c3p0</artifactId><version>0.9.5.5</version></dependency><!--spring坐标--><dependency><groupId>org.springframework</groupId><artifactId>spring-context</artifactId><version>6.1.6</version></dependency><!--Annotation坐标--><dependency><groupId>javax.annotation</groupId><artifactId>javax.annotation-api</artifactId><version>1.3.2</version></dependency><dependency><groupId>junit</groupId><artifactId>junit</artifactId><version>4.13.2</version><scope>test</scope></dependency><!--spring-test坐标--><dependency><groupId>org.springframework</groupId><artifactId>spring-test</artifactId><version>6.1.6</version><scope>test</scope></dependency></dependencies><build><finalName>SpringAnno</finalName><plugins><!-- Tomcat插件 --><plugin><groupId>org.apache.tomcat.maven</groupId><artifactId>tomcat7-maven-plugin</artifactId><version>2.2</version></plugin></plugins></build> </project> -
Step2: 创建测试类
TestTwo。代码如下- Spring配置文件的形式
package at.guigu.web;import at.guigu.service.BookService; import at.guigu.service.impl.BookServiceImpl; import org.junit.Test; import org.junit.runner.RunWith; import org.springframework.beans.factory.annotation.Autowired; import org.springframework.test.context.ContextConfiguration; import org.springframework.test.context.junit4.SpringJUnit4ClassRunner;// 1 集成 Spring 测试框架 @RunWith(SpringJUnit4ClassRunner.class) // 2 指定Spring配置文件或Spring配置类 @ContextConfiguration("classpath:applicationContext.xml") public class TestTwo {// 3 注入需要测试的对象@Autowiredprivate BookServiceImpl bookService;// 3 注入需要测试的对象:若需要测试的bean有多个则与@Qualifier结合指定对应id的bean@Autowired@Qualifier("dataSourceDruid")private DataSource dataSourceDruid;// 3 注入需要测试的对象:若需要测试的bean有多个则与@Qualifier结合指定对应id的bean@Autowired@Qualifier("dataSourceCp30")private DataSource dataSourceCp30;// 4 创建测试方法进行测试@Testpublic void test1() {bookServiceImpl.save();System.out.println(dataSourceDruid);System.out.println(dataSourceCp30);} }- Spring配置类的形式
package at.guigu.web;import at.guigu.config.SpringConfiguration;
import at.guigu.service.BookService;
import at.guigu.service.impl.BookServiceImpl;
import com.mchange.v2.c3p0.ComboPooledDataSource;
import org.junit.Test;
import org.junit.runner.RunWith;
import org.springframework.beans.factory.annotation.Autowired;
import org.springframework.beans.factory.annotation.Qualifier;
import org.springframework.test.context.ContextConfiguration;
import org.springframework.test.context.junit4.SpringJUnit4ClassRunner;import javax.sql.DataSource;// 1 集成 Spring 测试框架
@RunWith(SpringJUnit4ClassRunner.class)
// 2 指定Spring配置文件或Spring配置类
@ContextConfiguration(classes = {SpringConfiguration.class})
public class TestTwo {// 3 注入需要测试的对象@Autowiredprivate BookService bookServiceImpl;// 3 注入需要测试的对象:若需要测试的bean有多个则与@Qualifier结合指定对应id的bean@Autowired@Qualifier("dataSourceDruid")private DataSource dataSourceDruid;// 3 注入需要测试的对象:若需要测试的bean有多个则与@Qualifier结合指定对应id的bean@Autowired@Qualifier("dataSourceCp30")private DataSource dataSourceCp30;// 4 创建测试方法进行测试@Testpublic void test1() {bookServiceImpl.save();System.out.println(dataSourceDruid);System.out.println(dataSourceCp30);}
}
-
完整注解形式集成Junit代码实现
以Spring集成MyBatis项目为基础进行集成测试,要求:在maven项目的test包下完成测试(以测试业务层service包下的类为例)
-
Step1: 导入相关坐标,完整文件代码如下
- 导入Spring基础坐标:spring-context
- 导入Spring提供的监听器
ContextLoaderListener的相关坐标:spring-web - 导入Spring集成Web环境相关坐标:servlet、jsp
- 导入Spring注解相关坐标:Annotation
- 导入数据库相关坐标:mysql、数据源坐标(druid、cp30)
- 导入Spring集成JUnit相关坐标:junit、spring-test
- 导入Spring集成MyBatis相关坐标:mybatis、spring-jdbc、mybatis-spring
<project xmlns="http://maven.apache.org/POM/4.0.0" xmlns:xsi="http://www.w3.org/2001/XMLSchema-instance"xsi:schemaLocation="http://maven.apache.org/POM/4.0.0 http://maven.apache.org/maven-v4_0_0.xsd"><modelVersion>4.0.0</modelVersion><groupId>org.example</groupId><artifactId>SpringJunitDemo</artifactId><packaging>war</packaging><version>1.0-SNAPSHOT</version><name>SpringJunitDemo Maven Webapp</name><url>http://maven.apache.org</url><dependencies><dependency><groupId>junit</groupId><artifactId>junit</artifactId><version>3.8.1</version><scope>test</scope></dependency><!--===================Spring基础坐标=======================--><!--spring坐标--><dependency><groupId>org.springframework</groupId><artifactId>spring-context</artifactId><version>6.1.6</version></dependency><!--===================Spring自带监听器ContextLoaderListener所需坐标=======================--><!--spring-web--><dependency><groupId>org.springframework</groupId><artifactId>spring-web</artifactId><version>5.2.25.RELEASE</version></dependency><!--===================Spring集成Web环境相关坐标=======================--><!-- servlet--><dependency><groupId>javax.servlet</groupId><artifactId>javax.servlet-api</artifactId><version>4.0.1</version><scope>provided</scope></dependency><!--jsp--><dependency><groupId>javax.servlet.jsp</groupId><artifactId>javax.servlet.jsp-api</artifactId><version>2.3.3</version><scope>provided</scope></dependency><!--===================Spring注解相关坐标=======================--><!--Annotation坐标--><dependency><groupId>javax.annotation</groupId><artifactId>javax.annotation-api</artifactId><version>1.3.2</version></dependency><!--=====================数据库相关坐标=========================--><!--mysql坐标--><dependency><groupId>mysql</groupId><artifactId>mysql-connector-java</artifactId><version>8.0.33</version></dependency><!--druid坐标--><dependency><groupId>com.alibaba</groupId><artifactId>druid</artifactId><version>1.2.18</version></dependency><!--c3p0坐标--><dependency><groupId>com.mchange</groupId><artifactId>c3p0</artifactId><version>0.9.5.5</version></dependency><!--===================Spring集成junit相关坐标=======================--><!--junit坐标--><dependency><groupId>junit</groupId><artifactId>junit</artifactId><version>4.13.2</version><scope>test</scope></dependency><!--spring-test坐标--><dependency><groupId>org.springframework</groupId><artifactId>spring-test</artifactId><version>6.1.6</version><scope>test</scope></dependency><!--=====================MyBatis相关坐标=========================--><!--MyBatis坐标--><dependency><groupId>org.mybatis</groupId><artifactId>mybatis</artifactId><version>3.5.16</version></dependency><!--mybatis-spring--><dependency><groupId>org.mybatis</groupId><artifactId>mybatis-spring</artifactId><version>3.0.3</version></dependency><!--spring-jdbc--><dependency><groupId>org.springframework</groupId><artifactId>spring-jdbc</artifactId><version>6.1.10</version></dependency></dependencies><build><finalName>SpringJunitDemo</finalName><plugins><!-- Tomcat插件 --><plugin><groupId>org.apache.tomcat.maven</groupId><artifactId>tomcat7-maven-plugin</artifactId><version>2.2</version></plugin></plugins></build> </project> -
Step2: 在test包下创建三层架构包的业务层service包,并在该包中创建
BrandServiceTest测试类,完整代码如下- Step2-1: 该类要使用
@Runwith注解替换原来的运行器,并设置新的类运行器- 其属性为
SpringRunner.class或SpringJUnit4ClassRunner.class:用于集成 Spring 测试框架
- 其属性为
- Step2-2: 该类使用
@ContextConfiguration指定Spring配置文件或Spring配置类- 指定Spring配置文件:
@ContextConfiguration("classpath:applicationContext.xml") - 指定单个Spring配置类:
@ContextConfiguration(classes = SpringConfiguration.class) - 指定多个Spring配置类:
@ContextConfiguration(classes = {SpringConfiguration.class,...})
- 指定Spring配置文件:
- Step2-3: 在该类中使用
@Autowired注入需要测试的对象 - Step2-4: 在该类中创建对应测试方法测试对应方法
package at.guigu.service;import at.guigu.config.SpringConfiguration;
import at.guigu.pojo.Brand;
import org.junit.Test;
import org.junit.runner.RunWith;
import org.springframework.beans.factory.annotation.Autowired;
import org.springframework.test.context.ContextConfiguration;
import org.springframework.test.context.junit4.SpringJUnit4ClassRunner;import java.util.List;@RunWith(SpringJUnit4ClassRunner.class)
@ContextConfiguration(classes = {SpringConfiguration.class})
public class BrandServiceTest {@Autowiredprivate BrandService brandService;@Testpublic void testGetAll( ) {List<Brand> brands = brandService.getAll();for (Brand brand : brands) {System.out.println(brand);}}}
运行该测试类,截图如下

- Step2-1: 该类要使用
Spring集成Web环境
-
即集成
web/Controller表现层步骤-
Step1: 在pom.xml文件中导入servlet和jsp坐标
- 导入servlet和jsp坐标后三层架构中的
web/Controller表现层才会起效 - Spring需要导入的所有坐标:spring、spring-test、Annotation、servlet、jsp坐标。pom.xml文件完整代码如下
<project xmlns="http://maven.apache.org/POM/4.0.0" xmlns:xsi="http://www.w3.org/2001/XMLSchema-instance"xsi:schemaLocation="http://maven.apache.org/POM/4.0.0 http://maven.apache.org/maven-v4_0_0.xsd"><modelVersion>4.0.0</modelVersion><parent><groupId>org.example</groupId><artifactId>SpringDemo</artifactId><version>1.0-SNAPSHOT</version></parent><artifactId>SpringWeb</artifactId><packaging>war</packaging><name>SpringWeb Maven Webapp</name><url>http://maven.apache.org</url><dependencies><dependency><groupId>junit</groupId><artifactId>junit</artifactId><version>3.8.1</version><scope>test</scope></dependency><!--mysql坐标--><dependency><groupId>mysql</groupId><artifactId>mysql-connector-java</artifactId><version>8.0.33</version></dependency><!--druid坐标--><dependency><groupId>com.alibaba</groupId><artifactId>druid</artifactId><version>1.2.18</version></dependency><!--c3p0坐标--><dependency><groupId>com.mchange</groupId><artifactId>c3p0</artifactId><version>0.9.5.5</version></dependency><!--spring坐标--><dependency><groupId>org.springframework</groupId><artifactId>spring-context</artifactId><version>6.1.6</version></dependency><!--Annotation坐标--><dependency><groupId>javax.annotation</groupId><artifactId>javax.annotation-api</artifactId><version>1.3.2</version></dependency><dependency><groupId>junit</groupId><artifactId>junit</artifactId><version>4.13.2</version><scope>test</scope></dependency><!--spring-test坐标--><dependency><groupId>org.springframework</groupId><artifactId>spring-test</artifactId><version>6.1.6</version><scope>test</scope></dependency><!-- servlet--><dependency><groupId>javax.servlet</groupId><artifactId>javax.servlet-api</artifactId><version>4.0.1</version><scope>provided</scope></dependency><!--jsp--><dependency><groupId>javax.servlet.jsp</groupId><artifactId>javax.servlet.jsp-api</artifactId><version>2.3.3</version><scope>provided</scope></dependency></dependencies><build><finalName>SpringWeb</finalName><plugins><!-- Tomcat插件 --><plugin><groupId>org.apache.tomcat.maven</groupId><artifactId>tomcat7-maven-plugin</artifactId><version>2.2</version></plugin></plugins></build> </project> - 导入servlet和jsp坐标后三层架构中的
-
Step2: 创建三层架构,并写入对应接口和实现类,截图如下

-
Step3: 配置properties以及Spring配置文件,截图如下

-
Step4: 在
web/Controller表现层下创建类BookServlet,代码如下package at.guigu.web;import at.guigu.service.impl.BookServiceImpl; import org.springframework.context.ApplicationContext; import org.springframework.context.support.ClassPathXmlApplicationContext;import javax.servlet.*; import javax.servlet.http.*; import javax.servlet.annotation.*; import javax.sql.DataSource; import java.io.IOException;// 此时url不通过@WebServlet注解进行配置,而是在web.xml中进行配置 // @WebServlet("/bookServlet") public class BookServlet extends HttpServlet {@Overrideprotected void doGet(HttpServletRequest request, HttpServletResponse response) throws ServletException, IOException {//1 获取IOC容器ApplicationContext app = new ClassPathXmlApplicationContext("applicationContext.xml");//2 从IOC容器中获取bean对应的对象BookServiceImpl bookServiceImpl = (BookServiceImpl) app.getBean("bookServiceImpl");DataSource dataSourceDruid = (DataSource) app.getBean("dataSourceDruid");bookServiceImpl.save();System.out.println(dataSourceDruid);}@Overrideprotected void doPost(HttpServletRequest request, HttpServletResponse response) throws ServletException, IOException {this.doGet(request, response);} } -
Step5: 在web项目核心目录(即
WEB-INF)下的web.xml文件中进行web配置,代码如下- 利用
<servlet>标签声明Servlet - 利用
<servlet-mapping>标签将URL模式映射到特定的Servlet上 <servlet>标签一定要在<servlet-mapping>标签之前,否则会报错
<!DOCTYPE web-app PUBLIC"-//Sun Microsystems, Inc.//DTD Web Application 2.3//EN""http://java.sun.com/dtd/web-app_2_3.dtd" ><web-app><display-name>Archetype Created Web Application</display-name><!--声明一个Servlet--><servlet><!--指定要声明的Servlet的类名--><servlet-name>BookServlet</servlet-name><!--声明的Servlet的全限定名--><servlet-class>at.guigu.web.BookServlet</servlet-class></servlet><!--将URL模式映射到特定的Servlet上--><servlet-mapping><!--指定的Servlet的类名--><servlet-name>BookServlet</servlet-name><!--给指定的Servlet设置url,相当于@WebServlet("/bookServlet")--><url-pattern>/bookServlet</url-pattern></servlet-mapping></web-app> - 利用
-
Step6: 利用Tomcat运行该Web项目,运行截图如下

-
ApplicationContext应用上下文获取方式
-
定义:应用上下文对象是通过
new ClassPathXmlApplicationContext("spring配置文件");方式获取的,但是每次从容器中获得bean时都要编写该句代码,这就会造成代码冗余,配置文件加载多次,应用上下文对象创建多次-
解释:在Spring集成web环境中,其中Web层代码是通过Spring容器获取Service层的,即
BookServlet类中的如下两句代码//1 获取IOC容器 (ApplicationContext应用上下文获取方式) ApplicationContext app = new ClassPathXmlApplicationContext("applicationContext.xml"); //2 从IOC容器中获取bean对应的对象 BookServiceImpl bookServiceImpl = (BookServiceImpl) app.getBean("bookServiceImpl"); DataSource dataSourceDruid = (DataSource) app.getBean("dataSourceDruid"); -
由于
web/Controller表现层在后期会有很多业务(即很多Servlet类),所以就会造成代码冗余,配置文件加载多次,应用上下文对象创建多次
-
-
解决方式
在Web项目中,可以使用
ServletContextListener监听Web应用的启动,我们可在Web应用启动时就加载Spring配置文件,创建Spring的应用上下文对象ApplicationContext,然后将其存储到最大的域servletContext对象中,这样就可以在任意位置从域中获取应用上下文ApplicationContext对象了监听器Listener知识点内容可详见Filter&Listener&AJAX&Axios&JSON
自定义ContextListener
-
步骤
-
Step1: 在
web包下创建listener包,定义一个实现ServletContextListener接口的实现类ContextLoaderListener,代码及步骤如下package at.guigu.web.listener;import org.springframework.context.ApplicationContext; import org.springframework.context.support.ClassPathXmlApplicationContext;import javax.servlet.*; import javax.servlet.http.*; import javax.servlet.annotation.*;@WebListener public class ContextLoaderListener implements ServletContextListener {public ContextLoaderListener() {}@Overridepublic void contextInitialized(ServletContextEvent sce) {// 1 获取IOC容器,创建应用上下文对象`ApplicationContext` (ApplicationContext应用上下文获取方式)ApplicationContext app = new ClassPathXmlApplicationContext("applicationContext.xml");// 2 获取最大域ServletContext对象ServletContext servletContext = sce.getServletContext();// 2 将Spring的应用上下文对象`ApplicationContext`存储到最大的域`servletContext`中servletContext.setAttribute("app", app);}@Overridepublic void contextDestroyed(ServletContextEvent sce) {}} -
Step2: 在web项目核心目录(即
WEB-INF)下的web.xml文件中进行监听器Listener配置,代码如下<listener>标签一定要在<servlet>标签之前,否则会报错
<!DOCTYPE web-app PUBLIC"-//Sun Microsystems, Inc.//DTD Web Application 2.3//EN""http://java.sun.com/dtd/web-app_2_3.dtd" ><web-app><display-name>Archetype Created Web Application</display-name><listener><listener-class>at.guigu.web.listener.ContextLoaderListener</listener-class></listener><servlet><servlet-name>BookServlet</servlet-name><servlet-class>at.guigu.web.BookServlet</servlet-class></servlet><servlet-mapping><servlet-name>BookServlet</servlet-name><url-pattern>/bookServlet</url-pattern></servlet-mapping></web-app> -
Step3:
web/Controller表现层下创建类BookServlet的代码更改如下package at.guigu.web;import at.guigu.service.impl.BookServiceImpl; import org.springframework.context.ApplicationContext; import org.springframework.context.support.ClassPathXmlApplicationContext;import javax.servlet.*; import javax.servlet.http.*; import javax.sql.DataSource; import java.io.IOException;public class BookServlet extends HttpServlet {@Overrideprotected void doGet(HttpServletRequest request, HttpServletResponse response) throws ServletException, IOException {// 1 获取最大域ServletContext对象ServletContext servletContext = request.getServletContext();// 2 通过最大域ServletContext对象获取Spring的应用上下文对象,即IOC容器ApplicationContext app = (ApplicationContext) servletContext.getAttribute("app");// 3 获取IOC容器中的beanBookServiceImpl bookServiceImpl = (BookServiceImpl) app.getBean("bookServiceImpl");DataSource dataSourceDruid = (DataSource) app.getBean("dataSourceDruid");bookServiceImpl.save();System.out.println(dataSourceDruid);}@Overrideprotected void doPost(HttpServletRequest request, HttpServletResponse response) throws ServletException, IOException {this.doGet(request, response);} } -
然后利用Tomcat运行该Web项目即可
-
-
在上述过程中,其中监听器
ContextLoaderListener类中创建应用上下文对象ApplicationContext的那句代码需要传入Spring配置文件,这会造成耦合问题,因为我们可能会修改Spring配置文件的名称,为降低耦合,我们可将其进一步优化,步骤如下-
Step1:在web项目核心目录(即
WEB-INF)下的web.xml文件中添加一个<context-param>标签用于定义全局初始化参数,此处用于定义Spring配置文件供监听器使用,web.xml文件代码如下- 后期若Spring配置文件名字更改,我们就只需要更改web.xml文件中
<context-param>标签中的子标签<param-value>的参数即可
<!DOCTYPE web-app PUBLIC"-//Sun Microsystems, Inc.//DTD Web Application 2.3//EN""http://java.sun.com/dtd/web-app_2_3.dtd" ><web-app><display-name>Archetype Created Web Application</display-name><!--全局初始化参数--><context-param><!--定义参数的名称,必须是唯一的--><param-name>contextConfigLocation</param-name><!--定义参数的值--><param-value>classpath:applicationContext.xml</param-value></context-param><!--监听器--><listener><!--监听器类的全限定名--><listener-class>at.guigu.web.listener.ContextLoaderListener</listener-class></listener><!--声明一个Servlet--><servlet><!--声明的Servlet的类名--><servlet-name>BookServlet</servlet-name><!--声明的Servlet的全限定名--><servlet-class>at.guigu.web.BookServlet</servlet-class></servlet><!--将URL模式映射到特定的Servlet上--><servlet-mapping><!--指定的Servlet的类名--><servlet-name>BookServlet</servlet-name><!--给指定的Servlet设置url,相当于@WebServlet("/bookServlet")--><url-pattern>/bookServlet</url-pattern></servlet-mapping></web-app> - 后期若Spring配置文件名字更改,我们就只需要更改web.xml文件中
-
Step2: 实现
ServletContextListener监听器接口的实现类ContextLoaderListener代码更改如下package at.guigu.web.listener;import org.springframework.context.ApplicationContext; import org.springframework.context.support.ClassPathXmlApplicationContext;import javax.servlet.*; import javax.servlet.http.*; import javax.servlet.annotation.*;@WebListener public class ContextLoaderListener implements ServletContextListener {public ContextLoaderListener() {}@Overridepublic void contextInitialized(ServletContextEvent sce) {// 1 获取最大域`servletContext`对象ServletContext servletContext = sce.getServletContext();// 2 通过最大域`servletContext`对象获取web.xml文件中的全局参数String contextConfigLocation = servletContext.getInitParameter("contextConfigLocation");// 3 获取IOC容器,创建应用上下文对象`ApplicationContext` (ApplicationContext应用上下文获取方式)ApplicationContext app = new ClassPathXmlApplicationContext(contextConfigLocation);// 4 将应用上下文对象`ApplicationContext`存入最大域中servletContext.setAttribute("app", app);}@Overridepublic void contextDestroyed(ServletContextEvent sce) {// 释放资源}}
-
-
在上述优化后仍具有耦合,因为应用上下文对象的对象名是由开发人员在监听器对应的类中决定的,在Web层使用最大域对象来获取应用上下文对象时必须知道监听器类中所设置的对象名,这就具有耦合,为了解耦合,我们可以设置一个工具类,专门来返回应用上下文对象
ApplicationContext在最大域中的键名,步骤如下-
Step1: 在util包下创建工具类
ApplicationContextUtil,该类代码如下package at.guigu.util;import org.springframework.context.ApplicationContext;import javax.servlet.ServletContext;public class ApplicationContextUtil {public static ApplicationContext getApplicationContext(ServletContext servletContext) {return (ApplicationContext) servletContext.getAttribute("app");} } -
Step2:
web/Controller表现层下创建类BookServlet的代码更改如下package at.guigu.web;import at.guigu.service.impl.BookServiceImpl; import at.guigu.util.ApplicationContextUtil; import com.alibaba.druid.pool.DruidDataSource; import org.springframework.context.ApplicationContext;import javax.servlet.*; import javax.servlet.http.*; import java.io.IOException;public class BookServlet extends HttpServlet {@Overrideprotected void doGet(HttpServletRequest request, HttpServletResponse response) throws ServletException, IOException {// 1 获取最大域ServletContext对象ServletContext servletContext = request.getServletContext();// 2 获取应用上下文对象(即IOC容器)ApplicationContext app = ApplicationContextUtil.getApplicationContext(servletContext);//3 获取beanBookServiceImpl bookServiceImpl = app.getBean(BookServiceImpl.class);//等同于BookServiceImpl bookServiceImpl = (BookServiceImpl) app.getBean("bookServiceImpl");DruidDataSource dataSourceDruid = app.getBean(DruidDataSource.class);//等同于DataSource dataSourceDruid = (DataSource) app.getBean("dataSourceDruid");bookServiceImpl.save();System.out.println(dataSourceDruid);}@Overrideprotected void doPost(HttpServletRequest request, HttpServletResponse response) throws ServletException, IOException {this.doGet(request, response);} }
-
优化后完整步骤方式一(使用自己创建的监听器类)
-
Step1: 在pom.xml文件中导入坐标:spring、Annotation、spring-test、servlet、jsp以及Tomcat插件
-
若需要mysql及数据源(数据库连接池),则导入坐标:mysql、druid、c3p0
-
所有坐标代码如下
<!--mysql坐标-->
<dependency><groupId>mysql</groupId><artifactId>mysql-connector-java</artifactId><version>8.0.33</version>
</dependency><!--druid坐标-->
<dependency><groupId>com.alibaba</groupId><artifactId>druid</artifactId><version>1.2.18</version>
</dependency><!--c3p0坐标-->
<dependency><groupId>com.mchange</groupId><artifactId>c3p0</artifactId><version>0.9.5.5</version>
</dependency><!--spring坐标-->
<dependency><groupId>org.springframework</groupId><artifactId>spring-context</artifactId><version>6.1.6</version>
</dependency><!--Annotation坐标-->
<dependency><groupId>javax.annotation</groupId><artifactId>javax.annotation-api</artifactId><version>1.3.2</version>
</dependency>
<dependency><groupId>junit</groupId><artifactId>junit</artifactId><version>4.13.2</version><scope>test</scope>
</dependency><!--spring-test坐标-->
<dependency><groupId>org.springframework</groupId><artifactId>spring-test</artifactId><version>6.1.6</version><scope>test</scope>
</dependency><!-- servlet-->
<dependency><groupId>javax.servlet</groupId><artifactId>javax.servlet-api</artifactId><version>4.0.1</version><scope>provided</scope>
</dependency><!--jsp-->
<dependency><groupId>javax.servlet.jsp</groupId><artifactId>javax.servlet.jsp-api</artifactId><version>2.3.3</version><scope>provided</scope>
</dependency>
-
-
Step2: 创建三层架构,并写入对应接口和实现类,截图如下

-
Step3: 配置properties以及Spring配置文件,截图如下

-
**Step4:**在util包下创建工具类
ApplicationContextUtil,该类代码如下package at.guigu.util;import org.springframework.context.ApplicationContext;import javax.servlet.ServletContext;public class ApplicationContextUtil {public static ApplicationContext getApplicationContext(ServletContext servletContext) {return (ApplicationContext) servletContext.getAttribute("app");} } -
Step5: 在web包下创建listener包,并在listener包下创建实现
ServletContextListener接口的监听器类ContextLoaderListener,代码如下package at.guigu.web.listener;import org.springframework.context.ApplicationContext; import org.springframework.context.support.ClassPathXmlApplicationContext;import javax.servlet.*; import javax.servlet.http.*; import javax.servlet.annotation.*;@WebListener public class ContextLoaderListener implements ServletContextListener {public ContextLoaderListener() {}@Overridepublic void contextInitialized(ServletContextEvent sce) {// 1 获取最大的域`servletContext`对象ServletContext servletContext = sce.getServletContext();// 2 利用`servletContext`对象读取web.xml文件中的全局参数String contextConfigLocation = servletContext.getInitParameter("contextConfigLocation");// 3 获取IOC容器:获取应用上下文对象`ApplicationContext` 并将其存储到最大域中servletContext.setAttribute("app", new ClassPathXmlApplicationContext(contextConfigLocation));/* 等同于ApplicationContext app = new ClassPathXmlApplicationContext(contextConfigLocation);servletContext.setAttribute("app", app);*/}@Overridepublic void contextDestroyed(ServletContextEvent sce) {// 释放资源}} -
Step6: 在
web/Controller表现层下创建类BookServlet,代码如下package at.guigu.web;import at.guigu.service.impl.BookServiceImpl; import at.guigu.util.ApplicationContextUtil; import com.alibaba.druid.pool.DruidDataSource; import org.springframework.context.ApplicationContext;import javax.servlet.*; import javax.servlet.http.*; import java.io.IOException;public class BookServlet extends HttpServlet {@Overrideprotected void doGet(HttpServletRequest request, HttpServletResponse response) throws ServletException, IOException {// 1 获取最大域ServletContext对象ServletContext servletContext = request.getServletContext();// 2 获取应用上下文对象(即IOC容器)ApplicationContext app = ApplicationContextUtil.getApplicationContext(servletContext);//3 获取beanBookServiceImpl bookServiceImpl = app.getBean(BookServiceImpl.class);//等同于BookServiceImpl bookServiceImpl = (BookServiceImpl) app.getBean("bookServiceImpl");DruidDataSource dataSourceDruid = app.getBean(DruidDataSource.class);//等同于DataSource dataSourceDruid = (DataSource) app.getBean("dataSourceDruid");bookServiceImpl.save();System.out.println(dataSourceDruid);}@Overrideprotected void doPost(HttpServletRequest request, HttpServletResponse response) throws ServletException, IOException {this.doGet(request, response);} } -
Step7: 在web项目核心目录(即
WEB-INF)下的web.xml文件中进行:全局初始化参数、监听器Listener配置、web配置。完整代码如下<!DOCTYPE web-app PUBLIC"-//Sun Microsystems, Inc.//DTD Web Application 2.3//EN""http://java.sun.com/dtd/web-app_2_3.dtd" ><web-app><display-name>Archetype Created Web Application</display-name><!--全局初始化参数--><context-param><!--定义参数的名称,必须是唯一的--><param-name>contextConfigLocation</param-name><!--定义参数的值--><param-value>classpath:applicationContext.xml</param-value></context-param><!--监听器--><listener><!--监听器类的全限定名--><listener-class>at.guigu.web.listener.ContextLoaderListener</listener-class></listener><!--声明一个Servlet--><servlet><!--声明的Servlet的类名--><servlet-name>BookServlet</servlet-name><!--声明的Servlet的全限定名--><servlet-class>at.guigu.web.BookServlet</servlet-class></servlet><!--将URL模式映射到特定的Servlet上--><servlet-mapping><!--指定的Servlet的类名--><servlet-name>BookServlet</servlet-name><!--给指定的Servlet设置url,相当于@WebServlet("/bookServlet")--><url-pattern>/bookServlet</url-pattern></servlet-mapping></web-app> -
Step8: Tomcat运行该Web项目即可
优化后完整步骤方式二(使用Spring提供的监听器类)
- 完整步骤方式二,已上传到Gitee,可自行下载
Spring配置文件的形式(非注解开发 )
-
在优化后完整步骤方式一中使用的是我们自己创建的继承
ServletContextListener接口的监听器类ContextLoaderListener -
此处我们使用Spring所提供的监听器
ContextLoaderListener-
该监听器内部加载Spring配置文件,创建应用上下文对象,并存储到最大域
ServletContext中 -
它提供了一个客户端工具类
WebApplicationContextUtils供使用者获取应用上下文对象 -
使用该监听器的步骤
-
在web项目核心目录(即
WEB-INF)下的web.xml文件中配置ContextLoaderListener监听器(前提是要先导入**spring-web** 坐标)<!--必须为5.2.X.RELEASE版本,否则会报错使用WebApplicationContextUtils获取应用上下文对象会报错:需要的是Jakarta Servlet而不是Java Servlet--> <dependency><groupId>org.springframework</groupId><artifactId>spring-web</artifactId><version>5.2.25.RELEASE</version> </dependency> -
使用客户端工具类
WebApplicationContextUtils获取应用上下文对象ApplicationContext
-
-
-
实现步骤
-
Step1: 在pom.xml文件中导入坐标:spring、spring-web、spring-test、Annotation、servlet、jsp以及Tomcat插件
- 若需要mysql及数据源(数据库连接池),则导入坐标:mysql、druid、c3p0
- 若需要MyBatis,则导入:spring-jdbc、mybatis-spring、mybatis
<project xmlns="http://maven.apache.org/POM/4.0.0" xmlns:xsi="http://www.w3.org/2001/XMLSchema-instance"xsi:schemaLocation="http://maven.apache.org/POM/4.0.0 http://maven.apache.org/maven-v4_0_0.xsd"><modelVersion>4.0.0</modelVersion><parent><groupId>org.example</groupId><artifactId>SpringDemo</artifactId><version>1.0-SNAPSHOT</version></parent><artifactId>SpringWeb</artifactId><packaging>war</packaging><name>SpringWeb Maven Webapp</name><url>http://maven.apache.org</url><dependencies><dependency><groupId>junit</groupId><artifactId>junit</artifactId><version>3.8.1</version><scope>test</scope></dependency><!--===================Spring相关坐标=======================--><!--spring坐标--><dependency><groupId>org.springframework</groupId><artifactId>spring-context</artifactId><version>6.1.6</version></dependency><!--spring-web --><dependency><groupId>org.springframework</groupId><artifactId>spring-web</artifactId><version>5.2.25.RELEASE</version></dependency><!--spring-test坐标--><dependency><groupId>org.springframework</groupId><artifactId>spring-test</artifactId><version>6.1.6</version><scope>test</scope></dependency><!--Annotation坐标--><dependency><groupId>javax.annotation</groupId><artifactId>javax.annotation-api</artifactId><version>1.3.2</version></dependency><dependency><groupId>junit</groupId><artifactId>junit</artifactId><version>4.13.2</version><scope>test</scope></dependency><!-- servlet--><dependency><groupId>javax.servlet</groupId><artifactId>javax.servlet-api</artifactId><version>4.0.1</version><scope>provided</scope></dependency><!--jsp--><dependency><groupId>javax.servlet.jsp</groupId><artifactId>javax.servlet.jsp-api</artifactId><version>2.3.3</version><scope>provided</scope></dependency><!--=====================数据库相关坐标=========================--><!--mysql坐标--><dependency><groupId>mysql</groupId><artifactId>mysql-connector-java</artifactId><version>8.0.33</version></dependency><!--druid坐标--><dependency><groupId>com.alibaba</groupId><artifactId>druid</artifactId><version>1.2.18</version></dependency><!--c3p0坐标--><dependency><groupId>com.mchange</groupId><artifactId>c3p0</artifactId><version>0.9.5.5</version></dependency><!--=====================MyBatis相关坐标=========================--><!--spring-jdbc--><dependency><groupId>org.springframework</groupId><artifactId>spring-jdbc</artifactId><version>6.1.10</version></dependency><!--mybatis-spring--><dependency><groupId>org.mybatis</groupId><artifactId>mybatis-spring</artifactId><version>3.0.3</version></dependency><!--MyBatis坐标--><dependency><groupId>org.mybatis</groupId><artifactId>mybatis</artifactId><version>3.5.16</version></dependency></dependencies><build><finalName>SpringWeb</finalName><plugins><!-- Tomcat插件 --><plugin><groupId>org.apache.tomcat.maven</groupId><artifactId>tomcat7-maven-plugin</artifactId><version>2.2</version></plugin></plugins></build> </project> -
Step2: 创建三层架构,并写入对应接口和实现类,截图如下

-
Step3: 配置properties以及Spring配置文件,截图如下

-
Step4: 在web项目核心目录(即
WEB-INF)下的web.xml文件中进行:全局初始化参数、配置Spring所提供的ContextLoaderListener监听器、web配置。完整代码如下<!DOCTYPE web-app PUBLIC"-//Sun Microsystems, Inc.//DTD Web Application 2.3//EN""http://java.sun.com/dtd/web-app_2_3.dtd" ><web-app><display-name>Archetype Created Web Application</display-name><!--全局初始化参数--><context-param><!--定义参数的名称,必须是唯一的--><param-name>contextConfigLocation</param-name><!--定义参数的值--><param-value>classpath:applicationContext.xml</param-value></context-param><!--监听器--><!--配置Spring所提供的`ContextLoaderListener` 监听器--><listener><!--监听器类的全限定名--><listener-class>org.springframework.web.context.ContextLoaderListener</listener-class></listener><!--声明一个Servlet--><servlet><!--声明的Servlet的类名--><servlet-name>BookServlet</servlet-name><!--声明的Servlet的全限定名--><servlet-class>at.guigu.web.BookServlet</servlet-class></servlet><!--将URL模式映射到特定的Servlet上--><servlet-mapping><!--指定的Servlet的类名--><servlet-name>BookServlet</servlet-name><!--给指定的Servlet设置url,相当于@WebServlet("/bookServlet")--><url-pattern>/bookServlet</url-pattern></servlet-mapping></web-app> -
Step5: 在
web/Controller表现层下创建类BookServlet,代码如下package at.guigu.web;import at.guigu.service.impl.BookServiceImpl; import com.alibaba.druid.pool.DruidDataSource; import org.springframework.context.ApplicationContext; import org.springframework.web.context.support.WebApplicationContextUtils;import javax.servlet.ServletContext; import javax.servlet.ServletException; import javax.servlet.http.HttpServlet; import javax.servlet.http.HttpServletRequest; import javax.servlet.http.HttpServletResponse; import java.io.IOException;public class BookServlet extends HttpServlet {@Overrideprotected void doGet(HttpServletRequest request, HttpServletResponse response) throws IOException {// 1 获取最大域ServletContext对象ServletContext servletContext = request.getSession().getServletContext();// 2 获取应用上下文对象(即IOC容器)ApplicationContext app = WebApplicationContextUtils.getWebApplicationContext(servletContext);//3 获取beanBookServiceImpl bookServiceImpl = app.getBean(BookServiceImpl.class);//等同于BookServiceImpl bookServiceImpl = (BookServiceImpl) app.getBean("bookServiceImpl");DruidDataSource dataSourceDruid = app.getBean(DruidDataSource.class);//等同于DataSource dataSourceDruid = (DataSource) app.getBean("dataSourceDruid");bookServiceImpl.save();System.out.println(dataSourceDruid);}@Overrideprotected void doPost(HttpServletRequest request, HttpServletResponse response) throws ServletException, IOException {this.doGet(request, response);} }
-
Spring配置类的形式(注解开发 )
-
Step1: 在pom.xml文件中导入坐标:spring、spring-web、spring-test、Annotation、servlet、jsp以及Tomcat插件
- 若需要mysql及数据源(数据库连接池),则导入坐标:mysql、druid、c3p0
- 若需要MyBatis,则导入:spring-jdbc、mybatis-spring、mybatis
- pom.xml代码详见Spring配置文件的形式
-
Step2: 创建三层架构,并写入对应接口和实现类,并使用Spring注解开发截图如下

-
Step3: 右键源代码配置文件目录(即资源文件
resources)→New→File,创建properties配置文件,博主文件名为jdbc.properties,该配置文件代码如下- 注意: properties配置文件中配置的各个属性前必须添加个
id.(即id.属性,比如:属性url就设置为id.url,博主设置的为jdbc.url),以供Spring配置文件可以使用属性占位符${}语法引用这些属性
#driverClassName代表数据库驱动,后跟驱动全类名(在MySQL驱动jar包下的META-INF下的services文件夹下的java.sql.Driver文件内) jdbc.driverClassName=com.mysql.cj.jdbc.Driver # 数据库连接URL jdbc.url=jdbc:mysql://localhost:3306/test02?useUnicode=true&characterEncoding=utf-8&useSSL=false&serverTimezone=Asia/Shanghai # 数据库用户名 jdbc.username=root # 数据库密码 jdbc.password=123456 # 初始化连接数量---即容器中初始的数据库连接数量 jdbc.initialSize=5 # 最大活跃连接数量---容器中初始为5个,但若5个用完了,此时可以在申请5个数据库连接数量 #也就是说容器中最多存放10个数据库连接 jdbc.maxActive=10 # 获取连接时的最大等待时间,单位:毫秒。---与数据库进行连接时若超过3s仍未连接成功,则会报错 jdbc.maxWait=3000 #最小空闲连接数量---minIdle=5 # 配置检测连接是否有效的SQL,可以是一个查询语句,如果不指定则默认为"SELECT 1"---validationQuery=SELECT 1 # 是否开启自动提交事务---defaultAutoCommit=true - 注意: properties配置文件中配置的各个属性前必须添加个
-
Step4: 在三层架构包下创建一个
config包,并在该包下创建一个**代替Spring配置文件的类**SpringConfiguration,完整代码如下package at.guigu.config;import com.alibaba.druid.pool.DruidDataSource; import com.mchange.v2.c3p0.ComboPooledDataSource; import org.springframework.beans.factory.annotation.Value; import org.springframework.context.annotation.Bean; import org.springframework.context.annotation.ComponentScan; import org.springframework.context.annotation.Configuration; import org.springframework.context.annotation.PropertySource;import javax.sql.DataSource;// 该注解代表该类是Spring的核心配置类 @Configuration // 配置注解的组件扫描<context:component-scan base-package="at.guigu"></context:component-scan> @ComponentScan("at.guigu") // 加载properties配置文件<context:property-placeholder location="classpath:jdbc.properties"/> @PropertySource("classpath:jdbc.properties") public class SpringConfiguration {@Value("${jdbc.driverClassName}")private String driverClassName;@Value("${jdbc.url}")private String url;@Value("${jdbc.username}")private String username;@Value("${jdbc.password}")private String password;/*** Cp30对应的bean* Spring会将当前方法的返回值以指定的id存储到Spring的IOC容器中* @return* @throws Exception*/@Bean("dataSourceCp30")public DataSource getCp30DataSource() throws Exception{// 创建数据源对象ComboPooledDataSource dataSource = new ComboPooledDataSource();// 设置数据源基本连接数据dataSource.setDriverClass(driverClassName);dataSource.setJdbcUrl(url);dataSource.setUser(username);dataSource.setPassword(password);return dataSource;}/*** Druid对应的bean* Spring会将当前方法的返回值以指定的id存储到Spring的IOC容器中* @return* @throws Exception*/@Bean("dataSourceDruid")public DataSource getDruidDataSource() throws Exception{// 创建数据源对象DruidDataSource dataSource = new DruidDataSource();// 设置数据源基本连接数据dataSource.setDriverClassName(driverClassName);dataSource.setUrl(url);dataSource.setUsername(username);dataSource.setPassword(password);return dataSource;} } -
Step5: 在web项目核心目录(即
WEB-INF)下的web.xml文件中进行:全局初始化参数、配置Spring所提供的ContextLoaderListener监听器、web配置。完整代码如下<!DOCTYPE web-app PUBLIC"-//Sun Microsystems, Inc.//DTD Web Application 2.3//EN""http://java.sun.com/dtd/web-app_2_3.dtd" ><web-app><display-name>Archetype Created Web Application</display-name><!--配置Spring配置类的全局初始化参数--><context-param><param-name>contextClass</param-name><param-value>org.springframework.web.context.support.AnnotationConfigWebApplicationContext</param-value></context-param><context-param><!--定义参数的名称,必须是唯一的--><param-name>contextConfigLocation</param-name><!--定义参数的值--><param-value>at.guigu.config.SpringConfiguration</param-value></context-param><!--监听器--><!--配置Spring所提供的`ContextLoaderListener` 监听器--><listener><!--监听器类的全限定名--><listener-class>org.springframework.web.context.ContextLoaderListener</listener-class></listener><!--声明一个Servlet--><servlet><!--声明的Servlet的类名--><servlet-name>UserServlet</servlet-name><!--声明的Servlet的全限定名--><servlet-class>at.guigu.web.UserServlet</servlet-class></servlet><!--将URL模式映射到特定的Servlet上(即UserServlet)--><servlet-mapping><!--指定的Servlet的类名--><servlet-name>UserServlet</servlet-name><!--给指定的Servlet设置url,相当于@WebServlet("/userServlet")--><url-pattern>/userServlet</url-pattern></servlet-mapping></web-app> -
Step6: 在web层下创建
UserServlet类,代码如下package at.guigu.web;import at.guigu.service.impl.UserServiceImpl; import com.alibaba.druid.pool.DruidDataSource; import org.springframework.context.ApplicationContext; import org.springframework.web.context.support.WebApplicationContextUtils;import javax.servlet.ServletContext; import javax.servlet.ServletException; import javax.servlet.http.HttpServlet; import javax.servlet.http.HttpServletRequest; import javax.servlet.http.HttpServletResponse; import java.io.IOException;public class UserServlet extends HttpServlet {@Overrideprotected void doGet(HttpServletRequest request, HttpServletResponse response) throws ServletException, IOException {// 1 获取最大域ServletContext对象ServletContext servletContext = request.getServletContext();//等同于ServletContext servletContext = request.getSession().getServletContext();// 2 获取应用上下文对象(即IOC容器)ApplicationContext app = WebApplicationContextUtils.getWebApplicationContext(servletContext);//3 获取beanUserServiceImpl userServiceImpl = app.getBean(UserServiceImpl.class);//等同于BookServiceImpl bookServiceImpl = (BookServiceImpl) app.getBean("bookServiceImpl");DruidDataSource dataSourceDruid = app.getBean(DruidDataSource.class);//等同于DataSource dataSourceDruid = (DataSource) app.getBean("dataSourceDruid");userServiceImpl.save();System.out.println(dataSourceDruid);}@Overrideprotected void doPost(HttpServletRequest request, HttpServletResponse response) throws ServletException, IOException {this.doGet(request, response);} }Tomcat运行该Web项目后截图如下所示

相关文章:
Spring完整知识点二
Spring注解开发 Spring是轻代码而重配置的框架,配置比较繁重,影响开发效率,所以注解开发是一种趋势,它能够代替xml配置文件,可以简化配置,提高开发效率Spring注解根据出现时间分类 Spring原始注解…...
)
GESP三级集训——课堂笔记(部分)
进制转换(二进制、十进制、八进制、十六进制等) 十进制(逢十进一)——Decimal 十进制是我们生活中最常见的进制,如“1”“23”“891”等: 进位过程如下:{1,2,3,4,5,6,7,8,9}{10,11,12,13,14,…...

Spring Boot接口返回统一格式
统一的标准数据格式好处 SpringBoot返回统一的标准数据格式主要有以下几点好处: 增强接口的可读性和可维护性,使得前端开发人员能够更加清晰地理解接口返回的数据结构,从而提高开发效率。 降低前后端耦合度,当后端需要修改返回数…...
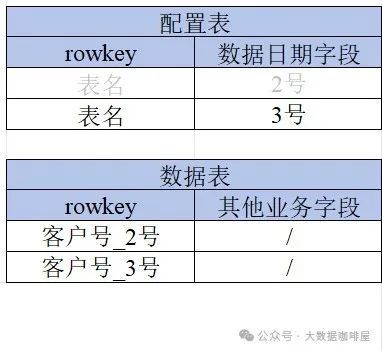
Flink如何基于数据版本使用最新离线数据
业务场景 假设批量有一张商户表,表字段中有商户名称和商户分类两个字段。 批量需要将最新的商户名称和分类的映射关系推到hbase供实时使用。 原实现方案 a.原方案内容 为解决批量晚批问题,批量推送hbase表时一份数据产生两类rowkey:T-1和…...

软件开发中的常用性能指标
大家好!我是今越。在软件开发中我们经常会遇到一些性能指标,下面就带大家一起来看看。 QPS Queries Per Second,每秒查询率,一台服务器每秒能够响应的查询次数。它是对一个特定的查询服务器在规定时间内所处理流量多少的衡量标准…...

cmakelist使用总结
支持能编译成在不同系统上运行程序的方法 我们代码就一份,但有时需要编译成arm32,有时需要编译成x86_64,或更多 1、首先先将代码定义一个名称: #将所有的源文件列为一个集合,集合名字叫做SRC_LISTS set(SRC_LISTS main.cpp A.cpp…...

准备阶段 Unity优化总纲
Unity优化总纲 我们在学习优化课程之前要预先做好准备功能 例如最主要是的接收到一个优化的任务,应该怎么做,其次怎么做,最后怎么做。 也要学习一些专业工具以及专业术语 了解游戏运行机制,在排查期间思路会更清晰 1.优化目的…...
——firewalld使用与讲解)
ubuntu防火墙(三)——firewalld使用与讲解
本文是Linux下,用ufw实现端口关闭、流量控制(二) firewalld使用方式 firewalld 是一个动态管理防火墙的工具,主要用于 Linux 系统(包括 Ubuntu 和 CentOS 等)。它提供了一个基于区域(zones)和服务&#x…...

zookeeper 搭建集群
基础的java 环境先安好,选择3台虚拟机 ip 不一样 机器应为奇数个 zookeeper 奇数个节点实际上是(2*n-1) 比偶数台机器少一台解决成本,并且能够满足 zookeeper 集群过半选举leader 的规则 # 3台虚拟机 将zookeeper 解压到服务器上 #在 conf/ 目录下 找到zoo_s…...

Java——异常机制(下)
1 异常处理之(捕获异常) (一般处理运行时异常) (try-catch-finally子句) (finally一般用于文件最后关闭) (catch捕获的子类在前父类在后——>不然父类在前面都让父类捕获掉了,会报错) (Exception是父类放在最后,如果前面没有捕获到,就…...

centos 手动安装libcurl4-openssl-dev库
下载源代码 curl downloadshttps://curl.se/download/ 选择需要下载的版本,我下载的是8.11.0 解压 tar -zxvf curl-8.11.0 查看安装命令 查找INSTALL.md,一般在docs文件夹下 –prefix :指定安装路径(默认安装在/usr/local&…...

JS学习(1)(基本概念与作用、与HTML、CSS区别)
目录 一、JavaScript是什么? (1)基本介绍 (2)简称:JS? 二、JavaScript的作用。 三、HTML、CSS、JS之间的关系。 (1)html、css。 (2)JavaScript。 …...

代码随想录算法训练营day50|动态规划12
不同的子序列 给定一个字符串 s 和一个字符串 t ,计算在 s 的子序列中 t 出现的个数。、 编辑距离中的删除元素,其实就是直接变数字,其只删除原来的较长的数组里的元素 递推模拟,使用s的最后一个元素匹配,或者删除…...

JavaWeb学习(2)(Cookie原理(超详细)、HTTP无状态)
目录 一、HTTP无状态。 (1)"记住我"? (2)HTTP无状态。 (3)信息存储客户端中。如何处理? 1、loaclStorage与sessionStorage。 2、Cookie。 二、Cookie。 (1&…...

java抽象类
目录 一.抽象类 1.什么是抽象类 2.抽象类特点 (1)抽象类不能直接实例化对象 (2)可以包含抽象方法和具体方法 (3)可以有构造方法 (4)抽象类必须被继承,并且继承后子类要重写父类中的抽象方法,否则子类也是抽象类,必须要使用 abstract 修…...

minio集群部署–linux环境
原文地址:minio集群部署–linux环境 – 无敌牛 欢迎参观我的个人博客:无敌牛 – 技术/著作/典籍/分享等 第一步:安装 有rpm、deb、和二进制文件安装方式。参考文档在:MinIO Object Storage for Linux — MinIO Object Storage …...

在vue3里使用scss实现简单的换肤功能
实现的换肤功能:主题色切换、亮色模式和暗黑模式切换、背景图切换 主题色就是网站主色,可以配置到组件库上面;亮色模式又分为两种风格:纯白风格和背景图风格,不需要背景图的话可以删掉这部分逻辑和相关定义;…...

JavaScript编写css自定义属性
一、自定义属性 是在 CSS 中定义的变量,以 --开头。它们可以存储颜色、尺寸、字体等任何 CSS 值,并且可以在整个文档中重复使用。 :root {--primary-color: #3498db;--font-size: 16px; }body {color: var(--primary-color);font-size: var(--font-siz…...

我们来学webservie - WSDL
WSDL 题记WSDL系列文章 题记 举个例子 酒桌上大领导们谈笑风生,把酒临风,其喜洋洋者矣老张说能签下xx项目,一来证明了集团在行业中的翘楚地位,二来感谢各位领导给予的大力支持接下来的一周,项目经理、业务顾问相继入场࿰…...

【Agent】构建智能诗歌创作系统:基于多 Agent 的协同创作实现
在探索大语言模型的创意应用过程中,我们开发了一个基于多 Agent 的智能诗歌创作系统。本文将介绍如何通过多个专业化的 Agent 协同工作,实现根据地点和天气信息自动创作诗歌的功能。 GitHub Code 项目地址 核心架构设计 1. Agent 基类设计 from pydan…...

技术实测:高精度三维扫描在涡轮叶片数字化检测中的应用
01 行业痛点:复杂曲面的测量困境 涡轮叶片作为航空发动机的核心部件,其制造公差往往在微米级。在检测过程中,工程师通常面临以下挑战: 几何特征复杂:叶片具有复杂的空间扭曲形状,且边缘(R角&…...

如何快速入门数据工程:GitHub精选项目data-engineer-handbook完整指南
如何快速入门数据工程:GitHub精选项目data-engineer-handbook完整指南 【免费下载链接】data-engineer-handbook This is a repo with links to everything youd ever want to learn about data engineering 项目地址: https://gitcode.com/GitHub_Trending/da/da…...

CompLLM:大语言模型长上下文处理技术解析
1. CompLLM:长上下文处理的技术革新 在当今大语言模型(LLM)应用中,处理长上下文一直是个棘手的问题。想象一下,当你让AI助手分析一份100页的技术文档时,传统方法就像要求一个人同时记住并处理整本书的内容—…...

让任天堂控制器在Windows上重获新生的双剑合璧方案
让任天堂控制器在Windows上重获新生的双剑合璧方案 【免费下载链接】WiinUPro 项目地址: https://gitcode.com/gh_mirrors/wi/WiinUPro 你是否曾经为手中的Wii、Wii U或Switch控制器无法在Windows电脑上使用而感到遗憾?那些设计精良、手感出色的任天堂控制器…...

Go 模块依赖管理策略
Go模块依赖管理策略解析 随着Go语言的快速发展,高效的依赖管理成为开发者关注的焦点。Go模块(Go Modules)自1.11版本引入后,逐渐取代了传统的GOPATH模式,成为官方推荐的依赖管理方案。它不仅解决了版本控制问题&#…...

告别C++编译等待:用Rust重写Qt小部件,体验极速构建与内存安全
告别C编译等待:用Rust重写Qt小部件,体验极速构建与内存安全 每次修改一行C代码后漫长的编译等待,是否让你在Qt开发中感到效率瓶颈?那些难以追踪的内存泄漏和悬空指针问题,是否已成为项目中的定时炸弹?今天&…...

Cinux:用 C++23 从 MBR 写到 GUI 桌面的 x86_64 教学操作系统
Cinux:用 C23 从 MBR 写到 GUI 桌面的 x86_64 教学操作系统 前言 Cinux Here! github.com/Charliechen114514/Cinux。 已严肃24小时待命PR和Issue(严肃.png) PS: 是否用AI了?用了,必须承认这个!毕竟手搓的…...

如何用WeChatMsg彻底掌控你的微信聊天数据:从新手到专家的完整指南
如何用WeChatMsg彻底掌控你的微信聊天数据:从新手到专家的完整指南 【免费下载链接】WeChatMsg 提取微信聊天记录,将其导出成HTML、Word、CSV文档永久保存,对聊天记录进行分析生成年度聊天报告 项目地址: https://gitcode.com/GitHub_Trend…...

luci-app-unblockneteasemusic网络劫持原理详解:从IPset到Hosts的完整实现
luci-app-unblockneteasemusic网络劫持原理详解:从IPset到Hosts的完整实现 【免费下载链接】luci-app-unblockneteasemusic [OpenWrt] 解除网易云音乐播放限制 项目地址: https://gitcode.com/gh_mirrors/lu/luci-app-unblockneteasemusic luci-app-unblockn…...

OpenSpeedy:基于Ring3 Hook的游戏变速引擎与系统性能优化方案
OpenSpeedy:基于Ring3 Hook的游戏变速引擎与系统性能优化方案 【免费下载链接】OpenSpeedy 🎮 An open-source game speed modifier. 项目地址: https://gitcode.com/gh_mirrors/op/OpenSpeedy OpenSpeedy是一款基于Ring3层Hook技术的开源游戏变速…...