AlgoC++第八课:手写BP
目录
- 手写BP
- 前言
- 1. 数据加载
- 2. 前向传播
- 3. 反向传播
- 总结
手写BP
前言
手写AI推出的全新面向AI算法的C++课程 Algo C++,链接。记录下个人学习笔记,仅供自己参考。
本次课程主要是手写 BP 代码
课程大纲可看下面的思维导图

1. 数据加载
我们首先来实现下MNIST数据集的加载工作
#include <iostream>
#include <tuple>
#include <string>
#include <fstream>
#include "matrix.hpp"using namespace std;namespace Application{namespace io{// 不要内存对齐struct __attribute__((packed)) mnist_labels_header_t{unsigned int magic_number;unsigned int number_of_items;}struct __attribute__((packed)) mnist_images_header_t{unsigned int magic_number;unsigned int number_of_images;unsigned int number_of_rows;unsigned int number_of_cols;}unsigned int inverse_byte(unsigned int v){unsigned char* p = (unsigned char*)&v;std::swap(p[0], p[3]);std::swap(p[1], p[2]);return v;}/* 加载mnist数据集 */tuple<Matrix, Matrix> load_data(const string& image_file, const string& label_file){// file, mode = rb/wb/a+Matrix images, labels;fstream fimage(image_file, ios::binary | ios::in);fstream flabel(label_file, ios::binary | ios::in)mnist_images_header_t images_header;mnist_labels_header_t labels_header;fimage.read((char *)&images_header, sizeof(images_header));flabel.read((char *)&labels_header, sizeof(labels_header));// 大小端转换images_header.number_of_images = inverse_byte(images_header.number_of_images);labels_header.number_of_items  = inverse_byte(labels_header.number_of_items);images.resize(images_header.number_of_images, 28 * 28);// one hot, floatlabels.resize(labels_header.number_of_items, 10);// 中间存储作用, 它的大小等于文件中图像数据的大小std::vector<unsigned char> buffer(images.rows() * images.cols());fimage.read((char*)buffer.data(), buffer.size());// buffer 是unsigned char类型的图像数据,pixel// 现在需要转化到images矩阵中// 顺便把标准化给做了for(int i = 0; i < buffer.size() ++i)images.ptr()[i] = (buffer[i] / 255.0f - 0.1307f) / 0.3081f;// 开始处理label,ont-hot过程// labels是全零的矩阵buffer.resize(labels.rows());flabel.read((char*)buffer.data(), buffer.size());for(int i = 0; i < buffer.size(); ++i)labels.ptr(i)[buffer[i]] = 1;	// one-hotreturn make_tuple(images, labels);}}int run(){// 验证Matrix images, labels;tie(images, labels) = io::load_data("mnist/train-images.idx3-ubyte","mnist/train-labels.idx1-ubyte");cout << labels;return 0;}
}int main(){return Application::run();
}
上面示例代码演示了 mnist 数据集加载的示例,其中
- 定义了两个用于 mnist 数据集的结构体,分别是
mnist_labels_header_t和mnist_images_header_t。这两个结构体表示 mnist 标签和图像的头信息 __attribute__((packed))是一个 GCC/Clang 的扩展,用于告诉编译器不要进行内存对齐,以便我们自己手动控制内存的布局和对齐。inverse_byte用于大小端转换。在 mnist 数据集中,头文件中存储的是大端模式,而读取数据时需要将其转换为小端模式。inverse_byte函数实现的方法是将 unsigned int 类型的变量按照字节顺序重新排列。load_data函数用于加载 mnist 数据集,需要传入图像和标签的文件名。在函数内部,使用 fstream 打开文件并读取头信息,对头信息进行大小端转换,然后根据图像和标签的大小创建矩阵。之后,读取图像和标签数据并进行归一化,最后返回归一化后的矩阵。
标签处理的代码有点看不懂,来分析下
buffer.resize(labels.rows());
flabel.read((char*)buffer.data(), buffer.size());
for(int i = 0; i < buffer.size(); ++i)labels.ptr(i)[buffer[i]] = 1;
在 MNIST 数据集中,标签是一个整数值,代表着手写数字的真实值。但是,在神经网络训练中,我们通常需要将标签转化为 one-hot 编码,以便于计算误差。例如,对于数字 5,它的 ont-hot 编码为[0,0,0,0,0,1,0,0,0,0],也就是在第 6 个位置上为 1,其余位置都为0
这段代码中,首先通过 resize 函数将 buffer 的大小设置为标签行数,也就是样本数。然后从 flabel 中读取 buffer.size() 个字节到 buffer 中。由于标签是一个字节大小的整数,所以 buffer 中存储的是一连串的整数值。接下来的 for 循环中,遍历 buffer 中的所有元素,将标签对应的位置设置为 1,其余位置设置为 0
labels.ptr(i) 返回 labels 中第i行的地址,然后用 [buffer[i]] 访问该行中第 buffer[i] 列的元素,将该元素的值设置为1。这样就完成了标签数据的转化,使其变为了适合神经网络训练的形式
2. 前向传播
来看下整个前向传播过程,包括初始化超参数和权重、偏置矩阵,矩阵相乘进行前传并求取 Loss
#include <iostream>
#include <tuple>
#include <string>
#include <fstream>
#include <random>
#include <cmath>
#include <string.h>
#include <algorithm>    // shuffle
#include "matrix.hpp"using namespace std;namespace Application{namespace tools{vector<int> range(int end){vector<int> output(end);for(int i = 0; i < end; ++i)output[i] = i;return  output;}// 通过指定索引数组,并且指定图像、索引的起点和终点。获取对应索引的对应图像,返回matrixMatrix slice(const Matrix& images, const vector<int>& indexs, int start, int size){Matrix output(size, images.cols());for(int i = 0; i < size; ++i){int image_row_index = indexs[start + i];// 把images[image_row_index]对应的一行,复制到output[i]行memcpy(output.ptr(i), images.ptr(image_row_index), sizeof(float) * images.cols());}return output;}};namespace random{// 对应的就是seedstatic default_random_engine global_random_engine;Matrix normal_distribution_matrix(int rows, int cols, float mean = 0.0f, float stddev = 0.0f){// seednormal_distribution<float> norm(mean, stddev);Matrix output(rows, cols);for(int i = 0; i < rows * cols; ++i)output.ptr()[i] = norm(global_random_engine);return output;}// inplace -> 现场修改void shuffle_array(vector<int>& indexs){std::shuffle(indexs.begin(), indexs.end(), global_random_engine);}};namespace nn{Matrix relu(cosnt Matrix& x){Matrix output = x;auto p = output.ptr();for(int i = 0; i < x.numel(); ++i, ++p){// max(float, int)*p = std::max(*p, 0.0f);}return output;            }float sigmoid_cross_entropy_loss(const Matrix& output, const Matrix& y){static auto sigmoid = [](float x){return 1.0f / (1.0f + exp(-x));}// output => n x 10// y      => n x 10auto po = output.ptr();auto py = y.ptr();float loss = 0;float eps = 1e-5;for(int i = 0; i < output.numnel(); ++i, ++po, ++py){float prob = sigmoid(*po);prob = max(min(prob, 1-eps), eps);// loss += -(y * log(p) + (1-y) * log(1-p));loss += (*py) * log(prob) + (1 - *py) * log(1 - prob);}return -loss / output.rows();}};int run(){Matrix trainimages, trainlabels;Matrix valimages, vallabels;tie(trainimages, trainlabels) = io::load_data("mnist/train-images.idx3-ubyte", "mnist/train-labels.idx1-ubyte");tie(valimage, vallabels)      = io::load_data("mnist/t10k-images.idx3-ubyte",  "mnist/t10k-labels.idx1-ubyte");// hidden = images @ w1 + b1// output = hidden @ w2 + b2// loss   = lossfn(output, onehot_label)// loss.backward()int num_images = trainimages.rows();  // 60000int num_input  = trainimages.cols();  // 784int num_hidden = 1024;int num_output = 10;int num_epoch  = 10;float lr       = 1e-1;int batch_size = 256;float momentum = 0.9f;// drop last -> pytorch dataloaderint num_batch_per_epoch = num_images / batch_size;// 训练流程// 1. 随机抓取一个batch,shuffle=True//      怎么实现随机呢?//      重点是,要求,每一个epoch,抓取的随机性不同//     按照索引抓取,index[0,1,2,3,4,5,6,7]//     shuffle(indexs) ->[6,5,4,0,1,3,2,7] auto image_indexs = tools::range(num_images);// 确定矩阵的大小,并且对矩阵做初始化(凯明初始化fan_in,fan_out)float w1_gain =  2.0f / std::sqrt((float)num_input + num_hidden); // 对应激活函数        Matrix w1 = random::normal_distribution_matrix(num_input, num_hidden, 0, w1_gain);Matrix b1 = random::normal_distribution_matrix(1, num_hidden);        float w2_gain =  1.0f / std::sqrt((float)num_hidden + num_output); // 对应激活函数        Matrix w2 = random::normal_distribution_matrix(num_hidden, num_output, 0, w1_gain);Matrix b2 = random::normal_distribution_matrix(1, num_output);for(int epoch = 0; epoch < num_epoch; ++epoch){random::shuffle_array(image_indexs);for(int ibatch = 0; ibatch < num_batch_per_epoch; ++ibatch){// image_indexs[ibatch * batch_size : (ibatch + 1) * batch_size]auto x = tools::slice(trainimages, image_indexs, ibatch * batch_size, batch_size);cout << x.rows() << ", " << x.cols() << endl;auto y = tools::slice(trainlabels, image_indexs, ibatch * batch_size, batch_size);// n x m + 1 x mauto hidden = x.gemm(w1) + b1;auto hidden_act = nn::relu(hidden);auto output     = hidden_act.gemm(w2) + b2;float loss      = nn::sigmoid_cross_entropy_loss(output, y);cout << "Loss: " << loss << endl;}}// 验证// Matrix t = random::normal_distribution_matrix(3, 3);// Matrix s = tools::slice(t, {0, 1, 2}, 1, 2);// cout << t;// cout << s;return 0;}
}int main(){return Application::run();
}
上面示例代码演示了前向传播的过程,包括初始化神经网络参数、进行前向传播计算、计算损失函数
- 首先,对神经网络的参数进行了初始化,包括输入层到隐藏层的权重矩阵 w1 和偏置向量 b1,隐藏层到输出层的权重矩阵 w2 和偏置向量 b2。这些参数都是通过调用
random::normal_distribution_matrix()函数生成的,该函数使用了高斯分布来初始化,而 w1 和 w2 的初始化还使用了凯明初始化 - 然后,代码进入了训练流程,首先进行了数据的随机抽取。随机抽取的方法是使用了
tools::range()函数生成一个索引数组,然后使用random::shuffle_array()函数对该索引数组进行打乱。打乱的目的是保证每个 epoch 中数据的随机性不同。 - 对于每个 batch,代码首先使用
tools::slice()函数从训练集抽取出 batch_size 个样本,然后进行前向传播计算。- hidden = images @ w1 + b1
- output = hidden @ w2 + b2
- 在得到输出层的数据后,代码计算了该 batch 的损失函数。其具体实现在
nn::sigmoid_cross_entropy_loss()函数中,采用交叉熵损失,它首先将 output 中的每个元素通过 sigmoid 函数,然后根据公式计算 loss 并返回。
3. 反向传播
我们先来回忆下反向传播的公式

根据上图来计算 L o s s Loss Loss 分别对 W 1 W_1 W1 B 1 B_1 B1 W 2 W_2 W2 B 2 B_2 B2 的梯度
-
1.隐藏层的输出为: H = r e l u ( X W 1 + B 1 ) H = relu(XW_1 + B_1) H=relu(XW1+B1)
-
2.输出层的预测概率为: P = s i g m o i d ( H W 2 + B 2 ) P = sigmoid(HW_2 + B_2) P=sigmoid(HW2+B2)
-
3.损失为: L = B i n a r y C r o s s E n t r o p y L o s s ( P , Y ) L = BinaryCrossEntropyLoss(P,Y) L=BinaryCrossEntropyLoss(P,Y)
-
4.计算 L L L 对 W 2 W_2 W2 和 B 2 B_2 B2 的梯度: ∂ L ∂ W 2 = H T ( P − Y ) \frac{\partial L}{\partial W_2}=H^{T}(P-Y) ∂W2∂L=HT(P−Y) ∂ L ∂ B 2 = r e d u c e _ s u m ( P − Y ) \frac{\partial L}{\partial B_{2}}= reduce\_sum(P-Y) ∂B2∂L=reduce_sum(P−Y)
-
5.计算 L L L 对 W 1 W_1 W1 和 B 1 B_1 B1 的梯度: ∂ L ∂ W 1 = X T ∂ L ∂ ( X W 1 + B 1 ) \frac{\partial L}{\partial W_{1}}=X^{T}\frac{\partial L}{\partial(X W_{1}+B_{1})} ∂W1∂L=XT∂(XW1+B1)∂L ∂ L ∂ B 1 = r e d u c e _ s u m ∂ L ∂ ( X W 1 + B 1 ) \frac{\partial L}{\partial B_{1}}=reduce\_sum\frac{\partial L}{\partial(X W_{1}+B_{1})} ∂B1∂L=reduce_sum∂(XW1+B1)∂L
-
6.拿到梯度后,对每一个参数应用优化器进行更新迭代
来看下整个反向传播的过程,根据 Loss 分别对 w1、b1、w2、b2 求取梯度,并更新参数
#include <iostream>
#include <tuple>
#include <string>
#include <fstream>
#include <random>
#include <cmath>
#include <string.h>
#include <algorithm>    // shuffle
#include "matrix.hpp"using namespace std;namespace Application{namespace nn{Matrix drelu(const Matrix& g, cosnt Matrix& x){Matrix output = g;auto px = x.ptr();auto pg = output.ptr();for(int i = 0; i < x.numel(); ++i, ++px, ++pg){if(*px < 0)*pg = 0;}return output;}Matrix relu(cosnt Matrix& x){Matrix output = x;auto p = output.ptr();for(int i = 0; i < x.numel(); ++i, ++p){// max(float, int)*p = std::max(*p, 0.0f);}return output;            }Matrix sigmoid(const Matrix& x){Matrix output = x;auto p = output.ptr();for(int i = 0; i < x.numel(); ++i, ++p){float t = *p;*p = 1.0f / (1.0f + exp(-t));}return output;}float sigmoid_cross_entropy_loss(const Matrix& prob, const Matrix& y){// static auto sigmoid = [](float x){return 1.0f / (1.0f + exp(-x));}auto prob = sigmoid(output);// output => n x 10// y      => n x 10auto po = prob.ptr();auto py = y.ptr();float loss = 0;float eps = 1e-5;for(int i = 0; i < prob.numel(); ++i, ++po, ++py){float prob = *po;// prob = max(min(prob, 1-eps), eps);// loss += -(y * log(p) + (1-y) * log(1-p));loss += (*py) * log(p) + (1 - *py) * log(1 - p);}return -loss / prob.rows();}float eval_accuracy(const Matrix& testset, const Matrix& y,const Matrix& w1, const Matrix& b1, const Matrix& w2, const Matrix& b2){auto hidden = nn::relu(testset.gemm(w1) + b1);auto prob   = nn::sigmoid(hidden.gemm(w2) + b2);int correct = 0;for(int i = 0; i < prob.rows(); ++i){// 为了拿到每一行预测的标签值,使用argmaxint predict_label = prob.argmax(i);// 因为y是one-hot,所以对应预测标签如果是1,则正确if(y(i, predict_label) == 1)correct++;}return correct / (float)prob.rows();}};int run(){Matrix trainimages, trainlabels;Matrix valimages, vallabels;tie(trainimages, trainlabels) = io::load_data("mnist/train-images.idx3-ubyte", "mnist/train-labels.idx1-ubyte");tie(valimages, vallabels)      = io::load_data("mnist/t10k-images.idx3-ubyte",  "mnist/t10k-labels.idx1-ubyte");// hidden = images @ w1 + b1// output = hidden @ w2 + b2// loss   = lossfn(output, onehot_label)// loss.backward()int num_images = trainimages.rows();  // 60000int num_input  = trainimages.cols();  // 784int num_hidden = 1024;int num_output = 10;int num_epoch  = 10;float lr       = 1e-1;int batch_size = 256;float momentum = 0.9f;// drop last -> pytorch dataloaderint num_batch_per_epoch = num_images / batch_size;  // 60000 / 256 = 234(iter)// 训练流程// 1. 随机抓取一个batch,shuffle=True//      怎么实现随机呢?//      重点是,要求,每一个epoch,抓取的随机性不同//     按照索引抓取,index[0,1,2,3,4,5,6,7]//     shuffle(indexs) ->[6,5,4,0,1,3,2,7] auto image_indexs = tools::range(num_images);// 确定矩阵的大小,并且对矩阵做初始化(凯明初始化fan_in,fan_out)float w1_gain =  2.0f / std::sqrt((float)num_input + num_hidden); // 对应激活函数        Matrix w1 = random::normal_distribution_matrix(num_input, num_hidden, 0, w1_gain);Matrix b1 = random::normal_distribution_matrix(1, num_hidden);        float w2_gain =  1.0f / std::sqrt((float)num_hidden + num_output); // 对应激活函数        Matrix w2 = random::normal_distribution_matrix(num_hidden, num_output, 0, w1_gain);Matrix b2 = random::normal_distribution_matrix(1, num_output);for(int epoch = 0; epoch < num_epoch; ++epoch){random::shuffle_array(image_indexs);for(int ibatch = 0; ibatch < num_batch_per_epoch; ++ibatch){    // 一个epoch// image_indexs[ibatch * batch_size : (ibatch + 1) * batch_size]auto x = tools::slice(trainimages, image_indexs, ibatch * batch_size, batch_size);cout << x.rows() << ", " << x.cols() << endl;auto y = tools::slice(trainlabels, image_indexs, ibatch * batch_size, batch_size);// n x m + 1 x mauto hidden      = x.gemm(w1) + b1;auto hidden_act  = nn::relu(hidden);auto output      = hidden_act.gemm(w2) + b2;auto probability = nn::sigmoid(output)float loss       = nn::sigmoid_cross_entropy_loss(probability, y);cout << "Loss: " << loss << endl;// backward过程// dloss / doutput = (sigmoid(output) - y) / output.rows// C = AB// G = dloss / dC// dloss / dA = G @ B^T// dloss / dB = A^T @ G// output = hidden_act @ w2auto doutput     = (probability - y) / (float)output.rows();auto db2         = doutput.reduce_sum_by_row();auto dhidden_act = doutput.gemm(w2, false, true);auto dw2         = hidden_act.gemm(doutput, true);// dloss / dhiddenauto dhidden     = nn::drelu(dhidden_act, hidden);// x @ w1 + b1auto db1         = dhidden.reduce_sum_by_row();auto dw1         = x.gemm(dhidden, true);// 更新w1 = w1 - lr * dw1;b1 = b1 - lr * dw1;}float accuracy = nn::eval_accuracy(valimages, vallabels, w1, b1, w2, b2);printf("%d. accuracy: %.2f %%\n", epoch, accuracy * 100);}// 验证// Matrix t = random::normal_distribution_matrix(3, 3);// Matrix s = tools::slice(t, {0, 1, 2}, 1, 2);// cout << t;// cout << s;return 0;}
}int main(){return Application::run();
}
在上面的示例代码中,主要是求取梯度的过程比较繁琐,需要明确 L L L 分别对 W 1 W_1 W1 B 1 B_1 B1 W 2 W_2 W2 B 2 B_2 B2 的导数计算,后续就是利用 SGD 算法进行参数更新。最后在每个 epoch 结束后,计算测试集上的准确率并输出结果
总结
本次课程跟着杜老师手写了一遍 BP 反向传播算法,加深了对 BP 的认识,锻炼了自己的动手能力,提高了对 C++ 和神经网络的进一步理解。整个 BP 过程还是比较清晰的,无非是前传 => 计算Loss => 反传 => 更新,但还是要求对许多细节的把握,比如如何去优化代码提高性能,如何尽可能的减少矩阵相乘的次数等等,多想多写吧。期待下次手写 AutoGrad 课程😄
相关文章:
AlgoC++第八课:手写BP
目录 手写BP前言1. 数据加载2. 前向传播3. 反向传播总结 手写BP 前言 手写AI推出的全新面向AI算法的C课程 Algo C,链接。记录下个人学习笔记,仅供自己参考。 本次课程主要是手写 BP 代码 课程大纲可看下面的思维导图 1. 数据加载 我们首先来实现下MNIST…...

【Java笔试强训 27】
🎉🎉🎉点进来你就是我的人了博主主页:🙈🙈🙈戳一戳,欢迎大佬指点! 欢迎志同道合的朋友一起加油喔🤺🤺🤺 目录 一、选择题 二、编程题 🔥 不用加…...

java紫砂壶交易购物系统 mysql
网络紫砂壶可充通过色彩、图片、说明、设置动画加强了产品了宣传,大大达到了陶瓷业的“色型”要求。实现产品管理方便,起到立竿见影的效果,不用因为更改菜色而重新印刷。只要在后台鼠标轻轻一点,全线马上更新。采用B/S模式&#x…...

7-4 多态练习-计算面积
定义三个类,父类(抽象类)GeometricObject代表几何形状,子类Circle代表圆形,子类Rectangle代表矩形。具体属性和方法如下: 父类 (抽象类)GeometricObject 属性: private String color; private S…...
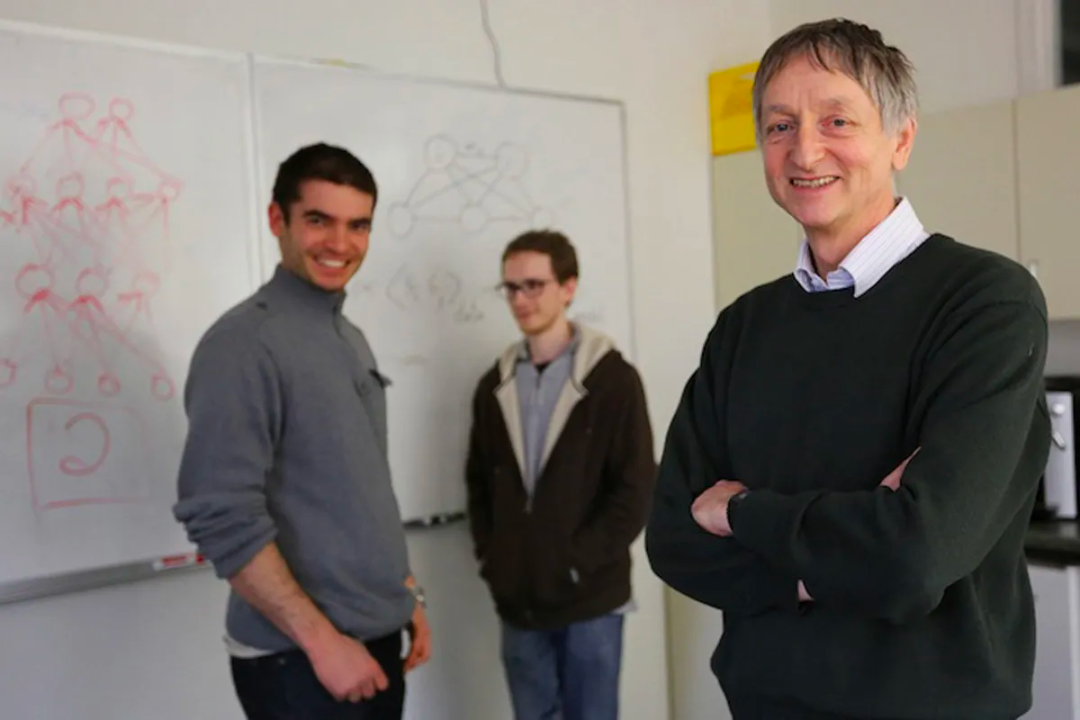
很佩服的一个Google大佬,离职了。。
这两天,科技圈又有一个突发的爆款新闻相信不少同学都已经看到了。 那就是75岁的计算机科学家Geoffrey Hinton从谷歌离职了,从而引起了科技界的广泛关注和讨论。 而Hinton自己也证实了这一消息。 提到Geoffrey Hinton这个名字,对于一些了解过…...
【Python习题集1】Python 语言基础知识
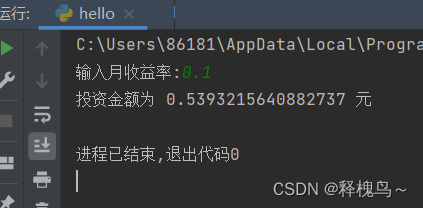
python习题 一、实验内容二、实验总结 一、实验内容 1、运用输入输出函数编写程序,将华氏温度转换成摄氏温度。换算公式:C(F-32)*5/9,其中C为摄氏温度,F为华氏温度。 (1)源代码: ffloat(input(输入华氏温…...

C语言进阶——数据在内存中的存储,你知道吗?
今天我们深度剖析数据在内存中的存储: 重点知识: 1、数据类型详细介绍 2、整形在内存中的存储:原码、反码、补码 3、大小端字节序介绍及判断 4、浮点型在内存中的存储解析 之前我们涉及关于这一部分的知识只是大致的进行讲解࿰…...

规则引擎----easy rules
一、规则引擎的作用 将复杂的if else判断剥离出来 二、使用 2.1、引入POM <!--easy rules核心库--><dependency><groupId>org.jeasy</groupId><artifactId>easy-rules-core</artifactId><version>3.3.0</version></depe…...

你手写过一把锁吗?你对轮询缓存怎么看?
当多个线程同时去操作一块内存的数据时如果不做一些限制,极其可能出现数据一致性问题。这时候,我们用一把锁锁住这块数据,持有钥匙者可以进入,不持有者等待钥匙用完再分配。所以在我看来啊,锁的本质就是一个标志位&…...
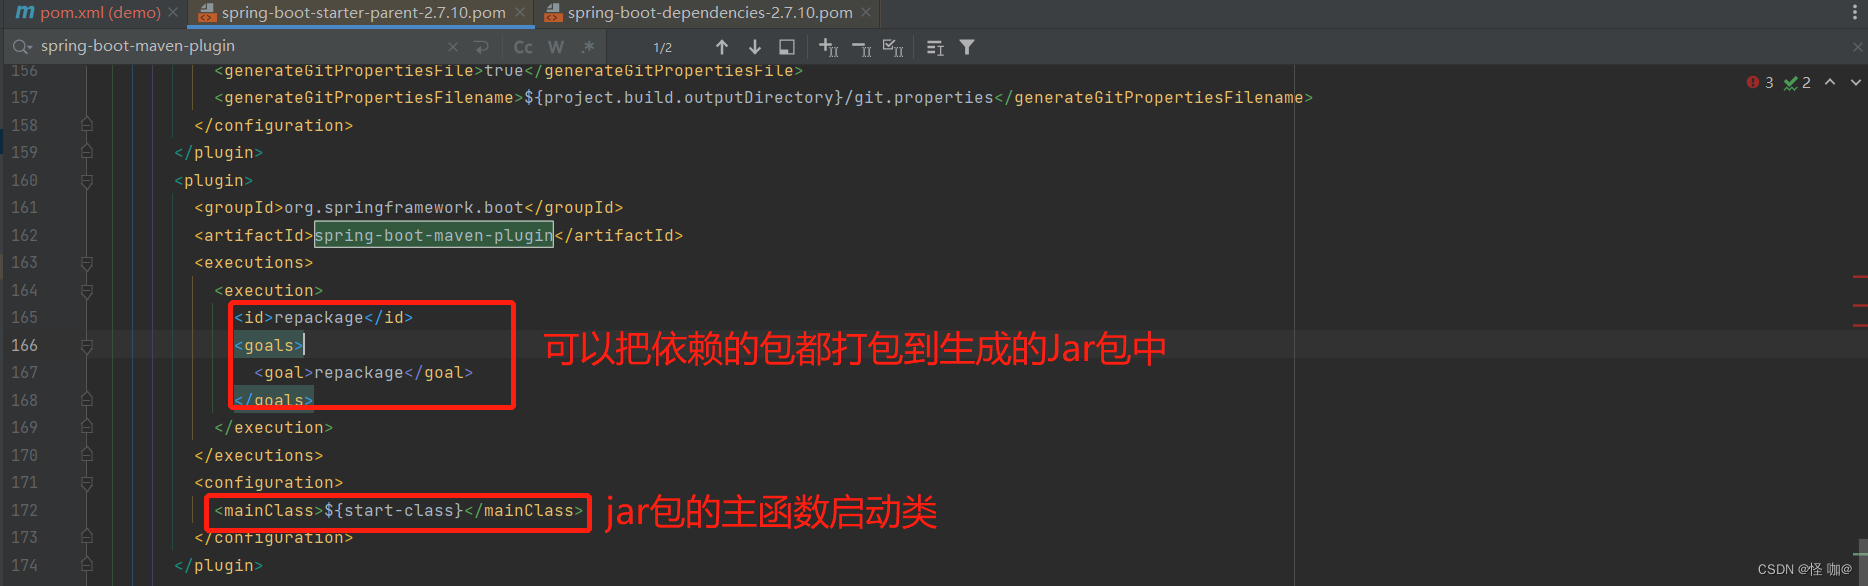
深入理解 spring-boot-starter-parent
目录 一、前言二、Maven继承三、分析spring-boot-starter-parent四、Maven单继承问题五、不继承spring-boot-starter-parent需要注意的 一、前言 在idea当中创建springboot项目的时候都会继承一个spring-boot-starter-parent作为父类,假如不继承我们的项目就不能使…...
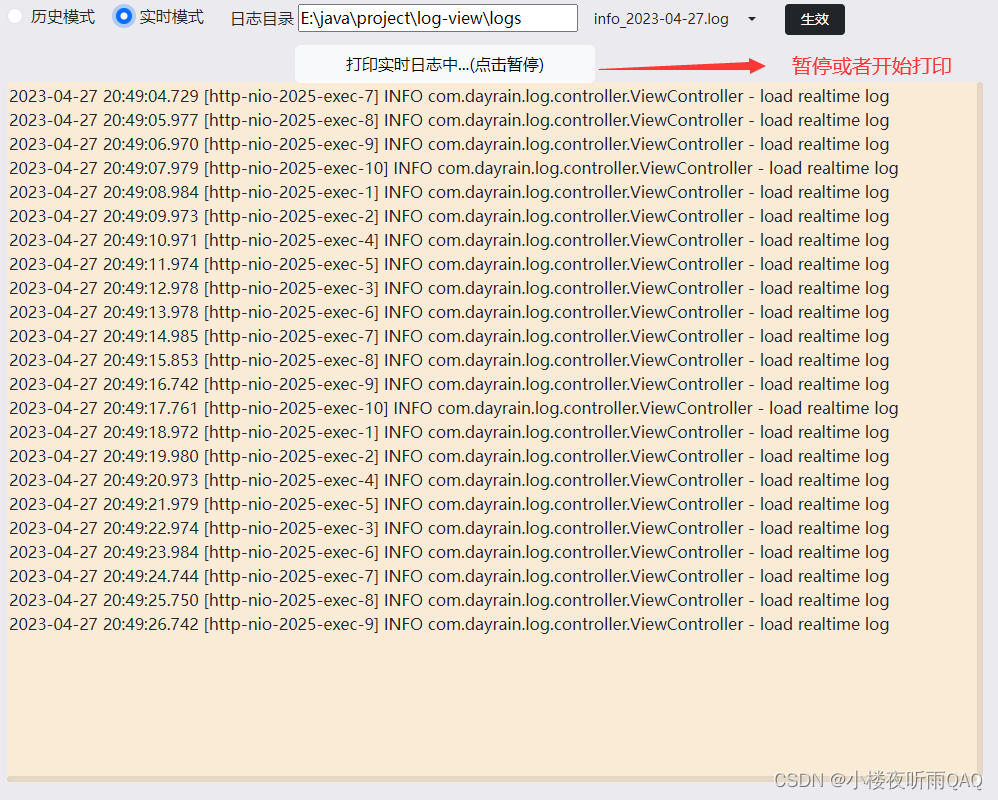
基于SpringBoot的线上日志阅读器
软件特点 部署后能通过浏览器查看线上日志。支持Linux、Windows服务器。采用随机读取的方式,支持大文件的读取。支持实时打印新增的日志(类终端)。支持日志搜索。 使用手册 基本页面 配置路径 配置日志所在的目录,配置后按回车…...
【Leetcode -405.数字转换为十六进制数 - 409.最长回文串】
Leetcode Leetcode -405.数字转换为十六进制数Leetcode - 409.最长回文串 Leetcode -405.数字转换为十六进制数 题目:给定一个整数,编写一个算法将这个数转换为十六进制数。对于负整数,我们通常使用 补码运算 方法。 注意 : 十六进制中所有…...
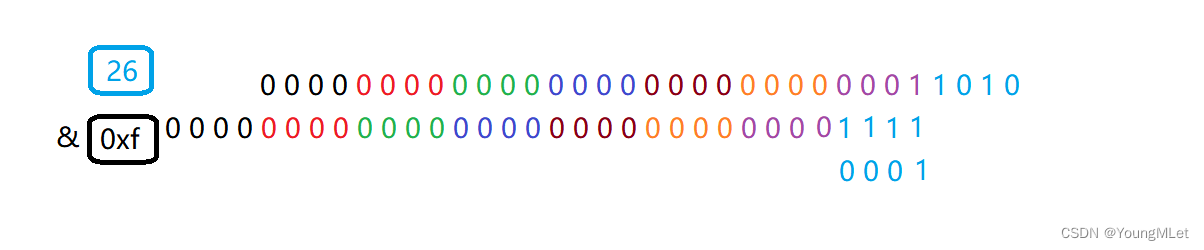
剑指 Offer:003 前 n 个数字二进制中 1 的个数
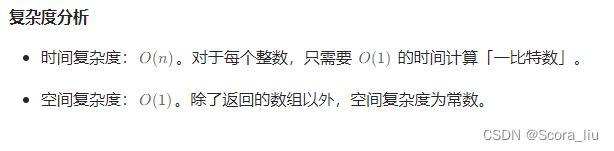
题目: 给定一个非负整数 n,请计算 0 到 n 之间的每个数字的二进制表示中 1 的个数,并输出一个数组 示例: 1、 输入: n 2 输出: [0,1,1] 解释: 0 --> 0 1 --> 1 2 --> 10 2、 输入: n 5 输出: [0,1,1,2,1,2] 解释: 0 …...
DDD系列:二、应用架构设计演变
作用: 通过规定一个固定的架构设计,可以让团队内有一个统一的开发规范,降低沟通成本,提升效率和代码质量。 目标: 在做架构设计时,一个好的架构应该需要实现以下几个目标: 独立于UI:前…...
Spring-IOC
IOC概念和原理 什么是IOC 控制反转,为了将系统的耦合度降低,把对象的创建和对象直接的调用过程权限交给Spring进行管理。 IOC底层原理 XML解析 通过Java代码解析XML配置文件或者注解得到对应的类的全路径,获取对应的Class类 Class clazz …...

基于Java语言开发B/S架构实现的云HIS
一、云HIS系统框架简介 1、技术框架 (1)总体框架: SaaS应用,全浏览器访问 前后端分离,多服务协同 服务可拆分,功能易扩展 (2)技术细节: 前端:AngularNg…...

清洁赛道新势力,米博凭“减法”突围?
在五四青年节这个特殊的日子,方太旗下的高端智能清洁品牌“米博”发布了新一代无滚布洗地机7系列。 5月4日晚,米博以“减法生活,净请7代”为主题,举办了新品发布会。在发布会上,从小红书翻红的董洁作为方太集团米博产…...

代码随想录训练营Day6| 242、349、202、1
242. 有效的字母异位词 给定两个字符串 s 和 t ,编写一个函数来判断 t 是否是 s 的字母异位词。 注意:若 s 和 t 中每个字符出现的次数都相同,则称 s 和 t 互为字母异位词。 class Solution {public boolean isAnagram(String s, String t)…...
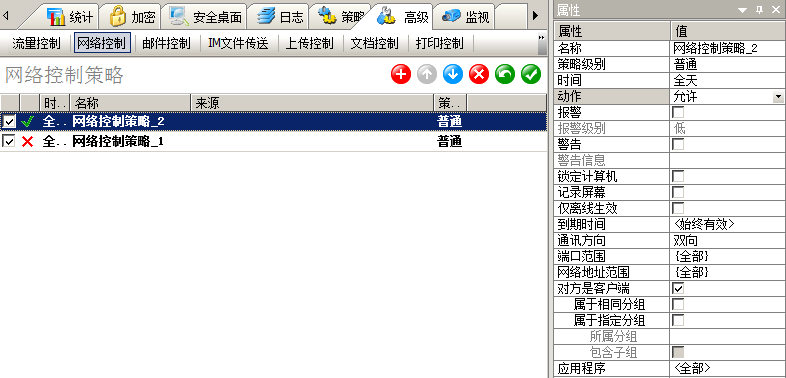
IP-GUARD如何通过网络控制策略禁止应用程序联网?
如何通过网络控制策略禁止应用程序联网? 可以在控制台-高级-网络控制中,添加以下策略: 动作:“禁止” 应用程序:填写要禁止的程序(以QQ示例) 如何禁止没有安装客户端的电脑访问客户端电脑? 可以给所有客户端设置只允许客户端电脑访问的网络控制策略; 在控制台左边的…...

Java RSA密钥转换,从RSAPrivateKey得到RSAPublicKey
概述: 在Java编程中,我们经常用到如下一段代码来生成RSA公私钥,分别拿到公私钥然后加解密计算: KeyPairGenerator keyPairGen; keyPairGen KeyPairGenerator.getInstance("RSA"); keyPairGen.initialize(2048, new S…...

[原创]心血管支架仿真:从力学分析到临床决策的虚拟桥梁
1. 心血管支架仿真的核心价值 心血管支架作为冠心病治疗的关键医疗器械,其设计和性能直接影响手术效果。传统支架研发依赖大量物理实验,不仅成本高昂,还存在伦理限制。仿真技术恰好填补了这一空白,成为连接力学研究与临床实践的虚…...

MySQL数据库备份实战:全量、增量、差异备份如何选择?附性能对比测试
MySQL数据库备份策略深度解析:全量、增量与差异备份的实战选择指南 引言:为什么备份策略如此重要? 数据库作为企业核心资产的存储载体,其安全性直接关系到业务连续性。一次意外的数据丢失可能导致数百万美元的损失,甚至…...

Emotion2Vec+在客服场景的应用:快速分析客户情绪,提升服务质量
Emotion2Vec在客服场景的应用:快速分析客户情绪,提升服务质量 1. 客服的痛点:我们真的“听懂”客户了吗? 想象一下这个场景:一位客户打进电话,语气平静地描述着一个产品问题。客服代表按照标准流程记录、…...

Java开发者指南:SpringBoot集成RexUniNLU,构建高性能NLU服务接口
Java开发者指南:SpringBoot集成RexUniNLU,构建高性能NLU服务接口 1. 为什么选择RexUniNLU 在电商客服系统升级项目中,我们遇到了一个典型问题:用户咨询表达千变万化。"快递还没到"、"物流停了"、"多久…...
)
Docker一键部署思源笔记:从安装到外网访问的完整指南(含路由侠配置)
Docker容器化部署思源笔记全流程实战:从本地搭建到安全外访 在个人知识管理工具百花齐放的今天,思源笔记以其开源可自托管的特性吸引了众多注重数据隐私的技术爱好者。作为一款支持端到端加密的Markdown笔记系统,它完美平衡了离线可用性与多端…...

MathLive:为Web应用打造高效数学编辑体验的Web组件解决方案
MathLive:为Web应用打造高效数学编辑体验的Web组件解决方案 【免费下载链接】mathlive A web component for easy math input 项目地址: https://gitcode.com/gh_mirrors/ma/mathlive 价值定位:重新定义网页数学编辑体验 在现代Web应用开发中&am…...

Nunchaku-flux-1-dev在Ubuntu20.04上的保姆级部署教程
Nunchaku-flux-1-dev在Ubuntu20.04上的保姆级部署教程 专为新手准备的详细指南,手把手带你避开所有坑 最近在折腾AI模型部署,发现Nunchaku-flux-1-dev这个模型效果还不错,但在Ubuntu系统上部署确实遇到不少问题。特别是驱动兼容性、环境配置这…...

PyMAVLink:无人机通信的Python桥梁——从入门到实践指南
PyMAVLink:无人机通信的Python桥梁——从入门到实践指南 【免费下载链接】pymavlink python MAVLink interface and utilities 项目地址: https://gitcode.com/gh_mirrors/py/pymavlink 如何通过PyMAVLink实现无人机高效通信? 解析MAVLink协议&a…...
)
Qt 5.14实战:用QGraphicsView打造可交互的2D绘图工具(附完整代码)
Qt 5.14实战:用QGraphicsView打造可交互的2D绘图工具(附完整代码) 1. 项目概述与核心组件 在Qt框架中构建2D绘图工具时,QGraphicsView架构提供了完美的解决方案。这个架构由三个核心类组成: QGraphicsScene:…...

IPv6分片机制详解:为什么路由器不再帮你切数据包?
IPv6分片机制详解:为什么路由器不再帮你切数据包? 作为一名常年与网络协议打交道的工程师,第一次在Wireshark中抓取IPv6流量时,最让我困惑的莫过于那些被丢弃的"Packet too big"ICMP报文。这背后隐藏着IPv6设计哲学中一…...