本地使用3台centos7虚拟机搭建K8S集群教程
第一步 准备3台centos7虚拟机
3台虚拟机与主机的网络模式都是桥接的模式,也就是他们都是一台独立的“主机”
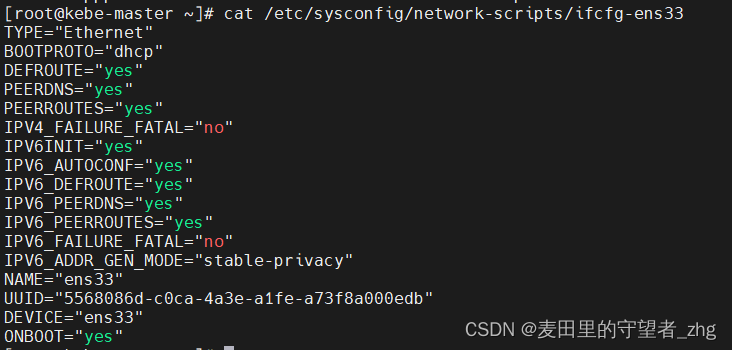
(1)kebe-master的配置
虚拟机配置:

网络配置:
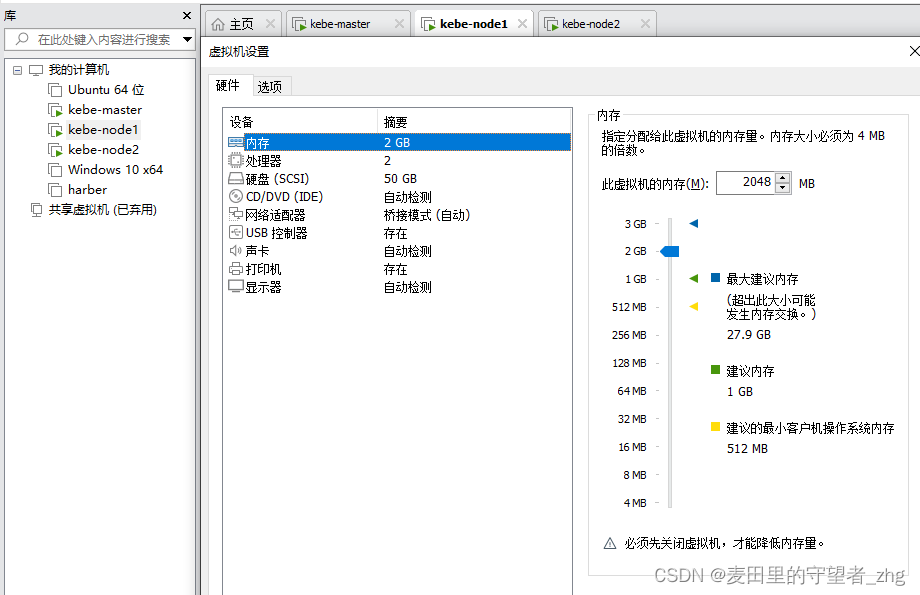
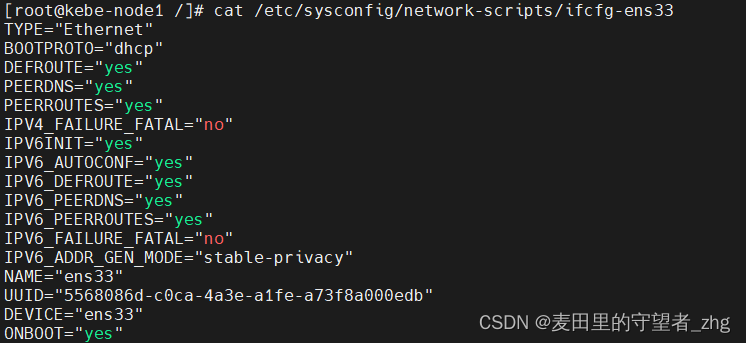
(2)kebe-node1的配置
虚拟机配置:
网络配置:
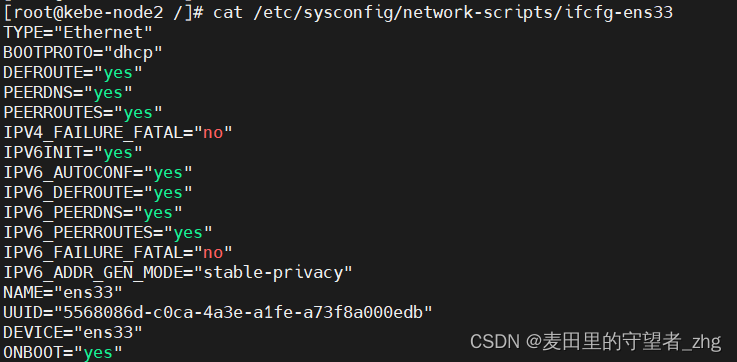
(3)kebe-node2的配置
虚拟机配置:
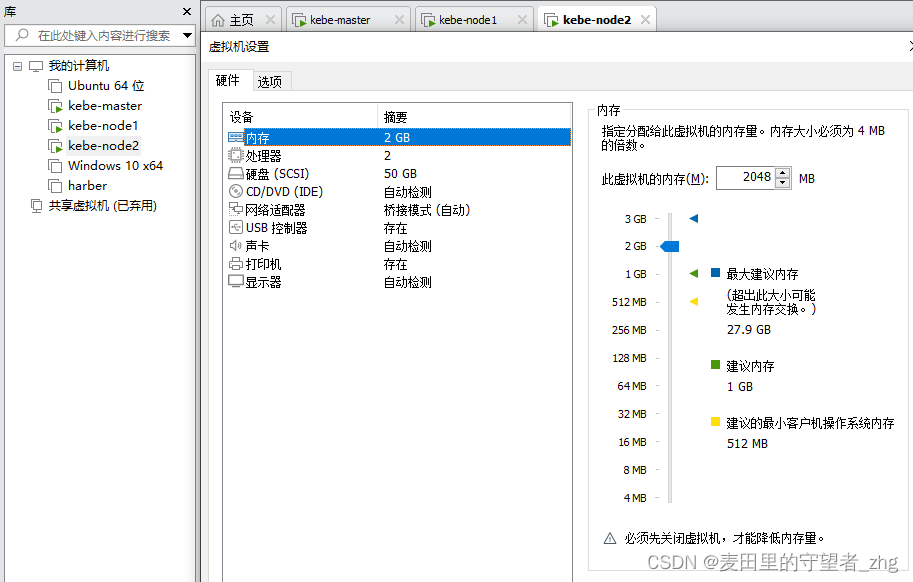
网络配置:
第二步 开始搭建集群
(1)系统初始化(所有节点都要安装)
关闭防火墙:
$ systemctl stop firewalld
$ systemctl disable firewalld
关闭selinux:
$ sed -i 's/enforcing/disabled/' /etc/selinux/config # 永久
$ setenforce 0 # 临时
关闭 swap:
$ swapoff -a # 临时
$ vim /etc/fstab # 永久
设置主机名:
$ hostnamectl set-hostname <hostname>
在kebe-master虚拟机添加hosts:
$ cat >> /etc/hosts << EOF
192.168.31.61 k8s-master
192.168.31.62 k8s-node1
192.168.31.63 k8s-node2
EOF
将桥接的 IPv4 流量传递到 iptables 的链:
$ cat > /etc/sysctl.d/k8s.conf << EOF
net.bridge.bridge-nf-call-ip6tables = 1
net.bridge.bridge-nf-call-iptables = 1
EOF
$ sysctl --system # 生效
时间同步:
$ yum install ntpdate -y
$ ntpdate time.windows.com
(2)开始安装K8S
添加安装源:(所有节点都要安装)
# 添加 k8s 安装源
$ cat <<EOF > kubernetes.repo
[kubernetes]
name=Kubernetes
baseurl=https://mirrors.aliyun.com/kubernetes/yum/repos/kubernetes-el7-x86_64
enabled=1
gpgcheck=0
repo_gpgcheck=0
gpgkey=https://mirrors.aliyun.com/kubernetes/yum/doc/yum-key.gpg https://mirrors.aliyun.com/kubernetes/yum/doc/rpm-package-key.gpg
EOF
mv kubernetes.repo /etc/yum.repos.d/# 添加 Docker 安装源
$ yum-config-manager --add-repo http://mirrors.aliyun.com/docker-ce/linux/centos/docker-ce.repo
安装所需组件:(所有节点都要安装)
$ yum install -y kubelet-1.22.4 kubectl-1.22.4 kubeadm-1.22.4 docker-ce
注意,据学员反馈,1.24 以上的版本会报错,跟教程有差异,所以建议大家指定版本号安装,版本号确保跟老师的一样
启动docker:
$ systemctl enable docker && systemctl start d
修改docker配置:(所有节点都要安装)
# kubernetes 官方推荐 docker 等使用 systemd 作为 cgroupdriver,否则 kubelet 启动不了
cat <<EOF > daemon.json
{"exec-opts": ["native.cgroupdriver=systemd"],"registry-mirrors": ["https://ud6340vz.mirror.aliyuncs.com"]
}
EOF
mv daemon.json /etc/docker/# 重启生效
systemctl daemon-reload
systemctl restart docker
在master节点安装网络插件(仅master节点安装)
# 很有可能国内网络访问不到这个资源,你可以网上找找国内的源安装 flannel
kubectl apply -f https://raw.githubusercontent.com/coreos/flannel/master/Documentation/kube-flannel.yml# 如果上面的插件安装失败,可以选用 Weave,下面的命令二选一就可以了。
kubectl apply -f https://github.com/weaveworks/weave/releases/download/v2.8.1/weave-daemonset-k8s.yaml
kubectl apply -f http://static.corecore.cn/weave.v2.8.1.yaml# 更多其他网路插件查看下面介绍,自行网上找 yaml 安装
https://blog.csdn.net/ChaITSimpleLove/article/details/117809007
使用kubeadm初始化主节点:(仅master节点安装)
# 初始化集群控制台 Control plane
# 失败了可以用 kubeadm reset 重置
$ kubeadm init --image-repository=registry.aliyuncs.com/google_containers# 记得把 kubeadm join xxx 保存起来
# 忘记了重新获取:kubeadm token create --print-join-command# 复制授权文件,以便 kubectl 可以有权限访问集群
# 如果你其他节点需要访问集群,需要从主节点复制这个文件过去其他节点
mkdir -p $HOME/.kube
cp -i /etc/kubernetes/admin.conf $HOME/.kube/config
chown $(id -u):$(id -g) $HOME/.kube/config$ kubectl get nodes
NAME          STATUS     ROLES                  AGE     VERSION
kebe-master   NotReady   control-plane,master   2m47s   v1.22.4
执行完kubeadm init … 命令之后的输出如下内容表示成功:
I0508 23:08:47.648647  119886 version.go:255] remote version is much newer: v1.27.1; falling back to: stable-1.22
[init] Using Kubernetes version: v1.22.17
[preflight] Running pre-flight checks
[preflight] Pulling images required for setting up a Kubernetes cluster
[preflight] This might take a minute or two, depending on the speed of your internet connection
[preflight] You can also perform this action in beforehand using 'kubeadm config images pull'
[certs] Using certificateDir folder "/etc/kubernetes/pki"
[certs] Generating "ca" certificate and key
[certs] Generating "apiserver" certificate and key
[certs] apiserver serving cert is signed for DNS names [kebe-master kubernetes kubernetes.default kubernetes.default.svc kubernetes.default.svc.cluster.local] and IPs [10.96.0.1 192.168.1.19]
[certs] Generating "apiserver-kubelet-client" certificate and key
[certs] Generating "front-proxy-ca" certificate and key
[certs] Generating "front-proxy-client" certificate and key
[certs] Generating "etcd/ca" certificate and key
[certs] Generating "etcd/server" certificate and key
[certs] etcd/server serving cert is signed for DNS names [kebe-master localhost] and IPs [192.168.1.19 127.0.0.1 ::1]
[certs] Generating "etcd/peer" certificate and key
[certs] etcd/peer serving cert is signed for DNS names [kebe-master localhost] and IPs [192.168.1.19 127.0.0.1 ::1]
[certs] Generating "etcd/healthcheck-client" certificate and key
[certs] Generating "apiserver-etcd-client" certificate and key
[certs] Generating "sa" key and public key
[kubeconfig] Using kubeconfig folder "/etc/kubernetes"
[kubeconfig] Writing "admin.conf" kubeconfig file
[kubeconfig] Writing "kubelet.conf" kubeconfig file
[kubeconfig] Writing "controller-manager.conf" kubeconfig file
[kubeconfig] Writing "scheduler.conf" kubeconfig file
[kubelet-start] Writing kubelet environment file with flags to file "/var/lib/kubelet/kubeadm-flags.env"
[kubelet-start] Writing kubelet configuration to file "/var/lib/kubelet/config.yaml"
[kubelet-start] Starting the kubelet
[control-plane] Using manifest folder "/etc/kubernetes/manifests"
[control-plane] Creating static Pod manifest for "kube-apiserver"
[control-plane] Creating static Pod manifest for "kube-controller-manager"
[control-plane] Creating static Pod manifest for "kube-scheduler"
[etcd] Creating static Pod manifest for local etcd in "/etc/kubernetes/manifests"
[wait-control-plane] Waiting for the kubelet to boot up the control plane as static Pods from directory "/etc/kubernetes/manifests". This can take up to 4m0s
[apiclient] All control plane components are healthy after 8.504213 seconds
[upload-config] Storing the configuration used in ConfigMap "kubeadm-config" in the "kube-system" Namespace
[kubelet] Creating a ConfigMap "kubelet-config-1.22" in namespace kube-system with the configuration for the kubelets in the cluster
[upload-certs] Skipping phase. Please see --upload-certs
[mark-control-plane] Marking the node kebe-master as control-plane by adding the labels: [node-role.kubernetes.io/master(deprecated) node-role.kubernetes.io/control-plane node.kubernetes.io/exclude-from-external-load-balancers]
[mark-control-plane] Marking the node kebe-master as control-plane by adding the taints [node-role.kubernetes.io/master:NoSchedule]
[bootstrap-token] Using token: 0ohedz.hg6dij9dvfxv8ywy
[bootstrap-token] Configuring bootstrap tokens, cluster-info ConfigMap, RBAC Roles
[bootstrap-token] configured RBAC rules to allow Node Bootstrap tokens to get nodes
[bootstrap-token] configured RBAC rules to allow Node Bootstrap tokens to post CSRs in order for nodes to get long term certificate credentials
[bootstrap-token] configured RBAC rules to allow the csrapprover controller automatically approve CSRs from a Node Bootstrap Token
[bootstrap-token] configured RBAC rules to allow certificate rotation for all node client certificates in the cluster
[bootstrap-token] Creating the "cluster-info" ConfigMap in the "kube-public" namespace
[kubelet-finalize] Updating "/etc/kubernetes/kubelet.conf" to point to a rotatable kubelet client certificate and key
[addons] Applied essential addon: CoreDNS
[addons] Applied essential addon: kube-proxyYour Kubernetes control-plane has initialized successfully!To start using your cluster, you need to run the following as a regular user:mkdir -p $HOME/.kubesudo cp -i /etc/kubernetes/admin.conf $HOME/.kube/configsudo chown $(id -u):$(id -g) $HOME/.kube/configAlternatively, if you are the root user, you can run:export KUBECONFIG=/etc/kubernetes/admin.confYou should now deploy a pod network to the cluster.
Run "kubectl apply -f [podnetwork].yaml" with one of the options listed at:https://kubernetes.io/docs/concepts/cluster-administration/addons/Then you can join any number of worker nodes by running the following on each as root:kubeadm join 192.168.1.19:6443 --token 0ohedz.hg6dij9dvfxv8ywy \--discovery-token-ca-cert-hash sha256:6fbf85e95ebf4260c2ef9e7643bcbbe30a4c55b0a1a39386d54d8e3c0fad1894
node节点连接加入master节点,将kubeadm init …的输出结果中的最下面一行命令复制到node1和node2节点,把两个node节点加入mater:
kubeadm join 192.168.1.19:6443 --token 0ohedz.hg6dij9dvfxv8ywy \--discovery-token-ca-cert-hash sha256:6fbf85e95ebf4260c2ef9e7643bcbbe30a4c55b0a1a39386d54d8e3c0fad1894
然后在master节点使用命令查看2个node节点是否加入成功:
$ kubectl get nodes
NAME          STATUS     ROLES                  AGE   VERSION
kebe-master   Ready      control-plane,master   26m   v1.22.4
kebe-node1    NotReady   <none>                 33s   v1.22.4
kebe-node2    NotReady   <none>                 29s   v1.22.4
相关文章:
本地使用3台centos7虚拟机搭建K8S集群教程
第一步 准备3台centos7虚拟机 3台虚拟机与主机的网络模式都是桥接的模式,也就是他们都是一台独立的“主机” (1)kebe-master的配置 虚拟机配置: 网络配置: (2)kebe-node1的配置 虚拟机配…...

NVIDIA CUDA驱动安装
1 引言 因为笔记本电脑上运行Milvus图像检索代码,需要安装CUDA驱动。电脑显卡型号是NVIDIA GeForce GTX 1050 Ti Mobile, 操作系统是Ubuntu 20.04,内核版本为Linux 5.15.0-72-generic。 2 CUDA驱动测试 参考网上的资料:https://blog.csdn.…...

python 从excel中获取需要执行的用例
classmethod def get_excel_data(cls, excel_name, sheet_name, case_numNone):"""读取excel文件的方法:param excel_name: 文件名称:param sheet_name: sheet页的名称:param case_name: 执行的case名称:return:"""def get_row_data(table, row)…...

Web3中文|乱花渐欲meme人眼,BRC-20总市值逼近10亿美元
现在的Web3加密市场,用“乱花渐欲meme人眼”来形容再合适不过了。 何为meme? “meme”这个词大概很多人都不知道如何正确发音,并且一看到它就会和狗狗币Dogecoin等联系在一起。那它究竟从何而来呢? Meme:[mi:m]&#x…...

盖雅案例入选「首届人力资源服务国际贸易交流合作大会20项创新经验」
近日,首届人力资源服务国际贸易交流合作大会顺利召开。为激励企业在人力资源服务贸易领域不断创新,加快培育对外贸易新业态、新模式,形成人力资源服务领域国际竞争新优势,大会评选出了「首届人力资源服务国际贸易交流合作大会20项…...
[论文笔记]SimMIM:a Simple Framework for Masked Image Modeling
文章地址:https://arxiv.org/abs/2111.09886 代码地址:https://github.com/microsoft/SimMIM 文章目录 摘要文章思路创新点文章框架Masking strategyPrediction headPrediction targetEvaluation protocols 性能实验实验设置Mask 策略预测头目标分辨率预…...
----索引/视图/范式)
mysql从零开始(4)----索引/视图/范式
接上文 mysql从零开始(3) 索引 索引是在数据库表的字段上添加的,是为了提高查询效率存在的一种机制。一张表的一个字段可以添加一个索引,也可以多个字段联合起来添加索引。索引相当于一本书的目录,是为了缩小扫描范围…...
Flutter框架:从入门到实战,构建跨平台移动应用的全流程解析
第一章:Flutter框架介绍 Flutter框架是由Google推出的一款跨平台移动应用开发框架。相比其他跨平台框架,Flutter具有更高的性能和更好的用户体验。本章将介绍Flutter框架的概念、特点以及与其他跨平台框架的比较,以及Flutter开发环境的搭建和…...

Spring AOP+注解方式实现系统日志记录
一、前言 在上篇文章中,我们使用了AOP思想实现日志记录的功能,代码中采用了指定连接点方式(Pointcut(“execution(* com.nowcoder.community.controller..(…))”)),指定后不需要在进行任何操作就可以记录日志了&…...

OpenGL 4.0的Tessellation Shader(细分曲面着色器)
细分曲面着色器(Tessellation Shader)处于顶点着色器阶段的下一个阶段,我们可以看以下链接的OpenGL渲染流水线的图:Rendering Pipeline Overview。它是由ATI在2001年率先设计出来的。 目录 细分曲面着色器细分曲面Patch细分曲面控…...

项目经理如何及时掌控项目进度?
延迟是指超出计划的时间,而无法掌控则意味着管理者对实际情况一无所知。 为了解决这些问题,我们需要建立好的制度和沟通机制。例如使用项目管理软件来跟踪进度、定期开会并避免沟通障碍等。 管理者可以建立相关制度: 1、建立进度记录制度。…...

HTML <applet> 标签
HTML5 中不支持 <applet> 标签在 HTML 4 中用于定义嵌入式小程序(插件)。 实例 一个嵌入的 Java applet: <applet code="Bubbles.class" width="350" height="350"> Java applet that draws animated bubbles. </applet&g…...
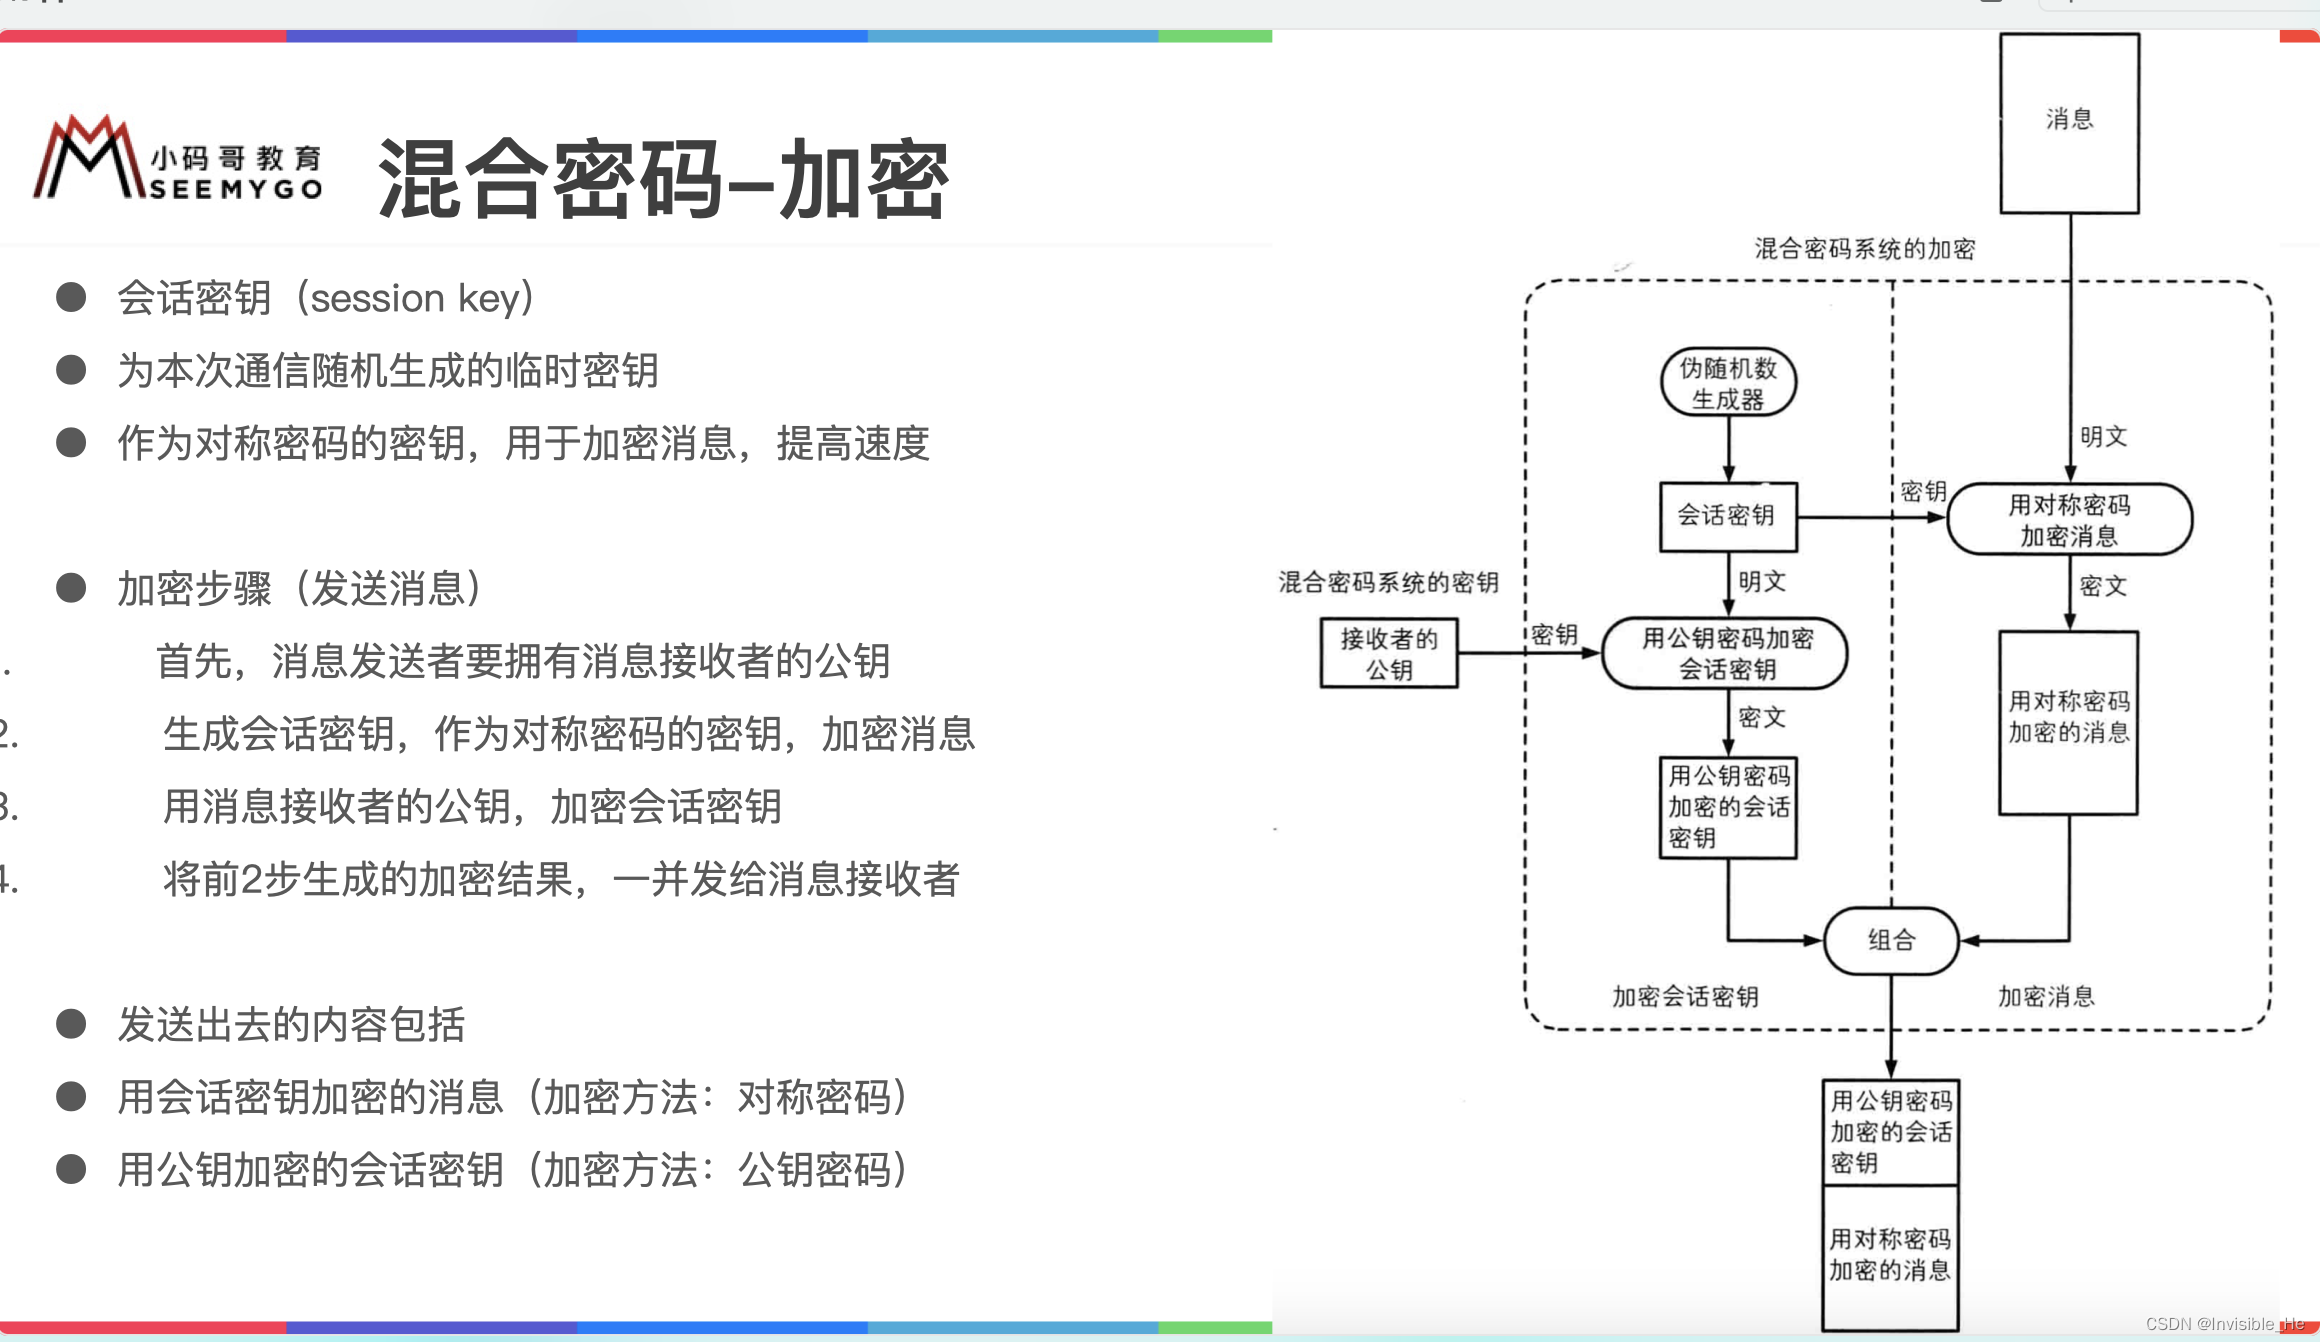
加密与解密
加密与解密 加密方式分类 加密方式主要分为两种 一种是对称加密一种是非对称加密 对称加密 对称和非对称两种方式主要说的是加密和解密两个过程。 如果对数据用一个钥匙进行了加密,那么, 你想成功读取到这个加密了的数据的话,就必须对这…...

京东金融Android瘦身探索与实践
作者:京东科技 冯建华 一、背景 随着业务不断迭代更新,App的大小也在快速增加,2019年~2022年期间一度超过了117M,期间我们也做了部分优化如图1红色部分所示,但在做优化的同时面临着新的增量代码,包体积一直…...
open3d-ml 读取SemanticKITTI Dataset
目录 1. 下载dataset 2. 读取并做可视化 3. 源码阅读 3.1 读取点云数据-bin格式 3.2 读取标注数据-.label文件 3.3 读取配置 3.4 test 3.5 train 1. 下载dataset 以SemanticKITTI为例。下载链接:http://semantic-kitti.org/dataset.html#download 把上面三…...
6.其他函数
1.时间日期类 -- current_date() 返回当前日期 -- date_add(date, n) 返回从date开始n天之后的日期 -- date_sub(date, n) 返回从date开始n天之前的日期 -- datediff(date1, date2) 返回date1-date2的日期差 -- year(date) 返回…...
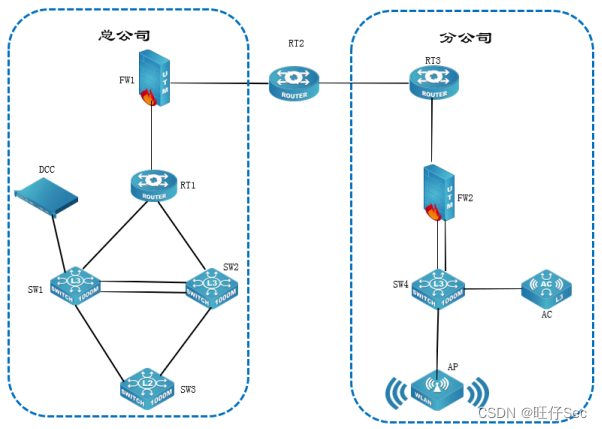
2023年宜昌市中等职业学校技能大赛 “网络搭建与应用”竞赛题-1
2023年宜昌市中等职业学校技能大赛 “网络搭建与应用”竞赛题 一、竞赛内容分布 “网络搭建及应用”竞赛共分二个部分,其中: 第一部分:企业网络搭建部署项目,占总分的比例为50%; 第二部分:企业网络服…...
Linux权限划分的原则
考察的不仅是一个具体的指令,还考察对技术层面的认知。 如果对 Linux 权限有较深的认知和理解,那么完全可以通过查资料去完成具体指令的执行。更重要的是,认知清晰的程序员可以把 Linux 权限管理的知识迁移到其他的系统设计中。 权限抽象 一…...

PhotoScan拼接无人机航拍RGB照片
目录 背景 拼接步骤 1.新建并保存项目 2.添加照片 3.对齐照片 4.添加标记(Markers) 5.添加地面控制点 6.建立批处理任务 7.使用批处理文件进行批处理 8.导出DEM 9.导出DOM 背景 本文介绍使用地面控制点(GCPs)拼接…...

【设计模式】责任链模式的介绍及其应用
责任链的介绍 责任链模式是一种对象的行为模式。在责任链模式里,很多对象由每一个对象对其下家的引用而连接起来形成一条链。请求在这个链上传递,直到链上的某一个对象决定处理此请求。发出这个请求的客户端并不知道链上的哪一个对象最终处理这个请求&a…...
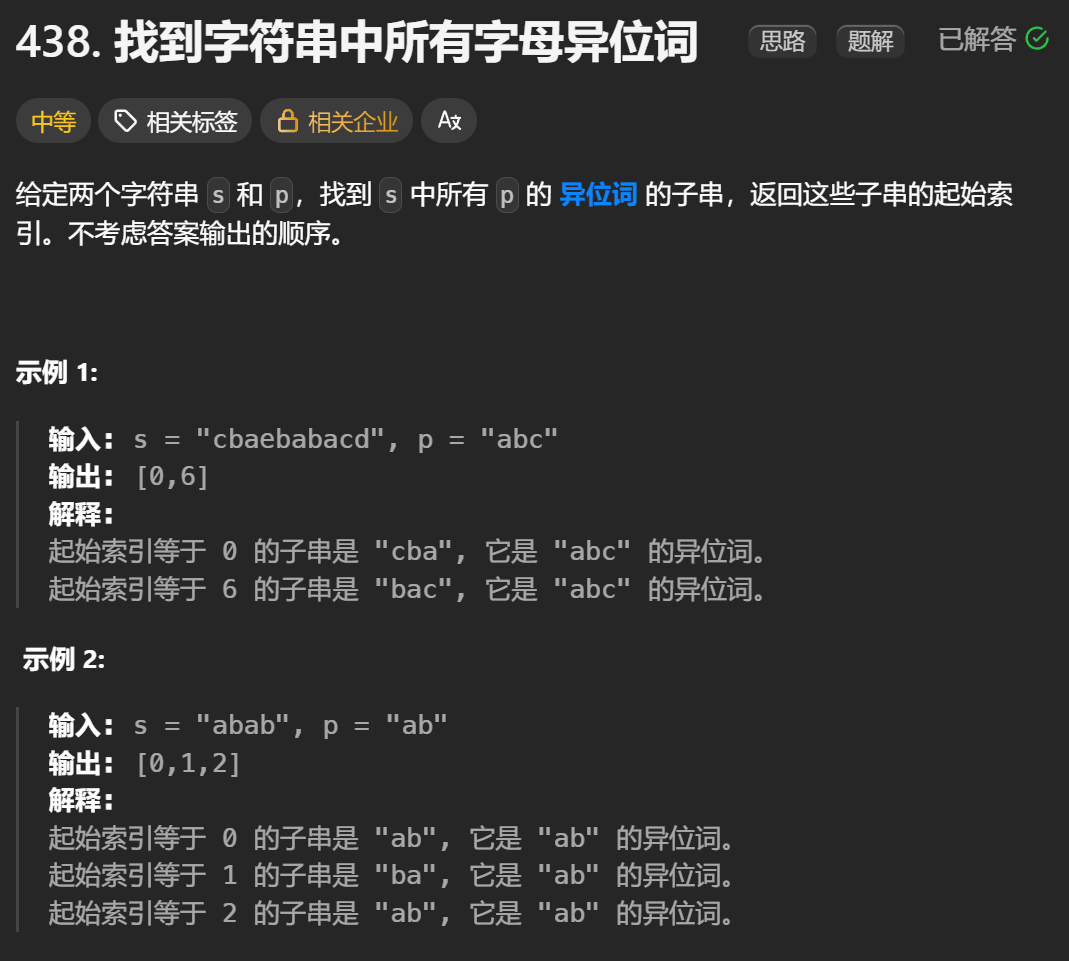
12.找到字符串中所有字母异位词
🧠 题目解析 题目描述: 给定两个字符串 s 和 p,找出 s 中所有 p 的字母异位词的起始索引。 返回的答案以数组形式表示。 字母异位词定义: 若两个字符串包含的字符种类和出现次数完全相同,顺序无所谓,则互为…...
)
是否存在路径(FIFOBB算法)
题目描述 一个具有 n 个顶点e条边的无向图,该图顶点的编号依次为0到n-1且不存在顶点与自身相连的边。请使用FIFOBB算法编写程序,确定是否存在从顶点 source到顶点 destination的路径。 输入 第一行两个整数,分别表示n 和 e 的值(1…...

【网络安全】开源系统getshell漏洞挖掘
审计过程: 在入口文件admin/index.php中: 用户可以通过m,c,a等参数控制加载的文件和方法,在app/system/entrance.php中存在重点代码: 当M_TYPE system并且M_MODULE include时,会设置常量PATH_OWN_FILE为PATH_APP.M_T…...
基于Java+VUE+MariaDB实现(Web)仿小米商城
仿小米商城 环境安装 nodejs maven JDK11 运行 mvn clean install -DskipTestscd adminmvn spring-boot:runcd ../webmvn spring-boot:runcd ../xiaomi-store-admin-vuenpm installnpm run servecd ../xiaomi-store-vuenpm installnpm run serve 注意:运行前…...
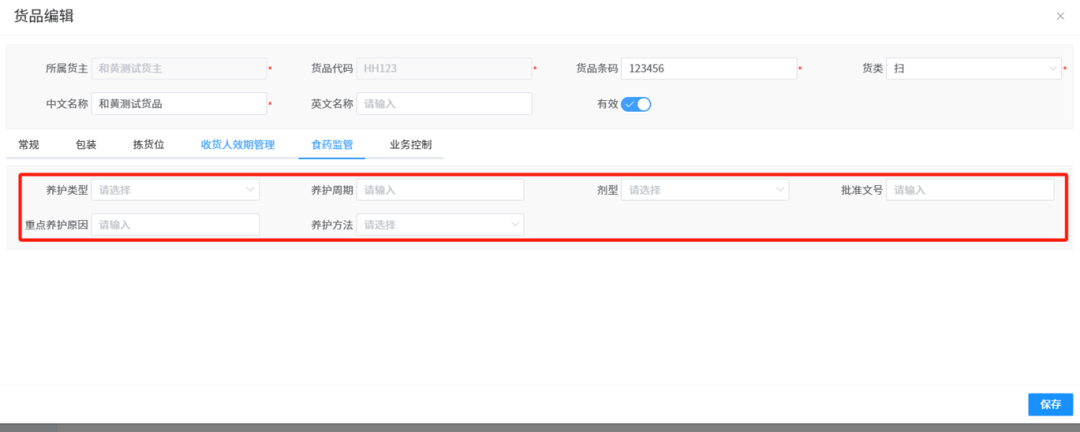
针对药品仓库的效期管理问题,如何利用WMS系统“破局”
案例: 某医药分销企业,主要经营各类药品的批发与零售。由于药品的特殊性,效期管理至关重要,但该企业一直面临效期问题的困扰。在未使用WMS系统之前,其药品入库、存储、出库等环节的效期管理主要依赖人工记录与检查。库…...

在RK3588上搭建ROS1环境:创建节点与数据可视化实战指南
在RK3588上搭建ROS1环境:创建节点与数据可视化实战指南 背景介绍完整操作步骤1. 创建Docker容器环境2. 验证GUI显示功能3. 安装ROS Noetic4. 配置环境变量5. 创建ROS节点(小球运动模拟)6. 配置RVIZ默认视图7. 创建启动脚本8. 运行可视化系统效果展示与交互技术解析ROS节点通…...

数据库正常,但后端收不到数据原因及解决
从代码和日志来看,后端SQL查询确实返回了数据,但最终user对象却为null。这表明查询结果没有正确映射到User对象上。 在前后端分离,并且ai辅助开发的时候,很容易出现前后端变量名不一致情况,还不报错,只是单…...

欢乐熊大话蓝牙知识17:多连接 BLE 怎么设计服务不会乱?分层思维来救场!
多连接 BLE 怎么设计服务不会乱?分层思维来救场! 作者按: 你是不是也遇到过 BLE 多连接时,调试现场像网吧“掉线风暴”? 温度传感器连上了,心率带丢了;一边 OTA 更新,一边通知卡壳。…...

在Spring Boot中集成RabbitMQ的完整指南
前言 在现代微服务架构中,消息队列(Message Queue)是实现异步通信、解耦系统组件的重要工具。RabbitMQ 是一个流行的消息中间件,支持多种消息协议,具有高可靠性和可扩展性。 本博客将详细介绍如何在 Spring Boot 项目…...

用 FFmpeg 实现 RTMP 推流直播
RTMP(Real-Time Messaging Protocol) 是直播行业中常用的传输协议。 一般来说,直播服务商会给你: ✅ 一个 RTMP 推流地址(你推视频上去) ✅ 一个 HLS 或 FLV 拉流地址(观众观看用)…...