tinkerCAD案例:22. Backpack Zipper Pull 背包拉链头
tinkerCAD案例:21. Custom Stamp 定制印章
原文
tinkerCAD案例:22. Backpack Zipper Pull 背包拉链头
Lesson Overview: 课程概述:
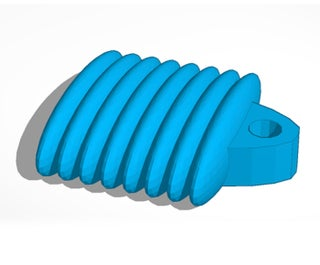
Now we’re going to make a zipper pull!
现在我们要做一个拉链头!
Your backpack, however, goes with you everywhere! And how do you close your backpack? Probably zippers!
然而,你的背包随身携带!你如何关闭背包?可能是拉链!
We’ll get you started on a basic zipper pull, but where you go with it is up to you!
我们将让您开始使用基本的拉链头,但您去哪里取决于您!

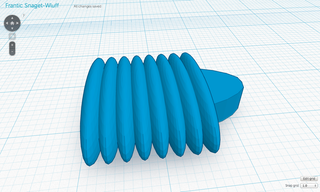
The first function of a zipper pull is to make a comfortable grip for our fingers. We’re going to create a texture that adds traction to the pull, and to easily and quickly do that, we’re going to make a pattern.
拉链头的第一个功能是使我们的手指舒适地抓握。我们将创建一个纹理,增加牵引力,为了方便快捷地做到这一点,我们将制作一个图案。
First, we’ll create the object to pattern.
首先,我们将创建要模式的对象。
Instructions 指示
说明
-
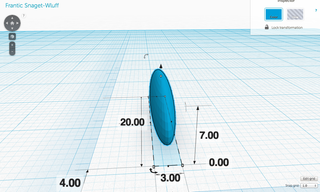
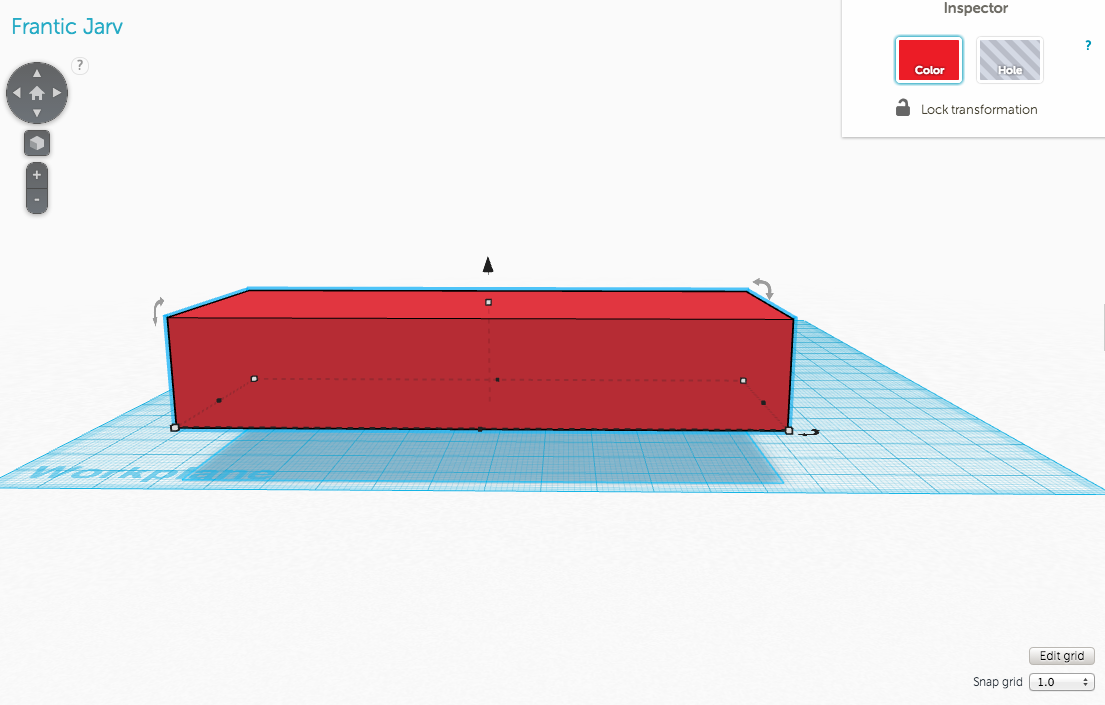
Drag a sphere from the geometric shapes menu onto the workplane.
将球体从几何形状菜单拖动到工作平面上。
-
Resize the sphere so it is 3 mm wide, 20 mm deep and 7 mm tall.
调整球体大小,使其宽 3 毫米、深 20 毫米、高 7 毫米。
-
Continue to the next step.
继续执行下一步。 -
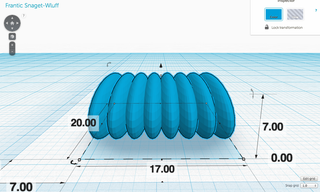
This step will duplicate the sphere to make the rest of the grip.
此步骤将复制球体以制作其余的抓地力。Tinkercad has a Smart Duplicate function that will watch how you are changing your duplicate and then it will repeat that change every time you make a new duplicate. This helps make patterns easy!
Tinkercad有一个智能复制功能,它将监视您如何更改副本,然后在每次创建新副本时都会重复该更改。这有助于简化模式!Instructions 指示
说明
-
Select the sphere, and then, from the Edit menu, click Duplicate to make an exact copy.
选择球体,然后从“编辑”菜单中,单击“复制”以制作精确副本。
-
Using the arrow keys, nudge the copy 2 mm to the right.
使用箭头键,将副本向右轻推 2 毫米。
-
Duplicate this object 7 more times. You’ll notice that Duplicate is now nudging your duplicates for you!
再复制此对象 7 次。您会注意到重复项现在正在为您轻推您的重复项!
-
Group your spheres so they are easier to work with.
对球体进行分组,以便更易于使用。
-
Continue to the next step.
继续执行下一步。 -
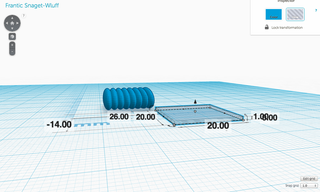
This object would not print easily on a 3-D printer since it has a round bottom. Your 3D printer really wants a nice flat surface on the first layer to anchor your part as it prints.
这个物体不会在3D打印机上轻松打印,因为它有一个圆底。您的3D打印机确实希望在第一层上有一个漂亮的平坦表面,以便在打印时锚定零件。So, let’s make the bottom flat!
所以,让我们把底部做平!Instructions 指示
说明
-
Drag out a box to the workplane and resize it so that it is 1 mm tall, 20 mm deep and 20 mm wide.
将一个框拖到工作平面上并调整其大小,使其高 1 毫米、深 20 毫米、宽 20 毫米。
-
Turn the box into a hole by clicking the hole button on the inspector.
通过单击检查器上的孔按钮将盒子变成一个洞。
-
Slide the spheres on top of the new flat box.
将球体滑动到新的平面框顶部。
-
Select everything and click the group button. The box will cut off the bottom of the spheres to make them flat.
选择所有内容,然后单击组按钮。盒子将切断球体的底部以使它们平坦。
-
Continue to the next step.
继续执行下一步。 -
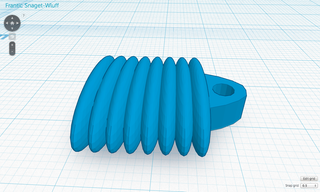
This step will create an attachment loop for connecting your zipper to the zipper pull.
此步骤将创建一个连接环,用于将拉链连接到拉链头。Instructions 指示
说明
-
Drag a light blue curved roof to the work area.
将浅蓝色弧形屋顶拖动到工作区。
-
Rotate it so one of the two flat ends is facing down, then lift it one mm off of the workplane (1mm along the Z axis)
旋转它,使两个平端中的一个朝下,然后将其抬离工作平面一毫米(沿 Z 轴 1 毫米)
-
Resize the object so it is 12mm along the Y axis, 20mm along the X axis and 4mm along the Z axis.
调整对象大小,使其沿 Y 轴为 12mm,沿 X 轴为 20mm,沿 Z 轴为 4mm。
-
Select the blue spheres and the roof object and center these two objects along the Y and Z axes. Make sure about 5mm of the roof extends past our patterned grip.
选择蓝色球体和屋顶对象,并沿 Y 轴和 Z 轴将这两个对象居中。确保屋顶的大约 5 毫米延伸到我们的图案手柄。
-
Select all the items by pressing Command-A on a Mac or Control-A on a Windows machine and then click group in the upper right corner.
通过在 Mac 上按 Command-A 或在 Windows 计算机上按 Control-A 来选择所有项目,然后单击右上角的组。
-
Continue to the next step.
继续执行下一步。 -
This last step cuts a hole in the top of the zipper pull so you can thread a key-ring or a wire through it.
最后一步在拉链头的顶部切开一个孔,以便您可以将钥匙圈或电线穿过它。Instructions 指示
说明
-
Drag a cylinder to the workplane and resize it to 5 mm tall, and 3 mm in diameter. Turn it into a hole.
将圆柱体拖动到工作平面上,并将其调整为 5 毫米高、3 毫米直径。把它变成一个洞。
-
Move it to the center of the round roof.
将其移动到圆形屋顶的中心。
Build a Spork for Outer Space 为外太空建造叉
Lesson Overview: 课程概述:
Now we’re going to make a spork!
现在我们要做一个叉!
Who decided a fork was a good idea?
谁决定分叉是个好主意?
I mean, don’t get me wrong, I use one everyday, and you probably do, too.
我的意思是,不要误会我的意思,我每天都使用一个,你可能也会这样做。
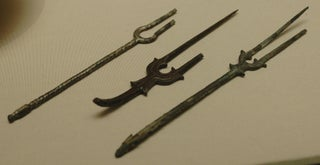
But not everyone does, and forks have only been in common use through out Europe and the Americas for about 200 years! And forks from thousands of years ago look nothing like the tools of today.
但并不是每个人都这样做,叉子在欧洲和美洲只普遍使用了大约 200 年!几千年前的叉子看起来完全不像今天的工具。
Then we have a relatively new invention, the Spork! Half spoon, half fork! Whoa!
然后我们有一个相对较新的发明,半勺子,半叉子!哇!
A small change, an appreciable difference.
一个小变化,一个明显的差异。
What change comes next? What would we be designing, today, if the fork wasn’t in wide use? Are we missing the next best thing?
接下来会发生什么变化?如果前叉没有被广泛使用,我们今天会设计什么?我们是否错过了下一个最好的东西?
Only one way to find out, design a better utensil!
只有一种方法可以找出答案,设计一个更好的器皿!
Instructions 指示
说明
-
Continue to the next step.
继续执行下一步。 -
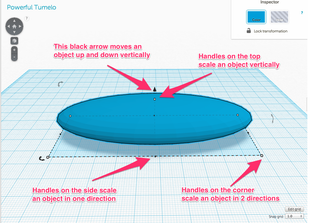
Let’s think about the basic function of a spoon. A spoon is a mouth-sized bowl for moving a small volume liquid food.
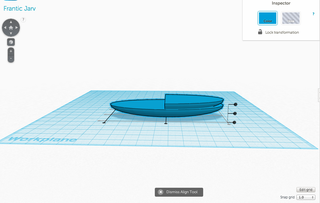
让我们考虑一下勺子的基本功能。勺子是一个嘴巴大小的碗,用于移动少量液体食物。So we need to make a mouth sized bowl. That tells me we want a round shape that is no larger than about 40mm wide (I cheated, I measured an existing spoon, please don’t tell anyone!)
所以我们需要做一个嘴巴大小的碗。这告诉我我们想要一个不超过 40 毫米宽的圆形(我作弊了,我测量了一个现有的勺子,请不要告诉任何人!Let’s make that shape, now.
现在让我们做这个形状。Instructions 指示
说明1. Drag out a sphere to the workplane and make it 100mm long, 40mm wide, and 20mm tall.将球体拖到工作平面上,使其长 100 毫米、宽 40 毫米、高 20 毫米。------2. Continue to the next step.继续执行下一步。
-
Now, a bowl isn’t a full sphere, it’s a hemi-sphere (half a sphere).
现在,碗不是一个完整的球体,它是一个半球体(半个球体)。The top part of our spork needs to be flat, so we need to remove the top of our squished oval so that we have a flat surface.
叉的顶部需要平坦,因此我们需要去除挤压椭圆形的顶部,以便我们有一个平坦的表面。Why didn’t we start with a hemi-sphere? Because, by trimming a sphere, we can choose where we want the bowl to begin or end. We might need this adjustability when we test our spork!
我们为什么不从半球开始?因为,通过修剪球体,我们可以选择我们希望碗开始或结束的位置。当我们测试我们的叉时,我们可能需要这种可调节性!Instructions 指示
说明
-
Drag out a box to the workplane and make it 110mm long, 40mm wide, and 20mm tall.
将一个盒子拖到工作平面上,使其长 110 毫米、宽 40 毫米、高 20 毫米。
-
Use the Z Axis translation arrow to pull the box 10mm off of the workplane.
使用 Z 轴平移箭头将盒子从工作平面上拉出 10 毫米。
-
Turn the box in to a hole and then use the Align tool to center the box over the oval along the X and Y axis
将框转为孔,然后使用“对齐”工具沿 X 轴和 Y 轴将框在椭圆上居中
-
Select both of the objects and group them.
选择两个对象并对其进行分组。
-
Continue to the next step.
继续执行下一步。
-
-
Now, we need to make a hollow for our food.
现在,我们需要为我们的食物做一个空心。We may think of a spoon as a thin piece of metal in a bowl shape, but when we’re designing one, we need to build it out of positive and negative spaces.
我们可能认为勺子是一块碗形的薄金属,但是当我们设计勺子时,我们需要用正负空间来构建它。So the bowl is a spherical hollow that intersects with a solid hemi-sphere. I
所以碗是一个球形的空心,与一个实心半球相交。我t’s a novel thing to think of the world in this way, which is why we’re taking the care to share this with you.
以这种方式思考世界是一件新奇的事情,这就是为什么我们小心翼翼地与您分享这一点。Instructions 指示
说明
-
Copy and paste our object to the side of the original so we can work on it.
将我们的对象复制并粘贴到原始对象的一侧,以便我们可以对其进行处理。
-
Drag out a box to the Workplane and make it 50mm long, 50mm wide, and 20mm tall.
将一个框拖到工作平面上,使其长 50 毫米、宽 50 毫米、高 20 毫米。
-
Align the box so that it is centered on our copied shape on the Y and Z axes but so it shares the lower limit on the X axis.
对齐框,使其在 Y 轴和 Z 轴上以我们复制的形状为中心,但使其在 X 轴上共享下限。
-
Turn the box into a hole and group it with our copied shape.
将盒子变成一个洞,并将其与我们复制的形状分组。
-
Select this new shape and drag its Z translation handle up 5mm.
选择此新形状并将其 Z 平移手柄向上拖动 5 毫米。
-
Use the Align tool to center this new shape to our original hemi-sphere along the Y and Z axes, and align them to the upper limit along the X axis,
使用对齐工具沿 Y 轴和 Z 轴将此新形状居中到原始半球体,并沿 X 轴将它们与上限对齐,
-
Turn the bowl shape into a hole and group it with the hemi-sphere.
将碗形变成一个孔,并将其与半球分组。
-
Continue to the next step
继续执行下一步
-
-
Good job making the spoon! We’re taking design of this tool one step at a time. Isn’t it fun watching it take shape?
做勺子干得好!我们正在一步一步地设计这个工具。看着它成形不是很有趣吗?Now it’s time to shape the fork. What are some characteristics of a fork?
现在是时候塑造叉子了。叉子有哪些特点?Well, a fork is a set of sharp, narrow tines, generally uniform in length.
嗯,叉子是一组锋利、狭窄的尖齿,长度通常均匀。An oval, however, is not conducive to making tines of uniform length. Let’s fix that.
然而,椭圆形不利于制作长度均匀的尖齿。让我们解决这个问题。Instructions 指示
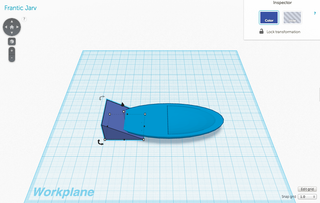
说明1. Drag a wedge shape to the workplane.将楔形拖动到工作平面上。------2. Rotate the wedge around it's Z axis 90° (clock wise) so that it points in the positive direction along the X Axis.将楔块绕其 Z 轴旋转 90°(顺时针),使其沿 X 轴指向正方向。------3. Make the wedge 34mm long (along the X axis), 30mm wide (Y axis), and 20mm tall (Z axis).使楔块长 34 毫米(沿 X 轴),宽 30 毫米(Y 轴),高 20 毫米(Z 轴)。------4. Move the wedge so that it fits within the hint.移动楔形,使其适合提示。------5. This shape and its position are arbitrary, meaning there are plenty of opportunities to tune these values.这种形状及其位置是任意的,这意味着有很多机会来调整这些值。------6. Turn this wedge into a hole and group it with your spoon.把这个楔子变成一个洞,用勺子把它组合在一起。------7. Continue to the next step.继续执行下一步。
-
Now we have a spoon on one side and the uniform length of a fork on the other. Ready to cut the tines?
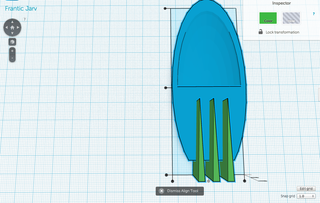
现在我们的一侧是勺子,另一侧是叉子的统一长度。准备好切割尖齿了吗?Like we used a negative space to define the bowl of the spoon, we’re going to use negative spaces to define the shape of the tines.
就像我们使用负空间来定义勺子的碗一样,我们将使用负空间来定义尖齿的形状。Instructions 指示
说明1. Drag out a green roof to the workplane.将绿色屋顶拖到工作平面上。------2. Rotate the roof 90° about its Z axis, and then again 90° about its Y axis so that it points in the positive direction along the X axis.将屋顶绕其 Z 轴旋转 90°,然后绕其 Y 轴旋转 90°,使其沿 X 轴指向正方向。------3. Resize the roof so that it is 40mm long (along the X axis) and 3mm wide (along the Y axis).调整屋顶大小,使其长 40 毫米(沿 X 轴)和宽 3 毫米(沿 Y 轴)。------4. Align the roof to the center of the Spork along the Y axis and the bottom limit of the Z axis. The alignment along the X axis is, again, arbitrary. Adjust the length and position of these roofs as an experiment!沿 Y 轴和 Z 轴的下限将屋顶与 Spork 的中心对齐。沿 X 轴的对齐再次是任意的。调整这些屋顶的长度和位置作为实验!------5. Duplicate the green roof twice and move the Duplicates 7mm along the Y Axis, one in the the positive direction and one in the negative direction.复制绿色屋顶两次,然后沿 Y 轴移动复制 7 毫米,一个在正方向,一个在负方向。------6. Select your three roof objects, turn them into a group and turn this group into a hole.选择三个屋顶对象,将它们变成一个组,然后将这个组变成一个洞。------7. Now group the tines with the rest of the spork, and we're done!现在将尖齿与其余的叉分组,我们就完成了!------8. Continue to the next step.继续执行下一步。
-
Now here’s where designs become a challenge. Not all designs are easy to manufacture. 3D printing can produce things other tools can, but there are still limits.
现在,设计成为挑战。并非所有设计都易于制造。3D打印可以生产其他工具可以生产的东西,但仍然存在局限性。For example, 3D printers can’t print on top of empty space. These features, called overhangs, will cause the 3D printer to dispense material into thin air.
例如,3D打印机不能在空白空间上打印。这些特征称为悬垂,将导致3D打印机将材料分配到稀薄的空气中。To accomplish prints with overhangs, 3D printers use “support scaffolding” or printed temporary supports to hold up the part. This material can be removed but may require some “Finishing Work” such as sanding.
为了完成带有悬垂的打印,3D打印机使用“支撑脚手架”或打印的临时支撑来支撑零件。这种材料可以去除,但可能需要一些“整理工作”,例如打磨。It’s best to minimize this finishing work.
最好尽量减少这种整理工作。To minimize this work, we’ll rotate our final design around its Y axis.
为了尽量减少这项工作,我们将围绕其 Y 轴旋转最终设计。The least amount of finishing work will be required if we rotate it 90° so that its tines are pointing down.
如果我们将其旋转 90°,使其尖齿朝下,则需要最少的精加工工作。However, rotating it 180° about the Y axis may be a more stable way to print.
但是,绕 Y 轴旋转 180° 可能是一种更稳定的打印方式。Experiment with both! 两者兼而有之!
Instructions 指示
说明
-
Drag out a green roof to the workplane.
将绿色屋顶拖到工作平面上。
-
Rotate the roof 90° about its Z axis, and then again 90° about its Y axis so that it points in the positive direction along the X axis.
将屋顶绕其 Z 轴旋转 90°,然后绕其 Y 轴旋转 90°,使其沿 X 轴指向正方向。
-
Resize the roof so that it is 40mm long (along the X axis) and 3mm wide (along the Y axis).
调整屋顶大小,使其长 40 毫米(沿 X 轴)和宽 3 毫米(沿 Y 轴)。
-
Align the roof to the center of the Spork along the Y axis and the bottom limit of the Z axis. The alignment along the X axis is, again, arbitrary. Adjust the length and position of these roofs as an experiment!
沿 Y 轴和 Z 轴的下限将屋顶与 Spork 的中心对齐。沿 X 轴的对齐再次是任意的。调整这些屋顶的长度和位置作为实验!
-
Duplicate the green roof twice and move the Duplicates 7mm along the Y Axis, one in the the positive direction and one in the negative direction.
复制绿色屋顶两次,然后沿 Y 轴移动复制 7 毫米,一个在正方向,一个在负方向。
-
Select your three roof objects, turn them into a group and turn this group into a hole.
选择三个屋顶对象,将它们变成一个组,然后将这个组变成一个洞。
-
Now group the tines with the rest of the spork, and we’re done!
现在将尖齿与其余的叉分组,我们就完成了!
-
相关文章:
tinkerCAD案例:22. Backpack Zipper Pull 背包拉链头
tinkerCAD案例:21. Custom Stamp 定制印章 原文 tinkerCAD案例:22. Backpack Zipper Pull 背包拉链头 Lesson Overview: 课程概述: Now we’re going to make a zipper pull! 现在我们要做一个拉链头! Your backpack, howev…...

Unity 性能优化四:UI耗时函数、资源加载、卸载API
UI耗时函数 1.1 Canvas.SendWillRenderCanvases 这个函数是由于自身UI的更新,产生的耗时 1. 这里更新的是vertex 属性,比如 color、tangent、position、uv,修改recttransform的position、scale,rotation并不会导致顶点属性改变…...
【Linux】用户相关内容
如果命令ll 出现以上信息,UID为具体的数字,代表之前UID为502的用户被删除了。 更改目录或文件所属用户和所属组 在Linux中,创建一个文件时,该文件的拥有者都是创建该文件的用户。 更改所属用户 chown 用户名 文件名/目录名 更…...
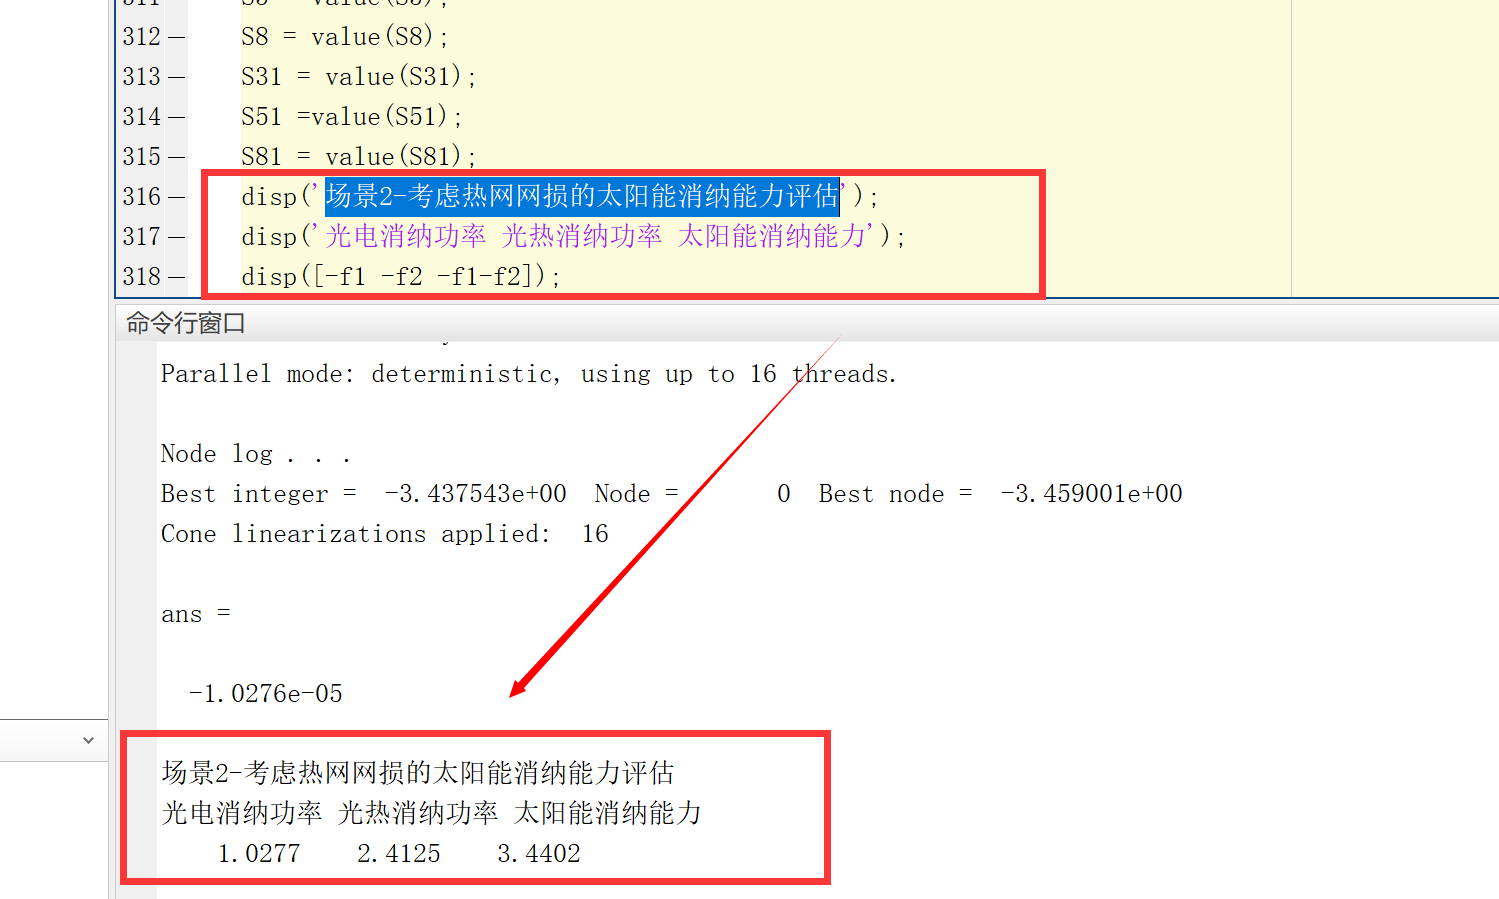
基于多场景的考虑虑热网网损的太阳能消纳能力评估研究(Matlab代码实现)
💥💥💞💞欢迎来到本博客❤️❤️💥💥 🏆博主优势:🌞🌞🌞博客内容尽量做到思维缜密,逻辑清晰,为了方便读者。 ⛳️座右铭&a…...
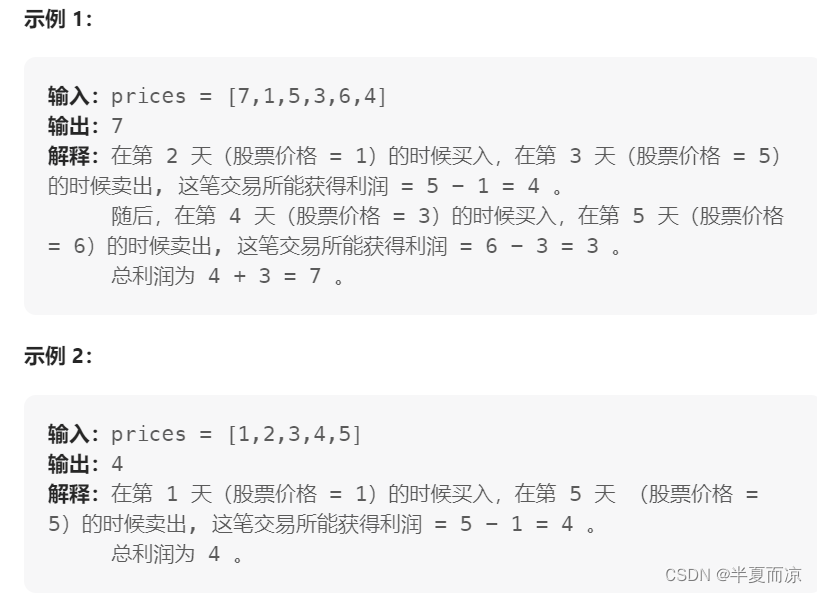
【动态规划part10】| 121.买卖股票的最佳时机、122.买卖股票的最佳时机II
目录 🎈LeetCode121. 买卖股票的最佳时机 🎈LeetCode122.买卖股票的最佳时机II 🎈LeetCode121. 买卖股票的最佳时机 链接:121.买卖股票的最佳时机 给定一个数组 prices ,它的第 i 个元素 prices[i] 表示一支给定…...

java 页面html常用写法总结
(注意:本文章默认base html中已经引入bootstrap.min.css、style.css等css样式) input :输入标签 <#input required"必填" id"cycle" name"周期" underline"true" style"width:75%" itype&quo…...
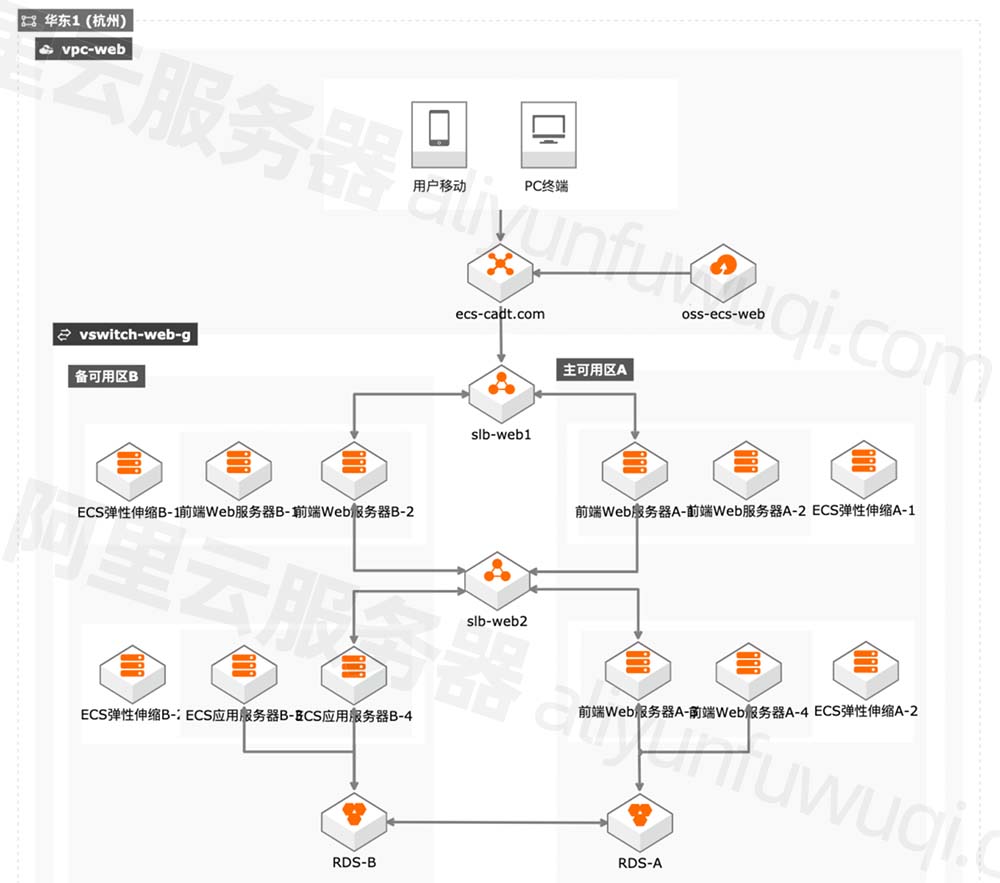
阿里云服务器全方位介绍_优势_使用_租用费用详解
阿里云服务器全方位介绍包括云服务器ECS优势、云服务器租用价格、云服务器使用场景及限制说明,阿里云服务器网分享云服务器ECS介绍、个人和企业免费试用、云服务器活动、云服务器ECS规格、优势、功能及应用场景详细你说明: 目录 什么是云服务器ECS&…...
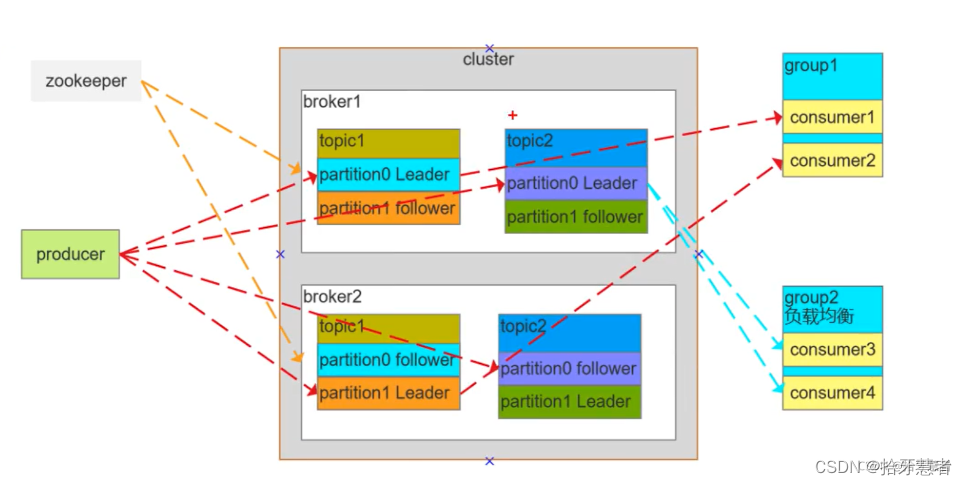
【Kafka】常用操作
1、基本概念 1. 消息: Kafka是一个分布式流处理平台,它通过消息进行数据的传输和存储。消息是Kafka中的基本单元,可以包含任意类型的数据。 2. 生产者(Producer): 生产者负责向Kafka主题发送消息。它将消息…...
【Spring框架】SpringBoot配置文件
目录 配置文件作用application.properties中午乱码问题:配置文件里面的配置类型分类SpringBoot热部署properties基本语法properties配置文件的优缺点:yml配置文件说明yml基本语法配置对象properties VS yml 配置文件作用 整个项⽬中所有重要的数据都是在…...
部署问题集合(十八)Windows环境下使用两个Tomcat
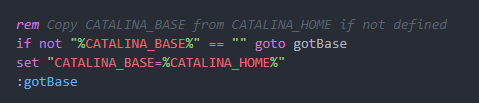
下载Tomcat Tomcat镜像下载地址:https://mirrors.cnnic.cn/apache/tomcat/进入如下地址:zip的是压缩版,exe是安装版 修改第二个Tomcat配置文件 第一步:编辑conf/server.xml文件,修改三个端口,有些版本改…...

数据结构问答8
查找 1. 一些基本概念 关键字:能唯一标识该元素 查找:给定值k,在含n个元素的表中找出关键字==k的元素。找到返回其位置信息,否则返回-1。 动、静态查找表:查找同时对表进行修改(插入、删除等),相应的表为动态,否则为静态。 内、外查找:整个查找过程在内存中进行…...

行为型设计模式之观察者模式【设计模式系列】
系列文章目录 C技能系列 Linux通信架构系列 C高性能优化编程系列 深入理解软件架构设计系列 高级C并发线程编程 设计模式系列 期待你的关注哦!!! 现在的一切都是为将来的梦想编织翅膀,让梦想在现实中展翅高飞。 Now everythi…...
)
vue2企业级项目(四)
vue2企业级项目(四) 路由设计,过场动画设计 1、router 项目下载依赖 npm install --save vue-router3.5.3src目录下创建router/index.js import Vue from "vue"; import Router from "vue-router";Vue.use(Router);con…...

(树) 剑指 Offer 26. 树的子结构 ——【Leetcode每日一题】
❓剑指 Offer 26. 树的子结构 难度:中等 输入两棵二叉树 A 和 B,判断 B 是不是 A 的子结构。(约定空树不是任意一个树的子结构) B 是 A 的子结构, 即 A 中有出现和B相同的结构和节点值。 例如: 给定的树 A: 3/ \4 5/ \1 2给定的树 B&…...
Linuxcnc-ethercat从入门到放弃(1)、环境搭建
项目开源网站 LinuxCNChttps://www.linuxcnc.org/当前release版本2.8.4 Downloads (linuxcnc.org)https://www.linuxcnc.org/downloads/可以直接下载安装好linuxcnc的实时debian系统,直接刻盘安装就可以了 安装IgH主站,网上有很多教程可供参考 git clo…...

14.Netty源码之模拟简单的HTTP服务器
highlight: arduino-light 简单的 HTTP 服务器 HTTP 服务器是我们平时最常用的工具之一。同传统 Web 容器 Tomcat、Jetty 一样,Netty 也可以方便地开发一个 HTTP 服务器。我从一个简单的 HTTP 服务器开始,通过程序示例为你展现 Netty 程序如何配置启动&a…...
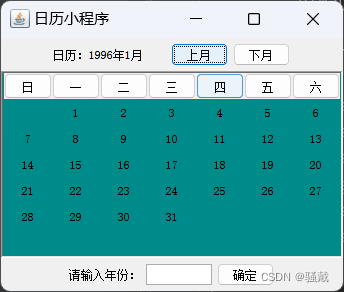
万年历【小游戏】(Java课设)
系统类型 Java实现的小游戏 使用范围 适合作为Java课设!!! 部署环境 jdk1.8Idea或eclipse 运行效果 更多Java课设系统源码地址:更多Java课设系统源码地址 更多Java小游戏运行效果展示:更多Java小游戏运行效果展…...
ad+硬件每日学习十个知识点(9)23.7.20
文章目录 1.正点原子fpga开拓者无gui检查项目2.排针连接器A2541WR-XP-2P3.肖特基二极管反接在LDO的输出端,是什么用?4.在AD中如何实现批量元器件的移动?5.在PCB中,如何让元器件以任意角度旋转?6.接口设计都要做静电防护…...

ipmitool 配置BMC的ip
要使用ipmitool配置BMC的IP地址,可以按照以下步骤进行操作: 确保已安装ipmitool工具。如果尚未安装,可以使用以下命令进行安装: |复制代码 sudo yum install ipmitool连接到BMC:使用IPMI-over-LAN(通过网…...
)
C++设计模式::小结(creation)
creation:隐藏创建逻辑. 1) 抽象工厂模式(Abstract Factory Pattern):多层次"任选"创建对象; 实现: 1) cShape:抽象对象; cShape*:具体对象; 2) cColor:抽象对象; cColor*:具体对象; 3) cFacto…...
eNSP-Cloud(实现本地电脑与eNSP内设备之间通信)
说明: 想象一下,你正在用eNSP搭建一个虚拟的网络世界,里面有虚拟的路由器、交换机、电脑(PC)等等。这些设备都在你的电脑里面“运行”,它们之间可以互相通信,就像一个封闭的小王国。 但是&#…...
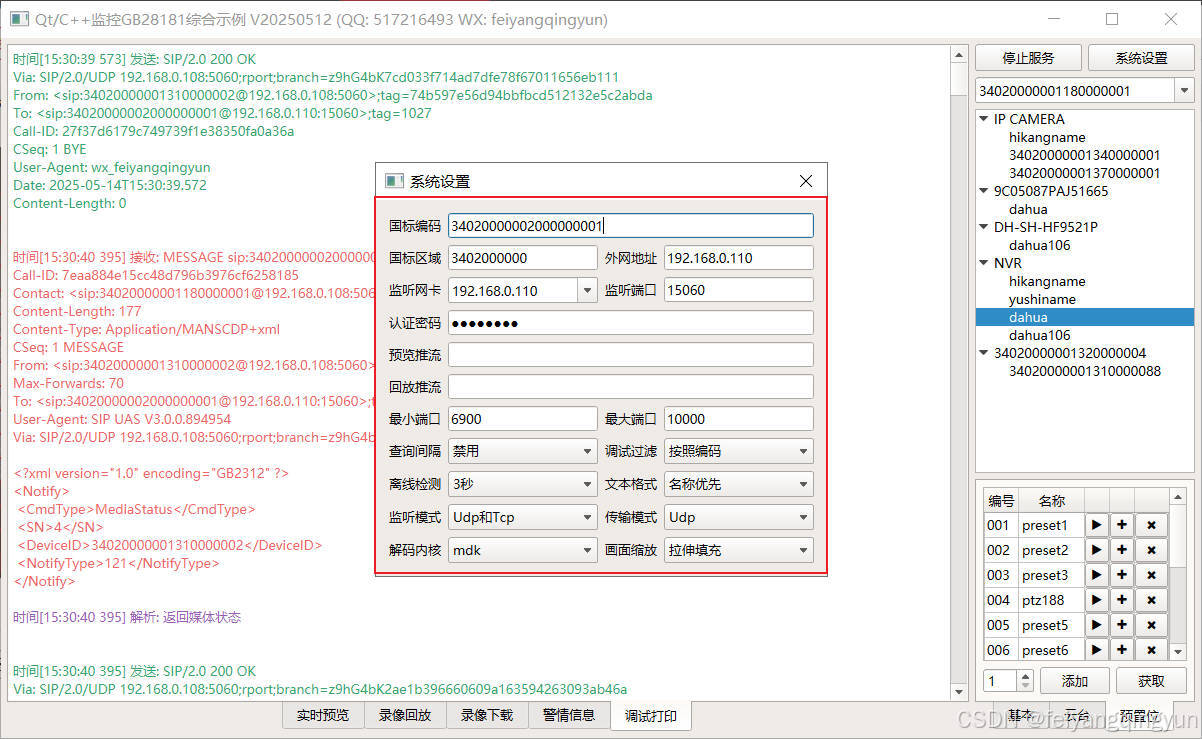
Qt/C++开发监控GB28181系统/取流协议/同时支持udp/tcp被动/tcp主动
一、前言说明 在2011版本的gb28181协议中,拉取视频流只要求udp方式,从2016开始要求新增支持tcp被动和tcp主动两种方式,udp理论上会丢包的,所以实际使用过程可能会出现画面花屏的情况,而tcp肯定不丢包,起码…...
高频面试之3Zookeeper
高频面试之3Zookeeper 文章目录 高频面试之3Zookeeper3.1 常用命令3.2 选举机制3.3 Zookeeper符合法则中哪两个?3.4 Zookeeper脑裂3.5 Zookeeper用来干嘛了 3.1 常用命令 ls、get、create、delete、deleteall3.2 选举机制 半数机制(过半机制࿰…...
【配置 YOLOX 用于按目录分类的图片数据集】
现在的图标点选越来越多,如何一步解决,采用 YOLOX 目标检测模式则可以轻松解决 要在 YOLOX 中使用按目录分类的图片数据集(每个目录代表一个类别,目录下是该类别的所有图片),你需要进行以下配置步骤&#x…...

Rapidio门铃消息FIFO溢出机制
关于RapidIO门铃消息FIFO的溢出机制及其与中断抖动的关系,以下是深入解析: 门铃FIFO溢出的本质 在RapidIO系统中,门铃消息FIFO是硬件控制器内部的缓冲区,用于临时存储接收到的门铃消息(Doorbell Message)。…...

在QWebEngineView上实现鼠标、触摸等事件捕获的解决方案
这个问题我看其他博主也写了,要么要会员、要么写的乱七八糟。这里我整理一下,把问题说清楚并且给出代码,拿去用就行,照着葫芦画瓢。 问题 在继承QWebEngineView后,重写mousePressEvent或event函数无法捕获鼠标按下事…...
Linux 内存管理实战精讲:核心原理与面试常考点全解析
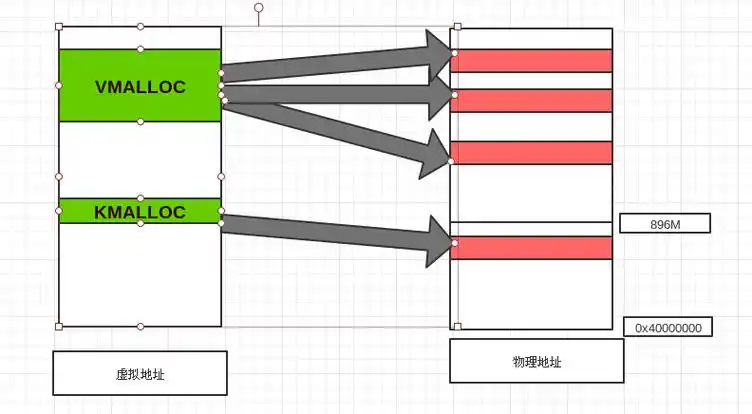
Linux 内存管理实战精讲:核心原理与面试常考点全解析 Linux 内核内存管理是系统设计中最复杂但也最核心的模块之一。它不仅支撑着虚拟内存机制、物理内存分配、进程隔离与资源复用,还直接决定系统运行的性能与稳定性。无论你是嵌入式开发者、内核调试工…...

C#中的CLR属性、依赖属性与附加属性
CLR属性的主要特征 封装性: 隐藏字段的实现细节 提供对字段的受控访问 访问控制: 可单独设置get/set访问器的可见性 可创建只读或只写属性 计算属性: 可以在getter中执行计算逻辑 不需要直接对应一个字段 验证逻辑: 可以…...
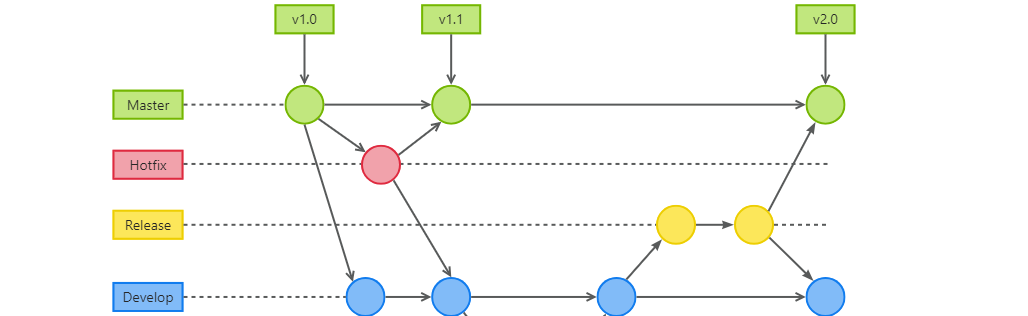
GitFlow 工作模式(详解)
今天再学项目的过程中遇到使用gitflow模式管理代码,因此进行学习并且发布关于gitflow的一些思考 Git与GitFlow模式 我们在写代码的时候通常会进行网上保存,无论是github还是gittee,都是一种基于git去保存代码的形式,这样保存代码…...
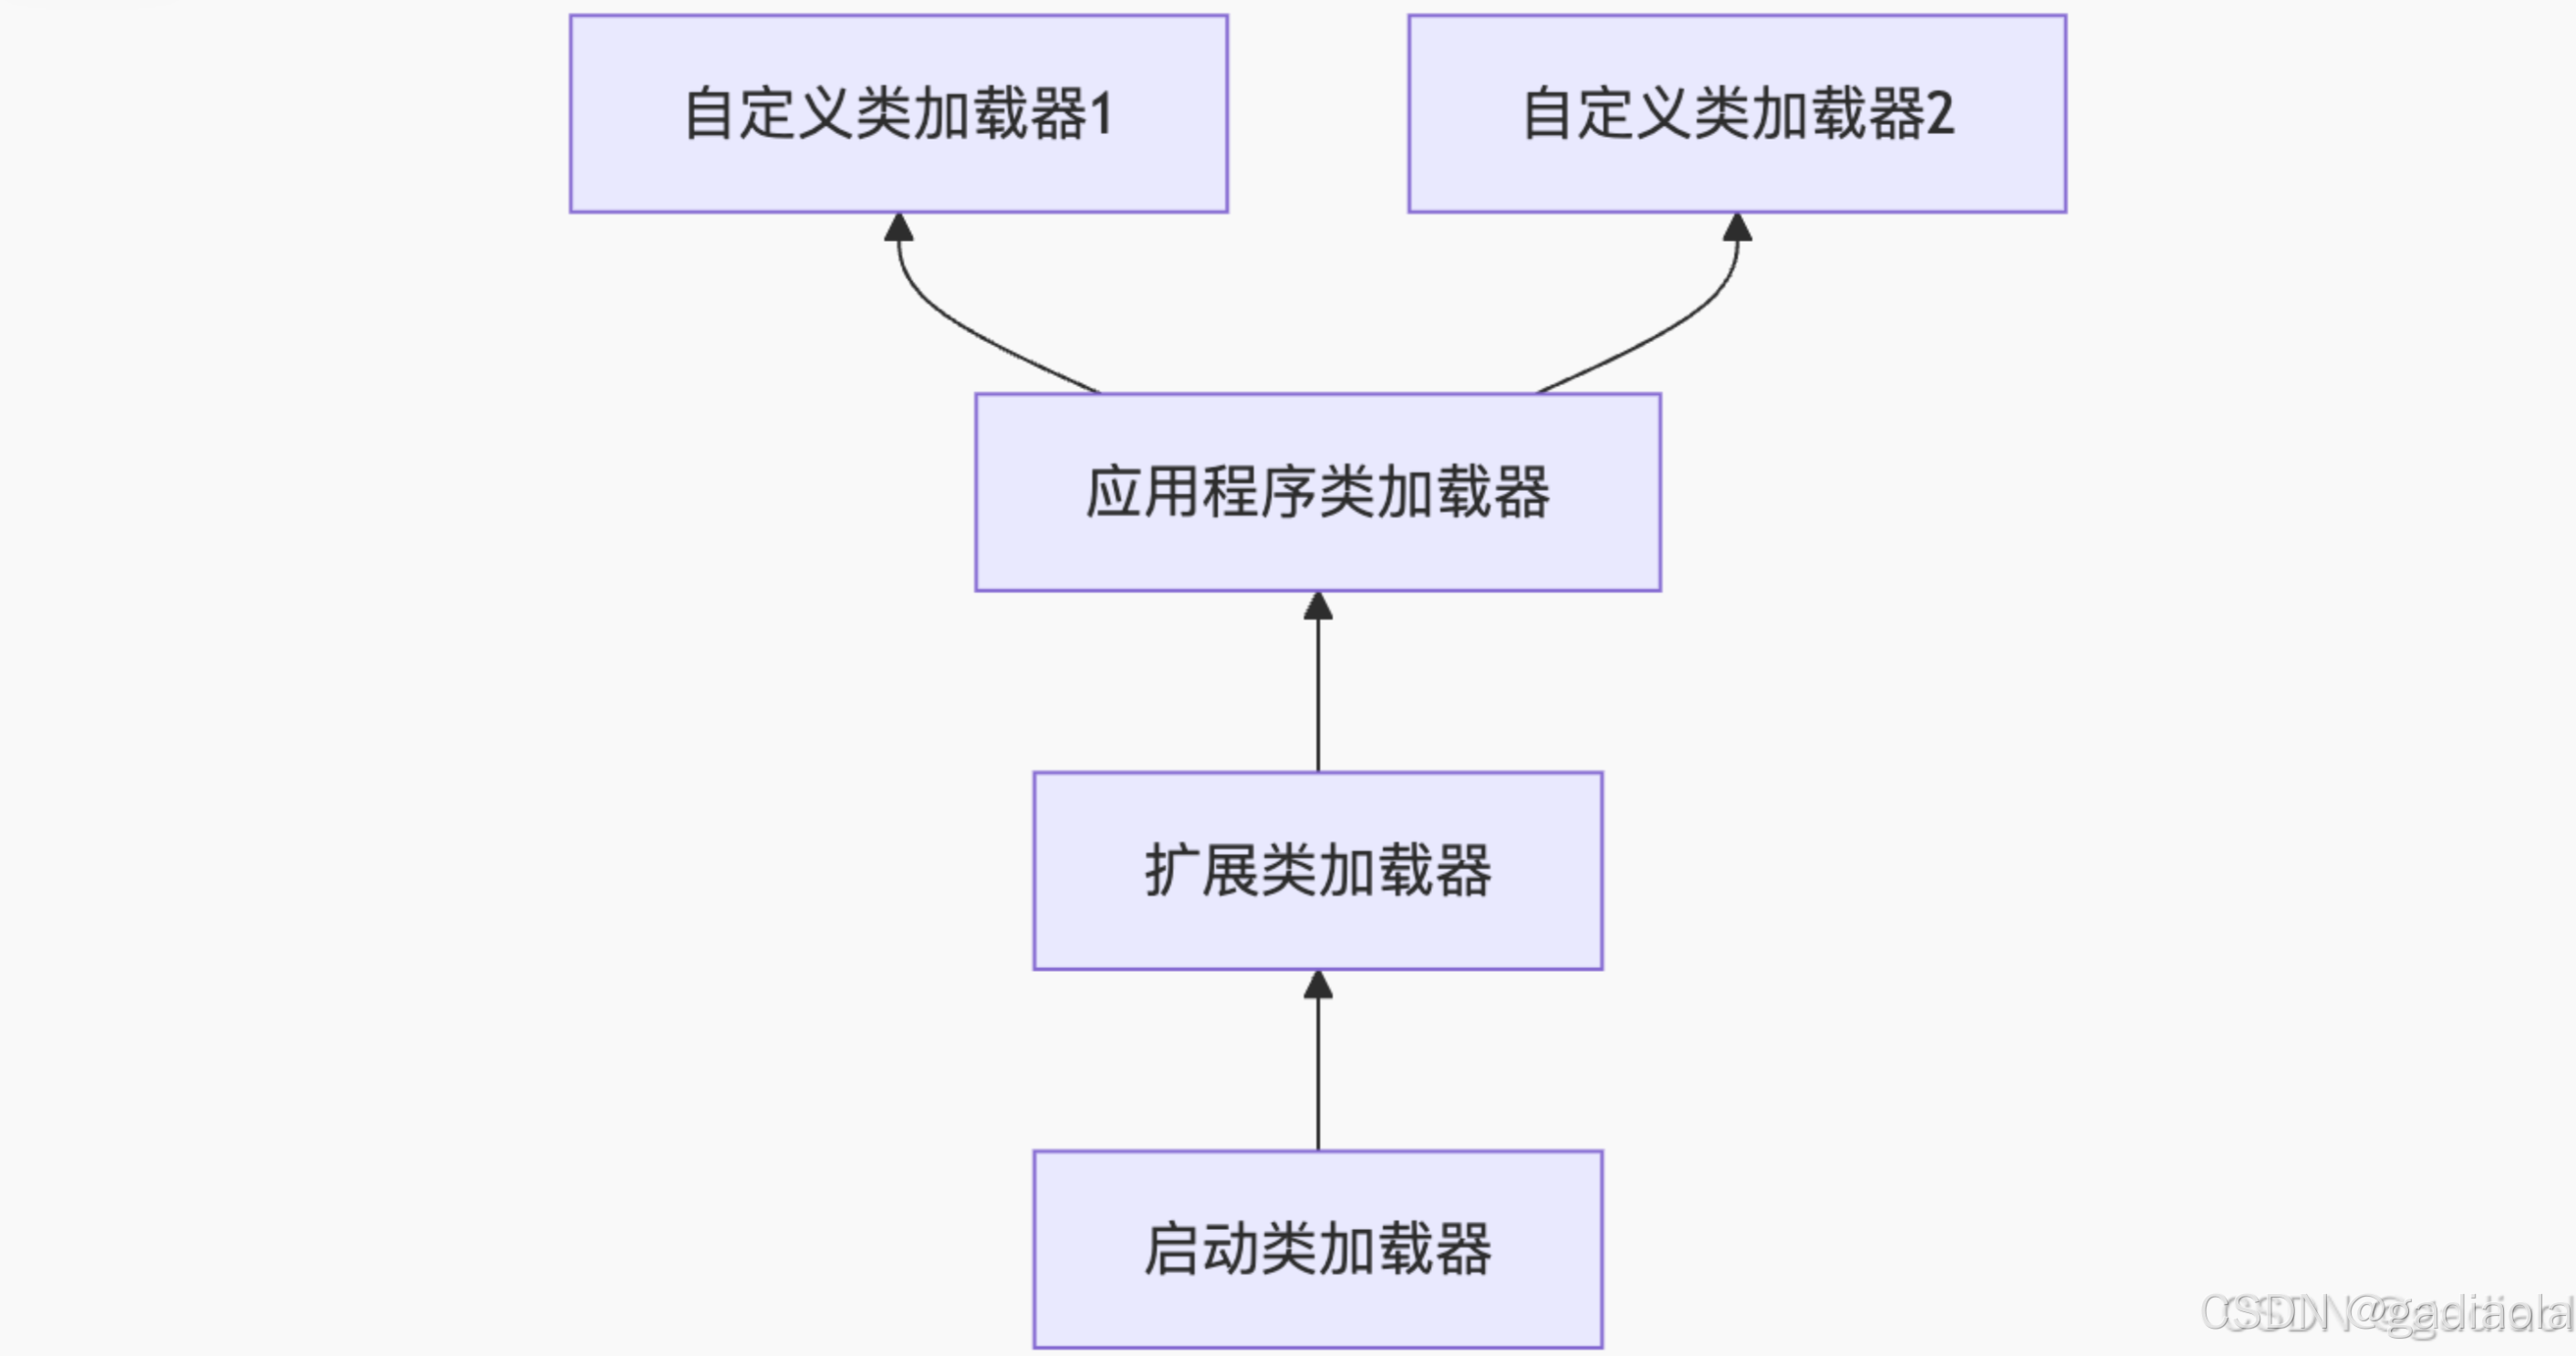
【JVM面试篇】高频八股汇总——类加载和类加载器
目录 1. 讲一下类加载过程? 2. Java创建对象的过程? 3. 对象的生命周期? 4. 类加载器有哪些? 5. 双亲委派模型的作用(好处)? 6. 讲一下类的加载和双亲委派原则? 7. 双亲委派模…...