【业务功能篇60】Springboot + Spring Security 权限管理 【终篇】
4.4.7 权限校验扩展
4.4.7.1 @PreAuthorize注解中的其他方法
hasAuthority:检查调用者是否具有指定的权限;
@RequestMapping("/hello")@PreAuthorize("hasAuthority('system:user:list')")public String hello(){return "hello Spring Security! !";}
hasAnyAuthority:检查调用者是否具有指定的任何一个权限;
@RequestMapping("/ok")@PreAuthorize("hasAnyAuthority('system:user:list,system:role:list')")public String ok(){return "ok Spring Security! !";}
hasRole:检查调用者是否有指定的角色;
**hasRole要求有对应的角色才可以访问,但是它内部会把我们传入的参数拼接上 **ROLE_ 后再去比较。所以这种情况下要用户对应的权限也要有 ROLE_ 这个前缀才可以。
@RequestMapping("/level1")@PreAuthorize("hasRole('admin')")public String level1(){return "level1 page";}
hasAnyRole:检查调用者是否具有指定的任何一个角色;
@RequestMapping("/level2")@PreAuthorize("hasAnyRole('admin','common')")public String level2(){return "level2 page";}
4.4.7.2 权限校验源码分析
- 详见视频
4.4.7.3 自定义权限校验
我们也可以定义自己的权限校验方法,在@PreAuthorize注解中使用我们的方法。
/*** 自定义权限校验方法* @author spikeCong* @date 2023/4/27**/@Component("my_ex")public class MyExpression {/*** 自定义 hasAuthority* @param authority 接口指定的访问权限限制* @return: boolean*/public boolean hasAuthority(String authority){//获取当前用户的权限Authentication authentication = SecurityContextHolder.getContext().getAuthentication();LoginUser loginUser = (LoginUser) authentication.getPrincipal();List<String> permissions = loginUser.getPermissions();//判断集合中是否有authorityreturn permissions.contains(authority);}}使用SPEL表达式,引入自定义的权限校验
SPEL(Spring Expression Language)是 Spring 框架提供的一种表达式语言,用于在 Spring 应用程序中进行编程和配置时使用。
Spring Security 中的权限表达式:可以使用 SPEL 表达式定义在授权过程中使用的逻辑表达式
@RequestMapping("/ok")@PreAuthorize("@my_ex.hasAuthority('system:role:list')")public String ok(){return "ok";}
4.4.7.4 基于配置的权限控制
- 在security配置类中,通过配置的方式对资源进行权限控制
@RequestMapping("/yes")public String yes(){return "yes";}
@Overrideprotected void configure(HttpSecurity http) throws Exception {//关闭csrfhttp.csrf().disable();//允许跨域http.cors();http //不会创建会话,每个请求都将被视为独立的请求。.sessionManagement().sessionCreationPolicy(SessionCreationPolicy.STATELESS).and()//定义请求授权规则.authorizeRequests()// 对于登录接口 允许匿名访问.antMatchers("/user/login").anonymous()//配置形式的权限控制.antMatchers("/yes").hasAuthority("system/menu/index")// 除上面外的所有请求全部需要鉴权认证.anyRequest().authenticated();//将自定义认证过滤器,添加到过滤器链中http.addFilterBefore(jwtAuthenticationTokenFilter, UsernamePasswordAuthenticationFilter.class);//配置异常处理器http.exceptionHandling()//配置认证失败处理器.authenticationEntryPoint(authenticationEntryPoint)//配置授权失败处理器.accessDeniedHandler(accessDeniedHandler);}
4.4.7.5 角色加权限校验方式解析
(1) Role 和 Authority 的区别
用户拥有的权限,有以下两种表示
roles("admin","common","test")authorities("system:user:list","system:role:list","system:menu:list");
给资源授予权限(角色或权限)
@PreAuthorize("hasAuthority('system:user:list')")@PreAuthorize("hasAnyAuthority('system:user:list,system:role:list')")@PreAuthorize("hasRole('admin')")@PreAuthorize("hasAnyRole('admin','common')")
用户权限的保存方式
-
roles("admin","common","test"),增加”ROLE“前缀存放:- 【“ROLE_admin”,“ROLE_common”,"ROLE_test"】 表示拥有的权限。
- 一个角色表示的是多个权限,用户传入的角色不能以 ROLE开头,否则会报错。ROLE是自动加上的 如果我们保存的用户的角色:直接传入角色的名字,权限【
new SimpleGrantedAuthority(“ROLE“ + role)】保存即可
-
authorities (“USER”,”MANAGER”),原样存放:【"system:user:list","system:role:list"】表示拥有的权限。- 如果我们保存的是真正的权限;直接传入权限名字,权限【
new SimpleGrantedAuthority(permission)】保存
**无论是 Role 还是 Authority 都保存在 **
List<GrantedAuthority>,每个用户都拥有自己的权限集合
用户权限的验证方式
- 通过角色(权限)验证: 拥有任何一个角色都可以访问,验证时会自动增加”ROLE_“进行查找验证:【”ROLE_admin”,”ROLE_common”】
- **通过权限验证: ** 拥有任何一个权限都可以访问,验证时原样查找进行验证:【”system:role:list”】
(2) 结合角色进行权限控制
- 创建Role角色实体
@Data@AllArgsConstructor@NoArgsConstructor@TableName(value = "sys_role")@JsonInclude(JsonInclude.Include.NON_NULL)public class Role implements Serializable {@TableIdprivate Long roleId;/*** 角色名*/private String roleName;/*** 角色权限字符串*/private String roleKey;/*** 角色状态 0正常,1停用*/private String status;/*** 删除标志 0存在,1删除*/private String delFlag;private Long createBy;private Date createTime;private Long updateBy;private Date updateTime;private String remark;}
- RoleMapper
public interface RoleMapper extends BaseMapper<Role> {List<String> selectRolesByUserId(Long id);}
<?xml version="1.0" encoding="UTF-8" ?><!DOCTYPE mapper PUBLIC "-//mybatis.org//DTD Mapper 3.0//EN" "http://mybatis.org/dtd/mybatis-3-mapper.dtd"><mapper namespace="com.mashibing.springsecurity_example.mapper.RoleMapper"><select id="selectRolesByUserId" resultType="java.lang.String">SELECTsr.role_keyFROM sys_user_role surLEFT JOIN sys_role sr ON sur.role_id = sr.role_idWHERE sur.user_id = #{userid} AND sr.status = 0 AND sr.del_flag = 0</select></mapper>
- UserServiceDetailsImpl
@Datapublic class LoginUser implements UserDetails {private SysUser sysUser;public LoginUser() {}public LoginUser(SysUser sysUser) {this.sysUser = sysUser;}//存储权限信息集合private List<String> permissions;//存储角色信息集合private List<String> roles;public LoginUser(SysUser user, List<String> permissions) {this.sysUser = user;this.permissions = permissions;}public LoginUser(SysUser user, List<String> permissions, List<String> roles) {this.sysUser = user;this.permissions = permissions;this.roles = roles;}//避免出现异常@JSONField(serialize = false)private List<SimpleGrantedAuthority> authorities;/*** 用于获取用户被授予的权限,可以用于实现访问控制。*/@Overridepublic Collection<? extends GrantedAuthority> getAuthorities() {if(authorities != null){return authorities;}//1.8 语法authorities = permissions.stream().map(SimpleGrantedAuthority::new).collect(Collectors.toList());//处理角色信息authorities = roles.stream().map(role -> new SimpleGrantedAuthority("ROLE_" + role)).collect(Collectors.toList());return authorities;}}
- Controller
@RequestMapping("/level1")//当前用户是common角色,并且具有system:role:list或者system:user:list@PreAuthorize("hasRole('common') AND hasAnyAuthority('system:role:list','system:user:list')")public String level1(){return "level1 page";}@RequestMapping("/level2")//当前用户拥有admin或者common角色,或者具有system:role:list权限@PreAuthorize("hasAnyRole('admin','common') OR hasAuthority('system:role:list')")public String level2(){return "level2 page";}
- 测试一下
@RequestMapping("/level1")//当前用户是common角色,并且具有system:role:list或者system:user:list@PreAuthorize("hasRole('admin') AND hasAnyAuthority('system:role:list','system:user:list')")public String level1(){return "level1 page";}@RequestMapping("/level2")//当前用户拥有admin或者common角色,或者具有system:role:list权限@PreAuthorize("hasAnyRole('admin','common') OR hasAuthority('system:role:list')")public String level2(){return "level2 page";}
4.4.8 认证方案扩展
我们首先创建一个新的项目,来进行接下来的案例演示,配置文件
server:#服务器的HTTP端口port: 8888spring:datasource:url: jdbc:mysql://localhost:3306/test_security?characterEncoding=utf-8&serverTimezone=UTCusername: rootpassword: 123456driver-class-name: com.mysql.cj.jdbc.Driverthymeleaf:prefix: classpath:/templates/suffix: .htmlencoding: UTF-8mode: HTMLcache: falsesecurity:user:name: testpassword: 123456roles: admin,usermybatis-plus:mapper-locations: classpath*:/mapper/**/*.xml
4.4.8.1 自定义认证
(1) 自定义资源权限规则
- 引入模板依赖
<!--thymeleaf--><dependency><groupId>org.springframework.boot</groupId><artifactId>spring-boot-starter-thymeleaf</artifactId></dependency>
- 在 templates 中定义登录界面 login.html
<!DOCTYPE html><html lang="en" xmlns:th="http://www.thymeleaf.org"><head><meta charset="UTF-8"><title>登录页面</title></head><body><h1>用户登录</h1><form method="post" th:action="@{/login}">用户名:<input name="username" type="text"/><br>密码:<input name="password" type="password"/><br><input type="submit" value="登录"/></form></body></html>
- 配置 Spring Security 配置类
@Configurationpublic class WebSecurityConfigurer extends WebSecurityConfigurerAdapter {@Overrideprotected void configure(HttpSecurity http) throws Exception {http.authorizeHttpRequests() //开始配置授权,即允许哪些请求访问系统.mvcMatchers("/login.html").permitAll() //指定哪些请求路径允许访问.mvcMatchers("/index").permitAll() //指定哪些请求路径允许访问.anyRequest().authenticated() //除上述以外,指定其他所有请求都需要经过身份验证.and().formLogin() //配置表单登录.loginPage("/login.html") //登录页面.loginProcessingUrl("/login") //提交路径.usernameParameter("username") //表单中用户名.passwordParameter("password") //表单中密码.successForwardUrl("/index") //指定登录成功后要跳转的路径为 /index//.defaultSuccessUrl("/index") //redirect 重定向 注意:如果之前请求路径,会有优先跳转之前请求路径.failureUrl("/login.html") //指定登录失败后要跳转的路径为 /login.htm.and().csrf().disable();//这里先关闭 CSRF}}
说明
- permitAll() 代表放行该资源,该资源为公共资源 无需认证和授权可以直接访问
- anyRequest().authenticated() 代表所有请求,必须认证之后才能访问
- **formLogin() 代表开启表单认证 **
- successForwardUrl 、defaultSuccessUrl 这两个方法都可以实现成功之后跳转
- **successForwardUrl 默认使用 **
forward跳转注意:不会跳转到之前请求路径 - **defaultSuccessUrl 默认使用 **
redirect跳转注意:如果之前有请求路径,会优先跳转之前请求路径,可以传入第二个参数进行修改
- **successForwardUrl 默认使用 **
注意: 放行资源必须放在所有认证请求之前!
- 创建Controller
@Controllerpublic class LoginController {@RequestMapping("/ok")public String ok(){return "ok";}@RequestMapping("/login.html")public String login(){return "login";}}
(2) 自定义认证成功处理器
- 有时候页面跳转并不能满足我们,特别是在前后端分离开发中就不需要成功之后跳转页面。只需要给前端返回一个 JSON 通知登录成功还是失败与否。这个时候可以通过自定义
AuthenticationSucccessHandler实现
public interface AuthenticationSuccessHandler {void onAuthenticationSuccess(HttpServletRequest request, HttpServletResponse response,Authentication authentication) throws IOException, ServletException;}
根据接口的描述信息,也可以得知登录成功会自动回调这个方法,进一步查看它的默认实现,你会发现successForwardUrl、defaultSuccessUrl也是由它的子类实现的
- 自定义 AuthenticationSuccessHandler 实现
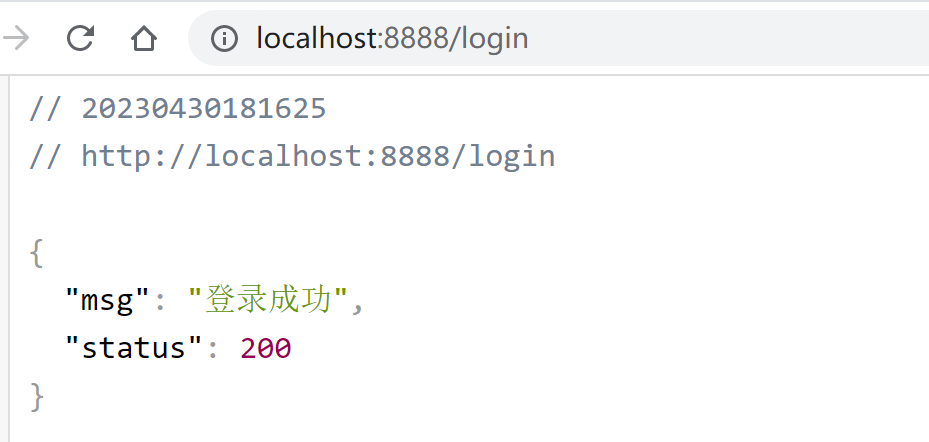
@Componentpublic class AuthenticationSuccessHandlerImpl implements AuthenticationSuccessHandler {@Overridepublic void onAuthenticationSuccess(HttpServletRequest request, HttpServletResponse response,Authentication authentication) throws IOException, ServletException {Map<String, Object> result = new HashMap<String, Object>();result.put("msg", "登录成功");result.put("status", 200);response.setContentType("application/json;charset=UTF-8");String s = new ObjectMapper().writeValueAsString(result);response.getWriter().println(s);}}
- 配置 AuthenticationSuccessHandler
@Configurationpublic class WebSecurityConfigurer extends WebSecurityConfigurerAdapter {@Autowiredprivate AuthenticationSuccessHandler successHandler;@Overrideprotected void configure(HttpSecurity http) throws Exception {http.authorizeHttpRequests() .and().formLogin() //配置表单登录.successHandler(successHandler).failureUrl("/login.html") //指定登录失败后要跳转的路径为 /login.htm.and().csrf().disable();//这里先关闭 CSRF}}
- 测试一下

(3) 自定义认证失败处理器
- 和自定义登录成功处理一样,Spring Security 同样为前后端分离开发提供了登录失败的处理,这个类就是 AuthenticationFailureHandler,源码为:
public interface AuthenticationFailureHandler {void onAuthenticationFailure(HttpServletRequest request, HttpServletResponse response,AuthenticationException exception) throws IOException, ServletException;}
根据接口的描述信息,也可以得知登录失败会自动回调这个方法,进一步查看它的默认实现,你会发现failureUrl、failureForwardUrl也是由它的子类实现的。
- 自定义 AuthenticationFailureHandler 实现
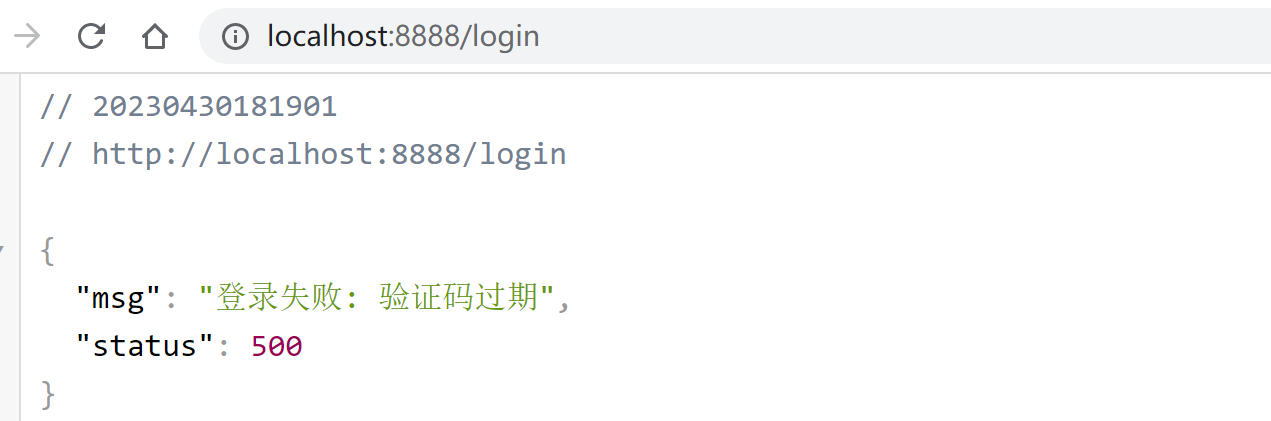
@Componentpublic class AuthenticationFailureHandlerImpl implements AuthenticationFailureHandler {@Overridepublic void onAuthenticationFailure(HttpServletRequest request, HttpServletResponse response,AuthenticationException exception) throws IOException, ServletException {Map<String, Object> result = new HashMap<String, Object>();result.put("msg", "登录失败: "+exception.getMessage());result.put("status", 500);response.setContentType("application/json;charset=UTF-8");String s = new ObjectMapper().writeValueAsString(result);response.getWriter().println(s);}}
- 配置 AuthenticationFailureHandler
@Configurationpublic class WebSecurityConfigurer extends WebSecurityConfigurerAdapter {@Overrideprotected void configure(HttpSecurity http) throws Exception {http.authorizeHttpRequests()//....and().formLogin()//...failureHandler(new MyAuthenticationFailureHandler()).and().csrf().disable();//这里先关闭 CSRF}}
- 测试一下

(4) 自定义注销登录处理器
Spring Security 中也提供了默认的注销登录配置,在开发时也可以按照自己需求对注销进行个性化定制。
-
开启注销登录
默认开启@Configurationpublic class WebSecurityConfigurer extends WebSecurityConfigurerAdapter {@Overrideprotected void configure(HttpSecurity http) throws Exception {http.authorizeHttpRequests()//....and().formLogin()//....and().logout().logoutUrl("/logout").invalidateHttpSession(true).clearAuthentication(true).logoutSuccessUrl("/login.html").and().csrf().disable();//这里先关闭 CSRF}}- 通过 logout() 方法开启注销配置
- **logoutUrl 指定退出登录请求地址,默认是 GET 请求,路径为 **
/logout - invalidateHttpSession 退出时是否是 session 失效,默认值为 true
- clearAuthentication 退出时是否清除认证信息,默认值为 true
- logoutSuccessUrl 退出登录时跳转地址
前后端分离注销登录配置
- 如果是前后端分离开发,注销成功之后就不需要页面跳转了,只需要将注销成功的信息返回前端即可,此时我们可以通过自定义 LogoutSuccessHandler 实现来返回注销之后信息:
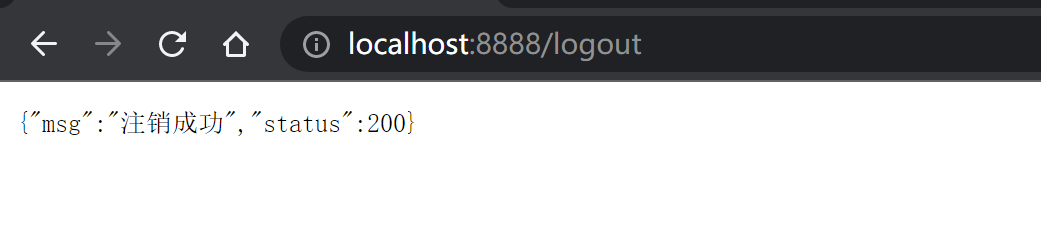
@Componentpublic class LogoutSuccessHandlerImpl implements LogoutSuccessHandler {@Overridepublic void onLogoutSuccess(HttpServletRequest request, HttpServletResponse response,Authentication authentication) throws IOException, ServletException {Map<String, Object> result = new HashMap<String, Object>();result.put("msg", "注销成功");result.put("status", 200);response.setContentType("application/json;charset=UTF-8");String s = new ObjectMapper().writeValueAsString(result);response.getWriter().println(s);}}
- 配置
@Configurationpublic class WebSecurityConfigurer extends WebSecurityConfigurerAdapter {@Autowiredprivate LogoutSuccessHandler logoutSuccessHandler;@Overrideprotected void configure(HttpSecurity http) throws Exception {http.authorizeHttpRequests() //开始配置授权,即允许哪些请求访问系统.and().formLogin() //配置表单登录//....and().logout()// .logoutUrl("/logout").invalidateHttpSession(true).clearAuthentication(true)// .logoutSuccessUrl("/login.html").logoutSuccessHandler(logoutSuccessHandler).and().csrf().disable();//这里先关闭 CSRF}}
- 测试
4.4.8.2 添加图形验证码
在用户登录时,一般通过表单的方式进行登录都会要求用户输入验证码,Spring Security默认没有实现图形验证码的功能,所以需要我们自己实现。
图形验证码一般是在用户名、密码认证之前进行验证的,所以需要在 UsernamePasswordAuthenticationFilter过滤器之前添加一个自定义过滤器 ImageCodeValidateFilter,用来校验用户输入的图形验证码是否正确。
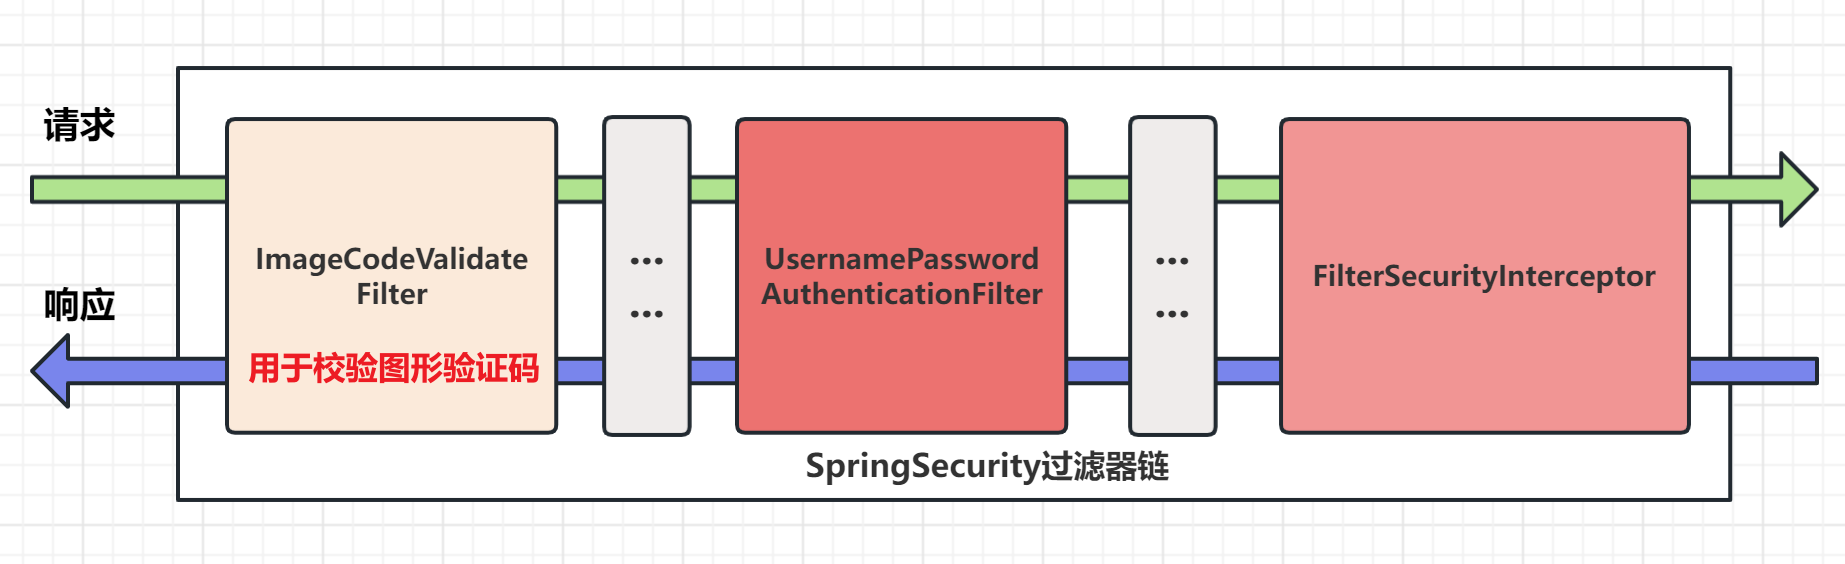
自定义的过滤器 ImageCodeValidateFilter 首先会判断请求是否为 POST 方式的登录表单提交请求,如果是就将其拦截进行图形验证码校验。如果验证错误,会抛出自定义异常类对象 ValidateCodeException,该异常类需要继承 AuthenticationException 类。在自定义过滤器中,我们需要手动捕获自定义异常类对象,并将捕获到自定义异常类对象交给自定义失败处理器进行处理。
(1) 传统web开发
Kaptcha 是谷歌提供的生成图形验证码的工具,参考地址为:https://github.com/penggle/kaptcha,依赖如下:
Kaptcha 是一个可高度配置的实用验证码生成工具,可自由配置的选项如:
- 验证码的字体
- 验证码字体的大小
- 验证码字体的字体颜色
- 验证码内容的范围(数字,字母,中文汉字!)
- 验证码图片的大小,边框,边框粗细,边框颜色
- 验证码的干扰线
- 验证码的样式(鱼眼样式、3D、普通模糊、…)
- 引入依赖
<dependency><groupId>com.github.penggle</groupId><artifactId>kaptcha</artifactId><version>2.3.2</version></dependency>
- 添加验证码配置类
@Configurationpublic class KaptchaConfig {@Beanpublic Producer kaptcha() {Properties properties = new Properties();// 是否有边框properties.setProperty(Constants.KAPTCHA_BORDER, "yes");// 边框颜色properties.setProperty(Constants.KAPTCHA_BORDER_COLOR, "192,192,192");// 验证码图片的宽和高properties.setProperty(Constants.KAPTCHA_IMAGE_WIDTH, "110");properties.setProperty(Constants.KAPTCHA_IMAGE_HEIGHT, "40");// 验证码颜色properties.setProperty(Constants.KAPTCHA_TEXTPRODUCER_FONT_COLOR, "0,0,0");// 验证码字体大小properties.setProperty(Constants.KAPTCHA_TEXTPRODUCER_FONT_SIZE, "32");// 验证码生成几个字符properties.setProperty(Constants.KAPTCHA_TEXTPRODUCER_CHAR_LENGTH, "4");// 验证码随机字符库properties.setProperty(Constants.KAPTCHA_TEXTPRODUCER_CHAR_STRING, "0123456789ABCDEFGHIJKLMNOPQRSTUVWXYAZ");// 验证码图片默认是有线条干扰的,我们设置成没有干扰properties.setProperty(Constants.KAPTCHA_NOISE_IMPL, "com.google.code.kaptcha.impl.NoNoise");Config config = new Config(properties);DefaultKaptcha defaultKaptcha = new DefaultKaptcha();defaultKaptcha.setConfig(config);return defaultKaptcha;}}
- 创建验证码实体类
public class CheckCode implements Serializable {private String code; //验证字符private LocalDateTime expireTime; //过期时间public CheckCode(String code, int expireTime) {this.code = code;//返回指定的过期时间this.expireTime = LocalDateTime.now().plusSeconds(expireTime);}public CheckCode(String code) {//默认验证码 60秒后过期this(code,60);}//是否过期public boolean isExpired(){return this.expireTime.isBefore(LocalDateTime.now());}public String getCode() {return code;}}
- 创建生成验证码Controller
@Controllerpublic class KaptchaController {private final Producer producer;@Autowiredpublic KaptchaController(Producer producer) {this.producer = producer;}@GetMapping("/code/image")public void getVerifyCode(HttpServletRequest request, HttpServletResponse response) throws IOException {//1.创建验证码文本String capText = producer.createText();//2.创建验证码图片BufferedImage bufferedImage = producer.createImage(capText);//3.将验证码文本放进 Session 中CheckCode code = new CheckCode(capText);request.getSession().setAttribute(Constants.KAPTCHA_SESSION_KEY, code);//4.将验证码图片返回,禁止验证码图片缓存response.setHeader("Cache-Control", "no-store");response.setHeader("Pragma", "no-cache");response.setDateHeader("Expires", 0);//5.设置ContentTyperesponse.setContentType("image/png");ImageIO.write(bufferedImage,"jpg",response.getOutputStream());}}
- 在 login.html 中添加验证码功能
<!DOCTYPE html><html lang="en" xmlns:th="http://www.thymeleaf.org"><head><meta charset="UTF-8"><title>登录</title></head><body><h3>表单登录</h3><form method="post" th:action="@{/login}"><input type="text" name="username" placeholder="用户名"><br><input type="password" name="password" placeholder="密码"><br><input name="imageCode" type="text" placeholder="验证码"><br><img th:onclick="this.src='/code/image?'+Math.random()" th:src="@{/code/image}" alt="验证码"/><br><button type="submit">登录</button></form></body></html>
- 更改安全配置类 SpringSecurityConfig,设置访问
/code/image不需要任何权限
@Configurationpublic class WebSecurityConfigurer extends WebSecurityConfigurerAdapter {@Overrideprotected void configure(HttpSecurity http) throws Exception {http.authorizeHttpRequests() //开始配置授权,即允许哪些请求访问系统.mvcMatchers("/login.html","/code/image").permitAll() //指定哪些请求路径允许访问.anyRequest().authenticated() //除上述以外,指定其他所有请求都需要经过身份验证.and().formLogin() //配置表单登录//......}}
- 测试
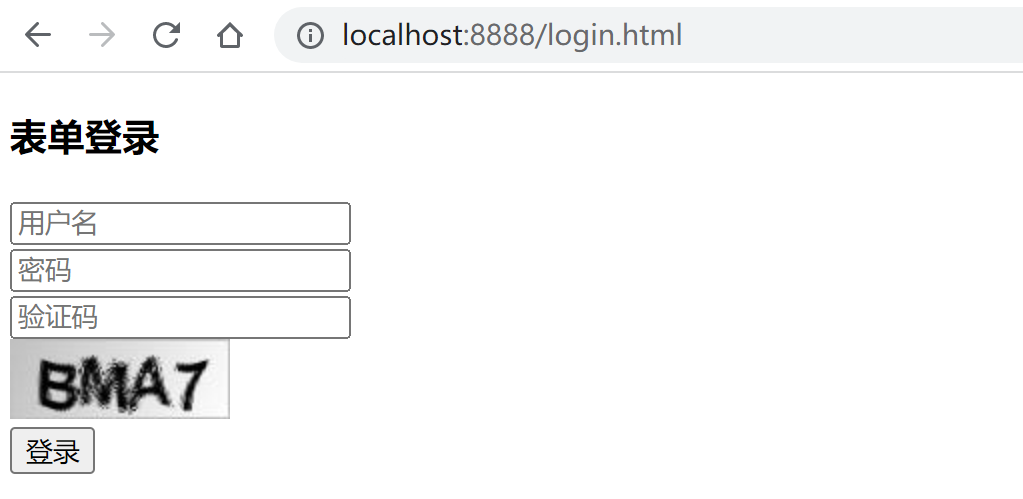
访问 http://localhost:8888/login.html,出现图形验证的信息
- 创建自定义异常类
/*** 自定义验证码错误异常* @author spikeCong* @date 2023/4/29**/public class KaptchaNotMatchException extends AuthenticationException {public KaptchaNotMatchException(String msg) {super(msg);}public KaptchaNotMatchException(String msg, Throwable cause) {super(msg, cause);}}
- 自定义图形验证码校验过滤器
@Componentpublic class KaptchaFilter extends OncePerRequestFilter {//前端输入的图形验证码参数private String codeParameter = "imageCode";//自定义认证失败处理器@Autowiredprivate AuthenticationFailureHandler failureHandler;@Overrideprotected void doFilterInternal(HttpServletRequest request, HttpServletResponse response,FilterChain filterChain) throws ServletException, IOException {//非post请求的表单提交不校验 图形验证码if (request.getMethod().equals("POST")) {try {//校验图形验证码合法性validate(request);} catch (KaptchaNotMatchException e) {failureHandler.onAuthenticationFailure(request,response,e);return;}}//放行进入下一个过滤器filterChain.doFilter(request,response);}//判断验证码合法性private void validate(HttpServletRequest request) throws KaptchaNotMatchException {//1.获取用户传入的图形验证码值String requestCode = request.getParameter(this.codeParameter);if(requestCode == null){requestCode = "";}requestCode = requestCode.trim();//2.获取session中的验证码值HttpSession session = request.getSession();CheckCode checkCode =(CheckCode) session.getAttribute(Constants.KAPTCHA_SESSION_KEY);if(checkCode != null){//清除验证码,不管成功与否,客户端应该在登录失败后 刷新验证码session.removeAttribute(Constants.KAPTCHA_SESSION_KEY);}// 校验出错,抛出异常if (StringUtils.isBlank(requestCode)) {throw new KaptchaNotMatchException("验证码的值不能为空");}if (checkCode == null) {throw new KaptchaNotMatchException("验证码不存在");}if (checkCode.isExpired()) {throw new KaptchaNotMatchException("验证码过期");}if (!requestCode.equalsIgnoreCase(checkCode.getCode())) {throw new KaptchaNotMatchException("验证码输入错误");}}}
- 更改安全配置类 SpringSecurityConfig,将自定义过滤器添加过滤器链中
@Configurationpublic class WebSecurityConfigurer extends WebSecurityConfigurerAdapter {@Autowiredprivate AuthenticationSuccessHandler successHandler;@Autowiredprivate AuthenticationFailureHandler failureHandler;@Autowiredprivate LogoutSuccessHandler logoutSuccessHandler;@Autowiredprivate KaptchaFilter kaptchaFilter;/*** 定制基于 HTTP 请求的用户访问控制*/@Overrideprotected void configure(HttpSecurity http) throws Exception {//开启基于HTTP请求访问控制http.authorizeHttpRequests()//开始配置授权,即允许哪些请求访问系统.mvcMatchers("/login.html","/code/image").permitAll()//除上述以外,指定其他所有请求都需要经过身份验证.anyRequest().authenticated();//开启 form表单登录http.formLogin().loginPage("/login.html") //登录页面(覆盖security的).loginProcessingUrl("/login") //提交路径.usernameParameter("username") //表单中用户名.passwordParameter("password") //表单中密码// 使用自定义的认证成功和失败处理器.successHandler(successHandler).failureHandler(failureHandler);//开启登出配置http.logout().invalidateHttpSession(true).clearAuthentication(true).logoutSuccessHandler(logoutSuccessHandler);http.csrf().disable();//这里先关闭 CSRF//将自定义图形验证码校验过滤器,添加到UsernamePasswordAuthenticationFilter之前http.addFilterBefore(kaptchaFilter, UsernamePasswordAuthenticationFilter.class);}}
- 测试
访问 http://localhost:8888/login.html,出现图形验证的信息,输入 用户名密码及 正确验证码
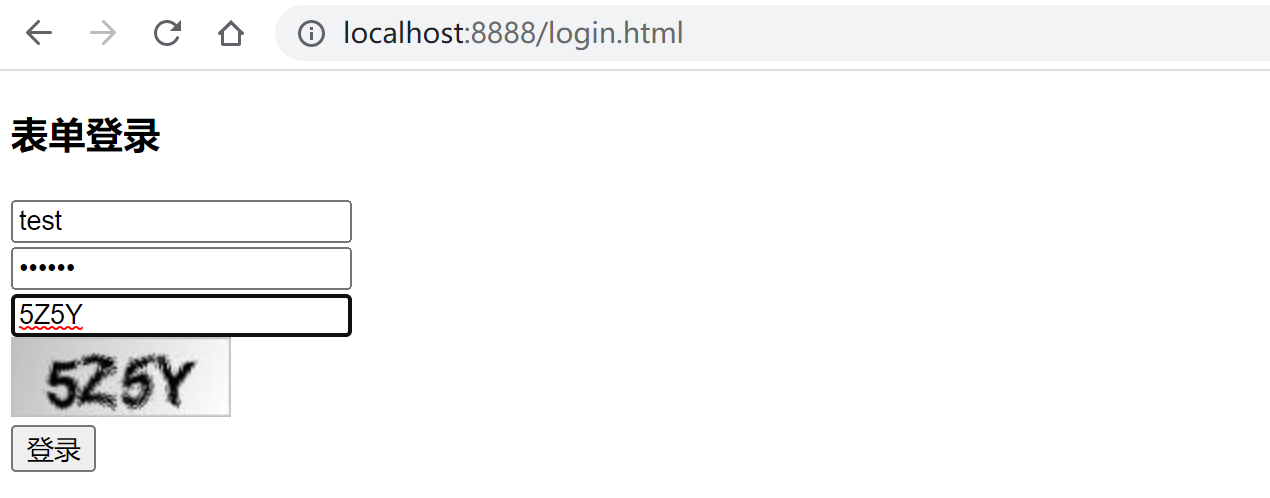
访问 localhost:8080/login/page,等待 60 秒后,输入正确的用户名、密码和验证码:
(3) 前后端分离开发
图形验证码包含两部分:图片和文字验证码。
- 在JSP时代,图形验证码生成和验证是通过Session机制来实现的:后端生成图片和文字验证码,并将文字验证码放在session中,前端填写验证码后提交到后台,通过与session中的验证码比较来实现验证。
- 在前后端分离的项目中,登录使用的是Token验证,而不是Session。后台必须保证当前用户输入的验证码是用户开始请求页面时候的验证码,必须保证验证码的唯一性。
前后端分离开发方式保证验证码唯一性的解决思路
-
把生成的验证码放在全局的的缓存中,如redis,并设置一个过期时间。
-
前端验证时,需要把验证码的id也带上,供后端验证。
为每个验证码code分配一个主键codeId。后端接收到获取验证码请求, 生成验证码的同时,生成一个验证码唯一ID, 并且以此唯一ID 为Key 将其保存到redis. 然后响应给前端. 前端请求验证码code时,将codeId在前端生成并发送给后端;后端对code和codeId进行比较,完成验证。
-
后台在生成图片后使用Base64进行编码
Base64用于将二进制数据编码成ASCII字符 (图片、文件等都可转化为二进制数据)
1. 回到第一个 springsecurity项目, 先创建一个 CaptchaController
- **导入easy-captcha **https://gitee.com/ele-admin/EasyCaptcha
<dependency><groupId>com.github.whvcse</groupId><artifactId>easy-captcha</artifactId><version>1.6.2</version></dependency>
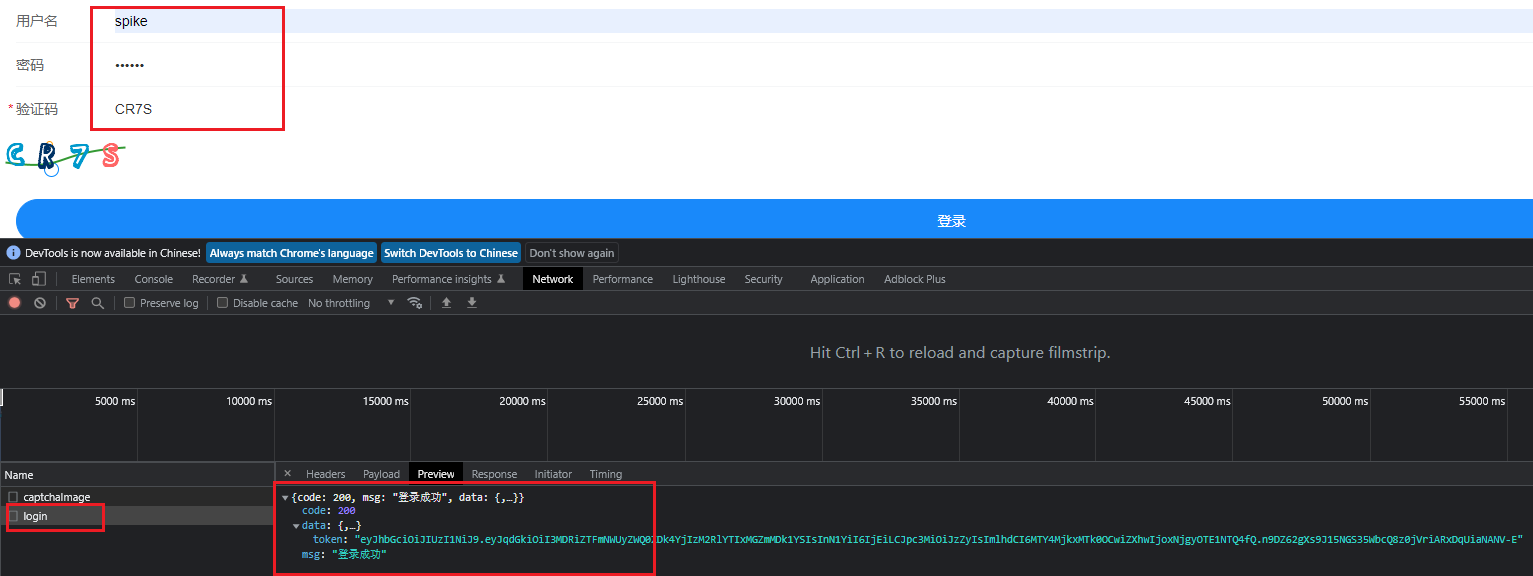
@RestControllerpublic class CaptchaController {@Autowiredprivate RedisCache redisCache;/*** 生成验证码* @param response* @return: com.mashibing.springsecurity_example.common.ResponseResult*/@GetMapping("/captchaImage")public ResponseResult getCode(HttpServletResponse response){SpecCaptcha specCaptcha = new SpecCaptcha(130, 48, 4);//生成验证码,及验证码唯一标识String uuid = UUID.randomUUID().toString().replaceAll("-", "");String key = Constants.CAPTCHA_CODE_KEY + uuid;String code = specCaptcha.text().toLowerCase();//保存到redisredisCache.setCacheObject(key,code,1000, TimeUnit.SECONDS);//创建mapHashMap<String,Object> map = new HashMap<>();map.put("uuid",uuid);map.put("img",specCaptcha.toBase64());return new ResponseResult(200,"验证码获取成功",map);}}
2. 创建用户登录对象
/*** 用户登录对象* @author spikeCong* @date 2023/4/30**/public class LoginBody {/*** 用户名*/private String userName;/*** 用户密码*/private String password;/*** 验证码*/private String code;/*** 唯一标识*/private String uuid = "";public String getUserName() {return userName;}public void setUserName(String userName) {this.userName = userName;}public String getPassword() {return password;}public void setPassword(String password) {this.password = password;}public String getCode() {return code;}public void setCode(String code) {this.code = code;}public String getUuid() {return uuid;}public void setUuid(String uuid) {this.uuid = uuid;}}
3. LoginController 中创建处理验证码的登录方法
/*** 登录方法** @param loginBody 登录信息* @return 结果*/@PostMapping("/user/login")public ResponseResult login(@RequestBody LoginBody loginBody){// 生成令牌String token = loginService.login(loginBody.getUserName(), loginBody.getPassword(), loginBody.getCode(),loginBody.getUuid());Map<String,Object> map = new HashMap<>();map.put("token",token);return new ResponseResult(200,"登录成功",map);}
4. LoginService中创建处理验证码的登录方法
public interface LoginService {String login(String username, String password, String code, String uuid);}
@Servicepublic class LoginServiceImpl implements LoginService {@Autowiredprivate AuthenticationManager authenticationManager;@Autowiredprivate RedisCache redisCache;/*** 带验证码登录* @param username* @param password* @param code* @param uuid* @return: java.lang.String*/@Overridepublic String login(String username, String password, String code, String uuid) {//从redis中获取验证码String verifyKey = Constants.CAPTCHA_CODE_KEY + uuid;String captcha = redisCache.getCacheObject(verifyKey);redisCache.deleteObject(captcha);if (captcha == null || !code.equalsIgnoreCase(captcha)){throw new CaptchaNotMatchException("验证码错误!");}// 该方法会去调用UserDetailsServiceImpl.loadUserByUsernameAuthentication authentication = authenticationManager.authenticate(new UsernamePasswordAuthenticationToken(username, password));//3.如果认证通过,使用userId生成一个JWT,并将其保存到 ResponseResult对象中返回//3.1 获取经过身份验证的用户的主体信息LoginUser loginUser = (LoginUser) authentication.getPrincipal();//3.2 获取到userID 生成JWTString userId = loginUser.getSysUser().getUserId().toString();String jwt = JwtUtil.createJWT(userId);//4.将用户信息存储在Redis中,在下一次请求时能够识别出用户,userid作为keyredisCache.setCacheObject("login:"+userId,loginUser);//5.封装ResponseResult,并返回return jwt;}}
5.添加自定义异常
public class CaptchaNotMatchException extends AuthenticationException {public CaptchaNotMatchException(String msg) {super(msg);}public CaptchaNotMatchException(String msg, Throwable cause) {super(msg, cause);}}
6.配置类中添加配置
// 对于登录接口 允许匿名访问.mvcMatchers("/user/login","/captchaImage").anonymous()
通常 mvcMatcher 比 antMatcher 更安全:
antMatchers(“/secured”) 仅仅匹配 /secured
mvcMatchers(“/secured”) 匹配 /secured 之余还匹配 /secured/, /secured.html, /secured.xyz
因此 mvcMatcher 更加通用且容错性更高。
7.前后端联调测试
- VSCode导入前端项目, 导入带有验证码 security_demo_captcha项目

注意
node_modules我已经给大家下载好了, 就不需要执行npm install
- npm run serve 启动项目,即可看到生成的验证码

请求信息

输入正确的用户名密码,验证码 登录成功.
相关文章:
【业务功能篇60】Springboot + Spring Security 权限管理 【终篇】
4.4.7 权限校验扩展 4.4.7.1 PreAuthorize注解中的其他方法 hasAuthority:检查调用者是否具有指定的权限; RequestMapping("/hello")PreAuthorize("hasAuthority(system:user:list)")public String hello(){return "hello Sp…...
文章详情页 - 评论功能的实现
目录 1. 准备工作 1.1 创建评论表 1.2 创建评论实体类 1.3 创建 mapper 层评论接口和对应的 xml 实现 1.4 准备评论的 service 层 1.5 准备评论的 controller 层 2. 总的初始化详情页 2.1 加载评论列表 2.1.1 实现前端代码 2.1.2 实现后端代码 2.2 查询当前登录用户的…...
使用贝叶斯滤波器通过运动模型和嘈杂的墙壁传感器定位机器人研究(Matlab代码实现)
💥💥💞💞欢迎来到本博客❤️❤️💥💥 🏆博主优势:🌞🌞🌞博客内容尽量做到思维缜密,逻辑清晰,为了方便读者。 ⛳️座右铭&a…...
Day 69-70:矩阵分解
代码: package dl;import java.io.*; import java.util.Random;/** Matrix factorization for recommender systems.*/public class MatrixFactorization {/*** Used to generate random numbers.*/Random rand new Random();/*** Number of users.*/int numUsers…...

数据结构:树的存储结构
学习树之前,我们已经了解了二叉树的顺序存储和链式存储,哪么我们如何来存储普通型的树结构的数据?如下图1: 如图1所示,这是一颗普通的树,我们要如何来存储呢?通常,存储这种树结构的数…...
Vue前端渲染blob二进制对象图片的方法
近期做开发,联调接口。接口返回的是一张图片,是对二进制图片处理并渲染,特此记录一下。 本文章是转载文章,原文章:Vue前端处理blob二进制对象图片的方法 接口response是下图 显然,获取到的是一堆乱码&…...
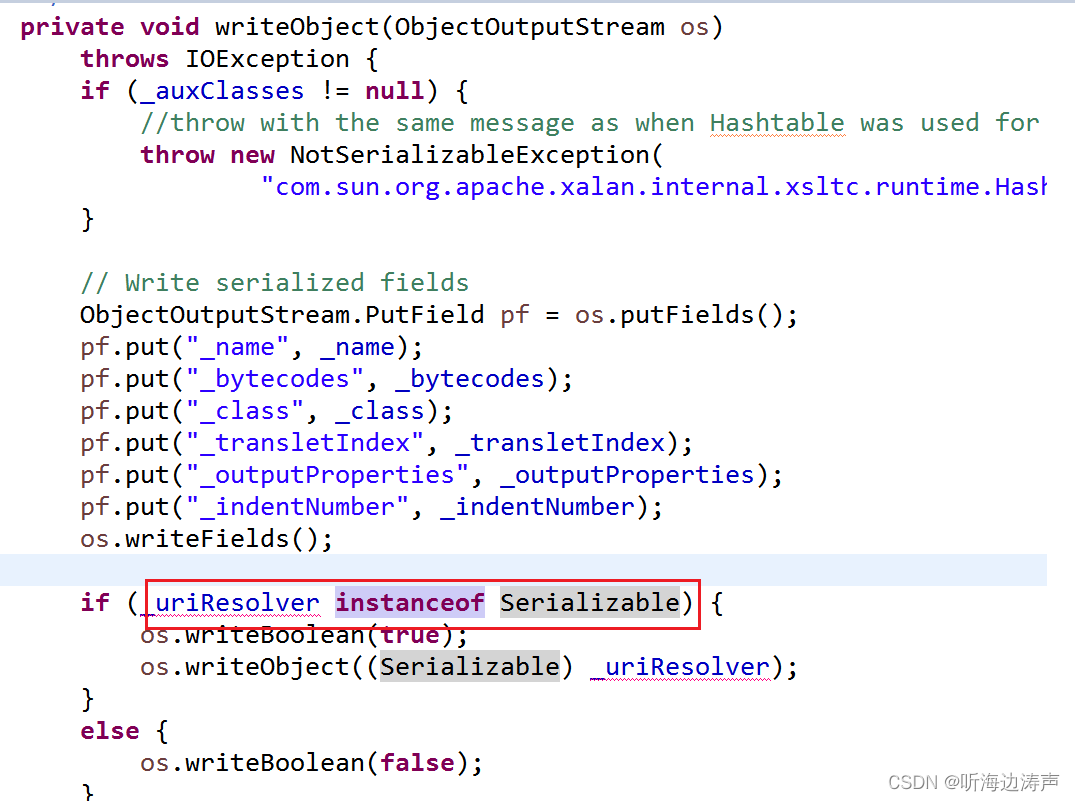
Java的标记接口(Marker Interface)
Java中的标记接口(Marker Interface)是一个空接口,接口内什么也没有定义。它标识了一种能力,标识继承自该接口的接口、实现了此接口的类具有某种能力。 例如,jdk的com.sun.org.apache.xalan.internal.xsltc.trax.Temp…...
Kafka基础架构与核心概念
Kafka简介 Kafka是由Apache软件基金会开发的一个开源流处理平台,由Scala和Java编写。Kafka是一种高吞吐量的分布式发布订阅消息系统,它可以处理消费者在网站中的所有动作流数据。架构特点是分区、多副本、多生产者、多订阅者,性能特点主要是…...
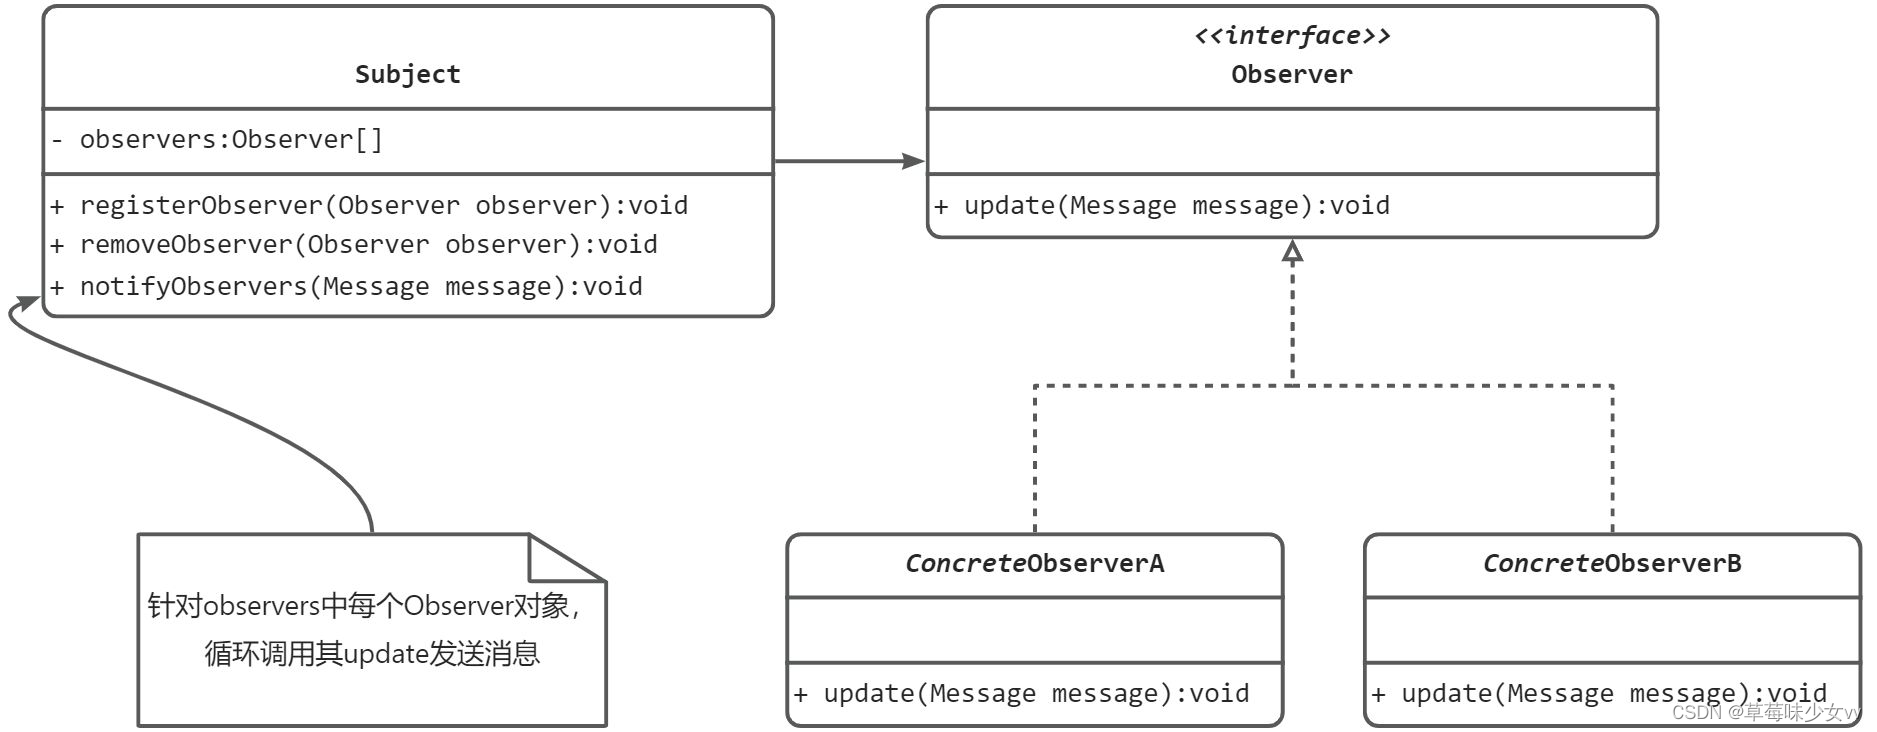
观察者模式与观察者模式实例EventBus
什么是观察者模式 顾名思义,观察者模式就是在多个对象之间,定义一个一对多的依赖,当一个对象状态改变时,所有依赖这个对象的对象都会自动收到通知。 观察者模式也称为发布订阅模式(Publish-Subscribe Design Pattern)࿰…...
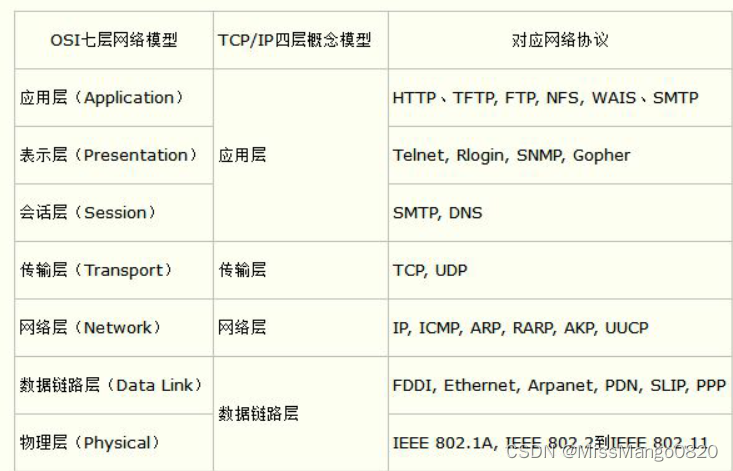
科普 | OSI模型
本文简要地介绍 OSI 模型 1’ 2’ 3。 更新:2023 / 7 / 23 科普 | OSI模型 术语节点链路协议网络拓扑 概念作用结构应用层表示层会话层传输层网络层数据链路层物理层 数据如何流动OSI 和TCP/IP 的对应关系和协议参考链接 术语 节点 节点( Node &#…...

redis相关异常之RedisConnectionExceptionRedisCommandTimeoutException
本文只是分析Letture类型的Redis 池化连接出现的连接超时异常、读超时异常问题。 1.RedisConnectionException 默认是10秒。 通过如下可以配置: public class MyLettuceClientConfigurationBuilderCustomizer implements LettuceClientConfigurationBuilderCusto…...
Merge the squares! 2023牛客暑期多校训练营4-H
登录—专业IT笔试面试备考平台_牛客网 题目大意:有n*n个边长为1的小正方形摆放在边长为n的大正方形中,每次可以选择不超过50个正方形,将其合并为一个更大的正方形,求一种可行的操作使所有小正方形都被合并成一个n*n的大正方形 1…...
STM32 串口学习(二)
要用跳线帽将PA9与RXD相连,PA10与TXD相连。 软件设计 void uart_init(u32 baud) {//UART 初始化设置UART1_Handler.InstanceUSART1; //USART1UART1_Handler.Init.BaudRatebound; //波特率UART1_Handler.Init.WordLengthUART_WORDLENGTH_8B; //字长为 8 位数据格式U…...
点大商城V2_2.5.0 全开源版 商家自营+多商户入驻 百度+支付宝+QQ+头条+小程序端+unipp开源前端安装测试教程
安装测试环境:Nginx 1.20PHP7.2MySQL 5.6 修复了无法上传开放平台问题 安装说明: 1、上传后端目录至网站 2、导入提供的数据库文件 3、修改数据库配置文件根目录下config.php,增加数据库用户名和密码 4、网站后台直接访问网址ÿ…...

“深入理解SpringBoot:从入门到精通“
标题:深入理解Spring Boot:从入门到精通 摘要:本文将介绍Spring Boot的基本概念和核心特性,并通过示例代码演示如何使用Spring Boot构建一个简单的Web应用程序。 1. 简介 Spring Boot是一个开源的Java框架,旨在简化基…...

PCB绘制时踩的坑 - SOT-223封装
SOT-223封装并不是同一的,细分的话可以分为两种常用的封装。尤其是tab脚的属性很容易搞错。如果你想着用tab脚连接有属性的铺铜,来提高散热效率,那么你一定要注意你购买的器件tab脚的属性。 第一种如下图,第1脚为GND,第…...
Go语法入门 + 项目实战
👂 Take me Hand Acoustic - Ccile Corbel - 单曲 - 网易云音乐 第3个小项目有问题,不能在Windows下跑,懒得去搜Linux上怎么跑了,已经落下进度了.... 目录 😳前言 🍉Go两小时 🔑小项目实战 …...
QT控件通过qss设置子控件的对齐方式、大小自适应等
一些复杂控件,是有子控件的,每个子控件,都可以通过qss的双冒号选择器来选中,进行独特的样式定义。很多控件都有子控件,太多了,后面单独写一篇文章来介绍各个控件的子控件。这里就随便来几个例子 例如下拉列…...

基于java在线收银系统设计与实现
摘要 科技的力量总是在关键的地方改变着人们的生活,不仅如此,我们的生活也是离不开这样或者那样的科技改变,有的消费者没有时间去商场购物,那么电商和快递的结合让端口到消费者的距离不再遥远;有的房客因地域或者工作的…...
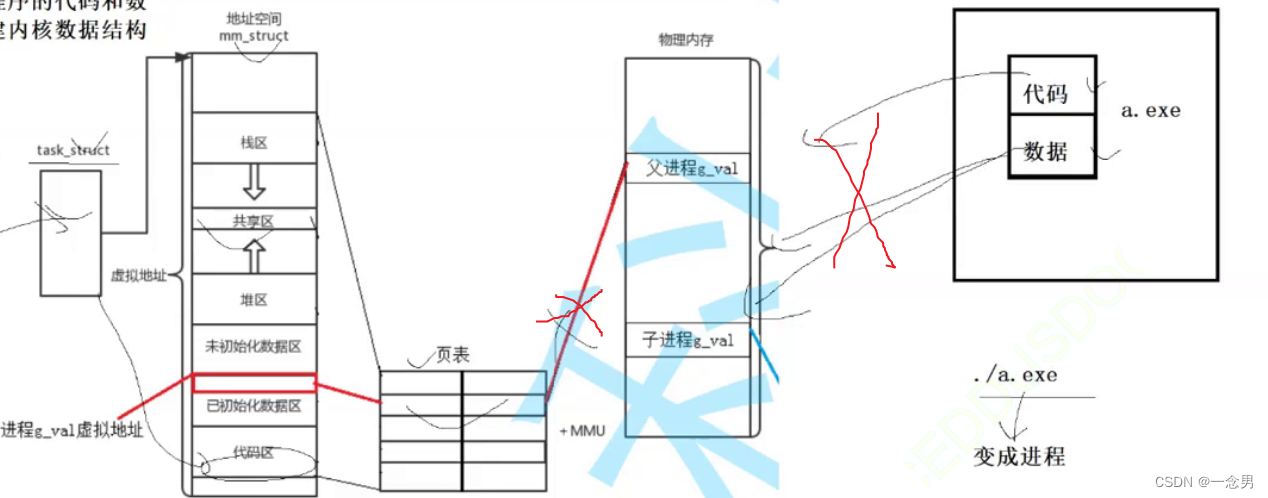
Linux--进程的新建状态
新建状态: 操作系统创建了进程的内核数据结构(task_struct、mm_struct、页表),但是页表没有创建映射关系,而且磁盘里的程序的代码和数据未加载到物理内存...
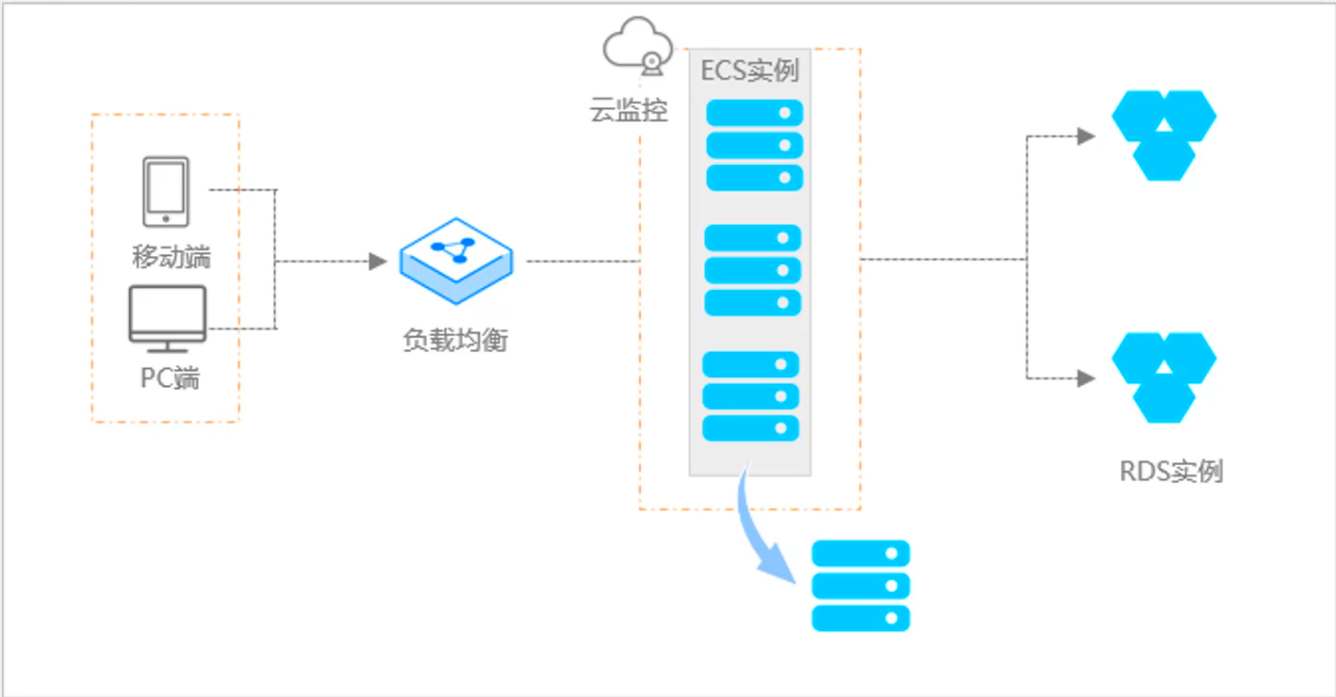
阿里云ACP云计算备考笔记 (5)——弹性伸缩
目录 第一章 概述 第二章 弹性伸缩简介 1、弹性伸缩 2、垂直伸缩 3、优势 4、应用场景 ① 无规律的业务量波动 ② 有规律的业务量波动 ③ 无明显业务量波动 ④ 混合型业务 ⑤ 消息通知 ⑥ 生命周期挂钩 ⑦ 自定义方式 ⑧ 滚的升级 5、使用限制 第三章 主要定义 …...

HTML前端开发:JavaScript 常用事件详解
作为前端开发的核心,JavaScript 事件是用户与网页交互的基础。以下是常见事件的详细说明和用法示例: 1. onclick - 点击事件 当元素被单击时触发(左键点击) button.onclick function() {alert("按钮被点击了!&…...
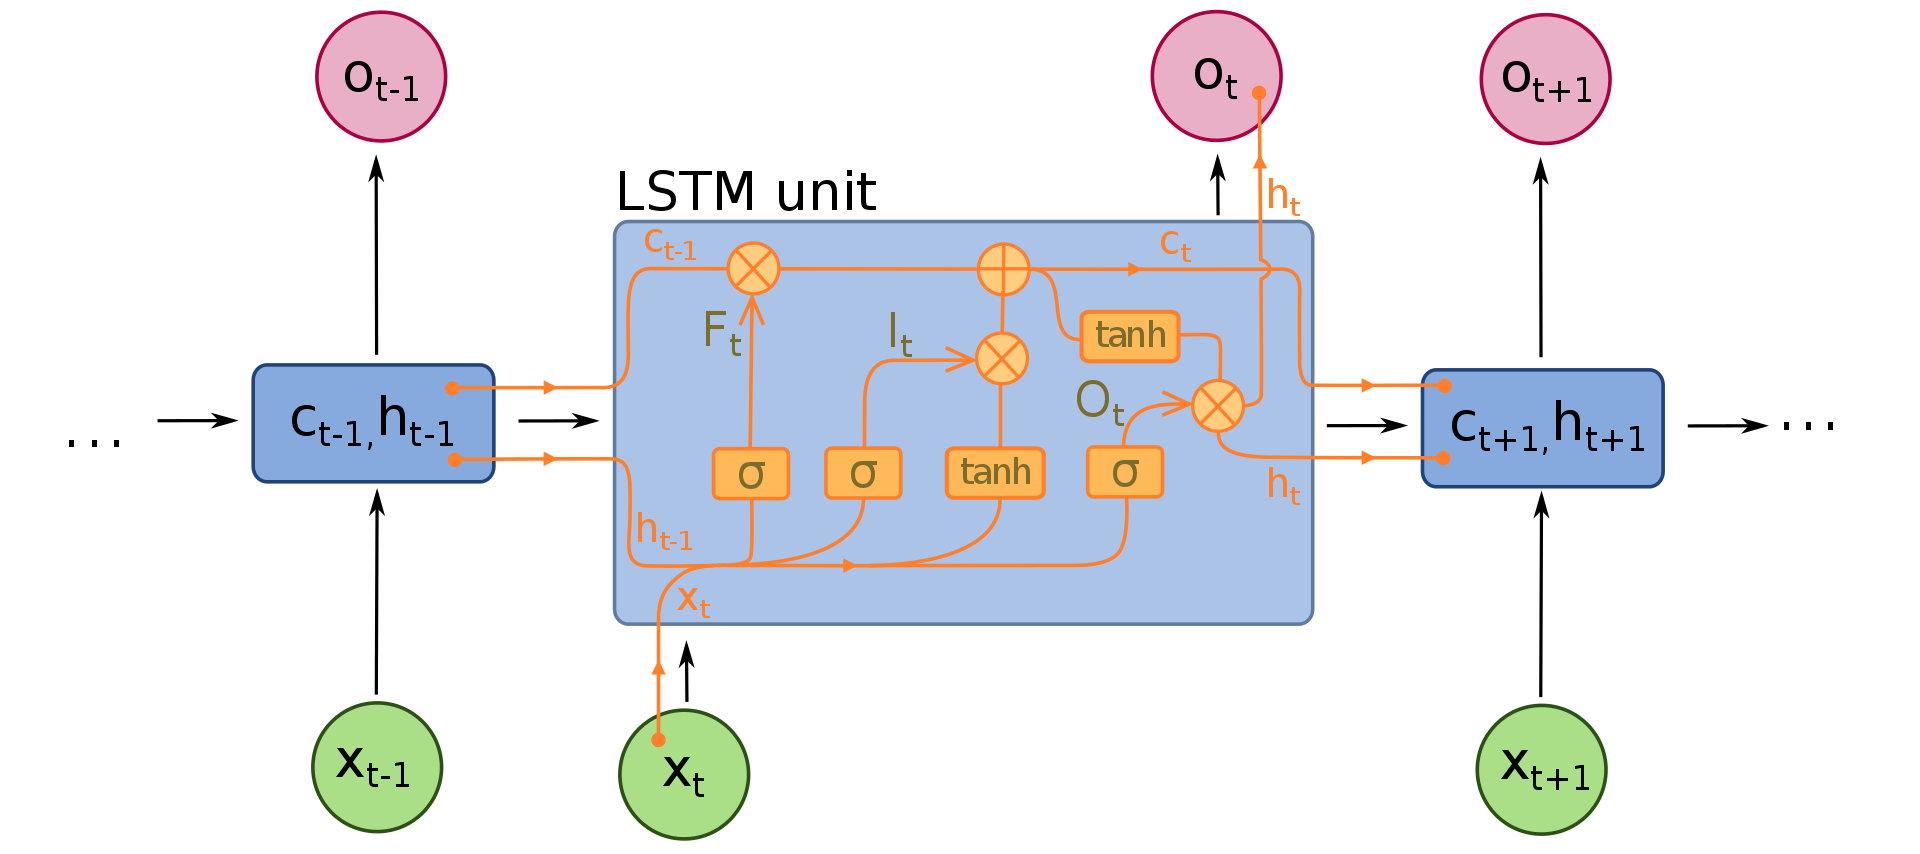
NLP学习路线图(二十三):长短期记忆网络(LSTM)
在自然语言处理(NLP)领域,我们时刻面临着处理序列数据的核心挑战。无论是理解句子的结构、分析文本的情感,还是实现语言的翻译,都需要模型能够捕捉词语之间依时序产生的复杂依赖关系。传统的神经网络结构在处理这种序列依赖时显得力不从心,而循环神经网络(RNN) 曾被视为…...
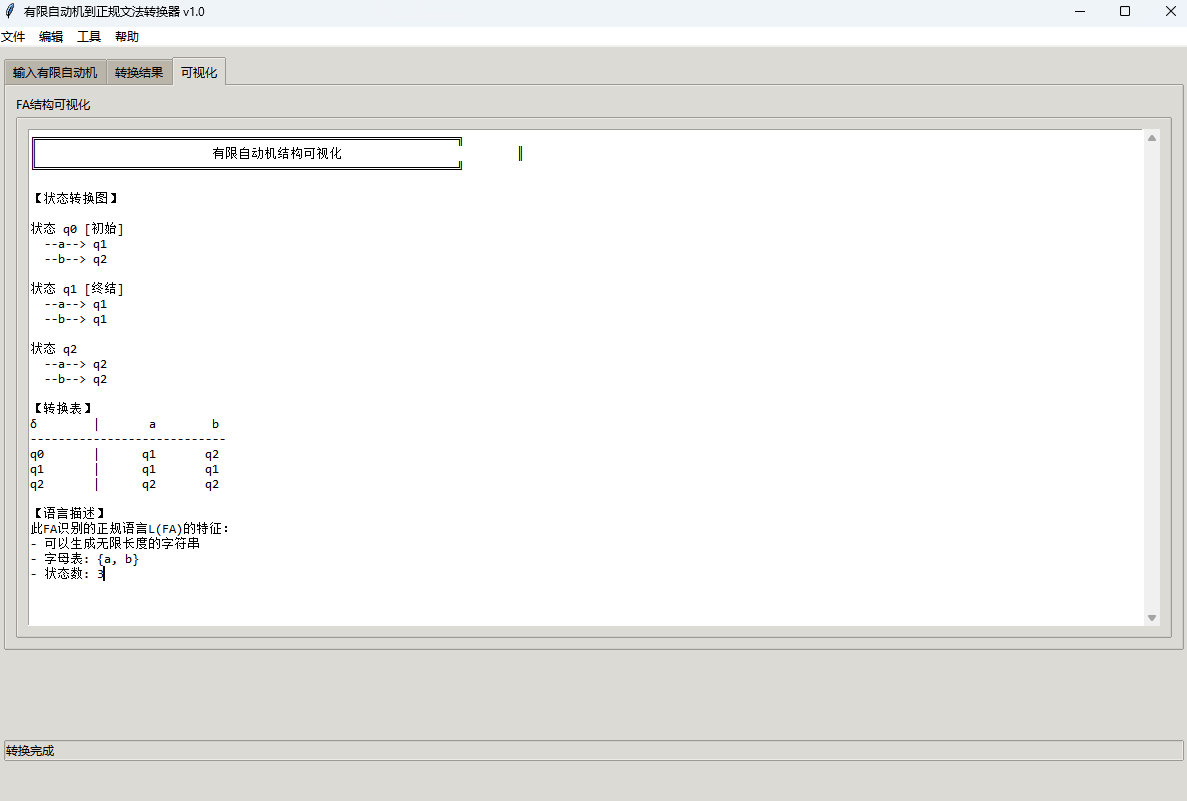
有限自动机到正规文法转换器v1.0
1 项目简介 这是一个功能强大的有限自动机(Finite Automaton, FA)到正规文法(Regular Grammar)转换器,它配备了一个直观且完整的图形用户界面,使用户能够轻松地进行操作和观察。该程序基于编译原理中的经典…...

python执行测试用例,allure报乱码且未成功生成报告
allure执行测试用例时显示乱码:‘allure’ �����ڲ����ⲿ���Ҳ���ǿ�&am…...
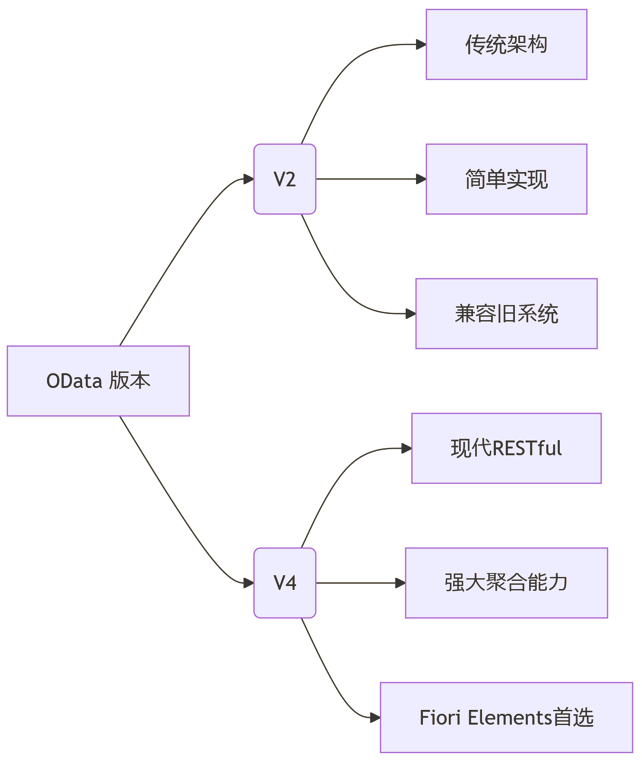
SAP学习笔记 - 开发26 - 前端Fiori开发 OData V2 和 V4 的差异 (Deepseek整理)
上一章用到了V2 的概念,其实 Fiori当中还有 V4,咱们这一章来总结一下 V2 和 V4。 SAP学习笔记 - 开发25 - 前端Fiori开发 Remote OData Service(使用远端Odata服务),代理中间件(ui5-middleware-simpleproxy)-CSDN博客…...
【分享】推荐一些办公小工具
1、PDF 在线转换 https://smallpdf.com/cn/pdf-tools 推荐理由:大部分的转换软件需要收费,要么功能不齐全,而开会员又用不了几次浪费钱,借用别人的又不安全。 这个网站它不需要登录或下载安装。而且提供的免费功能就能满足日常…...
uniapp 开发ios, xcode 提交app store connect 和 testflight内测
uniapp 中配置 配置manifest 文档:manifest.json 应用配置 | uni-app官网 hbuilderx中本地打包 下载IOS最新SDK 开发环境 | uni小程序SDK hbulderx 版本号:4.66 对应的sdk版本 4.66 两者必须一致 本地打包的资源导入到SDK 导入资源 | uni小程序SDK …...

Unity UGUI Button事件流程
场景结构 测试代码 public class TestBtn : MonoBehaviour {void Start(){var btn GetComponent<Button>();btn.onClick.AddListener(OnClick);}private void OnClick(){Debug.Log("666");}}当添加事件时 // 实例化一个ButtonClickedEvent的事件 [Formerl…...

SQL Server 触发器调用存储过程实现发送 HTTP 请求
文章目录 需求分析解决第 1 步:前置条件,启用 OLE 自动化方式 1:使用 SQL 实现启用 OLE 自动化方式 2:Sql Server 2005启动OLE自动化方式 3:Sql Server 2008启动OLE自动化第 2 步:创建存储过程第 3 步:创建触发器扩展 - 如何调试?第 1 步:登录 SQL Server 2008第 2 步…...