单链表的多语言表达:C++、Java、Python、Go、Rust
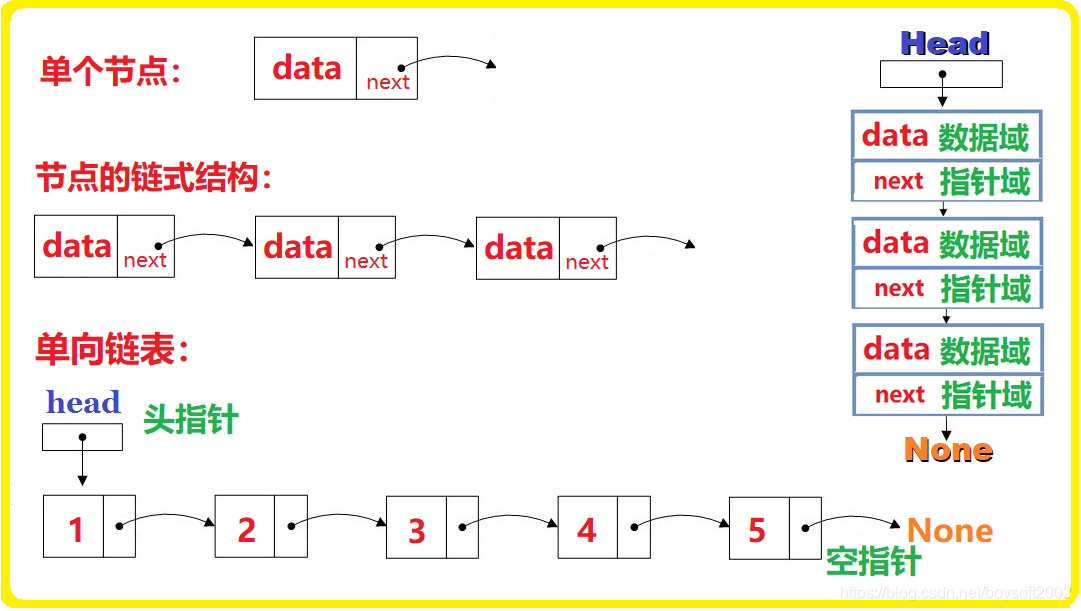
单链表
是一种链式数据结构,由一个头节点和一些指向下一个节点的指针组成。每个节点包含一个数据元素和指向下一个节点的指针。头节点没有数据,只用于表示链表的开始位置。
单链表的主要操作包括:
- 添加元素:在链表的头部添加新元素,需要修改头节点的指针。
- 删除元素:删除链表中的元素,需要修改头节点和其他节点的指针。
- 查找元素:在链表中查找某个元素,需要遍历整个链表。
- 遍历链表:按照链表的顺序依次访问每个元素,需要遍历整个链表。
单链表相对于数组的优点是插入和删除元素时不需要移动其他元素,时间复杂度为O(1)。但是,在查找元素时,单链表比数组要慢,时间复杂度为O(n)。
本文总结了 C++、Java、Python、Go、Rust 五种语言的单链表的表达:
C++
c++语言既可以用struct也能用class来表示链表节点,类可以定义方法调用相对方便。另外C++类需要自定义析构函数用以退出时释放节点所占空间,其它语言有自动的垃圾回收机制。
struct
// 定义结构体 Node,表示链表中的节点
struct Node {
int data; // 节点的数据
Node* next; // 指向下一个节点的指针
};
// 定义类 LinkedList,表示链表
class LinkedList {
private:
Node* head; // 指向链表头节点的指针
}
代码:
#include <iostream>using namespace std;// 定义结构体 Node,表示链表中的节点
struct Node {int data; // 节点的数据Node* next; // 指向下一个节点的指针
};// 定义类 LinkedList,表示链表
class LinkedList {
private:Node* head; // 指向链表头节点的指针public:// 构造函数,初始化链表为空链表LinkedList() {head = NULL;}// 析构函数,释放链表中的所有节点~LinkedList() {Node* curr = head;while (curr != NULL) {Node* next = curr->next;delete curr;curr = next;}}// 在链表头部添加一个新节点void add(int value) {Node* newNode = new Node;newNode->data = value;newNode->next = head;head = newNode;}// 在链表尾部添加一个新节点void push(int value) {Node* newNode = new Node;newNode->data = value;newNode->next = NULL;if (head == NULL) {head = newNode;} else {Node* curr = head;while (curr->next != NULL) {curr = curr->next;}curr->next = newNode;}}// 删除最后一个节点,并返回该节点的数据 int pop() {if (head == NULL) {return -1;} else if (head->next == NULL) {int data = head->data;delete head;head = NULL;return data;} else {Node* curr = head;while (curr->next->next != NULL) {curr = curr->next;}int data = curr->next->data;delete curr->next;curr->next = NULL;return data;}}// 遍历链表,打印每个节点的数据void traverse() {Node* curr = head;while (curr != NULL) {cout << curr->data << "->";curr = curr->next;}cout << "nil" << endl;}
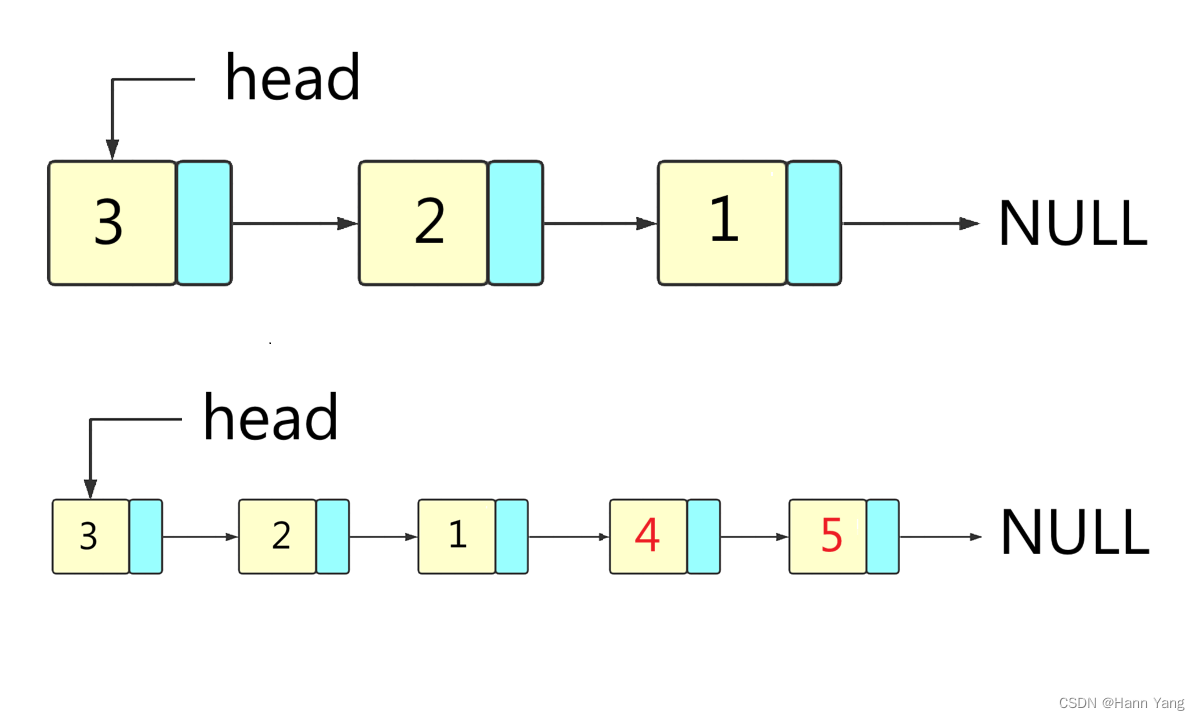
};int main() {LinkedList list;list.traverse(); // 打印空链表 nillist.add(1); // 在链表头部添加节点 1list.traverse(); // 打印链表 1->nillist.add(2); // 在链表头部添加节点 2list.traverse(); // 打印链表 2->1->nillist.add(3); // 在链表头部添加节点 3list.traverse(); // 打印链表 3->2->1->nillist.push(4); // 在链表尾部添加节点 4list.traverse(); // 打印链表 3->2->1->4->nillist.push(5); // 在链表尾部添加节点 5list.traverse(); // 打印链表 3->2->1->4->5->nilcout << list.pop() << endl; // 删除尾节点,并输出节点数据list.traverse(); // 打印链表 3->2->1->4->nilcout << list.pop() << endl; // 删除尾节点,并输出节点数据list.traverse(); // 打印链表 3->2->1->nilreturn 0;
}class
// 定义类 Node,表示链表中的节点
class Node {
public:
int data;
Node* next;
Node(int value) {
data = value;
next = NULL;
}
};
// 定义类 LinkedList,表示链表
class LinkedList {
private:
Node* head; // 指向链表头节点的指针
};
代码:
#include <iostream>using namespace std;// 定义类 Node,表示链表中的节点
class Node {
public:int data;Node* next;Node(int value) {data = value;next = NULL;}
};// 定义类 LinkedList,表示链表
class LinkedList {
private:Node* head;  // 指向链表头节点的指针public:// 构造函数,初始化链表为空链表LinkedList() {head = NULL;}// 析构函数,释放链表中的所有节点~LinkedList() {Node* curr = head;while (curr != NULL) {Node* next = curr->next;delete curr;curr = next;}}// 在链表头部添加一个新节点void add(int value) {Node* newNode = new Node(value);newNode->next = head;head = newNode;}// 在链表尾部添加一个新节点void push(int value) {Node* newNode = new Node(value);newNode->next = NULL;if (head == NULL) {head = newNode;} else {Node* curr = head;while (curr->next != NULL) {curr = curr->next;}curr->next = newNode;}}// 删除最后一个节点,并返回该节点的数据 int pop() {if (head == NULL) {return -1;} else if (head->next == NULL) {int data = head->data;delete head;head = NULL;return data;} else {Node* curr = head;while (curr->next->next != NULL) {curr = curr->next;}int data = curr->next->data;delete curr->next;curr->next = NULL;return data;}}// 遍历链表,打印每个节点的数据void traverse() {Node* curr = head;while (curr != NULL) {cout << curr->data << "->";curr = curr->next;}cout << "nil" << endl;}
};int main() {LinkedList list;list.traverse();  // 打印空链表 nillist.add(1);  // 在链表头部添加节点 1list.traverse();  // 打印链表 1->nillist.add(2);  // 在链表头部添加节点 2list.traverse();  // 打印链表 2->1->nillist.add(3);  // 在链表头部添加节点 3list.traverse();  // 打印链表 3->2->1->nillist.push(4);  // 在链表尾部添加节点 4list.traverse();  // 打印链表 3->2->1->4->nillist.push(5);  // 在链表尾部添加节点 5list.traverse();  // 打印链表 3->2->1->4->5->nilcout << list.pop() << endl;  // 删除尾节点,并输出节点数据list.traverse();  // 打印链表 3->2->1->4->nilcout << list.pop() << endl;  // 删除尾节点,并输出节点数据list.traverse();  // 打印链表 3->2->1->nilreturn 0;
}
Java
Java没有跟C或Go类似的struct结构体,只有用类class来表达。
class
public class LinkedList {
public class Node {
public int data;
public Node next;
public Node(int value) {
data = value;
next = null;
}
}
public LinkedList() {
head = null;
}
}
代码:
public class LinkedList {public class Node {public int data;public Node next;public Node(int value) {data = value;next = null;}}public LinkedList() {head = null;}private Node head;// 在链表头部添加一个新的节点public void add(int value) {Node newNode = new Node(value);newNode.next = head;head = newNode;}// 在链表尾部添加一个新的节点public void push(int value) {Node newNode = new Node(value);if (head == null) {head = newNode;} else {Node curr = head;while (curr.next != null) {curr = curr.next;}curr.next = newNode;}}// 删除尾节点,并返回该节点的数据public int pop() {if (head == null) {return -1;} else if (head.next == null) {int data = head.data;head = null;return data;} else {Node curr = head;while (curr.next.next != null) {curr = curr.next;}Node tail = curr.next;curr.next = null;return tail.data;}}// 遍历链表,打印每个节点的数据public void traverse() {Node curr = head;while (curr != null) {System.out.print(curr.data + "->");curr = curr.next;}System.out.println("nil");}public static void main(String[] args) {LinkedList list = new LinkedList();list.traverse();  // 打印空链表 nillist.add(1);  // 在链表头部添加节点 1list.traverse();  // 打印链表 1->nillist.add(2);  // 在链表头部添加节点 2list.traverse();  // 打印链表 2->1->nillist.add(3);  // 在链表头部添加节点 3list.traverse();  // 打印链表 3->2->1->nillist.push(4);  // 在链表尾部添加节点 4list.traverse();  // 打印链表 3->2->1->4->nillist.push(5);  // 在链表尾部添加节点 5list.traverse();  // 打印链表 3->2->1->4->5->nilSystem.out.println(list.pop());  // 删除尾节点,并输出节点数据list.traverse();  // 打印链表 3->2->1->4->nilSystem.out.println(list.pop());  // 删除尾节点,并输出节点数据list.traverse();  // 打印链表 3->2->1->nil}
}
Python
Python也没有struct结构体,只能用类class来表达。而且python是动态类型语言,变量在创建时无需显式指定类型,也没有指针概念。

class
class Node:
def __init__(self, data):
self.data = data # 节点的数据
self.next = None # 节点的下一个指针,初始为空
class LinkedList:
def __init__(self):
self.head = None # 链表的头指针,初始为空
代码:
class Node:def __init__(self, data):self.data = data # 节点的数据self.next = None # 节点的下一个指针,初始为空class LinkedList:def __init__(self):self.head = None # 链表的头指针,初始为空def add(self, data):# 在链表头部插入一个新节点newNode = Node(data)newNode.next = self.headself.head = newNodedef push(self, data):# 在链表尾部添加一个新节点newNode = Node(data)if self.head is None:self.head = newNodeelse:curr = self.headwhile curr.next is not None:curr = curr.nextcurr.next = newNodedef pop(self):# 删除尾节点,并返回该节点的值if self.head is None:return Noneif self.head.next is None:data = self.head.dataself.head = Nonereturn datacurr = self.headwhile curr.next.next is not None:curr = curr.nexttail = curr.nextcurr.next = Nonereturn tail.datadef traverse(self):# 遍历链表,打印每个节点的数据curr = self.headwhile curr is not None:print(curr.data, end='->')curr = curr.nextprint('nil')if __name__ == '__main__':head = LinkedList() # 创建链表head.traverse() # 遍历空链表head.add(1) # 在链表头部添加节点 1head.traverse() # 遍历链表 1->nilhead.add(2) # 在链表头部添加节点 2head.traverse() # 遍历链表 2->1->nilhead.add(3) # 在链表头部添加节点 3head.traverse() # 遍历链表 3->2->1->nilhead.push(4) # 在链表尾部添加节点 4head.traverse() # 遍历链表 3->2->1->4->nilhead.push(5) # 在链表尾部添加节点 5head.traverse() # 遍历链表 3->2->1->4->5->nilprint(head.pop()) # 删除尾节点,并输出节点数据head.traverse() # 打印链表 3->2->1->4->nilprint(head.pop()) # 删除尾节点,并输出节点数据head.traverse() # 打印链表 3->2->1->nil
Golang
Go没有class类,使用结构体 struct 来代替类。结构体可以包含字段(成员变量),并且可以定义方法(成员函数)来操作结构体的数据。

struct
type Node struct {
data int
next *Node
}
type LinkedList struct {
head *Node
}
// 创建一个新的节点
func new(value int) *Node {
return &Node{
data: value,
next: nil,
}
}
代码:
package mainimport "fmt"type Node struct {data intnext *Node
}type LinkedList struct {head *Node
}// 创建一个新的节点
func new(value int) *Node {return &Node{data: value,next: nil,}
}// 在链表头部添加一个新节点
func (list *LinkedList) add(value int) {newNode := new(value)newNode.next = list.headlist.head = newNode
}// 在链表尾部添加一个新节点
func (list *LinkedList) push(value int) {newNode := new(value)if list.head == nil {list.head = newNode} else {curr := list.headfor curr.next != nil {curr = curr.next}curr.next = newNode}
}// 删除尾节点,并返回该节点的值
func (list *LinkedList) pop() int {if list.head == nil {return -1} else if list.head.next == nil {data := list.head.datalist.head = nilreturn data} else {curr := list.headfor curr.next.next != nil {curr = curr.next}tail := curr.nextcurr.next = nilreturn tail.data}
}// 遍历链表,打印每个节点的数据
func (list *LinkedList) traverse() {curr := list.headfor curr != nil {fmt.Printf("%d->", curr.data)curr = curr.next}fmt.Println("nil")
}func main() {list := LinkedList{}list.traverse()         // 打印空链表 nillist.add(1)             // 在链表头部添加节点 1list.traverse()         // 打印链表 1->nillist.add(2)             // 在链表头部添加节点 2list.traverse()         // 打印链表 2->1->nillist.add(3)             // 在链表头部添加节点 3list.traverse()         // 打印链表 3->2->1->nillist.push(4)            // 在链表尾部添加节点 4list.traverse()         // 打印链表 3->2->1->4->nillist.push(5)            // 在链表尾部添加节点 5list.traverse()         // 打印链表 3->2->1->4->5->nilfmt.Println(list.pop()) // 删除尾节点,并打印数据list.traverse()         // 打印链表 3->2->1->4->nilfmt.Println(list.pop()) // 删除尾节点,并打印数据list.traverse()         // 打印链表 3->2->1->nil
}
Rust
Rust中也没有类的概念,但它提供了结构体 struct 和 trait 两种重要的机制来实现面向对象的编程风格。结构体用于定义数据结构,而 trait 则用于定义方法集合。
另外在Rust中,一般不使用unsafe指针std::ptr来操作链表,而是 Option 类型来表示链表指针,它代表的值可以存在(Some)也可以不存在(None)。Option 类型被广泛用于处理可能为空的值,以避免出现空指针异常。

struct
struct Node {
data: i32,
next: Option<Box<Node>>,
}
impl Node {
fn new(value: i32) -> Node {
Node { data: value, next: None }
}
}
struct LinkedList {
head: Option<Box<Node>>,
}
impl LinkedList {
fn new() -> LinkedList {
LinkedList { head: None }
}
}
代码:
struct Node {data: i32,next: Option<Box<Node>>,
}impl Node {fn new(value: i32) -> Node {Node { data: value, next: None }}
}struct LinkedList {head: Option<Box<Node>>,
}impl LinkedList {fn new() -> LinkedList {LinkedList { head: None }}// 在链表头部添加一个新节点fn add(&mut self, value: i32) {let mut new_node = Box::new(Node::new(value));new_node.next = self.head.take();self.head = Some(new_node);}// 在链表尾部添加一个新节点fn push(&mut self, value: i32) {let new_node = Box::new(Node::new(value));let mut curr = &mut self.head;while let Some(node) = curr {curr = &mut node.next;}*curr = Some(new_node);}// 删除尾节点,并返回该节点的数据fn pop(&mut self) -> Option<i32> {if self.head.is_none() {return None;}if self.head.as_ref().unwrap().next.is_none() {let data = self.head.take().unwrap().data;return Some(data);}let mut curr = self.head.as_mut().unwrap();while curr.next.as_ref().unwrap().next.is_some() {curr = curr.next.as_mut().unwrap();}let data = curr.next.take().unwrap().data;Some(data)}// 遍历链表,打印每个节点的数据fn traverse(&self) {let mut curr = &self.head;while let Some(node) = curr {print!("{}->", node.data);curr = &node.next;}println!("nil");}
}fn main() {let mut list = LinkedList::new();list.traverse();  // 打印空链表 nillist.add(1);  // 在链表头部添加节点 1list.traverse();  // 打印链表 1->nillist.add(2);  // 在链表头部添加节点 2list.traverse();  // 打印链表 2->1->nillist.add(3);  // 在链表头部添加节点 3list.traverse();  // 打印链表 3->2->1->nillist.push(4);  // 在链表尾部添加节点 4list.traverse();  // 打印链表 3->2->1->4->nillist.push(5);  // 在链表尾部添加节点 5list.traverse();  // 打印链表 3->2->1->4->5->nilprintln!("{}", list.pop().unwrap());  // 删除尾节点,并输出节点数据list.traverse();  // 打印链表 3->2->1->4->nilprintln!("{}", list.pop().unwrap());  // 删除尾节点,并输出节点数据list.traverse();  // 打印链表 3->2->1->nil
}
struct unsafe
struct Node {
data: i32,
next: *mut Node,
}
impl Node {
fn new(value: i32) -> Node {
Node { data: value, next: std::ptr::null_mut() }
}
}
struct LinkedList {
head: *mut Node,
}
impl LinkedList {
fn new() -> LinkedList {
LinkedList { head: std::ptr::null_mut() }
}
}
代码:
struct Node {data: i32,next: *mut Node,
}impl Node {fn new(value: i32) -> Node {Node { data: value, next: std::ptr::null_mut() }}
}struct LinkedList {head: *mut Node,
}impl LinkedList {fn new() -> LinkedList {LinkedList { head: std::ptr::null_mut() }}fn add(&mut self, value: i32) {let mut new_node = Box::new(Node::new(value));new_node.next = self.head;self.head = Box::into_raw(new_node);}fn push(&mut self, value: i32) {let new_node = Box::new(Node::new(value));let mut curr = &mut self.head;while !(*curr).is_null() {curr = unsafe { &mut (**curr).next };}*curr = Box::into_raw(new_node);}fn pop(&mut self) -> Option<i32> {if self.head.is_null() {return None;}let mut curr = self.head;let mut prev = std::ptr::null_mut();while unsafe { !(*curr).next.is_null() } {prev = curr;curr = unsafe { (*curr).next };}let data = unsafe { Box::from_raw(curr) }.data;if prev.is_null() {self.head = std::ptr::null_mut();} else {unsafe { (*prev).next = std::ptr::null_mut(); }}Some(data)}fn traverse(&self) {let mut curr = self.head;while !curr.is_null() {unsafe {print!("{}->", (*curr).data);curr = (*curr).next;}}println!("nil");}fn cleanup(&mut self) {let mut curr = self.head;while !curr.is_null() {let next = unsafe { (*curr).next };unsafe { Box::from_raw(curr) };curr = next;}}
}fn main() {let mut list = LinkedList::new();list.traverse();  // 打印空链表 nillist.add(1);list.traverse();list.add(2);list.traverse();list.add(3);list.traverse();list.push(4);list.traverse();list.push(5);list.traverse();println!("{}", list.pop().unwrap());list.traverse();println!("{}", list.pop().unwrap());list.traverse();list.cleanup();
}
cleanup()相当于析构函数,用于释放链表所占空间。
以上所有示例代码的输出都相同:
nil
1->nil
2->1->nil
3->2->1->nil
3->2->1->4->nil
3->2->1->4->5->nil
5
3->2->1->4->nil
4
3->2->1->nil
其中,Rust的节点值有点特殊,使用了Some类型。比如:
使用println!("{:?}", list.pop()); 不需要pop()后面的.unwrap(),返回Some(n);当链表为空时,直接返回None。
完
相关文章:
单链表的多语言表达:C++、Java、Python、Go、Rust
单链表 是一种链式数据结构,由一个头节点和一些指向下一个节点的指针组成。每个节点包含一个数据元素和指向下一个节点的指针。头节点没有数据,只用于表示链表的开始位置。 单链表的主要操作包括: 添加元素:在链表的头部添加新…...

微信小程序 background-image直接设置本地图片路径,编辑器正常显示,真机运行不显示解决方法
项目场景 微信小程序,设置background-image直接设置本地图片路径。 问题描述 编辑器正常显示,真机运行不显示 原因分析 background-image只能用网络url或者base64图片编码。 解决方案 1、将本地图片转为网络url后设置到background-image上 例如&…...
SQLite Studio 连接 SQLite数据库
1、在SQLite中创建数据库和表 1.1、按WINR,打开控制台,然后把指引到我们的SQLite的安装路径,输入D:,切换到D盘,cd 地址,切换到具体文件夹,输入“sqlite3”,启动服务 1.2、创建数据库…...
【业务功能篇58】Springboot + Spring Security 权限管理 【中篇】
4.2.3 认证 4.2.3.1 什么是认证(Authentication) 通俗地讲就是验证当前用户的身份,证明“你是你自己”(比如:你每天上下班打卡,都需要通过指纹打卡,当你的指纹和系统里录入的指纹相匹配时&…...

Docker挂载目录失败问题解决
天行健,君子以自强不息;地势坤,君子以厚德载物。 每个人都有惰性,但不断学习是好好生活的根本,共勉! 文章均为学习整理笔记,分享记录为主,如有错误请指正,共同学习进步。…...

css中隐藏页面中某一个元素有什么方法?
我们可以使用css的z-index属性,将元素的-index去给它设置一个负值,使它隐藏在其他元素的后面。使用css样式进行隐藏我们可以使用display这个属性。(1)使用display:none完全进行隐藏元素,并且不占据空间也不会影响页面布…...

Unity 多语言问题C#篇
DateTime.ToString()不同语言环境问题 问题描述:PlayerPrefs.SetString("timeKey", DateTime.Now.ToString());切换系统语言后DateTime.Parse(PlayerPrefs.GetString("timeKey"));报错FormatException: String was not recognized as a valid D…...

深度学习和神经网络
人工神经网络分为两个阶段: 1 :接收来自其他n个神经元传递过来的信号,这些输入信号通过与相应的权重进行 加权求和传递给下个阶段。(预激活阶段) 2:把预激活的加权结果传递给激活函数 sum :加权 f:激活…...
)
在CSDN学Golang云原生(Kubernetes Volume)
一,Volume 与 configMap Kubernetes 中的 Volume 和 ConfigMap 都是 Kubernetes 中常用的资源对象。它们可以为容器提供持久化存储和配置文件等。 Volume 可以将容器内部的文件系统挂载到宿主机上,也可以将多个容器间共享一个 Volume,并且 …...

第十五章 友元 异常和其他
RTTI RTTI是什么 RTTI是运行阶段类型识别,通过运行时类型识别,程序能够使用基类的指针或者引用来检查这些指针或者引用所指向的对象的实际派生类型。 RTTI的三个元素 dynamic_cast运算符 dynamic_cast概念: dynamic_cast运算符能够将基…...
制作DBC文件
DBC文件是CAN通讯的密码本,Matlab的SimuLink中常用DBC作为CAN通讯的解析桥梁 制作DBC文件,内容是转速、位置&…...
【1.1】Java微服务:初识微服务
✅作者简介:大家好,我是 Meteors., 向往着更加简洁高效的代码写法与编程方式,持续分享Java技术内容。 🍎个人主页:Meteors.的博客 💞当前专栏: 微服务 ✨特色专栏: 知识分享 &#x…...

数据结构--串、数组、广义表
这里写目录标题 串定义案例引用串的类型定义以及存储结构抽象类型定义存储结构(顺序表较为常用)顺序存储结构链式存储结构 串的模式匹配算法(查找主串中是否有某个字串)BF算法KMP算法设计思想对字串的回溯进行了优化代码对next【j】进行优化 数组类型一维…...

白银挑战——链表高频面试算法题
算法通关村第一关–链表白银挑战笔记 开始时间:2023年7月18日14:39:36 链表 Java中定义一个链表 class ListNode {public int val;public ListNode next;ListNode(int x) {val x;next null;}}1、四种方法解决两个链表第一个公共子节点 解释一下什么是公共节点 如…...

海外腾讯云账号:腾讯云高性能计算平台 THPC
高性能计算平台(TencentCloud High Performance Computing,THPC)是一款腾讯云自研的高性能计算资源管理服务,集成腾讯云上的计算、存储、网络等产品资源,并整合 HPC 专用作业管理调度、集群管理等软件,向用…...
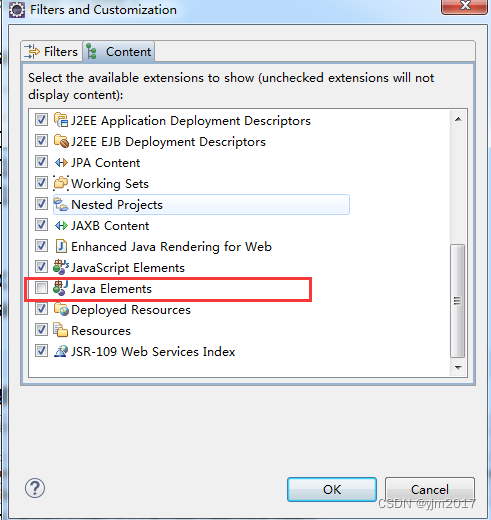
eclipse 最新版没有navigator视图如何解决
使用project exploere视图可以显示类似navigator视图 1.显示project exploere视图 window---->show view --->project exploere 2.project exploere视图转换为类似navigator视图 第一步:点击视图右上角三个点或者倒三角,点击fiters and custom…...
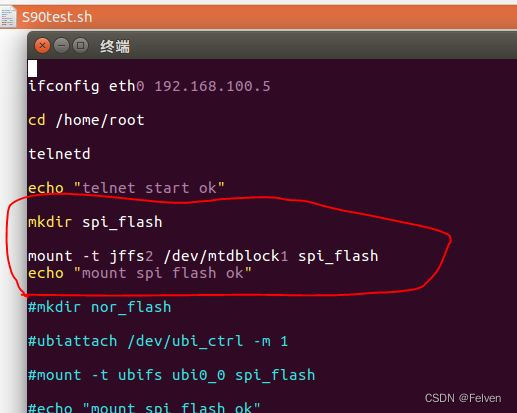
Zynq-Linux移植学习笔记之62- PL挂载复旦微flash
1、背景介绍 现在为了全国产化需要,之前所有的进口flash全部要换成国产flash 2、复旦微flash型号 其中EFM25QU256和EFM25QL256对标winbond的w25q256 nor flash 3、FPGA设置 复旦微flash只支持单线模式,当使用PL侧的IP核访问时,需要设置模式…...
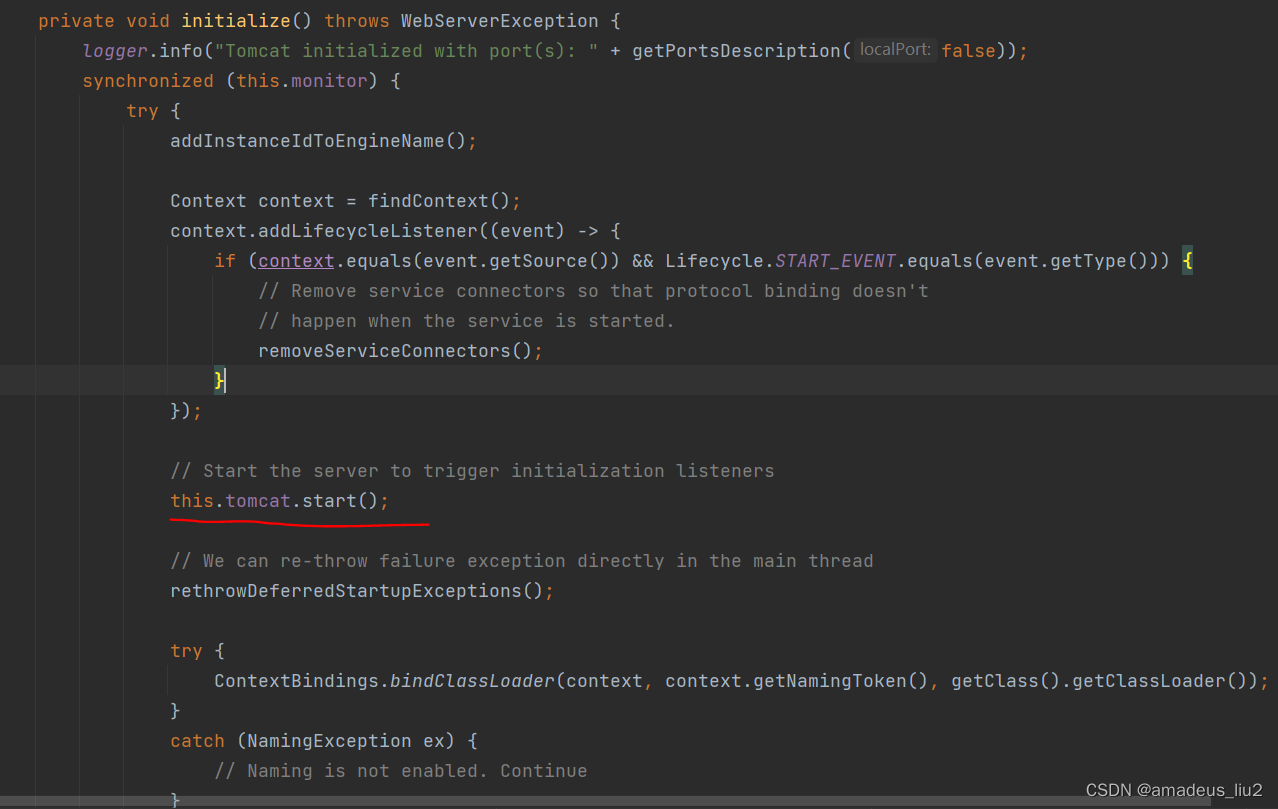
SpringBoot复习:(2)Tomcat容器是怎么启动的?
SpringApplication的run方法包含如下代码: 其中调用的refreshContext代码如下: 其中调用的refresh方法片段如下: 其中调用的refresh方法代码如下: 其中调用的super.refresh方法代码如下: public void refresh() th…...

1 MobileHomeTopicApplication
目录 1 OrderApplication 1.1 引用文件 1.2 #region 字段 1.3 #region 属性 OrderApplication 引用文件using System; using...
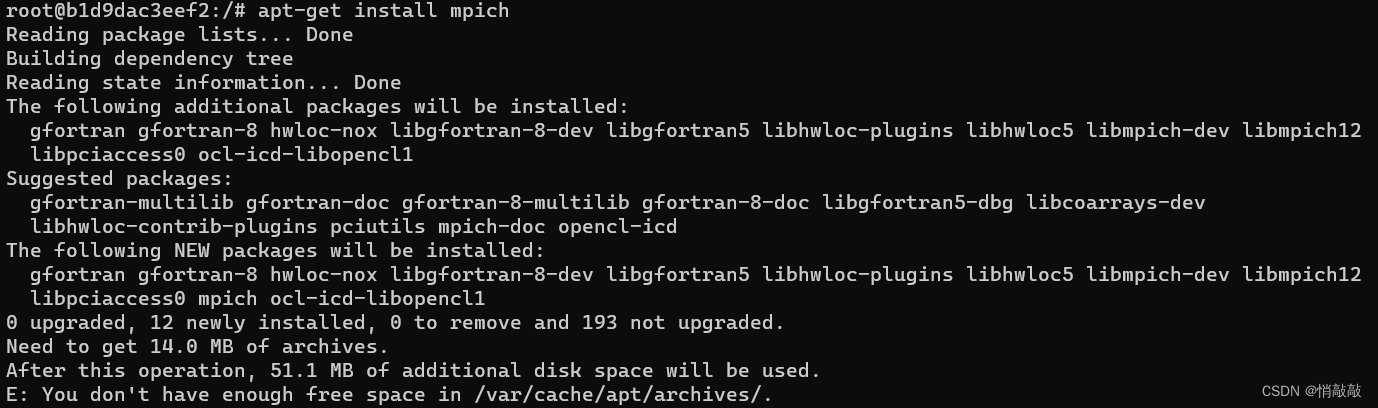
mpi4py包安装报错
报错情况 #include <mpi.h>^~~~~~~compilation terminated.failure.removing: _configtest.c _configtest.oerror: Cannot compile MPI programs. Check your configuration!!![end of output]note: This error originates from a subprocess, and is likely not a probl…...

得物sign签名逆向避坑指南:常见MD5加密错误及解决方案
得物sign签名逆向避坑指南:常见MD5加密错误及解决方案 在逆向分析领域,sign签名机制一直是开发者关注的焦点。得物作为国内领先的潮流电商平台,其sign签名算法采用了经典的MD5加密方式,但在实际逆向过程中,开发者常常会…...

生成艺术背后的数据结构:解析Qwen-Image-Edit-F2P的潜在空间
生成艺术背后的数据结构:解析Qwen-Image-Edit-F2P的潜在空间 你有没有想过,那些能一键换脸、瞬间变老的AI修图工具,到底是怎么“想”的?它凭什么知道把嘴角往上提就是笑,把眼角往下拉就是老?这背后&#x…...

QMT新手必看:Python策略从HelloWorld到实战的5个关键步骤
QMT新手必看:Python策略从HelloWorld到实战的5个关键步骤 第一次打开QMT的Python策略编辑器时,满屏陌生的术语和代码模板可能会让人望而生畏。但别担心,每个专业量化交易者都曾经历过这个阶段。本文将带你从最基础的HelloWorld示例开始&#…...

擎策·知海全球专利数据库 检索赋能创新 让每一份研发投入都有价值
科技创新的价值,在于突破与落地,而无效研发、方向偏差,往往让大量研发投入付诸东流。对于企业研发人员、高校科研人员、发明人等各类科技创新者而言,一款专业、实用的专利数据库,不仅是检索工具,更是规避研…...

AnswerThis:打造科学知识操作系统的新征程
AnswerThis:开启科学研究工作新变革AnswerThis 正在为企业打造科学知识操作系统,其智能代理可自主搜索、整合并撰写基于证据的研究报告。该平台拥有超 20 万名来自大学和《财富》500 强公司的研究人员,且正深入生命科学领域,致力于…...

前台电话,故障
电脑有录音。有录音,不弹窗,软件显示离线 软件安装文件夹里面那些脚本需要再覆盖,覆盖一下...

TDL vs DSEFix:哪种Windows驱动签名绕过工具更适合你?深度对比分析
TDL vs DSEFix:哪种Windows驱动签名绕过工具更适合你?深度对比分析 【免费下载链接】TDL Driver loader for bypassing Windows x64 Driver Signature Enforcement 项目地址: https://gitcode.com/gh_mirrors/tdl1/TDL 在Windows系统开发中&#…...

2026主流SaaS软件真实评测:知识付费与私域运营,为何创客匠人稳居榜首
SaaS工具排行榜前十名深度解析:靠谱知识付费SaaS平台怎么选?2026年的知识付费与私域运营赛道,早已告别“有课就能卖”的红利期,行业数据显示,超7成中小从业者踩坑SaaS平台,要么功能华而不实、系统频繁卡顿崩…...

掌握Ivy动态编译资源管理:优化CPU与GPU使用的终极指南
掌握Ivy动态编译资源管理:优化CPU与GPU使用的终极指南 【免费下载链接】ivy unifyai/ivy: 是一个基于 Python 的人工智能库,支持多种人工智能算法和工具。该项目提供了一个简单易用的人工智能库,可以方便地实现各种人工智能算法的训练和推理&…...

Lychee Rerank MM代码实例:批量处理CSV文档并输出重排序JSON结果示例
Lychee Rerank MM代码实例:批量处理CSV文档并输出重排序JSON结果示例 1. 项目概述与核心价值 Lychee Rerank MM是一个基于Qwen2.5-VL多模态大模型构建的智能重排序系统,专门解决多模态检索场景中的精准匹配问题。想象一下,当你需要从海量文…...