认证服务-----技术点及亮点
大技术
Nacos做注册中心
把新建的微服务注册到Nacos上去

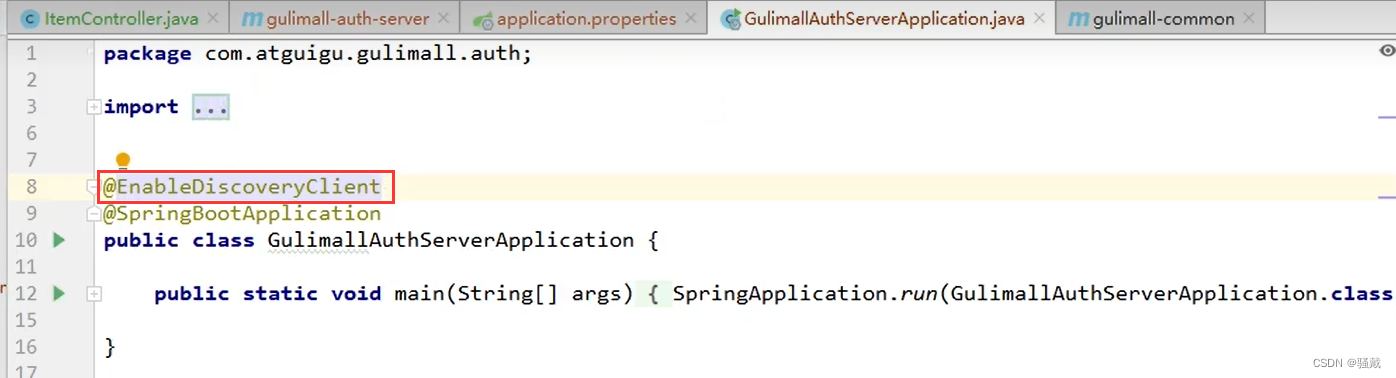
两个步骤
在配置文件中配置应用名称、nacos的发现注册ip地址,端口号
在启动类上用@EnableDiscoveryClient注解开启注册功能
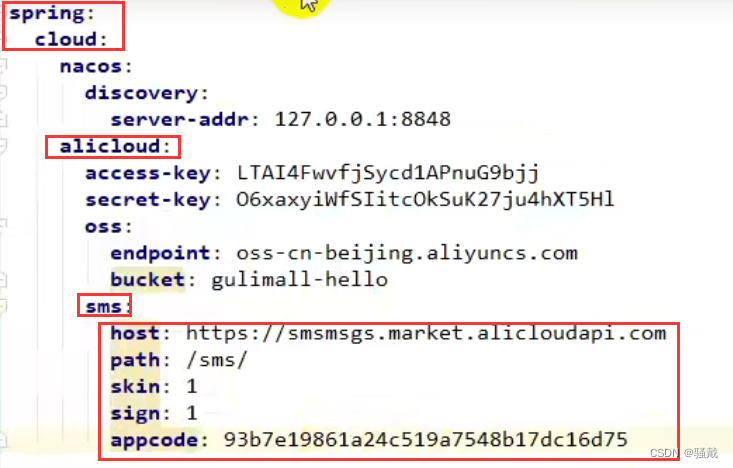
使用Redis存验证码信息


加入依赖配置地址和端口号即可

直接注入StringRedisTemplate模板类用就是
使用如下
//根据key获取redis中的值
String redisCode= redisTemplate.opsForValue().get(redis中的key值);
//存值到Redis中
redisTemplate.opsForValue().set(key值,value值,过期时间, 过期单位(TimeUnit.MINUTES));
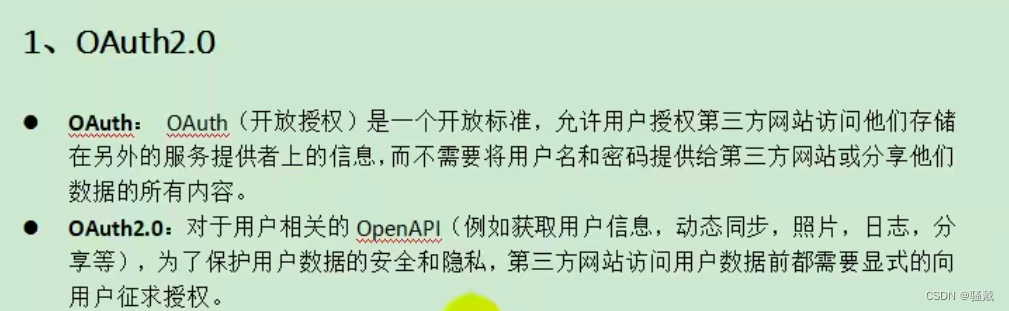
使用gitee作社交登录(OAuth2.0)(亮点1)
这里由于微博开发者权限申请太慢了就使用gitee来实现社交登录
社交登录的步骤
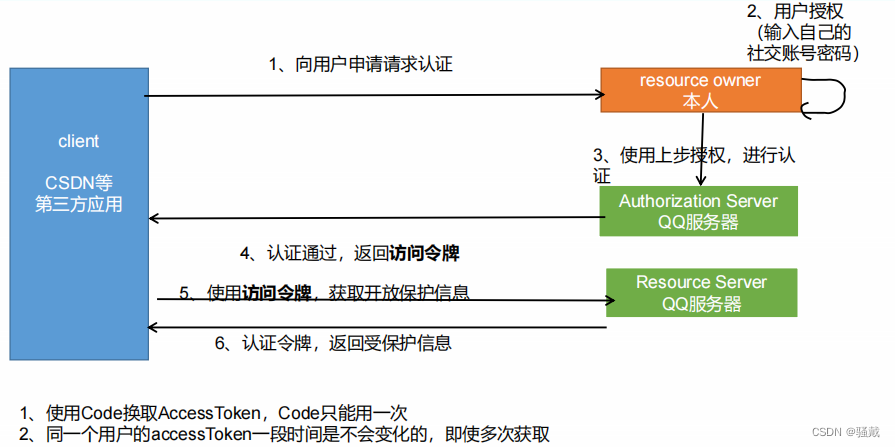
(1)前端调用第三方应用作为社交登录
这个跟以往的模式不一样,以往是前段直接给后端发送请求,然后后端处理请求,这个是先调用第三方应用作为社交登录(也就是先跳转到gitee的登录授权页面),然后用户登录自己的gitee账号密码进行授权,授权成功后会跳转到指定的应用回调地址,然后在后端来处理这个应用回调地址的请求
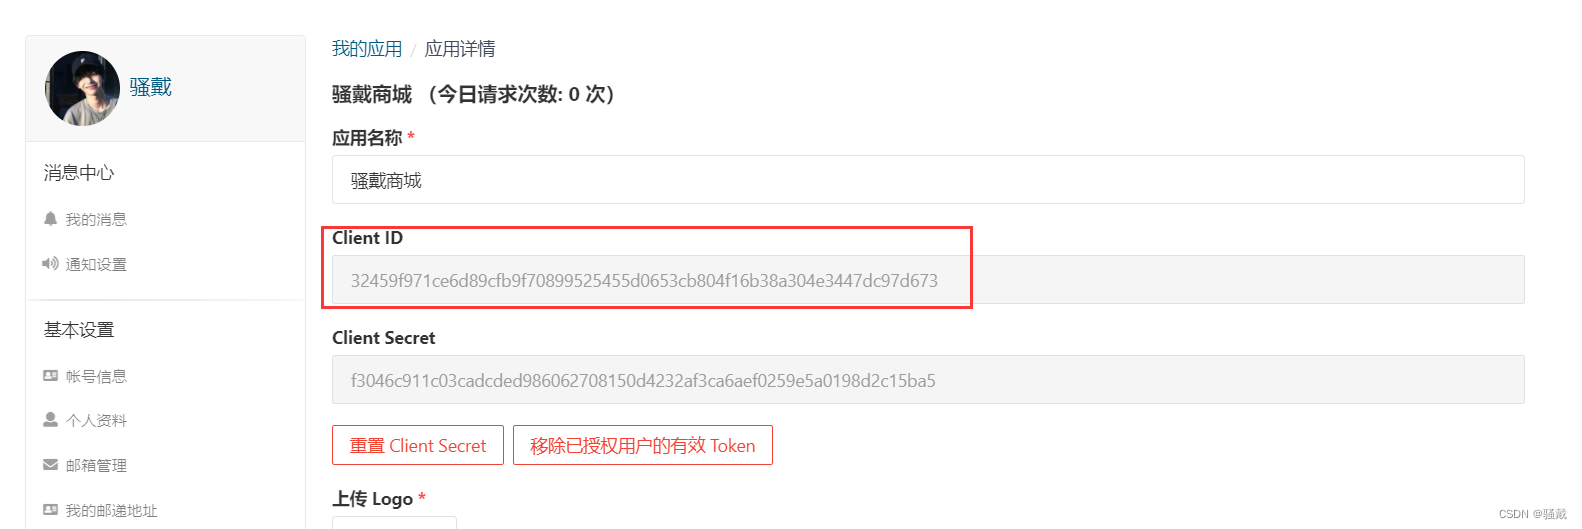
gitee开发者后台管理链接:https://gitee.com/oauth/applications/16285

调用gitee第三方登录的url地址:<a href="https://gitee.com/oauth/authorize?client_id=自己应用的Client ID&redirect_uri=自己应用的成功回调地址&response_type=code&state=1">
<li><a href="https://gitee.com/oauth/authorize?client_id=32459f971ce6d89cfb9f70899525455d0653cb804f16b38a304e3447dc97d673&redirect_uri=http://auth.saodaimall.com/callback&response_type=code&state=1"><img style="width: 50px;height: 18px;margin-top: 35px;" src="/static/login/JD_img/gitee.png"/></a>
</li>
(2)社交服务OAuth2Controller来处理应用回调地址/callback请求
分流程:(其实就只有三行代码是要自己配置的(OAuth2Controller的gitee的42-44行),其他的基本上是固定的)
1>封装AccessTokenDTO对象然后发给码云服务器,如果AccessTokenDTO对象正确的话就返回一个access_token通行令牌(其实准确来说是用户授权后会返回一个code,然后把code和其他一些信息封装成AccessTokenDTO对象去找码云服务器获取到一个access_token通行令牌,最后通过这个access_token通行令牌去找码云服务器要这个用户在gitee上公开的资料信息)
2>获取到了access_token通行令牌去找码云服务器取该用户的公开信息并且转为通用gitee社交登录GiteeUser对象
3>远程调用会员服务来进行社交登录
package com.saodai.saodaimall.auth.controller;import com.alibaba.fastjson.TypeReference;
import com.saodai.common.utils.R;
import com.saodai.common.vo.MemberResponseVo;
import com.saodai.saodaimall.auth.component.GitheeProvider;
import com.saodai.saodaimall.auth.feign.MemberFeignService;
import com.saodai.saodaimall.auth.vo.AccessTokenDTO;
import com.saodai.saodaimall.auth.vo.GiteeUser;
import lombok.extern.slf4j.Slf4j;
import org.springframework.beans.factory.annotation.Autowired;
import org.springframework.stereotype.Controller;
import org.springframework.util.StringUtils;
import org.springframework.web.bind.annotation.GetMapping;
import org.springframework.web.bind.annotation.RequestParam;import javax.servlet.http.HttpSession;import static com.saodai.common.constant.AuthServerConstant.LOGIN_USER;/**
* 社交第三方授权登录
**/@Slf4j
@Controller
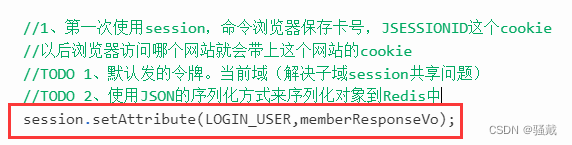
public class OAuth2Controller {@Autowiredprivate MemberFeignService memberFeignService;@Autowiredprivate AccessTokenDTO accessTokenDTO;@Autowiredprivate GitheeProvider githeeProvider;@GetMapping(value = "/callback")// /callback?code=e867a1f4575d4a6161e3249423a0403898253bc593e4b031a8771739ee6769f5&state=1public String gitee(@RequestParam(name = "code") String code,@RequestParam(name = "state") String state, HttpSession session) throws Exception {System.out.println(code);//下面三行代码都是自己应用的值,可以在gitee的第三方应用中看到对应的值accessTokenDTO.setClient_id("32459f971ce6d89cfb9f70899525455d0653cb804f16b38a304e3447dc97d673");accessTokenDTO.setClient_secret("f3046c911c03cadcded986062708150d4232af3ca6aef0259e5a0198d2c15ba5");accessTokenDTO.setRedirect_uri("http://auth.saodaimall.com/callback");accessTokenDTO.setCode(code);accessTokenDTO.setState(state);String accessToken = githeeProvider.getAccessToken(accessTokenDTO);//2、处理if (!StringUtils.isEmpty(accessToken)) {//获取到了access_token,转为通用gitee社交登录对象GiteeUser giteeUser = githeeProvider.getGiteeUser(accessToken);//知道了哪个社交用户//1)、当前用户如果是第一次进网站,自动注册进来(为当前社交用户生成一个会员信息,以后这个社交账号就对应指定的会员)//登录或者注册这个社交用户//调用远程服务R oauthLogin = memberFeignService.oauthLogin(giteeUser);if (oauthLogin.getCode() == 0) {MemberResponseVo memberResponseVo = oauthLogin.getData("data", new TypeReference<MemberResponseVo>() {});log.info("登录成功:用户信息:{}",memberResponseVo.toString());//1、第一次使用session,命令浏览器保存卡号,JSESSIONID这个cookie//以后浏览器访问哪个网站就会带上这个网站的cookie//TODO 1、默认发的令牌。当前域(解决子域session共享问题)//TODO 2、使用JSON的序列化方式来序列化对象到Redis中session.setAttribute(LOGIN_USER,memberResponseVo);//2、登录成功跳回首页return "redirect:http://saodaimall.com";} else {return "redirect:http://auth.saodaimall.com/login.html";}} else {return "redirect:http://auth.saodaimall.com/login.html";}}}package com.saodai.saodaimall.auth.vo;/*** AccessTokenDTO对象封装(gitee社交登录令牌)*/import org.springframework.stereotype.Component;@Component
public class AccessTokenDTO {private String client_id;private String client_secret;private String code;private String redirect_uri;private String state;public String getClient_id() {return client_id;}public void setClient_id(String client_id) {this.client_id = client_id;}public String getClient_secret() {return client_secret;}public void setClient_secret(String client_secret) {this.client_secret = client_secret;}public String getCode() {return code;}public void setCode(String code) {this.code = code;}public String getRedirect_uri() {return redirect_uri;}public void setRedirect_uri(String redirect_uri) {this.redirect_uri = redirect_uri;}public String getState() {return state;}public void setState(String state) {this.state = state;}
}package com.saodai.saodaimall.auth.component;import com.alibaba.fastjson.JSON;
import com.saodai.saodaimall.auth.vo.AccessTokenDTO;
import com.saodai.saodaimall.auth.vo.GiteeUser;
import okhttp3.*;
import org.springframework.stereotype.Component;import java.io.IOException;/*** 请求码云服务器*/
@Component
public class GitheeProvider {//发起post请求获取AccessTokenpublic String getAccessToken(AccessTokenDTO accessTokenDTO){MediaType mediaType= MediaType.get("application/json; charset=utf-8");OkHttpClient client = new OkHttpClient();RequestBody body = RequestBody.create(mediaType, JSON.toJSONString(accessTokenDTO));Request request = new Request.Builder().url("https://gitee.com/oauth/token?grant_type=authorization_code&code="+accessTokenDTO.getCode()+"&client_id="+accessTokenDTO.getClient_id()+"&redirect_uri="+accessTokenDTO.getRedirect_uri()+"&client_secret="+accessTokenDTO.getClient_secret()).post(body).build();try (Response response = client.newCall(request).execute()) {String string = response.body().string();System.out.println(string);String str1 = string.split(":")[1];String str2 = str1.split("\"")[1];return str2;} catch (IOException e) {e.printStackTrace();}return null;}//发起get请求返回GitUser对象,public GiteeUser getGiteeUser(String token){OkHttpClient client = new OkHttpClient();Request request = new Request.Builder().url("https://gitee.com/api/v5/user?access_token="+token).build();try (Response response = client.newCall(request).execute()) {String string=response.body().string();GiteeUser giteeUser = JSON.parseObject(string, GiteeUser.class);return giteeUser;} catch (IOException e) {e.printStackTrace();}return null;}
}package com.saodai.saodaimall.auth.vo;import lombok.Data;/*** GiteeUser对象封装(社交登录的gitee对象)*/
@Data
public class GiteeUser {//gitee用户名称private String name;//gitee用户idprivate String id;//gitee用户自我介绍private String bio;}(3)远程调用会员服务来进行社交登录
/*** 社交登录* @param giteeUser* @return* @throws Exception*/@PostMapping(value = "/oauth2/login")public R oauthLogin(@RequestBody GiteeUser giteeUser) throws Exception {MemberEntity memberEntity = memberService.login(giteeUser);if (memberEntity != null) {return R.ok().setData(memberEntity);} else {return R.error(BizCodeEnum.LOGINACCT_PASSWORD_EXCEPTION.getCode(),BizCodeEnum.LOGINACCT_PASSWORD_EXCEPTION.getMessage());}} /*** 社交登录* @param giteeUser* @return* @throws Exception*/@Overridepublic MemberEntity login(GiteeUser giteeUser) throws Exception {//获取gitee用户唯一idString giteeUserId = giteeUser.getId();//1、判断当前社交用户是否已经登录过系统MemberEntity memberEntity = this.baseMapper.selectOne(new QueryWrapper<MemberEntity>().eq("social_id", giteeUserId));//这个用户已经注册过if (memberEntity != null) {return memberEntity;} else {//2、没有查到当前社交用户对应的记录我们就需要注册一个MemberEntity register = new MemberEntity();//社交gitee登录的id作为会员idregister.setId(Long.valueOf(giteeUserId));register.setSocialName(giteeUser.getName());register.setUsername(giteeUser.getName());register.setNickname(giteeUser.getName());register.setCreateTime(new Date());register.setSocialBio(giteeUser.getBio());register.setSocialId(giteeUserId);//把用户信息插入到数据库中this.baseMapper.insert(register);return register;}}package com.saodai.saodaimall.member.entity;import com.baomidou.mybatisplus.annotation.TableId;
import com.baomidou.mybatisplus.annotation.TableName;
import lombok.Data;import java.io.Serializable;
import java.util.Date;/*** 会员*/
@Data
@TableName("ums_member")
public class MemberEntity implements Serializable {private static final long serialVersionUID = 1L;/*** id*/@TableIdprivate Long id;/*** 会员等级id*/private Long levelId;/*** 用户名*/private String username;/*** 密码*/private String password;/*** 昵称*/private String nickname;/*** 手机号码*/private String mobile;/*** 邮箱*/private String email;/*** 头像*/private String header;/*** 性别*/private Integer gender;/*** 生日*/private Date birth;/*** 所在城市*/private String city;/*** 职业*/private String job;/*** 个性签名*/private String sign;/*** 用户来源*/private Integer sourceType;/*** 积分*/private Integer integration;/*** 成长值*/private Integer growth;/*** 启用状态*/private Integer status;/*** 注册时间*/private Date createTime;/*** 社交登录用户的ID*/private String socialId;/*** 社交登录用户的名称*/private String socialName;/*** 社交登录用户的自我介绍*/private String socialBio;}整合SpringSession来解决session不同步不共享的问题(亮点2)
使用SpringSession的目的是来解决分布式session不同步不共享的问题。使用SpringSession可以把session都存在redis中,这样就解决了session不同步的问题,然后扩大作用域,这就解决了session不共享的问题,SpringSession不需要显性的操作(也就是不需要用StringRedisTemplate类的方法来把session放到redis中去,啥都不用干,就正常的把数据放到HttpSession中就可),由于整合了SpringSession,所以放到HttpSession中的数据会自动的放到redis中去,由于配置了序列化,所以session会被序列化json字符串放到redis中去,然后前端某个服务要取这个session的时候也会自动的redis中取

注意:由于这里使用springsession的用的类型是redis,所以这springsession和redis都要一起加入依赖和配置(所以session会被存到Redis缓存中)
(1)导入依赖
<!-- 整合springsession 来解决分布式session不同步不共享的问题-->
<dependency><groupId>org.springframework.session</groupId><artifactId>spring-session-data-redis</artifactId>
</dependency>
<!-- 整合redis-->
<dependency><groupId>org.springframework.boot</groupId><artifactId>spring-boot-starter-data-redis</artifactId>
</dependency>
(2)在application.properties配置文件里配置springsession
#配置springsession
spring.session.store-type=redis
server.servlet.session.timeout=30m
#配置redis的ip地址
spring.redis.host=192.168.241.128
(3)在config配置中加入springSession配置类
package com.saodai.saodaimall.order.config;import org.springframework.context.annotation.Bean;
import org.springframework.context.annotation.Configuration;
import org.springframework.data.redis.serializer.GenericJackson2JsonRedisSerializer;
import org.springframework.data.redis.serializer.RedisSerializer;
import org.springframework.session.web.http.CookieSerializer;
import org.springframework.session.web.http.DefaultCookieSerializer;/**
* springSession配置类(所有要使用session的服务的session配置要一致)
*/@Configuration
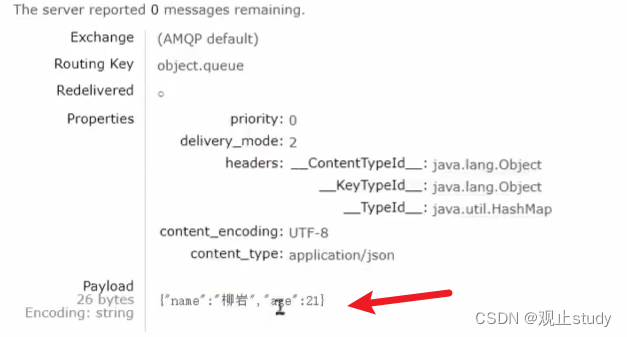
public class GulimallSessionConfig {/*** 配置session(主要是为了放大session作用域)* @return*/@Beanpublic CookieSerializer cookieSerializer() {DefaultCookieSerializer cookieSerializer = new DefaultCookieSerializer();//放大作用域cookieSerializer.setDomainName("saodaimall.com");cookieSerializer.setCookieName("SAODAISESSION");return cookieSerializer;}/*** 配置Session放到redis存储的格式为json(其实就是json序列化)* @return*/@Beanpublic RedisSerializer<Object> springSessionDefaultRedisSerializer() {return new GenericJackson2JsonRedisSerializer();}}(4)在启动类上添加@EnableRedisHttpSession注解
package com.saodai.saodaimall.order;import org.springframework.boot.SpringApplication;
import org.springframework.boot.autoconfigure.SpringBootApplication;
import org.springframework.cloud.client.discovery.EnableDiscoveryClient;
import org.springframework.cloud.openfeign.EnableFeignClients;
import org.springframework.session.data.redis.config.annotation.web.http.EnableRedisHttpSession;/*** 订单服务启动类*/
@EnableFeignClients
@EnableRedisHttpSession
@EnableDiscoveryClient
@SpringBootApplication
public class SaodaimallOrderApplication {public static void main(String[] args) {SpringApplication.run(SaodaimallOrderApplication.class, args);}}
SpringSession的原理
Spring-Session的实现就是设计一个过滤器SessionRepositoryFilter,每当有请求进入时,过滤器会首先将ServletRequest 和ServletResponse 这两个对象转换成Spring内部的包装类SessionRepositoryRequestWrapper和SessionRepositoryResponseWrapper对象,它使用了一个SessionRepositoryRequestWrapper类接管了Http Session并重写了getSession方法来实现了session的创建和管理工作。将原本需要由web服务器创建会话的过程转交给Spring-Session进行创建,本来创建的会话保存在Web服务器内存中,通过Spring-Session创建的会话信息可以保存第三方的服务中,如:redis,mysql等。Web服务器之间通过连接第三方服务来共享数据,实现Session共享!
@Order(SessionRepositoryFilter.DEFAULT_ORDER)
public class SessionRepositoryFilter<S extends Session> extends OncePerRequestFilter {@Overrideprotected void doFilterInternal(HttpServletRequest request, HttpServletResponse response, FilterChain filterChain) throws ServletException, IOException {request.setAttribute(SESSION_REPOSITORY_ATTR, this.sessionRepository);//使用HttpServletRequest 、HttpServletResponse和servletContext创建一个SessionRepositoryRequestWrapperSessionRepositoryRequestWrapper wrappedRequest = new SessionRepositoryRequestWrapper(request, response, this.servletContext);SessionRepositoryResponseWrapper wrappedResponse = new SessionRepositoryResponseWrapper(wrappedRequest, response);try {filterChain.doFilter(wrappedRequest, wrappedResponse);}finally {//保存session信息wrappedRequest.commitSession();}}
}
@Overridepublic HttpSessionWrapper getSession(boolean create) {//获取当前Request作用域中代表Session的属性,缓存作用避免每次都从sessionRepository获取HttpSessionWrapper currentSession = getCurrentSession();if (currentSession != null) {return currentSession;}//查找客户端中一个叫SESSION的cookie,拿到sessionId,通过sessionRepository对象根据sessionId去Redis中查找S requestedSession = getRequestedSession();//如果从redis中查询到了值if (requestedSession != null) {//客户端存在sessionId 并且未过期if (getAttribute(INVALID_SESSION_ID_ATTR) == null) {requestedSession.setLastAccessedTime(Instant.now());this.requestedSessionIdValid = true;currentSession = new HttpSessionWrapper(requestedSession, getServletContext());currentSession.setNew(false);//将Session设置到request属性中setCurrentSession(currentSession);return currentSession;}}else {// This is an invalid session id. No need to ask again if// request.getSession is invoked for the duration of this requestif (SESSION_LOGGER.isDebugEnabled()) {SESSION_LOGGER.debug("No session found by id: Caching result for getSession(false) for this HttpServletRequest.");}setAttribute(INVALID_SESSION_ID_ATTR, "true");}//不创建Session就直接返回nullif (!create) {return null;}if (SESSION_LOGGER.isDebugEnabled()) {SESSION_LOGGER.debug("A new session was created. To help you troubleshoot where the session was created we provided a StackTrace (this is not an error). You can prevent this from appearing by disabling DEBUG logging for "+ SESSION_LOGGER_NAME,new RuntimeException("For debugging purposes only (not an error)"));}//执行到这了说明需要创建新的Session// 通过sessionRepository创建RedisSession这个对象S session = SessionRepositoryFilter.this.sessionRepository.createSession();session.setLastAccessedTime(Instant.now());currentSession = new HttpSessionWrapper(session, getServletContext());setCurrentSession(currentSession);return currentSession;}// 通过sessionRepository创建RedisSession这个对象@Overridepublic RedisSession createSession() {Duration maxInactiveInterval = Duration.ofSeconds((this.defaultMaxInactiveInterval != null)? this.defaultMaxInactiveInterval: MapSession.DEFAULT_MAX_INACTIVE_INTERVAL_SECONDS);RedisSession session = new RedisSession(maxInactiveInterval);session.flushImmediateIfNecessary();return session;}
好文参考:Spring-Session实现session共享原理及解析_五霸哥的博客-CSDN博客_session共享如何实现
小技术
使用视图映射器来实现页面跳转
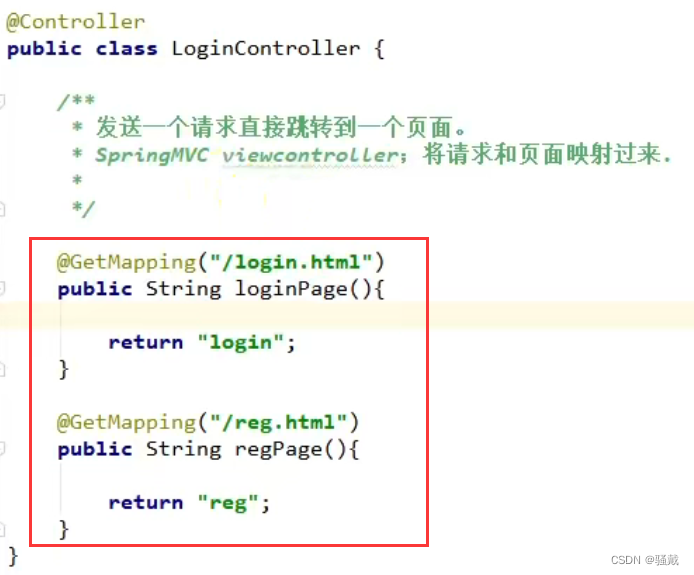
传统写法是在控制器里实现
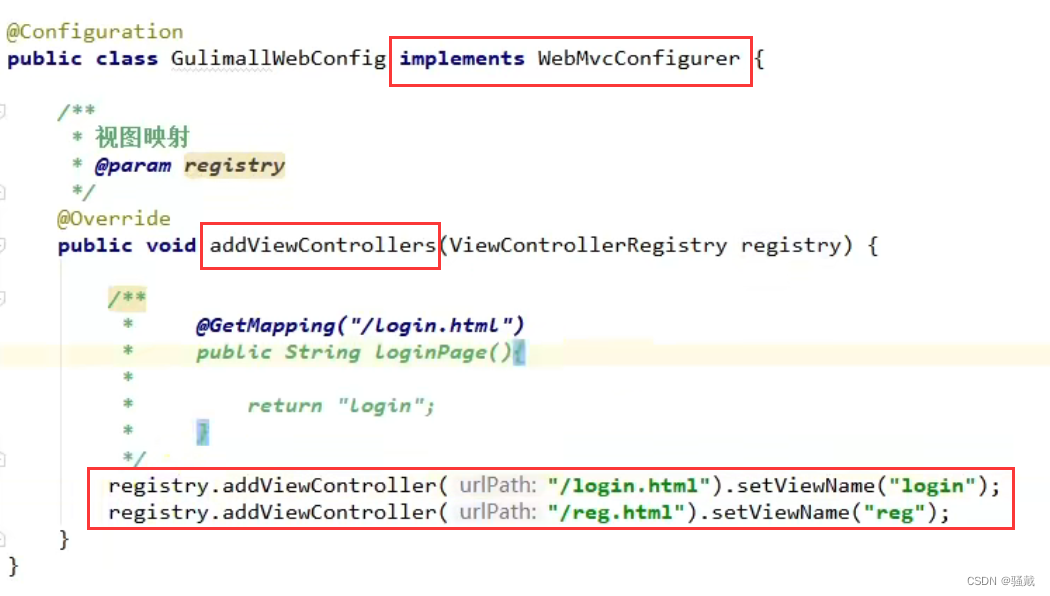
自定义一个配置类来实现WebMvcConfigurer接口,然后重写addViewControllers方法来增加视图映射器
使用配置文件来动态配置属性值
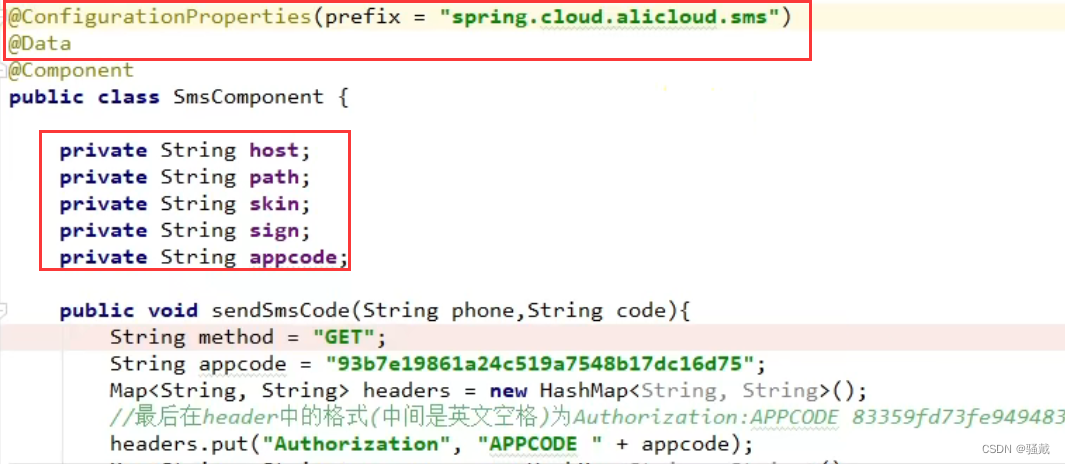
这样就可以通过在配置文件里修改对应的值来改变属性值,核心注解是@ConfigurationProperties(prefix=""),@Data注解也要加
使用Feign远程调用服务

添加openFeign依赖并且在启动了通过@EnableFeignClients注解开启远程调用端即可用feign远程调用服务
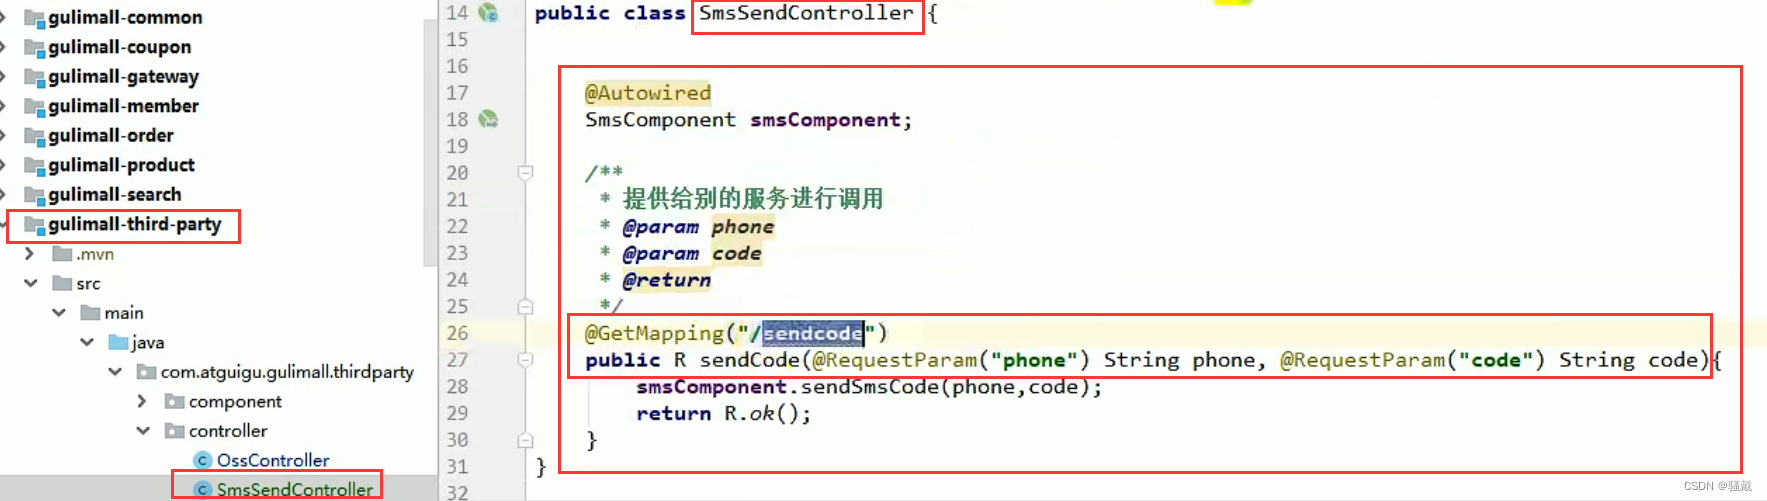

定义一个远程调用的接口,通过@FeignClient注解来指定调用哪个服务,把第三方服务控制器的方法签名拿过来即可,注意路径一定要写对,特别是如果有父路径不要忘了写
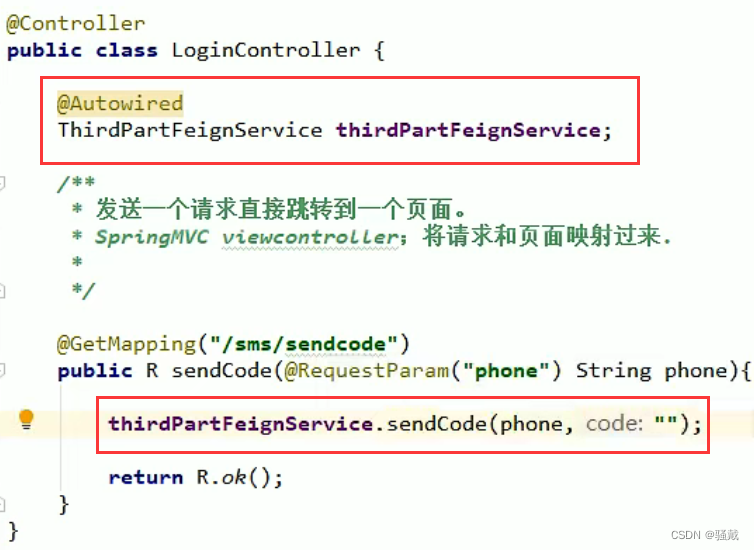
在需要远程调用的服务器里注入刚写的远程接口,然后调用就可,例如这里是认证中心调用第三方服务的发生验证码的接口
使用异常机制
/*** 会员注册*/@Overridepublic void register(MemberUserRegisterVo vo) {MemberEntity memberEntity = new MemberEntity();//设置默认等级MemberLevelEntity levelEntity = memberLevelDao.getDefaultLevel();memberEntity.setLevelId(levelEntity.getId());//设置其它的默认信息//检查用户名和手机号是否唯一。感知异常,异常机制(异常机制就是问题就抛出具体异常,没问题就继续执行下面的语句)checkPhoneUnique(vo.getPhone());checkUserNameUnique(vo.getUserName());memberEntity.setNickname(vo.getUserName());memberEntity.setUsername(vo.getUserName());//密码进行MD5盐值加密(盐值加密同一个数据的每次加密结果是不一样的,通过match方法来密码校验)// (注意这里不能用md5直接加密放数据库,因为彩虹表可以破解md5,所谓彩虹表就是通过大量的md5数据反向退出md5// 注意MD5是不可逆,但是可暴力通过彩虹表破解)BCryptPasswordEncoder bCryptPasswordEncoder = new BCryptPasswordEncoder();String encode = bCryptPasswordEncoder.encode(vo.getPassword());memberEntity.setPassword(encode);memberEntity.setMobile(vo.getPhone());memberEntity.setGender(0);memberEntity.setCreateTime(new Date());//保存数据this.baseMapper.insert(memberEntity);}/*** 检查手机号是否重复的异常机制方法* @param phone* @throws PhoneException*/@Overridepublic void checkPhoneUnique(String phone) throws PhoneException {Long phoneCount = this.baseMapper.selectCount(new QueryWrapper<MemberEntity>().eq("mobile", phone));//usernameCount > 0表示手机号已经存在if (phoneCount > 0) {throw new PhoneException();}}/*** 检查用户名是否重复的异常机制方法* @param userName* @throws UsernameException*/@Overridepublic void checkUserNameUnique(String userName) throws UsernameException {Long usernameCount = this.baseMapper.selectCount(new QueryWrapper<MemberEntity>().eq("username", userName));//usernameCount > 0表示用户名已经存在if (usernameCount > 0) {throw new UsernameException();}}上面定义检查用户名和电话号码的异常机制方法的具体实现
/*** 会员注册功能* @param vo* @return*/@PostMapping(value = "/register")public R register(@RequestBody MemberUserRegisterVo vo) {try {memberService.register(vo);} catch (PhoneException e) {//BizCodeEnum.PHONE_EXIST_EXCEPTION=存在相同的手机号 15002return R.error(BizCodeEnum.PHONE_EXIST_EXCEPTION.getCode(),BizCodeEnum.PHONE_EXIST_EXCEPTION.getMessage());} catch (UsernameException e) {//BizCodeEnum.USER_EXIST_EXCEPTION=商品库存不足 21000return R.error(BizCodeEnum.USER_EXIST_EXCEPTION.getCode(),BizCodeEnum.USER_EXIST_EXCEPTION.getMessage());}return R.ok();}使用异常机制的原因就是希望控制器能够发现并处理异常
package com.saodai.saodaimall.member.exception;public class UsernameException extends RuntimeException {public UsernameException() {super("存在相同的用户名");}
}
package com.saodai.saodaimall.member.exception;public class PhoneException extends RuntimeException {public PhoneException() {super("存在相同的手机号");}
}
把上面两个单独的异常抽取出来封装成异常类
使用MD5盐值加密
加密

先创建一个加密器BCryptPasswordEncoder,然后调用他的encode方法把需要加密的密码放进去就会自动生成一串加密后的值

注意同一个密码每次生成的值是不一样的
解密

从数据库里面拿到加密的数据后调用matches方法就可以匹配两个密码是否一致,如果一致那就返回true,不一致返回false,前面是password是旧密码(没加密的密码),后面的passwordDb是数据库加密的密码
相关文章:
认证服务-----技术点及亮点
大技术Nacos做注册中心把新建的微服务注册到Nacos上去两个步骤 在配置文件中配置应用名称、nacos的发现注册ip地址,端口号在启动类上用EnableDiscoveryClient注解开启注册功能使用Redis存验证码信息加入依赖配置地址和端口号即可直接注入StringRedisTemplate模板类用…...
6个常见的 PHP 安全性攻击
了解常见的PHP应用程序安全威胁,可以确保你的PHP应用程序不受攻击。因此,本文将列出 6个常见的 PHP 安全性攻击,欢迎大家来阅读和学习。 1、SQL注入 SQL注入是一种恶意攻击,用户利用在表单字段输入SQL语句的方式来影响正常的SQL执…...
三大基础排序算法——冒泡排序、选择排序、插入排序
目录前言一、排序简介二、冒泡排序三、选择排序四、插入排序五、对比References前言 在此之前,我们已经介绍了十大排序算法中的:归并排序、快速排序、堆排序(还不知道的小伙伴们可以参考我的 「数据结构与算法」 专栏)࿰…...
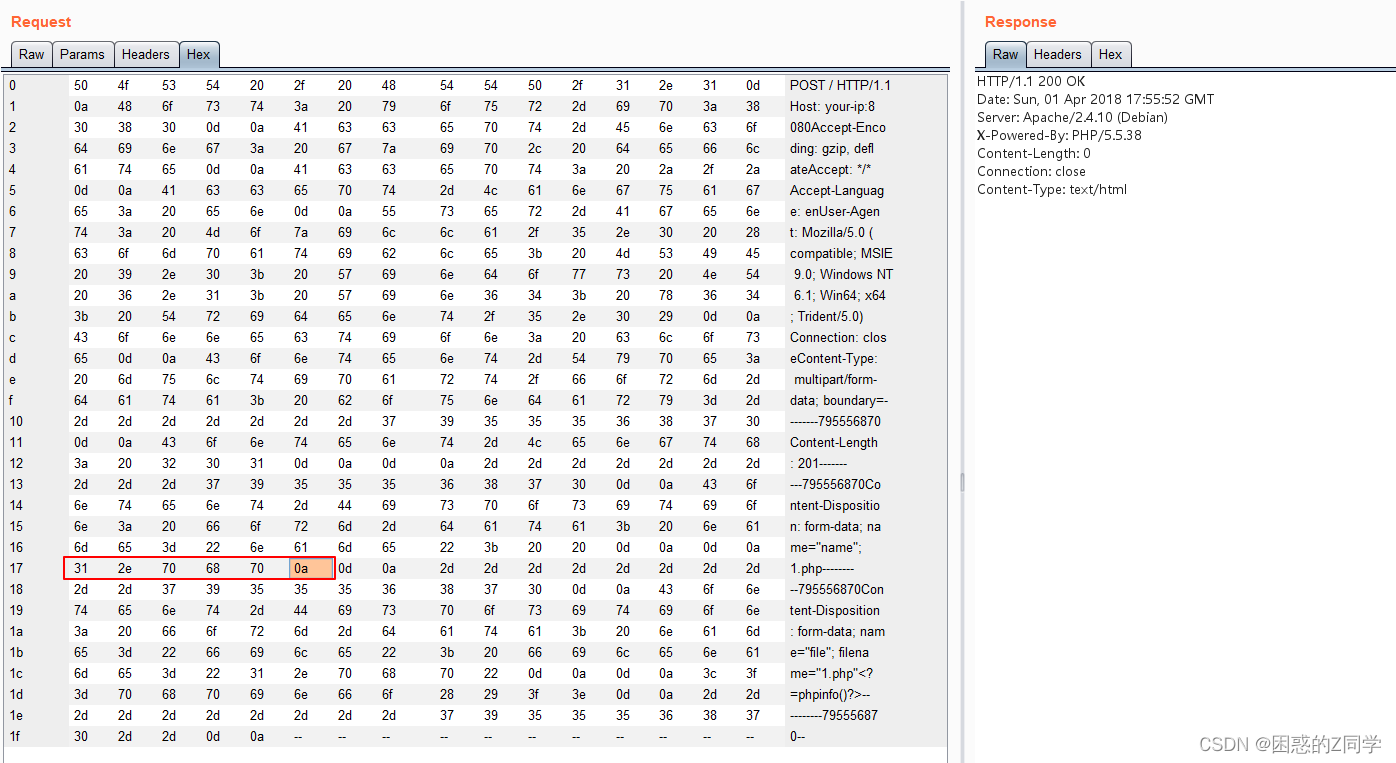
负载均衡上传webshell+apache换行解析漏洞
目录一、负载均衡反向代理下的webshell上传1、nginx负载均衡2、负载均衡下webshell上传的四大难点难点一:需要在每一台节点的相同位置上传相同内容的webshell难点二:无法预测下一次请求是哪一台机器去执行难点三:当我们需要上传一些工具时&am…...

【ESP 保姆级教程】玩转emqx数据集成篇③ ——消息重发布
忘记过去,超越自己 ❤️ 博客主页 单片机菜鸟哥,一个野生非专业硬件IOT爱好者 ❤️❤️ 本篇创建记录 2023-02-10 ❤️❤️ 本篇更新记录 2023-02-10 ❤️🎉 欢迎关注 🔎点赞 👍收藏 ⭐️留言📝🙏 此博客均由博主单独编写,不存在任何商业团队运营,如发现错误,请…...
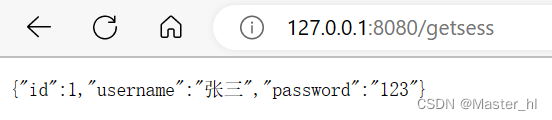
支持分布式部署的主流方式 - Session 持久化到 Redis
1.为什么要将 Session 存储在 Redis 中如果我们不将 Session 存储在 MySQL 或者 Redis 中, 那么做出来的项目就只能支持单机部署, 不支持分布式部署. 因为之前我们只是将 Session 存储在当前电脑的内存里面. 当张三去登录的时候, 将 Session 信息存储在 A 服务器, 这个时候负载…...
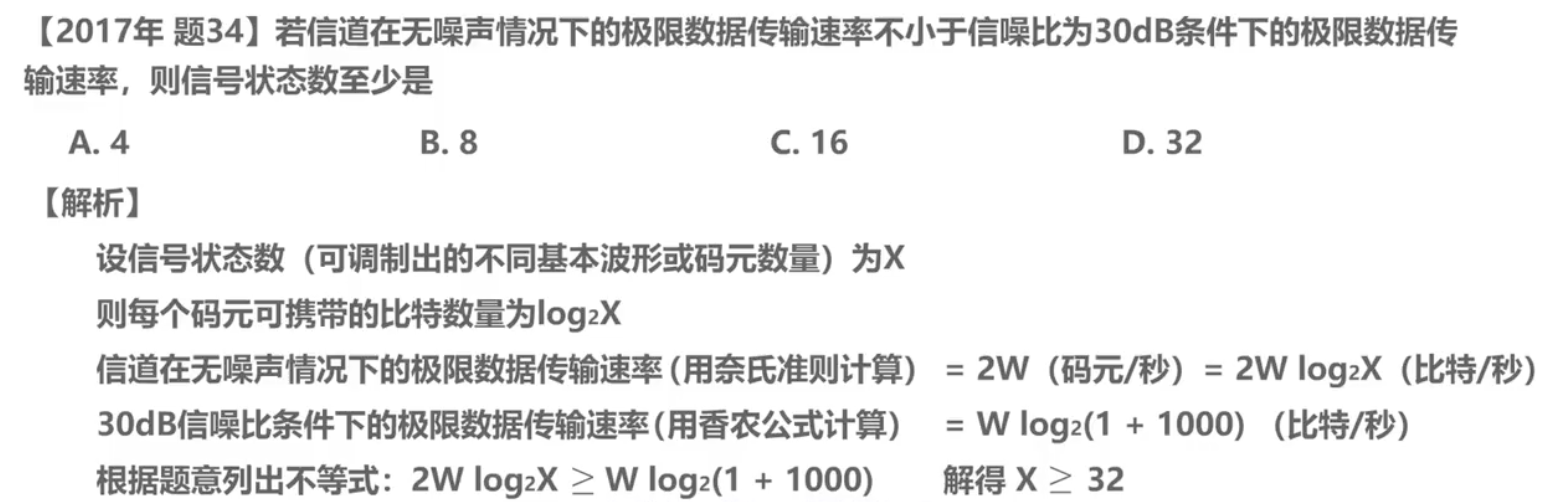
计算机网络|第二章 物理层|湖科大课程|从零开始的计网学习——物理层(计网入门就看这篇!)
图片来源于胡科大计算机网络课程,https://www.bilibili.com/video/BV1c4411d7jb?p20&vd_sourcedeb12d86dce7e419744a73045bc66364。文章非盈利商业用途,供博主与大家学习参考,如有侵权,请联系我删除!2.1物理层的基…...
【微服务】RabbitMQSpringAMQP消息队列
🚩本文已收录至专栏:微服务探索之旅 👍希望您能有所收获 一.初识MQ (1) 引入 微服务间通讯有同步和异步两种方式: 同步通讯:就像打电话,可以立即得到响应,但是你却不能跟多个人同时通话。 异…...

jenkins +docker+python接口自动化之docker下安装jenkins(一)
jenkins dockerpython接口自动化之docker下安装jenkins(一) 目录:导读 1、下载jenkins 2、启动jenkins 3、访问jenkins 4.浏览器直接访问http://ip/:8080 5.然后粘贴到输入框中,之后新手入门中先安装默认的插件即可,完成后出…...
SpringBoot——Banner介绍
一、什么是BannerBanner即横幅标语,我们在启动SpringBoot项目时会将Banner信息打印至控制台。我们可以输出一些图形、SpringBoot版本信息等内容。默认情况下是通过实现类SpringBootBanner输出的Banner内容,默认的输出内容如下。二、自定义Banner如果不想…...

【STL】综述
STL,一文即可知 文章目录一、STL基本知识概述容器二、序列式容器详述数组容器array向量容器vector双端队列容器deque链式容器list正向链容器forward_list二、关联式容器详述红黑树RB-Tree哈希表参考博客😊点此到文末惊喜↩︎ 一、STL基本知识 概述 STL…...

C++中编译的静态库与动态库
1.什么是库库是写好的现有的,成熟的,可以复用的代码。现实中每个程序都要依赖很多基础的底层库,不可能每个人的代码都从零开始,因此库的存在意义非同寻常。本质上来说库是一种可执行代码的二进制形式,可以被操作系统载…...

JS对象到原始值的转换
JS对象到原始值转换的复杂性 主要由于某些对象类型存在不止一种原始值的表示 对象到原始值转换的三种基本算法 在解释三种算法前需要了解toString valueOf这两个方法 toString 返回对象的字符串表示Array类的toString方法会将每个元素转换为字符串,再使用逗号作为…...

深度复盘-重启 etcd 引发的异常
作者信息: 唐聪、王超凡,腾讯云原生产品中心技术专家,负责腾讯云大规模 TKE 集群和 etcd 控制面稳定性、性能和成本优化工作。 王子勇,腾讯云专家级工程师, 腾讯云计算产品技术服务专家团队负责人。 概况 作为当前中国…...
------新特性)
2023年春招热点面试题(一)------新特性
文章目录一、Spring 6.0 新特性二、Spring Boot 3.0 新特性三、JDK 系列 新特性A.**JDK8新特性(2014年初)(LTS版本)**B. **JDK9新特性(2017年9月)**C.**JDK10新特性(2018年3月)**D.*…...

工程项目管理系统源码+spring cloud 系统管理+java 系统设置+二次开发
工程项目各模块及其功能点清单 一、系统管理 1、数据字典:实现对数据字典标签的增删改查操作 2、编码管理:实现对系统编码的增删改查操作 3、用户管理:管理和查看用户角色 4、菜单管理:实现对系统菜单的增删改查操…...
想要精通算法和SQL的成长之路 - 接雨水
想要精通算法和SQL的成长之路 - 接雨水前言一. 接雨水前言 想要精通算法和SQL的成长之路 - 系列导航 一. 接雨水 原题链接 给定 n 个非负整数表示每个宽度为 1 的柱子的高度图,计算按此排列的柱子,下雨之后能接多少雨水。 输入:height [0,…...

Vue3 更高效的构建工具——Vite
文章目录前言一、Vite简介1. Vite组成2.为什么选 Vite?二、Vite的优缺点vite优点vite缺点三、使用Vite创建Vue3项目1. 创建 vite 的项目2.项目的结构前言 本文讲解了构建工具 Vite,目前只有vue3才可以使用Vite,如果本文对你有所帮助请三连支持博主。 下…...

优思学院|從《狂飙》高启强爱看的《孙子兵法》到六西格玛项目管理
近期最受人瞩目的,无疑是电视剧《狂飙》中出类拔萃的反派高启强。而在剧中,指引高启强走向顶峰的,正是那部著名的军事经典——《孙子兵法》。 在剧中,高启强在一次村庄改造项目上遇到了困难,但他仍保持冷静࿰…...
如何利用状态机编程实现启保停控制(含Stateflow模型介绍)
状态机的介绍这里不再赘述,概念也很简单没有过多的复杂理论。下面我们直接给出具体实现过程。有限自动状态机详细讲解请参看下面的文章链接: PLC面向对象编程系列之有限状态机(FSM)详解_RXXW_Dor的博客-CSDN博客_有限状态机 plc实现编写PLC控制机器动作类程序时,当分支比较…...

OpenWrt V23.05安全加固:修改默认UI登录用户的完整流程
OpenWrt V23.05安全加固:修改默认UI登录用户的完整流程 在网络安全日益重要的今天,路由器作为家庭和企业网络的第一道防线,其安全性不容忽视。OpenWrt作为一款开源的嵌入式操作系统,因其高度可定制性和强大的功能而广受欢迎。然而…...

终极Windows游戏手柄模拟方案:ViGEmBus内核驱动完整指南
终极Windows游戏手柄模拟方案:ViGEmBus内核驱动完整指南 【免费下载链接】ViGEmBus Windows kernel-mode driver emulating well-known USB game controllers. 项目地址: https://gitcode.com/gh_mirrors/vi/ViGEmBus 你是否曾遇到过游戏不支持你的手柄&…...

艺术鉴赏零门槛:丹青识画智能系统,小白也能秒懂名画意境
艺术鉴赏零门槛:丹青识画智能系统,小白也能秒懂名画意境 1. 当科技遇见艺术:重新定义影像理解 站在美术馆的名画前,你是否曾感到困惑——明明被画面打动,却说不出所以然?或是精心拍摄的照片,总…...

Deep Agents中的ToolRuntime深度解析
ToolRuntime是LangChain生态(特别是Deep Agents框架)中连接工具与智能体运行时环境的关键组件,为工具提供了访问上下文、状态管理、流输出和长期记忆的核心能力。作为Deep Agents实现"深度智能体"的基础技术之一,ToolRu…...
)
Xamarin.Android开发避坑:搞定东大集成PDA扫码广播的完整配置流程(附Demo)
Xamarin.Android工业PDA扫码开发实战:从广播配置到异常处理的全链路指南 工业PDA设备在仓储物流、零售盘点等场景中扮演着重要角色,而扫码功能作为其核心能力,直接关系到业务系统的运行效率。不同于消费级Android设备,工业PDA的扫…...

Maxtang SXC-ALN30无风扇迷你主机工业应用解析
1. Maxtang SXC-ALN30无风扇迷你主机深度解析在工业自动化和嵌入式应用领域,一台兼具高性能与丰富接口的无风扇迷你主机往往能成为项目成功的关键。Maxtang SXC-ALN30就是这样一款专为严苛环境设计的设备,它搭载了Intel Alder Lake-N系列处理器ÿ…...

一次完整的渗透测试实战:从踩点到提权全记录
一次完整的渗透测试实战:从踩点到提权全记录 渗透测试就是利用我们所掌握的渗透知识,对网站进行一步一步的渗透,发现其中存在的漏洞和隐藏的风险,然后撰写一篇测试报告,提供给我们的客户。客户根据我们撰写的测试报告&…...
)
VxWorks核心内核模块:任务管理模块完整解读实践篇(1)
第一部分:任务管理概述与基本概念第一章:实时操作系统中的任务管理哲学在深入探讨VxWorks任务管理模块的技术细节之前,我们首先需要理解实时操作系统中任务管理的核心哲学。实时系统与通用计算系统有着本质的区别,这种区别不仅体现…...
)
别再傻等HAL_Delay了!手把手教你给STM32写个精准的微秒延时函数(附GPIO驱动避坑指南)
突破HAL库限制:STM32微秒级延时实战指南与GPIO时序优化 从HAL_Delay的局限到精准时序控制 在嵌入式开发中,精确的时序控制往往是成败的关键。当我们需要驱动WS2812全彩LED、超声波传感器或实现软件串口通信时,微秒级的延时精度变得至关重要。…...

Smart Power 3:嵌入式开发者的高性价比电源分析工具
1. Smart Power 3 产品概述Smart Power 3是Hardkernel推出的一款面向嵌入式开发者的智能电源分析工具,售价仅45美元。与Hardkernel以往主打的各种Arm架构单板计算机(如ODROID系列)不同,这款产品专注于帮助开发者优化硬件和软件的功…...