扩散模型实战(四):从零构建扩散模型
推荐阅读列表:
扩散模型实战(一):基本原理介绍
扩散模型实战(二):扩散模型的发展
扩散模型实战(三):扩散模型的应用
本文以MNIST数据集为例,从零构建扩散模型,具体会涉及到如下知识点:
- 退化过程(向数据中添加噪声)
- 构建一个简单的UNet模型
- 训练扩散模型
- 采样过程分析
下面介绍具体的实现过程:
一、环境配置&python包的导入
最好有GPU环境,比如公司的GPU集群或者Google Colab,下面是代码实现:
# 安装diffusers库!pip install -q diffusers# 导入所需要的包import torchimport torchvisionfrom torch import nnfrom torch.nn import functional as Ffrom torch.utils.data import DataLoaderfrom diffusers import DDPMScheduler, UNet2DModelfrom matplotlib import pyplot as pltdevice = torch.device("cuda" if torch.cuda.is_available() else "cpu")print(f'Using device: {device}')
# 输出Using device: cuda
此时会输出运行环境是GPU还是CPU
二、加载MNIST数据集
MNIST数据集是一个小数据集,存储的是0-9手写数字字体,每张图片都28X28的灰度图片,每个像素的取值范围是[0,1],下面加载该数据集,并展示部分数据:
dataset = torchvision.datasets.MNIST(root="mnist/", train=True, download=True, transform=torchvision.transforms.ToTensor())train_dataloader = DataLoader(dataset, batch_size=8, shuffle=True)x, y = next(iter(train_dataloader))print('Input shape:', x.shape)print('Labels:', y)plt.imshow(torchvision.utils.make_grid(x)[0], cmap='Greys');
# 输出Input shape: torch.Size([8, 1, 28, 28])Labels: tensor([7, 8, 4, 2, 3, 6, 0, 2])

三、扩散模型的退化过程
所谓退化过程,其实就是对输入数据加入噪声的过程,由于MNIST数据集的像素范围在[0,1],那么我们加入噪声也需要保持在相同的范围,这样我们可以很容易的把输入数据与噪声进行混合,代码如下:
def corrupt(x, amount):"""Corrupt the input `x` by mixing it with noise according to `amount`"""noise = torch.rand_like(x)amount = amount.view(-1, 1, 1, 1) # Sort shape so broadcasting worksreturn x*(1-amount) + noise*amount
接下来,我们看一下逐步加噪的效果,代码如下:
# Plotting the input datafig, axs = plt.subplots(2, 1, figsize=(12, 5))axs[0].set_title('Input data')axs[0].imshow(torchvision.utils.make_grid(x)[0], cmap='Greys')# Adding noiseamount = torch.linspace(0, 1, x.shape[0]) # Left to right -> more corruptionnoised_x = corrupt(x, amount)# Plottinf the noised versionaxs[1].set_title('Corrupted data (-- amount increases -->)')axs[1].imshow(torchvision.utils.make_grid(noised_x)[0], cmap='Greys');

从上图可以看出,从左到右加入的噪声逐步增多,当噪声量接近1时,数据看起来像纯粹的随机噪声。
四、构建一个简单的UNet模型
UNet模型与自编码器有异曲同工之妙,UNet最初是用于完成医学图像中分割任务的,网络结构如下所示:

代码如下:
class BasicUNet(nn.Module):"""A minimal UNet implementation."""def __init__(self, in_channels=1, out_channels=1):super().__init__()self.down_layers = torch.nn.ModuleList([nn.Conv2d(in_channels, 32, kernel_size=5, padding=2),nn.Conv2d(32, 64, kernel_size=5, padding=2),nn.Conv2d(64, 64, kernel_size=5, padding=2),])self.up_layers = torch.nn.ModuleList([nn.Conv2d(64, 64, kernel_size=5, padding=2),nn.Conv2d(64, 32, kernel_size=5, padding=2),nn.Conv2d(32, out_channels, kernel_size=5, padding=2),])self.act = nn.SiLU() # The activation functionself.downscale = nn.MaxPool2d(2)self.upscale = nn.Upsample(scale_factor=2)def forward(self, x):h = []for i, l in enumerate(self.down_layers):x = self.act(l(x)) # Through the layer and the activation functionif i < 2: # For all but the third (final) down layer:h.append(x) # Storing output for skip connectionx = self.downscale(x) # Downscale ready for the next layerfor i, l in enumerate(self.up_layers):if i > 0: # For all except the first up layerx = self.upscale(x) # Upscalex += h.pop() # Fetching stored output (skip connection)x = self.act(l(x)) # Through the layer and the activation functionreturn x
我们来检验一下模型输入输出的shape变化是否符合预期,代码如下:
net = BasicUNet()x = torch.rand(8, 1, 28, 28)net(x).shape
# 输出torch.Size([8, 1, 28, 28])
再来看一下模型的参数量,代码如下:
sum([p.numel() for p in net.parameters()])# 输出309057
至此,已经完成数据加载和UNet模型构建,当然UNet模型的结构可以有不同的设计。
五、扩散模型训练
扩散模型应该学习什么?其实有很多不同的目标,比如学习噪声,我们先以一个简单的例子开始,输入数据为带噪声的MNIST数据,扩散模型应该输出对应的最佳数字预测,因此学习的目标是预测值与真实值的MSE,训练代码如下:
# Dataloader (you can mess with batch size)batch_size = 128train_dataloader = DataLoader(dataset, batch_size=batch_size, shuffle=True)# How many runs through the data should we do?n_epochs = 3# Create the networknet = BasicUNet()net.to(device)# Our loss finctionloss_fn = nn.MSELoss()# The optimizeropt = torch.optim.Adam(net.parameters(), lr=1e-3)# Keeping a record of the losses for later viewinglosses = []# The training loopfor epoch in range(n_epochs):for x, y in train_dataloader:# Get some data and prepare the corrupted versionx = x.to(device) # Data on the GPUnoise_amount = torch.rand(x.shape[0]).to(device) # Pick random noise amountsnoisy_x = corrupt(x, noise_amount) # Create our noisy x# Get the model predictionpred = net(noisy_x)# Calculate the lossloss = loss_fn(pred, x) # How close is the output to the true 'clean' x?# Backprop and update the params:opt.zero_grad()loss.backward()opt.step()# Store the loss for laterlosses.append(loss.item())# Print our the average of the loss values for this epoch:avg_loss = sum(losses[-len(train_dataloader):])/len(train_dataloader)print(f'Finished epoch {epoch}. Average loss for this epoch: {avg_loss:05f}')# View the loss curveplt.plot(losses)plt.ylim(0, 0.1);
# 输出Finished epoch 0. Average loss for this epoch: 0.024689Finished epoch 1. Average loss for this epoch: 0.019226Finished epoch 2. Average loss for this epoch: 0.017939
训练过程的loss曲线如下图所示:

六、扩散模型效果评估
我们选取一部分数据来评估一下模型的预测效果,代码如下:
#@markdown Visualizing model predictions on noisy inputs:# Fetch some datax, y = next(iter(train_dataloader))x = x[:8] # Only using the first 8 for easy plotting# Corrupt with a range of amountsamount = torch.linspace(0, 1, x.shape[0]) # Left to right -> more corruptionnoised_x = corrupt(x, amount)# Get the model predictionswith torch.no_grad():preds = net(noised_x.to(device)).detach().cpu()# Plotfig, axs = plt.subplots(3, 1, figsize=(12, 7))axs[0].set_title('Input data')axs[0].imshow(torchvision.utils.make_grid(x)[0].clip(0, 1), cmap='Greys')axs[1].set_title('Corrupted data')axs[1].imshow(torchvision.utils.make_grid(noised_x)[0].clip(0, 1), cmap='Greys')axs[2].set_title('Network Predictions')axs[2].imshow(torchvision.utils.make_grid(preds)[0].clip(0, 1), cmap='Greys');
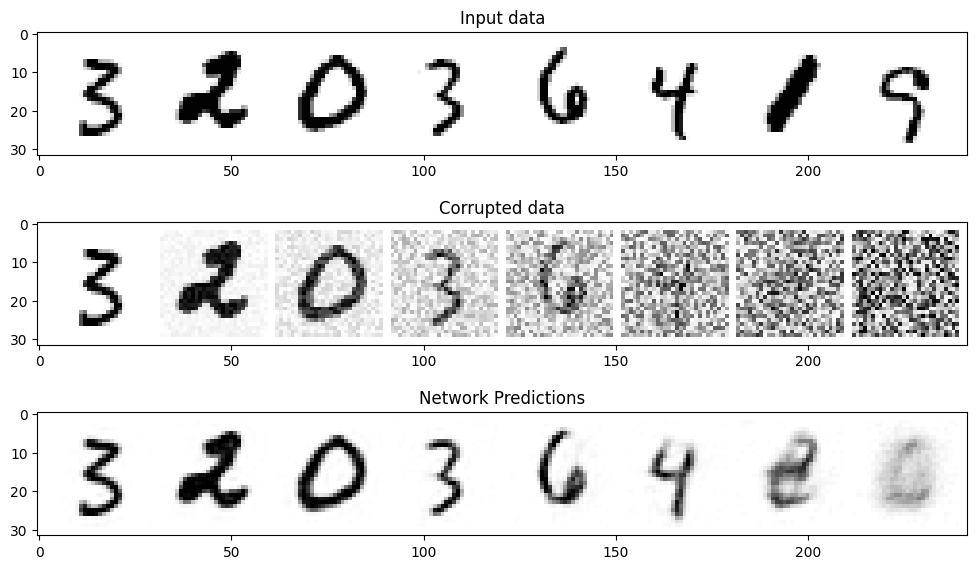
从上图可以看出,对于噪声量较低的输入,模型的预测效果是很不错的,当amount=1时,模型的输出接近整个数据集的均值,这正是扩散模型的工作原理。
Note:我们的训练并不太充分,读者可以尝试不同的超参数来优化模型。
相关文章:
扩散模型实战(四):从零构建扩散模型
推荐阅读列表: 扩散模型实战(一):基本原理介绍 扩散模型实战(二):扩散模型的发展 扩散模型实战(三):扩散模型的应用 本文以MNIST数据集为例,从…...

YOLOv5、YOLOv8改进:S2注意力机制
目录 1.简介 2.YOLOv5改进 2.1增加以下S2-MLPv2.yaml文件 2.2common.py配置 2.3yolo.py配置 1.简介 S2-MLPv2注意力机制 最近,出现了基于 MLP 的视觉主干。与 CNN 和视觉Transformer相比,基于 MLP 的视觉架构具有较少的归纳偏差,在图像识…...
LeetCode 542. 01 Matrix【多源BFS】中等
本文属于「征服LeetCode」系列文章之一,这一系列正式开始于2021/08/12。由于LeetCode上部分题目有锁,本系列将至少持续到刷完所有无锁题之日为止;由于LeetCode还在不断地创建新题,本系列的终止日期可能是永远。在这一系列刷题文章…...

使用open cv进行角度测量
使用open cv进行角度测量 用了一点初中数学的知识,准确度,跟鼠标点的准不准有关系,话不多说直接上代码 import cv2 import mathpath "test.jpg" img cv2.imread(path) pointsList []def mousePoint(event, x, y, flags, param…...

java 线程池实现多线程处理list数据
newFixedThreadPool线程池实现多线程 List<PackageAgreementEntity> entityList new CopyOnWriteArrayList<>();//多线程 10个线程//int threadNum 10;int listSize 300;List<List<PackageAgreementDto>> splitData Lists.partition(packageAgre…...
Centos安装Docker
Centos安装 Docker 从 2017 年 3 月开始 docker 在原来的基础上分为两个分支版本: Docker CE 和 Docker EE。 Docker CE 即社区免费版,Docker EE 即企业版,强调安全,但需付费使用。 本文介绍 Docker CE 的安装使用。 移除旧的版本&#x…...

Unity启动项目无反应的解决
文章首发见博客:https://mwhls.top/4803.html。 无图/格式错误/后续更新请见首发页。 更多更新请到mwhls.top查看 欢迎留言提问或批评建议,私信不回。 摘要:通过退还并重新载入许可证以解决Unity项目启动无反应问题。 场景 Unity Hub启动项目…...

2.3 opensbi: riscv: opensbi源码解析
文章目录 3. sbi_init()函数4. init_coldboot()函数4.1 sbi_scratch_init()函数4.2 sbi_domain_init()函数4.3 sbi_scratch_alloc_offset()函数4.4 sbi_hsm_init()函数4.5 sbi_platform_early_init()函数3. sbi_init()函数 函数位置:lib/sbi/sbi_init.c函数参数:scratch为每个…...
点破ResNet残差网络的精髓
卷积神经网络在实际训练过程中,不可避免会遇到一个问题:随着网络层数的增加,模型会发生退化。 换句话说,并不是网络层数越多越好,为什么会这样? 不是说网络越深,提取的特征越多ÿ…...
Ubuntu服务器service版本初始化
下载 下载路径 官网:https://cn.ubuntu.com/ 下载路径:https://cn.ubuntu.com/download 服务器:https://cn.ubuntu.com/download/server/step1 点击下载(22.04.3):https://cn.ubuntu.com/download/server…...
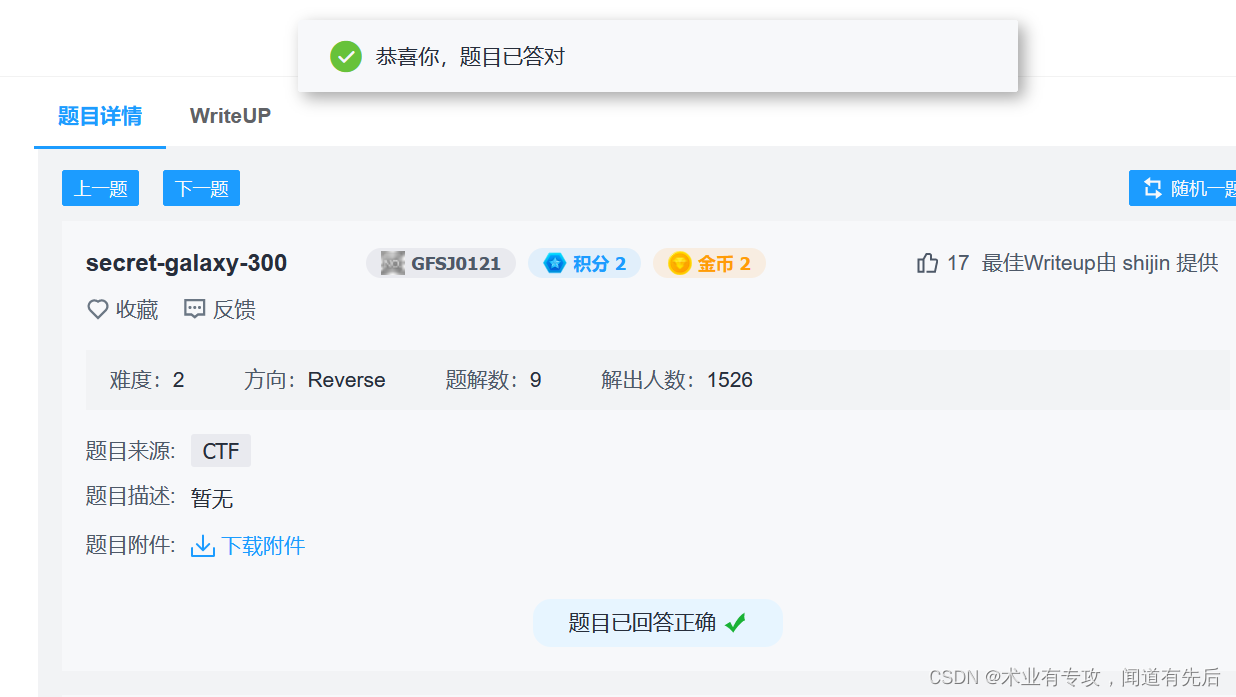
re学习(33)攻防世界-secret-galaxy-300(脑洞题)
下载压缩包: 下载链接:https://adworld.xctf.org.cn/challenges/list 参考文章:攻防世界逆向高手题之secret-galaxy-300_沐一 林的博客-CSDN博客 发现这只是三个同一类型文件的三个不同版本而已,一个windows32位exe࿰…...

Mybatis Plus中使用LambdaQueryWrapper进行分页以及模糊查询对比传统XML方式进行分页
传统的XML分页以及模糊查询操作 传统的XML方式只能使用limit以及offset进行分页,通过判断name和bindState是否为空,不为空则拼接条件。 List<SanitationCompanyStaff> getSanitationStaffInfo(Param("name") String name,Param("bi…...

vue中push和resolve的区别
import { useRouter } from vue-router;const routeuseRouter()route.push({path:/test,query:{name:1}})import { useRouter } from vue-router;const routeuseRouter()const urlroute.resolve({path:/test,query:{name:1}})window.open(url.href)比较上述代码会发现,resolve能…...

详解RFC 3550文档-1
1. 介绍 rfc 3550描述了实时传输协议RTP。RTP提供端到端的网络传输功能,适用于通过组播或单播网络服务传输实时数据(如音频、视频或仿真数据)的应用。 TP本身不提供任何机制来确保及时交付或提供其他服务质量保证,而是依赖于较低层的服务来完成这些工作。它不保证传输或防止…...

Go 与 Rust
目录 1. Go 与 Rust 1. Go 与 Rust 一位挺 Rust 的网友说道: “我也为这个选择烦恼了很久。最终 Rust 胜出了。首先, 我感觉 Rust 更接近于以前 Pascal 时代的东西, 你可以控制一切; 其次, 如果 wasm 和相关技术大爆发, Rust 将是一个更安全的选择; 然后, 我们已经有了 Python…...

Android Studio实现读取本地相册文件并展示
目录 原文链接效果 代码activity_main.xmlMainActivity 原文链接 效果 代码 activity_main.xml 需要有一个按钮和image来展示图片 <?xml version"1.0" encoding"utf-8"?> <LinearLayout xmlns:android"http://schemas.android.com/apk…...
python的全局解释锁(GIL)
一、介绍 全局解释锁(Global Interpreter Lock,GIL)是在某些编程语言的解释器中使用的一种机制。在Python中,GIL是为了保证解释器线程安全而引入的。 GIL的作用是在解释器的执行过程中,确保同一时间只有一个线程可以…...
小程序swiper一个轮播显示一个半内容且实现无缝滚动
效果图: wxml(无缝滚动:circular"true"): <!--components/tool_version/tool_version.wxml--> <view class"tool-version"><swiper class"tool-version-swiper" circul…...

【自然语言处理】关系抽取 —— SimpleRE 讲解
SimpleRE 论文信息 标题:An Embarrassingly Simple Model for Dialogue Relation Extraction 作者:Fuzhao Xue 期刊:ICASSP 2022 发布时间与更新时间:2020.12.27 2022.01.25 主题:自然语言处理、关系抽取、对话场景、BERT arXiv:[2012.13873] An Embarrassingly Simple M…...

【O2O领域】Axure外卖订餐骑手端APP原型图,外卖众包配送原型设计图
作品概况 页面数量:共 110 页 兼容软件:Axure RP 9/10,不支持低版本 应用领域:外卖配送、生鲜配送 作品申明:页面内容仅用于功能演示,无实际功能 作品特色 本品为外卖订餐骑手端APP原型设计图&#x…...

TDengine 快速体验(Docker 镜像方式)
简介 TDengine 可以通过安装包、Docker 镜像 及云服务快速体验 TDengine 的功能,本节首先介绍如何通过 Docker 快速体验 TDengine,然后介绍如何在 Docker 环境下体验 TDengine 的写入和查询功能。如果你不熟悉 Docker,请使用 安装包的方式快…...

51c自动驾驶~合集58
我自己的原文哦~ https://blog.51cto.com/whaosoft/13967107 #CCA-Attention 全局池化局部保留,CCA-Attention为LLM长文本建模带来突破性进展 琶洲实验室、华南理工大学联合推出关键上下文感知注意力机制(CCA-Attention),…...
[ICLR 2022]How Much Can CLIP Benefit Vision-and-Language Tasks?
论文网址:pdf 英文是纯手打的!论文原文的summarizing and paraphrasing。可能会出现难以避免的拼写错误和语法错误,若有发现欢迎评论指正!文章偏向于笔记,谨慎食用 目录 1. 心得 2. 论文逐段精读 2.1. Abstract 2…...

基于Docker Compose部署Java微服务项目
一. 创建根项目 根项目(父项目)主要用于依赖管理 一些需要注意的点: 打包方式需要为 pom<modules>里需要注册子模块不要引入maven的打包插件,否则打包时会出问题 <?xml version"1.0" encoding"UTF-8…...

【OSG学习笔记】Day 16: 骨骼动画与蒙皮(osgAnimation)
骨骼动画基础 骨骼动画是 3D 计算机图形中常用的技术,它通过以下两个主要组件实现角色动画。 骨骼系统 (Skeleton):由层级结构的骨头组成,类似于人体骨骼蒙皮 (Mesh Skinning):将模型网格顶点绑定到骨骼上,使骨骼移动…...

智能AI电话机器人系统的识别能力现状与发展水平
一、引言 随着人工智能技术的飞速发展,AI电话机器人系统已经从简单的自动应答工具演变为具备复杂交互能力的智能助手。这类系统结合了语音识别、自然语言处理、情感计算和机器学习等多项前沿技术,在客户服务、营销推广、信息查询等领域发挥着越来越重要…...

音视频——I2S 协议详解
I2S 协议详解 I2S (Inter-IC Sound) 协议是一种串行总线协议,专门用于在数字音频设备之间传输数字音频数据。它由飞利浦(Philips)公司开发,以其简单、高效和广泛的兼容性而闻名。 1. 信号线 I2S 协议通常使用三根或四根信号线&a…...
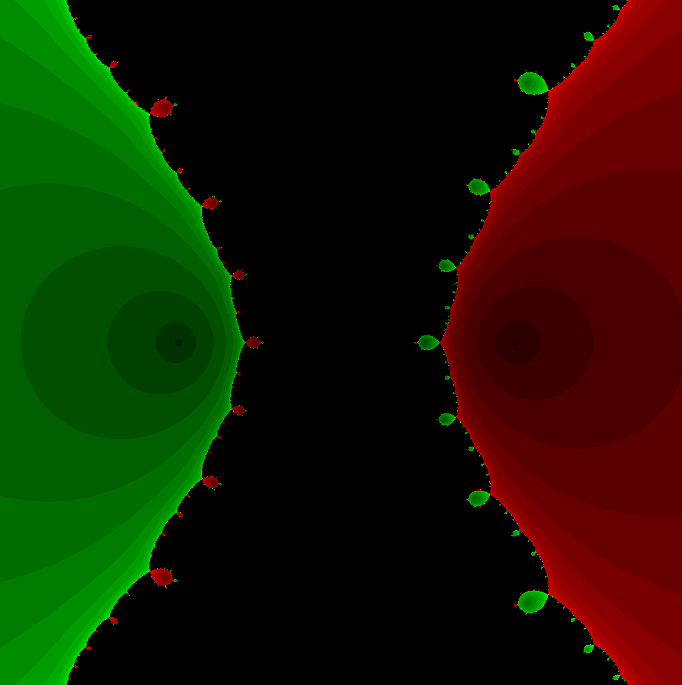
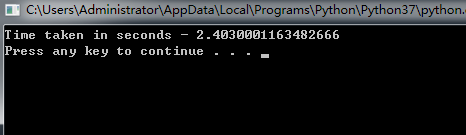
在Mathematica中实现Newton-Raphson迭代的收敛时间算法(一般三次多项式)
考察一般的三次多项式,以r为参数: p[z_, r_] : z^3 (r - 1) z - r; roots[r_] : z /. Solve[p[z, r] 0, z]; 此多项式的根为: 尽管看起来这个多项式是特殊的,其实一般的三次多项式都是可以通过线性变换化为这个形式…...

如何更改默认 Crontab 编辑器 ?
在 Linux 领域中,crontab 是您可能经常遇到的一个术语。这个实用程序在类 unix 操作系统上可用,用于调度在预定义时间和间隔自动执行的任务。这对管理员和高级用户非常有益,允许他们自动执行各种系统任务。 编辑 Crontab 文件通常使用文本编…...

JavaScript 数据类型详解
JavaScript 数据类型详解 JavaScript 数据类型分为 原始类型(Primitive) 和 对象类型(Object) 两大类,共 8 种(ES11): 一、原始类型(7种) 1. undefined 定…...