STM32 F103C8T6学习笔记11:RTC实时时钟—OLED手表日历
之前在 学习笔记10文章 做了一个简易的,使用定时器计时的简单时钟,现在使用RTC实时时钟同步代替定时器来实现一下OLED手表日历,接着上个实验文章进行完善~~
文章提供源码、测试工程下载、测试效果图。
目录
RTC实时时钟:
简介:
主要特性:
RTC框图:
UNIX时间戳:
程序设计:
配置RTC初始化过程分为以下几步:
RTC日历初始化相关代码:
主函数代码:
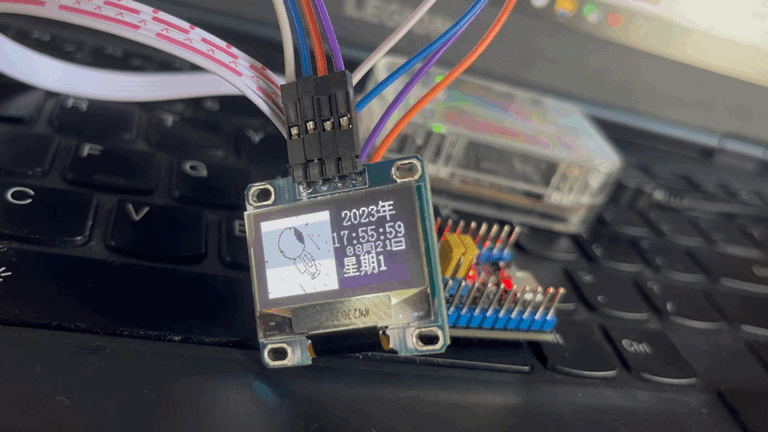
测试效果:
测试工程下载:
RTC实时时钟:
简介:
STM32F10x-中文参考手册 有关于RTC实时时钟的介绍是从 P308页开始的:
RTC时钟与DS1302时钟芯片不同,DS1302时钟芯片是通过读取寄存器实现读取年月日等信息的
而RTC时钟是作为STM32F103单片机中的一个时钟定时器模块(其余系列不一定),主电源掉电后会继续使用 后备电池(由 Vbat 引脚接 电源 继续供电 )继续运行的模块,它本质是一个32位的向上计数器。
因此我们在STM32F103单片机中 读取RTC时 本质是得到一个计数值,对其进行处理。
主要特性:
我们一般在LSE接一个 32.768k ( 2^15=32768 )的晶振作为RTC的时钟源,便于分频产生1HZ的时钟基准,
RTC框图:
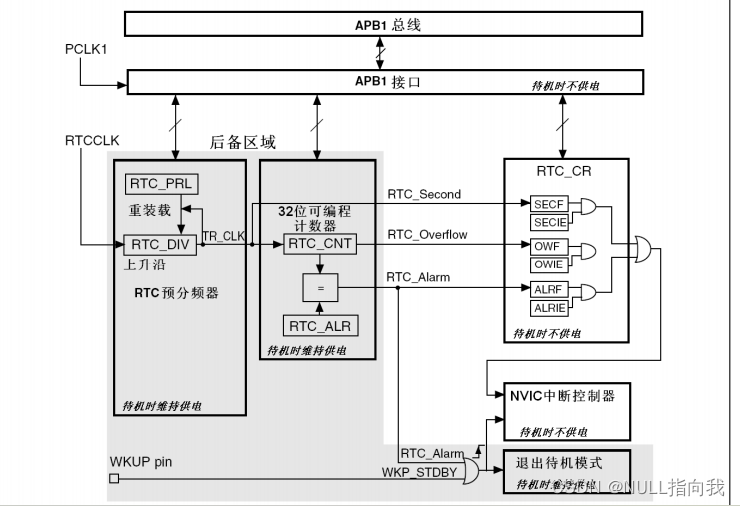
我们从RTC的框图可以了解到,它的秒、闹钟都是有中断的,但溢出事件(计数到达最大值)时没有中断。
UNIX时间戳:
在设计到日历时,我们就需要注意这个时间戳:

程序设计:
首先注意一下这些头文件,都是需要用到的,别忘记了添加:
#include "stm32f10x_rtc.h" //RTC相关库
#include "stm32f10x_pwr.h"
#include "stm32f10x_bkp.h"
配置RTC初始化过程分为以下几步:
1.配置中断,配置中断优先级
2.检查寄存器BKP_DR1,根据其值确定是否为第一次上电,V BAT是否有后备电池,第一次上电就要初始化时间。(V BAT没电池 以及 V BAT有电池 但寄存器没被写入值都算第一次上电)(后备寄存器区由V BAT引脚供电,因此当V BAT引脚有电时主电源断不会使得后备寄存器区的寄存器BKP_DR1的值丢失 )
3.定义时间结构体,用来存放改变时间等.
4.复制编写RTC_Configuration()函数,配置相关时钟源,外部时钟还是内部,分频等。
5.编写Time_Adjust()函数,给RTC时钟附上初始值(通过将 小时、分钟和秒都转换成秒 加起来 来实现设置当前计数值)(小时是 24小时制)
此处需要注意一个小细节:
就是我的程序设计使用上没用到串口,因此没有初始化串口,但在移植官方代码时,他们使用串口打印测试,各阶段初始化情况,起初我保留了这些printf()语句,认为会跳过,但实际上程序会因为没有初始化串口而在printf那卡住~·
RTC日历初始化相关代码:
#include "RTC.h"void RTC_init(void)
{NVIC_InitTypeDef NVIC_Initstructure;/*1. NVIC 中断配置 *//*Configure one bit for preemption priority 中断分组*/NVIC_PriorityGroupConfig(NVIC_PriorityGroup_1);/*Enable the RTC Interrupt */NVIC_Initstructure.NVIC_IRQChannel = RTC_IRQn;NVIC_Initstructure.NVIC_IRQChannelPreemptionPriority = 1;NVIC_Initstructure.NVIC_IRQChannelSubPriority = 0;NVIC_Initstructure.NVIC_IRQChannelCmd = ENABLE;NVIC_Init (&NVIC_Initstructure);	/*检查V BAT引脚是否为第一次上电(是否有后备电源)没有就要初始化时间*//*在启动时检查备份寄存器BKP_DR1,如果内容不是0xA5A5,则需重新配置时间并询问用户调整时间*/if (BKP_ReadBackupRegister( BKP_DR1) != 0xA5A5){//配置RTC与设置初值:RTC_Configuration();Time_Adjust(&time1);/*向BKP_DR1寄存器写入标志,说明RTC已在运行,只要后备有电,这个值就不会掉*/BKP_WriteBackupRegister( BKP_DR1, 0xA5A5);}else{/* 使能 PWR 和 Backup 时钟 */RCC_APB1PeriphClockCmd(RCC_APB1Periph_PWR | RCC_APB1Periph_BKP, ENABLE);/* 允许访问 Backup 区域 */PWR_BackupAccessCmd(ENABLE);		/*LSE启动无需设置新时钟*/
#ifdef RTC_CLOCK_SOURCE_LSI		/* 使能 LSI */RCC_LSICmd(ENABLE);/* 等待 LSI 准备好 */while (RCC_GetFlagStatus(RCC_FLAG_LSIRDY) == RESET){}
#endif/*检查是否是系统掉电重启*/if (RCC_GetFlagStatus(RCC_FLAG_PORRST) != RESET){ ;}/*检查是否Reset复位引脚引起的 复位*/else if (RCC_GetFlagStatus(RCC_FLAG_PINRST) != RESET){;}	/*等待寄存器同步*/RTC_WaitForSynchro();	/*允许RTC秒中断*/RTC_ITConfig(RTC_IT_SEC, ENABLE);	/*等待上次RTC寄存器写操作完成*/RTC_WaitForLastTask();}/*定义了时钟输出宏,则配置校正时钟输出到PC13*/#ifdef RTCClockOutput_Enable/* 使能 PWR 和 Backup 时钟 */RCC_APB1PeriphClockCmd(RCC_APB1Periph_PWR | RCC_APB1Periph_BKP, ENABLE);/* 允许访问 Backup 区域 */PWR_BackupAccessCmd(ENABLE);/* 禁止 Tamper 引脚 *//* 要输出 RTCCLK/64 到 Tamper 引脚,  tamper 功能必须禁止 */	BKP_TamperPinCmd(DISABLE); /* 使能 RTC 时钟输出到 Tamper 引脚 */BKP_RTCOutputConfig(BKP_RTCOutputSource_CalibClock);#endif/* 清除复位标志 flags */RCC_ClearFlag();
}/** 函数名:RTC_Configuration* 描述  :配置RTC* 输入  :无* 输出  :无* 调用  :外部调用*/
void RTC_Configuration(void)
{/* 使能 PWR 和 Backup 时钟 */RCC_APB1PeriphClockCmd(RCC_APB1Periph_PWR | RCC_APB1Periph_BKP, ENABLE);/* 允许访问 Backup 区域 */PWR_BackupAccessCmd(ENABLE);	/* 复位 Backup 区域 */BKP_DeInit();
//使用外部时钟还是内部时钟(在bsp_rtc.h文件定义)
//使用外部时钟时,在有些情况下晶振不起振
//批量产品的时候,很容易出现外部晶振不起振的情况,不太可靠
#ifdef 	RTC_CLOCK_SOURCE_LSE/* 使能 LSE */RCC_LSEConfig(RCC_LSE_ON);	/* 等待 LSE 准备好 */while (RCC_GetFlagStatus(RCC_FLAG_LSERDY) == RESET){}/* 选择 LSE 作为 RTC 时钟源 */RCC_RTCCLKConfig(RCC_RTCCLKSource_LSE);	/* 使能 RTC 时钟 */RCC_RTCCLKCmd(ENABLE);/* 等待 RTC 寄存器 同步* 因为RTC时钟是低速的,内环时钟是高速的,所以要同步*/RTC_WaitForSynchro();	/* 确保上一次 RTC 的操作完成 */RTC_WaitForLastTask();	/* 使能 RTC 秒中断 */RTC_ITConfig(RTC_IT_SEC, ENABLE);/* 确保上一次 RTC 的操作完成 */RTC_WaitForLastTask();	/* 设置 RTC 分频: 使 RTC 周期为1s  *//* RTC period = RTCCLK/RTC_PR = (32.768 KHz)/(32767+1) = 1HZ */RTC_SetPrescaler(32767); 	/* 确保上一次 RTC 的操作完成 */RTC_WaitForLastTask();
#else/* 使能 LSI */RCC_LSICmd(ENABLE);/* 等待 LSI 准备好 */while (RCC_GetFlagStatus(RCC_FLAG_LSIRDY) == RESET){}	/* 选择 LSI 作为 RTC 时钟源 */RCC_RTCCLKConfig(RCC_RTCCLKSource_LSI);	/* 使能 RTC 时钟 */RCC_RTCCLKCmd(ENABLE);	/* 等待 RTC 寄存器 同步* 因为RTC时钟是低速的,内环时钟是高速的,所以要同步*/RTC_WaitForSynchro();	/* 确保上一次 RTC 的操作完成 */RTC_WaitForLastTask();	/* 使能 RTC 秒中断 */RTC_ITConfig(RTC_IT_SEC, ENABLE);	/* 确保上一次 RTC 的操作完成 */RTC_WaitForLastTask();/* 设置 RTC 分频: 使 RTC 周期为1s ,LSI约为40KHz *//* RTC period = RTCCLK/RTC_PR = (40 KHz)/(40000-1+1) = 1HZ */	RTC_SetPrescaler(40000-1); /* 确保上一次 RTC 的操作完成 */RTC_WaitForLastTask();
#endif}
#ifndef _RTC_h_
#define _RTC_h_  #include "headfire.h"//使用LSE外部时钟 或 LSI内部时钟
//#define RTC_CLOCK_SOURCE_LSE
#define RTC_CLOCK_SOURCE_LSI
//北京时间的时区秒数差
#define TIME_ZOOM						(8*60*60)//初始化时间结构体
extern struct rtc_time time1;void RTC_init(void);           //初始化 与 配置RTC
void RTC_Configuration(void);  //配置RTC#endif
#include "RTC_day.h"/*时间结构体,初始化默认时间 2023-08-21 17:55:55*/
struct rtc_time time1= {55,55,17,21,8,2023,1} ;//初始化时间结构体uint16_t BMP_cnt,BMP_FLAG;#define FEBRUARY 2
#define STARTOFTIME 1970
#define SECDAY 86400L /* 一天有多少s */
#define SECYR (SECDAY * 365)
#define leapyear(year) ((year) % 4 == 0)
#define days_in_year(a) (leapyear(a) ? 366 : 365)
#define days_in_month(a) (month_days[(a) - 1])static int month_days[12] = { 31, 28, 31, 30, 31, 30, 31, 31, 30, 31, 30, 31 };/** This only works for the Gregorian calendar - i.e. after 1752 (in the UK)*//*计算公历*/
void GregorianDay(struct rtc_time * tm)
{int leapsToDate;int lastYear;int day;int MonthOffset[] = { 0,31,59,90,120,151,181,212,243,273,304,334 };lastYear=tm->tm_year-1;/*计算从公元元年到计数的前一年之中一共经历了多少个闰年*/leapsToDate = lastYear/4 - lastYear/100 + lastYear/400; /*如若计数的这一年为闰年,且计数的月份在2月之后,则日数加1,否则不加1*/if((tm->tm_year%4==0) &&((tm->tm_year%100!=0) || (tm->tm_year%400==0)) &&(tm->tm_mon>2)) {/** We are past Feb. 29 in a leap year*/day=1;} else {day=0;}day += lastYear*365 + leapsToDate + MonthOffset[tm->tm_mon-1] + tm->tm_mday; /*计算从公元元年元旦到计数日期一共有多少天*/tm->tm_wday=day%7;
}/* Converts Gregorian date to seconds since 1970-01-01 00:00:00.* Assumes input in normal date format, i.e. 1980-12-31 23:59:59* => year=1980, mon=12, day=31, hour=23, min=59, sec=59.** [For the Julian calendar (which was used in Russia before 1917,* Britain & colonies before 1752, anywhere else before 1582,* and is still in use by some communities) leave out the* -year/100+year/400 terms, and add 10.]** This algorithm was first published by Gauss (I think).** WARNING: this function will overflow on 2106-02-07 06:28:16 on* machines were long is 32-bit! (However, as time_t is signed, we* will already get problems at other places on 2038-01-19 03:14:08)**/
u32 mktimev(struct rtc_time *tm)
{if (0 >= (int) (tm->tm_mon -= 2)) { /* 1..12 -> 11,12,1..10 */tm->tm_mon += 12; /* Puts Feb last since it has leap day */tm->tm_year -= 1;}return ((((u32) (tm->tm_year/4 - tm->tm_year/100 + tm->tm_year/400 + 367*tm->tm_mon/12 + tm->tm_mday) +tm->tm_year*365 - 719499)*24 + tm->tm_hour /* now have hours */)*60 + tm->tm_min /* now have minutes */)*60 + tm->tm_sec; /* finally seconds */
}void to_tm(u32 tim, struct rtc_time * tm)
{register u32 i;register long hms, day;day = tim / SECDAY; /* 有多少天 */hms = tim % SECDAY; /* 今天的时间,单位s *//* Hours, minutes, seconds are easy */tm->tm_hour = hms / 3600;tm->tm_min = (hms % 3600) / 60;tm->tm_sec = (hms % 3600) % 60;/* Number of years in days */ /*算出当前年份,起始的计数年份为1970年*/for (i = STARTOFTIME; day >= days_in_year(i); i++) {day -= days_in_year(i);}tm->tm_year = i;/* Number of months in days left */ /*计算当前的月份*/if (leapyear(tm->tm_year)) {days_in_month(FEBRUARY) = 29;}for (i = 1; day >= days_in_month(i); i++) {day -= days_in_month(i);}days_in_month(FEBRUARY) = 28;tm->tm_mon = i;/* Days are what is left over (+1) from all that. *//*计算当前日期*/tm->tm_mday = day + 1;/** Determine the day of week*/GregorianDay(tm);}/** 函数名:Time_Adjust* 描述 :时间调节* 输入 :用于读取RTC时间的结构体指针(北京时间)* 输出 :无* 调用 :外部调用*/
void Time_Adjust(struct rtc_time* tm)
{/* 等待确保上一次操作完成 */RTC_WaitForLastTask();//更新日期GregorianDay(tm);// /* 设置当前时间 通过将 小时、分钟和秒都转换成秒 加起来 来实现设置当前计数值 (小时是 24小时制) */
// RTC_SetCounter(tm->tm_hour*3600+tm->tm_min*60+tm->tm_sec); //Tmp HH*3600 Tmp MM*60 Tmp SS/* 由日期计算时间戳并写入到RTC计数寄存器 */RTC_SetCounter(mktimev(tm)-TIME_ZOOM); /* 等待确保上一次操作完成 */RTC_WaitForLastTask();
}void Time_Display(uint32_t TimeVar,struct rtc_time *tm)
{char buf[20]; //用于暂存oled数据uint32_t BJ_TimeVar;/* 把标准时间转换为北京时间*/BJ_TimeVar =TimeVar + TIME_ZOOM;to_tm(BJ_TimeVar,tm);/*把定时器的值转换为北京时间*///打印年sprintf(buf,"%d",tm->tm_year);OLED_ShowString(75,0,(u8 *)buf,16);OLED_ShowCHinese(75+16*2,0,0); //打印中文“年”//打印时间:sprintf(buf,"%02d:%02d:%02d",tm->tm_hour,tm->tm_min,tm->tm_sec); OLED_ShowString(64,2,(u8 *)buf,16); //打印日期:sprintf(buf,"%02d",tm->tm_mon); OLED_ShowString(75,4,(u8 *)buf,12); //打印月 OLED_ShowCHinese_small(75+14,4,0); //打印中文月 sprintf(buf,"%02d",tm->tm_mday); OLED_ShowString(75+14+12,4,(u8 *)buf,12); //打印日OLED_ShowCHinese_small(75+14+12+14,4,1); //打印中文日//打印星期:OLED_ShowCHinese(70,5,1); //打印中文“星” OLED_ShowCHinese(70+16,5,2); //打印中文“期” sprintf(buf,"%d",tm->tm_wday); OLED_ShowString(70+16+16,5,(u8 *)buf,16);
}
#ifndef _RTC_day_h_
#define _RTC_day_h_#include "headfire.h"typedef unsigned int  u32;//定义时间结构体
struct rtc_time {int tm_sec;int tm_min;int tm_hour;int tm_mday;int tm_mon;int tm_year;int tm_wday;
};//初始化时间结构体
extern struct rtc_time time1;extern uint16_t BMP_cnt,BMP_FLAG;void GregorianDay(struct rtc_time * tm);
uint32_t mktimev(struct rtc_time *tm);
void to_tm(uint32_t tim, struct rtc_time * tm);
void Time_Display(uint32_t TimeVar,struct rtc_time *tm);
void Time_Adjust(struct rtc_time* tm);#endif
主函数代码:
#include "main.h"//时间结构体  在RTC_day.h中初始化了
//时间结构体定义在 RTC_day.h//刷新时间标志uint16_t TimeDisplay_cnt,TimeDisplay;int main(void)
{	init_ALL();     //初始化所有函数while(1){	if(TimeDisplay==1){Time_Display(RTC_GetCounter(),&time1);TimeDisplay=0;}switch(BMP_FLAG){case 1:OLED_DrawBMP(0,0,64,8,BMP1);  break;case 2:OLED_DrawBMP(0,0,64,8,BMP2);  break;case 3:OLED_DrawBMP(0,0,64,8,BMP3);  break;case 4:OLED_DrawBMP(0,0,64,8,BMP4);  break;case 5:OLED_DrawBMP(0,0,64,8,BMP5);  break;case 6:OLED_DrawBMP(0,0,64,8,BMP6);  break;case 7:OLED_DrawBMP(0,0,64,8,BMP7);  break;case 8:OLED_DrawBMP(0,0,64,8,BMP8);  break;case 9:OLED_DrawBMP(0,0,64,8,BMP9);  break;case 10:OLED_DrawBMP(0,0,64,8,BMP10);  break;case 11:OLED_DrawBMP(0,0,64,8,BMP11);  break;case 12:OLED_DrawBMP(0,0,64,8,BMP12);  break;case 13:OLED_DrawBMP(0,0,64,8,BMP13);  break;case 14:OLED_DrawBMP(0,0,64,8,BMP14);  break;case 15:OLED_DrawBMP(0,0,64,8,BMP15);  break;case 16:OLED_DrawBMP(0,0,64,8,BMP16);  break;case 17:OLED_DrawBMP(0,0,64,8,BMP17);  break;case 18:OLED_DrawBMP(0,0,64,8,BMP18);  break;case 19:OLED_DrawBMP(0,0,64,8,BMP19);  break;case 20:OLED_DrawBMP(0,0,64,8,BMP20);  break;		case 21:OLED_DrawBMP(0,0,64,8,BMP21);  break;case 22:OLED_DrawBMP(0,0,64,8,BMP22);  break;case 23:OLED_DrawBMP(0,0,64,8,BMP23);  break;case 24:OLED_DrawBMP(0,0,64,8,BMP24);  break;case 25:OLED_DrawBMP(0,0,64,8,BMP25);  break;case 26:OLED_DrawBMP(0,0,64,8,BMP26);  break;case 27:OLED_DrawBMP(0,0,64,8,BMP27);  break;case 28:OLED_DrawBMP(0,0,64,8,BMP28);  break;}}
}//初始化所有函数:
void init_ALL(void)
{SysTick_Init(72);         //初始化滴答计时器Timer2_Init();						//初始化定时器2i2c_GPIO_Config();	      //IIC初始化OLED_Init();              //初始化OLED屏幕OLED_Clear();             //清空屏幕数据RTC_init();}//定时器2中断服务函数
void TIM2_IRQHandler(void)
{if (TIM_GetITStatus(TIM2, TIM_IT_Update) == SET){		if(++TimeDisplay_cnt==100)  //定时器刷新时间{TimeDisplay_cnt=0;TimeDisplay=1;}if(++BMP_cnt==10)		        //定时器   刷新太空人图片{BMP_cnt=0;BMP_FLAG++;if(BMP_FLAG==29){BMP_FLAG=1;}}TIM_ClearITPendingBit(TIM2, TIM_IT_Update);//清出中断寄存器标志位,用于退出中断}
}//RTC每秒进的中断服务函数
void RTC_IRQHandler(void)
{if (RTC_GetITStatus(RTC_IT_SEC) != RESET){/* Clear the RTC Second interrupt */RTC_ClearITPendingBit(RTC_IT_SEC);//	    /* Enable time update */
//	    TimeDisplay = 1;
//	/* Wait until last write operation on RTC registers has finished */RTC_WaitForLastTask();}
}
测试效果:
测试工程下载:
https://download.csdn.net/download/qq_64257614/88237879?spm=1001.2014.3001.5503
相关文章:
STM32 F103C8T6学习笔记11:RTC实时时钟—OLED手表日历
之前在 学习笔记10文章 做了一个简易的,使用定时器计时的简单时钟,现在使用RTC实时时钟同步代替定时器来实现一下OLED手表日历,接着上个实验文章进行完善~~ 文章提供源码、测试工程下载、测试效果图。 目录 RTC实时时钟: 简介&…...

无法将“环境变量”项识别为 cmdlet、函数、脚本文件或可运行程序的名称(pycharm)
无法将“配置的任何一个环境变量”项识别为 cmdlet、函数、脚本文件或可运行程序的名称。 记录解决“无法将“C:......conda.exe”项识别为 cmdlet、函数、脚本文件或可运行程序的名称”以及“表达式或语句中包含意外的标记”的系列问题(VSCode开发环境)一、Conda.exe无法正常识…...

基于图像链接的批量下载
1. 获取图像路径 1.1 给定图像链接,这是一张图像 image_url “https://univs-news-1256833609.cos.ap-beijing.myqcloud.com/123/upload/resources/image/7467914.jpg”1.1通过网站规则得到其想要的图像链接 image_urls [ f"https://univs-news-125683360…...

mongodb使用心得
入门 术语 collection:相当于db的表 document:相当于表的记录 启动 单机模式启动mongo server mongod --dbpath D:\programs\mongodb-4.2.8\data\dbreplica set模式启动 replica set模式其实就是主从模式。 做mongo的启动配置文件: …...

学习Vue:响应式原理与性能优化策略
性能优化是Vue.js应用开发中的一个关键方面,而深入了解响应式原理并采用有效的性能优化策略可以显著提升应用的性能。本文将解释响应式原理并介绍一些性能优化策略,旨在帮助您构建高性能的Vue.js应用。 响应式原理 Vue.js的响应式原理是通过利用Object.…...

神经网络基础-神经网络补充概念-43-梯度下降法
概念 梯度下降法(Gradient Descent)是一种优化算法,用于在机器学习和深度学习中最小化(或最大化)目标函数。它通过迭代地调整模型参数,沿着梯度方向更新参数,以逐步接近目标函数的最优解。梯度…...

Reids之Set类型解读
目录 基本介绍 命令概述 SADD key member1 [member2] SCARD key SINTER key1 [key2] SMEMBERS key SPOP key SUNION key1 [key2] 基本介绍 新的存储需求:存储大量的数据 在查询方面提供更高的效率需要的存储结构:能够保存大量的数据&#x…...

【网络基础】数据链路层
【网络基础】数据链路层 文章目录 【网络基础】数据链路层1、对比网络层2、以太网2.1 基本概念2.2 类似技术2.3 以太网帧 3、MAC地址对比IP地址 4、MTU4.1 对IP协议影响4.2 对UDP协议影响4.3 对TCP协议影响4.4 地址、MTU查看 5、ARP协议5.1 协议作用5.2 协议工作流程5.3 数据报…...
云计算|OpenStack|使用VMware安装华为云的R006版CNA和VRM---初步使用(二)
前言: 在前面一篇文章云计算|OpenStack|使用VMware安装华为云的R006版CNA和VRM---初始安装(一)_华为cna_晚风_END的博客-CSDN博客 介绍了基于VMware虚拟机里嵌套部署华为云的云计算,不过仅仅是做到了在VRM的web界面添加计算节点…...

Python typing函式庫和torch.types
Python typing函式庫和torch.types 前言typingSequence vs IterableCallableUnionOptionalFunctionsCallableIterator/generator位置參數 & 關鍵字參數 Classesself自定義類別ClassVar\_\_setattr\_\_ 與 \__getattr\_\_ torch.typesbuiltins 參數前的* …...

UE5 编程规范
官方文档 使用现代C编程标准, 使用前沿C标准库版本. 1. 类中按照先 Public 后 Private 去写 2. 继承自 UObject 的类都以 U 前缀 3. 继承自 AActor 的类都以 A 前缀 4. 继承自 SWidget 的类都以 S 前缀 5. 模板以 T 前缀 6. 接口以 I 前缀 7. 枚举以 E 前缀 8. 布尔值…...

交互消息式IMessage扩展开发记录
IMessage扩展简介 iOS10新加入的基于iMessage的应用扩展,可以丰富发送消息的内容。(分享表情、图片、文字、视频、动态消息;一起完成任务或游戏。) 简单的将发送的数据内型分为三种: 1.贴纸Stickers; 2.交…...

软件团队降本增效-建立需求评估体系
需求对于软件开发来说是非常重要的输入,它们直接决定了软件的产品形态、代码数量和质量。如果需求不清晰、不完善,或者存在逻辑冲突,将会导致软件质量迅速下降,增加代码耦合性和开发成本。 在开发过程中,对需求的产品…...

npm yarn pnpm 命令集
npm 安装依赖 npm install 安装某个依赖 npm install xxx7.6.3 安装到全局(dependencies) npm install xxx7.6.3 -S 安装到线下(devDependencies) npm install xxx7.6.3 -D 卸载某个依赖 npm uninstall xxx 卸载全局依…...
python 开发环境(PyCharm)搭建指南
Python 的下载并安装 参考:Python基础教程——搭建Python编程环境 下载 Python Python 下载地址:官网 (1)点击【Downloads】>>>点击【Windows】>>>点击【Python 3.x.x】下载最新版 Python; Pyt…...
springboot里 运用 easyexcel 导出
引入pom <dependency><groupId>com.alibaba</groupId><artifactId>easyexcel</artifactId><version>2.2.6</version> </dependency>运用 import com.alibaba.excel.EasyExcel; import org.springframework.stereotype.Contr…...

一“码”当先,PR大征集!2023 和RT-Thread一起赋能开源!
活动地址:https://club.rt-thread.org/ask/article/3c7cf7345ca47a18.html 活动介绍 「一“码”当先,PR大征集!」是一项为了鼓励开发者积极参与开源软件开发维护的活动。 你可在Github RT-Thread( https://github.com/RT-Thread …...
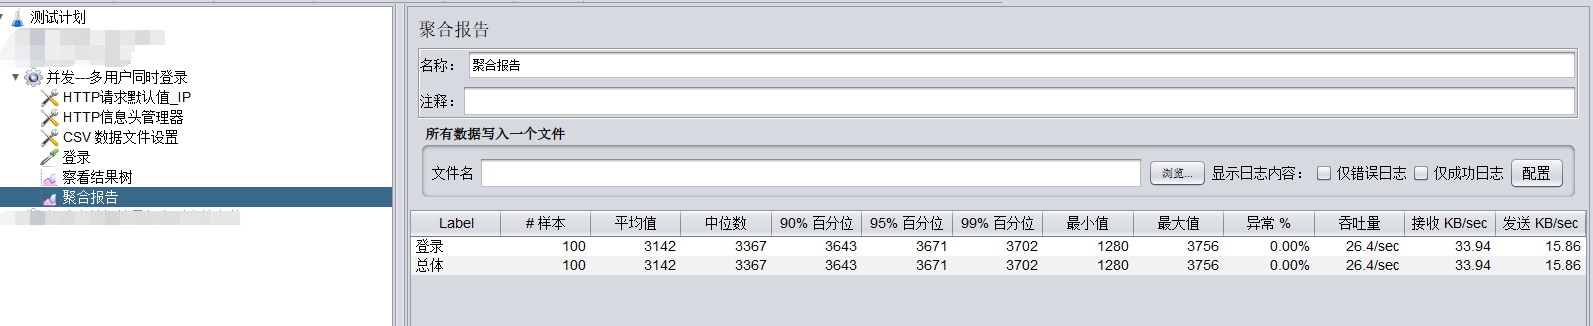
jmeter模拟多用户并发
一、100个真实的用户 1、一个账号模拟100虚拟用户同时登录和100账号同时登录 区别 (1)1个账号100个人用,同时登录; (2)100个人100个账号,同时登录。 相同 (1)两个都…...

澎峰科技|邀您关注2023 RISC-V中国峰会!
峰会概览 2023 RISC-V中国峰会(RISC-V Summit China 2023)将于8月23日至25日在北京香格里拉饭店举行。本届峰会将以“RISC-V生态共建”为主题,结合当下全球新形势,把握全球新时机,呈现RISC-V全球新观点、新趋势。 本…...
【系统架构】系统架构设计之数据同步策略
文章目录 一、介绍1.1、分布式系统中的数据同步定义1.2、为何数据同步如此关键1.3、数据同步策略简介 二、为什么需要数据同步2.1、提高系统可用性2.2、备份与灾难恢复2.3、提高性能2.4、考虑地理位置(如使用CDN) 三、同步备份3.1、定义和概述3.2、工作原…...

使用docker在3台服务器上搭建基于redis 6.x的一主两从三台均是哨兵模式
一、环境及版本说明 如果服务器已经安装了docker,则忽略此步骤,如果没有安装,则可以按照一下方式安装: 1. 在线安装(有互联网环境): 请看我这篇文章 传送阵>> 点我查看 2. 离线安装(内网环境):请看我这篇文章 传送阵>> 点我查看 说明:假设每台服务器已…...

SkyWalking 10.2.0 SWCK 配置过程
SkyWalking 10.2.0 & SWCK 配置过程 skywalking oap-server & ui 使用Docker安装在K8S集群以外,K8S集群中的微服务使用initContainer按命名空间将skywalking-java-agent注入到业务容器中。 SWCK有整套的解决方案,全安装在K8S群集中。 具体可参…...
css实现圆环展示百分比,根据值动态展示所占比例
代码如下 <view class""><view class"circle-chart"><view v-if"!!num" class"pie-item" :style"{background: conic-gradient(var(--one-color) 0%,#E9E6F1 ${num}%),}"></view><view v-else …...

MySQL 隔离级别:脏读、幻读及不可重复读的原理与示例
一、MySQL 隔离级别 MySQL 提供了四种隔离级别,用于控制事务之间的并发访问以及数据的可见性,不同隔离级别对脏读、幻读、不可重复读这几种并发数据问题有着不同的处理方式,具体如下: 隔离级别脏读不可重复读幻读性能特点及锁机制读未提交(READ UNCOMMITTED)允许出现允许…...
UE5 学习系列(三)创建和移动物体
这篇博客是该系列的第三篇,是在之前两篇博客的基础上展开,主要介绍如何在操作界面中创建和拖动物体,这篇博客跟随的视频链接如下: B 站视频:s03-创建和移动物体 如果你不打算开之前的博客并且对UE5 比较熟的话按照以…...

Objective-C常用命名规范总结
【OC】常用命名规范总结 文章目录 【OC】常用命名规范总结1.类名(Class Name)2.协议名(Protocol Name)3.方法名(Method Name)4.属性名(Property Name)5.局部变量/实例变量(Local / Instance Variables&…...

【磁盘】每天掌握一个Linux命令 - iostat
目录 【磁盘】每天掌握一个Linux命令 - iostat工具概述安装方式核心功能基础用法进阶操作实战案例面试题场景生产场景 注意事项 【磁盘】每天掌握一个Linux命令 - iostat 工具概述 iostat(I/O Statistics)是Linux系统下用于监视系统输入输出设备和CPU使…...
高等数学(下)题型笔记(八)空间解析几何与向量代数
目录 0 前言 1 向量的点乘 1.1 基本公式 1.2 例题 2 向量的叉乘 2.1 基础知识 2.2 例题 3 空间平面方程 3.1 基础知识 3.2 例题 4 空间直线方程 4.1 基础知识 4.2 例题 5 旋转曲面及其方程 5.1 基础知识 5.2 例题 6 空间曲面的法线与切平面 6.1 基础知识 6.2…...
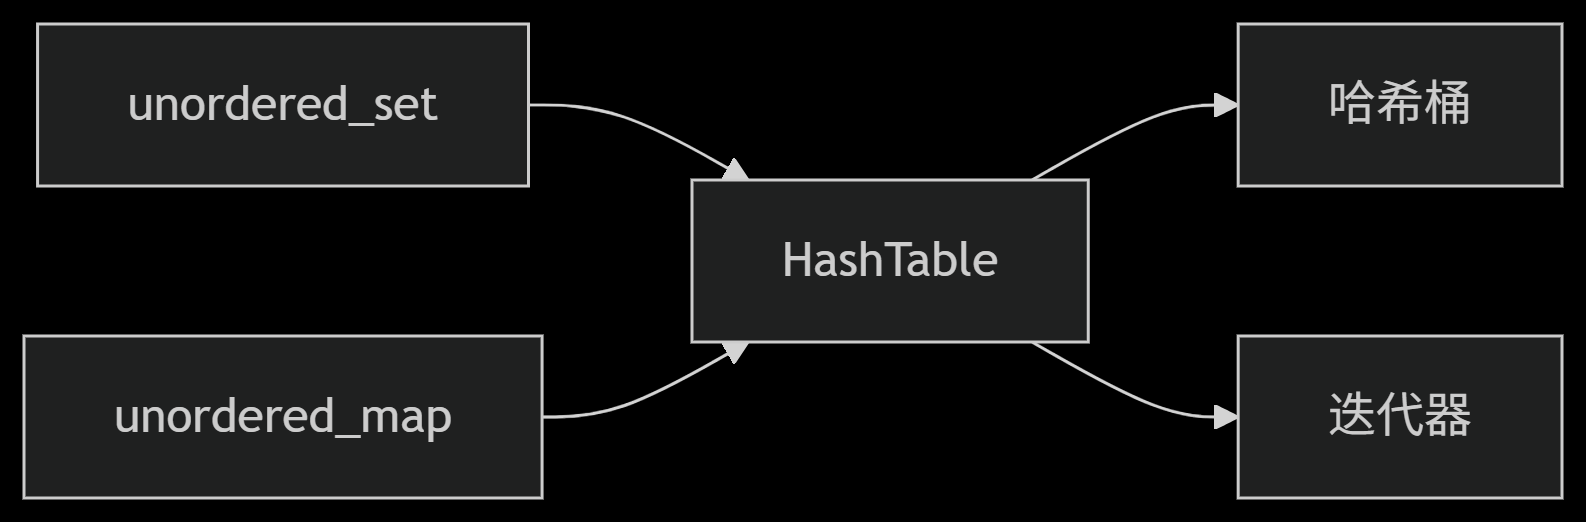
从零实现STL哈希容器:unordered_map/unordered_set封装详解
本篇文章是对C学习的STL哈希容器自主实现部分的学习分享 希望也能为你带来些帮助~ 那咱们废话不多说,直接开始吧! 一、源码结构分析 1. SGISTL30实现剖析 // hash_set核心结构 template <class Value, class HashFcn, ...> class hash_set {ty…...

Ascend NPU上适配Step-Audio模型
1 概述 1.1 简述 Step-Audio 是业界首个集语音理解与生成控制一体化的产品级开源实时语音对话系统,支持多语言对话(如 中文,英文,日语),语音情感(如 开心,悲伤)&#x…...