SpringBoot整合FFmpeg进行视频分片上传(Linux)
SpringBoot整合FFmpeg进行视频分片上传(Linux)
上传的核心思路:
1.将文件按一定的分割规则(静态或动态设定,如手动设置20M为一个分片),用slice分割成多个数据块。
2.为每个文件生成一个唯一标识Key,用于多数据块上传时区分所属文件。
3.所有分片上传完成,服务端校验合并标识为Key的所有分片为一个最终文件。
分片上传到意义:
将文件分片上传,在网络环境不佳时,可以对文件上传失败的部分重新上传,避免了每次上传都需要从文件起始位置上传的问题。
分片的附带好处还能很方便的实现进度条。
分片上传的原理:
使用ffmpeg,把视频文件切片成m3u8,并且通过springboot,可以实现在线的点播。
客户端上传视频到服务器,服务器对视频进行切片后,返回m3u8,封面等访问路径。可以在线的播放。
准备工作:
需要先在linux下安装FFmpeg,并配置环境变量
一:下载、解压
使用命令下载:
wget https://johnvansickle.com/ffmpeg/release-source/ffmpeg-4.1.tar.xz
#使用命令解压:
cd  /root/FFmpeg
tar -xvJf ffmpeg-4.1.tar.xz
# 编辑准备
cd /root/FFmpeg/ffmpeg-4.1    # 切换到ffmpeg-4.1目录
yum install gcc  # 安装gcc编译器
yasm安装包
cd /root/FFmpeg
wget http://www.tortall.net/projects/yasm/releases/yasm-1.3.0.tar.gz  #下载源码包
tar zxvf yasm-1.3.0.tar.gz #解压
cd yasm-1.3.0 #进入目录
./configure #配置
make && make install #编译安装
安装FFmpeg
cd /root/FFmpeg/ffmpeg-4.1/
./configure --enable-shared --prefix=/usr/local/ffmpeg-4.1
make && make install #编译安装
下载x264
cd /root/libx264/
yum -y install git
git clone https://git.videolan.org/git/x264.git
安装nasm
tar -xvf nasm-2.14.02.tar.gz
cd nasm-2.14.02
./configure
make
sudo make install
#查看是否安装成功
nasm -version
安装x264
cd /root/FFmpeg/libx264/x264
./configure --prefix=/usr/softinstall/x264/ --includedir=/usr/local/include --libdir=/usr/local/lib --enable-shared
make
sudo make install
安装FFmpeg
#配置 /etc/ld.so.conf
vim /etc/ld.so.conf #通过vim指令进入位于etc目录中的ld.so.conf
#输入i进入插入模式,将第二行的内容插入到该文件
include ld.so.conf.d/*.conf
/usr/local/ffmpeg-4.1/libldconfig #ldconfig 是一个动态链接库管理命令,其目的为了让动态链接库为系统所共享。
make
sudo make install
# ffmpeg -i /root/FFmpeg/wukel.mp4 -c:v libx264 -c:a copy -hls_key_info_file /root/FFmpeg/video_folder/20220308/test1/ -hls_time 15 -hls_playlist_type vod -hls_segment_filename %06d.ts index.m3u8
ldd ffmpeg
cd /root/FFmpeg/ffmpeg-4.1
./configure --prefix=/usr/softinstall/ffmpeg --enable-gpl --enable-shared --enable-libx264# 配置环境变量
vim /etc/profile
#配置如下
export FFMPEG_HOME=/usr/local/ffmpeg-4.1
export PATH=$FFMPEG_HOME/bin:$PATH
#修改完使用命令退出
~:wq
source /etc/profile
# 测试
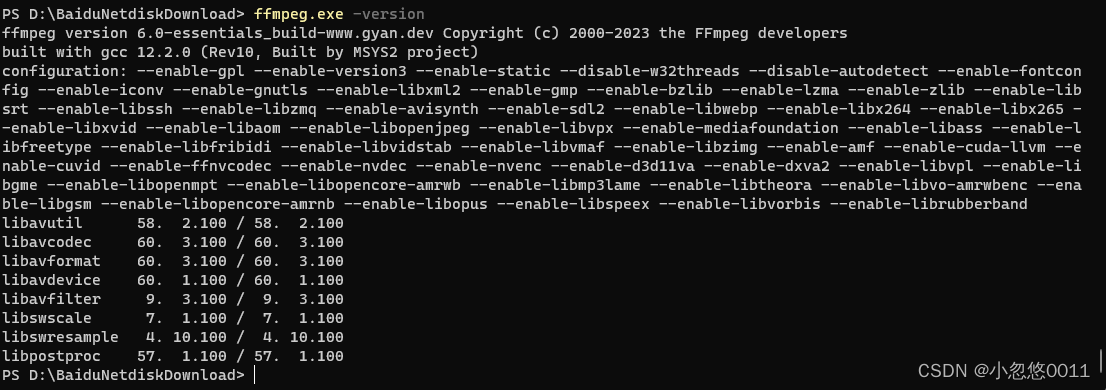
ffmpeg -version
~~~~~~~~成功~~~~~~~~~
代码展示:
pom文件
pom.xml
<parent><groupId>org.springframework.boot</groupId><artifactId>spring-boot-starter-parent</artifactId><version>2.5.4</version><relativePath /> <!-- lookup parent from repository --></parent><properties><java.version>1.8</java.version><javacv.version>1.5.4</javacv.version><ffmpeg.version>4.3.1-1.5.4</ffmpeg.version></properties><dependencies><dependency><groupId>commons-lang</groupId><artifactId>commons-lang</artifactId><version>2.6</version></dependency><dependency><groupId>commons-fileupload</groupId><artifactId>commons-fileupload</artifactId><version>1.2.2</version></dependency><dependency><groupId>commons-io</groupId><artifactId>commons-io</artifactId><version>2.5</version></dependency><!--web 模块 --><dependency><groupId>org.springframework.boot</groupId><artifactId>spring-boot-starter-web</artifactId><exclusions><!--排除tomcat依赖 --><exclusion><artifactId>spring-boot-starter-tomcat</artifactId><groupId>org.springframework.boot</groupId></exclusion></exclusions></dependency><!--undertow容器 --><dependency><groupId>org.springframework.boot</groupId><artifactId>spring-boot-starter-undertow</artifactId></dependency><dependency><groupId>org.springframework.boot</groupId><artifactId>spring-boot-starter-test</artifactId><scope>test</scope></dependency><!-- javacv 和 ffmpeg的依赖包 --><dependency><groupId>org.bytedeco</groupId><artifactId>javacv</artifactId><version>${javacv.version}</version><exclusions><exclusion><groupId>org.bytedeco</groupId><artifactId>*</artifactId></exclusion></exclusions></dependency><dependency><groupId>org.bytedeco</groupId><artifactId>ffmpeg-platform</artifactId><version>${ffmpeg.version}</version></dependency><dependency><groupId>cn.hutool</groupId><artifactId>hutool-all</artifactId><version>5.6.5</version></dependency><dependency><groupId>log4j</groupId><artifactId>log4j</artifactId><version>1.2.17</version></dependency><dependency><groupId>org.springframework.boot</groupId><artifactId>spring-boot-starter-test</artifactId><scope>test</scope></dependency><dependency><groupId>org.junit.vintage</groupId><artifactId>junit-vintage-engine</artifactId><scope>test</scope></dependency><dependency><groupId>org.springframework.boot</groupId><artifactId>spring-boot-starter-web</artifactId><exclusions><exclusion><groupId>org.springframework.boot</groupId><artifactId>spring-boot-starter-tomcat</artifactId></exclusion></exclusions></dependency><dependency><groupId>org.springframework.boot</groupId><artifactId>spring-boot-starter-undertow</artifactId></dependency><dependency><groupId>commons-codec</groupId><artifactId>commons-codec</artifactId></dependency><dependency><groupId>com.google.code.gson</groupId><artifactId>gson</artifactId></dependency></dependencies><build><finalName>${project.artifactId}</finalName><plugins><plugin><groupId>org.springframework.boot</groupId><artifactId>spring-boot-maven-plugin</artifactId><configuration><executable>true</executable></configuration></plugin></plugins></build>yml配置
application.yml
server:port: 8086app:# 存储转码视频的文件夹video-folder: /root/FFmpeg/video_folderspring:servlet:multipart:enabled: true# 不限制文件大小max-file-size: -1# 不限制请求体大小max-request-size: -1# 临时IO目录location: "${java.io.tmpdir}"# 不延迟解析resolve-lazily: false# 超过1Mb,就IO到临时目录file-size-threshold: 1MBweb:resources:static-locations:- "classpath:/static/"- "file:${app.video-folder}" # 把视频文件夹目录,添加到静态资源目录列表工具类
MediaInfo
import java.util.List;import com.google.gson.annotations.SerializedName;public class MediaInfo {public static class Format {@SerializedName("bit_rate")private String bitRate;public String getBitRate() {return bitRate;}public void setBitRate(String bitRate) {this.bitRate = bitRate;}}public static class Stream {@SerializedName("index")private int index;@SerializedName("codec_name")private String codecName;@SerializedName("codec_long_name")private String codecLongame;@SerializedName("profile")private String profile;}@SerializedName("streams")private List<Stream> streams;@SerializedName("format")private Format format;public List<Stream> getStreams() {return streams;}public void setStreams(List<Stream> streams) {this.streams = streams;}public Format getFormat() {return format;}public void setFormat(Format format) {this.format = format;}
}
TranscodeConfig
import lombok.Data;@Data
public class TranscodeConfig {private String poster = "00:00:00.001";				// 截取封面的时间			HH:mm:ss.[SSS]private String tsSeconds = "15";			// ts分片大小,单位是秒private String cutStart;			// 视频裁剪,开始时间		HH:mm:ss.[SSS]private String cutEnd;				// 视频裁剪,结束时间		HH:mm:ss.[SSS]public String getPoster() {return poster;}public void setPoster(String poster) {this.poster = poster;}public String getTsSeconds() {return tsSeconds;}public void setTsSeconds(String tsSeconds) {this.tsSeconds = tsSeconds;}public String getCutStart() {return cutStart;}public void setCutStart(String cutStart) {this.cutStart = cutStart;}public String getCutEnd() {return cutEnd;}public void setCutEnd(String cutEnd) {this.cutEnd = cutEnd;}@Overridepublic String toString() {return "TranscodeConfig [poster=" + poster + ", tsSeconds=" + tsSeconds + ", cutStart=" + cutStart + ", cutEnd="+ cutEnd + "]";}
}
FFmpegUtils
import java.io.BufferedReader;
import java.io.File;
import java.io.IOException;
import java.io.InputStreamReader;
import java.nio.charset.StandardCharsets;
import java.nio.file.Files;
import java.nio.file.Path;
import java.nio.file.Paths;
import java.nio.file.StandardOpenOption;
import java.security.NoSuchAlgorithmException;
import java.time.LocalDate;
import java.time.format.DateTimeFormatter;
import java.util.*;import javax.crypto.KeyGenerator;import org.apache.commons.codec.binary.Hex;
import org.slf4j.Logger;
import org.slf4j.LoggerFactory;
import org.springframework.http.HttpStatus;
import org.springframework.http.ResponseEntity;
import org.springframework.util.StringUtils;import com.google.gson.Gson;
import org.springframework.web.bind.annotation.RequestPart;
import org.springframework.web.multipart.MultipartFile;public class FFmpegUtils {private static final Logger LOGGER = LoggerFactory.getLogger(FFmpegUtils.class);// 跨平台换行符private static final String LINE_SEPARATOR = System.getProperty("line.separator");/*** 生成随机16个字节的AESKEY* @return*/private static byte[] genAesKey ()  {try {KeyGenerator keyGenerator = KeyGenerator.getInstance("AES");keyGenerator.init(128);return keyGenerator.generateKey().getEncoded();} catch (NoSuchAlgorithmException e) {return null;}}/*** 在指定的目录下生成key_info, key文件,返回key_info文件* @param folder* @throws IOException */private static Path genKeyInfo(String folder) throws IOException {// AES 密钥byte[] aesKey = genAesKey();// AES 向量String iv = Hex.encodeHexString(genAesKey());// key 文件写入Path keyFile = Paths.get(folder, "key");Files.write(keyFile, aesKey, StandardOpenOption.CREATE, StandardOpenOption.TRUNCATE_EXISTING);// key_info 文件写入StringBuilder stringBuilder = new StringBuilder();stringBuilder.append("key").append(LINE_SEPARATOR);					// m3u8加载key文件网络路径stringBuilder.append(keyFile.toString()).append(LINE_SEPARATOR);	// FFmeg加载key_info文件路径stringBuilder.append(iv);											// ASE 向量Path keyInfo = Paths.get(folder, "key_info");Files.write(keyInfo, stringBuilder.toString().getBytes(), StandardOpenOption.CREATE, StandardOpenOption.TRUNCATE_EXISTING);return keyInfo;}/*** 指定的目录下生成 master index.m3u8 文件* @param file			master m3u8文件地址* @param indexPath			访问子index.m3u8的路径* @param bandWidth			流码率* @throws IOException*/private static void genIndex(String file, String indexPath, String bandWidth) throws IOException {StringBuilder stringBuilder = new StringBuilder();stringBuilder.append("#EXTM3U").append(LINE_SEPARATOR);stringBuilder.append("#EXT-X-STREAM-INF:BANDWIDTH=" + bandWidth).append(LINE_SEPARATOR);  // 码率stringBuilder.append(indexPath);Files.write(Paths.get(file), stringBuilder.toString().getBytes(StandardCharsets.UTF_8), StandardOpenOption.CREATE, StandardOpenOption.TRUNCATE_EXISTING);}/*** 转码视频为m3u8* @param source				源视频* @param destFolder			目标文件夹* @param config				配置信息* @throws IOException * @throws InterruptedException */public static void transcodeToM3u8(String source, String destFolder, TranscodeConfig config) throws IOException, InterruptedException {// 判断源视频是否存在if (!Files.exists(Paths.get(source))) {throw new IllegalArgumentException("文件不存在:" + source);}// 创建工作目录Path workDir = Paths.get(destFolder, "ts");Files.createDirectories(workDir);// 在工作目录生成KeyInfo文件Path keyInfo = genKeyInfo(workDir.toString());// 构建命令List<String> commands = new ArrayList<>();commands.add("ffmpeg");commands.add("-i")						;commands.add(source);					// 源文件commands.add("-c:v")					;commands.add("libx264");				// 视频编码为H264commands.add("-c:a")					;commands.add("copy");					// 音频直接copycommands.add("-hls_key_info_file")		;commands.add(keyInfo.toString());		// 指定密钥文件路径commands.add("-hls_time")				;commands.add(config.getTsSeconds());	// ts切片大小commands.add("-hls_playlist_type")		;commands.add("vod");					// 点播模式commands.add("-hls_segment_filename")	;commands.add("%06d.ts");				// ts切片文件名称if (StringUtils.hasText(config.getCutStart())) {commands.add("-ss")					;commands.add(config.getCutStart());	// 开始时间}if (StringUtils.hasText(config.getCutEnd())) {commands.add("-to")					;commands.add(config.getCutEnd());		// 结束时间}commands.add("index.m3u8");														// 生成m3u8文件// 构建进程Process process = new ProcessBuilder().command(commands).directory(workDir.toFile()).start();// 读取进程标准输出new Thread(() -> {try (BufferedReader bufferedReader = new BufferedReader(new InputStreamReader(process.getInputStream()))) {String line = null;while ((line = bufferedReader.readLine()) != null) {LOGGER.info(line);}} catch (IOException e) {}}).start();// 读取进程异常输出new Thread(() -> {try (BufferedReader bufferedReader = new BufferedReader(new InputStreamReader(process.getErrorStream()))) {String line = null;while ((line = bufferedReader.readLine()) != null) {LOGGER.info(line);}} catch (IOException e) {}}).start();// 阻塞直到任务结束if (process.waitFor() != 0) {throw new RuntimeException("视频切片异常");}// 切出封面if (!screenShots(source, String.join(File.separator, destFolder, "poster.jpg"), config.getPoster())) {throw new RuntimeException("封面截取异常");}// 获取视频信息final MediaInfo[] mediaInfo = {getMediaInfo(source)};if (mediaInfo[0] == null) {throw new RuntimeException("获取媒体信息异常");}// 生成index.m3u8文件genIndex(String.join(File.separator, destFolder, "index.m3u8"), "ts/index.m3u8", mediaInfo[0].getFormat().getBitRate());// 删除keyInfo文件Files.delete(keyInfo);}/*** 获取视频文件的媒体信息* @param source* @return* @throws IOException* @throws InterruptedException*/public static MediaInfo getMediaInfo(String source) throws IOException, InterruptedException {List<String> commands = new ArrayList<>();commands.add("ffprobe");	commands.add("-i")				;commands.add(source);commands.add("-show_format");commands.add("-show_streams");commands.add("-print_format")	;commands.add("json");Process process = new ProcessBuilder(commands).start();MediaInfo mediaInfo = null;try (BufferedReader bufferedReader = new BufferedReader(new InputStreamReader(process.getInputStream()))) {mediaInfo = new Gson().fromJson(bufferedReader, MediaInfo.class);} catch (IOException e) {e.printStackTrace();}if (process.waitFor() != 0) {return null;}return mediaInfo;}/*** 截取视频的指定时间帧,生成图片文件* @param source		源文件* @param file			图片文件* @param time			截图时间 HH:mm:ss.[SSS]		* @throws IOException * @throws InterruptedException */public static boolean screenShots(String source, String file, String time) throws IOException, InterruptedException {List<String> commands = new ArrayList<>();commands.add("ffmpeg");commands.add("-i")				;commands.add(source);commands.add("-ss")				;commands.add(time);commands.add("-y");commands.add("-q:v")			;commands.add("1");commands.add("-frames:v")		;commands.add("1");commands.add("-f");				;commands.add("image2");commands.add(file);Process process = new ProcessBuilder(commands).start();// 读取进程标准输出new Thread(() -> {try (BufferedReader bufferedReader = new BufferedReader(new InputStreamReader(process.getInputStream()))) {String line = null;while ((line = bufferedReader.readLine()) != null) {LOGGER.info(line);}} catch (IOException e) {}}).start();// 读取进程异常输出new Thread(() -> {try (BufferedReader bufferedReader = new BufferedReader(new InputStreamReader(process.getErrorStream()))) {String line = null;while ((line = bufferedReader.readLine()) != null) {LOGGER.error(line);}} catch (IOException e) {}}).start();return process.waitFor() == 0;}
}
controller调用
UploadController
import java.io.IOException;
import java.nio.file.Files;
import java.nio.file.Path;
import java.nio.file.Paths;
import java.time.LocalDate;
import java.time.format.DateTimeFormatter;
import java.util.HashMap;
import java.util.Map;
import java.util.UUID;import org.slf4j.Logger;
import org.slf4j.LoggerFactory;
import org.springframework.beans.factory.annotation.Value;
import org.springframework.http.HttpStatus;
import org.springframework.http.ResponseEntity;
import org.springframework.web.bind.annotation.*;
import org.springframework.web.multipart.MultipartFile;import com.demo.ffmpeg.FFmpegUtils;
import com.demo.ffmpeg.TranscodeConfig;@RestController
@RequestMapping("/uploadController")
public class UploadController {@Value("${app.video-folder}")private String videoFolder;private Path tempDir = Paths.get(System.getProperty("java.io.tmpdir"));/*** 上传视频进行切片处理,返回访问路径* @param video* @param transcodeConfig* @return* @throws IOException */@PostMapping("/upload")@CrossOriginpublic Object upload (@RequestPart(name = "file", required = true) MultipartFile video,@RequestPart(name = "config", required = true) TranscodeConfig transcodeConfig) throws IOException {/**    参数传UUID去数据库查询需要转换的视频地址 进行入参public ResponseData upload (@RequestParam("uuid") String uuid) throws Exception {TranscodeConfig transcodeConfig = new TranscodeConfig();FastDfsFile fastDfsFile = sectionService.getSectionByUUID(uuid);if(fastDfsFile.getFastDfsFileUrl() == null){LOGGER.info("请上传视频!!");return ResponseData.warnWithMsg("请选择要上传的视频!");}MultipartFile video = UrlToMultipartFile.urlToMultipartFile(fastDfsFile.getFastDfsFileUrl());*/
LOGGER.info("文件信息:title={}, size={}", video.getOriginalFilename(), video.getSize());LOGGER.info("转码配置:{}", transcodeConfig);// 原始文件名称,也就是视频的标题String title = video.getOriginalFilename();// io到临时文件Path tempFile = tempDir.resolve(title);LOGGER.info("io到临时文件:{}", tempFile.toString());try {video.transferTo(tempFile);// 删除后缀title = title.substring(0, title.lastIndexOf(".")) + "-" + UUID.randomUUID().toString().replaceAll("-", "");// 按照日期生成子目录String today = DateTimeFormatter.ofPattern("yyyyMMdd").format(LocalDate.now());// 尝试创建视频目录Path targetFolder = Files.createDirectories(Paths.get(videoFolder, today, title));LOGGER.info("创建文件夹目录:{}", targetFolder);Files.createDirectories(targetFolder);// 执行转码操作LOGGER.info("开始转码");try {transcodeToM3u8(tempFile.toString(), targetFolder.toString(), transcodeConfig);} catch (Exception e) {LOGGER.error("转码异常:{}", e.getMessage());Map<String, Object> result = new HashMap<>();result.put("success", false);result.put("message", e.getMessage());return ResponseEntity.status(HttpStatus.INTERNAL_SERVER_ERROR).body(result);}// 封装结果Map<String, Object> videoInfo = new HashMap<>();videoInfo.put("title", title);videoInfo.put("m3u8", String.join("/", "", today, title, "index.m3u8"));videoInfo.put("poster", String.join("/", "", today, title, "poster.jpg"));//返回数据Map<String, Object> result = new HashMap<>();result.put("success", true);result.put("data", videoInfo);return result;} finally {// 始终删除临时文件Files.delete(tempFile);}}
}
Url转换MultipartFile的工具类
如controller中参数传的是URL 使用以下工具类转换一下即可
UrlToMultipartFile
import org.apache.commons.fileupload.FileItem;
import org.apache.commons.fileupload.FileItemFactory;
import org.apache.commons.fileupload.disk.DiskFileItemFactory;
import org.apache.commons.lang.RandomStringUtils;
import org.slf4j.Logger;
import org.slf4j.LoggerFactory;
import org.springframework.web.multipart.MultipartFile;
import org.springframework.web.multipart.commons.CommonsMultipartFile;import java.io.*;
import java.net.HttpURLConnection;
import java.net.URL;public class UrlToMultipartFile {private static final Logger LOGGER = LoggerFactory.getLogger(UrlToMultipartFile.class);/*** inputStream 转 File*/public static File inputStreamToFile(InputStream ins, String name) throws Exception{//System.getProperty("java.io.tmpdir")临时目录+File.separator目录中间的间隔符+文件名File file = new File(System.getProperty("java.io.tmpdir") + File.separator + name);OutputStream os = new FileOutputStream(file);int bytesRead;int len = 8192;byte[] buffer = new byte[len];while ((bytesRead = ins.read(buffer, 0, len)) != -1) {os.write(buffer, 0, bytesRead);}os.close();ins.close();return file;}/*** file转multipartFile*/public static MultipartFile fileToMultipartFile(File file) {FileItemFactory factory = new DiskFileItemFactory(16, null);FileItem item=factory.createItem(file.getName(),"text/plain",true,file.getName());int bytesRead = 0;byte[] buffer = new byte[8192];try {FileInputStream fis = new FileInputStream(file);OutputStream os = item.getOutputStream();while ((bytesRead = fis.read(buffer, 0, 8192)) != -1) {os.write(buffer, 0, bytesRead);}os.close();fis.close();} catch (IOException e) {e.printStackTrace();}return new CommonsMultipartFile(item);}//url转MultipartFilepublic static MultipartFile urlToMultipartFile(String url) throws Exception {File file = null;MultipartFile multipartFile = null;try {HttpURLConnection httpUrl = (HttpURLConnection) new URL(url).openConnection();httpUrl.connect();file = UrlToMultipartFile.inputStreamToFile(httpUrl.getInputStream(),RandomStringUtils.randomAlphanumeric(8)+".mp4");LOGGER.info("---------"+file+"-------------");multipartFile = UrlToMultipartFile.fileToMultipartFile(file);httpUrl.disconnect();} catch (Exception e) {e.printStackTrace();}return multipartFile;}}
相关文章:
)
SpringBoot整合FFmpeg进行视频分片上传(Linux)
SpringBoot整合FFmpeg进行视频分片上传(Linux) 上传的核心思路: 1.将文件按一定的分割规则(静态或动态设定,如手动设置20M为一个分片),用slice分割成多个数据块。 2.为每个文件生成一个唯一标识…...
eNSP综合小实验:VRRP、MSTP、Eth-Trunk、NAT、DHCP等技术应用
完成下图要求: 拓扑图: 配置命令: 由于交换机日志太多不便于复制,所以就复制命令。大概步骤如下: 第一步先分配IP地址,在sw1和sw2上创建VLAN100用于e0/0/3口配IP,在sw1、sw2、sw3、sw4上创建VL…...

正中优配:尾盘拉升的股票第二天的走势?
尾盘拉升是指买卖日快结束时股票价格呈现上涨的状况。关于许多投资者来说,这一般是好事情,因为它可认为他们带来更高的收益。但是,人们常常会问尾盘拉升的股票第二天的走势怎么。本文将从多个角度进行剖析。 首要,咱们需求认识到这…...
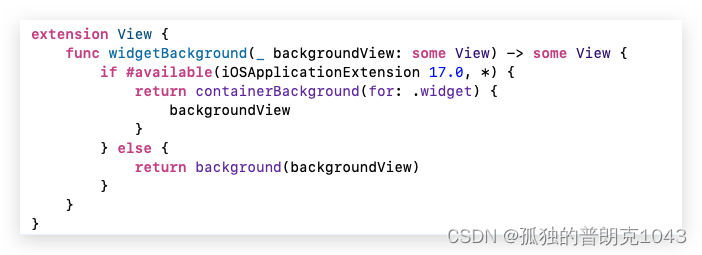
ios小组件报错:Please adopt containerBackground API
iOS 17 小组件报错:Please adopt containerBackground API 使用下面的方法解决了: 代码: extension View {func widgetBackground(_ backgroundView: some View) -> some View {if #available(iOSApplicationExtension 17.0, *) {return containerBackground(for: .wi…...
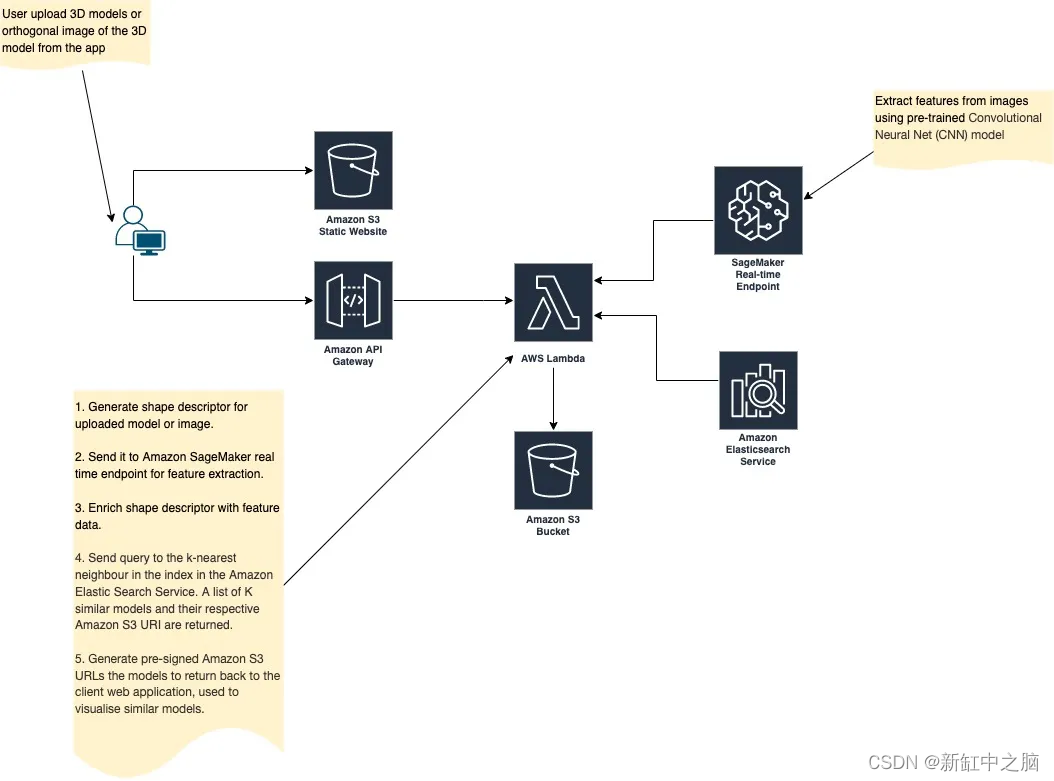
基于AWS的3D模型搜索服务实现
3D模型广泛应用于计算机游戏、电影、工程、零售业、广告等许多领域。市场上有很多制作3D模型的工具,但几乎没有工具可以直观地搜索3D模型数据库以找到类似的3D模型 因为开发好的 3D 模型搜索工具非常具有挑战性。 它需要复杂的计算和 AI/ML 框架来创建模型描述符并提…...

pycharm远程连接docker容器
pycharm远程连接docker容器 1.根据镜像创建容器2.进入容器3.修改容器的root密码4. 容器安装openssh-server和openssh-client5.修改SSH配置文件6.重启ssh服务7. 退出测试8.配置pycharm并连接docker容器9. 选择docker环境 1.根据镜像创建容器 sudo docker run -itd --nameconn_t…...

开源全球地理空间数据可视化框架——Cesium学习(2023.8.21)
Cesium学习 2023.8.21 1、Cesium简介1.1 Github上的Cesium 2、Cesium下载安装使用2.1 方式一:页面在线引用2.2 方式二:页面离线使用2.3 方式三:完整项目使用 3、CesiumJS学习教程(快速上手 API文档)3、Cesium官方示例…...
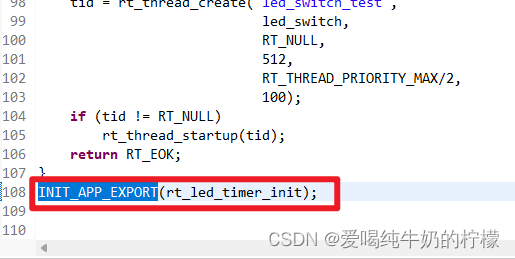
RT-Thread学习日记——点亮LED
最近开始接触RT-Thread,后面会单独建立专栏以此记录我的学习过程,如果能给你的学习提供参考,本人倍感荣幸。 学习工具:正点原子战舰开发板 一、、点亮LED 在RT-Thread的配置项里搜索LED可以看到和LED相关的很多内容,…...
)
粘包问题(TCP面向字节流批量发送数据导致)
粘包问题出现的原因 由于TCP协议网络传输数据的基本单位是字节流,所以当应用程序收到了传输的数据时,看到的是一连串的字节数据,而TCP协议网络传输数据有滑动窗口的机制(核心就是批量传输数据,推荐看TCP中窗口和滑动窗…...
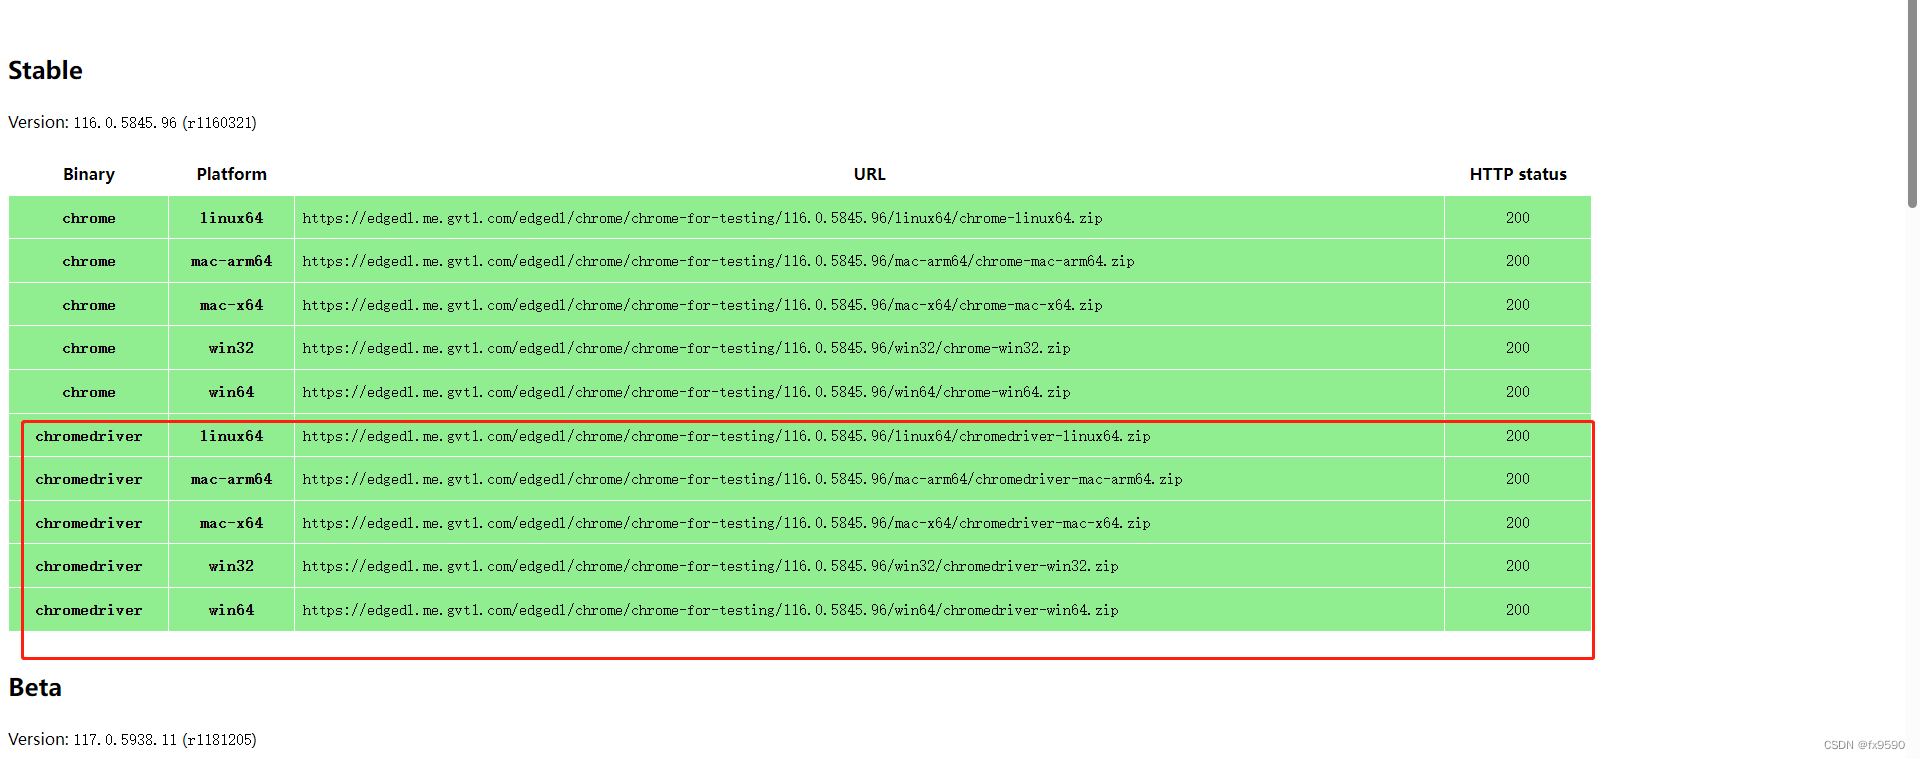
selenium Chrome驱动下载地址
Chrome驱动官方最新版下载地址:https://googlechromelabs.github.io/chrome-for-testing/ 有稳定版,开发版等版本可以选择下载 选择 操作系统复制下载链接直接下载...

Linux命令200例:tar命令主要用于创建、查看和提取归档文件(常用)
🏆作者简介,黑夜开发者,全栈领域新星创作者✌。CSDN专家博主,阿里云社区专家博主,2023年6月csdn上海赛道top4。 🏆数年电商行业从业经验,历任核心研发工程师,项目技术负责人。 &…...

【Django】Task4 序列化及其高级使用、ModelViewSet
【Django】Task4 序列化及其高级使用、ModelViewSet Task4主要了解序列化及掌握其高级使用,了解ModelViewSet的作用,ModelViewSet 是 Django REST framework(DRF)中的一个视图集类,用于快速创建处理模型数据的 API 视…...

FFMPEG RTMP流打开速度慢优化方法一
先上使用方法: codec_ctx->flags | AVFMT_FLAG_NOBUFFER; AVFMT_FLAG_NOBUFFER 标记如果没有设置,就会导致打开时探测的数据包丢AVFormatContext的缓存区中。 播放的时候,就从这些数据包开始,但是整个探测过程时间可能较长&…...
)
NextJs - Middleware(中间件)
中间件允许您在请求完成之前运行代码。然后,根据传入的请求,您可以通过重写、重定向、修改请求或响应标头或直接响应来修改响应。 中间件在缓存内容和路由匹配之前运行。 使用规则 使用项目根目录中的文件 middleware.ts(或 .js)…...

记录几个Hudi Flink使用问题及解决方法
前言 如题,记录几个Hudi Flink使用问题,学习和使用Hudi Flink有一段时间,虽然目前用的还不够深入,但是目前也遇到了几个问题,现在将遇到的这几个问题以及解决方式记录一下 版本 Flink 1.15.4Hudi 0.13.0 流写 流写…...

Go:测试框架GoConvey 简介
快速开始 GoConvey是一个完全兼容官方Go Test的测试框架,一般来说这种第三方库都比官方的功能要强大、更加易于使用、开发效率更高,闲话少说,先看一个example: package utils import (. "github.com/smartystreets/goconvey…...

JavaWeb-特殊文件(propertis与XML)
目录 Properties文件 一.properties介绍 二.properties使用 三.解决中文乱码问题 XML文件 一.XML介绍 二.XML文件的语法规则 三.XML的使用 Properties文件 一.properties介绍 1.什么是properties文件 Properties文件是一种常用的配置文件格式,用于存储键值…...
ffmpeg合并mp4视频文件
下载ffmpeg Download FFmpeg 2配置环境 右键此电脑-》属性-》高级系统设置 环境变量-》path 解压上面ffmpeg压缩包,找到bin目录,复制完整路径,添加到path环境变量中 测试ffmpeg ffmpeg合并MP4文件 创建一个文本文件,例如inpu…...
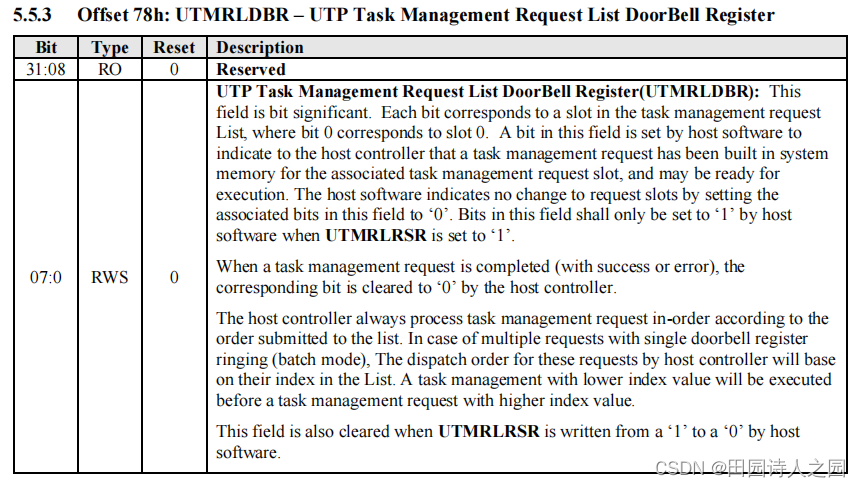
ATF BL1/BL2 ufs_read_blocks/ufs_write_blocks使用分析
ATF BL1/BL2 ufs_read_blocks/ufs_write_blocks使用分析 1 ATF的下载链接2 ATF BL1/BL2 ufs_read_blocks/ufs_write_blocks处理流程2.1 ATF BL1/BL2 ufs_read_blocks2.2 ATF BL1/BL2 ufs_write_blocks 3 UFS System Model4 ufs_read_blocks/ufs_write_blocks详细分析4.1 ufs_re…...
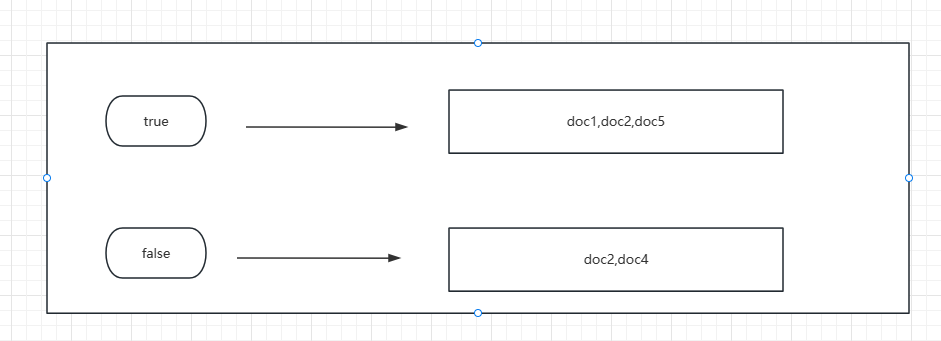
Elasticsearch(十二)搜索---搜索匹配功能③--布尔查询及filter查询原理
一、前言 本节主要学习ES匹配查询中的布尔查询以及布尔查询中比较特殊的filter查询及其原理。 复合搜索,顾名思义是一种在一个搜索语句中包含一种或多种搜索子句的搜索。 布尔查询是常用的复合查询,它把多个子查询组合成一个布尔表达式,这些…...

抖音批量下载助手:轻松管理您的抖音视频资源库
抖音批量下载助手:轻松管理您的抖音视频资源库 【免费下载链接】douyinhelper 抖音批量下载助手 项目地址: https://gitcode.com/gh_mirrors/do/douyinhelper 还在为手动保存抖音视频而烦恼吗?抖音批量下载助手正是您需要的效率工具!这…...

3步实现BERT模型轻量化部署与性能优化:基于Torch-Pruning的结构化剪枝指南
3步实现BERT模型轻量化部署与性能优化:基于Torch-Pruning的结构化剪枝指南 【免费下载链接】Torch-Pruning [CVPR 2023] Towards Any Structural Pruning; LLMs / Diffusion / Transformers / YOLOv8 / CNNs 项目地址: https://gitcode.com/gh_mirrors/to/Torch-P…...

FreeRTOS数据通信避坑指南:为什么我的MessageBuffer总是接收失败?
FreeRTOS消息缓冲区实战:从接收失败到高效通信的深度解析 第一次在FreeRTOS项目中使用MessageBuffer时,我遇到了一个令人抓狂的问题——明明发送端显示消息已成功写入,接收端却总是返回0字节。调试器显示缓冲区非空,但xMessageBuf…...

5分钟掌握Goldberg模拟器:告别Steam限制,畅玩单机游戏
5分钟掌握Goldberg模拟器:告别Steam限制,畅玩单机游戏 【免费下载链接】gbe_fork Fork of https://gitlab.com/Mr_Goldberg/goldberg_emulator 项目地址: https://gitcode.com/gh_mirrors/gbe/gbe_fork 你是否厌倦了Steam平台的网络限制ÿ…...

高效一键构建:DoL-Lyra整合包的智能自动化构建系统解析
高效一键构建:DoL-Lyra整合包的智能自动化构建系统解析 【免费下载链接】DOL-CHS-MODS Degrees of Lewdity 整合 项目地址: https://gitcode.com/gh_mirrors/do/DOL-CHS-MODS 还在为Degrees of Lewdity游戏的美化整合包配置而烦恼吗?您是否曾因手…...

uniapp 如何实现google登录-安卓端
uniapp 如何实现google登录-安卓端 本文只讲解uniapp安卓端如何获取到idToken来实现登录,ios使用uniapp官方方法可以获取 海外app貌似最常用的就是邮箱登录,在app上表现出来最常用的就是谷歌一键登录,或者邮箱加网页验证;google登…...
)
QT5实战:如何用QTreeView打造层级分明的下拉菜单(附完整代码)
QT5实战:用QTreeView构建层级下拉菜单的工程化实现 在桌面应用开发中,标准的下拉菜单往往难以应对复杂的层级数据展示需求。想象一下文件浏览器中的树形目录、多级分类的商品筛选器,或是组织架构中的部门-人员选择场景——这些都需要更强大的…...

GY39传感器实战:从数据采集到环境监测应用
1. GY39传感器入门指南 第一次拿到GY39传感器时,我完全被它小巧的体积震惊了。这个只有拇指大小的模块,居然能同时测量气压、温湿度、光照强度四种环境参数。它的工作电压是3-5V,用普通的USB充电器就能供电,特别适合DIY项目。 GY3…...
的进阶指南)
【Linux】深入理解进程调度:从nice值到实时优先级(RT Priority)的进阶指南
1. Linux进程调度基础:从nice值说起 第一次接触Linux进程调度时,我被那个叫"nice值"的概念搞懵了。为什么用"nice"这个词?后来才明白,这个命名其实很形象——越"nice"的进程越谦让,愿意…...

04. Web可访问性最佳实践:让每个用户都能平等访问
04. Web可访问性最佳实践:让每个用户都能平等访问 引言 Web 可访问性是前端开发的重要组成部分,它确保所有用户,包括残障人士,都能平等地访问和使用网站。作为一名把代码当散文写的 UI 匠人,我始终认为:好…...