Appium 2安装与使用java对Android进行自动化测试
文章目录
- 1、Appium 2.1安装
- 1.1、系统要求
- 1.2、安装Appium2.1服务
- 1.3、安装UiAutomator2驱动
- 1.4、安装Android SDK platform tools
- 1.5、下载OpenJDK
- 2、Android自动代码例子
- 2.1、安装Android自动化测试元素定位工具Appium Inspector
- 2.2、编写android app自动化测试代码和使用extentreports生成测试报告
1、Appium 2.1安装
1.1、系统要求
当前Appium2.1服务器的要求:
- 支持macOS、Linux或Windows操作系统
- Node.js版本要求^14.17.0 || ^16.13.0 | >=18.0.0
- NPM版本>= 8 (NPM通常与Node.js捆绑在一起,但可以独立升级)
系统要求:http://appium.io/docs/en/2.1/intro/requirements/
1.2、安装Appium2.1服务
下载nodejs:https://nodejs.org/zh-cn/download/releases
本文下载:node-v18.17.1-win-x64.zip
解压在D:\Program Files\nodejs\node-v18.17.1-win-x64目录
在PATH环境变量中添加
D:\Program Files\nodejs\node-v18.17.1-win-x64
npm默认使用国外源,网络原因容易出现安装依赖失败,本文设置npm为国内源
npm config set registry https://registry.npmmirror.com
运行NPM命令安装Appium,参考官方安装http://appium.io/docs/en/2.1/quickstart/install/
npm i --location=global appium
图片
安装成功后,输入下边命令可以直接启动服务
appium

1.3、安装UiAutomator2驱动
查看当前可用驱动appium driver list
C:\Users\admin>appium driver list
✔ Listing available drivers
- uiautomator2 [not installed]
- xcuitest [not installed]
- mac2 [not installed]
- espresso [not installed]
- safari [not installed]
- gecko [not installed]
- chromium [not installed]
- uiautomator2 用于android自动化测试
- xcuitest 用于ios自动化测试
本文只研究android测试,输入下边命令安装
appium driver install uiautomator2

官方参考:http://appium.io/docs/en/2.1/quickstart/uiauto2-driver/
可能会遇到的一个错误
Error installing Chromedriver: unable to verify the first certificate# 解决方法
npm config set strict-ssl false
npm config set ca=""
1.4、安装Android SDK platform tools
下载Android SDK platform tools:Android SDK platform tools
解压目录:D:\ProgramData\android\sdk\platform-tools
在PATH环境变量中添加
D:\ProgramData\android\sdk\platform-tools
如果使用真机测试,只安装platform tools就可以了,如果使用模拟器,需要安装完整在sdk,可以下载Android Studio:https://developer.android.google.cn/studio,使用Android Studio里面的管理SDK工具管理相关SDK和工具。


1.5、下载OpenJDK
下载OpenJDK:https://21doc.net/java/awesomejava#jvm-and-jdk
当前版本支持JDK11,本文使用bellsoft-jdk11.0.20+8-windows-amd64.zip,下载地址:https://bell-sw.com/pages/downloads/
下载后解压在:C:\Program Files\Java\bellsoft\jdk-11.0.20
在PATH环境变量中添加
C:\Progra~1\Java\bellsoft\jdk-11.0.20\bin
2、Android自动代码例子
2.1、安装Android自动化测试元素定位工具Appium Inspector
Appium Inspector官网:https://github.com/appium/appium-inspector
官方介绍Appium Inspector基本上只是一个带有用户界面的Appium客户端(如WebdriverIO、Appium的Java客户端、Appium的Python客户端等)。有一个接口用于指定使用哪个Appium服务器、设置哪些功能,然后在启动会话后与元素和其他Appium命令进行交互。
在1.22版本后appium-deskop不集成Appium Inspector,所以Appium Inspector需要单独打开。
Appium Inspector支持web和客户端版本。
-
web版本
web版本可以直接访问:https://inspector.appiumpro.com/使用。 -
客户端版本
下载地址:https://github.com/appium/appium-inspector/releases

点击“启动会话”,就可以打开APP,进行元素定位

参数配置可查看:https://appium.io/docs/en/2.1/guides/caps/
** 启动会话可能会出现下边的错误提示**
Exception in thread "main" org.openqa.selenium.SessionNotCreatedException: Could not start a new session. Response code 500. Message: An unknown server-side error occurred while processing the command. Original error: Check https://forum.xda-developers.com/t/i-cant-enable-write_secure_settings-for-an-app-over-adb.3855596/ for throubleshooting. Error executing adbExec. Original error: 'Command 'D:\\ProgramData\\android\\sdk\\platform-tools\\adb.exe -P 5037 -s 972cac1 shell 'settings delete global hidden_api_policy_pre_p_apps;settings delete global hidden_api_policy_p_apps;settings delete global hidden_api_policy'' exited with code 255'; Command output: Security exception: Permission denial: writing to settings requires:android.permission.WRITE_SECURE_SETTINGS
解决办法
-
小米设备: 开启 USB调试(安全设置)
(1) 手机-插入 sim卡
(2) 设置 - 更多设置 - 开发者选项 - USB调试(安全设置)- 开启 -
OPPO设备: 开启 禁止权限监控
开发者选项 - 禁止权限监控 - 开启
2.2、编写android app自动化测试代码和使用extentreports生成测试报告
使用appium的java-client库(https://github.com/appium/java-client)编写android app自动化测试代码,并使用extentreports生成测试报告
maven工程,pom.xml
<?xml version="1.0" encoding="UTF-8"?>
<project xmlns="http://maven.apache.org/POM/4.0.0"xmlns:xsi="http://www.w3.org/2001/XMLSchema-instance"xsi:schemaLocation="http://maven.apache.org/POM/4.0.0 http://maven.apache.org/xsd/maven-4.0.0.xsd"><modelVersion>4.0.0</modelVersion><groupId>com.penngo.app</groupId><artifactId>monitor_app</artifactId><version>1.0-SNAPSHOT</version><properties><maven.compiler.source>11</maven.compiler.source><maven.compiler.target>11</maven.compiler.target><project.build.sourceEncoding>UTF-8</project.build.sourceEncoding><log4j2.version>2.17.2</log4j2.version><slf4j_simple.version>1.7.36</slf4j_simple.version><lombok.version>1.18.24</lombok.version><testng.version>7.4.0</testng.version><hutool.version>5.8.3</hutool.version><extentreports-testng-adapter.version>1.2.3</extentreports-testng-adapter.version><extentreports.version>5.0.9</extentreports.version></properties><dependencies><dependency><groupId>io.appium</groupId><artifactId>java-client</artifactId><version>8.5.1</version>
<!--            <scope>test</scope>--></dependency><dependency><groupId>org.seleniumhq.selenium</groupId><artifactId>selenium-java</artifactId><version>4.9.1</version></dependency><dependency><groupId>org.testng</groupId><artifactId>testng</artifactId><version>${testng.version}</version></dependency><dependency><groupId>com.aventstack</groupId><artifactId>extentreports</artifactId><version>${extentreports.version}</version></dependency><dependency><groupId>com.aventstack</groupId><artifactId>extentreports-testng-adapter</artifactId><version>${extentreports-testng-adapter.version}</version></dependency><dependency><groupId>org.apache.logging.log4j</groupId><artifactId>log4j-api</artifactId><version>${log4j2.version}</version></dependency><dependency><groupId>org.apache.logging.log4j</groupId><artifactId>log4j-core</artifactId><version>${log4j2.version}</version></dependency><dependency><groupId>org.slf4j</groupId><artifactId>slf4j-simple</artifactId><version>${slf4j_simple.version}</version></dependency><dependency><groupId>cn.hutool</groupId><artifactId>hutool-all</artifactId><version>${hutool.version}</version></dependency></dependencies><repositories><repository><id>alimaven</id><name>Maven Aliyun Mirror</name><url>https://maven.aliyun.com/repository/central</url></repository></repositories><build><plugins><plugin><groupId>org.apache.maven.plugins</groupId><artifactId>maven-compiler-plugin</artifactId><version>3.8.1</version><configuration><source>${maven.compiler.source}</source><target>${maven.compiler.source}</target><encoding>UTF-8</encoding></configuration></plugin><plugin><groupId>org.apache.maven.plugins</groupId><artifactId>maven-surefire-plugin</artifactId><version>2.22.2</version><configuration><skip>true</skip></configuration></plugin></plugins></build>
</project>
测试用例java代码
import cn.hutool.core.io.FileUtil;
import com.aventstack.extentreports.testng.listener.ExtentIReporterSuiteClassListenerAdapter;
import io.appium.java_client.AppiumBy;
import io.appium.java_client.android.Activity;
import io.appium.java_client.android.AndroidDriver;
import lombok.extern.slf4j.Slf4j;
import org.openqa.selenium.OutputType;
import org.openqa.selenium.WebElement;
import org.openqa.selenium.support.ui.ExpectedConditions;
import org.openqa.selenium.support.ui.WebDriverWait;
import org.testng.Assert;
import org.testng.annotations.Listeners;
import org.testng.annotations.Test;import java.io.File;
import java.io.FileOutputStream;
import java.time.Duration;
import java.util.HashSet;
import java.util.List;/*** 例子* https://github.com/appium/java-client/blob/master/src/test/java/io/appium/java_client/android/AndroidTouchTest.java*/
@Listeners(ExtentIReporterSuiteClassListenerAdapter.class)
@Slf4j
@Test(description="APP测试", priority = 1)
public class AppTest {public static final String APP_ID = "com.penngo.xxx";protected static final int PORT = 4723;protected static AndroidDriver driver = null;private static AppiumDriverLocalService service;@BeforeClasspublic void setUpAll(){service = new AppiumServiceBuilder().withIPAddress("127.0.0.1").usingPort(PORT).build();service.start();UiAutomator2Options options = new UiAutomator2Options().setDeviceName("972cac1").setAppPackage(APP_ID).setAppActivity("com.penngo.xxx.activity.MainActivity");driver = new AndroidDriver(service.getUrl(), options);}@AfterClasspublic void tearDownAll(){if(driver != null){driver.quit();}}/*** app首页*/@Test(description="APP首页", priority = 1)public void testHome() {String activity = driver.currentActivity();Assert.assertEquals(activity, ".activity.MainActivity");}/*** app 我首页*/@Test(description="关于", priority = 2)public void testMe() {String activity = driver.currentActivity();// 获取底部5个选项WebElement navTabIndicator = driver.findElement(AppiumBy.id("com.penngo.xxx:id/NavTabIndicator"));List<WebElement> list = navTabIndicator.findElements(AppiumBy.className("android.widget.TextView"));System.out.println("list.size====="+ list.size());HashSet tabs = new HashSet();WebElement myElement = null;for(WebElement el:list){String text = el.getAttribute("text");if(text.equals("关于")){myElement = el;}}// 切换到关于选项卡myElement.click();new WebDriverWait(driver, Duration.ofSeconds(10)).until(ExpectedConditions.elementToBeClickable(AppiumBy.id("com.penngo.xxx:id/setting_fragment")));// 切换到设置WebElement setting = driver.findElement(AppiumBy.id("com.penngo.xxx:id/setting_fragment"));setting.click();new WebDriverWait(driver, Duration.ofSeconds(10)).until(d->{AndroidDriver driver2 = (AndroidDriver)d;String currentActive = driver2.currentActivity();if(!currentActive.equals(activity)){log.info("设置====" + activity);return currentActive;}else{return null;}});System.out.println("设置 Activity====" + driver.currentActivity());log.info("设置 Activity====" + driver.currentActivity());// 截图File screenShotFile = driver.getScreenshotAs(OutputType.FILE);System.out.println("screenShotFile====" + screenShotFile);FileUtil.copy(screenShotFile.getAbsolutePath(), new File("logs/setting.png").getAbsolutePath(), true);}}
运行效果:

生成测试报告:

更多官方例子:https://github.com/appium/java-client/tree/master/src/test/java/io/appium/java_client/android
相关文章:
Appium 2安装与使用java对Android进行自动化测试
文章目录 1、Appium 2.1安装1.1、系统要求1.2、安装Appium2.1服务1.3、安装UiAutomator2驱动1.4、安装Android SDK platform tools1.5、下载OpenJDK 2、Android自动代码例子2.1、安装Android自动化测试元素定位工具Appium Inspector2.2、编写android app自动化测试代码和使用ex…...

小程序运营方式有哪些?如何构建小程序运营框架?
如今,每个企业基本都做过至少一个小程序,但由于小程序本身不具备流量、也很少有自然流量,因此并不是每个企业都懂如何运营小程序。想了解小程序运营方式方法有哪些? 在正式运营小程序前,了解小程序的功能与企业实际经…...
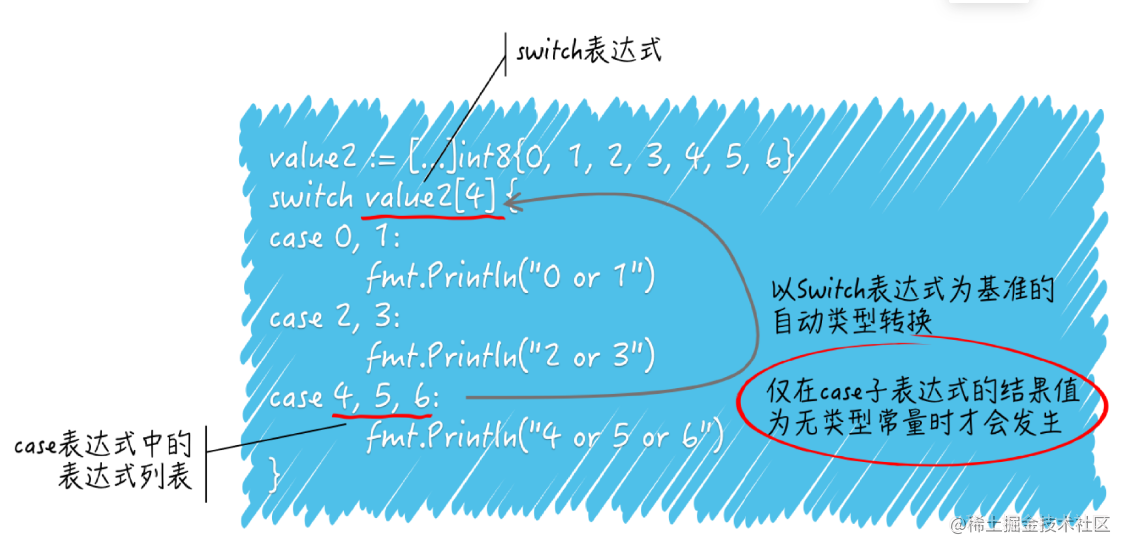
【golang】for语句和switch语句
使用携带range子句的for语句时需要注意哪些细节? numbers1 : []int{1, 2, 3, 4, 5, 6} for i : range numbers1 {if i 3 {numbers1[i] | i} } fmt.Println(numbers1)这段代码执行后会打印出什么内容? 答案:[1 2 3 7 5 6] 当for语句被执行…...

三、数据库索引
1、索引介绍 索引是一种用于快速查询和检索数据的数据结构,其本质可以看成是一种排序好的数据结构。 常见的索引结构有:B数,B树,Hash和红黑树等。在MySQL中,无论是 InnoDB还是MyISAM,都使用了B树作为索引…...

长时间带什么耳机最舒服,分享长时间佩戴舒服的耳机推荐
时代在进步,科技在不断革新。近年来,一种崭新的耳机——骨传导耳机,如火如荼地进驻耳机市场,引起一阵热潮。不论是平日里的工作出勤还是运动时的挥洒汗水,相比传统耳机,骨传导耳机无疑更加贴合现代生活的需…...
)
Yolov8小目标检测(1)
💡💡💡本文目标:通过原始基于yolov8的红外弱小目标检测,训练得到初版模型,进行问题点分析; 💡💡💡Yolo小目标检测,独家首发创新(原创),适用于Yolov5、Yolov7、Yolov8等各个Yolo系列,专栏文章提供每一步步骤和源码,带你轻松实现小目标检测涨点 💡💡…...

GPS定位漂移问题分析
有很多种因素会影响到GPS的准确率,以下是一个GPS误差引入简表: l 卫星时钟误差:0-1.5米 l 卫星轨道误差:1-5米 l 电离层引入的误差:0-30米 l 大气层引入的误差:0-30米 l 接收机…...

前端简介(HTML+CSS+JS)
学习Django过程中遇到一些前端相关的内容,于是整理了一下相关概念。 前端开发是创建WEB页面或APP等前端界面呈现给用户的过程。 如果只是想要入门前端,只要学习网页三剑客(HTML、CSS、JavaScript)即可。 如果把网页比喻成一个房子,HTML就是…...

List与String数组互转
一.List 转为 String 数组 1.使用toArray方法 public static void main(String[] args) {List<String> list Lists.newArrayList("1","2","3");// Java6以前版本String[] str1 list.toArray(new String[list.size()]);// Java6以后版本…...

MySQL中的数据类型
文章目录 1 常见的数据类型2 整数类型2.1 属性 M2.2 属性 UNSIGNED2.3 属性 ZEROFILL2.4 整数类型的适用场景 3 浮点类型4 定点类型5 位类型6 日期与时间类型6.1 YEAR 类型6.2 DATE 类型6.3 TIME 类型6.4 DATETIME 类型6.5 TIMESTAMP 类型 1 常见的数据类型 类型类型分类整数类…...

python多任务
一、多任务 1.1 概念 多任务就是指:同一时间能执行多个任务。比方我们的电脑能一边QQ聊天,一边写论文,还能听歌。 1.2 多任务的优势: 多任务的最大好处是 充分利用CPU资源,提高程序的执行效率。 1.3 多任务的两种表…...
)
c语言 - inline关键字(内联函数)
概念 在编程中,inline是一个关键字,用于修饰函数。inline函数是一种对编译器的提示,表示这个函数在编译时应该进行内联展开。 内联展开是指将函数的代码插入到调用该函数的地方,而不是通过函数调用的方式执行。这样可以减少函数调…...

如何在Ubuntu 18.04上安装PHP 7.4并搭建本地开发环境
引言 PHP是一种流行的服务器脚本语言,用于创建动态和交互式web页面。开始使用你选择的语言是学习编程的第一步。 本教程将指导您在Ubuntu上安装PHP 7.4,并通过命令行设置本地编程环境。您还将安装依赖管理器Composer,并通过运行脚本来测试您…...

狭义相对论
文章目录 一、为什么光速不变?二、为什么爱因斯坦坚信“相对性原理”三、逻辑和数学显威力,狭义相对论时空变换(洛伦兹变换)推导四、新时空变换带来的新时空观1、有关相对论时间的“傻问题”2、关于相对论的“怪问题”3、关于“双…...
仓库使用综合练习
目录 1、使用mysql:5.6和 owncloud 镜像,构建一个个人网盘。 2、安装搭建私有仓库 Harbor 3、编写Dockerfile制作Web应用系统nginx镜像,生成镜像nginx:v1.1,并推送其到私有仓库。 4、Dockerfile快速搭建自己专属的LAMP环境,生…...
如何在前端实现WebSocket发送和接收TCP消息(多线程模式)
目录 第一步:创建WebSocket连接第二步:监听WebSocket事件第三步:发送消息第四步:后端处理函数说明 当在前端实现WebSocket发送和接收TCP消息时,可以使用以下步骤来实现多线程模式。本文将详细介绍如何在前端实现WebSoc…...
VB.NET通过VB6 ActiveX DLL调用PowerBasic及FreeBasic动态库
前面说的Delphi通过Activex DLL同时调用PowerBasic和FreeBasic写的DLL,是在WINDOWS基础平台上完成的。 而 .NET平台是架在WINDOWS基础平台之上的,它的上面VB.NET或C#等开发的APP程序,下面写一下用VB.NET,通过VB6注册的Activex DLL…...

怎样不引入图片实现前端css实现x关闭按钮
首先初始化一个dom节点 <span class"closeButton"></span>设置样式 .closeButton {width: 12px;height: 12px;margin-top: 5px;margin-right: 5px;float: right;cursor: pointer;color: #105c86;}通过伪元素before after画两条线 margin-left 的设置是…...

SpringBoot实现文件下载的多种方式
SpringBoot实现文件下载的几种方式 1. 将文件以流的形式一次性读取到内存,通过响应输出流输出到前端1.1 下载文件 2. 将输入流中的数据循环写入到响应输出流中,而不是一次性读取到内存,通过响应输出流输出到前端3. 下载网络文件到本地4. 网络…...

uniapp简单版语音播放
mounted() {this.ScanAudio(http://118.178.137.235:88/ipoker.mp3, 3); // 开始播放音频},ScanAudio(url, count) {// 递归终止条件:当循环次数小于等于 0 时,停止递归if (count < 0) return;// 创建内部音频上下文对象var music uni.createInnerAu…...
-----深度优先搜索(DFS)实现)
c++ 面试题(1)-----深度优先搜索(DFS)实现
操作系统:ubuntu22.04 IDE:Visual Studio Code 编程语言:C11 题目描述 地上有一个 m 行 n 列的方格,从坐标 [0,0] 起始。一个机器人可以从某一格移动到上下左右四个格子,但不能进入行坐标和列坐标的数位之和大于 k 的格子。 例…...
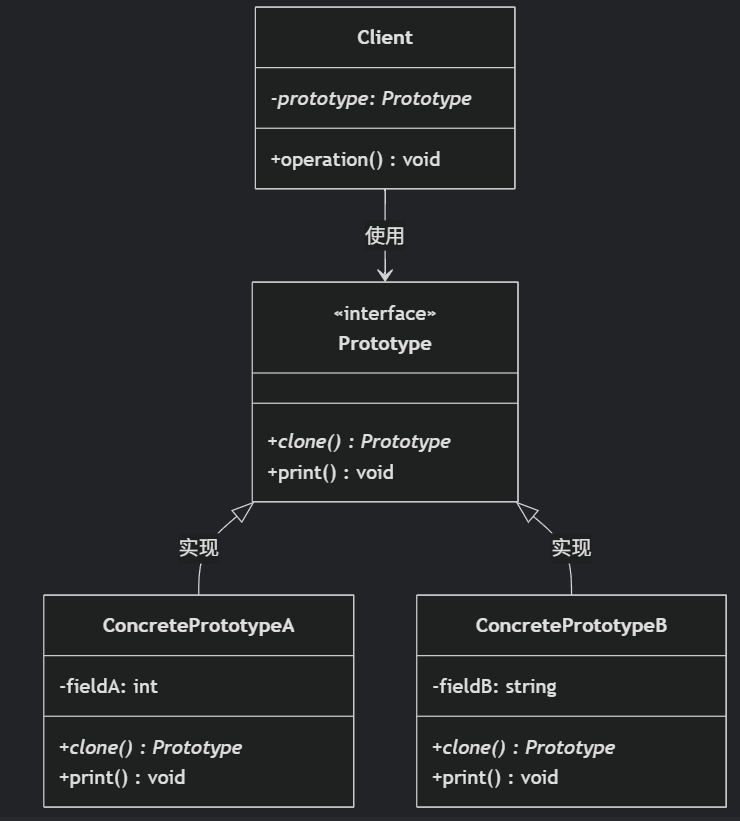
(二)原型模式
原型的功能是将一个已经存在的对象作为源目标,其余对象都是通过这个源目标创建。发挥复制的作用就是原型模式的核心思想。 一、源型模式的定义 原型模式是指第二次创建对象可以通过复制已经存在的原型对象来实现,忽略对象创建过程中的其它细节。 📌 核心特点: 避免重复初…...

【算法训练营Day07】字符串part1
文章目录 反转字符串反转字符串II替换数字 反转字符串 题目链接:344. 反转字符串 双指针法,两个指针的元素直接调转即可 class Solution {public void reverseString(char[] s) {int head 0;int end s.length - 1;while(head < end) {char temp …...
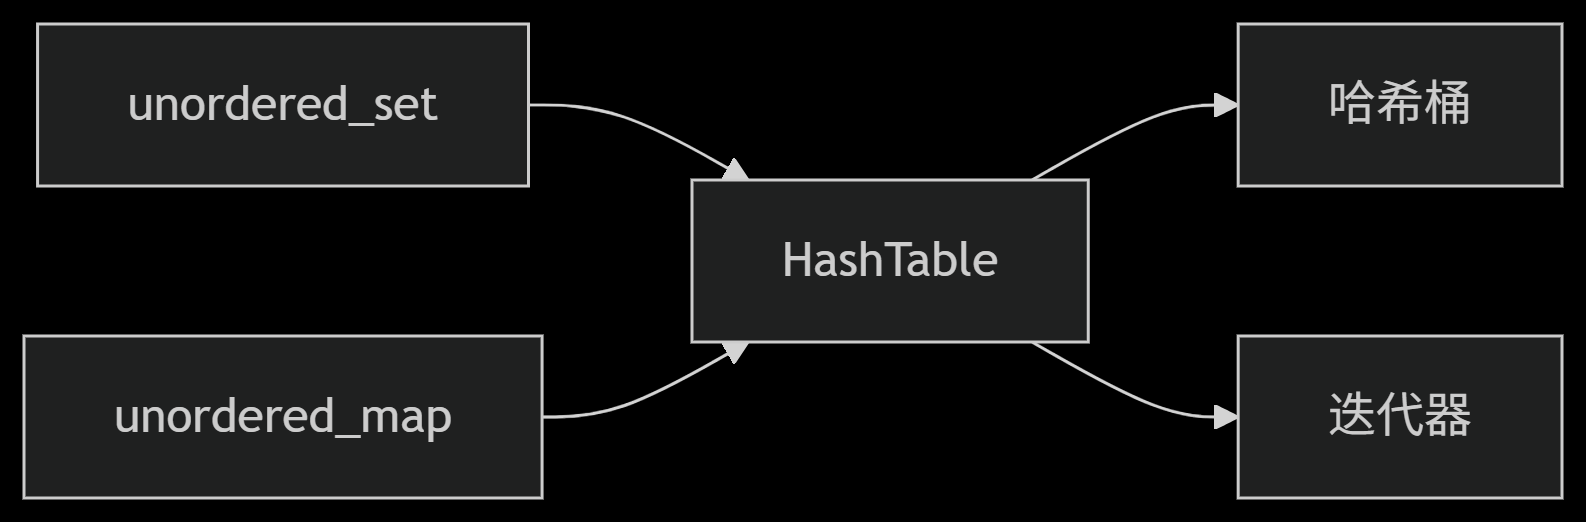
从零实现STL哈希容器:unordered_map/unordered_set封装详解
本篇文章是对C学习的STL哈希容器自主实现部分的学习分享 希望也能为你带来些帮助~ 那咱们废话不多说,直接开始吧! 一、源码结构分析 1. SGISTL30实现剖析 // hash_set核心结构 template <class Value, class HashFcn, ...> class hash_set {ty…...

在web-view 加载的本地及远程HTML中调用uniapp的API及网页和vue页面是如何通讯的?
uni-app 中 Web-view 与 Vue 页面的通讯机制详解 一、Web-view 简介 Web-view 是 uni-app 提供的一个重要组件,用于在原生应用中加载 HTML 页面: 支持加载本地 HTML 文件支持加载远程 HTML 页面实现 Web 与原生的双向通讯可用于嵌入第三方网页或 H5 应…...

4. TypeScript 类型推断与类型组合
一、类型推断 (一) 什么是类型推断 TypeScript 的类型推断会根据变量、函数返回值、对象和数组的赋值和使用方式,自动确定它们的类型。 这一特性减少了显式类型注解的需要,在保持类型安全的同时简化了代码。通过分析上下文和初始值,TypeSc…...

LCTF液晶可调谐滤波器在多光谱相机捕捉无人机目标检测中的作用
中达瑞和自2005年成立以来,一直在光谱成像领域深度钻研和发展,始终致力于研发高性能、高可靠性的光谱成像相机,为科研院校提供更优的产品和服务。在《低空背景下无人机目标的光谱特征研究及目标检测应用》这篇论文中提到中达瑞和 LCTF 作为多…...

车载诊断架构 --- ZEVonUDS(J1979-3)简介第一篇
我是穿拖鞋的汉子,魔都中坚持长期主义的汽车电子工程师。 老规矩,分享一段喜欢的文字,避免自己成为高知识低文化的工程师: 做到欲望极简,了解自己的真实欲望,不受外在潮流的影响,不盲从,不跟风。把自己的精力全部用在自己。一是去掉多余,凡事找规律,基础是诚信;二是…...

2.2.2 ASPICE的需求分析
ASPICE的需求分析是汽车软件开发过程中至关重要的一环,它涉及到对需求进行详细分析、验证和确认,以确保软件产品能够满足客户和用户的需求。在ASPICE中,需求分析的关键步骤包括: 需求细化:将从需求收集阶段获得的高层需…...

前端工具库lodash与lodash-es区别详解
lodash 和 lodash-es 是同一工具库的两个不同版本,核心功能完全一致,主要区别在于模块化格式和优化方式,适合不同的开发环境。以下是详细对比: 1. 模块化格式 lodash 使用 CommonJS 模块格式(require/module.exports&a…...