使用Pytorch和OpenCV实现视频人脸替换
“DeepFaceLab”项目已经发布了很长时间了,作为研究的目的,本文将介绍他的原理,并使用Pytorch和OpenCV创建一个简化版本。
本文将分成3个部分,第一部分从两个视频中提取人脸并构建标准人脸数据集。第二部分使用数据集与神经网络一起学习如何在潜在空间中表示人脸,并从该表示中重建人脸图像。最后部分使用神经网络在视频的每一帧中创建与源视频中相同但具有目标视频中人物表情的人脸。然后将原人脸替换为假人脸,并将新帧保存为新的假视频。
项目的基本结构(在第一次运行之前)如下所示
├── face_masking.py├── main.py├── face_extraction_tools.py├── quick96.py├── merge_frame_to_fake_video.py├── data│ ├── data_dst.mp4│ ├── data_src.mp4
main.py是主脚本,data文件夹包含程序需要的的data_dst.mp4和data_src.mp4文件。
提取和对齐-构建数据集
在第一部分中,我们主要介绍face_extraction_tools.py文件中的代码。
因为第一步是从视频中提取帧,所以需要构建一个将帧保存为JPEG图像的函数。这个函数接受一个视频的路径和另一个输出文件夹的路径。
def extract_frames_from_video(video_path: Union[str, Path], output_folder: Union[str, Path], frames_to_skip: int=0) -> None:"""Extract frame from video as a JPG images.Args:video_path (str | Path): the path to the input video from it the frame will be extractedoutput_folder (str | Path): the folder where the frames will be savedframes_to_skip (int): how many frames to skip after a frame which is saved. 0 will save all the frames.If, for example, this value is 2, the first frame will be saved, then frame 2 and 3 will be skipped,the 4th frame will be saved, and so on.Returns:"""video_path = Path(video_path)output_folder = Path(output_folder)if not video_path.exists():raise ValueError(f'The path to the video file {video_path.absolute()} is not exist')if not output_folder.exists():output_folder.mkdir(parents=True)video_capture = cv2.VideoCapture(str(video_path))extract_frame_counter = 0saved_frame_counter = 0while True:ret, frame = video_capture.read()if not ret:breakif extract_frame_counter % (frames_to_skip + 1) == 0:cv2.imwrite(str(output_folder / f'{saved_frame_counter:05d}.jpg'), frame, [cv2.IMWRITE_JPEG_QUALITY, 90])saved_frame_counter += 1extract_frame_counter += 1print(f'{saved_frame_counter} of {extract_frame_counter} frames saved')
函数首先检查视频文件是否存在,以及输出文件夹是否存在,如果不存在则自动创建。然后使用OpenCV 的videoccapture类来创建一个对象来读取视频,然后逐帧保存为输出文件夹中的JPEG文件。也可以根据frames_to_skip参数跳过帧。

然后就是需要构建人脸提取器。该工具应该能够检测图像中的人脸,提取并对齐它。构建这样一个工具的最佳方法是创建一个FaceExtractor类,其中包含检测、提取和对齐的方法。
对于检测部分,我们将使用带有OpenCV的YuNet。YuNet是一个快速准确的基于cnn的人脸检测器,可以由OpenCV中的FaceDetectorYN类使用。要创建这样一个FaceDetectorYN对象,我们需要一个带有权重的ONNX文件。该文件可以在OpenCV Zoo中找到,当前版本名为“face_detection_yunet_2023mar.onnx”。
我们的init()方法如下:
def __init__(self, image_size):"""Create a YuNet face detector to get face from image of size 'image_size'. The YuNet modelwill be downloaded from opencv zoo, if it's not already exist.Args:image_size (tuple): a tuple of (width: int, height: int) of the image to be analyzed"""detection_model_path = Path('models/face_detection_yunet_2023mar.onnx')if not detection_model_path.exists():detection_model_path.parent.mkdir(parents=True, exist_ok=True)url = "https://github.com/opencv/opencv_zoo/blob/main/models/face_detection_yunet/face_detection_yunet_2023mar.onnx"print('Downloading face detection model...')filename, headers = urlretrieve(url, filename=str(detection_model_path))print('Download finish!')self.detector = cv2.FaceDetectorYN.create(str(detection_model_path), "", image_size)
函数首先检查权重文件是否存在,如果不存在,则从web下载。然后使用权重文件和要分析的图像大小创建FaceDetectorYN对象。检测方法采用YuNet检测方法在图像中寻找人脸
def detect(self, image):ret, faces = self.detector.detect(image)return ret, faces
YuNet的输出是一个大小为[num_faces, 15]的2D数组,包含以下信息:
- 0-1:边界框左上角的x, y
- 2-3:边框的宽度、高度
- 4-5:右眼的x, y(样图中蓝点)
- 6-7:左眼x, y(样图中红点)
- 8-9:鼻尖x, y(示例图中绿色点)
- 10-11:嘴巴右角的x, y(样例图像中的粉色点)
- 12-13:嘴角左角x, y(样例图中黄色点)
- 14:面部评分

现在已经有了脸部位置数据,我们可以用它来获得脸部的对齐图像。这里主要利用眼睛位置的信息。我们希望眼睛在对齐后的图像中处于相同的水平(相同的y坐标)。
@staticmethoddef align(image, face, desired_face_width=256, left_eye_desired_coordinate=np.array((0.37, 0.37))):"""Align the face so the eyes will be at the same levelArgs:image (np.ndarray): image with faceface (np.ndarray): face coordinates from the detection stepdesired_face_width (int): the final width of the aligned face imageleft_eye_desired_coordinate (np.ndarray): a length 2 array of values between0 and 1 where the left eye should be in the aligned imageReturns:(np.ndarray): aligned face image"""desired_face_height = desired_face_widthright_eye_desired_coordinate = np.array((1 - left_eye_desired_coordinate[0], left_eye_desired_coordinate[1]))# get coordinate of the center of the eyes in the imageright_eye = face[4:6]left_eye = face[6:8]# compute the angle of the right eye relative to the left eyedist_eyes_x = right_eye[0] - left_eye[0]dist_eyes_y = right_eye[1] - left_eye[1]dist_between_eyes = np.sqrt(dist_eyes_x ** 2 + dist_eyes_y ** 2)angles_between_eyes = np.rad2deg(np.arctan2(dist_eyes_y, dist_eyes_x) - np.pi)eyes_center = (left_eye + right_eye) // 2desired_dist_between_eyes = desired_face_width * (right_eye_desired_coordinate[0] - left_eye_desired_coordinate[0])scale = desired_dist_between_eyes / dist_between_eyesM = cv2.getRotationMatrix2D(eyes_center, angles_between_eyes, scale)M[0, 2] += 0.5 * desired_face_width - eyes_center[0]M[1, 2] += left_eye_desired_coordinate[1] * desired_face_height - eyes_center[1]face_aligned = cv2.warpAffine(image, M, (desired_face_width, desired_face_height), flags=cv2.INTER_CUBIC)return face_aligned
这个方法获取单张人脸的图像和信息,输出图像的宽度和期望的左眼相对位置。我们假设输出图像是平方的,并且右眼的期望位置具有相同的y位置和x位置的1 - left_eye_x。计算两眼之间的距离和角度,以及两眼之间的中心点。
最后一个方法是extract方法,它类似于align方法,但没有转换,它也返回图像中人脸的边界框。
def extract_and_align_face_from_image(input_dir: Union[str, Path], desired_face_width: int=256) -> None:"""Extract the face from an image, align it and save to a directory inside in the input directoryArgs:input_dir (str|Path): path to the directory contains the images extracted from a videodesired_face_width (int): the width of the aligned imaged in pixelsReturns:"""input_dir = Path(input_dir)output_dir = input_dir / 'aligned'if output_dir.exists():rmtree(output_dir)output_dir.mkdir()image = cv2.imread(str(input_dir / '00000.jpg'))image_height = image.shape[0]image_width = image.shape[1]detector = FaceExtractor((image_width, image_height))for image_path in tqdm(list(input_dir.glob('*.jpg'))):image = cv2.imread(str(image_path))ret, faces = detector.detect(image)if faces is None:continueface_aligned = detector.align(image, faces[0, :], desired_face_width)cv2.imwrite(str(output_dir / f'{image_path.name}'), face_aligned, [cv2.IMWRITE_JPEG_QUALITY, 90])

训练
对于网络,我们将使用AutoEncoder。在AutoEncoder中,有两个主要组件——编码器和解码器。编码器获取原始图像并找到它的潜在表示,解码器利用潜在表示重构原始图像。
对于我们的任务,要训练一个编码器来找到一个潜在的人脸表示和两个解码器——一个可以重建源人脸,另一个可以重建目标人脸。

在这三个组件被训练之后,我们回到最初的目标:创建一个源面部但具有目标表情的图像。也就是说使用解码器A和人脸B的图像。

面孔的潜在空间保留了面部的主要特征,如位置、方向和表情。解码器获取这些编码信息并学习如何构建全脸图像。由于解码器A只知道如何构造A类型的脸,因此它从编码器中获取图像B的特征并从中构造A类型的图像。
在本文中,我们将使用来自原始DeepFaceLab项目的Quick96架构的一个小修改版本。

模型的全部细节可以在quick96.py文件中。
在我们训练模型之前,还需要处理数据。为了使模型具有鲁棒性并避免过拟合,我们还需要在原始人脸图像上应用两种类型的增强。第一个是一般的转换,包括旋转,缩放,在x和y方向上的平移,以及水平翻转。对于每个转换,我们为参数或概率定义一个范围(例如,我们可以用来旋转的角度范围),然后从范围中选择一个随机值来应用于图像。
random_transform_args = {'rotation_range': 10,'zoom_range': 0.05,'shift_range': 0.05,'random_flip': 0.5,}def random_transform(image, rotation_range, zoom_range, shift_range, random_flip):"""Make a random transformation for an image, including rotation, zoom, shift and flip.Args:image (np.array): an image to be transformedrotation_range (float): the range of possible angles to rotate - [-rotation_range, rotation_range]zoom_range (float): range of possible scales - [1 - zoom_range, 1 + zoom_range]shift_range (float): the percent of translation for x and yrandom_flip (float): the probability of horizontal flipReturns:(np.array): transformed image"""h, w = image.shape[0:2]rotation = np.random.uniform(-rotation_range, rotation_range)scale = np.random.uniform(1 - zoom_range, 1 + zoom_range)tx = np.random.uniform(-shift_range, shift_range) * wty = np.random.uniform(-shift_range, shift_range) * hmat = cv2.getRotationMatrix2D((w // 2, h // 2), rotation, scale)mat[:, 2] += (tx, ty)result = cv2.warpAffine(image, mat, (w, h), borderMode=cv2.BORDER_REPLICATE)if np.random.random() < random_flip:result = result[:, ::-1]return result
第2个是通过使用带噪声的插值图产生的失真。这种扭曲将迫使模型理解人脸的关键特征,并使其更加一般化。
def random_warp(image):"""Create a distorted face image and a target undistorted imageArgs:image (np.array): image to warpReturns:(np.array): warped version of the image(np.array): target image to construct from the warped version"""h, w = image.shape[:2]# build coordinate map to wrap the image according torange_ = np.linspace(h / 2 - h * 0.4, h / 2 + h * 0.4, 5)mapx = np.broadcast_to(range_, (5, 5))mapy = mapx.T# add noise to get a distortion of the face while warp the imagemapx = mapx + np.random.normal(size=(5, 5), scale=5*h/256)mapy = mapy + np.random.normal(size=(5, 5), scale=5*h/256)# get interpolation map for the center of the face with size of (96, 96)interp_mapx = cv2.resize(mapx, (int(w / 2 * (1 + 0.25)) , int(h / 2 * (1 + 0.25))))[int(w/2 * 0.25/2):int(w / 2 * (1 + 0.25) - w/2 * 0.25/2), int(w/2 * 0.25/2):int(w / 2 * (1 + 0.25) - w/2 * 0.25/2)].astype('float32')interp_mapy = cv2.resize(mapy, (int(w / 2 * (1 + 0.25)) , int(h / 2 * (1 + 0.25))))[int(w/2 * 0.25/2):int(w / 2 * (1 + 0.25) - w/2 * 0.25/2), int(w/2 * 0.25/2):int(w / 2 * (1 + 0.25) - w/2 * 0.25/2)].astype('float32')# remap the face image according to the interpolation map to get warp versionwarped_image = cv2.remap(image, interp_mapx, interp_mapy, cv2.INTER_LINEAR)# create the target (undistorted) image# find a transformation to go from the source coordinates to the destination coordinatesrc_points = np.stack([mapx.ravel(), mapy.ravel()], axis=-1)dst_points = np.mgrid[0:w//2+1:w//8, 0:h//2+1:h//8].T.reshape(-1, 2)# We want to find a similarity matrix (scale rotation and translation) between the# source and destination points. The matrix should have the structure# [[a, -b, c],# [b, a, d]]# so we can construct unknown vector [a, b, c, d] and solve for it using least# squares with the source and destination x and y points.A = np.zeros((2 * src_points.shape[0], 2))A[0::2, :] = src_points # [x, y]A[0::2, 1] = -A[0::2, 1] # [x, -y]A[1::2, :] = src_points[:, ::-1] # [y, x]A = np.hstack((A, np.tile(np.eye(2), (src_points.shape[0], 1)))) # [x, -y, 1, 0] for x coordinate and [y, x, 0 ,1] for y coordinateb = dst_points.flatten() # arrange as [x0, y0, x1, y1, ..., xN, yN]similarity_mat = np.linalg.lstsq(A, b, rcond=None)[0] # get the similarity matrix elements as vector [a, b, c, d]# construct the similarity matrix from the result vector of the least squaressimilarity_mat = np.array([[similarity_mat[0], -similarity_mat[1], similarity_mat[2]],[similarity_mat[1], similarity_mat[0], similarity_mat[3]]])# use the similarity matrix to construct the target image using affine transformationtarget_image = cv2.warpAffine(image, similarity_mat, (w // 2, h // 2))return warped_image, target_image
这个函数有两个部分,我们首先在面部周围的区域创建图像的坐标图。有一个x坐标的映射和一个y坐标的映射。mapx和mapy变量中的值是以像素为单位的坐标。然后在图像上添加一些噪声,使坐标在随机方向上移动。我们添加的噪声,得到了一个扭曲的坐标(像素在随机方向上移动一点)。然后裁剪了插值后的贴图,使其包含脸部的中心,大小为96x96像素。现在我们可以使用扭曲的映射来重新映射图像,得到一个新的扭曲的图像。
在第二部分创建未扭曲的图像,这是模型应该从扭曲的图像中创建的目标图像。使用噪声作为源坐标,并为目标图像定义一组目标坐标。然后我们使用最小二乘法找到一个相似变换矩阵(尺度旋转和平移),将其从源坐标映射到目标坐标,并将其应用于图像以获得目标图像。

然后就可以创建一个Dataset类来处理数据了。FaceData类非常简单。它获取包含src和dst文件夹的文件夹的路径,其中包含我们在前一部分中创建的数据,并返回大小为(2 * 96,2 * 96)归一化为1的随机源和目标图像。我们的网络将得到的是一个经过变换和扭曲的图像,以及源脸和目标脸的目标图像。所以还需要实现了一个collate_fn
def collate_fn(self, batch):"""Collate function to arrange the data returns from a batch. The batch returns a listof tuples contains pairs of source and destination images, which is the input of thisfunction, and the function returns a tuple with 4 4D tensors of the warp and targetimages for the source and destinationArgs:batch (list): a list of tuples contains pairs of source and destination imagesas numpy arrayReturns:(torch.Tensor): a 4D tensor of the wrap version of the source images(torch.Tensor): a 4D tensor of the target source images(torch.Tensor): a 4D tensor of the wrap version of the destination images(torch.Tensor): a 4D tensor of the target destination images"""images_src, images_dst = list(zip(*batch)) # convert list of tuples with pairs of images into tuples of source and destination imageswarp_image_src, target_image_src = get_training_data(images_src, len(images_src))warp_image_src = torch.tensor(warp_image_src, dtype=torch.float32).permute(0, 3, 1, 2).to(device)target_image_src = torch.tensor(target_image_src, dtype=torch.float32).permute(0, 3, 1, 2).to(device)warp_image_dst, target_image_dst = get_training_data(images_dst, len(images_dst))warp_image_dst = torch.tensor(warp_image_dst, dtype=torch.float32).permute(0, 3, 1, 2).to(device)target_image_dst = torch.tensor(target_image_dst, dtype=torch.float32).permute(0, 3, 1, 2).to(device)return warp_image_src, target_image_src, warp_image_dst, target_image_dst
当我们从Dataloader对象获取数据时,它将返回一个元组,其中包含来自FaceData对象的源图像和目标图像对。collate_fn接受这个结果,并对图像进行变换和失真,得到目标图像,并为扭曲的源图像、目标源图像、扭曲的目标图像和目标目标图像返回四个4D张量。
训练使用的损失函数是MSE (L2)损失和DSSIM的组合
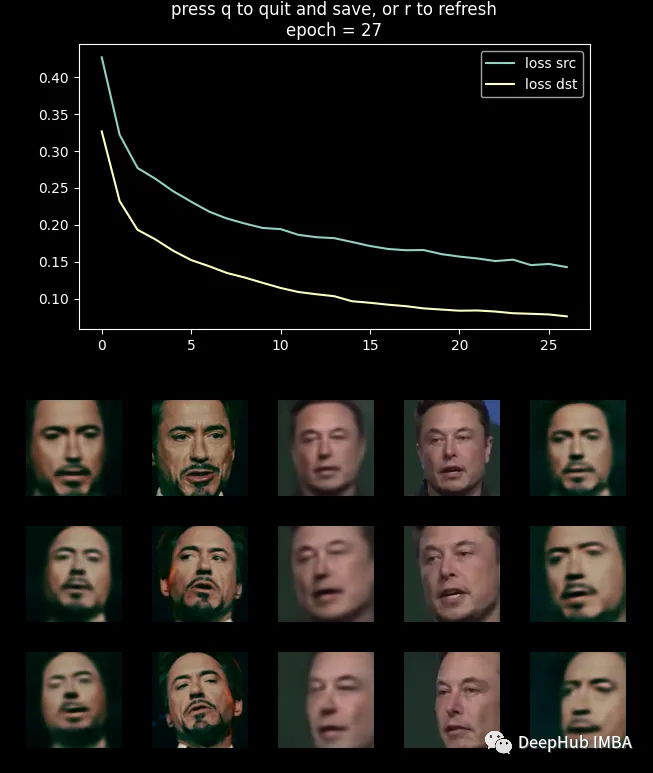
训练的指标和结果如上图所示
生成视频
在最后一步就是创建视频。处理此任务的函数称为merge_frame_to_fake_video.py。我们使用MediaPipe创建了facemask类。
当初始化facemask对象时,初始化MediaPipe人脸检测器。
class FaceMasking:def __init__(self):landmarks_model_path = Path('models/face_landmarker.task')if not landmarks_model_path.exists():landmarks_model_path.parent.mkdir(parents=True, exist_ok=True)url = "https://storage.googleapis.com/mediapipe-models/face_landmarker/face_landmarker/float16/latest/face_landmarker.task"print('Downloading face landmarks model...')filename, headers = urlretrieve(url, filename=str(landmarks_model_path))print('Download finish!')base_options = python_mp.BaseOptions(model_asset_path=str(landmarks_model_path))options = vision.FaceLandmarkerOptions(base_options=base_options,output_face_blendshapes=False,output_facial_transformation_matrixes=False,num_faces=1)self.detector = vision.FaceLandmarker.create_from_options(options)
这个类也有一个从人脸图像中获取掩码的方法:
def get_mask(self, image):"""return uint8 mask of the face in imageArgs:image (np.ndarray): RGB image with single faceReturns:(np.ndarray): single channel uint8 mask of the face"""im_mp = mp.Image(image_format=mp.ImageFormat.SRGB, data=image.astype(np.uint8).copy())detection_result = self.detector.detect(im_mp)x = np.array([landmark.x * image.shape[1] for landmark in detection_result.face_landmarks[0]], dtype=np.float32)y = np.array([landmark.y * image.shape[0] for landmark in detection_result.face_landmarks[0]], dtype=np.float32)hull = np.round(np.squeeze(cv2.convexHull(np.column_stack((x, y))))).astype(np.int32)mask = np.zeros(image.shape[:2], dtype=np.uint8)mask = cv2.fillConvexPoly(mask, hull, 255)kernel = np.ones((7, 7), np.uint8)mask = cv2.erode(mask, kernel)return mask
该函数首先将输入图像转换为MediaPipe图像结构,然后使用人脸检测器查找人脸。然后使用OpenCV找到点的凸包,并使用OpenCV的fillConvexPoly函数填充凸包的区域,从而得到一个二进制掩码。最后,我们应用侵蚀操作来缩小遮蔽。
def get_mask(self, image):"""return uint8 mask of the face in imageArgs:image (np.ndarray): RGB image with single faceReturns:(np.ndarray): single channel uint8 mask of the face"""im_mp = mp.Image(image_format=mp.ImageFormat.SRGB, data=image.astype(np.uint8).copy())detection_result = self.detector.detect(im_mp)x = np.array([landmark.x * image.shape[1] for landmark in detection_result.face_landmarks[0]], dtype=np.float32)y = np.array([landmark.y * image.shape[0] for landmark in detection_result.face_landmarks[0]], dtype=np.float32)hull = np.round(np.squeeze(cv2.convexHull(np.column_stack((x, y))))).astype(np.int32)mask = np.zeros(image.shape[:2], dtype=np.uint8)mask = cv2.fillConvexPoly(mask, hull, 255)kernel = np.ones((7, 7), np.uint8)mask = cv2.erode(mask, kernel)return mask
merge_frame_to_fake_video函数就是将上面所有的步骤整合,创建一个新的视频对象,一个FaceExtracot对象,一个facemask对象,创建神经网络组件,并加载它们的权重。
def merge_frames_to_fake_video(dst_frames_path, model_name='Quick96', saved_models_dir='saved_model'):model_path = Path(saved_models_dir) / f'{model_name}.pth'dst_frames_path = Path(dst_frames_path)image = Image.open(next(dst_frames_path.glob('*.jpg')))image_size = image.sizeresult_video = cv2.VideoWriter(str(dst_frames_path.parent / 'fake.mp4'), cv2.VideoWriter_fourcc(*'MJPG'), 30, image.size)face_extractor = FaceExtractor(image_size)face_masker = FaceMasking()encoder = Encoder().to(device)inter = Inter().to(device)decoder = Decoder().to(device)saved_model = torch.load(model_path)encoder.load_state_dict(saved_model['encoder'])inter.load_state_dict(saved_model['inter'])decoder.load_state_dict(saved_model['decoder_src'])model = torch.nn.Sequential(encoder, inter, decoder)
然后针对目标视频中的所有帧,找到脸。如果没有人脸就把画面写入视频。如果有人脸,将其提取出来,转换为网络的适当输入,并生成新的人脸。
对原人脸和新人脸进行遮蔽,利用遮蔽图像上的矩量找到原人脸的中心。使用无缝克隆,以逼真的方式将新脸代替原来的脸(例如,改变假脸的肤色,以适应原来的脸皮肤)。最后将结果作为一个新的帧放回原始帧,并将其写入视频文件。
frames_list = sorted(dst_frames_path.glob('*.jpg'))for ii, frame_path in enumerate(frames_list, 1):print(f'Working om {ii}/{len(frames_list)}')frame = cv2.imread(str(frame_path))retval, face = face_extractor.detect(frame)if face is None:result_video.write(frame)continueface_image, face = face_extractor.extract(frame, face[0])face_image = face_image[..., ::-1].copy()face_image_cropped = cv2.resize(face_image, (96, 96)) #face_image_resized[96//2:96+96//2, 96//2:96+96//2]face_image_cropped_torch = torch.tensor(face_image_cropped / 255., dtype=torch.float32).permute(2, 0, 1).unsqueeze(0).to(device)generated_face_torch = model(face_image_cropped_torch)generated_face = (generated_face_torch.squeeze().permute(1,2,0).detach().cpu().numpy() * 255).astype(np.uint8)mask_origin = face_masker.get_mask(face_image_cropped)mask_fake = face_masker.get_mask(generated_face)origin_moments = cv2.moments(mask_origin)cx = np.round(origin_moments['m10'] / origin_moments['m00']).astype(int)cy = np.round(origin_moments['m01'] / origin_moments['m00']).astype(int)try:output_face = cv2.seamlessClone(generated_face, face_image_cropped, mask_fake, (cx, cy), cv2.NORMAL_CLONE)except:print('Skip')continuefake_face_image = cv2.resize(output_face, (face_image.shape[1], face_image.shape[0]))fake_face_image = fake_face_image[..., ::-1] # change to BGRframe[face[1]:face[1]+face[3], face[0]:face[0]+face[2]] = fake_face_imageresult_video.write(frame)result_video.release()
一帧的结果是这样的

模型并不完美,面部的某些角度,特别是侧面视图,会导致图像不那么好,但总体效果不错。
整合
为了运行整个过程,还需要创建一个主脚本。
from pathlib import Pathimport face_extraction_tools as fetimport quick96 as q96from merge_frame_to_fake_video import merge_frames_to_fake_video##### user parameters ###### True for executing the stepextract_and_align_src = Trueextract_and_align_dst = Truetrain = Trueeval = Falsemodel_name = 'Quick96' # use this name to save and load the modelnew_model = False # True for creating a new model even if a model with the same name already exists##### end of user parameters ###### the path for the videos to processdata_root = Path('./data')src_video_path = data_root / 'data_src.mp4'dst_video_path = data_root / 'data_dst.mp4'# path to folders where the intermediate product will be savedsrc_processing_folder = data_root / 'src'dst_processing_folder = data_root / 'dst'# step 1: extract the frames from the videosif extract_and_align_src:fet.extract_frames_from_video(video_path=src_video_path, output_folder=src_processing_folder, frames_to_skip=0)if extract_and_align_dst:fet.extract_frames_from_video(video_path=dst_video_path, output_folder=dst_processing_folder, frames_to_skip=0)# step 2: extract and align face from framesif extract_and_align_src:fet.extract_and_align_face_from_image(input_dir=src_processing_folder, desired_face_width=256)if extract_and_align_dst:fet.extract_and_align_face_from_image(input_dir=dst_processing_folder, desired_face_width=256)# step 3: train the modelif train:q96.train(str(data_root), model_name, new_model, saved_models_dir='saved_model')# step 4: create the fake videoif eval:merge_frames_to_fake_video(dst_processing_folder, model_name, saved_models_dir='saved_model')
总结
在这篇文章中,我们介绍了DeepFaceLab的运行流程,并使用我们自己的方法实现了该过程。我们首先从视频中提取帧,然后从帧中提取人脸并对齐它们以创建一个数据库。使用神经网络来学习如何在潜在空间中表示人脸以及如何重建人脸。遍历了目标视频的帧,找到了人脸并替换,这就是这个项目的完整流程。
本文只做学习研究,实际项目请参见:
https://avoid.overfit.cn/post/ec72d69b57464a08803c86db8720e3e9
作者:DZ
相关文章:
使用Pytorch和OpenCV实现视频人脸替换
“DeepFaceLab”项目已经发布了很长时间了,作为研究的目的,本文将介绍他的原理,并使用Pytorch和OpenCV创建一个简化版本。 本文将分成3个部分,第一部分从两个视频中提取人脸并构建标准人脸数据集。第二部分使用数据集与神经网络一…...

【力扣】202. 快乐数 <哈希>
【力扣】202. 快乐数 编写一个算法来判断一个数 n 是不是快乐数。 【快乐数】 定义为: 对于一个正整数,每一次将该数替换为它每个位置上的数字的平方和。 然后重复这个过程直到这个数变为 1,也可能是 无限循环 但始终变不到 1。 如果这个过程…...
深度学习4. 循环神经网络 – Recurrent Neural Network | RNN
目录 循环神经网络 – Recurrent Neural Network | RNN 为什么需要 RNN ?独特价值是什么? RNN 的基本原理 RNN 的优化算法 RNN 到 LSTM – 长短期记忆网络 从 LSTM 到 GRU RNN 的应用和使用场景 总结 百度百科维基百科 循环神经网络 – Recurre…...
自动驾驶感知传感器标定安装说明
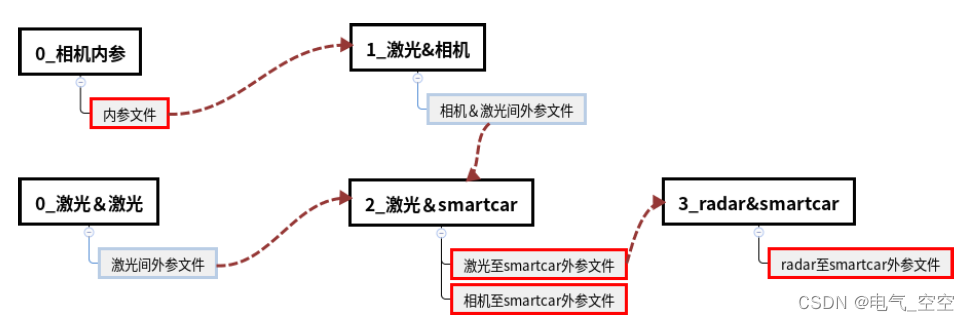
1. 概述 本标定程序为整合现开发的高速车所有标定模块,可实现相机内参标定和激光、相机、前向毫米波 至车辆后轴中心标定,标定参数串联传递并提供可视化工具验证各个模块标定精度。整体标定流程如下,标定顺序为下图前标0-->1-->2-->3,相同编号标定顺序没有强制要求…...
基于JAYA算法优化的BP神经网络(预测应用) - 附代码
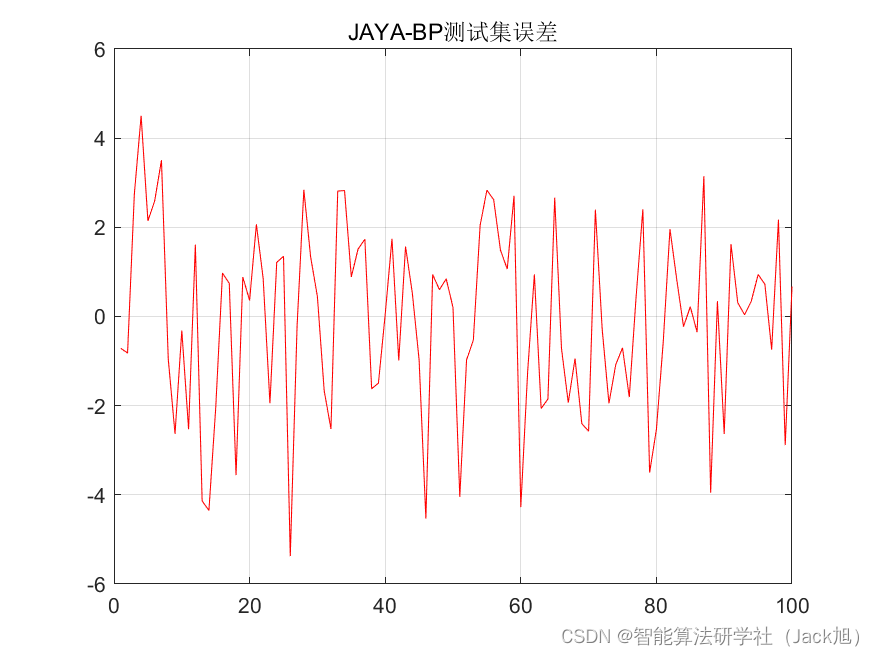
基于JAYA算法优化的BP神经网络(预测应用) - 附代码 文章目录 基于JAYA算法优化的BP神经网络(预测应用) - 附代码1.数据介绍2.JAYA优化BP神经网络2.1 BP神经网络参数设置2.2 JAYA算法应用 4.测试结果:5.Matlab代码 摘要…...
基于单片机串口控制直流电机调速
一、系统方案 (2)本设计采用STC89C5单片机作为主控器,串口控制直流电机调速,串口助手发送1-8,改变电机速度,数码管显示对应速度。 二、硬件设计 原理图如下: 三、单片机软件设计 1、首先是系统初始化 TMOD0x21;//定…...
Linux(基础篇一)
Linux基础篇 Linux基础篇一1. Linux文件系统与目录结构1.1 Linux文件系统1.2 Linux目录结构 2. VI/VIM编辑器2.1 vi/vim是什么2.2 模式间的转换2.3 一般模式2.4 插入模式2.4.1 进入编辑模式2.4.2 退出编辑模式 2.5 命令模式 3. 网络配置3.1 网络连接模式3.2 修改静态ip3.3 配置…...

小程序如何手动变更会员卡等级
有时候需要商家手动变更会员卡等级,以让会员获取更多的福利和特权。下面就介绍一些小程序手动变更会员卡等级的常见方法和策略。 1. 找到指定的会员卡。在管理员后台->会员管理处,找到需要更改等级的会员卡。也支持对会员卡按卡号、手机号和等级进行…...
Tensorflow2.0搭建网络八股
目录 引言:keras与Tensorflow2.0结合 一、六步法 1.导入头文件:import 2.收集处理训练集和测试集:train, test: 3.描述各层网model tf.keras.models.Sequential: 4.描述使用什么优化反向传播:model.c…...

【安装GPU版本pytorch,torch.cuda.is_available()仍然返回False问题】
TOC 第一步 检查cuda是否安装,CUDA环境变量是否正确设置,比如linux需要设置在PATH,window下环境变量编辑看看,是否有CUDA 第二步,核查python中torch版本 首先查看你环境里的pytorch是否是cuda版本,我这…...
Git 版本控制系统
git相关代码 0、清屏幕:clear 1、查看版本号 git -v2、暂存、更改、提交 3、当前项目下暂存区中有哪些文件 git ls-files4、查看文件状态 git status -s5、暂时存储,可以临时恢复代码内容 git restore 目标文件 //(注意:完全…...

70吨服务区生活污水处理设备加工厂家电话
70吨服务区生活污水处理设备加工厂家电话 设备简单说明 调节池 由于来水标高低,无法直接流入地埋式生活污水处理设备,在生化一体化设备前增加集水调节池一座。集水提升池内装有两台潜水提升泵,将集水提升池内的废水提升至一体化污水处理设备。…...
十一、hadoop应用
1.上传数据集 27.19.74.143,2015/3/30 17:38,/static/image/common/faq.gif 110.52.250.126,2015/3/30 17:38,/data/cache/style_1_widthauto.css?y7a 27.19.74.143,2015/3/30 17:38,/static/image/common/hot_1.gif 27.19.74.143,2015/3/30 17:38,/static/image/common/hot_2…...
Pytorch06-复杂模型构建
https://github.com/ExpressGit/Pytorch_Study_Demo 1、PyTorch 复杂模型构建 1、模型截图2、模型部件实现3、模型组装 2、模型定义 2.1、Sequential 1、当模型的前向计算为简单串联各个层的计算时, Sequential 类可以通过更加简单的方式定义模型。2、可以接收…...

iPhone 15 Pro与谷歌Pixel 7 Pro:哪款相机手机更好?
考虑到苹果最近将更多高级功能转移到iPhone Pro设备上的趋势,今年秋天iPhone 15 Pro与谷歌Pixel 7 Pro的对决将是一场特别有趣的对决。去年发布的iPhone 14 Pro确实发生了这种情况,有传言称iPhone 15 Pro再次受到了苹果的大部分关注。 预计iPhone 15系列会有一些变化,例如切…...
react通过ref获取函数子组件实例方法
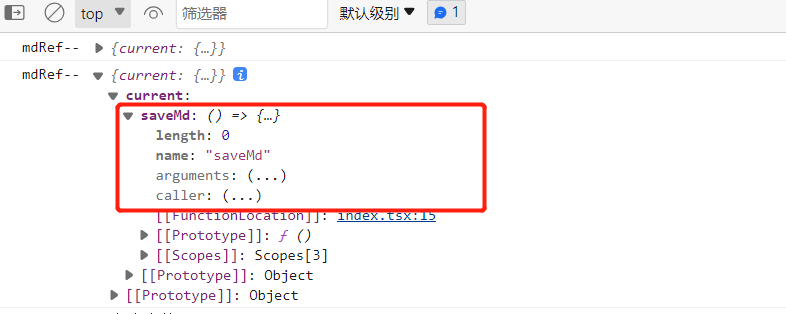
在react16之后带来了hooks之后,确实方便了很多组件开发,也加快了函数式编程的速度,但是当你通过useRef获取子组件的时候,又恰好子组件是一个函数组件,那么将会报一个错误:报这个错误的主要原因是函数组件没…...
MathType7MAC中文版数学公式编辑器下载安装教程
如今许多之前需要手写的内容都可以在计算机中完成了。以前我们可以通过word输入一些简单的数学公式,但现在通过数学公式编辑器便可以完成几乎所有数学公式的写作。许多简单的数学公式,我们可以使用输入法一个个找到特殊符号并输入,但是对于高…...

python项目实战
文章 项目1:外星人入侵项目2:数据可视化2.a matplotlib2.b csv文件格式2.c json文件格式2.d 使用Web API2.e 使用Pygal可视化仓库 项目3:Web应用程序3.1 Django入门3.1.1 建立项目3.1.2 创建应用程序3.1.3 创建网页 3.2 用户账户3.2.1 让用户…...

网络渗透day03-Windows Server相关知识
1.在Windows Server中,以下哪个工具用于实时监视系统资源使用情况? A.Event Viewer B.Task Manager C.Performance Monitor D.Resource Monitor 正确答案:D 答案解析:Resource Monitor用于实时监视系统资源使用情况。 2.在Wi…...
关于述职答辩的一点思考和总结
公众号:赵侠客 侠客说:优秀人才的四个特征:格局、思路、实干、写作 一、前言 1.1 述职答辩的重要性 公司都会有晋升通道,述职答辩是你想升职加薪除了跳槽以外的必由之路,其重要性对个人发展来说不言而喻,…...

Buzz音频转录完全指南:3大核心功能+5个实战场景,快速掌握本地语音转文字技术
Buzz音频转录完全指南:3大核心功能5个实战场景,快速掌握本地语音转文字技术 【免费下载链接】buzz Buzz transcribes and translates audio offline on your personal computer. Powered by OpenAIs Whisper. 项目地址: https://gitcode.com/GitHub_Tr…...

机器学习结合基因无关通路映射:从临床数据挖掘新药靶点
1. 项目概述:当机器学习遇见代谢通路,如何从数据中“挖”出新药靶点?在生物医学研究的前沿,我们正面临一个核心矛盾:一方面,我们拥有海量的临床数据,比如血糖、血压、BMI等指标;另一…...

DeepSeek系统设计辅助:如何在48小时内完成可审计、可回滚、可压测的AI服务架构图?
更多请点击: https://intelliparadigm.com 第一章:DeepSeek系统设计辅助 DeepSeek系统设计辅助模块面向架构师与后端工程师,提供模型能力调用、接口契约生成、异步任务编排等核心支撑能力。该模块不替代人工设计决策,而是通过结构…...
到底在‘看’什么?)
从社交关系到分子结构:图解GCN(图卷积网络)到底在‘看’什么?
从社交关系到分子结构:图解GCN(图卷积网络)到底在‘看’什么?想象一下,你刚搬到一个新社区,想快速了解周围的邻居。最直接的方式是什么?不是挨家挨户敲门,而是通过社区活动认识几位关…...

对称与负电源测试:动态直流电子负载的设计、原理与应用
1. 项目概述:对称与负电源的静态与动态直流负载在电子实验室里,测试一个电源的性能,尤其是它的动态响应能力,是件既基础又关键的事。我们常说的“直流电子负载”就是这个领域的核心工具。我之前设计并分享过一个用于正电源测试的静…...

Vue3 图片标框功能实现方案
基于 Vue3 组合式 API 的图片标框(画框、标注、选框)完整实现,核心逻辑封装在 GetBoxes 组件里,复制就能用 一、功能说明 ✅ 在图片上鼠标拖拽画矩形框 ✅ 实时显示框坐标(x, y, width, height) ✅ 支持多…...

Redis分布式锁进阶第二十篇
一、本篇前置衔接 第二十篇我们完成了全系列终局复盘,整理了故障排查SOP与企业级落地铁律。常规单资源锁、热点分片锁、隔离锁全部讲透,但真实复杂业务永远不是单一资源:下单要扣库存、扣优惠券、扣积分、冻结余额,多资源并行争抢…...

PentestGPT实战部署指南:AI驱动的渗透测试工作流落地
1. 这不是另一个“AI安全”的概念玩具,而是一套能真正跑起来的渗透测试辅助工作流“PentestGPT”这个名字刚在GitHub上出现时,我第一反应是点开又关掉——过去三年里,我见过太多打着“AI渗透”旗号的项目:有的只是把ChatGPT API封…...

钱钟书《围城》第1-5章阅读笔记:一场关于人生困境的提前预演
前言 钱钟书先生的《围城》被誉为"新儒林外史",是中国现代文学史上风格独特的讽刺经典。这部创作于20世纪40年代的长篇小说,以抗战初期为背景,通过主人公方鸿渐的人生轨迹,深刻揭示了知识分子群体的精神困境与人性弱点。…...

Taotoken平台快速获取APIKey并开始你的第一个Python调用示例
🚀 告别海外账号与网络限制!稳定直连全球优质大模型,限时半价接入中。 👉 点击领取海量免费额度 Taotoken平台快速获取APIKey并开始你的第一个Python调用示例 1. 准备工作:注册与登录 要开始使用Taotoken,…...