gRPC + Spring Boot 编程教程 - piot
在本文中,您将学习如何实现通过 gRPC 通信的 Spring Boot 应用程序。gRPC 是一个现代开源远程过程调用 (RPC) 框架,可以在任何环境中运行。默认情况下,它使用 Google 的 Protocol Buffer 来序列化和反序列化结构化数据。当然,我们也可以切换为其他数据格式,例如JSON。为了简化我们对 gRPC 和 Spring Boot 的探索,我们将为此使用专用的启动器gRPC Spring Boot starter。
由于 gRPC 和 Spring Boot 之间的集成没有官方支持的启动器,因此我们将选择最流行的第三方项目。它在GitHub上有大约 3100 颗星。您可以在此处找到有关其功能的详细文档。
源代码
如果您想自己尝试一下,可以随时查看我的源代码。为此,您需要克隆我的 GitHub 存储库。它包含四个应用程序。其中两个account-service与customer-service我之前的文章相关,该文章介绍了 Java 中的 Protocol Buffers。当前文章请参考另外两个appaccount-service-grpc和customer-service-grpc。它们与相应的应用程序非常相似,但使用我们的第三方 Spring Boot 和 gRPC 通信而不是 REST。另外,他们需要使用 Spring Boot 2,因为我们的第三方启动器仍然不支持 Spring Boot 3。无论如何,一旦您克隆了存储库,只需按照我的说明操作即可!
为 gRPC 生成模型类和服务
第一步,我们将使用.proto清单生成模型类和 gRPC 服务。我们需要包含一些额外的 Protobuf 模式才能使用google.protobuf.*包**(1)。我们的 gRPC 服务将提供使用各种条件搜索帐户的方法以及添加新帐户的单一方法(2)。这些方法将使用文件google.protobuf.*中定义的包和模型类中的原.proto语作为消息。定义了两条消息。该Account消息代表单个模型类。它包含三个字段:id、number和customer_id (3)。该消息包含对象Accounts列表(4)**。Account
syntax = "proto3";

package model;

option java_package = "pl.piomin.services.grpc.account.model";
option java_outer_classname = "AccountProto";

// (1)
import "empty.proto";
import "wrappers.proto";

// (2)
service AccountsService {
  rpc FindByNumber(google.protobuf.StringValue) returns (Account) {}
  rpc FindByCustomer(google.protobuf.Int32Value) returns (Accounts) {}
  rpc FindAll(google.protobuf.Empty) returns (Accounts) {}
  rpc AddAccount(Account) returns (Account) {}
}

// (3)
message Account {
  int32 id = 1;
  string number = 2;
  int32 customer_id = 3;
}

// (4)
message Accounts {
  repeated Account account = 1;
}
您可能还记得,有两个示例 Spring Boot 应用程序。让我们看一下.proto第二个应用程序的架构customer-service-grpc。它比之前的定义稍微复杂一些。我们的 gRPC 服务还将提供多种用于搜索对象的方法和一种用于添加新客户的方法**(1)。正在customer-service-grpc与应用程序通信account-service-grpc,因此我们需要生成Account消息Accounts( 2)。当然,您可以使用生成的 Protobuf 类创建一个额外的接口模块,并在我们的两个示例应用程序之间共享它。最后,我们必须定义我们的模型类。该类Customer包含三个原始字段id, pesel, name, 枚举type,以及分配给特定客户的帐户列表(3)**。还有Customers包含对象列表Customer(4) 的消息。
syntax = "proto3";

package model;

option java_package = "pl.piomin.services.grpc.customer.model";
option java_outer_classname = "CustomerProto";

import "empty.proto";
import "wrappers.proto";

// (1)
service CustomersService {
  rpc FindByPesel(google.protobuf.StringValue) returns (Customer) {}
  rpc FindById(google.protobuf.Int32Value) returns (Customer) {}
  rpc FindAll(google.protobuf.Empty) returns (Customers) {}
  rpc AddCustomer(Customer) returns (Customer) {}
}

// (2)
message Account {
  int32 id = 1;
  string number = 2;
  int32 customer_id = 3;
}

message Accounts {
  repeated Account account = 1;
}

// (3)
message Customer {
  int32 id = 1;
  string pesel = 2;
  string name = 3;
  CustomerType type = 4;
  repeated Account accounts = 5;
  enum CustomerType {
    INDIVIDUAL = 0;
    COMPANY = 1;
  }
}

// (4)
message Customers {
  repeated Customer customers = 1;
}
为了从.proto模式生成 Java 类,我们将使用 Maven 插件。您可以使用一些可用的插件来实现这一点。我的选择落在了protoc-jar-maven-plugin插件上。在配置中,我们需要将 .proto 架构的默认位置覆盖为src/main/proto. 我们还需要.proto使用includeDirectories标签包含在清单中使用的其他 Protobuf 模式。这些清单位于src/main/proto-imports目录内。输出目标目录为src/main/generated. 默认情况下,该插件不生成 gRPC 服务。为了启用它,我们需要在类型outputTarget中包含grpc-java。为了生成类,我们将使用该protoc-gen-grpc-java库。
<plugin>
  <groupId>com.github.os72</groupId>
  <artifactId>protoc-jar-maven-plugin</artifactId>
  <version>3.11.4</version>
  <executions>
    <execution>
      <phase>generate-sources</phase>
      <goals>
        <goal>run</goal>
      </goals>
      <configuration>
        <addProtoSources>all</addProtoSources>
        <includeMavenTypes>direct</includeMavenTypes>
        <outputDirectory>src/main/generated</outputDirectory>
        <inputDirectories>
          <include>src/main/proto</include>
        </inputDirectories>
        <includeDirectories>
          <include>src/main/proto-imports</include>
        </includeDirectories>
        <outputTargets>
           <outputTarget>
             <type>java</type>
             <outputDirectory>src/main/generated</outputDirectory>
           </outputTarget>
           <outputTarget>
             <type>grpc-java</type>
             <pluginArtifact>io.grpc:protoc-gen-grpc-java:1.57.2</pluginArtifact>
             <outputDirectory>src/main/generated</outputDirectory>
          </outputTarget>
        </outputTargets>
      </configuration>
    </execution>
  </executions>
</plugin>
我们还将src/main/generated使用 Maven 插件将生成的 Java 代码附加到源目录下build-helper-maven-plugin。
<plugin>
  <groupId>org.codehaus.mojo</groupId>
  <artifactId>build-helper-maven-plugin</artifactId>
  <executions>
    <execution>
      <id>add-source</id>
      <phase>generate-sources</phase>
      <goals>
        <goal>add-source</goal>
      </goals>
      <configuration>
        <sources>
          <source>src/main/generated</source>
        </sources>
      </configuration>
    </execution>
  </executions>
</plugin>
一旦执行mvn clean package命令,Maven 将生成所需的 Java 类。account-service-grpc这是生成 Java 类后应用程序中的最终目录结构。
$ tree
.
├── pom.xml
└── src
    ├── main
    │   ├── generated
    │   │   └── pl
    │   │       └── piomin
    │   │           └── services
    │   │               └── grpc
    │   │                   └── account
    │   │                       └── model
    │   │                           ├── AccountProto.java
    │   │                           └── AccountsServiceGrpc.java
    │   ├── java
    │   │   └── pl
    │   │       └── piomin
    │   │           └── services
    │   │               └── grpc
    │   │                   └── account
    │   │                       ├── AccountApplication.java
    │   │                       ├── repository
    │   │                       │   └── AccountRepository.java
    │   │                       └── service
    │   │                           └── AccountsService.java
    │   ├── proto
    │   │   └── account.proto
    │   ├── proto-imports
    │   │   ├── empty.proto
    │   │   └── wrappers.proto
    │   └── resources
    └── test
        └── java
            └── pl
                └── piomin
                    └── services
                        └── grpc
                            └── account
                                └── AccountServicesTests.java
使用 gRPC Spring Boot 启动器
一旦我们生成了所需的 Protobuf 模型类和 gRPC 存根,我们就可以继续实施。第一步,我们需要包含以下 Spring Boot 启动器:
<dependency>
  <groupId>net.devh</groupId>
  <artifactId>grpc-server-spring-boot-starter</artifactId>
  <version>2.14.0.RELEASE</version>
</dependency>
然后我们必须创建gRPC服务实现类。AccountsServiceImplBase它需要根据声明扩展生成.proto。@GrpcService 我们还需要用(1)注释整个类。之后,我们将重写通过 gRPC 公开的所有方法。我们的服务使用一个简单的内存存储库(2)。每个方法都提供一个参数对象和io.grpc.stub.StreamObserver用于以反应方式返回响应的类**(3)** (4)。
@GrpcService // (1)
public class AccountsService extends AccountsServiceGrpc.AccountsServiceImplBase {

    @Autowired
    AccountRepository repository; // (2)

    @Override
    public void findByNumber(StringValue request, StreamObserver<AccountProto.Account> responseObserver) { // (3)
        AccountProto.Account a = repository.findByNumber(request.getValue());
        responseObserver.onNext(a); # (4)
        responseObserver.onCompleted();
    }

    @Override
    public void findByCustomer(Int32Value request, StreamObserver<AccountProto.Accounts> responseObserver) {
        List<AccountProto.Account> accounts = repository.findByCustomer(request.getValue());
        AccountProto.Accounts a = AccountProto.Accounts.newBuilder().addAllAccount(accounts).build();
        responseObserver.onNext(a);
        responseObserver.onCompleted();
    }

    @Override
    public void findAll(Empty request, StreamObserver<AccountProto.Accounts> responseObserver) {
        List<AccountProto.Account> accounts = repository.findAll();
        AccountProto.Accounts a = AccountProto.Accounts.newBuilder().addAllAccount(accounts).build();
        responseObserver.onNext(a);
        responseObserver.onCompleted();
    }

    @Override
    public void addAccount(AccountProto.Account request, StreamObserver<AccountProto.Account> responseObserver) {
        AccountProto.Account a = repository.add(request.getCustomerId(), request.getNumber());
        responseObserver.onNext(a);
        responseObserver.onCompleted();
    }
}
这是AccountRepository实现:
public class AccountRepository {

    List<AccountProto.Account> accounts;
    AtomicInteger id;

    public AccountRepository(List<AccountProto.Account> accounts) {
        this.accounts = accounts;
        this.id = new AtomicInteger();
        this.id.set(accounts.size());
    }

    public List<AccountProto.Account> findAll() {
        return accounts;
    }

    public List<AccountProto.Account> findByCustomer(int customerId) {
        return accounts.stream().filter(it -> it.getCustomerId() == customerId).toList();
    }

    public AccountProto.Account findByNumber(String number) {
        return accounts.stream()
                .filter(it -> it.getNumber().equals(number))
                .findFirst()
                .orElseThrow();
    }

    public AccountProto.Account add(int customerId, String number) {
        AccountProto.Account a = AccountProto.Account.newBuilder()
                .setId(id.incrementAndGet())
                .setCustomerId(customerId)
                .setNumber(number)
                .build();
        return a;
    }

}
我们在启动时添加一些测试数据。这是我们的应用程序主类:
@SpringBootApplication
public class AccountApplication {

    public static void main(String[] args) {
        SpringApplication.run(AccountApplication.class, args);
    }

    @Bean
    AccountRepository repository() {
        List<AccountProto.Account> accounts = new ArrayList<>();
        accounts.add(AccountProto.Account.newBuilder().setId(1).setCustomerId(1).setNumber("111111").build());
        accounts.add(AccountProto.Account.newBuilder().setId(2).setCustomerId(2).setNumber("222222").build());
        accounts.add(AccountProto.Account.newBuilder().setId(3).setCustomerId(3).setNumber("333333").build());
        accounts.add(AccountProto.Account.newBuilder().setId(4).setCustomerId(4).setNumber("444444").build());
        accounts.add(AccountProto.Account.newBuilder().setId(5).setCustomerId(1).setNumber("555555").build());
        accounts.add(AccountProto.Account.newBuilder().setId(6).setCustomerId(2).setNumber("666666").build());
        accounts.add(AccountProto.Account.newBuilder().setId(7).setCustomerId(2).setNumber("777777").build());
        return new AccountRepository(accounts);
    }
}
在启动应用程序之前,我们还将包含 Spring Boot Actuator 以公开一些与 gRPC 相关的指标。我们将在与 gRPC 服务不同的端口下公开,因此我们还需要包含 Spring Boot Web starter:
<dependency>
  <groupId>org.springframework.boot</groupId>
  <artifactId>spring-boot-starter-web</artifactId>
</dependency>
<dependency>
  <groupId>org.springframework.boot</groupId>
  <artifactId>spring-boot-starter-actuator</artifactId>
</dependency>
在application.yml文件中我们应该启用metrics端点:
spring.application.name: account-service-grpc

management.endpoints.web.exposure.include: metrics
management.endpoint.metrics.enabled: true
默认情况下,gRPC服务在该端口下可用9090。我们可以使用该grpc.server.port属性覆盖该数字。将端口设置为 0 使用空闲的随机端口。让我们开始我们的示例应用程序:
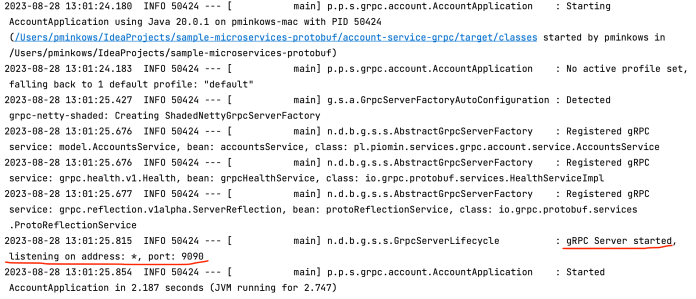
调用gRPC服务
我们可以使用grpcurlCLI 工具来调用示例应用程序公开的 gRPC 服务。9090 默认情况下,gRPC 服务器将在端口使用 模式下启动 PLAINTEXT 。为了打印可用服务的列表,我们需要执行以下命令:
$ grpcurl --plaintext localhost:9090 list
grpc.health.v1.Health
grpc.reflection.v1alpha.ServerReflection
model.AccountsService
然后,让我们打印 所公开的方法列表model.AccountService:
$ grpcurl --plaintext localhost:9090 list model.AccountsService
model.AccountsService.AddAccount
model.AccountsService.FindAll
model.AccountsService.FindByCustomer
model.AccountsService.FindByNumber
我们还可以使用describe命令中的关键字打印有关每个方法的详细信息:
$ grpcurl --plaintext localhost:9090 describe model.AccountsService.FindByNumber
model.AccountsService.FindByNumber is a method:
rpc FindByNumber ( .google.protobuf.StringValue ) returns ( .model.Account );
现在,让我们调用上面可见的命令所描述的端点。我们的方法的名称是model.AccountsService.FindByNumber。我们还使用111111值设置输入字符串参数。
$ grpcurl --plaintext -d '"111111"' localhost:9090 model.AccountsService.FindByNumber
{
  "id": 1,
  "number": "111111",
  "customer_id": 1
}
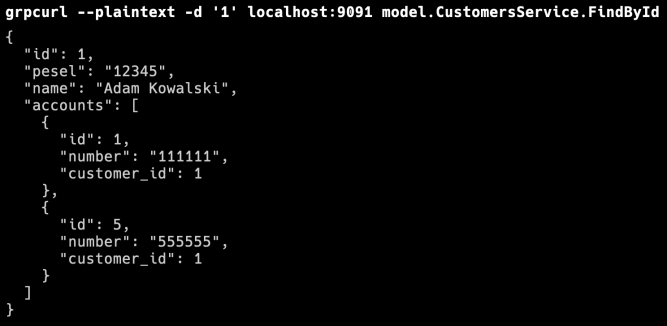
之后我们就可以看一下model.AccountsService.FindByNumbergRPC方法了。它接受一个整数作为输入参数并返回一个对象列表。
$ grpcurl --plaintext -d '1' localhost:9090 model.AccountsService.FindByCustomer
{
  "account": [
    {
      "id": 1,
      "number": "111111",
      "customer_id": 1
    },
    {
      "id": 5,
      "number": "555555",
      "customer_id": 1
    }
  ]
}
最后我们就可以调用添加新账户的方法了。它以 JSON 对象作为输入参数。然后它将返回一个新创建的Account带有增量id字段的对象。
$ grpcurl --plaintext -d '{"customer_id": 6, "number": "888888"}' localhost:9090 model.AccountsService.AddAccount
{
  "id": 8,
  "number": "888888",
  "customer_id": 6
}
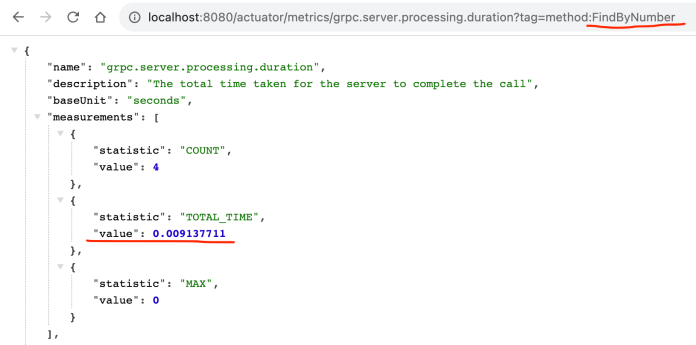
gRPC Spring Boot 启动器向执行器添加了三个附加指标。

我们可以显示每个 gRPC 方法的请求数量。这是该方法的请求和响应FindByNumber。

我们还可以显示每种方法的平均处理时间,如下所示。
测试 gRPC 服务
在上一节中,我们使用 CLI 工具手动运行应用程序并测试 gRPC 服务grpcurl。不过,我们也可以基于Spring Boot Test模块来实现单元或集成测试。我们将为我们的应用程序与 gRPC 客户端创建集成测试。为此,我们需要在 Maven 中包含以下三个依赖项pom.xml:
<dependency>
  <groupId>io.grpc</groupId>
  <artifactId>grpc-testing</artifactId>
  <version>1.51.0</version>
  <scope>test</scope>
</dependency>
<dependency>
  <groupId>org.springframework.boot</groupId>
  <artifactId>spring-boot-starter-test</artifactId>
  <scope>test</scope>
</dependency>
<dependency>
  <groupId>net.devh</groupId>
  <artifactId>grpc-client-spring-boot-starter</artifactId>
  <version>2.14.0.RELEASE</version>
  <scope>test</scope>
</dependency>
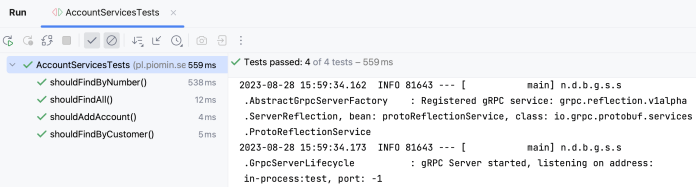
在下面可见的测试实现中,我们需要启用“进程内”服务器**(1)并禁用外部服务器(2)**。然后我们必须配置客户端连接到“进程内服务器” (3)。我们将使用 Maven 构建期间已生成的 gRPC 客户端。它可以作为AccountsServiceBlockingStub类使用。我们只需使用@GrpcClient (4)对其进行正确注入和注释。之后,我们可以使用客户端存根来调用我们的 gRPC 服务(5)。
@SpringBootTest(properties = {
        "grpc.server.inProcessName=test", // (1)
        "grpc.server.port=-1", // (2)
        "grpc.client.inProcess.address=in-process:test" // (3)
})
@DirtiesContext
public class AccountServicesTests {

    @GrpcClient("inProcess") // (4)
    AccountsServiceGrpc.AccountsServiceBlockingStub service;

    @Test
    void shouldFindAll() {
        AccountProto.Accounts a = service.findAll(Empty.newBuilder().build()); // (5)
        assertNotNull(a);
        assertFalse(a.getAccountList().isEmpty());
    }

    @Test
    void shouldFindByCustomer() {
        AccountProto.Accounts a = service.findByCustomer(Int32Value.newBuilder().setValue(1).build());
        assertNotNull(a);
        assertFalse(a.getAccountList().isEmpty());
    }

    @Test
    void shouldFindByNumber() {
        AccountProto.Account a = service.findByNumber(StringValue.newBuilder().setValue("111111").build());
        assertNotNull(a);
        assertNotEquals(0, a.getId());
    }

    @Test
    void shouldAddAccount() {
        AccountProto.Account a = AccountProto.Account.newBuilder()
                .setNumber("123456")
                .setCustomerId(10)
                .build();

        a = service.addAccount(a);
        assertNotNull(a);
        assertNotEquals(0, a.getId());
    }

}
以下是我们的测试结果:
gRPC 微服务之间的通信
在本节中,我们将切换到customer-service-grpc应用程序。与之前的应用程序相同,我们需要使用 Maven 命令生成类和 gRPC 服务存根mvn clean package。服务实现也与account-service-grpc. 不过,这一次,我们使用客户端来调用外部 gRPC 方法。下面是 的实现@GrpcService。如您所见,我们注入AccountClientbean,然后使用它来调用account-service-grpc应用程序**(1)公开的 gRPC 方法。然后我们使用客户端 bean 查找分配给特定客户的帐户(2)**。
@GrpcService
public class CustomersService extends CustomersServiceGrpc.CustomersServiceImplBase {

    @Autowired
    CustomerRepository repository;
    @Autowired
    AccountClient accountClient; // (1)

    @Override
    public void findById(Int32Value request, StreamObserver<CustomerProto.Customer> responseObserver) {
        CustomerProto.Customer c = repository.findById(request.getValue());
        CustomerProto.Accounts a = accountClient.getAccountsByCustomerId(c.getId()); // (2)
        List<CustomerProto.Account> l = a.getAccountList();
        c = CustomerProto.Customer.newBuilder(c).addAllAccounts(l).build();
        responseObserver.onNext(c);
        responseObserver.onCompleted();
    }

    @Override
    public void findByPesel(StringValue request, StreamObserver<CustomerProto.Customer> responseObserver) {
        CustomerProto.Customer c = repository.findByPesel(request.getValue());
        responseObserver.onNext(c);
        responseObserver.onCompleted();
    }

    @Override
    public void findAll(Empty request, StreamObserver<CustomerProto.Customers> responseObserver) {
        List<CustomerProto.Customer> customerList = repository.findAll();
        CustomerProto.Customers c = CustomerProto.Customers.newBuilder().addAllCustomers(customerList).build();
        responseObserver.onNext(c);
        responseObserver.onCompleted();
    }

    @Override
    public void addCustomer(CustomerProto.Customer request, StreamObserver<CustomerProto.Customer> responseObserver) {
        CustomerProto.Customer c = repository.add(request.getType(), request.getName(), request.getPesel());
        responseObserver.onNext(c);
        responseObserver.onCompleted();
    }
}
现在,我们来看看该类的实现AccountClient。我们使用生成的客户端存根来调用外部 gRPC 方法**(1)**。请注意注释内的值。这是我们客户的名字。
@Service
public class AccountClient {

    private static final Logger LOG = LoggerFactory.getLogger(AccountClient.class);

    @GrpcClient("account-service-grpc") // (1)
    AccountsServiceGrpc.AccountsServiceBlockingStub stub;

    public CustomerProto.Accounts getAccountsByCustomerId(int customerId) {
        try {
            return stub.findByCustomer(Int32Value.newBuilder().setValue(customerId).build());
        } catch (final StatusRuntimeException e) {
            LOG.error("Error in communication", e);
            return null;
        }
    }
}
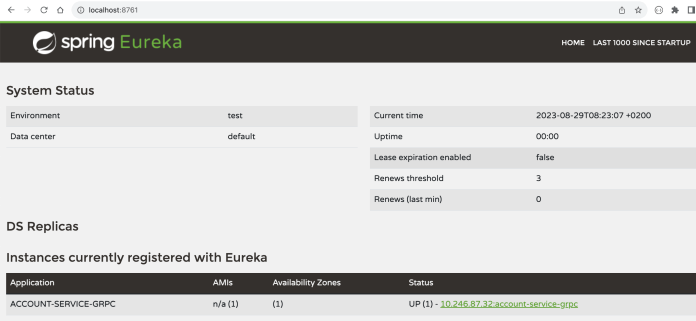
我们需要做的最后一件事是提供目标服务的地址。幸运的是,gRPC Spring Boot 支持使用 Spring Cloud 进行服务发现。我们将使用 Eureka 作为发现服务器。因此,我们的两个示例应用程序都需要包含 Spring Cloud Eureka 客户端。
<dependency>
  <groupId>org.springframework.cloud</groupId>
  <artifactId>spring-cloud-starter-netflix-eureka-client</artifactId>
</dependency>
我们还需要添加包含我们使用的 Spring Cloud 版本的dependencyManagement部分。pom.xml
<dependencyManagement>
  <dependencies>
    <dependency>
     <groupId>org.springframework.cloud</groupId>
       <artifactId>spring-cloud-dependencies</artifactId>
       <version>2021.0.8</version>
       <type>pom</type>
       <scope>import</scope>
    </dependency>
  </dependencies>
</dependencyManagement>
为了避免与端口冲突,account-service-grpc我们将覆盖默认的 gRPC 和 HTTP(执行器)端口。我们还需要为@GrpcClient. 首先,我们应该与类@GrpcClient中注释中设置的名称相同AccountClient。客户端通过明文协议进行通信,并根据字段中设置的名称从发现服务器读取目标服务的地址discovery:///。
server.port: 8081
grpc.server.port: 9091

grpc:
  client:
    account-service-grpc:
      address: 'discovery:///account-service-grpc'
      enableKeepAlive: true
      keepAliveWithoutCalls: true
      negotiationType: plaintext
最后,我们可以运行发现服务器和两个示例微服务。Eureka 服务器可在我们的存储库中的 discovery-server 目录中找到。运行后,您可以转到http://localhost:8761地址下可用的 UI 仪表板。
然后运行我们的两个示例 Spring Boot gRPC 微服务。您可以使用以下 Maven 命令运行所有应用程序:
$ mvn spring-boot:run
最后,我们来调用customer-service-grpc与 通信的方法account-service-grpc。grpcurl我们再次使用该工具。正如您所看到的,它返回对象内的帐户列表Customer:
最后的想法
gRPC Spring Boot Starter 提供了一些有用的功能来简化开发人员的工作。我们可以轻松地使用 来创建服务@GrpcService,使用 来创建客户端@GrpcClient,或者将 gRPC 与 Spring Boot Actuator 指标和 Spring Cloud 发现集成。然而,也存在一些缺点。该库的开发不是很积极。每年大概有2-3个版本发布,目前还没有对Spring Boot 3的支持。
更多Spring Boot 3文章:https://www.jdon.com/tag-34038/
相关文章:
gRPC + Spring Boot 编程教程 - piot
在本文中,您将学习如何实现通过 gRPC 通信的 Spring Boot 应用程序。gRPC 是一个现代开源远程过程调用 (RPC) 框架,可以在任何环境中运行。默认情况下,它使用 Google 的 Protocol Buffer 来序列化和反序列化结构化数据。当然,我们…...

新建Spring Boot项目
使用IDEA 来创建: 文件-新建-项目 填写项目元数据 选择依赖项 此处可以先选 web-spring web 关于这些依赖项,更多可参考: IDEA创建Spring boot项目时各依赖的说明(Developer Tools篇)[1] 项目结构介绍 展开项目,此时…...

Python数据分析的第三方库
ython作为一种简单易学、功能强大的编程语言,逐渐成为数据分析领域的首选工具。在Python数据分析中,有许多优秀的第三方库可以帮助我们进行数据处理、可视化和建模。 常用第三方库: NumPy:提供了高性能的多维数组对象和用于数组…...
,排除参数为空的条件)
EF列表分页查询(单表、多表),排除参数为空的条件
在日常使用EF框架查询数据库时,有时传入的参数为空,那么我们应该把该条件排除,不应列入组装的sql中,本篇文件以分页查询为例介绍EF框架的单表、多表的多条件查询,参数为空时排除条件。 首先我们要有派生自DBContext类的数据上下文…...

VisualStudio配置pybind11-Python调用C++方法
个人测试下来Debug生成的dll改pyd,py中import会报错gilstate->autoInterpreterState 如果遇到同样问题使用Release吧 目录 1.安装pybind11 1.pip: 2.github: 2.配置VS工程 2.在VC目录中的包含目录添加: 3.在VC目录中的库目录…...

ZZULIOJ 1164: 字符串加密,Java
ZZULIOJ 1164: 字符串加密,Java 题目描述 输入一串字符(长度不超过100)和一个正整数k,将其中的英文字母加密并输出加密后的字符串,非英文字母不变。加密思想:将每个字母c加一个序数k,即用它后…...

联合体(共用体)的简单介绍
目录 概念: 联合的声明: 类比结构体: 联合体的大小: 联合的⼤⼩⾄少是最⼤成员的⼤⼩ 联合体的空间是共用的 联合体内部成员的赋值: 当最⼤成员⼤⼩不是最⼤对⻬数的整数倍的时候,就要对⻬到最⼤对⻬…...
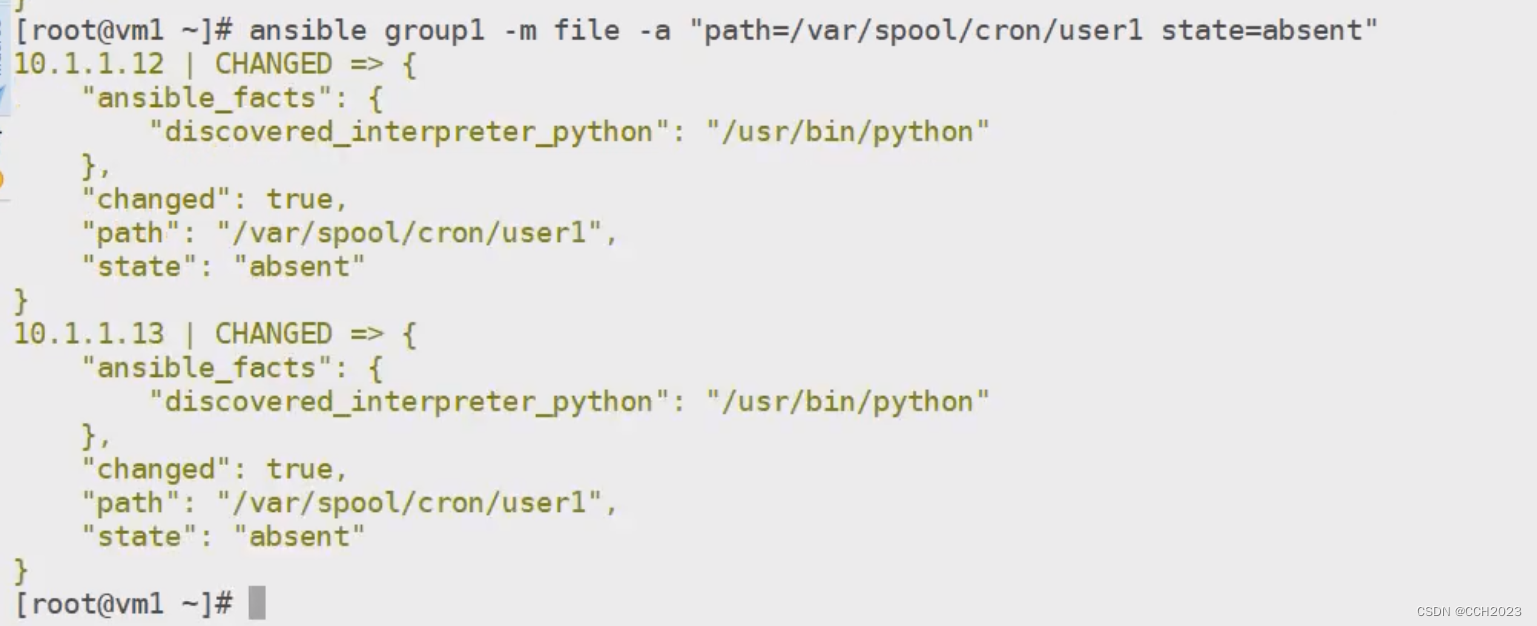
Ansible学习笔记8
group模块: 创建一个group组: [rootlocalhost ~]# ansible group1 -m group -a "nameaaa gid5000" 192.168.17.105 | CHANGED > {"ansible_facts": {"discovered_interpreter_python": "/usr/bin/python"}…...

五子棋游戏禁手算法的改进
五子棋游戏禁手算法的改进 五子棋最新的禁手规则: 1.黑棋禁手判负、白棋无禁手。黑棋禁手有“三三”(包括“四三三”)、“四四”(包括“四四三”)和“长连”。黑棋只能以“四三”取胜。 2.黑方…...
基于 Debian 12 的 Devuan GNU+Linux 5 为软件自由爱好者而生
导读Devuan 开发人员宣布发布 Devuan GNULinux 5.0 “代达罗斯 “发行版,它是 Debian GNU/Linux 操作系统的 100% 衍生版本,不包含 systemd 和相关组件。 Devuan GNULinux 5 基于最新的 Debian GNU/Linux 12 “书虫 “操作系统系列,采用长期支…...

算法系列-力扣234-回文链表判定
回文链表判定 给你一个单链表的头节点 head ,请你判断该链表是否为回文链表。如果是,返回 true ;否则,返回 false 。 方法一:栈反转对比法 解题思路:找到中间节点后用栈辅助反转对比 解题方法࿱…...

算法通关村——海量数据场景下的热门算法题的处理方法
1. 从40个亿中产生一个不存在的整数 题目要求:给定一个输入文件,包含40亿个非负整数,请设计一个算法,产生一个不存在该文件中的整数,假设你有1GB的内存来完成这项任务。 ● 进阶:如果只有10MB的内存可用&a…...
【C++从0到王者】第二十五站:多继承的虚表
文章目录 前言一、多继承的虚函数表二、菱形继承与菱形虚拟继承的虚函数表1.菱形继承2.菱形虚拟继承的虚函数表 三、抽象类1.抽象类的概念2.接口继承与实现继承 总结 前言 其实关于单继承的虚函数表我们在上一篇文章中已经说过了,就是派生类中的虚表相当于拷贝了一…...

老程序员教你如何笑对问题,轻松培养逻辑思考和解决问题的能力
原文链接 老程序员教你如何笑对问题,轻松培养逻辑思考和解决问题的能力 故事发生在一个阳光明媚的午后,我们的主人公,老李,一位拥有十年工作经验的 Python 老程序员,正悠哉地在喝着咖啡。 这时&#x…...
Omni Recover for Mac(专业的iPhone数据恢复软件)
Omni Recover for Mac是一款专业的Mac数据恢复软件,能够帮助用户快速找回被误删除、格式化、病毒攻击等原因造成的文件和数据,包括图片、视频、音频、文档、邮件、应用程序等。同时,Omni Recover for Mac还具有数据备份和清理功能,…...

视频垂直镜像播放,为您的影片带来新鲜感
大家好!在制作视频时,我们常常希望能够给观众带来一些新鲜感和独特的视觉效果。而垂直镜像播放是一个能够让您的影片与众不同的技巧。然而,传统的视频剪辑软件往往无法直接实现视频的垂直镜像播放,给我们带来了一些困扰。现在&…...
十一、MySQL(DQL)聚合函数
1、聚合函数 注意:在使用聚合函数时,所有的NULL是不参与运算的。 2、实际操作: (1)初始化表格 (2)统计该列数据的个数 基础语法: select count(字段名) from 表名; ;统…...
C语言:三子棋小游戏
简介: 目标很简单:实现一个 三子棋小游戏。三子棋大家都玩过,规则就不提及了。本博文中实现的三子棋在对局中,电脑落子是随机的,不具有智能性,玩家的落子位置使用键盘输入坐标。下面开始详细介绍如何实现一…...

JAVA - PO DTO 生成器
PO DTO 生成器 假设你是一个Java 高级程序员,我会提供一些信息,你需要帮我自动生成Java的PO、DTO 对象。 这些信息有着固定的形式,第一行是对象的类名,其后的每一行都是该对象的属性(简称“属性”)。 对于我属性,格式…...

tcpdump
TCPDump是一个用于抓取网络数据包的命令行工具。它可以帮助网络管理员和开发人员分析网络流量、故障排除以及安全问题。下面是一些TCPDump的详细用法: 基本用法: 监听指定网络接口:tcpdump -i eth0通过IP地址过滤:tcpdump host 19…...
深入浅出Asp.Net Core MVC应用开发系列-AspNetCore中的日志记录
ASP.NET Core 是一个跨平台的开源框架,用于在 Windows、macOS 或 Linux 上生成基于云的新式 Web 应用。 ASP.NET Core 中的日志记录 .NET 通过 ILogger API 支持高性能结构化日志记录,以帮助监视应用程序行为和诊断问题。 可以通过配置不同的记录提供程…...

pam_env.so模块配置解析
在PAM(Pluggable Authentication Modules)配置中, /etc/pam.d/su 文件相关配置含义如下: 配置解析 auth required pam_env.so1. 字段分解 字段值说明模块类型auth认证类模块,负责验证用户身份&am…...

蓝牙 BLE 扫描面试题大全(2):进阶面试题与实战演练
前文覆盖了 BLE 扫描的基础概念与经典问题蓝牙 BLE 扫描面试题大全(1):从基础到实战的深度解析-CSDN博客,但实际面试中,企业更关注候选人对复杂场景的应对能力(如多设备并发扫描、低功耗与高发现率的平衡)和前沿技术的…...
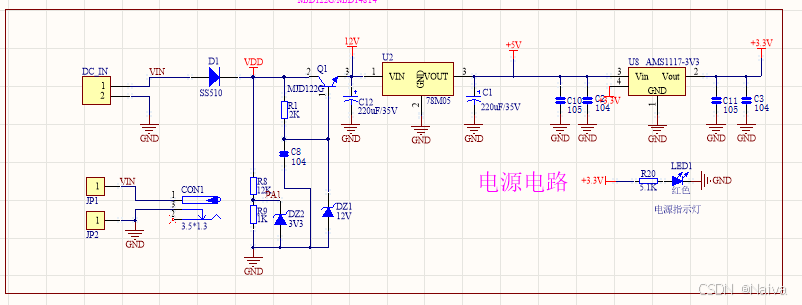
【电力电子】基于STM32F103C8T6单片机双极性SPWM逆变(硬件篇)
本项目是基于 STM32F103C8T6 微控制器的 SPWM(正弦脉宽调制)电源模块,能够生成可调频率和幅值的正弦波交流电源输出。该项目适用于逆变器、UPS电源、变频器等应用场景。 供电电源 输入电压采集 上图为本设计的电源电路,图中 D1 为二极管, 其目的是防止正负极电源反接, …...

Proxmox Mail Gateway安装指南:从零开始配置高效邮件过滤系统
💝💝💝欢迎莅临我的博客,很高兴能够在这里和您见面!希望您在这里可以感受到一份轻松愉快的氛围,不仅可以获得有趣的内容和知识,也可以畅所欲言、分享您的想法和见解。 推荐:「storms…...

根目录0xa0属性对应的Ntfs!_SCB中的FileObject是什么时候被建立的----NTFS源代码分析--重要
根目录0xa0属性对应的Ntfs!_SCB中的FileObject是什么时候被建立的 第一部分: 0: kd> g Breakpoint 9 hit Ntfs!ReadIndexBuffer: f7173886 55 push ebp 0: kd> kc # 00 Ntfs!ReadIndexBuffer 01 Ntfs!FindFirstIndexEntry 02 Ntfs!NtfsUpda…...

LangFlow技术架构分析
🔧 LangFlow 的可视化技术栈 前端节点编辑器 底层框架:基于 (一个现代化的 React 节点绘图库) 功能: 拖拽式构建 LangGraph 状态机 实时连线定义节点依赖关系 可视化调试循环和分支逻辑 与 LangGraph 的深…...

CVPR2025重磅突破:AnomalyAny框架实现单样本生成逼真异常数据,破解视觉检测瓶颈!
本文介绍了一种名为AnomalyAny的创新框架,该方法利用Stable Diffusion的强大生成能力,仅需单个正常样本和文本描述,即可生成逼真且多样化的异常样本,有效解决了视觉异常检测中异常样本稀缺的难题,为工业质检、医疗影像…...

全面解析数据库:从基础概念到前沿应用
在数字化时代,数据已成为企业和社会发展的核心资产,而数据库作为存储、管理和处理数据的关键工具,在各个领域发挥着举足轻重的作用。从电商平台的商品信息管理,到社交网络的用户数据存储,再到金融行业的交易记录处理&a…...

es6+和css3新增的特性有哪些
一:ECMAScript 新特性(ES6) ES6 (2015) - 革命性更新 1,记住的方法,从一个方法里面用到了哪些技术 1,let /const块级作用域声明2,**默认参数**:函数参数可以设置默认值。3&#x…...